RSS
 

10 Cheap Photo Tricks for Creative Images

29 Aug

The post 10 Cheap Photo Tricks for Creative Images appeared first on Digital Photography School. It was authored by Rick Ohnsman.

As the coronavirus crisis drags on, you may find that you’re getting out less to make photos. You could probably use some fresh and fun photo ideas as a pleasant diversion from the gloomy news. Whether you call these photo tricks, techniques, projects, or whatever, I suggest you give them a try and see what new and interesting photos you can make.

Photo Tricks - Photo Elasticity
I think you’ll eat up these photo tricks with a fork and spoon! This is the last one in the collection, but be patient. Read the rest first, as there are some good ones; we’ll save this technique for dessert.

For a deeper dive

My intent here is not to get into great detail or give much “how-to” for these tricks. For some, I’ve already written complete articles and, where that is the case, I have linked to those articles so you can do a deeper dive into the subject.

For a few other tricks, I may not have written about them in-depth, but others have. The idea is that while these tricks may not be unheard of, this is a collection of photo tricks all in one place; it’s a jumping-off point for your photo exploration.

1. Bag a vignette

You may have heard of accessories called Lensbabies, a collection of adjustable and specialized lenses designed to give artistic, soft, blurred, and other looks to your image.

Now, I won’t pretend this trick will do for a few cents what specialized gear costing a few hundred dollars can do. But here’s a way to bag some interesting, Lensbaby-style images for dirt cheap.

Photo Tricks - Baggie Vignette
This photo accessory costs a few pennies and easily fits in your pocket: the “Baggie Vignette.”

Here’s what you do:

Get a plastic sandwich bag and tear a ragged hole in the bottom of it. Pull the bag over your lens so that portions of the bag intrude into the edges of the image. Focus on your subject.

Viola, you have “Baggie FX.”

Play with the positioning, the size of the hole, various apertures, and lighting. Photo accessories don’t get any cheaper than this.

2. Bokeh with flair

Pronounce it how you like; bokeh refers to the look and quality of out-of-focus elements in a photo. Bokeh becomes especially noticeable when the out-of-focus elements are specular highlights.

Different lenses with different optics, different aperture blade shapes, and different numbers of blades will produce different kinds of bokeh, as will the photographer’s choice of aperture.

Specular Light Bokeh effects with a wide aperture
A wide aperture combined with out-of-focus highlights will give some nice bokeh effects. The pattern of the bokeh shape will depend on the lens. The Canon 50mm f/1.8 gives this kind of look.

Here’s a way to go a step further and make patterned bokeh. Lay a filter the size of lens you intend to use on a piece of cardboard, trace around it, and cut out the cardboard. Now cut a shape, such as a small star, into the center of the cardboard disc you made. Place the disc over the lens and tape it there, or sandwich it between the lens and a filter.

Photo Tricks - Patterned Bokeh
Here, a star pattern was cut in a “bokeh filter,” and the specular highlights in a piece of aluminum foil produced the star effect. Then the image was layered with another shot to create the final result.

With a wide aperture (a 50mm f/1.8 prime, the “nifty fifty,” works great), shoot something with some specular highlights and ensure those highlights are out-of-focus. The highlights will now be the shape of your “bokeh filter.”

Rather than make your own bokeh filter, you can also buy patterned bokeh filter kits with more elaborate shapes than you could probably cut yourself. For folks into 3D printing, this could also be a good project.

3. Reflect on this

You can take a still-life or product photo up another notch by shooting it on a reflective surface. You might think a mirror would be a natural choice for this, but because both the glass surface of a mirror, as well as its silvered backing, are each reflective, you will get two sets of slightly separated reflections if you shoot objects on a mirror.

Photo Tricks - Reflections
A polished dark table proved just right for getting a reflection of the wedding rings. The jar of marbles was shot on a piece of black acrylic sheet and the bokeh effects were added with a string of Christmas lights in the background.

A better choice is a piece of acrylic plastic sheet, also known as plexiglass. You can get this in many colors, but I find a very dark black plastic sheet creates a look I like. (A piece of black tile would work well too, but I’ve not been able to find larger tiles.) Shoot with a black backdrop and you can isolate your subject nicely.

4. Big results with little lights

When we used film or less-sensitive digital cameras, big and often hot lights were needed for indoor photography. With the advent of LED lighting coupled with cameras offering low noise capabilities, we can now make images with very little light.

Also, when doing still-life photos, shutter speed can be anything you like: full seconds, or even minutes, if necessary. Now almost any lighting instrument can be used with some ingenuity. Small LED flashlights can also be used for light painting.

Photo Tricks - Big Results with little lights
LED flashlights like these can be found cheap at the hardware store. The second image shows how they were used…
Photo Tricks - Lighting with small LED Flashlights
…to produce this image. Having limited light isn’t a problem when shooting still life where long exposures are fine. Canon 6D | Canon EF 24-105 f/4 | 3.2 sec | f/3.2 | ISO 100.

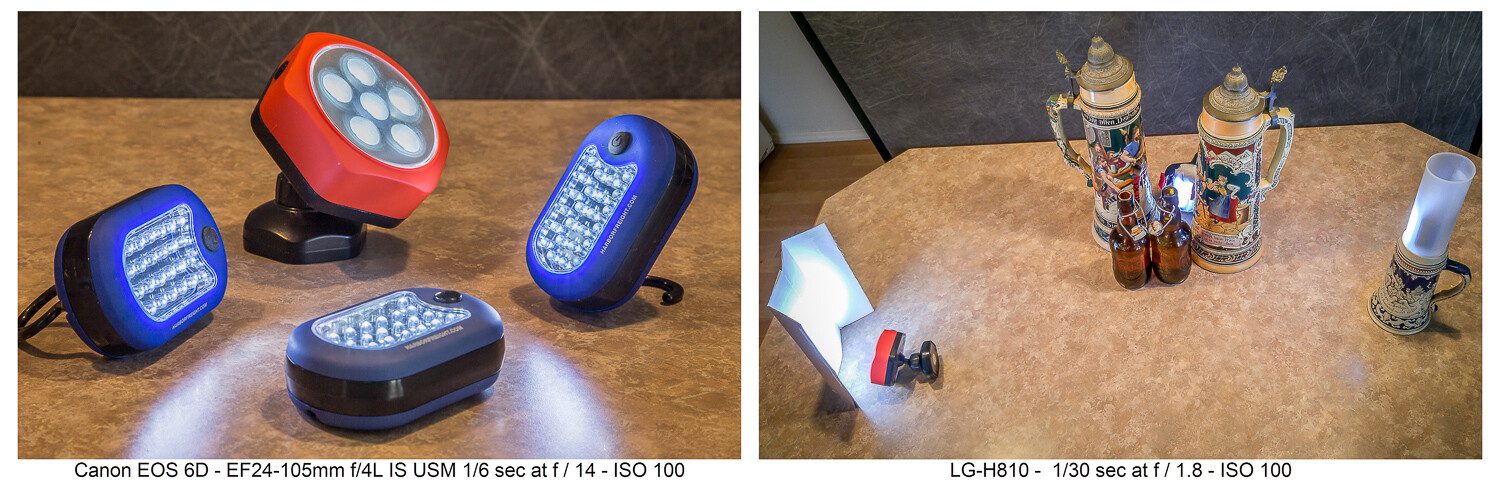
I have a collection of various flashlights (aka “torches”) and other LED lighting gear, which I’ve typically bought for just a few dollars online or at the local hardware store. Finding new ways to creatively use these little lights has allowed me to make some creative images. Take a look at this article which explores this topic further.

5. CD rainbow macros

Before you toss that scratched CD, add it to your bag of photo tricks. Mount a macro lens on your camera, or use whatever means you have to get close to your subject. Put the CD down with the reflective, non-printed side up. Then, with an eyedropper or other tool, place small water droplets all over the surface of the disc.

Photo Tricks - Water drops on a CD
Waterdrops on a CD shot with a macro lens and lit in various ways can produce some colorful abstract images.

Focus your shot and get creative. The lighting is purely up to you. Perhaps try some shots in direct sunlight where the intense light will really pop the rainbow spectrum. Maybe try a small flashlight. Try a long exposure and light-paint the droplets. Anything goes when you’re making abstract images.

6. Oil and water abstracts

I wrote a complete article on this technique, which is another way to get some interesting and colorful abstract images. With minimal equipment and whatever lighting you like (even shooting outdoors with natural light), you can have a whole afternoon of fun.

Photo Tricks - Oil and Water Abstracts
Oil and water don’t mix, and that’s a good thing for this technique. A glass dish shot from above and through the mixture with some colorful objects in the background is the technique here.

7. Up in smoke

Add this to your collection of photo tricks to make some smokin’ hot images. An incense stick and some care with your lighting will get you going. Then take your shots to the computer where you can add additional effects. Have a look at my article here on DPS, “How to Make Interesting Abstract Smoke Photos,” for a full write-up on this technique.

Photo Tricks - Smoke and Mirrors
This is a straight, side-lit shot of the smoke pattern rising from an incense stick.
Photo Tricks - Smoke and Mirrors
Take the straight shot on the left, mirror it in editing, and colorize it. Then you have a firebird! (At least that’s what I see. What do you see in this abstract?)
Photo Tricks - The Gordian Knot
The original smoke photo mirrored both horizontally and vertically and colorized in editing. Is this what they mean by “smoke and mirrors?”

8. Interaction with reflection and refraction

Find historic images of early photographers, and you might see them standing behind their cameras with black capes thrown over their heads. They did not have DSLRs, where the image entering the lens is reflected onto a mirror, through a prism, and then into the viewfinder right-side up. Instead, early photographers used the first “mirrorless” cameras, and the image came through the lens and displayed upside down on a ground glass at the back of the camera. The image was quite dim, which explains the need for the cape to better see the projected image.

Photo Tricks - Reflection and Refraction
The water-filled glasses refract the light while the black acrylic plastic sheet below reflects it. There’s a lot of light physics going on in these shots.

We won’t require you to take a course in optical physics so you can understand the behavior of lenses, light, reflection, refraction, or the differences in light transmission through various mediums. Just break out some glassware, pour in a little water, maybe use that piece of black plexiglass we mentioned earlier, find an interesting background, and go for it.

Photo Tricks - Refraction
You are getting sleeeepy… The water in the glass refracts the light and flips the image, much like a lens.

If you do want to dive deeper into understanding light behavior, take a look at my article “How to Understand Light and Color to Improve Your Photography.” Maybe take a look at this one as well: “Just Dew It – Fun with Macro Dewdrop Photography.”

Photo tricks - Water Drop Refraction
These tiny glycerin drops act as little lenses, focusing, refracting, and reversing the image behind them.

9. Zooming around

In our collection of photo tricks, this one is hardly a secret. You probably have done it before. No? Well, if not, and you have a zoom lens, it’s high time you tried the zoom blur effect.

The technique is simple enough. Set your exposure so you can get at least a one-second shutter speed, if not longer. This ought to be easy enough at night if you set the ISO to its lowest setting (such as ISO 100) and stop down the aperture to a small size (such as f/16 or f/22). If you’re shooting in the daytime and these settings alone don’t get you down to a second or more of exposure time, try adding a polarizing filter or a neutral density (ND) filter to reduce the light still further.

Photo Tricks - Zooming during the exposure
Lights at night make great subjects for the zoom blur technique. You’ll definitely need to work on a tripod.

You can do this technique handheld, but a tripod helps. Set your camera so you get the 2-second shutter delay, then with one hand on the zoom ring, trip the shutter. When you hear it click, zoom in (or out) during the exposure. Play with starting zoomed tight and then pulling out during the exposure, or starting wide and then zooming in. Lights at night can make for great looks. Try only zooming during the first or second half of the exposure. There’s no single way to do this, so play and discover what you can create.

Photo Tricks - Long exposures with zooming
Both these shots were zoomed during the exposure. See my fireworks article for the “Boom, Zoom, Bloom” technique.

10. Create a computer screen background

An interesting background can add to the story of your photo. If you have a good-sized computer monitor and are shooting a smaller object, being able to create a background on your computer screen opens all kinds of possibilities.

Photo Tricks - Computer as background
Create a unique background to go along with the theme of your photo by putting up something appropriate on a computer screen in the background of your shot.

Photographing screens would seem a simple process, but can be more tricky than you think. If you plan to do much of this, reading up on the best camera techniques for shooting screens would be time well spent.

Cheaper by the dozen

The title said 10 photo tricks, but I’m going to throw in two more for free and make it an even dozen. I really like the looks I can get with these last two.

11. Action sequences with Microsoft ICE

I wrote the article “Make Easy Panoramic Images with Microsoft ICE,” which focused primarily on how to use this free and very powerful tool from Microsoft to make panoramic images. That is good fun in itself and a very useful technique.

Toward the end of that article, I touched on something else you could do with ICE: sequential action images. These are great for showing the progressive steps of action, and ICE makes the technique quite easy. Follow the link, read through the article, and see how you can make images like this:

Photo Tricks - Sequential Action Images using Microsoft ICE
Pan with the action while shooting multiple images in continuous mode, then use the free Microsoft ICE software to assemble them. Quite easy, actually!

Here’s an alternative way to make sequential action photos with a completely different technique, one that’s more well-suited to capturing very fast action: “How to Use Multi-flash to Capture Compelling Action Photos.”

12. Phun photos with photoelasticity

Combine physics with fun and you get Phun, right? With this technique, you will be exploring what is called photoelasticity or, more specifically, birefringence.

Photo Tricks - Photo Elasticity
Clear plastic tableware goes cosmic with this technique. Learn about birefringence.

You don’t have to understand what’s going on, and this isn’t hard to do. It just works and looks cool. Here’s what you’ll need to do:

  • Your light source will need to be an LCD computer monitor, TV or, for smaller subjects, a tablet, or even a cellphone. LCD screens emit polarized light, and using polarized light to backlight your subject is part of what’s needed to make this work.
  • Try to limit any other ambient light. The effect will be stronger if the LCD light is dominant in your shot.
  • Use subjects made of hard, clear plastic. Polystyrene is what is used for most clear plastic cutlery and drinkware, so these make good subjects. Often the plastic in cheap picture frames is made from similar materials. Glass objects will not work for this.
  • You will need a polarizing filter on your lens. Standard circular polarizing (CPL) filters work well.
Photo Tricks with Birefringence
Polarized light plus a polarized lens reveals the “mechanical stress patterns” within certain types of plastics. Clear styrene plastic usually works well.

Now, get ready to say “Wow!” Place your subject in front of the LCD light source. Bring up an image that will create a totally blank, white, bright screen so that light backlights your subject. You won’t see anything until you look through the camera viewfinder and through the attached polarized filter. Cool, huh?

Now rotate the filter. The computer screen will be white, black, or intermediate shades, while the plastic subject will show the rainbow birefringence effect. The patterns will be showing the mechanical stress within the plastic, with tighter patterns where the curves of the object are tighter.

Photo tricks - Photo Elasticity
Is it okay to still say “Groovy, man?” A second sheet of plastic was held in front of the lens, producing the colored background. Aside from some exposure and saturation adjustments, this effect is what you see through the lens while making the shot, not added later on the computer.

Just a tip when you are seeking potential subjects for this kind of photography:

Your LCD cellphone screen is a polarized light source. If you have a pair of polarized sunglasses, objects held in front of a blank white screen on the phone and viewed while wearing the glasses will show the effect if they are the right kind of material. You may have to tilt your head to get the same effect as rotating a circular polarizing filter.

Now go play

So there’s a dozen new things to try with your camera. You will also find that these kinds of photography will force you to use different exposure, focusing, camera control, lens selection, and editing skills than perhaps you normally might use.

Remember, even failed experiments can be lessons when you seek to determine what went wrong and then try again to get it right. Now go try some of these photo tricks, have fun, and post some of your images in the comments section. If you have any questions, feel free to post those, too.

The post 10 Cheap Photo Tricks for Creative Images appeared first on Digital Photography School. It was authored by Rick Ohnsman.


Digital Photography School

 
Comments Off on 10 Cheap Photo Tricks for Creative Images

Posted in Photography


The two most-produced 35mm cameras of all time? You’ve probably never heard of them

28 Aug
Photo: Stephen Dowling

What were the most-produced 35mm cameras of all time, you ask? Perhaps the Kodak Brownie, or the Argus C3, the Olympus Trip 35, or maybe the Nikon F? Nope, those cameras didn’t even come close the the number of Soviet-era Smena-8’s and Smena 8M’s that rolled off the assembly line; a combined 21 million in total. The next closest of the cameras mentioned is the Olympus Trip 35 with 5.4 million units made.

So what’s the deal with these apparently ubiquitous cameras, produced by Leningradskoye Optiko-Mekhanicheskoye Obyedinenie (Lomo), which many of us have probably never seen/heard of? Our good friends over at Kosmo Foto have the full scoop and more. Click the link and read on!

Read: Kosmo Foto – These are the most produced 35mm cameras of all time

About Film Fridays: We recently launched an analog forum and in a continuing effort to promote the fun of the medium, we’ll be sharing film-related content on Fridays, including articles from our friends at KosmoFoto and 35mmc.

Articles: Digital Photography Review (dpreview.com)

 
Comments Off on The two most-produced 35mm cameras of all time? You’ve probably never heard of them

Posted in Uncategorized


Nikon Z5 sample gallery

28 Aug

$ (document).ready(function() { SampleGalleryV2({“containerId”:”embeddedSampleGallery_4324192573″,”galleryId”:”4324192573″,”isEmbeddedWidget”:true,”selectedImageIndex”:0,”isMobile”:false}) });

Nikon’s entry-level Z-mount full-framer is proving to be a fun and capable companion for everyday stills photography. And we’ve been busy enjoying the last licks of summer with it by our side.

Take a look at our Nikon Z5 sample gallery, and check back soon for Raw conversions; we’ll add them as soon as support becomes available.

See our Nikon Z5 sample gallery

Articles: Digital Photography Review (dpreview.com)

 
Comments Off on Nikon Z5 sample gallery

Posted in Uncategorized


Astronomers warn SpaceX Starlink satellites may hinder scientific observation and discovery

28 Aug

SpaceX plans to launch thousands of satellites into space for the firm’s Starlink high-speed satellite internet network. While the Starlink service aims to bring high-speed internet to locations where it is otherwise unavailable or prohibitively expensive, Independent is reporting that hundreds of astronomers have expressed concerns that Starlink’s satellite array will have an impact on astronomy and slow down scientific discoveries.

A report by the Satellite Constellations 1 (SATCON1) workshop stated that constellations of satellites in the night sky are problematic for ground-based observations, including those utilizing optical and infrared technologies. The research underpinning the workshop’s report included input from ‘more than 250 astronomers, satellite operators and dark-sky advocates.’

SATCON1 co-chair Connie Walker from the National Science Foundation’s (NSF) NOIRLab said of the report, ‘Recent technology developments for astronomical research – especially cameras with wide fields of view on large optical-infrared telescopes – are happening at the same time as the rapid deployment of many thousands of low-Earth-orbiting satellites (LEOsats) by companies rolling out new space-based communication technologies.’

Not to scale. Illustration courtesy of NOIRLab / NSF / AURA / P. Marenfeld

The report concludes that large satellite constellations will impact astronomical research and the general human experience of the night sky, although they find that the impact will range from ‘negligible’ to ‘extreme.’ When Starlink’s first 60 communication satellites launched in May 2019, the impact was felt immediately by astronomers and the satellites were ‘brighter than anyone expected.’ It is not fiscally or scientifically feasible to stop utilizing ground-based astronomy.

While the impact of LEOsats may be negative for astronomers, the introduction of communication services to underserved areas is undoubtedly positive for potential users. The SATCON1 workshop is trying to work with satellite operators to find a solution. In the report, there are two main findings. One is that LEOsats ‘disproportionately affect science programs that require twilight observations, such as searches for Earth-threatening asteroids and comets, outer solar system objects, and visible-light counterparts of fleeting gravitational-wave sources.’ The second finding is that there are at least a half dozen ways to reduce the harm caused to astronomy by large satellite constellations.

From the SATCON1 workshop report: ‘A wide-field image (2.3 degrees across) from the Dark Energy Camera on the Víctor M. Blanco 4-m telescope at the Cerro Tololo InterAmerican Observatory, on 18 November 2019. Several Starlink satellites crossed the field of view. Image credit DECam DELVE Survey/CTIO/AURA/NSF.’ For many more visual examples of the impact of Starlink satellites on astronomical observations, read the full SATCON1 technical report.

One of these six ways is to launch fewer or no LEOsats, which is of course an impractical and unlikely solution. More realistically, the workshop found that the impact of LEOsats can be reduced if they are deployed at orbital altitudes no higher than 600 km, satellites are darkened or include sunshades, or are carefully oriented in space to reduce reflections. There may also be ways to reduce the impact of satellite trails with improvements to processing techniques for astronomical images. Further, if satellite owners provide astronomers with accurate orbital information, observers may be able to avoid satellites with their telescopes.

NOIRLab director Patrick McCarthy says of the report’s findings and recommendations that he hopes that they ‘will serve as guidelines for observatories and satellite operators alike as we work towards a more detailed understanding of the impacts and mitigations and we learn to share the sky, one of nature’s priceless treasures.’

The next workshop, SATCON2, will aim to tackle the issues of policy and regulation when it meets in early to mid-2021.

Image credit: SpaceX / Starlink

SpaceX plans to launch more than 30,000 Starlink satellites. This represents approximately a doubling of space-based moving objects visible to the naked eye during twilight, according to the SATCON1 report.

Despite there being only about 500 Starlink satellites currently in orbit, the program’s impact has already been felt during significant astronomical events. For example, the comet Neowise made an appearance this summer, something possible only once every 6,800 years, and Starlink satellites disrupted observation for many.

Image credit: SpaceX / Starlink

Thus far, SpaceX has taken steps to reduce the impact of its satellites. The space exploration firm has utilized a twisting technique to make the solar panels on the satellites less reflective. It has also explored painting reflective surfaces black and using sunshades. SpaceX has worked with the American Astronomical Society (AAS), National Radio Astronomy Observatory (NORAF) and the Green Bank Observatory (GBO) in pursuit of a solution to the issue of LEOsat visibility.

SpaceX stated ‘We’ve taken an experimental and iterative approach to reduce the brightness of the Starlink satellites. Orbital brightness is an extremely difficult problem to tackle analytically.’

For astronomers, the SATCON2 workshop cannot come soon enough. Professor Tony Tyson of the University of California, Davis, says that ‘…no combination of mitigations can completely avoid the impacts of satellite trails on the science programs of the coming generation of optical astronomy facilities.’

Articles: Digital Photography Review (dpreview.com)

 
Comments Off on Astronomers warn SpaceX Starlink satellites may hinder scientific observation and discovery

Posted in Uncategorized


Canon releases 1.2 firmware update for 1DX Mark III, bringing improved AF, connectivity and more

28 Aug

In addition to the EOS R5 1.1 firmware update, Canon has also released firmware version 1.2 for the Canon 1D X Mark III. The new firmware improves a number of features and addresses a handful of bug fixes for Canon’s flagship DSLR.

Specifically, Canon says firmware version 1.2 improves face and eye recognition autofocus (AF) at greater distances, improves FTP connectivity during transmission and improves Wi-Fi connectivity when using the Canon EFT-E9 Wireless File Transmitter.

Canon has also improved the experience when using the Browser Remote and addressed a number of ‘phenomenons’ — AKA bugs — that can occur during viewfinder shooting when specific settings are selected. You can see a full list of the bug fixes in the changelog below.

Firmware version 1.2.0 for the Canon 1DX Mark III is available to download from Canon’s product page.

Changelog:

Firmware Version 1.2.0 incorporates the following enhancements and fixes:

  • Enhancements when using Browser Remote:
    • The image list displayed will be refreshed automatically on the browser.
    • On the shooting screen of the browser, you can set the movie resolution and a high frame rate.
    • On the shooting screen of the browser, you can change the movie shooting mode.
    • On the shooting screen of the browser, Live View will be displayed as soon as you select the movie shooting button.
  • Enhances Auto Focus (AF) for improved face and eye recognition at greater distances.
  • Fixes a phenomenon that may occur during viewfinder shooting, in which the shutter may not be released or the camera may not operate in the following settings:
    • In One-Shot AF mode, when the AF Area Selection Mode is set as Zone AF, Large Zone AF or Automatic Selection AF.
    • In AI Servo AF, when direct AF point selection is made using the smart controller.
    • When the Register/Recall Shooting Function is assigned to the AE Lock button, in the Custom Controls.
  • Connectivity during FTP transmission has been improved.
  • Improves Wi-Fi connectivity when using the Wireless File Transmitter WFT-E9.
  • Fixes a phenomenon, in which the card access time may take longer when using certain CFexpress cards.

Articles: Digital Photography Review (dpreview.com)

 
Comments Off on Canon releases 1.2 firmware update for 1DX Mark III, bringing improved AF, connectivity and more

Posted in Uncategorized


Leica announces 9 Portuguese-made lenses for the US market, bypassing import tariffs

28 Aug

In retaliation for allegedly illegal subsidies from the European Union to Airbus, giving the European airplane manufacturer an unfair advantage over US-based Boeing, the United States levied about $ 7.5B USD in tariffs against the EU. These tariffs, beginning last fall, have been applied to certain EU goods, as approved by the World Trade Organization (WTO).

Included in the new tariff regulations are selected imports from France, Germany, Spain and the United Kingdom, including a 25-percent tariff on ‘agricultural and other products.’ Under the umbrella of ‘other products’ are camera lenses. Leica has long been known for making many of its cameras and lenses in Germany, resulting in US customers being forced to pay more for already expensive Leica lenses.

In order to bypass the US-issued tariff, Leica began work on establishing an alternative production line elsewhere in Europe. Building upon an existing presence in Portugal, Leica will now offer US-based customers nine different M-mount ‘Made in Portugal’ lenses for a reduced cost relative to their tariff-inflated ‘Made in Germany’ equivalents. Customers can still choose to pay extra for the same lenses made in Germany.

The nine lenses Leica is currently manufacturing in Portugal for the US market include the following, with Made in Portugal prices listed first and Made in Germany prices listed second:

• Summicron-M 28mm F2 ASPH (Black) – $ 4,395 (Portugal) – $ 4,895 (Germany)

• Elmarit-M 28mm F2.8 ASPH (Black) – $ 2,295 – $ 2,595

• Summaron-M 28mm F5.6 (Silver) – $ 2,595 – $ 2,895

• Summicron-M 35mm F2 ASPH (Black) – $ 3,295 – $ 3,695

• Summicron-M 35mm F2 ASPH (Silver) – $ 3,495 – $ 3,895

• Summilux-M 50mm F1.4 ASPH (Black) – $ 3,995 – $ 4,395

• Summilux-M 50mm F1.4 ASPH (Silver) – $ 4,195 – $ 4,695

• Summilux-M 50mm F1.4 ASPH (Black-Chrome) – $ 4,595 – $ 5,095

• Summicron-M 50mm F2 (Black) – $ 2,395 – $ 2,695

As you can see, the Made in Portugal lenses do not fully capture the 25 percent tariff levied against the imported German versions, but the relocated production does provide some relief to customers in the US. Presumably Leica incurred considerable cost to their business setting up a new production line. Of this, Leica says, ‘Leica Camera has made a large investment to establish a second production line in reaction to these global economic developments and market requirements.’

Image credit: Leica Store Miami

Leica continues, assuaging the fears of customers that Made in Portugal lenses will be inferior products, ‘With this new production line at Leica Camera’s state-of-the-art facility in Portugal, Leica has decided to offer USA consumers a choice to buy a selection of some of the most popular and essential Leica M-Lenses, stringent to the same quality and standards expected from Leica as our German-made products, Made in Portugal, at a much lower price than their Made in Germany counterparts. The price differential is a direct result of tariffs, and in no way indicative of quality standards.’

If you’d like to learn more about the Leica facility in Portugal, Film and Digital Times published a great tour in 2017.

The nine lenses Made in Portugal lenses Leica has announced will be released in staggered groups. The trio of Leica Summilux-M 50mm F1.4 ASPH lenses will be available this month. In September, the Leica Summicron-M 35mm F2 primes and the Summaron-M 28mm F5.6 will begin shipping. Finally, this December, the final three lenses, the Summicron-M 28mm F2, Summicron-M 50mm F2 and Elmarit-M 28mm F2.8, will become available.

Prospective customers can order any of the nine Portuguese-built lenses from US-based Leica stores, including Leica Store Miami.

Articles: Digital Photography Review (dpreview.com)

 
Comments Off on Leica announces 9 Portuguese-made lenses for the US market, bypassing import tariffs

Posted in Uncategorized


You can now upload images directly to Google Photos with select Canon cameras

28 Aug

Google has teamed up with Canon to release a new integration for Google Photos that makes it possible to automatically back up your photos over Wi-Fi.

The integration works through Canon’s image.canon app for Android and iOS. Inside the app, you can connect your Google account and have images automatically upload to Google Photos when they’re transferred from your compatible Canon DSLR or mirrorless camera.

A full list of the cameras supported by image.canon

Unfortunately, this integration doesn’t come free. In order to wirelessly upload images to Google Photos, you must have a Google One subscription, which starts at $ 20/year ($ 2/month) for the 100GB plan and goes up to $ 100/year ($ 10/month) for the 2TB plan. Google is offering a free month to Canon users interested in testing out the new feature.

Articles: Digital Photography Review (dpreview.com)

 
Comments Off on You can now upload images directly to Google Photos with select Canon cameras

Posted in Uncategorized


Olympus releases its OM-D Webcam Beta for macOS computers

27 Aug

Olympus has announced the macOS version of its OM-D Webcam Beta utility is now available. Like the Windows version, released back in June, the macOS version enables select OM-D cameras to be used as webcams with compatible videoconferencing and streaming software over USB.

The utility is free to download from Olympus’ website. Once installed, the process is as simple as plugging one of the compatible Olympus cameras and selecting the OM-D Webcam Beta as an input in the conferencing or streaming program of your choosing. Below is the limited list of compatible cameras:

  • OM-D E-M1X
  • OM-D E-M1 Mark III
  • OM-D E-M1 Mark II
  • OM-D E-M1
  • OM-D E-M5 Mark II

Olympus notes the utility won’t capture audio from your camera, so plan on having another microphone nearby (or just use your computer’s built-in microphone). Olympus also says streaming quality will be lower if there isn’t a memory card inside the camera.

We have contacted Olympus to see if any other cameras will be compatible in the future. You can find out more information and download the utility on Olympus’ website.

Articles: Digital Photography Review (dpreview.com)

 
Comments Off on Olympus releases its OM-D Webcam Beta for macOS computers

Posted in Uncategorized


Is There a Right and a Wrong Way To Expose Your Photos?

27 Aug

The post Is There a Right and a Wrong Way To Expose Your Photos? appeared first on Digital Photography School. It was authored by Kevin Landwer-Johan.

I have never liked the term ‘correct exposure.’ I don’t believe there’s often a single right way to expose your photos. There’s always room for artistic interpretation depending on:

  • Light
  • Subject
  • Camera
  • Lens
  • Exposure setting choices
  • Composition choices
  • Intent

All these will have some influence on the way a photograph will appear. One of the most important aspects of achieving a pleasing exposure is your intent. This cannot be measured by an exposure meter.

Buddha statue for Expose your photos
© Kevin Landwer-Johan. Nikon D800 | 35mm | 1/8000 sec | f/2.8 | ISO 400.

Choose how you expose your photos

How you expose your photos is a key choice when working with your camera. Most photos you take will display variation in tone from the brightest point to the darkest. You won’t often photograph subjects that are the same tone throughout.

The quality of light and how it reflects off the surfaces in your composition will help determine the exposure value for each tone. Sometimes the range of tones in a composition means your camera will not be able to render them all with visible detail.

Young Chinese woman on a white background
© Kevin Landwer-Johan. Nikon D800 | 35mm | 1/200 sec | f/1.4 | ISO 100.

When the level of contrast is beyond what your camera’s sensor can capture in a single exposure, you have to choose how to expose your photos. What is the most important part of the composition you want to expose correctly? Often this will be the middle tones. Other times it will be either the highlights or the darkest parts of your composition.

Particularly with high contrast lighting, you must choose how you want to expose your photograph. This is where the intent you have for how the photo will look comes into play. Do you want a bright, energetic image, or a more somber and moody one? What look will best suit your subject?

With a more monotone subject, the tonal range will not be large, especially when what you are photographing is not highly reflective. It was very easy to make a nice, even exposure of this dusty little dog lying in the dirt. This was because of the limited tonal range, low-contrast light, and overall beige color.

looking down at a dog on the dirt for expose your photos
© Kevin Landwer-Johan. Nikon D800 | 50mm |1/1000 sec | f/4.5 | ISO 400.

Think like a film photographer

The dynamic range of film is far narrower than that of modern camera sensors. Our digital cameras are far more capable of recording a broader tonal range in a single image than any film. When you take photos with film, you need to be more precise about how you expose your photos. This is more vital in high contrast situations.

Because the tonal range of film is much narrower, you’re more likely to lose detail in the shadows and/or highlights than when you work with a digital camera. Imagining that you are using film can help you be more aware of what part of your composition you want to expose well.

Novice Buddhist monk in the dark
© Kevin Landwer-Johan. Nikon D800 | 35mm | 1/125 sec | f/3.2 | ISO 1000.

For example, when I photographed this novice monk (above), he was in a dark space with light coming through a window. The contrast was significant. I knew that if I let my camera decide the exposure, it would mean the light area of the boy’s face would be overexposed. This is because most of the composition was in shadow.

I used my spot meter to take an exposure reading from the light reflecting off the monk’s face and set my exposure accordingly. In my original file, there is some detail visible in the shadows. I have boosted the contrast during post-processing to eliminate it.

The bell-shaped histogram myth

The notion that a correctly exposed image will produce a bell-shaped histogram is nonsense. You can’t rely on a histogram to provide useful information about exposure.

Histograms are a graphical representation of the tones present in a photo. When the photo is mostly middle tones, you’ll see the histogram as a bell shape: high in the middle section and low toward the left and the right.

The tonal range of the scene you are photographing has an influence on what the histogram will look like. This is why you cannot gauge exposure by looking at the histogram. Some people may find it helpful, but it’s not good practice to rely on it to help you choose your exposure settings. Don’t aim to make your histogram a bell shape.

Old Karen woman against a black background for expose your photos
© Kevin Landwer-Johan. Nikon D800 | 85mm | 1/640 sec | f/2.8 | ISO 400.

For example, portraits made against a black background will never display a bell-shaped histogram. The graph will always spike on the left because there are more dark tones in the image than midtones or light tones. Depending on what a person is wearing, such a histogram may be very flat.

For the image above, the grandma’s face is where I wanted the correct exposure. It would not be possible, even if I wanted it, to set my exposure so that detail in both the background and the headscarf was visible.

Expose your photos with intent

Know what you want before you press the shutter release.

Often, you have chosen your subject. You’ve composed carefully. Then you take a photo with no real regard for the lighting or your exposure setting.

Letting the camera take care of the exposure using averaged metering and an automatic setting is the way many people take pictures. The results of such exposures are relatively predictable. This is because of how cameras are designed and calibrated. To obtain the best exposure each time you take a photograph, you must match it to your intent.

How do you want the light on your subject to look? What is the mood you want your photo to convey? Are you capable of achieving this with the current lighting? These things must be considered before you press the shutter release.

Be in control of your exposure settings. Read your meter as a guide. Rather than ensuring that your meter is reading zero for every photo, adjust your settings to where you can capture the photo that matches your intent.

Buddhist nun at a temple for expose your photos
© Kevin Landwer-Johan. Nikon D800 | 35mm | 1/100 sec | f/2.8 | ISO 400.

Conclusion

I do not believe there is a right or wrong exposure choice for any photo. You can take into account all the technical aspects, but while this approach may produce technically correct images, they will often lack expression and feeling of any kind.

Not being intentional when you expose your photos often produces bland results.

The post Is There a Right and a Wrong Way To Expose Your Photos? appeared first on Digital Photography School. It was authored by Kevin Landwer-Johan.


Digital Photography School

 
Comments Off on Is There a Right and a Wrong Way To Expose Your Photos?

Posted in Photography


Ricoh releases Silver Edition version of its Pentax K-1 Mark II DSLR, three D FA* lenses

27 Aug

Ricoh has announced the limited release of a Silver edition of its Pentax K-1 Mark II DSLR as well as, for the first time ever, silver versions of its D FA* lenses.

The limited-edition camera is identical to its black counterpart, complete with a 36MP full-frame CMOS sensor, Safox 12 autofocus system with 33 AF points and a maximum ISO of 819,200. The only difference is the paint scheme, which is silver with contrasting parts, including a black shutter release and hot shoe.

In addition to the camera, Ricoh is also releasing Silver edition versions of three lenses: the HD Pentax-D FA* 70–200mm F2.8, 50mm F1.4 and 85mm F1.4. Like the camera, these lenses are identical to their black counterparts, but unlike the camera, just 600 units for each model will be produced.

This isn’t the first time Ricoh has released Silver editions of their gear. In March 2010, the Pentax K-7 Limited Silver camera was released and, more recently, the Pentax K-1 Limited Silver was released in September 2017.

The Pentax K-1 Mark II Silver Edition camera body will be available in September for $ 2100. The lenses will also be released in September with prices ranging from $ 1200–2100. All Silver Edition cameras and lenses will come with specially designed product boxes.

Press release:

Ricoh announces Silver Edition of PENTAX K-1 Mark II, plus three HD PENTAX-D FA? Silver Edition lenses

PARSIPPANY, NJ, August 26, 2020 – Ricoh Imaging Americas Corporation today announced the PENTAX K-1 Mark II Silver Edition, a special silver-colored version of its digital single-lens reflex (SLR) flagship model. Ricoh is also releasing for the first time silver versions of its D FA? series lenses, with high-grade silver coating that is especially well suited to the top-of-the-line PENTAX optics.

The camera will be available in a limited quantity of 1,000 units worldwide, and the three lenses— HD PENTAX-D FA? 70-200mm f/2.8, 50mm f/1.4 and 85mm f/1.4—will be available worldwide in limited quantities of 600 units for each model. These lenses join the silver-edition PENTAX full-frame lenses currently available: SMC PENTAX FA 31mm F1.8 LTD, SMC PENTAX FA 43mm F1.9 LTD and SMC PENTAX FA 77mm F1.8 LTD.

The limited-edition silver models of the camera and lenses are coveted by PENTAX photographers worldwide. The PENTAX K-1 Mark II Silver Edition camera sports contrasting black parts–a shutter release button and hot shoe—to provide a handsome complementary color and enable it to be color coordinated whether used with traditional black or the special silver-colored lenses.

Previously issued limited-edition cameras include the PENTAX K-7 Limited Silver (March 2010) and the PENTAX K-1 Limited Silver (September 2017).

Pricing and Availability

The PENTAX K-1 Mark II Silver Edition camera body will be available in September for a manufacturer’s suggested retail price of $ 2099.95. The HD PENTAX-D FA? Silver Edition lenses will be available in September with prices ranging from $ 1199.95 – $ 2099.95. Both the camera and lenses can be purchased at www.us.ricoh-imaging.com and at select Ricoh Imaging-authorized retail outlets.

Main features of the PENTAX K-1 Mark II Silver Edition

  • ? The camera body and detachable battery grip feature a high-grade, fine-textured silver coating, with an exclusive silver SR badge placed on the front of the body.

  • ? The camera’s shutter release button and hot shoe, as well as the battery grip’s shutter release button, feature black parts, so the camera is coordinated with either black or silver lenses.

  • ? Each camera has been given a unique serial number, from 0000001 to 0001000, to further support its exclusivity.

  • ? Two exclusive batteries are included in a product package to simultaneously power both the camera body and the battery grip.

  • This special camera and its accessories come in a specially-designed product box.

  • The camera body comes with the latest firmware version pre-installed.

Main features of the HD PENTAX-D FA? Silver Edition lenses

  • The lenses’ high-grade silver coating complements their use with silver-edition camera bodies.
  • Each lens has been given a unique serial number, from 0000001 to 0000600, to further support its exclusivity.
  • The lenses come in a specially-designed product box.

NOTE: The features and specifications of this camera body and lenses are identical to those of standard models, except for the camera firmware

Articles: Digital Photography Review (dpreview.com)

 
Comments Off on Ricoh releases Silver Edition version of its Pentax K-1 Mark II DSLR, three D FA* lenses

Posted in Uncategorized