Sigma UK recently collaborated with the company Sent Into Space to send a pair of Sigma fp full frame mirrorless cameras into the upper atmosphere. Sigma 14mm F1.8 lenses were used on each camera. It’s a notable kit because it combines the world’s smallest and lightest full frame mirrorless camera with the brightest full frame 14mm prime lens available.
The Sigma fp cameras and 14mm F1.8 lenses were attached to weather balloons and sent up to an altitude of roughly 19 mi. (about 30.5km). At altitude, the cameras captured high-resolution photos and 4K RAW video of Earth.
No good marketing operation is complete without stunning media to share with prospective customers. Sigma UK published a video to document the process of sending Sigma fp cameras into near space and show off the amazing results of the project.
The launches took place in Sheffield and the first Sigma fp to gain altitude was dedicated to recording 12-bit 4K UHD Raw video and the second camera was dedicated to capturing 24.6MP still images. Each camera was part of a kit that includes on-board equipment to provide data and telemetry back to the Sent Into Space team back on the ground.
The balloons, filled with hydrogen, expand considerably during the ascent. As the atmosphere gets thinner, the gas inside the balloon tries to escape to fill the vacuum. At a certain altitude, the balloon will fail and burst, and the equipment will return to the surface aided by onboard parachutes. As Chris Rose of Sent Into Space points out in the video above, the payload will actually descend at up to 250 mph before the atmosphere gets thick enough to act against the parachute.
Each camera was sent into space with an attached 2TB SSD drive. Even with that much storage capacity, the fp couldn’t record 4K UHD RAW video for the entire flight. The stills camera was set up with an interval timer to capture a still image every five seconds for the entire journey.
To learn more about the Sigma fp, head to our First Impressions. For more on the Sigma 14mm F1.8 DG HSM Art lens and its applications for space photography, check out Jose Francisco Salgado’s ‘Astrophotography with the Sigma 14mm F1.8 Art lens’ article.
About 10 years ago, Bob Janes decided it was high time to track down some of the dream cameras of his youth. One of the cameras in particular, the Pentax Spotmatic F, had left an important impression on him, early in his photographic journey.
So when one popped up locally on Ebay for a mere £16, he grabbed it, no questions asked. It turned to be in pristine mechanical condition. Now, 41 years after first laying eyes, Bob has finally had the chance to put the Spotmatic F properly through its paces. Read his long waited review (courtesy of our friends at 35mmc):
Read: Asahi Pentax Spotmatic F Review – a class act
About Film Fridays: We recently launched an analog forum and in a continuing effort to promote the fun of the medium, we’ll be sharing film-related content on Fridays, including articles from our friends at KosmoFoto and 35mmc.
The post Nikon Z6 II and Z7 II to Launch on October 14th appeared first on Digital Photography School. It was authored by Jaymes Dempsey.
Almost exactly two years after the launch of Nikon’s full-frame mirrorless system, it’s time for an update:
The Z6 II and the Z7 II, officially launching on October 14th.
If you want to know precisely when the new models will be announced, you can view a countdown on the Nikon USA website, here.
Unfortunately, Nikon didn’t release any product specifications or extra information to go along with the announcement, other than the title, “The Next Chapter.” But Nikon Rumors has been publishing on Nikon Z6 II and Z7 II specifications for months, which is why we know a lot more about these two cameras than you might expect.
First, as is now clear from the titles, the Z6 II and the Z7 II will offer enhancements on the existing Z6 and Z7 models, Nikon’s first two mirrorless cameras. Both the Z6 and Z7 debuted back in late 2018 to general praise, which means that the Z6 II and the Z7 II, regardless of any major upgrades or innovations, should be formidable cameras.
In fact, it’s looking like Nikon will take a relatively laid-back approach to these successor models.
Nikon Rumors reports that the new cameras will be an “incremental update to the current Z6/Z7 models;” they’ll feature the same sensors as their predecessors (24 MP and 45.7 MP, respectively), the same electronic viewfinder resolution (3.69M-dot), and similar designs.
On the other hand, the Z6 II and the Z7 II should come with plenty of useful upgrades, including:
Dual card slots
4K/60p video capabilities
Next-level autofocus
Enhanced continuous shooting capabilities (with a larger buffer and speedier shooting)
Interestingly, Nikon Rumors also claims that the Z6 II will be “the last Nikon camera with a 24 MP sensor.” Assuming this rumor is correct, it begs the question: Where does Nikon plan to go after this? Perhaps we’ll see a shift to 26 MP sensors, 30 MP sensors, or even a drop back to 20 MP sensors, but I have a hard time believing the change will be any more drastic.
After all, there are several reasons that camera manufacturers stick with lower megapixel counts on some of their cameras (despite their ability to manufacturer 50+ megapixel sensors). For instance, a 45 MP camera will struggle to go toe-to-toe with a 24 MP camera in low light, which is why we’re still getting a 12 MP sensor on the Sony a7S III and a 20 MP sensor on the Canon 1D X Mark III.
Like the Nikon Z6 and Z7, you can expect that the Z6 II and Z7 II will cater to professionals and other experienced photographers. So if you’re interested in a top-notch full-frame camera, one with dual card slots and plenty of other great features, then take a look at these new models!
Now over to you:
What do you think of the Nikon Z6 II and Z7 II? Were you hoping for more significant upgrades? Or are you looking forward to these new models? Share your thoughts in the comments!
The post Nikon Z6 II and Z7 II to Launch on October 14th appeared first on Digital Photography School. It was authored by Jaymes Dempsey.
You’ve got your creation exactly how you want it and now it’s time to save it. You want to save it as a PNG. However, when you go to save it, PNG does not appear in the list of file type options that you can choose. What do you do? Shaking your fist at your computer in frustration will do Continue Reading
The post How To Save PNG in Photoshop (If Its Not Letting You) appeared first on Photodoto.
Photographer Brendan Barry was commissioned by the Exeter Canal and Quay Trust to turn a room in the Custom House in Exeter, U.K. into a large camera obscura.
Barry had a residency at the Custom House in Exeter and during his time, he used a variety of analog cameras to capture images of Exeter Quay. Of his work, Barry says, ‘My work aims to challenge our understanding of what a camera is, what it can do and how one can be constructed, taking the whole notion of what a camera might be, unpicking these preconceptions and creating new ways of inviting an audience into having a transformative experience in a space.’
Image credit: Brendan Barry
Brendan continues, ‘During my residency at the Custom House I will be transforming a number of rooms in the building into giant cameras and using them to capture images of Exeter Quay using a range of analog photographic processes and techniques.’ Barry created a very informative video of the experience, which can be seen below. In his video, Brendan shows the entire process, from his approach to building a camera obscura and the equipment he uses to create large prints.
As you can see, Brendan required a lot of equipment for his project. After getting his equipment into the upstairs room, he must create a large frame with a backboard to hold the photographic paper. Next is setting up the lens holder in the room’s window, blacking out the rest of the window and setting up a holder for a graduated neutral density filter to ensure a balanced exposure.
Image credit: Brendan Barry
This is not Brendan Barry’s first foray with making a large analog camera. You can check out Barry’s previous projects in which Barry turned his shed into a camera, as well as an older project wherein he turned a skyscraper into a camera obscura.
If you’d like to see more videos from Brendan Barry, be sure to check out his YouTube channel. To see more of his work, visit his website and follow him on Instagram.
Autofocus has gotten very good. Scarily good, even. But some situations call for good old fashioned manual focus, whether you’re shooting macro, video or channeling your inner Cartier-Bresson on the street. For these occasions, Chris and Jordan have a few quick tips that will help you nail your manually focused shot every time.
Introduction
Punch in focus
Peaking
Hyperfocal distance
Focus marks
Focusing with camera movement
Snapping into focus
Subscribe to our YouTube channel to get new episodes of DPReview TV every week.
Google has released an updated version of the Google Photos app for Android, bringing with it a few new features, including an after-capture Portrait Light mode, a one-tap editing feature and a slightly revamped editing interface.
As Google briefly demonstrated during yesterday’s Pixel 5 event, the new Portrait Light mode will edit the image to appear as though there’s light coming from a light source not actually in the image. While limited to Google’s new Pixel 4a 5G and Pixel 5 devices for the time being, this feature lets you apply ‘lighting’ in post-production by editing the image to appear as though it’s coming from a specific direction.
As noted by PetaPixel, it’s possible this new adjustable lighting technology is derived from a research project Google participated in back in 2019. Google says this feature will be coming to other Pixel devices, but doesn’t specify which ones or a definitive timeframe.
Also included in this Google Photos update is a one-tap editing feature that uses ‘machine learning to give you suggestions that are tailored to the specific photo you’re editing.’ In its current form, only three suggestions are available: Black and White, color Pop and Enhance, but Google says more options for landscapes, portraits and more will be available ‘in the coming months.’
Google has also changed the user interface (UI) of the manual editing tools. There’s now a scrollable toolbar at the bottom with round buttons and icons, akin to the interface of Apple’s Photo app, VSCO and others. This updated interface, in theory, makes it easier to quickly find the settings you need and make the appropriate adjustments.
This update will go live in the Google Play Store this week. If you don’t already have the Google Photos app, you can download it for free; if you do, be sure to keep an eye out for updates. Google hasn’t specified whether or not we’ll see these new features and redesign make their way to the iOS version of the app.
Ahead of Luminar AI’s release this holiday season, Skylum Software has shared additional information about how Templates will work in the upcoming all-in-one photo editing software and how Templates can be used to save photographers a lot of time and energy when processing many images.
In many traditional photo editors, users must adjust different sliders to get the desired results when processing images. There are often available presets, which will speed up the editing process, but presets have limitations, and photographers are often left feeling like their creativity has been removed from the editing process. Ideally, many of us want to save time without sacrificing creative control. Skylum believes that Luminar AI’s Templates will remove the frustration and overcome the limitations of presets in other photo editors.
Photo credit: Elia Locardi
The artificial intelligence in Luminar AI has been integrated throughout the entire editing process and has been trained with ‘expert input from artists, photographers, colorists and scientists.’ Alex Tsepko, Skylum’s CEO, says, ‘With Luminar AI, we wanted to ensure that AI not only was easy to use, but that it also provided creatives a way to express themselves. Through our unique 3D depth-mapping and segmentation technologies, we’re able to recognize the contents of a photo, recommended edits and then allow creatives to refine every aspect of that recommendation. Doing this lets creatives retain their unique style in their edits without tedious, manual work. Professional results, but in a fraction of the time.’
Artificial intelligence starts operating as soon as you open an image in Luminar AI. The software identifies the contents of an image, analyzes potential problem spots, and evaluates the depth of the image. Luminar AI then offers a list of carefully selected Templates for users to select from.
Users can test out different Templates and see how they impact their image. Skylum states that a preview is created in less than a second. When you evaluate a specific Template you can even see which AI tools were utilized in the Template. For beginners, it should prove useful to see which tools are used to create different images and how each tool changes the look and feel of a photo.
Photo credit: Javier Pardina
Templates will offer novices a variety of ideas to help choose the direction they want to take an image. For advanced photographers with more editing experience, they can choose when and how they want more advanced manual control over their image edits. They can pick and choose which AI tools they want to utilize and then create their own templates for future use on single images or when batch editing. Skylum states that utilizing templates will allow photographers to save ‘up to 90% of their time spent editing.’
You can learn more about Luminar AI here. For a list of Frequently Asked Questions about Luminar AI, click here. Luminar AI is available for preorder at a special price, which you can learn more about here. As the release of Luminar AI approaches this holiday, stay tuned for more information, including a planned hands-on preview ahead of the full public release of Luminar AI.
Sigma has unveiled an all-new 105mm F2.8 macro lens, which will provide 1:1 reproduction and will be offered for E-mount and L-mount mirrorless cameras. It features a new optical formula comprising 17 elements in 12 groups, including one SLD (Special Low Dispersion) element.
The 105mm F2.8 DG DN Macro features a 14cm (5.5″) working distance, an aperture ring that functions either clicked or de-clicked, and a three-zone focus limiting switch. The lens is dust- and splash-proof, and the L-mount version is compatible with Sigma’s 1.4x and 2x teleconverters.
The Sigma 105mm F2.8 DG DN Macro Art lens will ship in late October for $ 800.
View our sample gallery
Press release
Sigma Announces the 105mm F2.8 DG DN Macro | Art Lens, Redefining Mirrorless Macro Performance
Life-sized magnification (1:1) short tele macro for full-frame mirrorless
Dust and Splash-proof construction
Completely new optical formula for exceptional sharpness and pleasing bokeh
Hypersonic Motor optimized for both contrast and phase detection autofocus
Clicked and de-clicked aperture ring with Aperture Ring Lock Switch
Focus Limiter switch for macro, portrait, or full range autofocus
Available in L-Mount and Sony E-Mount
MSRP: $ 799
Anticipated Shipping Date: Late October 2020
Ronkonkoma, NY – September 30, 2020 – The SIGMA 105mm F2.8 DG DN Macro | Art lens is the first prime macro lens designed by Sigma exclusively for full-frame mirrorless cameras, as the DG DN in the name indicates. Announced today by Sigma Corporation, this lens offers 1:1 magnification (life-sized) at a 5.5-inch working distance with internal focusing, and it is available in Sony E-Mount and L-Mount formats.
Exceptional focal plane sharpness with minimal aberration is achieved through a new optical formula featuring 17 elements in 12 groups with one SLD element. The lens design also features excellent peripheral brightness for pleasing bokeh, complemented by nine rounded aperture blades. The L-Mount version of the 105mm F2.8 DG DN Macro | Art lens is compatible with the SIGMA Teleconverter TC-1411 and TC-2011, increasing the maximum magnification to 1.4:1 and 2:1, respectively.
“In order to capture the minute details of small subjects, macro lenses must meet an extremely high standard of optical precision, and the new SIGMA 105mm F2.8 DG DN Macro | Art lens truly delivers,” says Mark Amir-Hamzeh, President of Sigma Corporation of America. “Whether you are shooting images of flowers, insects or just interesting objects around the house, the sharpness, bokeh quality and practical functionality of this lens will exceed the expectations of professionals and hobbyists alike.”
The Hypersonic Motor delivers smooth, quiet, confident autofocus in both close-up and portrait-distance settings, and the three-zone focus limiter switch allows for even swifter response when focusing exclusively in either the macro or more distant range.
The Sigma Art line has been consistently redefining both imaging excellence and satisfying handfeel, and this new lens continues that journey. The dust and splash-proof design, aluminum and TSC (Thermally Stable Composite) construction, a brass bayonet mount, plus well-damped switches and rings demonstrate the level of build quality that the Art name represents. The Aperture Ring can be clicked or de-clicked by flick of a switch, and the lens also includes an Aperture Ring Lock Switch function. Additional benefits include a programmable AFL button on the lens barrel, and compatibility with face and eye-detection autofocus.
The lens will begin shipping late October 2020. / MSRP: $ 799
Sigma 105mm F2.8 DG DN Macro specifications
Principal specifications
Lens type
Prime lens
Max Format size
35mm FF
Focal length
105 mm
Image stabilization
No
Lens mount
L-Mount, Sony FE
Aperture
Maximum aperture
F2.8
Minimum aperture
F22
Aperture ring
Yes
Number of diaphragm blades
9
Optics
Elements
17
Groups
12
Special elements / coatings
1 super-low-dispersion element, Super Multi-layer coating
The post Tips for Using Photographic Minimalism to Great Effect appeared first on Digital Photography School. It was authored by Simon Bond.
In today’s article, you’ll learn a key tip for improving your photography. After all, when you understand that photography is the art of subtraction, it makes sense that minimalism works so well for photography.
This means that employing photographic minimalism in your work will immediately improve your results. Let’s take a look at what minimalism is, where you’ll find it, and how to use it in your own photos.
Shooting upward toward the fisherman helped produce a minimalist photo.
What is minimalism?
Minimalism, as the name suggests, is about keeping things simple. It means avoiding clutter, which in photography equates to removing unwanted elements from your photos.
You do want a main subject, though; this is needed for the minimalist parts of your photos to have something to contrast with.
Key elements of photographic minimalism
The great thing about minimalism is that it can be applied to almost every genre of photography, including portrait, landscape, and still life. The only area where minimalism doesn’t always work well is street photography, where you often want to show more of the scene.
Therefore, the key aspects of photographic minimalism are the following:
Negative space: This refers to an area of empty space in your photo. The negative space still needs to work compositionally, but that space is what will give your photo its minimalism.
Small main subject: The main subject should not fill the frame. It needs to be present, but have enough space around it for the photo to breathe.
Avoid clutter: When you compose a photo, do so in such a way that you include the main subject and the background with little else.
This photo uses a wall similar in color to the ice cream.
The best location for photographic minimalism
It’s possible to produce photographic minimalism in almost any location.
The important factors are the angle you photograph at and the focal length of your lens. Here are a few possible ideas you can use:
Minimal locations: Places like coastlines and deserts offer minimalism pretty much wherever you point the camera.
Urban settings: Look for a plain wall and use this as a background for a minimalist portrait.
A shard of light: Go for low-key minimalism by locating a shard of sunlight, or by putting a snoot on a flash and aiming it at a person. Then expose for the light on that person, while leaving the background underexposed and dark.
Product photos: Use a lightbox to produce high-key product photos that are surrounded by white (or by the background color that you choose).
The ocean is minimal by nature. The ripples on the water add interest to the negative space.
Which lens works best?
The lens that works best for minimalism will depend a lot on the location you’re photographing. It may be hard to produce minimalism with a wide-angle lens in an urban setting, but take the same lens to a desert and it’ll do a great job. The following is a guide to help you choose the correct lens:
Wide-angle: Use a wide-angle lens in a location where you can fill the frame with one particular background. That background will often be the sky, but could equally be rolling green hills. This works best in rural areas.
Telephoto: It’s easier to produce minimalism when you use a telephoto lens. This is because you can zoom in on a specific area to avoid elements that clutter the frame. When using a long focal length, ensure there is enough negative space around your main subject.
It’s possible to take minimal street photos, as well. Simply find a wall with a strong color to photograph against.
Change the angle
A simple change of angle can have a big impact on your photos and help you produce photographic minimalism. Stepping to the side or crouching down to the ground can be all it takes to remove a distracting element from your composition.
Here are some options that will turn a cluttered scene into a minimalist one:
A bird’s-eye view: This works best where you have fields or a coastline, so the location is already minimalist.
Crouching below a wall: Use a wall as the horizon line and aim up towards the sky. The wall blocks out the usually busy horizon, and you can add a person as a silhouette against the sky.
Compression: I already talked about this in the section about lenses and focal length, but zooming in to remove distracting elements from the edge of the frame works well.
Move to the side: A single step can be all it takes to change the background from cluttered to minimal.
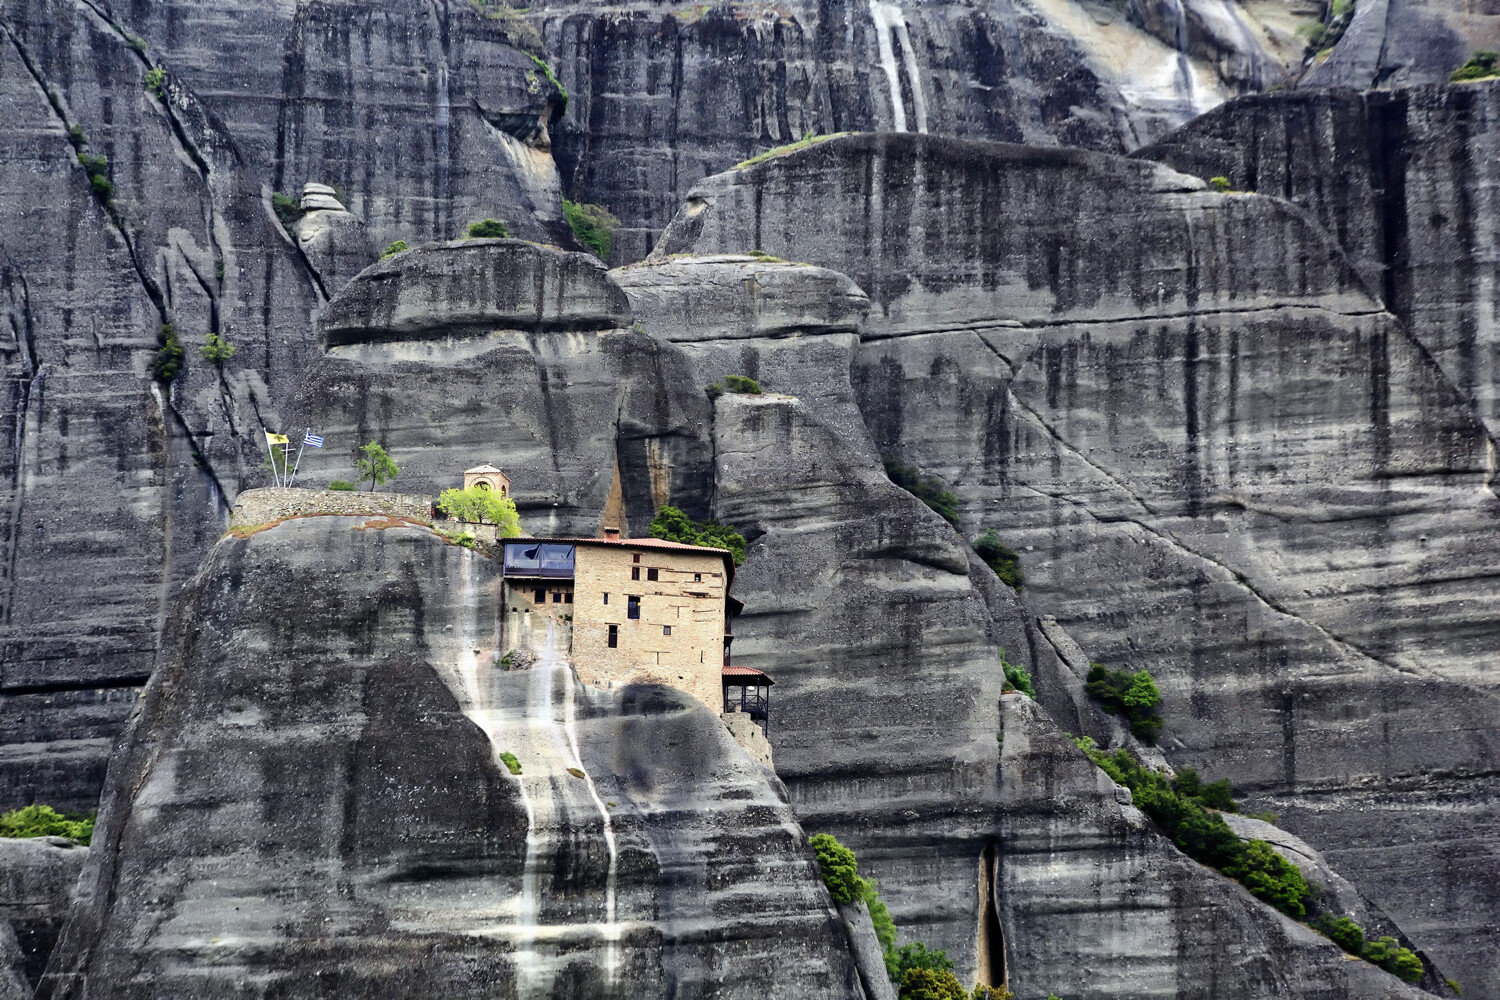
This photo shows a monastery at Meteora in Greece. A long focal length is used and the rocks create a minimal, textured background.
Post processing can help
Now, it’s best to get your photo right from the start and simply change your position so that you can compose a minimalist photo.
That said, there are times that creating a minimalist composition in-camera isn’t possible, yet the photo is still very much there to be taken. There could be a lamppost or an electric pylon that comes into your frame.
Fortunately, it’s increasingly easy to clone out unwanted elements from your photo. And once you’ve done that, you’ll have created minimalism.
This farmworker in Laos works as a great main subject to add interest to the composition.
Maximize your photos with minimalism!
A lot of successful photos use minimalism to great effect. Are you a minimalist with your photography? If so, how do you go about taking photos in the minimalistic style? If you have ideas and photos you’d like to share, please do so in the comments section below.
Now it’s time to maximize your creativity with photographic minimalism!
The post Tips for Using Photographic Minimalism to Great Effect appeared first on Digital Photography School. It was authored by Simon Bond.