RSS
 

Posts Tagged ‘working’

Finding and Working with Available Light

17 Apr

I don’t use a flash for my photography, it’s a personal preference. Available light, in its many forms, is both challenging and rewarding so I rarely find a need to turn to creative lighting.

MWT_Avail_Light_2

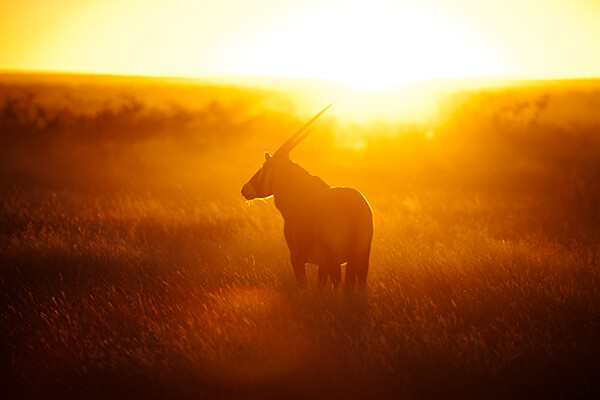
Natural light, golden hour

What is ‘available light’?

Let’s be clear on definitions first. As a street photographer my preferred source of light is sunlight, more specifically, natural light. Available and ambient light refer to any and all light sources the photographer did not introduce for their photograph; light bulbs, candles, fire, neon, to name a few.

The available light around us is a great opportunity for our photography and photographers should be passionate about making best use of this light when capturing a photo.

George Eastman said, “Light makes photography. Embrace light. Admire it. Love it. But above all, know light. Know it for all you are worth, and you will know the key to photography.”

On a basic level we all recognise the beautiful sprawling vista before us looks wonderful bathed in the rays of the setting sun, and less so beneath an overcast grey sky. I refer to this as the quality of the light.

What are the different qualities of light?

Starting with the obvious, the sun, the qualities of its light are wildly variable.

MWT_Avail_Light_5

Natural light, sunset

Direct sun

The sun is warmer and softer at each end of the day. Shadows are long and also soft. These two periods, at sunrise and sunset, are referred to as the Golden Hour and many landscape photographers won’t recognise any other part of the day. Quick tip: when the skies are a glorious combination of oranges and reds, set your white balance to Sunny. Set to auto white balance, the camera often attempts to compensate for, what it believes are, overly warm tones.

During the day when the sun is high, the light is bright and harsh and shadows will be short. The principal challenge here is how to properly expose where there is a massive range of exposure between areas of light and shadow.

MWT_Avail_Light_4

Harsh direct sun

Indirect sun

This covers areas of shade, reflected sunlight, side lighting through a window and that pallid grey diffuse light from cloud cover.

MWT_Avail_Light_3

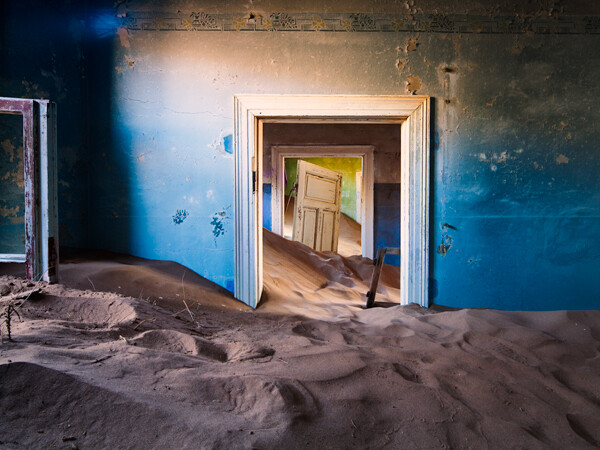
Indirect sun from a side window

Artificial light

Ignoring light from the night sky, what remains to light our photography is artificial light. No less challenging to work with, artificial ambient lighting can vary in brightness from a candle to stadium lighting, and can be located on ground level to anywhere overhead. There could be multiple sources and, if all this wasn’t bad enough, some of those light sources could be moving!

What is the quality and direction of light?

MWT_Avail_Light_6

Direct sun, nearly overhead casting short harsh shadows

Direct overhead sunlight

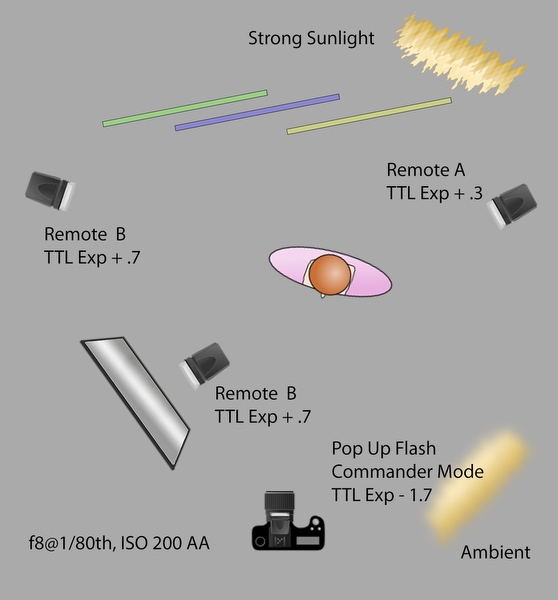
Taking a portrait in direct overhead sunlight is tough going. The light is bright and harsh, the shadows equally so. I’m a street photographer, so there’s no option to move subject(s). In this scenario I have to weigh up the contrasts between bright and dark areas, especially with faces. The subject’s clothes will affect the exposure, dark materials losing texture to the shadows more quickly. Backgrounds should be considered too. For example, a small portion of bright sky in the frame can horribly distract when the rest of the photo is a fairly balanced exposure.

If you can move your subject, the effects of the direct sun can be mitigated when you consider placing the person next to a light coloured wall, or other reflective surface. Very much along the lines of a subtle fill using the reflected light. These light and shadow areas will all be softer and your subject won’t be squinting. Moving to a wholly shaded area will result in a flat lighting with little or no shadow. Yes, exposure will be easy but your image will take on a decidedly flat look.
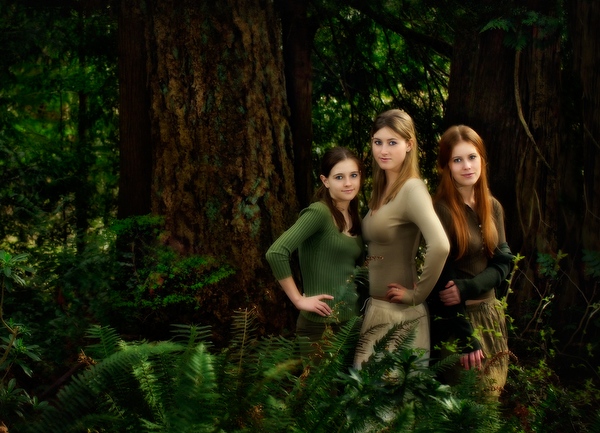
Open shade

Open Shade, Combination Of Sun And Shade

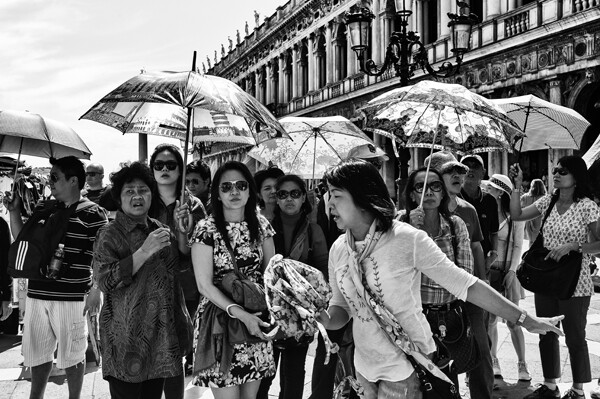
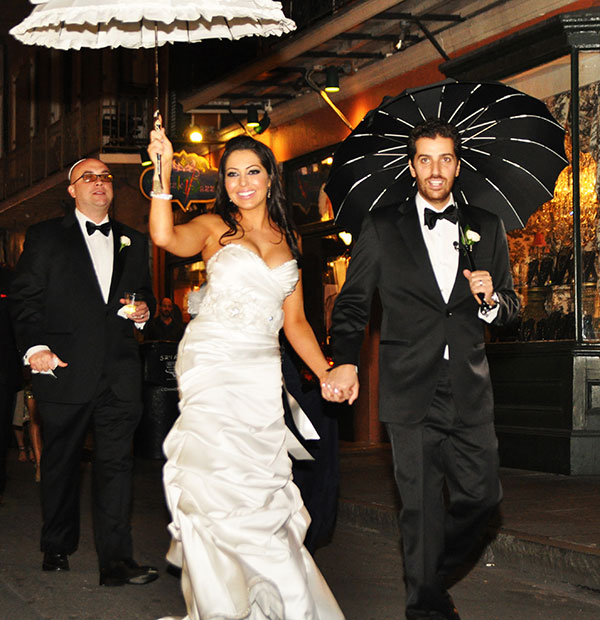
Open shade, combination of sun and shade

These areas are great opportunities to introduce depth into your images with portions of direct sunlight as well as shadows cast from the shaded area, all within the frame. Trees are the obvious candidates for partially shaded areas, but also consider open doorways and alleys. The example above takes advantage of the shade cast by several umbrellas.

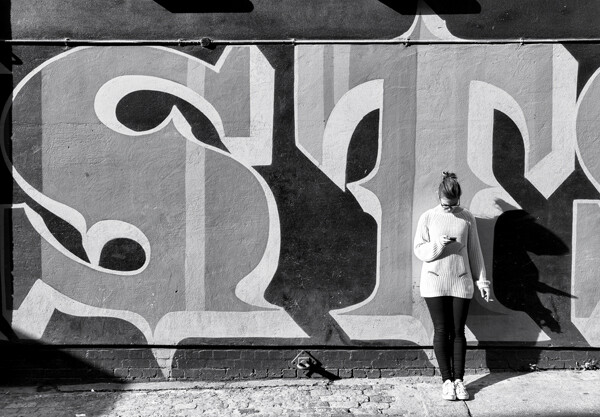
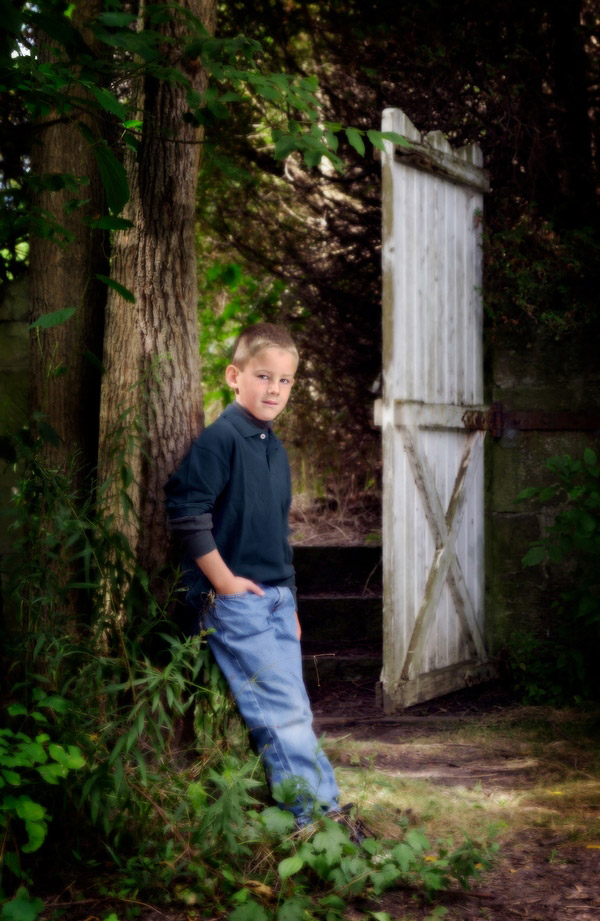
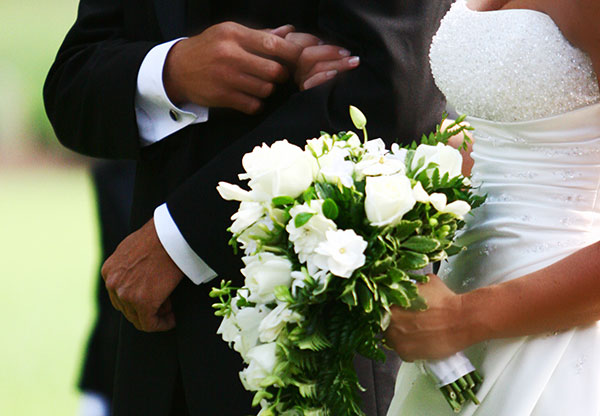
Side light or window light

Making use of light from the side, open windows or low sun late in the day, also generates images with a real sense of depth. The side lighting will reveal the smallest textures. The dynamic range of light to dark in these scenes is much reduced. Pay attention to the contrast play now on a more horizontal plane than you would see with overhead light sources.

Diffuse light

With little or no discernible direction, diffuse light from a shaded area or overcast sky introduces problems with colour temperature and a general lack of depth in images. I don’t let this bother my street photography, however this is a challenge for a scheduled shoot.

I have generally been referencing available light from the sun. Working in environments with artificial light you are faced with the same factors, though problems can be amplified. Unnatural light frequently complicates exposures with off colour temperatures and much lower levels of light.

On one occasion, I was commissioned to photograph an event where all the lighting was eye level and against the walls! There are only so many silhouette shots you can get away with and I spent a large part of the evening against a wall to be able to shoot with the light.

How much light do you have to work with?

MWT_Avail_Light_7

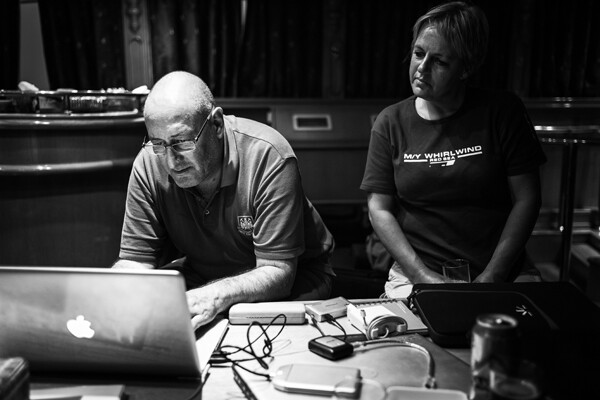
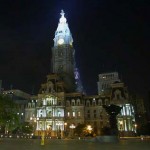
Indoor artificial low light

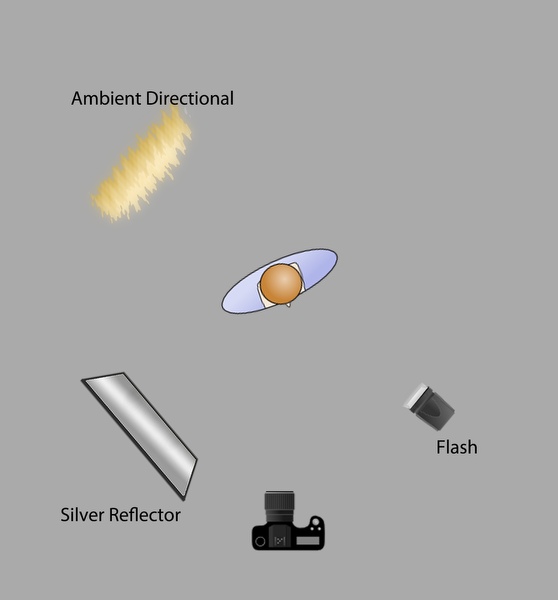
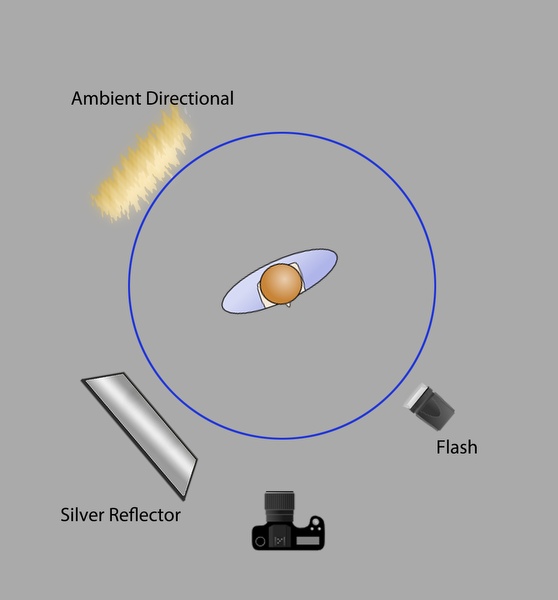
Whatever the quality and level of the light, reflective surfaces are useful to make the best of the ambient levels. For planned shoots, particularly with models, metallic reflectors are an excellent method of manipulating light onto a subject. Even nature photographers carry fold up reflector discs to reduce the silhouetting effects of shooting into the sun. No reflector, and no alternate light sources? I suggest white walls, shiny floors, glass surfaces.

Low available light situations are challenging for photographers and this is one area where the right gear will enable you to take a better photograph. Capturing a well exposed image requires as much light as the sensor can get. Static subjects will allow a longer exposure. Events, concerts, parties, weddings all rely on photographers obtaining shots quickly. This means fast glass and, where needed, increased sensor sensitivity or ISO. I recommend a lens capable of f/2 for very low lit scenes. If you are shooting hand held, you will probably still need to increase your ISO to prevent a blurred exposure.

It frustrates me terribly to see so many people constantly using their smart phone, however, the light from the screens always helps illuminate faces. It is precisely this kind of observation that will help you find light where you need it. 

Notes on exposure

Exposure is influenced by aperture, shutter speed and ISO and your camera’s metering programme will wiggle those three factors to attempt to capture an evenly exposed scene. In reality, you are the principal metering programme; your ability to see where the light falls, the points of reflection and those areas of dark shadow.

My camera is set to spot metering and I pick an area of the scene to meter against and therefore influence the exposure. In bright sunlight, I might meter on the subject’s light coloured jacket to reduce the effects of the bright sun. At an event, I am likely to meter near to the ground to elevate overall exposure. Less commonly, and for balanced light situations, I will meter against the subject’s face. You will become more practiced with reading light levels and metering to control your exposures.

Don’t be fooled into thinking Auto White Balance will save your scene. Also, shooting RAW affords you the maximum dynamic range your camera is capable of and, though White Balance is an attribute, you still need to consciously set it. Carry white balance cards and custom white balance!

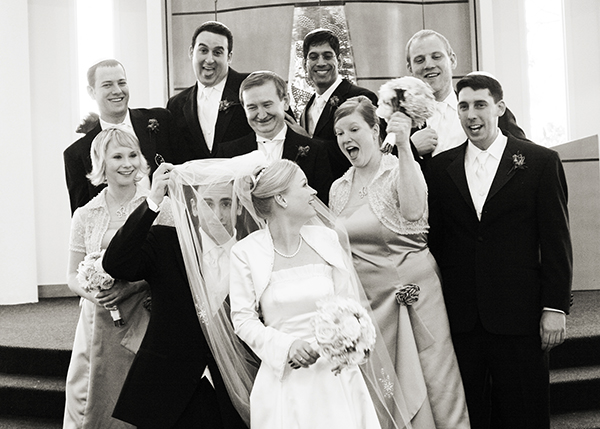
One final suggestion. Shoot RAW and set your camera to Black & White. Reviewing your images in monochrome will allow you to view only the luminosity in the scene and see where the light play is. You can set your image back to its original colour at a later stage.

Where would your photography be without light?! There are so many situations to which only practise reveals the solution, so please discuss available light questions and issues in the comments and I will do my best to answer.

The post Finding and Working with Available Light by Michael Walker-Toye appeared first on Digital Photography School.


Digital Photography School

 
Comments Off on Finding and Working with Available Light

Posted in Photography


Understanding and Working With Natural Light to Get Stellar Pictures Every Time

24 Mar

Understanding the different forms of light is one of the keys to achieving good photographs, as photography is all about light. For most photographers, the most available light, the one that is free, is natural light. To learn how to get the most of natural light requires a lot of observing and practicing, but once you understand how to work Continue Reading

The post Understanding and Working With Natural Light to Get Stellar Pictures Every Time appeared first on Photodoto.


Photodoto

 
Comments Off on Understanding and Working With Natural Light to Get Stellar Pictures Every Time

Posted in Photography


Techniques for Working Textures Into Your Photography

12 Jan

Textured-purple-flower-600
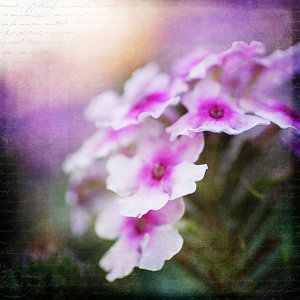
Where do you begin when you are considering using textures in your photography? I suggest you begin with the absolute best photo possible. Adding a texture to a bad photo does not make it a good photo. You want to make sure you have it exposed correctly, composed well, have a clear subject and not too much in the competing in the background competing. Textures work best with photos that are not too busy to start. Once I have chosen the photo I am going to work with, I do all of my edits before I add the texture, including adjusting the colors and sharpening.

In this article I’ll share some of my techniques for working textures into your photography.

Sharpening your image

You want to sharpen your photo before you add the texture. This is so that your subject is sharp and the texture isn’t over sharpened compared to the subject. You want the texture to enhance your photo, not compete with it. When I sharpen the photo I use the high pass filter as opposed to the unsharp mask. I like this method best because it defines and clears up all the edges of your subject without over-sharpening all the fill areas. Below is how I do this and the settings:

  1. Duplicate your background layer and while that duplicate copy is still highlighted, go up to the Filter menu and select: Other > Highpass filter
  2. Set the filter radius between 6 and 10 pixels (or higher) depending upon how sharp you need to have your photo, but be careful not to over sharpen.
    Sharpening highpass pop up
  3. Next change the blending mode of this layer to “Softlight” or “Overlay”. Overlay is stronger than Softlight, so test out each option to see what works best for your image.
Textured-yellow-flower-600

Finished image with texture and vintage paper applied

Once I am finished adding my textures to the photo I might do a final sharpen at the end if needed.

How to erase texture and still retain tone, plus a few extras

Once you are finished with your edits and sharpening, you are ready to add the texture. One concern people have in adding texture is how to erase the texture from the subject without it being obvious. You wouldn’t want to have the face of a baby be texturized, for instance, but you would want the face to match the rest of the photo in color and tone.

5 Steps:

  1. Place the selected texture on your photo. Do this by going to: “File > Place” in the top menu. Then select the texture image you want to use. It opens up as a new layer on top of your photo, ready to resize. Do that, then I right click the texture layer and choose “rasterize”, so it will no longer be a Smart Object. Change the blend mode and opacity of the texture layer to suit your image, such as “Softlight” or “Overlay”. At this point you are just manipulating the texture and not worrying about erasing it yet.
  2. While the texture layer is still highlighted, there are a few techniques you can do to the layer before you move on. Adjust the levels, curves, and the saturation of the texture layer to make the texture more vivid or pronounced, but not more opaque. I work in Softlight mode a lot as it brings out some of the texture without changing the mode.Levels curves saturation
  3. Once you are happy with the way the texture is working with the image, duplicate the texture layer and apply a Gaussian blur set to about 60 pixels to the bottom texture layer so it gives you the exact tones of the texture. Get to the Gaussian blur box by going to “Filter > Blur > Gaussian blur”. Next, turn off the bottom layer that you just added the blur to.
    Gaussian blur
  4. Add a mask to the top layer. With a soft black brush, set to about 30% opacity, ybegin to brush off the texture in any areas where you don’t want it. By using a low opacity you can slowly build up the amount you are removing. If you remove too much simply change the brush to white ,and wipe some of the texture back on. Make sure while you are doing this that you have the mask box selected (it will have square brackets around it) not the image itself.Sharpening mask
  5. Once you are happy that the texture is removed from all the important areas – select the mask box, hold down “Shift + Alt” and drag the mask box from the top texture layer to the bottom texture layer. Now you have applied the mask to the blur layer, and you have inverted it at the same time. Turn that layer back on and you will notice the tone where you erased the texture has the same coloring as the rest of your photo.Sharpening finished

Using vintage papers in your photography

Working with vintage papers is another fun aspect of textures that you can use in your photography. I get vintage papers from several great sources including my own family documents from the mid 1800’s, flea markets, online searches, Etsy, etc. I have curated several collections on my website for sale if you don’t want to go through the trouble of searching for them yourself. I especially love vintage French papers because of their wonderful scripts, markings, and fancy headers.

Part One

Working with the vintage papers is the same as working with textures. Place the paper on your photo in the approximate location that you want to use it. You will notice in the sample that I have placed it on the top of the many textures I have used in this photo, but you can place it on any layer that you want, to get the look you are trying to achieve.

Textures vintage paper

Part Two

Next, adjust the layer using the darkening blending modes: darken, darker color, color burn, linear burn, and multiply. Experiment with them all to see which one works best on the photo. The goal is to make the paper part of the document disappear, and have just the writing remain. Then just adjust the opacity to suit your taste. You can add a mask to this layer if you want to strategically erase some of the text which I do quite often.

Vintage paper texture

Finished image

Finished image

I hope you will give some of these techniques a try whether you are new to textures or have been doing them for years. If you do, please share in the comments below!

Further reading on using textures in your photography:

  • How To Create Your Own Unique Textures and Apply Them To Your Photography
  • Textures Made Simple
  • How To Apply Textures To Your Photographs

The post Techniques for Working Textures Into Your Photography by Denise Love appeared first on Digital Photography School.


Digital Photography School

 
Comments Off on Techniques for Working Textures Into Your Photography

Posted in Photography


LEGO Hot Rod: 500,000-Piece Working Replica Runs on Air

21 Dec

[ By Steph in Technology & Vehicles & Mods. ]

LEGO Hot Rod 1

This hot rod might not be much faster than a bicycle, but the fact that it runs at all is extraordinary given that it’s made of 500,000 Lego bricks and is powered by air. Australian Steve Sammartino sent out a cryptic tweet asking potential investors to fund a mystery project costing $ 500 – $ ,1000, and the ‘Super Awesome Micro Project’ was the result.

LEGO Hot Rod 2

LEGO Hot Rod 3

Other than the Legos, the only components of the car are a set of tires, gauges and a load-bearing frame. Believe it or not, four orbital engines with 256 pistons entirely made with Legos propel the car with compressed air, getting it up to about 18 miles per hour.

LEGO Hot Rod 4

The car could potentially go faster than that, but the creators were afraid of a “Lego explosion.” It was built in Romania before being shipped to Australia for its debut on the road. “It’s a hot rod design, mainly because hot rods are cool,” they add. See it in action above.

Share on Facebook


[ By Steph in Technology & Vehicles & Mods. ]

[ WebUrbanist | Archives | Galleries | Privacy | TOS ]


WebUrbanist

 
Comments Off on LEGO Hot Rod: 500,000-Piece Working Replica Runs on Air

Posted in Creativity


Working with Off Camera Flash and TTL

18 Dec

Working with Off Camera Flash and TTL

To be able to create a portrait of someone is a wonderful experience. To do so in an interesting location is even better. To be able to make use of lighting techniques that allow your imaginative ideas to come to life and bring out the personality of the subject and the location environment… is where it really gets exciting!

Working with Off Camera & Remote Flash

Step one – analyze the natural light first

The natural, or ambient light, even though it may seem to be everywhere all at once, actually has the same qualities of direction, intensity, colour and softness that are so easily seen in studio conditions. Taking a moment to observe and think about these ambient light qualities is the first step in determining how you can best make use of additional lighting from off camera flash.

You might find it helpful to think of your location portrait setting as a clock or compass with your subject in the middle, and the camera and light sources arranged around the subject in a circular manner, through a 360 degree arc.

The first example below shows a natural light style portrait, with differing qualities of light on the subject and the background. The ambient light direction comes from slightly behind the subject, through the trees, without being too distinct, but enough to provide interest to the background.

005-Natural-Style-Portrait

Adding more light – main light placement moulds the portrait

The diagram below shows the lighting setup with the added a reflector and flash to our scene, in a circular arrangement with the subject in the centre. Light sources have been placed at 45 degree positions, relative to the subject and camera.

Working with Off Camera & Remote Flash

Working with Off Camera & Remote Flash

Strong lighting positions

On camera flash, is generally known to be harsh and often not that interesting, similarly, light sources from directly from behind and the side are equally strong and not used that often for traditional portraits. These positions of 0, 90, 180 and 270 degrees are shown in the diagram below. These are not “bad” light setups, you can consider them “strong style” positions that are not as flexible to make use of, so they are used less often than more “desirable” lighting setups.

Working with Off Camera & Remote Flash

007-Athlete-Portrait-Harsh-Light

Working with Off Camera & Remote Flash

Adjusting lighting positions

Between these hard angle positions is where you want to position your primary or “Main” light sources. Doing so allows you to shape our subject with light in a natural manner and provides a more flexible set so that your subject can easily adjust their pose without “missing” the light. This is more comfortable setup for the photographer and will almost always provide more pleasing results of the subject. Photographs become more interesting as there is now more definition provided by the presence of highlights and shadows, which are also easier to control when working with this setup (003)

Working with Off Camera & Remote Flash

Adding secondary lights or reflectors

Once you have identified your ambient light conditions, and placed your main light source, you can now determine where to best place your accent lighting with additional flashes or reflectors. These lights provide enhanced interest to the image, by bringing out the subtleties of texture, colour and form. Placing them too close to your primary light will cause them to wash out each other, so remember the desirable angles created by our light compass earlier. When you think of the compass, you’ll want to have your additional light sources at least 90 degrees away from each other. This allows them to be effective on their own, without overlapping the other lights and losing their intended effect.

Working with Off Camera & Remote Flash

Accent lights are always positioned relative to the main light and tend to provide the feeling of a skimmed light back to the camera. This is the most effective way to enhance the creative style within an image, and is surprisingly easy to do now that you understand how the lights work with each other, and how you can arrange them to work best with your subject and where you position your camera.

Working with Off Camera & Remote Flash

Working with Off Camera & Remote Flash

Working with Off Camera & Remote Flash

Working with Off Camera & Remote Flash

TIP 1: To gain even more flexibility with outdoor flash, make use of the High Speed Sync feature, which will allow you to use shutter speeds that go beyond the traditional limits of 1/125th or 1/250th. Look to your camera manual for setting that up, so you can use speeds up to 1/8000th , it really works!.

It may seem intimidating, but controlling the off camera flashes can actually be very easy, surprisingly intuitive, and very effective. Nikon have their way of remotely controlling the settings of their flashes, with their Creative Lighting System (CLS) using highly accurate Through The Lens (TTL) metering. You can use a separate flash on camera as the “Master” to control the Remotes, or even use the camera’s built-in pop up flash in “Commander Mode”. You can adjust the flash output, so the light portion doesn’t affect your image, or use it as additional fill. Nikon has a separate controller as well, called the SU-800. At half the price, it’s like a flash, but without the actual flash head.

Canon has their equivalent versions available, and other manufactures also enable TTL options. These controls take the fear and pain out of the remote flash experience. Controlling the remote flashes can be as simple as deciding you want more or less light output, then bumping the dial up or down from the camera location.

Tip 2: Setting your camera to under-expose the natural light by one or two steps, allows your flashes to take over the look of the image and dominate the lighting conditions.

You can set your camera Manually or use Aperture Priority, either way the camera will “talk to the flash” to calculate the correct flash exposures as they appear in camera, on the sensor. With the internal technology that works so well, the simple camera and flash setups do the work, so you don’t have to.

Yes, it can be that simple!

More example images and diagrams

013-Executive-Indoor-Portrait

Working with Off Camera & Remote Flash

Working with Off Camera & Remote Flash

Working with Off Camera & Remote Flash

The post Working with Off Camera Flash and TTL by Craig Minielly appeared first on Digital Photography School.


Digital Photography School

 
Comments Off on Working with Off Camera Flash and TTL

Posted in Photography


Working with a Second Shooter – Legal Ins and Outs

23 Nov

The Importance of Being or Having a Second Shooter

second-shooter-event-photography-02

If you have ever done any kind event photography, weddings in particular, you already know how important it is to hire a second shooter. You’re trying to adequately photograph hundreds of people, often in multiple locations in the same venue. You’re good, but you’ve yet to master the finer points of time travel and being in two places at once. Similarly, if you’re still looking for your way into professional event photography, you already know how important it is to be a second shooter. This is your chance to learn from someone who has already walked in your footsteps. It is the opportunity to hone your skills, connect with a mentor, establish relationships, and start building your portfolio.

Ownership of the Images

But who owns the second shooter’s photographs?

Common sense would dictate that if I am contracted to shoot an event, all of the photos taken by me or anyone working for me fall under my copyright, and therefore belong to Guyer Photography. One of the main things I learned in 14 years of practicing law, however, is that contractual situations are rarely ever common, and are often devoid of sense.

“Whoa. Hold On. Did you just say, ‘contract?’”

Yes, but relax, we’ll come back to that in a minute.

For now, it’s important to know that copyright law makes two facts abundantly, and undeniably clear. First, an image is copyrighted from the moment the shutter clicks. I’m not going to get into copyright registration  in this article, except to say that registration is not necessary for copyright protection to take effect. Compose, focus, click, done. Copyright protection. That’s it. Just like magic. It is the second fact, though, that creates a potential problem for photographers and their second shooters. Not only does the copyright spring to life  at the very moment of capture, but the copyright actually belongs to the photographer who presses the button.

I’m going to go get myself a snack while you ponder the ramifications of that point.

guyer-photography-second-shooter-copyright-1

Okay, so by now you’re thinking about your images showing up on your second shooter’s website and the value of those images deflating like a hot air balloon in a thunder storm. But, have you also considered that if the second shooter owns the image they may also be able to prevent you from sharing, blogging, posting, tweeting, advertising, marketing, printing,  or doing anything with it other than passing it along to the client? There are so many ways that this copyright ownership technicality can take an otherwise great working relationship and turn it sideways if you aren’t careful. It’s a scary proposition, but it’s a minefield which can be easily avoided if you just take a few simple steps to protect yourself.

Put it in Writing

Most photographers who hire second shooters, do so on a job-by-job basis. They are there to do what you need them to do, when you need them to do it, but technically they are independent contractors, not employees. As such, having a contract in place is essential. A photography work for hire contract will cover everything from copyright and compensation, to confidentiality and liability.

Copyright – Retain It, But Be Fair

This is going to be the most important paragraph in the entire contract. Here is where the photographer stakes their claim to the copyright of all images taken by their second shooter in the course of photographing the event. The language must be clear that the photographer retains all copyrights associated with the second shooter’s images. If your contract contains nothing else, make sure it contains this copyright protection. Without it, it’s your second shooter who owns the images outright, not you.

This is also where the photographer may choose to outline what rights, if any, the second shooter has to those images. I may choose, for instance, to allow the second shooter to use his or her photos in a print portfolio but not on a website. Or, I might tell them they can have unrestricted use of the images, but not until six months after the wedding date. Another option might be to let them use the images on their website, as long as it bears a credit line that reads “Photographed for Guyer Photography.” You can come up with any set of conditions you feel to be reasonable, but you are also well within your rights to explicitly state that they cannot use the photos ever, for any reason. Obviously, this is an extreme example and I do not recommend it. A good second shooter works hard and should have something to show for it.  They also have their own communities in which they share their experiences and opinions. If word gets out that you aren’t letting your second shooters use their images, good luck finding any who want to work with you down the road.

You are in business for a reason, and giving away your copyright is not that reason. As outlined below, there are other important elements to the contract, but getting the ownership question answered early and clearly is crucial to the survival of your business.

guyer-photography-second-shooter-copyright-2

The Relationship

It is important to clearly state that the second shooter is not an employee, but an independent contractor. If they are an employee, you could be responsible for liability issues, as well as insurance and taxes. Any one of these could push you into a variety of financial pitfalls. Be clear, and spell it out. Leaving it open to interpretation will only lead to headaches down the road.

Compensation

This is pretty basic. You have to make sure that the contract properly reflects whatever compensation you’ve negotiated with your second shooter. Be specific. If you are paying them a flat rate for the entire job, indicate that in the contract. If you are paying them hourly, make it clear what the rate is and how many hours you plan to cover, as well as an agreed-upon rate for overtime. Events rarely stick to a schedule and often run longer than expected. If you are contractually bound to pay for six hours, plan for what happens when the reception is still going strong at six and a half hours. You don’t want to be negotiating this while you’re waiting to get the shot of the bride and groom leaving. This is also the section of the contract where you need to cover expenses like parking, meals, travel, etc.

Gear

This is the perfect place to spell out what gear you expect your second shooters to have with them when they show up at the venue. Whenever I hire a new second shooter, one of the first things I do is email them a complete list of my gear and ask them to send me a complete list of theirs. By detailing what is expected of them up front, I avoid unpleasant surprises on the day of the wedding.

Delivery Schedule

Some photographers put delivery schedule in the contract, and some don’t. I put it in, not because I feel the need to tell you how much time you have to get your images to me after the event, but to make sure you understand that I will hide your car keys in the bushes if need be to ensure you go absolutely nowhere before clearing your memory cards onto my laptop. I realize this comes off a bit harsh, but there are practical reasons behind it. First, I was burned once and had to refund an entire wedding because the second shooter lost an important memory card. Second, unless the second shooter is going to be editing the images, there’s really no reason to wait.

second-shooter-event-photography-01

Liability

As long as you’re getting everything else in writing, why not take a few lines to address what happens when your second shooter breaks your equipment, or gets broken himself. What unforeseen expenses are you willing to take on and which will you make certain he understands are his personal responsibility?  If you don’t deal with it as a possibility in the contract, it will be too late to deal with it as a reality in the emergency room.

Confidentiality and Non-Compete Clauses

I was extremely lucky when I started out in this business. I found amazing photographers who were generous with their time, knowledge, and gear. I believe in giving back and paying it forward. If you work for me as an assistant or second shooter there is virtually nothing I won’t share with you. I’ll answer your questions, make suggestions, offer critique, and tell all my friends about you, to help get you more work. I’ll do all of that and more, right up until that moment when you break my confidence. My event is not the time or place for you to be handing out your freshly printed business cards. When you meet your friends for drinks after the job do not discuss my prices, my marketing materials, or even this contract. You’re looking for your place in this profession and I want to help. Look out for me and I’ll look out for you.

Ideally, you and your second shooter should be able to view this contract as a mere formality. If you can’t, you may not be right for each other. But if you can, the two of you could be on your way to a long, mutually beneficial relationship. Honest and open communication of expectations is an important two-way street. Nobody wants to train a new second shooter every time an event comes along. You want someone in your corner who has your back and knows how you want things done. As much as you may like and respect your second shooter, you both need to get on the same page and make sure that reasonable expectations are met, particularly and most importantly when it comes to ownership of the photos.


NOTE: The advice in this article and the accompanying sample contract is based on my experience as a professional photographer and does not constitute legal advice. While the principles discussed are widely applicable, every jurisdiction is different and you should consult a local attorney for specific legal advice. – JJG

Editors note: Please keep in mind this article is the writer’s opinion on how to handle this issue. I’m sure each photographer has a different approach to hiring second shooters. If you have any suggestions or comments please add them below and let’s have a discussion. 

Post originally from: Digital Photography Tips.

Check out our more Photography Tips at Photography Tips for Beginners, Portrait Photography Tips and Wedding Photography Tips.

Working with a Second Shooter – Legal Ins and Outs

The post Working with a Second Shooter – Legal Ins and Outs by Jeff Guyer appeared first on Digital Photography School.


Digital Photography School

 
Comments Off on Working with a Second Shooter – Legal Ins and Outs

Posted in Photography


Google working on Raw format for Android

20 Nov

TS520x0~cms_posts-7036618563-n5-device_0.jpg

It looks like Raw capability for Android is in development. After digging into the publicly-available application programming interface (API) for Android 4.4 Kitkat, code-reading sleuth Josh Brown made some observations on his Google+ page. ‘Looks like Google was working on a new Camera API, but it didn’t make the KitKat release’, he said. Learn more on connect.dpreview.com

News: Digital Photography Review (dpreview.com)

 
Comments Off on Google working on Raw format for Android

Posted in Uncategorized


Photoshop Basics: Working with Layers

05 Apr

Photoshop.  For photographers, web developers and graphic designers alike, its the go-to program for creating and editing professional grade graphics.  And like every beloved piece of software, it has to have a strong foundation to build upon; a base system that supports all other operations.  For Photoshop, it’s layers. Operations we describe here are performed using Adobe Photoshop CS5, but Continue Reading

The post Photoshop Basics: Working with Layers appeared first on Photodoto.


Photodoto

 
Comments Off on Photoshop Basics: Working with Layers

Posted in Photography


A Simple Exercise on Working with Natural Light in Portraits

01 Apr

Today I thought it might be fun to share a little exercise that we feature in our Natural Light eBook (by Mitchell Kanashkevich) – both because it gives you a taste for the content but also because I think it’s a useful exercise to do to help you understand light and photograph portraits using it.

This exercise is particularly useful because one of the differences in shooting with natural light as opposed to artificial light is that with artificial light you’re able to ‘direct’ the light (by moving lights around your subject and changing how much those lights output).

When it comes to working with natural light we need to learn to direct ourselves and/or the subject in relation to the light source.

Rather than moving lights around… it is us (and the subject) that may need to be moved.

The exercise is simple:

Find a room with a window allowing fairly bright diffused (indirect) light.

Get your subject to move to different spots in relation to the window. Move around with the subject, take photos, and pay attention to what effect the movement of both of you has on the way that light makes the subject look.

For the eBook Mitchell did this exercise with his nephew. Below are the images and corresponding diagrams of where the subject was in relation to the window and below are descriptions of the shots, EXIF information and what Mitchell did and what impact that had on the shot.

3 directions window light

1. The subject is turned at approximately 45° towards the window.

Result: A very smooth progression of light to dark tones.

EXIF: 16-35@35mm, f/2.8, 1/125s, ISO 2000

2. Subject is at 90° or parallel to the window.

Result: Very harsh contrast between the side of the face close to the window and the side further away from the window.

EXIF: 16-35@35mm, f/2.8, 1/200s, ISO 500

3. The subject is at 90°, parallel to the window, with his head turned towards it.

Result: Light still works the same way, but instead of one side of the face being dark, the face is well lit and it is the back of my nephew’s head which is dark.

EXIF: 16-35@35mm, f/2.8, 1/125s, ISO 500

Mitchell also notes: Having a light source such as a window also gives you control over the intensity of light. The further away you are from the light source, the less intense it is. Less
intensity also means less contrast between light and dark.

I did this exercise recently with a family member and was fascinated with the results and was also reminded what an incredible variety of styles of shots that you can achieve – all in the one setting but by simply changing up where you position yourself and your subject.

Give the exercise a go and let us know how you go!

Get more exercises and teaching like this from Mitchell in his Natural Light eBook.

Post originally from: Digital Photography Tips.

Check out our more Photography Tips at Photography Tips for Beginners, Portrait Photography Tips and Wedding Photography Tips.

A Simple Exercise on Working with Natural Light in Portraits


Digital Photography School

 
Comments Off on A Simple Exercise on Working with Natural Light in Portraits

Posted in Photography


8 Tips for Working with Models Every Photographer Should Know

27 Feb

Photographing people often requires a completely different bag of tricks comparedto photographing landscapes or static objects. As someone who personally loves taking candid shots, it’s taken me a lot of practice to get used to working with models in such a way that I get the perfect look and feel I want for my photo shoots every time. If you’re Continue Reading

The post 8 Tips for Working with Models Every Photographer Should Know appeared first on Photodoto.


Photodoto

 
Comments Off on 8 Tips for Working with Models Every Photographer Should Know

Posted in Photography