Whether the Oscars inspired you to shoot like the greats, or displeased you to the point of “I could do better,” NOW is the time to step up your video shootin’ game!
Take up your trusty DSLR, a Focus Shifter, the Oh! Wow. Ring Light and start writing that acceptance speech.
The Oh! Wow. Ring Light surrounds your lens in LEDs that provide even light at three brightness settings. It has a constant mode (perfect for videos) and also flash mode for stills.
The Focus Shifter fits snug on any lens, giving you a handle for max control of your focus ring and a marker board to set your focus points before you shoot.
Just don’t forget to thank the Academy, your mom and Photojojo. 🙂
See more example pix from our Ring Light
$ 99 at the Photojojo Shop
Learn More about the Focus Shifter
$ 49 at the Photojojo Shop
So you want to take pictures; or do you want to be a photographer? I deal with a strikingly similar question every time I swing a golf club; I want to be a golfer, but with life events and time constraints the reality is I merely play golf. Fortunately, making a great photo doesn’t consume the amount of time 18 holes does and since you’re here reading this, it’s safe to say you want to be a photographer.
WHAT TO PHOTOGRAPH?
Portraits, landscapes, sports, oh my! As a new photographer it is incredibly tempting to photograph everything, and that’s a good thing as it will help you understand where your true passion lies. However, I am a firm believer that early success leads to more success.
Let me say that again – early success leads to more success.
As a new photographer there is no better feeling than capturing a truly excellent photo; and if you’re anything like me, time is very limited. Luckily with a simple understanding of light, your home is a great place to create stunning photos.
All of the photos in this article were shot in my home. I do not have a home studio, and as I mentioned earlier, I also have little spare time; but that’s ok because you don’t need either to make great photos. The photos of the tulip and baseball were shot with a cheap piece of white poster board and available light from a window.
USING WINDOW LIGHT
While there are no “essentials” to creating great photos with available light from a widow, I always use a tripod and would highly recommend one. However, if you do not have a tripod, you’ll need to raise the ISO to increase your shutter speed if you plan to hand-hold your camera. A generic rule of thumb is you’ll need a shutter speed of 1 divided by the focal length of your lens. For example, I used a 100mm lens for the tulip, and shot it at f/16 and an 8 second exposure. If I did not have a tripod, I would have had to increase the ISO (and realistically open the aperture as well) until I had a shutter speed of 1/100 (because I was using a 100mm lens) to keep the image sharp; but since I was making use of a tripod, an 8 second exposure was no problem.
There are endless opportunities for photography with available window light. Again, you could certainly hold your camera if you raised the ISO, but I would suggest the following as rough guidelines for photographing next to a window:
Use a tripod, or raise your ISO until the shutter speed is 1 / the focal length of your lens
If using a tripod, set your ISO as low as possible
Set your camera to manual mode and the aperture to around f/11, then adjust the exposure via shutter speed from there
For a clean seamless background, such as the baseball photo here, grab a cheap piece or poster board from the school or office supply aisle at your favourite box store.
What do you do once you’re bored shooting next to the window, or want to learn something more? Stay at home of course!
WHAT’S NEXT? LEARN ABOUT LIGHT
There’s plenty of room to grow with your photography in the house. After all, what’s the underlying foundation of photography? Light! Even if you don’t have a flash you can still learn about lighting at home. Don’t have an off camera flash? No problem, I bet you have a flashlight! I created the photo of the kiwi fruit in a bathroom with the lights off and a flashlight lighting the fruit from behind.
I would take a photo, look at it on the camera’s LCD, and then adjust the angle of light from there. So what if I spent an abnormal amount of time in a dark bathroom by myself, and got strange looks from my wife. I learned a lot about how the position of the light effects the look of the photo, and made a cool photo!
Bottom line, you don’t need a flash to learn lighting and take a great photo, all you need is a dark room (very dark, as in no light at all) and a flashlight.
USING FLASH
So what about flash? I think using flash in photos is the key to creating photos that stand out from the rest. If you have a speedlite or other hot shoe flash, the best thing you can do to take your photography to the next level is learn to use it. After that, the next best thing you can do is take it off the camera when you use it. The photo of the little yellow guy smiling and the red silhouette of the golfer were both shot using off camera flash, and aside from a few tweaks in post processing, they look very close to what was produced in the camera with help from the flash. Once you understand about positioning and light fall off, you’ll be able to manipulate the light in such a way that creates great photos right in the camera.
The point being here, and something you’ll learn either in due time, or right now as I tell you, all great photos have one thing in common: great light. Whether you use light from a window, a flash, or light from something as simple as a flashlight – there are numerous ways you can get great light right in the comfort of your own home.
To recap, here’s what I used in the photos:
Flower and baseball- window light, white poster board, and a tripod
Kiwi fruit- tripod and a flashlight
Golfer – single off camera speedlite with a red gel fired into a seamless paper
Little yellow smiling guy – white seamless paper, and a single off camera flash handheld above and to the left of the camera
Once you create one photo with great light at home, I guarantee you will be hooked! Best of luck to you, now go shoot!
The post How to Create Great Photos without Leaving Home by Brian Barthel appeared first on Digital Photography School.
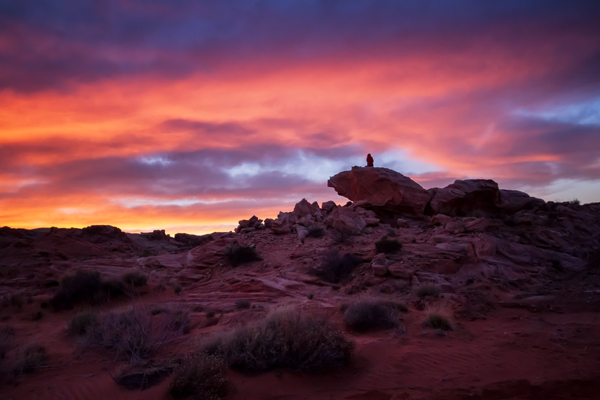
A tripod is my most valuable photo accessory. In fact, I view it as an essential item, and not an accessory. But sometimes using one is just not practical. Sometimes you get caught without it unexpectedly, and sometimes they even break. It’s good to know what to do in these situations so you don’t miss any photo opportunities.
While shooting in the Valley of Fire, Nevada, I broke my tripod. Of course, there was a spectacular sunset that night. I was able to make this photo by increasing my ISO to 2000 and using a wide aperture of f/5.0 (the widest aperture for the lens I was using) when normally I would have used a much small aperture for this scene.
If you don’t have your tripod with you, or you’re trying to make do without one, you still have some options for low-light photography.
1. Use a wide aperture
If you want to handhold your camera in low light, you’ll have to work with a wide aperture, a high ISO, or both. Often landscape photographers want to use a small aperture such as f/18 to get maximum depth of field, but that isn’t practical for low light situations. Instead, use your camera’s widest aperture (the smallest f number) and focus on the most important feature in the frame.
Most standard kit lenses don’t perform very well in the dark, so if you do a lot of this type of photography, consider picking up a simple 50mm f/1.8 lens; nearly every brand has a cheap one and they’re well worth it for their sharpness and low-light capability. The maximum aperture of f/1.8 is a full 3.5 stops (lets in 12x more light!) wider than a standard 18-55mm kit lens at the same focal length.
2. Use Image Stabilization
The rule of thumb for shutter speed is that if you want a sharp image, the shutter speed should be no slower than the same fraction as your focal length – that is, if you’re using a 50mm lens, set your shutter speed to 1/50 second. However, if your lens has image stabilization, the shutter value can be two or three stops slower than this. This leeway makes a big difference in low light situations.
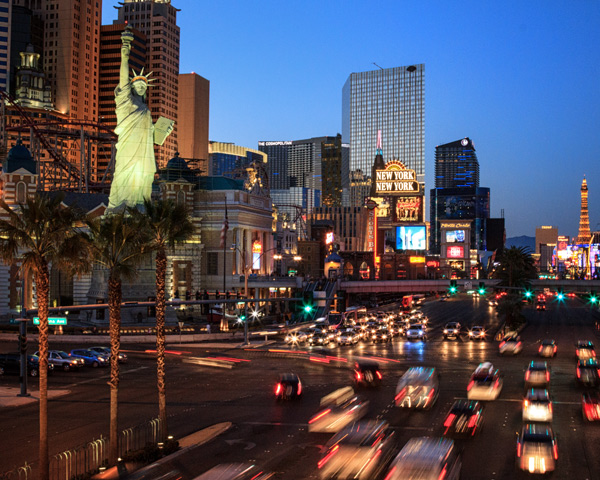
3. Use proper camera holding techniques
In low light photography, learning the proper stance and camera holding technique can give you even more leeway when it comes to preventing camera shake. It’s all about stability – plant your feet firmly, about shoulder width apart. With your right hand on the shutter button, hold the lens with your left hand, to steady it. Tuck your elbows tightly into your chest and control your breathing, shooting after you exhale whenever possible. All these things will contribute to your own stillness, minimizing handshake blur.
In Las Vegas, I wanted to make an image with a fairly long shutter speed to blur the motion of the cars. However, I was standing on a bridge that had a chain link fence, and it was also a narrow pedestrian bridge with lots of pedestrians. Using a tripod was not practical. Instead using ISO 1250 and proper camera holding techniques allowed me to hold it steady for half a second.
3. Use a high ISO setting
ISO refers to the level of light sensitivity of your camera. The higher the ISO the more sensitive the sensor is to light, therefore the less light is needed to make a good exposure. The downside is that the higher the ISO, the more “noise” you will find in your image. Noise is a grainy look as opposed to a smooth look. Some noise is okay and it can often be removed in post processing.
When photographing in low light, turn your ISO up as high as you can before the image quality gets too noisy. This setting is different on every camera and an acceptable amount of noise is different for every photographer.
I recommend that you do an exercise so you know the maximum ISO for your camera, that results in a noise level you think is acceptable. Take the same shot at a number of different ISO settings and when you view the photos on your computer later (view at 100% size or 1:1), you will see at what point image quality begins to deteriorate. With today’s cameras this point is probably higher than you might think. Often with ISO 800 or 1600 you will see some noise, but not so much that you can’t fix it in post processing. It’s a good idea to try this exercise both in good light, and low light situations.
Photographing Canada Geese flying overhead at twilight meant that I needed a relatively fast shutter speed to stop the motion. Therefore, I had to use a high ISO and a wide aperture to enable the faster shutter speed. This image was made at ISO 1600, f/4.5 1/200 second.
Noise is not necessarily a bad thing and can be used for creative purposes. If you are using a very high ISO, try shooting in black and white – it removes the colour from the noise and instead gives your photos an old-school grainy look.
Some of the most beautiful landscape photographs are made in low light, so learning these techniques will help you take advantage of low light opportunities and get that great shot even when you don’t have a tripod.
Further reading on low-light photography:
A guide to outdoor low-light photography
Better low-light photos without a flash
15 tips for low light landscape photography
The post Low Light Photography: How to Shoot Without a Tripod by Anne McKinnell appeared first on Digital Photography School.
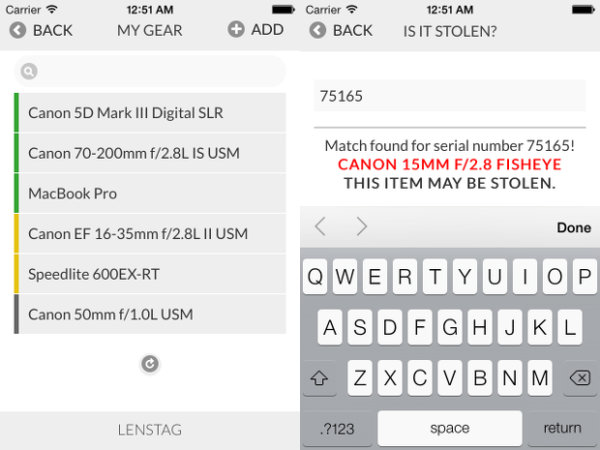
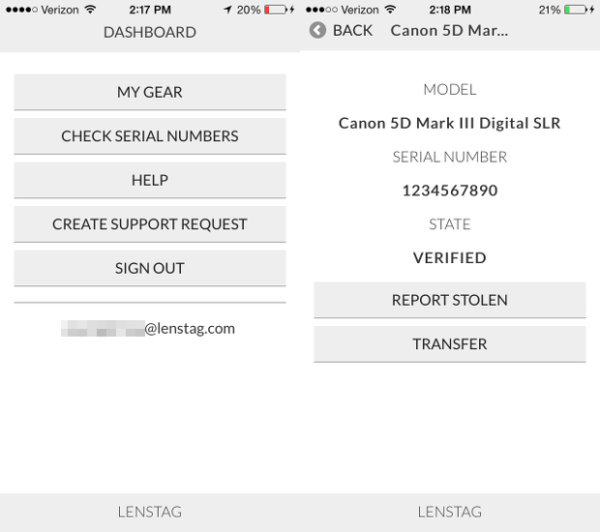
Lenstag is a recently-launched, free online service for iOS, Android, and the web that records the serial numbers of your lenses, cameras, flashes, laptops and anything else in a secure, private registry before they are stolen.
If one or more of your items disappear, you can immediately flag the missing items as stolen which creates a public web page, quickly indexed by search engines. The serial number is then discoverable by a single Google search (example: ’75165 lenstag’) or by checking the Lenstag apps. Thanks to Lenstag’s growing relationships with the pawn shop industry and law enforcement, the exchange of money for that stolen item becomes much more difficult akin to trying to sell a stolen vehicle. The idea behind this service is that if everyone gets into the habit of checking serials numbers online before purchasing used equipment, it will become harder and harder over time to peddle hot items and thieves will get arrested when they try to pawn them. Think of it like a DMV for camera equipment. The more people who register their gear, the more effective the registry system becomes.
By locking down a particular serial number as belonging to you, the reselling and pawning of that stolen item becomes discouraged. Serial #s on Lenstag, marked as stolen, are indexed online.
There is currently no foolproof way to prevent potentially having all of your gear stolen, even if your equipment never leaves your home. Insurance can protect you financially, but you permanently lose your original items and any images or video stored on them. There is no guarantee Lenstag can get your original items back either, but with Lenstag there is a chance that only increases with time.
The more serial numbers that get checked prior to purchase on the used market, the safer everyone’s gear becomes.
With Lenstag, you have a centrally-located place to store all of your serial numbers. They can be easily transferred to another Lenstag user if you decide to sell your gear. Your serial logs are date marked. This is handy if you ever need, for whatever reason, to prove that you have owned a certain piece of gear for at least as long as it has been registered. You can make your gear lists public as well. This is handy for showing clients what you own or for resource planning with collaborators.
Transfer serials, share gear lists with others, or prove what you own via an clear-cut dashboard.
You should use Lenstag if?
You don’t have any insurance. This service is free and is better than having absolutely no protection at all.
You already have insurance but want just a little extra peace of mind.
You collaborate with other photographers a lot or work with clients who need to know what equipment you are using.
You, for whatever reason, need to prove you own something without having to carry around a bunch of receipts or registration cards.
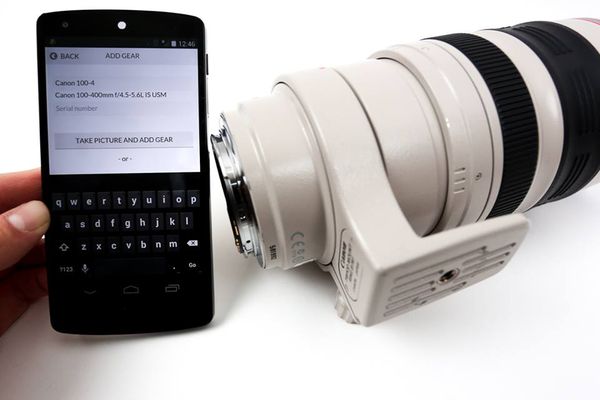
You buy a lot of used gear. You don’t have to be a Lenstag user to check a serial # but having the app on-hand for checking makes the process very easy. You can also use Lenstag’s text-to-check feature by texting the serial number in question to +1-415-749-9808. This works regardless of whether or not you’re registered on Lenstag.
Text to check a serial in question, regardless of whether or not you are registered on Lenstag.
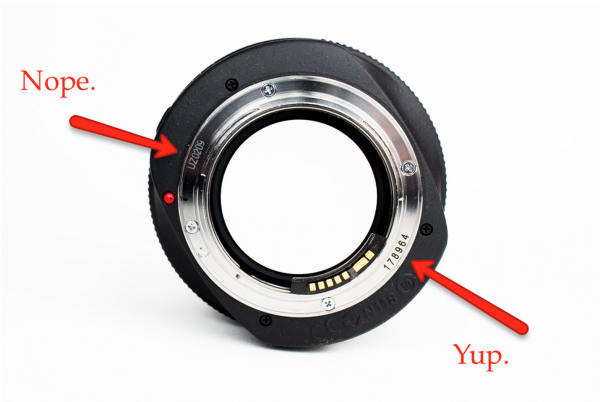
Lenstag is used by all three of the major rental houses in the United States: BorrowLenses.com, LensRentals.com, and LensProToGo.com. It is currently being used in over 150 countries worldwide. Uploading an image of your item is quick and helps discourage theft one indexed serial at a time. Be sure your serial # is visible on your item when taking its picture for inclusion in your personal registry.
Not every number on your lens is a serial. Be sure you are reading the right thing.
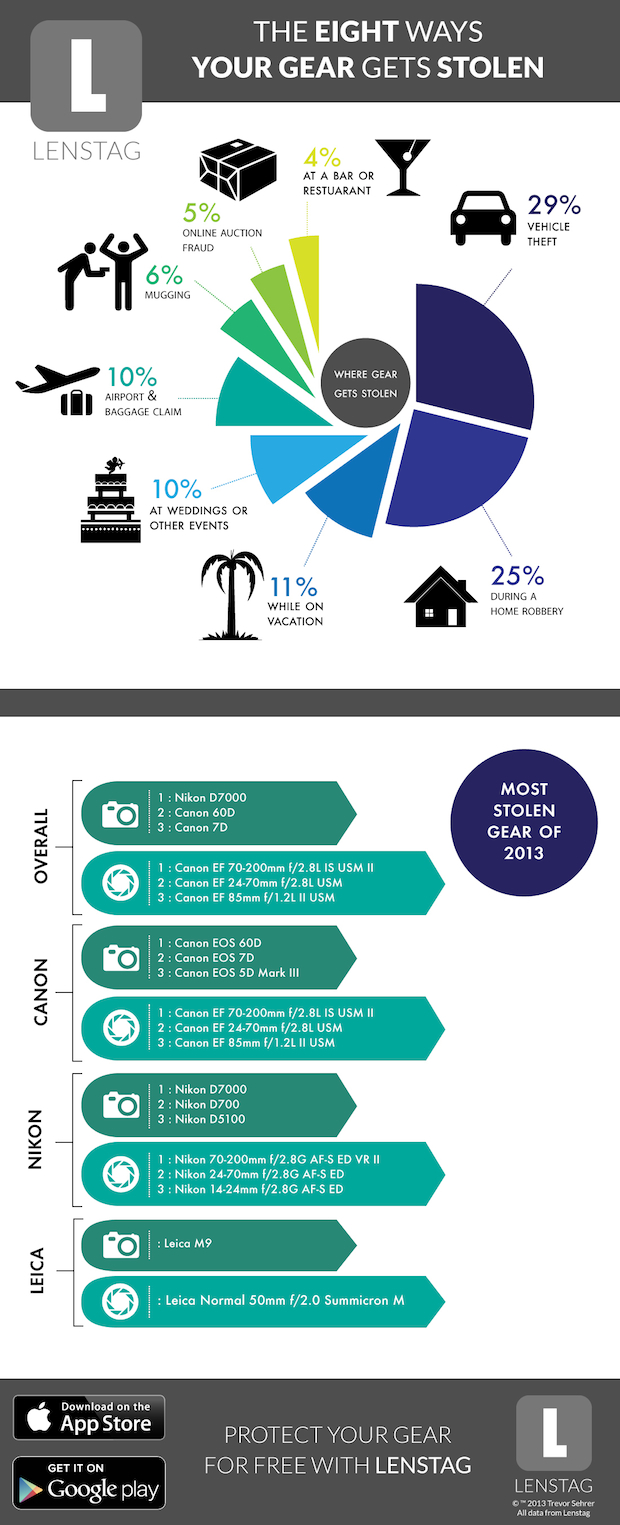
Want to know how gear gets stolen the most? The results may surprise you. Lenstag took the stats of its reported serials to learn the most common ways gear got stolen in 2013, along with the most commonly stolen models.
Don’t leave it behind! You’re most likely to have items taken from your car.
How to use & find Lenstag
Lenstag can be download for iOS and Android. You can also use their service via their desktop site.
The post Lenstag: a World Without Camera Theft by Jim Goldstein appeared first on Digital Photography School.
This is something I get asked about a lot, and its inclusion on the site is far overdue. The following is a list of gear in which I have complete confidence, and would recommend wholeheartedly to any photographer.
The Without Reservation list will be kept up to date going forward, so these are all subject to change at some point in the future. But as of now, this is the go-to gear that I rely upon day in and day out.
Adobe has released version 12 of its Photoshop Elements software for Mac and Windows. One of the highlights of the latest version of this consumer-friendly photo editor is ‘Mobile Access’, which uses Adobe’s Revel cloud service to let users view and retouch photos on their mobile devices, keeping everything in sync. Other new features include ‘Content-Aware Move’, guided editors, and 64-bit support for Macs. Best of all, there’s no monthly subscription fee. Read on to learn more about Elements 12, and if it may be a good substitute for its big brother.
I don’t know a single photographer who would think a Canon L lens-shaped coffee cup is something not absolutely amazing! Today, web stores are packed with mobile photography accessories you could only imagine: Camera-resembling iPhone cases, camera-shaped keychains, various photo-filters and hotshoe mounted levels. All of them arouse the “I-want-it-now” feeling and make your hand click the “Add-to-cart” button without Continue Reading
The post 5 Mobile Photography Accessories You Will Never Leave Your Home Without appeared first on Photodoto.
Good photographers learn to work within the limitations of their equipment and learn to cope with scenes where the brightness range is too great for the camera’s sensor to handle. Here are some ideas for you to explore – and none of them involve HDR techniques.
1. Look at the light
I suspect the reason that most photographers are attracted to HDR photography is because they like the look of the high contrast, super saturated images you often see created with this technique. It’s not really about capturing every detail of a high contrast subject.
Look at the light instead. If you are shooting a landscape or architectural study, and the brightness range of the scene is too much for your camera to handle, you are most likely shooting in the wrong light for the subject. Wait until the sun is lower in the sky and the light is softer. The quality of the light will be better, the brightness range will be less, and the photo will be better.
2. Let shadows go dark
You don’t have to see into the shadows. Let them go dark. If the brightness is too bright, expose for the highlights (i.e make sure the camera captures all highlight detail) and let the shadows go where they will. It won’t work all the time – sometimes you just need better light (see tip one). But exposing for the highlights and letting the shadows go dark is a good exercise in observation and creating images. Work with the light to create graphic images, not against it.
You can take this even further in post-processing. Photographers Eduardo Izquierdo and Tom Hoops both deliberately make dark backgrounds in their portraits darker or even black so that the viewer’s attention goes straight to the model, without distractions. Maybe it’s time for a low dynamic range setting on our cameras?
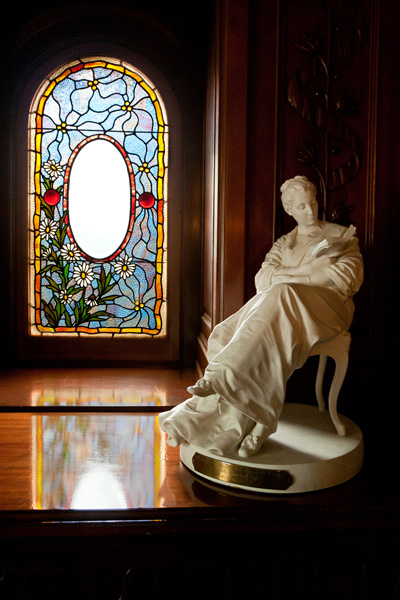
3. Exposure blending
Sometimes you will come across a scene like the one above where the brightness range is too much for your camera but the quality of the light is good. The issue here is the difference in brightness between the light coming through the window and the light illuminating the interior of the building. If you expose for the interior, the window will burn out. If you expose for the window, you won’t get much detail in the interior.
So what do you do if you want good detail in both? The answer is to take two separate exposures, as in the examples above, and blend them in Photoshop. Ideally the camera should be on a tripod so that the images match exactly, but I was able to do that with the above photos even though they were hand-held and slightly out of register:
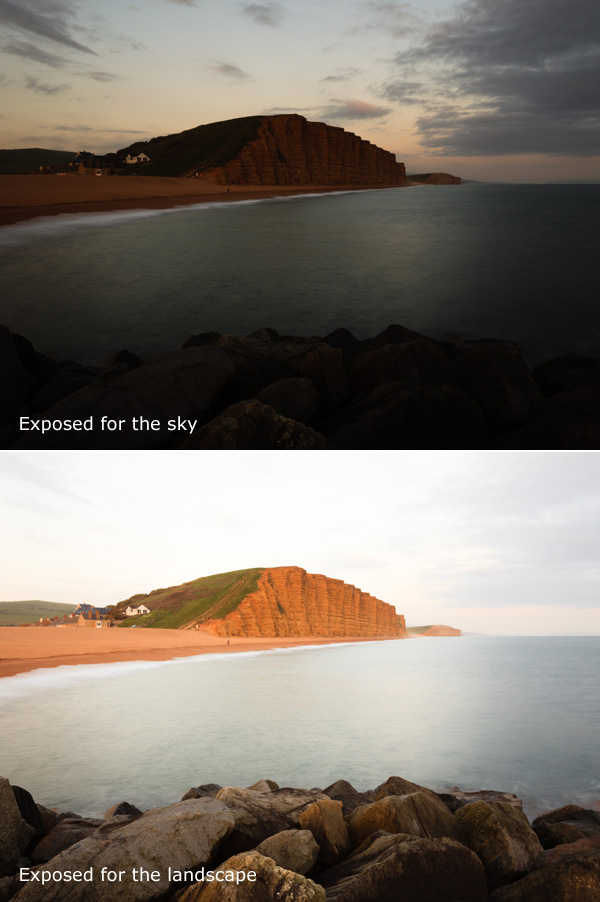
4. Exposure blending in the landscape
Landscapes are another area where you may have good quality of light, but the brightness range is still too great for your camera. That’s because the sky is often much brighter than the landscape itself. You may also want to make the sky darker for dramatic effect (as well as to capture more detail).
One solution is to use a neutral density graduated filter; a square or rectangular filter that is clear at the bottom and dark at the top that clips into a holder screwed onto the front of your lens. You move it up or down so that the dark half blocks some of the light from the sky and effectively reduces the brightness range of the scene.
Grads are great, but they’re not perfect. They work well when the horizon is a straight line across the photo, but badly if it has an irregular shape. Good quality grads are expensive, and cheap ones may give your sky a magenta colour cast.
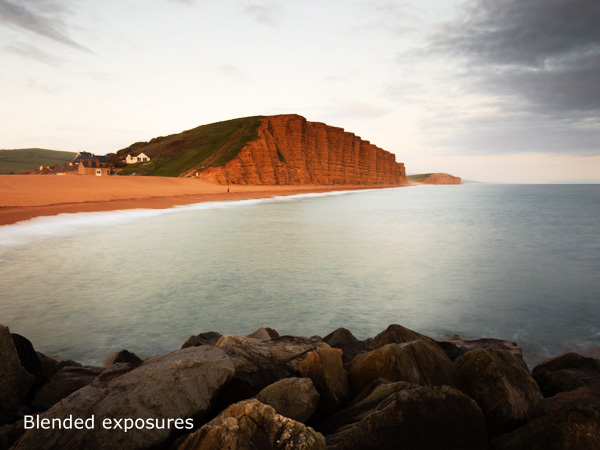
Exposure blending resolves those issues. Just like the previous example, you need to take two photos – one exposed for the sky, and the other for the landscape itself:
Then you can blend the two together in Photoshop. The idea is to create a blend that looks natural to the eye, so that means making sure the sky isn’t too dark, or that the landscape isn’t too light, otherwise it won’t look right. You end up with something like this:
The Photoshop techniques used for this can get quite involved. Christopher O’Donnell has written a good article about it here.
Mastering Photography
My latest ebook, Mastering Photography: A Beginner’s Guide to Using Digital Cameras introduces you to digital photography and helps you make the most out of your digital cameras. It covers concepts such as lighting and composition as well as the camera settings you need to master to take photos like the ones in this article.
Post originally from: Digital Photography Tips.
Check out our more Photography Tips at Photography Tips for Beginners, Portrait Photography Tips and Wedding Photography Tips.
All around the world, people are inundated daily with advertisements hawking everything from soda to furniture to vacations. We’re so used to seeing the ads and logos almost everywhere that we can identify the logos without even seeing them in context. That is the message that artist Dorothy sends with her series “You Took My Name.”
In the series, the artist removes the company names from well-known logos. It challenges viewers to recognize and identify the brands even when the company names are missing.
Another goal of the series is to change our perspective on logo art. These symbols are the result of hours of work and research, and they can be seen as works of art in their own right.
Is this real life or are you in a Taylor Swift music video? You’re in the middle of one of the best kisses of your life!
Amidst the fireworks, stars, and confetti, you catch a glimmer off a camera lens five inches from your face, followed by the sound of a shutter. Moment. Ruined.
Cameras might be notorious kiss-ruiners, but they don’t have to be! Our pal Haley Sheffield is a fantastic wedding photographer who’s a master at capturing kisses that look real, natural, and downright beautiful.
Haley’s tips will show you how to get your couple comfortable and how to direct them to get the best kissing photo possible. Most couples aren’t used to kissing in front of a camera, but they’ll be on-camera kissers in a no time.
Now you can have the best kiss of your life and catch it on camera, too.
Tips for Snapping the Perfect Kiss
p.s. We’re looking to re-invent what/how/where we publish online, and we’re seeking one amazing Editorial & Community Lead to lead the charge.
p.p.s. We’re still on the hunt for an awesome sauce Buyer for the Photojojo Shop. Is it you? Go here.
Why Eliminating Awkwardness Makes for Better Kisses
In my past couple of years as a wedding photographer, I’ve read several articles by some of the industry’s top photojournalists and thought I should be more of a fly-on-the-wall. I’m not giving my clients the room or the opportunity to let those natural moments happen.
Well, that the fly-on-the-wall approach is great in theory and–hey–it works for some people, but you know what I got from it? Photographs of fish-lipped kisses and near-make-out sessions.
In my experience, if you step back thirty feet and tell your clients to “do whatever feels natural”, your clients are not going to look like they just jumped out of a Ralph Lauren ad. They’re going to look uncomfortable. Or maybe a little too comfortable. In their heads, they look like every romance movie they’ve ever seen. In their heads, it’s perfect and magical and worthy of an Oscar.
I want my clients to look at photos of themselves and think, “We look awesome. We look in love. We look happy.” There’s nothing unnatural or inorganic about giving a little bit of direction.
So, if you’re wanting to photograph a kiss without the awkwardness, here are a few tips I’ve developed over the years.
1.HUMOR
If you’re funny, use it to your advantage.
Ask the clients to kiss and then crack a joke as they lean in. You’ll get this beautiful laugh/kiss/smile combo in a natural moment, and probably a sweet kiss with a little extra smirk. Unfortunately, I’m not that funny. So I most often use tip number two.
2. THE SIGNATURE KISS-AND-SMILE
I always, always love a good almost-kiss more than full lip-on-lip action.
There’s something about an almost-kiss or a post-kiss shot that lends to the idea that you’ve really captured a moment in time instead of simply asked the clients to kiss and snapped a picture of it.
This is pretty simple: Ask your clients to hug. Position their arms and hands in flattering pose (if this didn’t happen naturally). Then, ask them to kiss a few times and smile in-between.
It feels goofy, and there will be a little bit of nose-bumping and awkward timing (where one is kissing while the other one is smiling, etc.), but that will lend to an even better almost-kiss smile.
I normally start by saying “Alright, let’s do some kisses and smiles,” and then fire off a few shots until I get a good laugh from the couple. If it doesn’t induce laughter, I’ve found that it often creates this sweet flirtatious moment between them–almost like they’ve forgotten about me for a short time (which is always a good thing).
3. STEP BACK
While I feel like my favorite kissing shots have ended up being the close-ups, your clients will always be more comfortable if you start off by giving them space.
So, in the cycle of shooting a kiss, pose or set-up the clients first, tell them you’d like them to kiss-and-smile for a little bit, then back up a good 20-30 feet and photograph them from far away.
This is a great time to get that landscape shot. I often photograph the kiss (and most poses/moments) in this order: landscape, full-body, ¾ body, and close-up.
4. DON’T BE AFRAID TO GIVE DIRECTION
Listen. Some people are just awkward. They smush noses or keep their eyes open or kiss like a face-eating-Zombie.
While it can be really uncomfortable to correct a kiss, sometimes you just have to do it.
Tell the clients to tilt their heads instead of smushing noses. If the girl is insecure about her nose, get her to tilt her head away from you.
Ask them to kiss softly if they’re getting a little too sloppy. Say “alright, this time let’s try that again, but both of you close your eyes.” Eliminate the weirdness in the beginning, so you don’t go home from the session praying there was just one frame without the groom’s eyes open.
5. USE MOVEMENT
Oftentimes, I’ve realized that clients stiffen up when you put them in uber romantic pretzel-poses.
As rad as the Spiderman kiss is, your clients aren’t Spiderman. They’re not used to hanging upside-down and maintaining a suave composure.
Try to loosen them up by asking them to walk hand-in-hand towards you, and then throw them off by asking them to steal a kiss while they’re walking.
If the couple is right for it, you can ask the guy to hug the girl and spin her around in a circle while exchanging some kisses and smiles.
One of the smallest movements that I’ve found makes a HUGE difference in kiss pictures, is to ask the groom to gently place his hand on the bride’s neck and softly brush her face with his thumb. I normally ask them to do this for a few moments without kissing–just forehead-to-forehead and with their eyes closed.
It really brings their attention into each other, and puts me on the outside just documenting the moment.
OTHER PORTRAIT TIPS
Start out the session by asking the clients how they normally cuddle. Do they normally walk while holding hands? Does she normally wrap her arms around his arm and rest her head on his shoulder? Does he normally place his hand at a certain spot on her back?
Create moments that bring them close, and lessen their time staring into the camera. I often ask my clients to get it really close–like nose-to-nose or forehead-to-forehead–otherwise it looks like they’re avoiding bad breath. (And that joke normally brings on a few chuckles). Sometimes I’ll ask them to walk and try to keep on looking at each other–only looking at the ground if they feel like they’re going to fall, but never looking up at me.
Be yourself. I’m not really a funny girl, and I can be exceptionally calm while photographing (instead of the “YES! YES! Work it, work it!” approach, I’m often exclaiming “Oh, that is just beautiful.”). I don’t know that either approach is better, but I do know that my clients feel way more comfortable in front of my camera now than they did when I was putting on my pseudo-photographer personality. Just be you. Whatever that looks like. It will make them more comfortable being them.
Related posts:
How to Photograph the Holidays — From Around the Web Points of Interest Got ideas for great New Year’s Photo…
How to Photograph Lightning ~Have a cool photo product or site? Reach 270,000 photo…
Schlieren Photography: How to Photograph the Invisible ~Have a cool photo product or site? Reach 270,000 photo…


 In my past couple of years as a wedding photographer, I’ve read several articles by some of the industry’s top photojournalists and thought I should be more of a fly-on-the-wall. I’m not giving my clients the room or the opportunity to let those natural moments happen.
 If you’re funny, use it to your advantage.
  I always, always love a good almost-kiss more than full lip-on-lip action.
  While I feel like my favorite kissing shots have ended up being the close-ups, your clients will always be more comfortable if you start off by giving them space.
  Listen. Some people are just awkward. They smush noses or keep their eyes open or kiss like a face-eating-Zombie.
  Oftentimes, I’ve realized that clients stiffen up when you put them in uber romantic pretzel-poses.
You must be logged in to post a comment.