RSS
 

Posts Tagged ‘want’

You’ll Never Want to Leave This All-in-One Bed Full of Gadgets & Storage

07 Sep

[ By SA Rogers in Design & Furniture & Decor. ]

Blow-up dolls and boyfriend-shaped body pillows may make you feel a little less lonely, but they can’t give you a massage – unlike this multifunctional bed that performs so many functions, you half-expect it to cook you breakfast in the morning. Sold by a variety of Asian retailers for roughly $ 600 USD, including SG Shop and English TaoBao, this slightly bonkers piece of furniture incorporates virtually everything you can imagine (reasonably) wanting to be built right into your bed, from USB chargers, speakers, power outlets and a pop-out laptop table to an actual built-in massage chair with multiple settings.

Lift up the mattress to find plenty of storage underneath for extra bedding and ubiquitous pillows. There’s also hidden storage in the bench at the foot of the bed, and shelves all along both sides. Optional features include leather upholstery instead of the default fabric, which comes in a multitude of colors, and even a freaking safe to hold your valuables.

If there’s one glaringly obvious feature this bed doesn’t have to offer, it’s a mattress long enough for the average American. The small size measures just 4’11” while the large size adds a foot. So if you’re larger of stature, this bed might not be for you – at least, not to sleep in. It would still make a pretty cool living room lounger. If you were designing your own all-in-one dream bed, what would you add? A mini fridge? A built-in coffee maker?

h/t My Modern Met

Share on Facebook


[ By SA Rogers in Design & Furniture & Decor. ]

[ WebUrbanist | Archives | Galleries | Privacy | TOS ]


WebUrbanist

 
Comments Off on You’ll Never Want to Leave This All-in-One Bed Full of Gadgets & Storage

Posted in Creativity


Why You Might Want to Consider Keeping a Visual Diary

27 Aug

Maintaining creativity can be difficult for artists at the best of times. Fortunately, there are ways to combat the dreaded artist’s-block. Carried around in the crook of many an artist’s arms, the visual diary has developed alongside the very beginnings of art history.

Famous artists like Leonardo da Vinci, Frida Kahlo, Vincent van Gogh and Kurt Cobain all kept detailed visual journals for their thoughts and creative progress. Cecil Beaton, famous for his portraits of Marilyn Monroe, religiously kept scrapbooks of drawings, newspaper clippings, paintings, and copious amounts of photographs. Art school curricular also relies heavily on the use of a personal visual diary to detail a student’s thoughts and processes.

Why You Might Want to Consider Keeping a Visual Diary

Materials in a visual diary aren’t limited to just pieces of paper. Here I’ve fixed a piece of plastic that I wanted to use later into my visual diary for safe keeping.

Why You Might Want to Consider Keeping a Visual Diary

Keeping track of different film I’ve used is easy with a visual diary – I simply stow the flattened box for later reference.

What is a visual diary?

As the name suggests, visual diaries are a collection of visual references compiled by an artist. Made up of notes, diagrams, collage, photography, images, and detritus, a visual diary can contain any number of materials compiled into a series of books or folders.

The purpose of a visual diary is to provide space for an artist to work within visually. By documenting your own progress and inspiration in a physical diary, you can build important skills and identify trends to further your creative skill. A visual diary also provides a cathartic space to record ideas and personal observations. You can combine private journal entries with test-prints and swatches, or you can keep a strictly photo-based body of work. You can even use separate books for separate media or projects. It doesn’t have to be pretty, as long as it works for you.

Why You Might Want to Consider Keeping a Visual Diary

Proof sheets of negatives are most useful when stored in a visual diary for easy reference.

What diary should I use?

One of the most popular formats of visual diaries is spiral-bound booklets. These booklets can be laid flat on a surface and have thick paper for sketching. Plus, you can stick a pen down the spiral joint so you’ll always have a marker at hand.

A4 and A5 booklets are generally the most popular sizes for visual journals. Larger journals are harder to transport and a very small booklet may be too little to stick cut-outs in. Lined and unlined booklets are another consideration. I personally prefer an unlined book – every sheet is like a blank canvas as it holds nothing but potential! Having said that, grid books can be useful for structured lighting diagrams and geometrical drawings.

An alternative to keeping a booklet as a visual diary, mood boards are another great way to maintain inspiration and direction. Having a mood board to look over and update frequently can be just as beneficial as having a visual diary, only it’s a little less portable. All you need is a good cork board, a few pins and a choice selection of images and notes. You can even use several mood boards, each sectioned off for different moods or projects.

Why You Might Want to Consider Keeping a Visual Diary

Keeping a mood or cork board full of artistic material can be a great source of inspiration for projects.

Why keep a visual diary?

There are many benefits to keeping a visual diary.

Organizationally speaking, having a visual diary keeps all your artistic detritus in one place. I’m definitely guilty of spreading my materials out, scribbling notes on bits of paper and losing them shortly after. Writing notes in your journal or taping pieces of paper with notes into your diary will keep them together so you can easily refer back to them later. Visual diaries are also great for unexpected flashes of inspiration – try keeping one next to your bed for those breakthroughs in the middle of the night.

Your visual diary is your own personal work space. Recording your artistic progress now will create a timeline of your personal development to refer back to later. This can help maintain your focus or realign your artistic direction. Once you get into the habit of filling in your visual diary, you will develop a pattern of creativity, training your photographic eye. Plus, if you aren’t keen on posting personal thoughts in an online blog, paper-based visual diaries are a safe space for your own creativity.

Visual journaling is good for your health too. Cutting images out and doodling in your visual diary can be a very meditative process, increasing mindfulness and reducing stress. Simple tasks like cutting and pasting photographs clear your mind of negative thoughts with repetitive motion and critical thinking.

Why You Might Want to Consider Keeping a Visual Diary

Negatives and digital proof sheets that need to be close at hand for projects are easy to find and revise in a visual diary.

Conclusion

Keeping a visual diary is a great way to boost inspiration, consolidate thoughts and even improve your mental health. As a placeholder for ideas and reference material, keeping a visual journal will quickly become an invaluable tool for developing your photography. Think of it as an artistic space, created and curated by you!

Visual diaries are not only great for storing inspirational material but for recording things like photography expenses or even your wish list.

The post Why You Might Want to Consider Keeping a Visual Diary by Megan Kennedy appeared first on Digital Photography School.


Digital Photography School

 
Comments Off on Why You Might Want to Consider Keeping a Visual Diary

Posted in Photography


Why would I want an external recorder/monitor?

12 Jun

Not everyone wants to shoot video, so it may seem unthinkable to spend around $ 1000 on an external video monitor/recorder. However, others find it opens up creative challenges every bit as satisfying as stills photography.

The more you shoot video, the more you’re likely to encounter (and find yourself needing) tools that are rarely provided on stills/video cameras. We’ll be shooting with a couple of the more common models over the coming weeks to see how they compare, but first we wanted to give an overview of why you’d even consider using one.

Why would I want an external monitor/recorder?

As the two-part descriptor suggests, there are two main benefits to using an external recorder: to get a bigger, more informative preview as you shoot and to capture better quality footage.

Recording

In terms of recording, the benefits come from a number of factors.

Understandably, most stills/video cameras have processors designed primarily for stills, and they also have to make significant compromises in the name of battery life and thermal management, since video isn’t their primary role. Also, for the most part, they’re designed to produce amounts of data that are manageable by consumers, and at bit rates compatible with (relatively) slow memory cards. This typically means heavily compressed video, usually using what’s known as a GOP (group of pictures) video codec, which only records a full image at select key frames while interpolating the in-between images based on changes between frames. H.264 is a common example of a GOP codec.

“As the two-part descriptor suggests, there are two main benefits to using an external recorder: to get a bigger, more informative preview as you shoot and to capture better quality footage.”

External recorders, by contrast, are dedicated video capture devices built by companies that specialize in video capture. So, while they can’t improve the level of detail that your camera initially captures, they leverage the fact that your camera often captures more detail than can be recorded using the internal codec. As a result, you can capture video with fewer compression artifacts, and usually in formats that work smoothly with major editing software, such as Apple’s ProRes and Avid’s DNxHD and HR.

For example, most cameras output a more detailed 4:2:2 stream over HDMI, rather than the simpler 4:2:0 footage they can themselves capture and compress. Meanwhile the Fujifilm X-T2 will only output Log footage over its HDMI socket. Other cameras, notably Panasonic’s GH4 and 5, will output 10-bit footage and can’t capture their very highest quality footage internally.

External recorders also often support SDI connectors, a more robust type of connection typically used on pro video cameras. The latest recorders support Raw footage over SDI which means the recorder can continue to serve you if you move beyond your current camera.

Camera Frame Rate Codec Bit depth / sub-sampling Bitrate
Panasonic GH5 UHD/24p h.264 10-bit, 4:2:2 400 Mbps
Sony a7S II UHD/24p h.264 8-bit 4:2:0 100 Mbps
Olympus E-M1 Mark II DCI/24p h.264 8-bit 4:2:0 237 Mbps
UHD/24p ProRes 422 10-bit 4:2:2 471 Mbps
UHD/24p ProRes 422 HQ 10-bit 4:2:2 707 Mbps

Similarly, external recorders often have better audio capture capabilities than those baked into the mass-market capture formats used in many cameras. As with the video footage, this is primarily a case of having more space dedicated on the screen, lower levels of compression and a wider range of settings and connectors.

Monitoring

The monitor side of things, there are a lot more benefits than just having a bigger screen to see things with, though this in itself is valuable. The ability to see your scene on a larger screen makes it easier to spot small, distracting objects and check precisely where your focus is set. It can also help you better visualize the way your final footage will look, helping you make creative decisions such as choosing how much depth-of-field you want.

It’s also common for monitors to offer overlays and composition aids. For example, framing guides that show crops for different aspect ratios can be helpful if you intend to publish your work in something other than the camera’s native aspect ratio.

Also, freed from having to share battery power with so many other functions, external monitors can often be run brighter than the rear screen on your camera, making it easier to shoot outdoors.

Boxes full of tools

But just as significantly, external devices often include useful monitoring tools that go beyond those offered in most cameras, both in terms of the range of tools available, and the precision with which they can be configured.

It’s becoming increasingly common for cameras to offer focus peaking, to check where the point of perfect focus is, but zebras, which highlights an area of a certain brightness, are still not universal. External recorders offer these features, often with greater control over their settings. The ability to choose to highlight a typical skintone brightness or everything exposed over 90 or 95% brightness, makes achieving consistent exposure much easier.

Focus peaking is becoming increasingly common on cameras, but external monitors can offer more subtle control over color and threshold, to make it easier to fine-focus.

The other feature common on external recorders that we’ve only seen on a couple of cameras is the ability to apply color and gamma curve correcting look up tables (LUTs) to Log video in real time. This means that you can shoot gradable, but washed-out-looking, Log footage but with a preview that approximates the finished result, so you end up looking at something much more visually meaningful.

‘Scopes

There are a series of exposure and color analysis tools widely used in video production, collectively known as ‘scopes.’ These are very rare on contemporary stills/video cameras, but are hugely useful for assessing your setup.

A waveform display is a tool to help visualize luminance/exposure. It’s common on pro video equipment as well as in video editing software. Rather than a histogram, which just tells you how many pixels hold each brightness value, a waveform tell you where those pixels occur in the image. The waveform diagram shows the brightness values for every column of pixels in the image: dark at the bottom, bright at the top.

Videographers like to use waveforms because it’s easy to visualize both exposure and contrast across the frame. This is particularly helpful for judging exposure at a particular location, such as a subject’s face. It’s also pretty common to have a choice of Luminance or separate R,G,B waveforms (known as an ‘RGB Parade’), for judging color balance and per-channel exposure.

The luma waveforms shown here are representing the ColorChecker on our test scene. There’s a thin, bright peak on the far left, representing the sliver of white that just crept into shot, then there are six columns representing the six columns of color patches on the ColorChecker.
Look closely and you’ll see that the pattern of the left-hand three columns getting progressively shorter continues into the right-hand columns: these are the progressively darker greyscale patches along the bottom of the ColorChecker.

The other common video tool is the Vectorscope, which can be used to evaluate color information in the image, such as hue and saturation. Getting accurate color straight out of camera (as well as matching it between shots) is particularly important when shooting video since Raw video capture hasn’t yet arrived in hybrid cameras. It’s a bit like shooting JPEGs – you only have so much latitude to adjust things in post.

False Color paints regions of the image to reflect their brightness. There’s a fairly standard scale, red for clipped whites, purple for crushed blacks, green for middle grey and pink for skintones.

Finally, one feature we’ve not seen on any camera yet is False Color, which is a little bit like having multiple zebras active at the same time. Most brands use a similar scheme in which tones around middle grey are painted green, one stop above this (the approximate brightness of Caucasian skin tones) is painted pink, near clipping is yellow, clipped is red, near black is blue and crushed black is purple. The result is a riot of color but with a bit of experience, it gives you a very easy way to interpret your exposure.

Workflow benefits

The net effect of these features quickly add up to provide benefits throughout the video workflow. If you can capture footage using a codec favored by your choice of editing software, you can usually speed up the process of importing by avoiding the need to transcode.

Similarly, the use of the fastest memory cards or still-faster SSDs maximizes transfer rates when it comes to transferring large video files to your editing computer. Again, with a project that takes more than a handful of clips, this is a huge time-saver.

Some external devices let you review and tag your clips before you get back to your computer, again speeding up the initial step of organizing your footage.

It’s not all good

As you’d expect, there are disadvantages to using external recorders, too.

Although each of the tools offered make it easier to set your shot up perfectly, this more precise way of working can also risk slowing you down. Also, the added weight and bulk of carrying a second device around with you makes it much harder to run-and-gun with an external monitor.

On top of this, it’s much less likely that you’ll go unnoticed. Even a relatively small monitor/recorder makes your setup look more professional and consequently more obtrusive. This is not the look for Guerrilla film making.

One downside of off-camera recorders is that it’s a bit harder to blend into the scenery and remain unnoticed.

Also, although external devices don’t need to share their battery power with so many other functions, it still takes a lot of power to run a screen and capture and compress video. Even the models with fans tend to run hot and hit their batteries hard, meaning you’ve got more recharging to plan and worry about.

But, given the amount of planning that goes into anything beyond the simple grabbing of clips, this additional consideration isn’t that onerous. For a bit more planning and setup time, an external recorder can help you get the very best out of your camera.

$ 1000 isn’t a trivial amount of money but, for a great many photographers, it’s an amount they’d justify spending on a lens. Just like a lens, an external recorder can help expand the range of things you can do with your current camera. It’s also brand agnostic, so unlike a lens, it’s very likely to work regardless of what camera you buy next, and will help boost the quality of everything you shoot, not just the things you can use a new lens for. And that’s got to be worth it, hasn’t it?

Articles: Digital Photography Review (dpreview.com)

 
Comments Off on Why would I want an external recorder/monitor?

Posted in Uncategorized


Want your sports photos to stand out from the crowd? Use a strobe

03 Jun

How to get these shots

A post shared by Garrett Ellwood (@gwephoto) on

Garrett Ellwood’s body of work speaks for itself. He’s a seasoned sports photographer and, according to his website, has been the official team photographer for the Charlotte Hornets, Carolina Panthers, Denver Nuggets and Colorado Rapids. Since 1995, he’s photographed 19 NBA Finals. So he’s got some experience.

While Ellwood’s more ‘standard’ action shots are well executed, images like the one above spark a lot of interest and attention because they’re different. Ellwood is still capturing a moment, a play in the game, but the result is evidence of greater pre-visualization and planning. Oh, and triggers, and very powerful strobes.

For those who aren’t sports shooters or who aren’t well-versed in using flash, here’s a quick breakdown of his (likely) setup.

A post shared by Garrett Ellwood (@gwephoto) on

The first thing you’d need for this sort of stuff is permission, and given Ellwood’s experience, he’s sure to have it. Next, you’ll need radio triggers; PocketWizard’s are the industry standard, and cost a pretty penny, but they’re reliable and have great range. You’ll then need to mount your strobe pretty high up in the rafters, and because of the distance from your subjects, it’d better be powerful.

We can also tell from these images that it’s likely a bare bulb (evident in the first image from the very hard shadows, the second image appears to have players more ‘filled in’ from light reflecting off the court). It looks to be in a cone-shaped reflector of some sort, or behind a grid – we can see this from the pronounced falloff midway up the court. Ellwood could have underexposed the background in two ways; first, he could have used a very narrow aperture, or he could have used high-speed sync, or a combination of the two. From there, just pump up the flash power to your desired level, and fire away.

The result is a decidedly different and dramatic look. The moral of the story? You don’t have to keep the strobes relegated to staged portraiture or studio shots – experiment with how your particular setup allows you to balance with ambient lighting scenarios, and have fun!

For more: Garrett Ellwood’s Instagram, portfolio, and a slideshow of additional images from NBA.com.

Articles: Digital Photography Review (dpreview.com)

 
Comments Off on Want your sports photos to stand out from the crowd? Use a strobe

Posted in Uncategorized


How to Understand Your Camera’s Light Meter and Get the Exposure You Want

26 May

Regardless of how you shoot, and whichever shooting mode you prefer to use, there is one item that remains constant – the light meter. Somehow, either you or your camera has to know how much light in on your scene in order to determine the optimal combination of aperture size, shutter speed, and ISO sensitivity to get the photo you want. This tool, which may not seem all that relevant to new photographers, is called a light meter.

Understanding what your camera’s light meter does and how it works is critical to advancing your skills and helping you get the shots you really want. Hopefully, this article will help you get a grip on it.

How to Understand Your Camera's Light Meter and Get the Exposures You Want

An analogy to help you understand the light meter

Before I get into a discussion about how the light meter works, think about the last time you cooked some meat on the grill. Whether it was a steak, some pork chops, or even just a couple hamburgers – you likely had a vision in your mind of what the finished product would be.

For backyard chefs like me who aren’t very good at this sort of thing, we have to use a meat thermometer to make sure our food is properly cooked. There’s always the question of where to put the thermometer to check and see if the meat is done. Or, in photography terms, check to see if the meat is properly exposed. You can touch it to the surface, poke it through to the middle, or insert the thermometer at various points around your dinner in order to get a good overall reading.

Each method would work for a different scenario, but it all depends on what you are cooking and how you want the finished food to turn out.

How to Understand Your Camera's Light Meter and Get the Exposures You Want

Your camera’s light meter is like measuring the temperature using a meat thermometer. Placement is crucial for an accurate reading.

How the camera light meter works

When you point your camera at a scene you also need a way of measuring the incoming light so you know how much of it there is and what settings you (or your camera) need to control in order to get the shot you want. It’s just like measuring the temperature of your food with a thermometer to make sure it’s done properly.

Most cameras today use a process called TTL Metering, which stands for through-the-lens. It means that your camera examines the light coming in through the lens and evaluates the brightness of the scene. Then you, or your camera, can adjust the settings in order to make sure your photo is exposed how you want. You may not ever notice the light meter at work or even see that it’s there at all unless you shoot in Manual Mode. But trust me, it’s constantly monitoring the light whether you know it’s working or not.

View the metering scale in Manual Mode

To see the light meter doing its thing, put your camera in Manual Mode and look for a series of dots or vertical lines at the bottom of your camera’s viewfinder.

How to Understand Your Camera's Light Meter and Get the Exposures You Want

In Manual Mode, look at the bottom of the screen in your viewfinder. Notice the scale with zero in the middle. That is the light meter at work.

The number scale at the bottom of the image above is an example of a camera’s light meter, and the tiny little triangle shows whether the picture is properly exposed or not. In this case, the triangle is at 0, which means the image is neither under or overexposed, but changing the aperture, shutter speed or ISO would make the triangle move up or down the line accordingly and result in a picture that is either a little too bright or a little too dark.

What part of the scene is the camera measuring the light from?

While that is all well and good, it’s only part of the story because it doesn’t explain how your light meter actually functions. Is it looking at all the incoming light or just some of it? Where in the frame is it looking as it measures the light? Understanding the answers to these questions is the key to unlocking the power of your camera’s light meter, and it all has to do with what’s known as metering modes.

How to Understand Your Camera's Light Meter and Get the Exposures You Want

Measuring the Light

Most cameras today have a few basic ways of measuring the incoming light:

  1. Matrix or Evaluative Metering – the camera looks at the light in the entire scene and averages it, (Nikon puts a bigger emphasis on the area where your lens is focused as well). Nikon calls this Matrix Metering, Canon calls it Evaluative.
  2. Center-Weighted Average Metering – looks at the light of the entire scene and averages it, but with emphasis on the center of the frame. Nikon and Canon both call this Center-Weighted Average Metering.
  3. Partial Metering – this measures the light only in a small portion of the center of the frame (about 8-12% of the scene). This is a Canon metering mode, Nikon does not have one similar.
  4. Spot Metering – measures the light only in a small area around the central autofocus point (about 1.5-3% of the frame). Nikon and Canon both call this Spot Metering.

Other camera manufacturers have different names for these modes, but suffice it to say the way in which your camera measures incoming light can have a huge impact on whether your photo is properly exposed. As an example, here are three shots that were taken with different metering modes.

Image #1, taken with Matrix (Nikon) or Evaluative (Canon) Metering.

Image #2, taken with Center-Weighted Metering.


Image #3, taken with Spot Metering.


Reflective versus incident metering

There’s another aspect of light metering that comes into play when setting up a shot. It has to do with how TTL metering works as opposed to a handheld light meter.

Reflective metering

The former, (the type of metering used in DSLRs), works by measuring the amount of light that comes through the lens. But the problem with that is that unless you are pointing your camera directly at the light source, the light being measured is actually bouncing off your subject first.

All the colors we see in the world around us get their hues and tonal values by absorbing every color of light except for what is bounced off of them. As many of us learned in grade school, light is made up of a spectrum of colors including red, orange, yellow, green, blue, indigo, and violet. A green tree leaf absorbs every color of light except for green. A red car absorbs every color except for red, and so on.

reflective metering - camera light meter

When your camera measures incoming light, it’s looking at the amount of light being bounced off your subject, not the amount of light actually hitting your subject. This has huge implications and can dramatically affect your exposure. In the illustration above, the subject is wearing clothes that absorb most colors of light except for blue, which means there is still a great deal of light being bounced off him and sent to the camera. However if the child changes clothes things can change a great deal.

reflective metering dark subject - camera light meter

In the illustration above, even though the amount of light hitting the boy has not changed, the camera will read the scene much differently because he is now wearing a dark shirt and pants. The camera will think it needs more exposure to compensate for what it thinks is less light on the scene, and the overall image will be overexposed as a result.

Here’s a real-world example of how this works:

reflective metering - camera light meter

Nikon D7100, 200mm, f/2.8, 1/8000th of a second.

In the photo above, so much light was being reflected off the girl’s white shirt that my camera had a hard time metering the scene properly. Much of the sunlight was bouncing off the shirt and coming directly back to my camera, so it responded by using a very fast shutter speed and low ISO value in an effort to make sure the shirt was properly exposed. Unfortunately, the rest of the scene was underexposed as a result.

Nikon D7100, 200mm, f/2.8, 1/1500th.

This was a few seconds later in the exact same spot, and all I did was have her put on a brown shirt. With much of the light from the sun being absorbed by the dark color of her outfit, my camera created a much brighter exposure by using a slower shutter speed. Not as much light was being captured by the TTL metering system so the camera thought more light was required for a good exposure.

Incident metering

This phenomenon can be particularly troublesome if you are shooting a wedding; grooms often wear dark tuxedoes whereas brides will usually be dressed in dazzling whites, which can really throw off your camera’s TTL metering system. The solution is to use an external handheld light meter, such as the Sekonic L-308S-U, which actually measures the amount of light falling on the subject.

Handheld light meter for incident light metering (light falling on the subject).

In the image above you can see that the meter shows you need an aperture value of f/16, shutter speed of 1/125th of a second, and ISO 100 in order to get a properly exposed scene. These numbers will likely be different from what the camera’s TTL system measures because some light will invariably be absorbed by the subject, which is why an external system like this can be so useful.

Here’s how the diagram from earlier would look if the setup involved an external handheld incident light meter.

incident metering - handheld light meter

You will often see wedding photographers using a light meter such as this in order to get a more accurate reading of how much light is hitting the wedding party during formal photos. This is especially true if they’re using a system of flashes or external speedlights because they need to know how much extra light the scene will require or tolerate.

When shooting a wedding it is quite common for the bride to wear a white dress, which reflects a great deal of light, and the groom to wear a dark tuxedo which absorbs almost all light. This can wreak havoc with a TTL metering system, and an external light meter is a great way to address the problem.

light metering - camera light meter

Conclusion

The overall goal here is to understand how the light meter in your camera functions. This, in turn, will help you know how you will need to alter the exposure settings to get the shot you want.

I hope this article has been helpful in explaining how the light meter works, how light is reflected off your subjects, and why your camera may not see a given scene quite like you expect it to. Ultimately it’s important to remember that there is no one correct way of metering a scene. Any of the metering modes and methods will work as long as you know what you are shooting and what type of results you are trying to achieve.

Knowing the difference between the various metering modes and types, and understanding how light is measured as it hits your camera can help you get the shots you want. None of these methods are any better or worse than the other, but each one has its own strengths and weaknesses. The more you know about how all of this works the better equipped you will be to get precisely the photographs you want.

The post How to Understand Your Camera’s Light Meter and Get the Exposure You Want by Simon Ringsmuth appeared first on Digital Photography School.


Digital Photography School

 
Comments Off on How to Understand Your Camera’s Light Meter and Get the Exposure You Want

Posted in Photography


CP+ 2017 Canon interview: ‘We want to be number one in the overall ILC market’

28 Feb
Mr. Mizoguchi and Mr. Tokura took the time at CP+ 2017 to discuss Canon’s future with us. 

Just prior to CP+ 2017, Canon announced three new consumer cameras in the mirrorless EOS M6, the DSLR EOS 77D and EOS Rebel T7i . We had the chance to catch up with Canon while in Japan covering CP+ and discussed the company’s current state of affairs, as well as its future (in relation to mirrorless).

Specifically, we spoke with Go Tokura, Executive Officer and Chief Executive for Image Communication Business Operation and Yoshiyuki Mizoguchi, Group Executive of ICB Products Group, Image Communication Business Operation.

Please note that this interview was conducted through an interpreter, and has been edited slightly for clarity and flow.


What is Canon’s main strategic focus going forward into the next product cycle?

We can break down our focus into two areas: improving our network connectivity and video. We still have a lot of room to grow in the video area in terms of what we can offer. And in terms of customer strategy, we want to continue to build new users, specifically enticing more entry-level users.

Where do you see most demand for 4K, and are you beginning to see beginners ask for 4K video?

Whether you’re a professional or at the entry-level, you likely want high-quality video. And we think there is potential for the entry-level to grow. So we will obviously be looking at introducing our 4K technologies down to the entry-levels at some point.

But introducing 4K to the entry-level is linked to the 4K TV market. How quickly that takes off and penetrates will tell us how and when we should introduce 4K to more affordable cameras. 

Looking at 4K TV saturation, what kind of time-frame does that suggest and when do you think it will be necessary to have 4K in every part of your product line?

We obviously have to look at the technical feasibility of it, cost-wise, as well as [the challenge of power consumption]. Those factors will tell us how we will introduce 4K technologies going forward.

We will continue to challenge and overcome these technical hurdles that we are seeing at moment in introducing 4K into our entire product lineup. But it is important to keep in mind that we don’t want to harm the original inherent concept of these products. 4K should compliment, rather than hinder.

The Canon EOS Rebel T7i was announced earlier this month. It shoots 1080/60p. Will we ever see a Rebel with 4K video? Probably, it’s just a matter of when.  

Does Canon have any ambitions to become a manufacturer of high quality monitor displays for enthusiasts and consumers?

We don’t have any plans to enter the consumer display panel market.

We’ve seen companies creating affordable cine lenses for mirrorless videographers. Do you see an opportunity in that market segment?

The Cinema Lens market, including for mirrorless, is a great market. When it comes to cinema lenses you have demand for everything from the professional to the affordable. Overall we’d like to increase the breadth of our share of the market on the affordable end. So we will continue to spend our efforts on that.

The EOS M series continues to expand. What is the long term goal of the M series in terms of market share?

That is a difficult question to respond to with a simple answer because we don’t have a particular number set in terms of getting the market share for the mirrorless market. This is because we are a company that produces [both mirrorless and DSLR], as a total package.

Our intention is to become number one in the overall ILC market: mirrorless and SLR. Different regions would have different penetration and different market share of mirrorless products.

The EOS M5 is Canon’s flagship mirrorless camera. 

Specifically, which markets are leaning more toward mirrorless and which more toward SLR?

In the Southeast Asian market we’re seeing a real high demand for mirrorless, while the US has the least mirrorless penetration. In terms of the Japanese market we’re seeing a slight majority [of] mirrorless at this time. But having said that, compared to two years ago we’re now seeing a slowing down of mirrorless taking over. We were expecting to see more mirrorless taking off, keeping that momentum, but that has not happened.

Do you think there could be a professional-level EOS M model sometime in the future?

Obviously we think it could be possible, there is a potential, but we do not want to put a time frame on that.

Do you think in a similar way, we may begin to see the L-series lens line expand into EF-M?

The demand for that is still quite limited and so we won’t be able to say. But obviously as people start to look for more professional-level quality and performance, we will extend our lens line to respond to what the customer is looking for.

Canon has yet to introduce a Dual I.S. system into its mirrorless cameras for fear the stabilized sensor will increase the size and weight.

If the EOS M series begins to eat away at sales of Rebel DSLRs, do you regard that as a good thing or a bad thing, or is it just inevitable?

We’re letting the customer, market and demand tell us how we should go about approaching different regions. Because if you’re looking at a market with a high level of mirrorless penetration, we would obviously look to push forward with the EOS M series in that region. And we will watch and see: are Rebel users moving on to the EOS M? Frankly, if that becomes inevitable, it is something we will support. Having said that, overall we are looking to simply be number one the combined SLR and mirrorless market, offering a total package.

Has there been any demand from customers to introduce something like Dual IS into Canon’s mirrorless cameras?

We do get customers saying they want more and better IS. However, in the mirrorless market for us, it’s all about satisfying the desire for a small, light-weight camera. In terms of introducing sensor-based stabilization into our EOS-M series, I think it will add weight, which might deter some of our mirrorless customers. Which is why we think optical IS is the way to go for us.

That said, we are aware that our competitors have already introduced this style of sensor-based stabilization. And we do see the merits of having optical and sensor based IS working together. What we’re looking at is trying to evolve ourselves in terms of developing technology so that we can downsize and reduce the weight of a sensor-based IS system.

You’d mentioned Wi-Fi capability being an area of focus in the future. Is that a result of user feedback? If so, what kind of feedback have users given?

Yes that is the result of direct user feedback, like that from our customer service centers. Most responses are regarding “how to use” Wi-Fi, which implies that many customers find it difficult to use. Overall, we can summarize what customers are looking for, regarding connectivity, is overall ease-of-use. To respond to that demand, we’re working to make connecting simpler and have incorporated Bluetooth technology into some of our cameras.

Do you have any plans to enter the VR or 360 markets?

We’re always looking to see what sorts of new visual means of expression we can offer to our customers, 360 imaging included. So, yes, we are considering how we can leverage 360 technology.

That said, we’re already seeing a lot of 360 cameras out there in the market. There are many players at the moment, but none have actually achieved big, great success. I think that’s telling, [and suggests that] that there is something lacking. In other words, if we were to come out with a Canon 360 camera, we would need to have Canon-like added value, ideas and concepts. Unless we do that I think there’s no meaning.

Do you think 360 is going to become the next 3D, where people talk about it for a few years, then it just goes away?

There is a lot of hype at the moment. But in terms of new visual expression, I think there is a value 360 technology adds to the visual world. i don’t think it will die out as 3D did.

Another way to look at it is 360 technology is not just about taking the photo, or the satisfaction of making an image , but how to display it, and how to leverage what you’ve actually taken. I think there has to be a total package for 360 technology to advance into the future. 

Will Canon introduce a VR camera like Nikon did with the KeyMission 360? Only if they see it adding value to the market.

We’ve seen several brands put out retro-style cameras in recent years. Canon has a long history in the analog camera market. Has there been any talk of launching a product that is a throwback to Canon’s film heritage?

I can’t give a detailed answer to this question, but we do have these customer demands and we’re hearing them. But it’s not to say we’ll be shifting a lot of focus onto such a product, but its rather we are feeling out of what the customer is looking for at the moment.

However I don’t think making such a camera is just about the retro design, it’s about having a retro look and feel, but with the evolution of features Canon currently has to offer.

Tokyo Olympics are coming up in 2020, obviously we’ll see Canon and Nikon DSLR lenses on the sidelines. but how long do you think it will be before we see mirrorless cameras shooting major sporting events?

It’s difficult to project into the future. Looking at mirrorless and it’s current state at the moment, and the timeframe between now and 2020, I don’t think I can envisage mirrorless at the Olympic games.

People [like Reuters, AP etc.] who come as press to something like the Olympics and bring their own gear, obviously they can’t make mistakes – its a once in lifetime opportunity. So my guess is the majority will still be using the cameras they are used to for the time being. In other words, DSLRs.

Film sales are up in 2017. Has there been any talk of perhaps introducing a new Canon film camera? Like an EOS 1V Mark II?

I can say in terms of new products: doubtful. But there are people who still love film and we still offer the EOS-1v from our existing line of film cameras.


Editor’s note:

We’ve interviewed Mr Tokura on several previous occasions, and we were pleasantly surprised with the responses what we received to a lot of questions. 

Specifically, it is encouraging to hear just how much Canon values the feedback of its customers. It seems like a lot of decisions about the future are based, at least in part, on customer feedback. All the more reason to be a vocal consumer!

On the same point, it’s exciting to hear that Canon is beginning to regard 4K video capture as something that perhaps it needs to offer in all ILC products, regardless of price. I just hope it makes its way to the Rebel series soon. 

Canon’s response to our question about a potential entry in the VR realm was interesting. Essentially, they feel that it is something they will only commit to if they truly feel like they can launch a 360 product that will do right by their customers. 

On a similar note, though we may never see an a digital reincarnation of the AE-1, it’s pretty cool to hear that Canon is aware of a customer desire for a retro-designed Canon camera, but (unsurprisingly) won’t make one unless it marries current tech with old-school design principles. 

That said, we were a little disappointed to see Canon continue to view mirrorless as a consumer technology and not as something with a potential, in the near future, to be something pro sports and photojournalists reach for.

Canon is a brand with a strong identity, and while we at DPReview may feel like perhaps they entered the mirrorless market a little on the late side, Canon’s caution into jumping into industry trends too quickly doesn’t seem to have done the company any obvious harm. But please, give us 4K at the consumer level. 

Articles: Digital Photography Review (dpreview.com)

 
Comments Off on CP+ 2017 Canon interview: ‘We want to be number one in the overall ILC market’

Posted in Uncategorized


CP+ 2017: You want a Fujifilm GFX 50S (and we have the shots to prove it)

24 Feb

The Fujifilm GFX 50S is one of the most talked-about recent camera launches, and for good reason. Announced at Photokina last year, it’s Fujifilm’s first medium-format camera since the days of film.

It’s based around a familiar 51.4MP sensor, uses a new G-mount and offers weather sealing. With its late February launch imminent, we’ve just taken delivery of a production camera, in Yokohama. Take a look at some of the first images from this potentially groundbreaking new system.

See our Fujifilm GFX 50S sample gallery

Articles: Digital Photography Review (dpreview.com)

 
Comments Off on CP+ 2017: You want a Fujifilm GFX 50S (and we have the shots to prove it)

Posted in Uncategorized


The M U want: Leica M10 First Impressions Review and Samples

19 Jan

The Leica M10 is a 24MP, full-frame, manual focus camera with an archaic coupled rangefinder focusing system, a tunnel-type optical viewfinder, no video mode and not even so much as a USB socket. And it’s absolutely lovely.

Leica M10: Key Features

  • ‘Newly developed’ 24MP full-frame CMOS sensor
  • 1.04 million-dot rear LCD (with Corning Gorilla glass)
  • 5 fps max continuous shooting for up to 30 Raw frames
  • ISO 100-6400 (extendable to 50,000)
  • Center-weighted (RF), spot and ‘multi-field’ (LV) metering modes
  • Revised menu system (including customizable ‘favorites’ menu)
  • Automatic lens corrections with 6-bit coded lenses
  • Compatible with ‘Visoflex’ 2.4m-dot EVF for eye-level live view shooting
  • ~210 shot battery life (CIPA)
  • Built-in WiFi

Leica is a refreshingly unusual company in the modern camera industry – weird, wonderful, gleefully anachronistic but never, ever, boring. As such, Leica is one of those companies that I’ve always enjoyed writing about.

This is the kind of picture that generally, I don’t take. But being handed a Leica to review spurred me to make a bit more effort to get ‘street’ shots on a recent trip to New York. I used live view to capture this waist-level image without drawing attention to myself.

35mm F1.4 Summilux ASPH. F2.8 (ish), ISO 500. (Converted from Raw)

In fact, the very first camera that I ever reviewed right at the beginning of my career was a Leica. This was more than ten years ago, around the same time that the M8 was released, but I wasn’t (yet) trusted with such a prestigious product. The camera that I was handed to review was one of those rebadged Panasonics that the German company still officially maintains in its lineup, but doesn’t really talk about anymore. I forget the exact model, but it wasn’t particularly good. I seem to remember high noise levels, lens aberrations and clumsy, detail-destroying noise reduction being the main areas of complaint, all of which were enough to take the (figurative) shine off what was physically a beautiful camera, and all of which I dutifully reported in my review.

While the camera was forgettable, more than a decade on, that review still sticks in my mind. It was shortly after filing my draft that my editor at the time pulled me over, the printout in his hand, to explain that ‘there are certain words we do not use about Leica’. Apparently, ‘disappointing’ was one of those words, indicated (ironically) with large red rings of ink, wherever I had used it.

My draft was massaged accordingly, and I didn’t review another Leica camera for a long time.

For a great many years, there really was a kind of ‘reality distortion field’ around Leica, and to some extent there still is. With some exceptions (the Q being one of them), the company specializes in high-cost nouveau-classic products with few objective advantages over their competitors. It’s all about the look. It’s all about the feel. It’s all about the magic. It’s all about Das Wesentliche1.

When on occasion Leica has tried something genuinely new, like the brushed-aluminum touch-sensitive experiment that was the Leica T2, it typically hasn’t made quite the same impact on the group psychology of photographers and photography writers as its M, R and (more recently) S-series.

‘The Leica Effect’

I’m not immune to the ‘Leica effect’ myself. I owned and used an M3 for years, and wildly impractical as it was (considering I was attempting to make a career as a 21st Century music photographer3) I’ve always regretted selling it. There’s just something about the M series, some intangible magic when compared to the average mass-produced camera, regardless of whatever new and wonderful technologies they might lack by comparison.

I still maintain that if you can accurately focus on a human subject with a fast Leica prime wide-open, you’ve earned the right to call yourself a photographer. It’s not easy – and that’s the point.

It’s been a long time since I shot live music, too. I didn’t expect much when I took the M10 to a rock concert, but apparently my focusing gets better after a couple of beers. 

35mm F1.4 Summilux ASPH. F2 (ish), ISO 3200. (Converted from Raw) 

For all that, I’ve never really enjoyed the digital M-series models. The M8’s APS-H sensor felt like a compromise, and both that camera and the full-frame M9 always felt a little bloated, their shutters a bit too loud, their images a bit too noisy. Things got better – the Typ 240 and Typ 262 are very good cameras, and the Monochroms are fun – but neither they nor their predecessors ever really truly felt like a continuation of the classic film models. Leica claims that adding a movie mode to the Typ 240 was in response to demand from its customers, but the idea of shooting video on a rangefinder always seemed a bit silly to me.

The M10 can’t shoot video – let’s just get that out of the way. If you really need video in an M-series body, the Typ 240 is still available.

Personally, as you might be able to tell, I like the M10 a lot more than the Typ 240 and 262. There’s no single major change which makes all the difference, but rather a raft of little tweaks which add up to (in my opinion) a more attractive product than the the digital Ms which came before it. 

First Look: Leica M10


1. Which roughly translates as ‘The pure / the essential / the heart / the bits that really matter’.

2. With original firmware, I should make that clear. It got better.

3. Ask me how that worked out. 

Articles: Digital Photography Review (dpreview.com)

 
Comments Off on The M U want: Leica M10 First Impressions Review and Samples

Posted in Uncategorized


How to Choose the Right Camera Mode to Get the Shot You Want

02 Dec

When starting out in photography, one of the scariest and most confusing things for a beginner is deciding which camera mode to use. While the automatic modes provide a bit of a safety net for those just starting out, there will come a time when you either want to or have to, take greater control of your camera to get the results you desire. But how do you know what camera mode to use?

Aperture Priority Mode

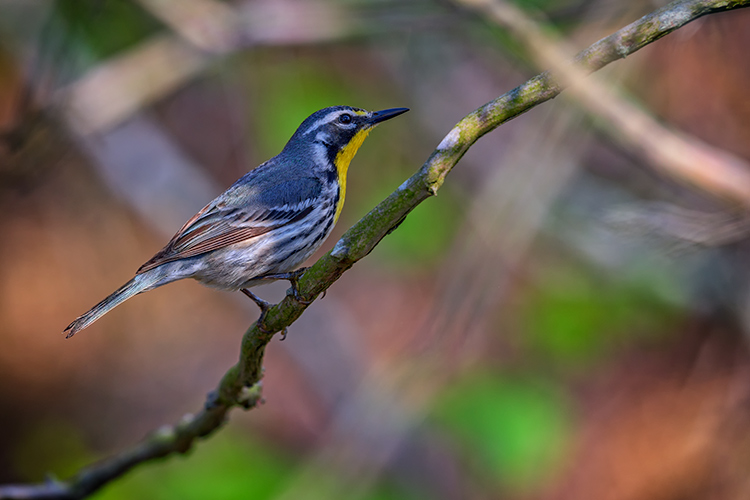
Aperture Priority mode is a perfect choice for a scene like this where you know you’ll want deep depth of field to keep the entire scene in focus.

First off, I won’t discuss any of the automatic modes here. A full discussion of what those do can be found here: Camera Modes Explained for Newbies. What I’d like to do here is discuss specific situations and the appropriate mode for each. Before we dive into that, I’ll explain the basics before we move forward.

Aperture

The aperture is the opening of the lens, which determines exactly how much light enters the camera and strikes the imaging sensor. The aperture also affects the field of focus from foreground to background, otherwise known as depth of field. A shallow depth of field is one that has a sharp focus on the subject, while objects in front of or behind the subject are out of focus. Deep depth of field is when the entire image is in sharp focus from foreground to background. And of course, you can have a depth of field that is somewhere in between those two.

Aperture is shown as a number on your lens, usually as a ratio. For instance, lenses with a maximum (widest) aperture of f/1.8 will have a very shallow depth of field. That same lens set to f/16 will have a deeper depth of field. An easy way to remember this is smaller numbers give you less and higher numbers give you greater depth of field.

Aperture Priority

When you know you want the background blurred, setting a wide aperture to create a shallow depth of field is key. Aperture Priority mode can be used in cases like this (keep reading to learn more on that a bit later).

Shutter Speed

Shutter speed determines the amount of time light strikes the sensor when it enters the camera. The faster the shutter speed, the less light strikes the sensor. In addition, shutter speed is directly responsible for how movement is rendered in an image. Shutter speeds are referred to in fractions of a second, such as 1/125th, 1/60th, or 1/1000th. Faster shutter speeds, such as 1/500th, freeze motion, while slower shutter speeds, such as ½, 1 second, or even 30 seconds,  will show motion as more of a blur. The longer the shutter speed, the more blur motion will create.

ISO

Your camera’s ISO determines how sensitive it is to light. Lower numbers such as ISO 100 or 200 mean your camera is less sensitive to light and are used in bright situations, such as in direct sunlight. When there is less light, such as in shade, or indoors, you might use a higher ISO such as 800, 1600, or 3200 to make your camera more sensitive to light. ISO plays an important part in the various situations I will discuss going forward, so always keep in mind that you can change this setting, and don’t be afraid to raise your ISO if needed.

Camera Modes

Before going any further, I want to clarify that there are multiple ways to get a specific desired result with your camera, using any of these modes. Once you understand the relationship between shutter speed, aperture, and ISO, you’ll be able to do whatever you like in any of these modes.

But which mode is best for which situation? You’ll have to visualize your image to decide.

Program Mode

"<yoastmark

Program Mode resides on the advanced side of the camera mode dial, usually denoted by a P. In this mode, the camera will set the aperture, ISO, and shutter speed for you. So when should you use Program Mode?

Program Mode is good when you’re not looking for any effect in particular. Your camera, when set to Program Mode, will attempt to give you a proper exposure that can be handheld, meaning you won’t be required to use a tripod to steady your camera. This is a good mode for when you’re just casually photographing and just want to be sure your exposures are right.

It is a lot like Automatic Mode in that regard, except that you have the ability to override, or shift, the exposure the camera sets, as well as many other settings such as white balance and picture style. In addition, while in Auto mode, the camera will pop your flash up when it thinks it needs more light. But in Program Mode the flash will not pop up unless you tell it to.

Aperture Priority

On some cameras, this mode is simply denoted by an A on the mode dial, while on Canon cameras it is denoted as Av, meaning Aperture Value. In any case, in this mode, you set the aperture and ISO you want and the camera will set the appropriate shutter speed for you. So when should you use Aperture Priority mode?

Aperture Priority

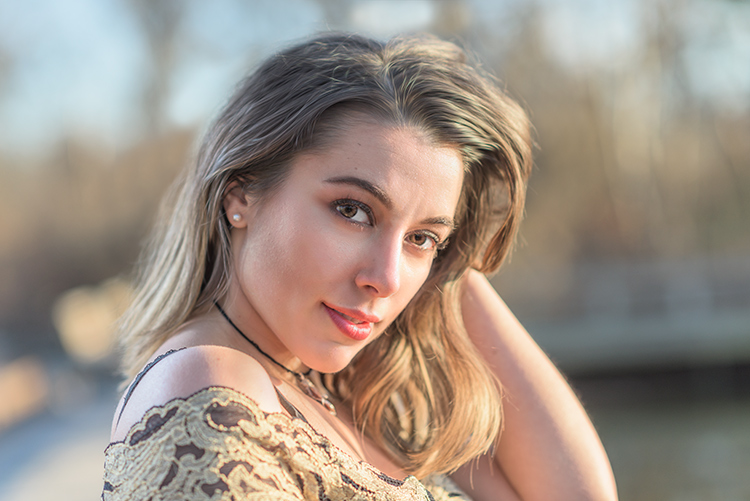
When you want a shallower depth of field, such as in a portrait, using Aperture Priority and setting a wide aperture is an excellent choice.

To determine the answer, visualize your finished image in your mind’s eye. What do you want it to look like? Generally speaking, if you’ve decided that the most important factor in your image is a specific depth of field, you’ll want to use Aperture Priority Mode so that you can force your camera to give you the depth of field that you want. For instance, if you’re making a portrait, you probably want your subject in sharp focus, but you may also want the background to be a little blurred, to keep your viewer’s focus on the subject. An out of focus background can create a setting without distractions for the viewer. So you might decide you want to use a fairly wide aperture such as f/4, to create enough depth of field to keep your subject sharp, but let the background blur nicely.

But watch your shutter speed too

It’s important to note, however, that you also need to keep an eye on the shutter speed setting. While the camera will set this for you, unlike in Program Mode, the camera is not going to try and give you a fast enough shutter speed to handhold. If there isn’t enough light, this will result in a slower shutter speed that may not be fast enough to freeze any subject movement. This could result in a slight blur due to unsteady hands or slight movement by your subject. If the shutter speed chosen by the camera (based on the aperture you’ve set) isn’t fast enough to freeze motion in this situation, you’ll need to raise your ISO. Raising your ISO will effectively increase the shutter speed given for the aperture you’ve set.

Aperture Priority Landscape

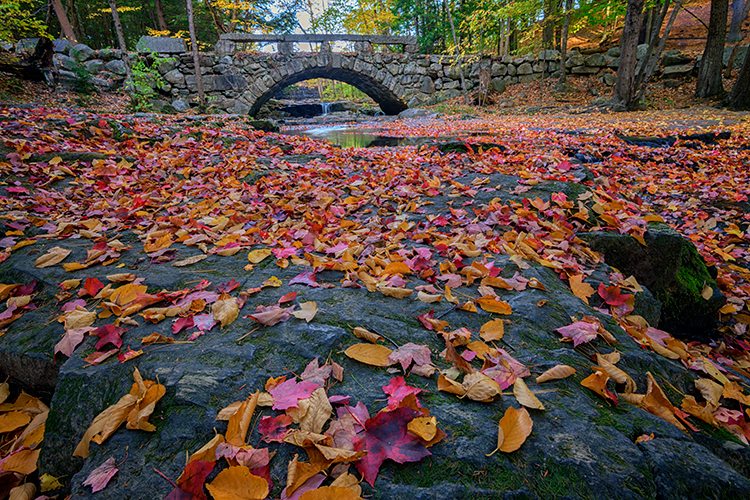
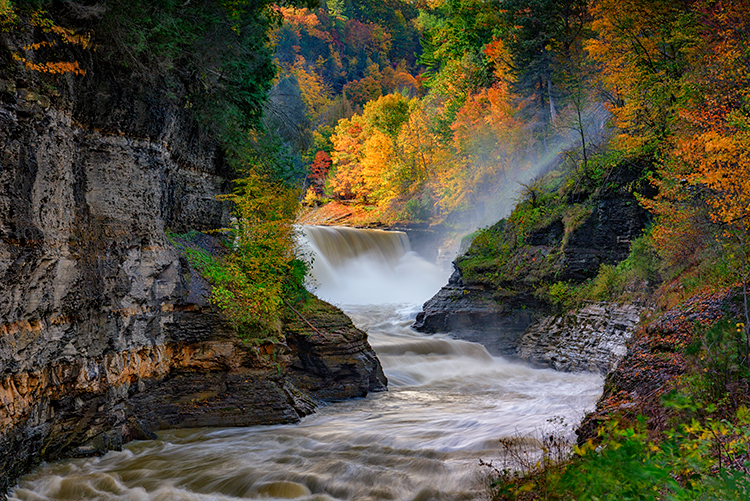
Aperture Priority is a great choice when photographing a landscape where you want a deep depth of field, and the shutter speed doesn’t need to be set at anything specific to capture motion a certain way.

For landscape photography

Another situation for Aperture Priority would be a landscape photo, where you may want greater depth of field to keep the entire scene in focus. In this situation, your primary goal is to get lots of depth of field to keep the entire scene in focus, so you’d set an aperture of f/11 or even f/16 to capture a greater amount of the scene sharply. In this situation, if you’re using a tripod, the shutter speed may not be as big of a factor for you.

But if you’re handholding the camera,  you will want to pay attention to the shutter speed the camera sets to ensure it’s fast enough to avoid camera shake. In addition, if there is moving water or clouds, or the wind is blowing the trees or grass, you’ll want to ensure that the shutter speed the camera sets is appropriately stopping that movement to your liking. If not, you’ll want to adjust your ISO so the camera sets a more appropriate shutter speed.

Shutter Priority

Panning using Shutter Priority

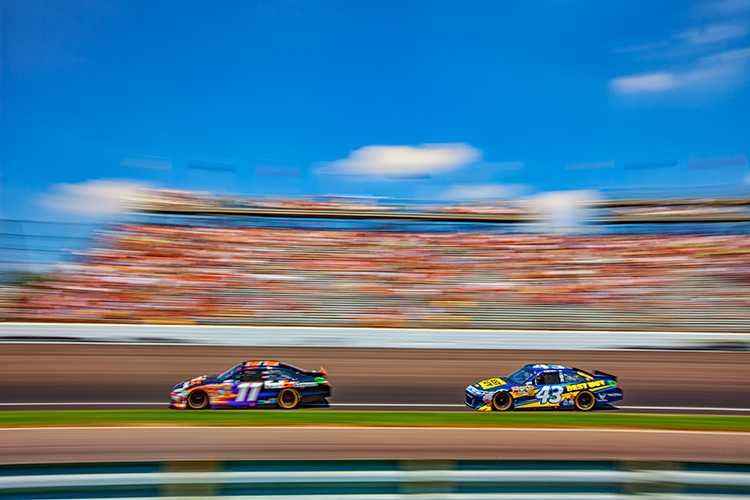
When you know you need a specific shutter speed, such as this image where a panning technique was used, Shutter Priority is often the best choice.

Shutter Priority is usually denoted using an S on most cameras, while Canon uses Tv, representing Time Value to denote Shutter Priority mode. Shutter Priority Mode is just the opposite of Aperture Priority. In this mode, you set the shutter speed you want, as well as the ISO, and let the camera choose the appropriate aperture.  This mode is an excellent choice when you’ve decided that rendering motion in a certain way is the key component of your image.

Shooting sports

For example, suppose you are photographing a sporting event. Most likely, you’ll want to freeze the action of the athletes on the field. To do so, you need a fast shutter speed, such as 1/500th or even 1/1000th. In shutter priority, you’ll need to again keep an eye on your ISO to ensure that the camera is giving you a proper exposure. Usually, the exposure indicator in your viewfinder will flash to show that at the current settings, proper exposure cannot be achieved. In this case, raise the ISO to achieve the correct exposure for the shutter speed you want.

Shutter Priority for Fast Action

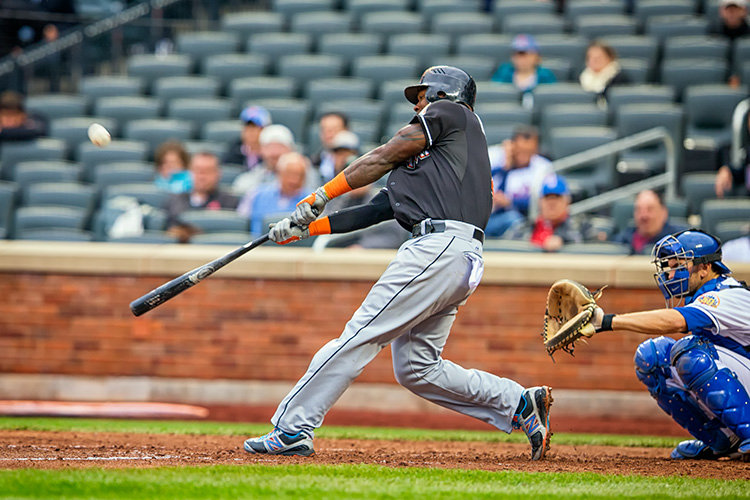
You might want to use Shutter Priority Mode when you know you need a fast shutter speed to stop action, such as when photographing sports.

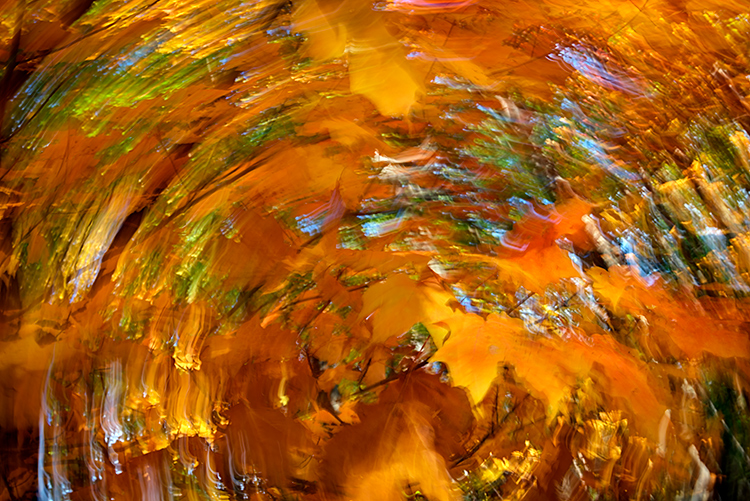
As another example, let’s say you want a slower shutter speed to create a panning effect. Again you would set the correct shutter speed to create the effect, and let the camera adjust the aperture. Any time the primary concern is the appearance of motion in an image, Shutter Priority is a good choice for shooting or camera mode.

Panning in Shutter Priority mode

Another example of using a slow shutter speed to create a panning effect in Shutter Priority Mode.

Manual Mode

Once you’re comfortable with changing settings and you really want to take control of your camera, Manual mode is the way to do that. You will set all of your settings according to how you want your final image to look. There is one caveat, however. Your settings will also be dependent on the available light in the scene. So if you want a fast shutter speed, and deep depth of field, you’ll probably need to raise your ISO a bit. Or compromise on one of the other settings as well.

Watch the meter

Just keep an eye on your camera’s meter and it will help you find the right combination of shutter speed, ISO, and aperture. The other modes do a nice job of taking some of the load off your brain by allowing you to choose one setting to have priority, but sometimes you just need to take full control.

Silhouette in Manual Mode

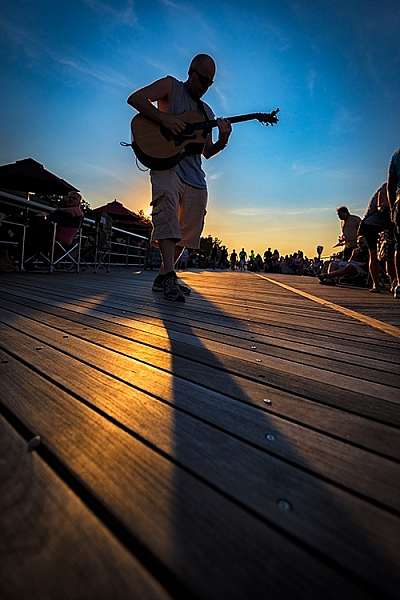
Manual Mode is the best choice when you want to create an effect that the camera’s normal exposure modes just don’t normally do, such as this silhouette.

Exposures long than 30 seconds

One instance where you’ll need to do this is when creating an exposure longer than 30 seconds. Today’s cameras don’t have shutter speeds for longer than that, so you would need to calculate in your head how long to keep the shutter open, and then use the Bulb setting to do so. Any time the camera can’t properly calculate exposure is a good time to use Manual Mode.

manual-mode-long-exposure

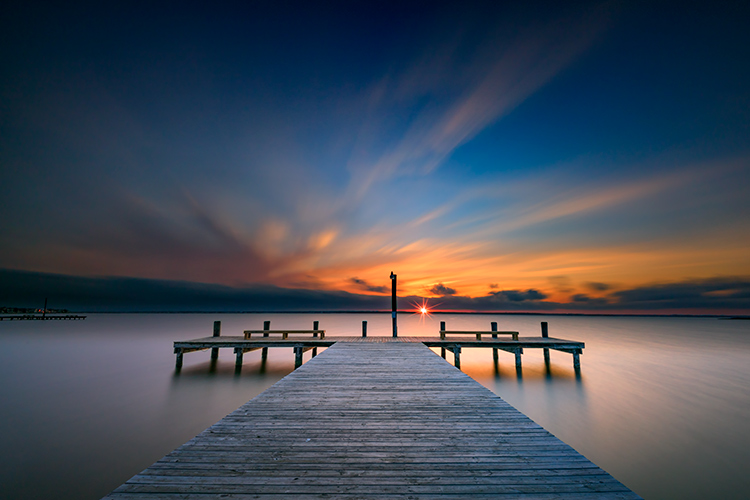
When creating images using a long exposure, such as this one with an exposure time of two minutes, Manual Mode is the best (or possibly only) choice.

Another time to use Manual Mode is when the lighting in a scene is especially challenging, such as when there are a lot of dark shadows. Your camera will try to expose for the deep shadows, causing the highlights to overexpose. Using a manual setting to override the camera’s choices will work well in achieving a satisfactory exposure.

Summary

As I mentioned, there are many ways to capture an image and arrive at similar settings. But each time I’m out photographing, I go through the following checklist in my head:

  1. Do I want deep or shallow depth of field?
  2. Do I want to stop action or is some motion blur okay?
  3. Which of the above two choices is more important for this image?
  4. Is one of the priority modes suitable for the available light of the scene?

The answer to those four questions should lead you to the correct mode for the shot you want.

Shutter Priority for fast action

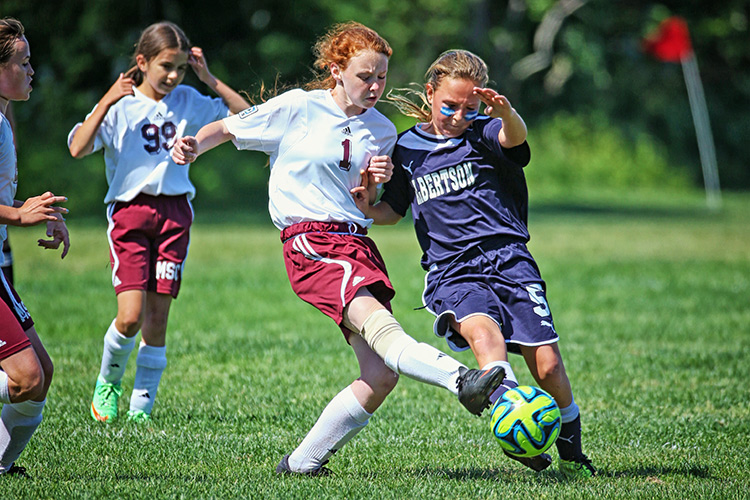
Shutter Priority can be used when photographing sports to set a fast shutter speed to stop action.

googletag.cmd.push(function() {
tablet_slots.push( googletag.defineSlot( “/1005424/_dPSv4_tab-all-article-bottom_(300×250)”, [300, 250], “pb-ad-78623” ).addService( googletag.pubads() ) ); } );

googletag.cmd.push(function() {
mobile_slots.push( googletag.defineSlot( “/1005424/_dPSv4_mob-all-article-bottom_(300×250)”, [300, 250], “pb-ad-78158” ).addService( googletag.pubads() ) ); } );

The post How to Choose the Right Camera Mode to Get the Shot You Want by Rick Berk appeared first on Digital Photography School.


Digital Photography School

 
Comments Off on How to Choose the Right Camera Mode to Get the Shot You Want

Posted in Photography


DPReview Asks: Who would you want to shoot your portrait?

16 Nov

We sat down with ten well-known photographers and asked a simple question: “Who would you want to shoot your portrait?” Some of the answers may surprise you.

So what do you think – if you had your pick, who would shoot your portrait? Tell us in the comments!

Articles: Digital Photography Review (dpreview.com)

 
Comments Off on DPReview Asks: Who would you want to shoot your portrait?

Posted in Uncategorized