RSS
 

Posts Tagged ‘Versus’

How to Understand the Difference Between TTL Versus Manual Flash Modes

01 Sep

It is no secret that the popup flash which comes built-in to your digital camera simply isn’t enough in most situations. For a variety of reasons, shooting using just the popup flash is not a feasible option. That is why you will find photographers everywhere you look, going for an external flash and using it increasingly during their shoots.

External flash, also known by the term “speedlight” provides many benefits and advantages to photographers, even while shooting in extremely low light conditions. They allow us to have a far superior control over the lighting of an image. Flashes are available in the market from a variety of manufacturers including camera makers like Canon and Nikon, or third-party companies like Godox, Yongnuo, Nissin, etc.

How to Understanding Your Flash Settings: TTL Versus Manual Mode

If you step out in the market to buy your first flash, you will come across two variants, a fully manual flash, and a TTL (Through The Lens) flash. You may end up getting confused over which flash will suit you the best and which one you should invest your money in. Both the Manual and TTL flash have their own plus and minus points which appeal to photographers. What is important is to properly understand their systems, functionalities, advantages, and disadvantages.

Understanding Manual Flash

On a fully Manual flash, there is no control (d either by the camera or the flash) over the intensity or duration of the light emitted from the flash. Instead, it is the photographer who controls the output of the flash by adjusting the settings, either in-camera or on the flash itself.

While using a manual flash, there are four controls you can use to set your flash output manually as per your requirements:

  • Adjust the ISO on the camera.
  • Raise or lower the level of output from oyur flash (½, ¼, 1/8th power, etc.)
  • Alter the distance between the subject and the flash (light source).
  • Adjust the aperture value on the camera.
How to Understanding Your Flash Settings: TTL Versus Manual Mode

Manual mode – check the user manual for your flash to see how to set it.

Not all flashes are equal

An important point to remember and consider is that the majority of flashes can shoot in manual mode, but not every flash can shoot in TTL mode. A manual flash also gives you specific control over the light and exposure, and allows you to set it exactly to your requirements. You do not have to use exposure compensation while using a manual flash as your composition, frame, etc., does not have any affect on the overall exposure and lighting of the scene.

Pros and cons of manual flash

In situations where the distance between the flash and the subject is constant and fixed, you can opt to use manual flash settings. A manual flash is extremely useful in situations where you have to fire away a series of shots of the subject repeatedly, under similar exposure conditions. E.g., in food photography, product shoots, and more this is the case. The power level is fixed, and it remains the same, which ensures that the exposure does not vary from shot to shot.

How to Understanding Your Flash Settings: TTL Versus Manual Mode

Manual flash works best when the subject is not moving like this setup, posed shot.

One of the main drawbacks of using a flash in manual mode is that you still need to figure out the optimal power output needed to obtain the correct exposure, which can be a time consuming process. And thus, a manual flash can mainly be used while shooting portraits, headshots, and fine art. In other words, in situations where you can take time to setup the scene.

Many also believe that manual mode is the best to use to learn about external flash photography. You choose the output, click the picture and then review it. If it does not come out the way you were expecting and wanted it to, then you can tweak the settings and try again. So you end up learning more in the process.

Understanding Automatic or TTL Flash

When the flash output is directly controlled by your camera, it is called Through-the-Lens metering or TTL. In the case of an Automatic or TTL enabled flash, the flash output is directly controlled by the flash or by the camera’s exposure metering system. Thus, using a flash in TTL mode will give you varied flash output.

How to Understanding Your Flash Settings: TTL Versus Manual Mode

Flash in TTL or Automatic mode.

The only method to control a TTL enabled flash is to use the flash exposure compensation function on the flash or through your camera settings. Also, while using a TTL flash, your chosen Aperture and ISO levels do not affect the flash output because the camera tells the flash to emit a particular output based on the camera’s readings. If the settings change, so will the output to compensate automatically.

When you half-press our shutter release button on your camera to focus, your camera not only focuses, but it also takes a metering of the scene and its exposure. It measures the amount of ambient light which is being returned “Through the Lens” to the sensor.

How to Understanding Your Flash Settings: TTL Versus Manual Mode

How it works

A TTL enabled flash fires a “pre-flash” before the actual shot is taken. The camera then measures the pre-flash with the ambient light level to calculate the power needed from the actual flash to make a correct exposure. This pre flash happens really quickly, only micro-seconds before the main flash, and thus cannot be seen by the human eye. Based on the model of your flash, this pre-flash can be an actual white light flash or an infrared one.

Using a TTL enabled flash is extremely helpful in situations when you are moving around a lot, shooting in different or changing lighting settings, etc., and do not have the time to fire a series of test shots before the shoot.

How to Understanding Your Flash Settings: TTL Versus Manual Mode

One of the drawbacks which accompany the use of a TTL flash is less control and less precision over the lighting. If you get an incorrect exposure while using a flash in TTL mode, it is really difficult for you to know the power setting which was used for that shot.

Conclusion

If you have recently purchased your first digital camera and plan to buy an external flash, then you have two options.

Either go for a manual flash, as it will urge you to learn more about how to control and adjust the lighting in various situations. But if you want to take up professional assignments and cannot afford to experiment with a manual flash, then go for a TTL enabled flash.

Which do you use? Do you have a flash that does both? Which do you prefer for different situations? Please tell us in the comments below.

The post How to Understand the Difference Between TTL Versus Manual Flash Modes by Kunal Malhotra appeared first on Digital Photography School.


Digital Photography School

 
Comments Off on How to Understand the Difference Between TTL Versus Manual Flash Modes

Posted in Photography


Why I Use ACDSee Versus Adobe Bridge for Culling Images and More

27 Jul

Believe me, I have tried. Over the years, I have tried to wean myself off ACDSee. But, like Al Pacino in The Godfather, “Just when I thought I was out, they pull me back in!”. ACDSee does what I want it to do and, as a single package, and it does it better than anything else I have found.

I use Lightroom as a factory, a mass production tool. I import the images, I process them, that’s it. For a long time, I have felt no urge to look at anything other than the Library and Develop modules.

ACDSee Image Software

The wood shed.

Continuing the analogy, what I might call handcrafted images, are processed in the garden shed, with Photoshop. Pretty much everything else I do in ACDSee.

ACDSee in place of Adobe Bridge

First and foremost, ACDSee is an Adobe Bridge replacement for me. For something like 80% of the time, I use about 20% of its capacity, that is its ability to act in the place of Bridge. I am certain that I have only launched Adobe Bridge once in the last year. I had to do it just once to write this article! ACDSee simply does it better in my opinion.

ACDSee Image Software

Standard file manager style screen

Any of the different versions, even the most basic of them, meet my needs. The screen shots for this article are from ACDSee Ultimate, but my previous experience is that all versions work in a similar way. You would need to work out just how many bells and whistles you wanted to invest in. ACDSee offers a good comparison of the different versions on their website. I am sure you would find that ACDSee is not a challenging piece of software, it works quite conventionally.

This article may well invite some comments suggesting that “such and such” software does that too, and I am sure that is true. Is the elephant in the room Photo Mechanic, is it Irfan View, or even Adobe Bridge? I am also sure that there are even others. So I try others, I give them a go, but I end up back in the arms of the little-known all-around beauty which is ACDSee.

ACDSee Image Software

Lifestyle

I tend to be a little bemused when I have heard people talk about having a lifestyle. I have wondered if I ought to get myself such a thing. My reaction is not much different when people talk about having a workflow. Different situations seem to me to require different approaches, and I have wondered if I should get myself a workflow.

The truth is that I am not totally slapdash. For example, if I have been out on a photo walk, there is a routine which I tend to follow. Stepping through that routine seems a good way to look at some aspects of ACDSee. Here is my process.

IMPORTING IMAGES

ACDSee provides a ton of choices for importing photographs, let me highlight just one.

ACDSee Image Software

Import window of ACDSee.

I am a huge believer in the adage that “Data only exists if it exists in two places”. The extension of that thought is that you do not actually have a backup until you have a third copy. Presuming that you leave your images on the card in the camera, ACDSee gives you the choice to make two copies on import and to give you those second and third copies of your images. The first copy can be imported to one folder and the second copy can be imported to another location. That might just prove to be a very useful safety net one day. You might be glad you tried ACDSee for this reason alone.

It might be a consequence of having used computers since before The Ark, but I still tend to think in terms of named and dated folders. Libraries, collections and the like, clearly work for some, but I import to my date/location file structure, then into Lightroom from there.

THE CULLING PROCESS

One of the most important parts of my workflow (Oops! did I just admit to something?) is the culling process. I will take a long time sorting through the photographs, in sweeps, which are progressively more demanding, deleting those which I do not want to spend time processing. ACDSee helps me with the cull in at least 3 ways.

ACDSee Image Software

1 – ACDSee is fast with RAW files

Subjectively, I tend to find Adobe Bridge rather clunky to operate and slow in responding. It was painfully slow to open a folder and draw the thumbnails on a computer with quite high specifications. The same folder was opened, with thumbnails and images viewable very promptly, in less than ten seconds with ACDSee. It was taking so long with Bridge, the images were still not viewable after 2 minutes, that I moved to another copy I have of the same images on a faster, SSD drive. In all fairness, Bridge was then just as quick as ACDSee.

ACDSee Image Software

Adobe Bridge

Objectively, ACDSee is faster at drawing a RAW file than Bridge to an insane degree. I took shot Image A and opened it to a full-screen view in ACDSee, then in Bridge. Then I reversed the process and opened Image B in Bridge first, then in ACDSee. Both ways, using ACDSee, the image was clear, viewable in sharp detail, within 2 seconds. Using Bridge, after more than 30 seconds I gave up, clicked to zoom in, and only then did it become a clear, sharp, fully-drawn image.

ACDSee Image Software
That adds up to an awful lot of time over the years. I cannot fathom that there is anyone who likes sitting and waiting for their computer to catch up. Not only would you save a huge amount of time cumulatively, it also makes for a much more satisfying experience.

2 – Comparing images is easy with ACDSee

Second, the process of culling is easier because ACDSee offers an excellent tool for comparing photographs in close detail. I know Lightroom offers something similar, probably others do too, but none seem to work as well as that in ACDSee. Often I will have a series of four or five shots (or more) which are largely similar. ACDSee lets you put those shots on screen, next to each other, all at the same time. Actually, I think it works best with just three on screen at a time.

ACDSee Image Software

Three or more photographs compared side by side.

The choice as to which photograph to keep often comes down to a technical decision such as which shot is the sharpest. For a portrait, that usually means looking at the eye. With ACDSee, when you zoom in on one of the photographs which you are comparing, all of the shots zoom in to the same point, at the same level. Again, I acknowledge that other software probably does this, but I have not come across all the things I want, working as well as they do, in one package.

ACDSee Image Software

All three shots zoomed in to the same level.

3 – Full-screen mode

The third way in which ACDSee helps me cull images is that it goes to full screen so very easily and quickly. It displays photographs in the way I want to see them. Full screen, with no window border, no mouse pointer. Double click or hit Enter and you are in full screen. Also “Crtl/Cmd+scroll wheel” zooms you in. That is how I want to view photographs.

Then, there are two bonuses. First, a right click option is Zoom Lock, which means I can Page Up and Page Down between shots which are full screen and zoomed in to the same point and level. You might even prefer this to the side by side comparison. The next bonus, which can be useful now and then, is that the EXIF data can be brought up very quickly with ALT/OPTION+Enter in the full-screen view mode.

ACDSee Image Software

Full-screen mode, with the EXIF data, added on the right.

All the above is mostly about ACDSee being used as a replacement for Adobe Bridge. One important thing I have not squeezed in so far is that you can open an image straight into Photoshop from ACDSee. It does the file browser function of Bridge just as well, and a very easy keystroke combination of Ctrl/Cmd+Alt+X takes the image into Photoshop. It is probably the only shortcut I can use without looking at the keyboard.

These factors alone make a case for why ACDSee keeps pulling me back in. However, there is more!

BATCH PROCESSING

ACDSee Image Software

ACDsee has a good selection of batch operations.

The tools which I probably use most often, and they work very well, with all the options you could ask for, are the batch tools. I find it so helpful that ACDSee will batch resize a number of images, then convert the file format, then rename them. There are a few other tricks too.

It is not part of the batch menu but, at least in my mind, it is linked. I often publish directly to social websites where, again, you are given useful choices.

ACDSee Image Software

Send to …

ACDSee Image Software

This is probably a good place to mention again that I know Adobe has the tools to do all of this. But I do not think anyone can believe that they are as simple to use, and they are certainly not all in one place.

MANAGE

As I have already confessed, I am still in the mentality of file browsers, and that is the format which you are looking at with ACDSee. It has all the benefits which you would expect from such a tool. You can search, play with metadata, sort by different criteria, look at different views … it just works well.

ACDSee Image Software

Full-screen slideshow.

Seems this might be the time to mention that ACDSee does good slide shows too, with some level of sophistication. Full screen, with the toolbar you can see above only appearing when you click on the screen. Most notably, that gives you the ability to change the delay. For more sophisticated settings, you can dig a little deeper.

ACDSee Image Software

Slideshow settings window.

EDITING

Finally, the part of ACDSee which I use least often, though still appreciate, is the program’s capacity as an image editor.

I do sometimes use it for one-off processing of an image. Some people suggest that ACDSee is a full blown alternative to products which are much better known. ACDSee will handle RAW, it has layers, it is non-destructive … it has some clever tricks … if you do a search on You Tube, you will find plenty of people offering not just enthusiasm, but solid tuition that might persuade you that ACDSee can meet ALL your photographic needs in what would then be a very reasonably priced package.

Read dPS author Leanne Cole’s review here: Photo Editing Alternative – An Overview of ACDSee Ultimate 10

It might seem trivial, but what I often use ACDSee for is cropping and leveling. Without a description of the minute details, it has all the usual cropping facilities, but with the easy ability to set dimensions precisely to the pixel.

ACDSee Image Software

Pixel precise cropping.

You can then place the mask precisely on the image, in a way that I have not found any other program capable of doing. I also like the way it allows you to vary the opacity of the image area outside the mask. If you set a crop dimension and move through a series of photographs, the dimension will also be retained from one photograph to the next.

ACDSee Image Software

A helpful tool.

It also works similarly with regards rotating the image.

ACDSee Image Software

You can rotate by the degree.

I’ve not used anything else which lets you rotate the image with such precision, auto-cropping as you go.

Again, a clear display of what is happening, with helpful options

CONCLUSION

I love the forensic, hugely detailed reviews which, for example, DP Review conducts. This article cannot be of that nature. It is more a taster, highlighting a few of the things which I find helpful to me personally, and which might work for you too. I also join others in celebrating the underdog, particularly if it is, in fact, a really good team, which plays a good game.

Why not go over to ACDSee, download it for a 30-day free trial and give it a go yourself. If you already use it, tell us in the comments below what features you love the most and why.

The post Why I Use ACDSee Versus Adobe Bridge for Culling Images and More by Richard Messsenger appeared first on Digital Photography School.


Digital Photography School

 
Comments Off on Why I Use ACDSee Versus Adobe Bridge for Culling Images and More

Posted in Photography


How to Understand the Differences Between Full-Frame Versus Crop-Sensor Cameras

14 Jun

I remember how excited I was to get my first DSLR several years ago. My wife and I had a newborn and wanted to get better shots of our little baby than what a pocket camera could provide. So we soon found ourselves with a new-to-us Nikon D200 that produced stunning images of our precious little boy. The pictures wouldn’t win any prizes, but they were leagues beyond what we could get with our pocket camera or cell phone and that was fine with us.

However, the more I learned about cameras in the coming months, the more I started to think we had made a mistake because our camera was, I discovered, a crop-sensor model. Unbeknownst to us, we had spent hundreds of dollars on what was clearly an inferior camera! Or so I thought at the time. The truth, as is so often the case, is much more nuanced. I’ll explore it a bit in this article so you can understand the practical differences between these two types of cameras and hopefully decide which one is right for you.

How to Understand the Differences Between Full-Frame Versus Crop-Sensor Cameras

This duck is rushing to get the latest full-frame camera he read about on the internet.

Different, not better

Before I get too deep into this article I want to make one thing clear; neither crop, nor full-frame, nor medium format, nor micro-four-thirds are any better than the others. All of them are different, and each format has its strengths and weaknesses (yes, even full-frame cameras have weaknesses!) and each is ideally suited to different types of photography. Moreover, all types of cameras are capable of taking great photos. Even mobile phones, which are basically super-duper-ultra-crop sensor cameras, can take breathtaking award-winning shots that grace not only social media feeds but billboards, walls, and pages of magazines across the world.

The term crop-sensor or full-frame refers solely to the size of the imaging sensor inside a camera. A full-frame sensor is the same size as a piece of 35mm film which was, and still is, the most widely-used type of film in analog cameras. The most common size that the term crop-sensor refers to is known as APS-C, which is the same size as a piece of film from the mid-1990’s Advantix format (also called the Advanced Photo System or APS) invented by Kodak.

How the smaller sensor affects your images

Using a smaller sensor has interesting effects on things like depth of field and apparent focal length of lenses, but it’s not a subjective measure of how good or bad a camera is. Think of it like going to an all-you-can-eat buffet with different sized plates. Shooting with a full-frame camera is like taking a normal size plate to the serving area, whereas using a crop sensor camera is like using a plate that is about 30% smaller. Both will get the job done, and both are great for different types of people. So what’s all the fuss about? Understanding some of the practical differences between these two types of plates…er…cameras will help you know which type is best for you.

So what’s all the fuss about? Understanding some of the practical differences between these two types of plates…er…cameras will help you know which type is best for you.

How to Understand the Differences Between Full-Frame Versus Crop-Sensor Cameras

Crop-sensor versus Full-Frame…it’s not about which is better, but which will suit you better.

ISO performance

For years one of the immutable truths about shooting with a full-frame camera was that it automatically gave you better performance at high ISO values. While this is still mostly true today, it’s also safe to say that for a majority of practical scenarios crop-sensor cameras have picked up the slack and can hold their own fairly well when pitted against their large-sensor counterparts.

If you are looking for the ultimate in high ISO performance though, you might want to ditch that Canon Rebel and start shopping around for a 5D Mark IV or a 1DX. The reason for this discrepancy is due to physics. The pixels, or tiny individual light-sensitive bits on a camera imaging sensor, are usually larger on a full-frame camera.

Bigger buckets

For example, pretend it’s raining and you want to collect some of the water that’s falling freely in your front yard. To do so you set out 24 large buckets (so big you call them mega-buckets) next to each other and wait a few minutes for them to start filling up. Your neighbor, meanwhile, sees your plan and rushes to do the same thing but uses 24 ultra-mega-buckets that are about 30% larger than yours. When the sun comes out and the birds start to sing, who will have collected more water? I’ll give you a hint, it’s not going to be you.

How to Understand the Differences Between Full-Frame Versus Crop-Sensor Cameras

Even though you and your neighbor were both harvesting rainwater with 24 mega-buckets, hers were larger in size and therefore able to collect more water. It’s kind of the same with cameras in that a model like the Nikon D5500 has a 24-megapixel image sensor which is the same as a full-frame Nikon D750. However, since the pixels on the D750 are bigger they are more sensitive to light. So, when there’s not much light available, such as a situation where you may need to shoot at ISO 6,400 or 12,800, they do a better job of collecting the light.

How to Understand the Differences Between Full-Frame Versus Crop-Sensor Cameras

ISO 6400, crop-sensor Nikon D7100. Note how grainy much of the dark areas look, and the somewhat desaturated feel of the bright colors.

How to Understand the Differences Between Full-Frame Versus Crop-Sensor Cameras

Shooting the same scene with a full-frame Nikon D750 yields much better results, with less overall noise and cleaner colors.

Technology advances

This analogy quickly breaks down when you consider the advances in modern technology. Most crop-sensor cameras today significantly outshine their forebears from just a few years ago when shooting at ISO 3200 or 6400. The Fuji X-T1, a modern crop-sensor camera, is about equal to the full-frame Canon 5D Mark III in terms of high ISO performance. Granted the latter is a few years old and has since been bested by other full-frame cameras, but still, the point remains that today’s crop-sensor cameras are no slouch when it comes to shooting at high ISO values.

However, if you want the absolute best in terms of high ISO sensitivity, a modern full-frame camera is usually going to be your best bet. It’s not a zero-sum game though, and there are many other practical considerations to think about. Lastly, just because a camera can shoot at ISO 25,600 doesn’t mean it’s the right one for you.

Cost and Size

There is a principal of mathematics known as modus ponens which is used as a way of showing a certain thing to be true because it follows a logical progression. Basically, it’s a formal way of saying that one thing P naturally implies Q. If P is true, then Q must also be true.

Camera Size

When we apply this rule to photography we can immediately see one disadvantage of cameras with larger sensor sizes. It goes like this; full-frame sensors are larger than cropped image sensors (i.e. condition P). Larger sensors need larger camera bodies in order to compensate for the increase in sensor size (i.e. condition Q). Therefore, cameras with larger sensors are larger than cameras with smaller sensors. Quod erat demonstrandum.

How to Understand the Differences Between Full-Frame Versus Crop-Sensor Cameras

The sensor in a full-frame camera is much larger than the sensor in a crop-frame camera. Therefore, the camera itself needs to be larger too.

Price – $ $ $

Thus, we can see another key difference between cameras with various sensor sizes, and it’s something to keep in mind when considering which type of camera to buy. Image sensors range from the size of a tic-tac breath mint to that of a postage stamp, to a potato chip, and even larger when you consider highly specialized imaging devices like those used at NASA. These image sensors are not cheap to manufacture, which is why full-frame cameras can easily cost twice as much as their crop-sensor counterparts. If you go all the way up to medium format, with sensors that are significantly larger than full-frame, you can easily spend $ 10,000, $ 20,000, or more on the camera alone, without any lenses.

How to Understand the Differences Between Full-Frame Versus Crop-Sensor Cameras
Crop-sensor cameras like the Nikon D3300 or the Canon Rebel T6i are smaller, less expensive, and also more portable than their full-frame counterparts. If you’re shopping for a camera, don’t need crazy-high ISO performance, and also don’t want to empty your pocketbook in the process, then a crop-sensor or micro-four-thirds camera (which has a sensor that’s about 25% as large as a full-frame camera) will suit you quite nicely.

However for many photographers, the size of their camera is of little concern, and they don’t mind the increase in size, weight, and cost that comes with venturing into the full-frame territory. Just know that bigger isn’t always better, especially because along with bigger sensors comes bigger lenses that are required to fit on them as well.

Lens Size and Selection

When considering a camera system, whether crop-sensor or full-frame, it’s not just the size of the camera that you will need to keep in mind but the size and price of the accompanying lenses as well. Lenses designed for smaller sensors are generally smaller and less expensive than lenses for full-frame cameras. A 70-200mm f/2.8 lens for full-frame cameras, which is fairly standard for many photographers, can easily cost upwards of $ 1500. Whereas a similar piece of glass like the Sigma 50-100mm f/1.8 lens for crop-sensor cameras will set you back about $ 1000. It’s even better when you look at the micro four thirds system, where lenses are significantly smaller and often less expensive than comparable full-frame models.

How to Understand the Differences Between Full-Frame Versus Crop-Sensor Cameras

The classic 70-200mm f/2.8 lens. Designed for full-frame cameras, it’s a fantastic lens that will give you great photos but it’s also expensive and heavy. Similar lenses for cameras with smaller sensors are smaller, lighter, and often cheaper.

However, one advantage of going with a full-frame system is the sheer quantity and variety of lenses that you have available at your disposal. Since all 35mm film cameras ever made are full-frame, you can use most of those lenses on modern cameras and sometimes you don’t even need an adapter. Many modern full-frame cameras are capable of autofocusing with older lenses too, making it easy to find high-quality glass that will suit your needs if you don’t necessarily need to buy brand-new. There is a growing selection of lenses for crop-sensor cameras, particularly in the micro-four-thirds ecosystem. But if you need access to the largest possible array of lenses than a full-frame camera might just be your best bet.

Lens Performance: Depth of Field and Focal Length

At this point, it might sound like I’m less than enthusiastic about full-frame cameras, but I promise you that’s not the case. I shoot with both crop-sensor and full-frame gear. There is a reason why full-frame cameras and lenses are highly sought-after despite their larger size, heavier weight, and greater cost. Most glass made for full-frame systems costs more and weighs more because it is higher quality. They also produce superior results compared to some of the cheaper lenses for smaller cameras. (Note that I said most, not all. Certainly, there are many outstanding lenses for APS-C and micro-four-thirds cameras. But it’s safe to say that lenses made for full-frame cameras are, for the most part, going to produce outstanding results.)

There’s also the fact that when shooting full-frame you get the benefit of a shallower depth of field. For example, portrait photographers often prefer shallow depth of field. When shooting with a large sensor and a 70-200mm f/2.8 lens you can get results that are difficult to replicate with crop-sensor gear. The math is a bit tricky, but shooting a subject at 200mm with an aperture of f/2.8 on a full-frame camera gives very different results than using a crop-sensor camera.

Examples

How to Understand the Differences Between Full-Frame Versus Crop-Sensor Cameras

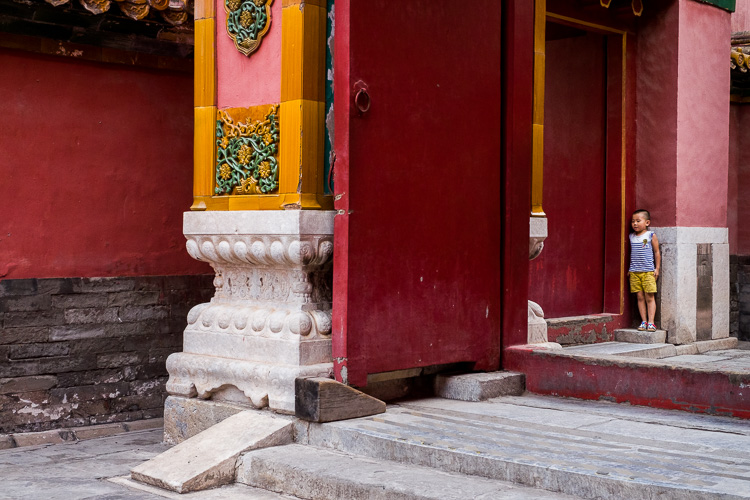
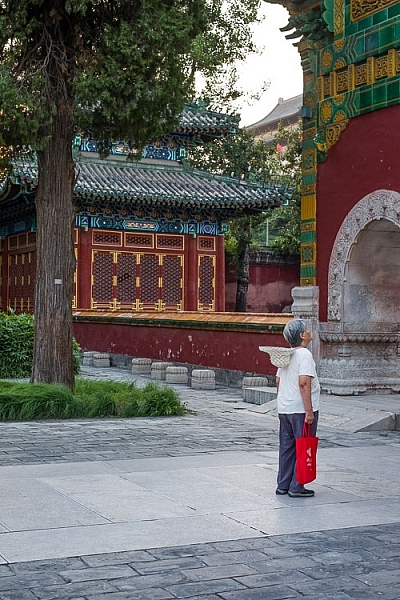
Shot with a 200mm lens on a full-frame camera.

I shot the photo above at 200mm with my full-frame camera, but it would have been quite different if I shot it on my crop-sensor camera. A 200mm lens behaves like a 300mm lens when mounted on an APS-C camera. That means I would have had to move much farther back to get this same composition and therefore would have significantly increased the depth of field. The background would not have been as blurry, and the pillar behind the boy would have been more in focus as well.

85mm lens on full-frame versus crop-sensor

Here’s a photo that I took with my crop-sensor D7100, using an 85mm lens at f/4.

How to Understand the Differences Between Full-Frame Versus Crop-Sensor Cameras

85mm lens at f/4 shot with a crop-sensor camera.

After I took that picture I put the same 85mm lens on my full-frame D750 and while standing in the same spot, took the following image:

How to Understand the Differences Between Full-Frame Versus Crop-Sensor Cameras

85mm lens at f/4 on full-frame, same physical position as the first picture.

It looks like I zoomed out, but in fact, I was using the exact same lens but on a full-frame camera. To get a picture like the one I shot initially, I had to move forward which then changed the background elements and also gave me a shallower depth of field with a background that was more out of focus.

How to Understand the Differences Between Full-Frame Versus Crop-Sensor Cameras

85mm lens at f/4 shot on a full-frame camera.

The reason this happens is that with the former you are getting a picture that accurately reflects a lens’s true focal length, whereas on a crop sensor camera you are seeing a cropped version of what the lens sees.

Wide-angle

This picture of the Edmond Low Library on the Oklahoma State University campus was taken with my 35mm lens on my Nikon D7100 (crop-sensor).

How to Understand the Differences Between Full-Frame Versus Crop-Sensor Cameras

35mm lens at f/4 on a crop-sensor camera.

I took the next picture sitting in the exact same spot on the library lawn, using literally the exact same 35mm lens mounted to my full-frame Nikon D750.

How to Understand the Differences Between Full-Frame Versus Crop-Sensor Cameras

35mm lens at f/4 on a full-frame camera.

Nothing changed here except the camera on which the lens was mounted. The shot of the library on my crop-sensor camera is, in a very real sense, a cropped version of what you see on a full-frame camera. The implications of this are profound since it means a 35mm lens on a crop-sensor body actually behaves more like a 55mm lens. (The exact value varies just a bit depending on whether you shoot Nikon or Canon, which each use a slightly different crop factor.)

Implications – how it affects you

So what are the practical implications of this phenomenon? It means that if you are primarily interested in landscape, architecture, or other shots that are suited for wider focal lengths, a full-frame camera will generally be a good choice. However, if you like to shoot wildlife or sports, a crop-sensor camera can give you a lot of extra reach with your lenses and effectively transform a 300mm telephoto lens into a 450mm birdwatching, goal-scoring powerhouse.

How to Understand the Differences Between Full-Frame Versus Crop-Sensor Cameras

I like to do close-up photography on my full-frame D750 not because it’s objective a better camera, but because there are specific features about it that I like for this type of photography.

The Final Word

After examining various differences between crop and full-frame cameras, I hope it’s clear that neither one is inherently better. Both are uniquely suited to different types of photographic tasks.

I’m always eager to hear from the dPS community on topics like this though, and if you have thoughts you would like to share on this issue please leave them in the comments below. Which system do you use and why? Are you satisfied, or are you considering switching from one format to another?

Do you have any questions after reading this article? Post a reply and in the meantime, no matter what type of camera you have, remember to get out there and use it to take pictures you enjoy.

The post How to Understand the Differences Between Full-Frame Versus Crop-Sensor Cameras by Simon Ringsmuth appeared first on Digital Photography School.


Digital Photography School

 
Comments Off on How to Understand the Differences Between Full-Frame Versus Crop-Sensor Cameras

Posted in Photography


Photoshop Versus Lightroom: Which is Best for Beginners?

07 Jun

If you’re new to photography, you’re likely wondering how to post-process or edit your photos. There is a wide selection of photo editing software to choose from, but the two that you probably hear debated the most are Adobe Photoshop versus Lightroom. So what are the main differences and which program is best for beginners and for you? Read on for a basic overview!

Photoshop v Lightroom

A Quick Note

While going through this article, please keep three points in mind:

  1. This is not meant to be a thorough comparison review of the two programs. There are endless features to compare between Photoshop and Lightroom, but this article is meant to give beginning photographers a point of reference as to which program to start with first.
  2. Ever since the Creative Cloud rolled out, Photoshop and Lightroom are constantly being updated with new tools and features. So depending on which version of the programs you are using, some of the tools and features mentioned below may or may not be present in your version of Photoshop or Lightroom.
  3. There are many other comparisons written several years ago that aren’t up to date don’t reflect the new features and changes in Photoshop and Lightroom. So if you read other comparison articles (including this one), be sure to double check when they were published and if they have been updated. For reference, I have Lightroom CC 2015.10 and Photoshop CC 2017.0.1

Get both Photoshop and Lightroom here and receive 20% off the Creative Cloud Photography membership now for dPS readers. 

What is Adobe Photoshop?


Photoshop Versus Lightroom: Which is Best for Beginners?

What the photo editing layout typically looks like in Photoshop.

Photoshop is a name that has become synonymous with photo editing. Today, thanks to its extensive functionality, Photoshop is used by not only photographers, but also by graphic designers, web designers, architects, and publishers.

Photoshop is also a pixel-based image editor, giving you ultimate control of every single pixel that makes up your digital photograph. This means you have limitless options when it comes to manipulating your photos. Want to stitch your friend’s head to a frog’s body or swap out gray skies for sunny skies? These are instances when you would turn to Photoshop.

What is Adobe Lightroom?

If you take a look at the main Photoshop interface for the first time, you’re likely to feel overwhelmed. There is a seemingly endless array of tools and options to choose from, and it’s hard to know where to start. This is because Photoshop contains features not only for photographers but also for designers and those of other creative skillsets. So when it comes to easily finding the photo editing tools you need, this is where Lightroom typically excels, especially for those new to photo editing.

Lightroom takes many of Photoshop’s features that are specific to photographers and puts them in an easy-to-find panel. Previous versions of Lightroom lacked extensive editing tools, but today, Lightroom contains many of the main image manipulation tools you need to process your photos.

Another benefit to using Lightroom is that it is also a fantastic image management software. You can use it to import, organize, manage, and edit your photos. In essence, Lightroom is your all-in-one photo management and editing tool. On the other hand, if you want to manage and organize your images with Photoshop, you must use the accompanying software called Adobe Bridge (which automatically comes with Photoshop).

Photoshop Versus Lightroom: Which is Best for Beginners?

What you’ll typically see in Lightroom after you import some photos.

Lightroom versus Photoshop?

Not long ago, you had to purchase Photoshop or Lightroom individually, and it was truly a challenge to figure out which was a more worthwhile investment. Today, you now get access to both programs if you purchase a subscription to Adobe Creative Cloud. For around $ 10 a month, you can purchase the Photography Creative Cloud package, which gives you access to both Lightroom and Photoshop (with Bridge). If you need other Adobe software such as Illustrator, InDesign or Premiere Pro, you can upgrade to the $ 50 per month Creative Cloud subscription.

However, the average photographer will be just fine with the simple plan that includes Lightroom and Photoshop. So from a financial perspective, it’s a no-brainer to get both photo editing programs. But in practice, here are some rules of thumb when deciding whether to use Lightroom or Photoshop.

Use Lightroom if…

You are brand new to photo editing

Most beginning photographers will probably prefer the layout of Lightroom. It presents all of your main editing tools in an easy-to-find column, and it is pretty intuitive to figure out. In Photoshop, you have to do a little more customization to set up your workstation exactly how you want; this leads to more flexibility, meaning you can further customize what tools you choose to appear. However, this can be confusing for beginning photographers.

Photoshop Versus Lightroom: Which is Best for Beginners?

For comparison: Lightroom automatically presents your basic photo editing tools in a column.

Photoshop Versus Lightroom: Which is Best for Beginners?

On the other hand, you have to customize which photo editing tools appear in your Photoshop work area.

You want to batch process multiple images

If you have a bunch of photos that you want to batch process, it is much easier to do in Lightroom using presets and its smooth workflow. Batch processing can still be done in Photoshop using Actions, but Lightroom is arguably more straightforward.

 You value a smooth, straightforward workflow

When it comes to workflow, Lightroom is arguably much better than Photoshop. Using Lightroom, you can easily create image collections, keyword images, share images directly to social media, batch process, and more.

Photoshop Versus Lightroom: Which is Best for Beginners?

In Lightroom, you can both organize your photo library and edit photos.

Adobe Bridge - Photoshop Versus Lightroom: Which is Best for Beginners?

If you want to organize or manage your photo library with Photoshop, you must use another program called Adobe Bridge.

Use Photoshop if…

You can’t do it in Lightroom

This is the easy answer since Lightroom will truly meet the photo editing needs of most beginning photographers. With that said, there are a few instances in particular when Photoshop will outperform Lightroom.

Advanced Retouching

While the latest versions of Lightroom do include some basic retouching tools for patching and removing blemishes, you can do much more in Photoshop. Want to make a person look thinner, whiten teeth, and remove small objects? While you can do this in Lightroom, Photoshop’s retouching tools are much more powerful. It might take some extra time to figure out where these tools are within Photoshop and how to use them, but you’ll be able to enhance your photos much more than in Lightroom.

Compositing

Do you want to combine the elements of multiple images into a single one? This is termed as compositing, and you will want to use Photoshop to combine and further manipulate images.

In Conclusion

If you are a beginning photographer looking for a relatively intuitive photo editing software, Lightroom is generally best, to begin with. You can always add Photoshop to the mix later, if and when you’re in need of advanced photo manipulation techniques.

What do you think? In the Photoshop Versus Lightroom debate, which is best for beginners? Why? Let us know in the comments below.

The post Photoshop Versus Lightroom: Which is Best for Beginners? by Suzi Pratt appeared first on Digital Photography School.


Digital Photography School

 
Comments Off on Photoshop Versus Lightroom: Which is Best for Beginners?

Posted in Photography


How a Short Versus Long Exposure Will Affect Your Landscape Images

29 May

The shutter speed is probably the factor which has the greatest impact on an image. By adjusting the exposure time by only a few stops, you’re able to completely change the appearance of an image. But what exposure time is best for landscape photography? Should you use a  long exposure or should you work with shorter ones? When will adjusting the shutter speed have the greatest impact?

In this article, I’ll share three case studies where I compare how adjusting the shutter speed has impacted the final images. I don’t believe that either is better than the other (in each case) but it’s important that you’re aware of the differences so it becomes easier to convey the story or emotions you desire.

What is a Long Exposure?

I’ve had many discussions with fellow photographers regarding the exact definition of Long Exposure. At first thought, most consider a long exposure to be an image where the clouds are dragged across the sky or moving water looks like silk or ice. However, this is judging solely based on the visual aspect of the image. Is it not still considered a long exposure if you don’t see its effect? Wouldn’t a 20-second exposure be 20 seconds no matter what?

The definition most of my photography friends have agreed upon is that a long exposure begins when you can’t take a sharp image handheld. Normally, this is at about 1/50th of a second with a wide angle lens.

Using a tripod makes it possible to have a longer exposure.

Case Study #1 – Waterfalls

Waterfalls are often ideal to start experimenting with long exposures. Since the water is moving quickly, you don’t need an extremely long exposure just to capture some motion. In fact, you’ll need a very quick shutter speed to avoid capturing any motion at all.

The choice of shutter speed has an extremely high impact on the image. You might not even need a filter to begin capturing the motion of water in your shots. However, I find waterfalls to be tricky to photograph at times because of this. The different shutter speeds have such a big impact that the entire mood (and story you tell) of your image quickly changes. So, consider what you wish to convey.

If it’s a huge waterfall with a lot of power you might want to use a quick shutter speed to capture its raw power and beauty. While a smaller waterfall might be more appealing when you use a slow shutter speed (long exposure). Experimentation is always the key when working with shutter speeds.

waterfall case study

Rjukandefossen, Norway 1/5th of a second shutter speed.

For the image above, I chose to use a shutter speed slow enough to require the use of a tripod but not so long that the water would become completely blurred. The textures in the water help build the overall atmosphere of the image and it compliments the rawness. By keeping some texture in the water, I’ve also strengthened the composition. When a longer shutter speed was used (see below), many of the lines in the foreground were lost and the flow wasn’t as natural anymore.

long exposure waterfall

Rjukandefossen, Norway 20-second exposure.

When lengthening the exposure time to 20-seconds, the image lost a lot of its raw and natural feel, which was what I wanted to convey. Now, the image has an unnatural appearance and even though it’s still visually pleasing, it’s not as interesting anymore.

A long shutter speed wasn’t ideal since the river was flowing so quickly. Had the water been slower, a 20-second exposure might have done a better job. So, when photographing a waterfall make sure that you keep in mind how quickly the water is flowing, as this will have a great impact on your choice of shutter speed.

Had I used a faster shutter speed than on the first image (for example 1/500th) the image would have a different impact yet again. Such a quick shutter speed would freeze most of the water and remove the sense of motion shown in the first image. Instead, there would have been a lot of texture in the water but no movement to compliment it. That would have resulted in a messy and, again, less appealing image.

Case Study #2 – Seascapes

When working with images that have more than one moving element (for example the sky and the water), you’ve got multiple factors to consider when choosing a shutter speed. Not only will the choice of shutter speed determine how the sky appears but it’s also crucial for the appearance of the water. In fact, since the water is what’s moving the quickest, that is where you’ll see the biggest difference (just as with the waterfalls).

For the image above, I used a shutter speed of 0.6 seconds. In the grand picture of long exposures this is still a relatively short shutter speed, and for some, it doesn’t even qualify as a long exposure. However, despite the shutter speed being only 0.6 seconds, there’s quite a lot of motion in the image. Since the waves were coming in fast the camera was able to register a significant amount of motion within that short time.

Personally, I’m a big fan of exposures between 0.5 seconds to 1.5 seconds when photographing seascapes (especially when using a low perspective like this). The shutter speed is long enough to capture the motion but it’s also fast enough that there’s still a lot of texture in the water. The lines that come as a result of the slow shutter speed do a significant job in improving the composition.

long exposure seascape

In the second image, I increased the exposure time to 30 seconds, allowing the camera to register motion for a longer period of time. As you can see, the texture that was the previous image is lost and the water has completely changed its appearance. Now it looks more like ice, or some sort of solid state.

However, the clouds are also considerably different than in the first seascape. By using a 30-second exposure the camera has also registered motion in the clouds, resulting in a more dynamic sky. When the clouds are dragged across the sky, such as above, you’ve got an extra factor to consider for your composition. In this scenario, the clouds are moving towards the horizon, creating a series of extra lines that help lead your eye through the image. Often this can be a great advantage.

I don’t believe that one is necessarily better than the other but, again, it’s important to understand how the choice of shutter speed (exposure time) will impact the image. When working with a slow shutter speed you’re introduced to several new factors (such as the helpful leading lines in the sky) and being aware of them will make the process of learning long exposure photography easier.

Case Study #3 – Generic Landscape

Once you remove the second element of motion, the choice of shutter speed becomes somewhat less crucial. Still, there will be a big difference between a 30-second exposure and a 1-second exposure if you’ve got some movement in the clouds. But the difference between a 0.5 second and 5-second exposure is less significant for a generic landscape and a seascape or waterfall photo.

It’s not uncommon for me to see someone using an ND Filter when photographing a mountain on a cloudless day. This is very common when first using filters, as you want to use them all the time. However, a 2-minute exposure won’t look any different than a 1/100th of a second exposure when there aren’t any moving elements in the image. After all, an ND filter doesn’t create motion, it registers it.

The image above is a typical example of when a long exposure wouldn’t make a big difference. I used a 1/5th second exposure time for this particular image but had I used a 30-second exposure with filters instead, it still would have looked more or less the same. Simply put, it wouldn’t have been beneficial to use a long exposure on this scene.

It isn’t until you’ve got at least one moving element that the true power of a long exposure photography appears (remember, this can be something as simple as grass moving in the wind). In the image below, you see the same scene but this time with clouds in the sky. The shutter speed I used for this image was 1/15th of a second, which means that I wasn’t able to capture any motion – yet.

short exposure generic landscape

Once clouds had appeared and there was one element of movement in the frame, a long exposure would have an impact on the image. Since the clouds were moving I was able to capture the motion and, again, create a more dynamic image.

For the image above I increased the exposure time to 30-seconds. By increasing it that much you can clearly see how the sky has changed and how the overall mood of the image has changed along with it. Unfortunately, the clouds were moving sideways. Had the clouds moved towards or away from me, the image would have greatly benefited from a long exposure and taken advantage of the leading lines that would have helped to lead the eyes towards the structure. Since the clouds were moving sideways, the extra leading lines in the image aren’t as helpful, even though they look nice.

Summary and Conclusion

After reading this article I hope you have a better understanding of how the shutter speed will affect an image and when increasing or decreasing it will be beneficial. There’s no “correct” way of doing it, and in the end, which image you prefer depends on what you’re looking for in your image. However, as I’ve mentioned multiple times, it’s extremely important that you understand how a longer or shorter shutter speed will impact the image. By understanding this, you’ll be able to save a lot of time in the field and ultimately create better images.

Remember, a slower shutter speed can affect the appearance of an image when there’s more than one moving element within the frame. A slow shutter speed is not going to make a difference when there are no moving elements.

The post How a Short Versus Long Exposure Will Affect Your Landscape Images by Christian Hoiberg appeared first on Digital Photography School.


Digital Photography School

 
Comments Off on How a Short Versus Long Exposure Will Affect Your Landscape Images

Posted in Photography


Side by Side Drone Comparison – DJI Mavic Pro Versus the Phantom Pro 4

22 May

Drones are becoming more and more popular and there is more competition on the market now. Phantom isn’t the only game in town anymore. But does the DJI Mavic match up?

DJI Mavic Pro Versus the Phantom Pro 4 – Drone Comparison

In this video, Colin Smith from PhotoshopCAFE shows you footage from each drone and a summary of his points. Each has their pros and cons, and ultimately it comes down to your needs.

Do you have a drone? Which one? What was the deciding factor for you in choosing yours?

Shop for the DJI Mavic Pro or the Phantom 4 Pro on Amazon.com.

The post Side by Side Drone Comparison – DJI Mavic Pro Versus the Phantom Pro 4 by Darlene Hildebrandt appeared first on Digital Photography School.


Digital Photography School

 
Comments Off on Side by Side Drone Comparison – DJI Mavic Pro Versus the Phantom Pro 4

Posted in Photography


Comparing a 50mm Versus 85mm Lens for Photographing People

12 May

As a writer for Digital Photography School, one of the most frequently asked questions I receive from beginner and intermediate photographers is, “If I have to choose just ONE lens to buy right now, which one should I choose?” We’ve previously discussed the differences between a 24mm lens and a 50mm lens for photographing people, and in that same vein, it’s time for another lens showdown!

lens photographing people

In this article, we’ll be discussing the differences between an 85mm and a 50mm lens for photographing people. Once again, I’ll walk you through several sets of similar images taken with each lens so that you can easily see the differences between the two. Hopefully, you can walk away with a better understanding of which lens might be the best upgrade for you.

To keep things consistent, all images in this article were taken with a Canon 60D, and either the Canon 50mm f/1.8 lens or the Canon 85mm f/1.8 lens. The Canon 60D is an APS-C sensor (cropped sensor) camera, so in order to determine the functioning focal length of these lenses on this camera, multiply the lens focal length by 1.6 (multiply by 1.5 if you use Nikon). So on a cropped sensor camera, the 50mm lens functions roughly as an 80mm lens, and the 50mm lens functions as a 136mm lens.

1. Differences in Depth of Field

lens photographing people

This image was taken with Canon 85mm lens at f/1.8.

One of the biggest differences between the 85mm lens and the 50mm lens is the distance that you’ll need to stand from your subject. With the 85mm lens, the minimum focusing distance is 2.8 ft, and with the 50mm lens, the minimum focusing distance is 1.15 ft.

This means that in general, you will be standing further away from your subject with the 85mm lens, than you will with the 50mm. In turn, this decreases the depth of field, which means that images shot with the 85mm lens tend to have much blurrier bokeh than images shot with the 50mm lens, even when using the same aperture.

lens photographing people

This image was taken with a Canon 50mm at f/1.8.

You can see the difference clearly in the cherry blossoms in the background of the two images above, both of which were shot at f/1.8. The cherry blossoms are fairly well blurred in both images, but the shape of the blossoms is more defined in the image taken with the 50mm lens, and the blossoms are significantly more blurred and creamy in the image that with the 85mm lens.

Of course, everyone has a different preference when it comes to bokeh. Some prefer the more uniform creaminess that the 85mm lens offers, while other photographers prefer to have a little more definition in the background.

lens photographing people

Left: 85mm lens | Right: 50mm lens.

You may even find that you prefer different approaches in different applications! For example, I usually favor the more uniform bokeh of the 85mm lens. However, when I’m photographing in the grass, I prefer the bit of texture which the 50mm lens provides (see the examples above).

This is purely a matter of preference, so start making mental notes about which type of images you tend to prefer when you look at other photographers’ work. If you find that you are always drawn to the creamier texture, then the 85mm lens may be a better fit for you. If you prefer a bit more texture in the background, you may want to consider the 50mm lens instead.

2. Differences in Framing

lens photographing people

This image was taken with 50mm lens.

In addition, spend some time thinking about the content of your backdrops. Using an 85mm lens will result in an image that is more closely framed on your subject. On the other hand, shooting with the 50mm lens will result in an image that includes more of the background (though not nearly as much as shooting with the Canon 24mm lens).

Do you happily hike up to the top of a mountain for a photo session? You might want to consider the 50mm lens in order to more fully capture the trees and vistas in the background behind your portrait subject(s).

lens photographing people

This image was taken in exactly the same place as the previous one, only using the 85mm lens instead of the 50mm.

On the other hand, do you often find yourself trying to disguise the background in your images? Do you shoot on location with backgrounds that are sometimes out of your control and/or unpredictable?  In that case, you may want to consider the 85mm lens.

When you combine the decreased depth of field of the 85mm lens with the closer framing of your subject, the 85mm lens is stellar at creating beautiful portrait images at almost any location.

3. Differences in Shooting Distance

lens photographing people

This image was taken with 50mm lens.

Remember when I said that when you’re using an 85mm lens you’ll be standing further away from your subject than you would be using a 50mm lens? Here’s another reason why that’s important to know, I almost never use my 85mm lens inside our home.

Our house is just over 1,000 square feet, and depending on the room, sometimes I physically cannot back up far enough to use my 85mm lens. Aside from official photography business, it’s important to me to be able to capture little day to day moments of our family, and so having a fast lens that I can use indoors is a must-have for me.

As much as I love my 85mm lens, it just isn’t a great fit for that purpose given the size of our home. Your mileage may vary.

Lens photographing people

This image was taken with 85mm lens.

On the other hand, when we’re outdoors I often prefer my 85mm lens. In that situation, standing further away from my subjects is a good thing. I can let my kids play and have fun without being all up in their business. Having a bit more space between them and the camera means that they’re able to relax more easily, which in turn leads to more genuine expressions and candid smiles.

Conclusion

As you can see, both of these lenses are great for capturing portrait-style images of people – I personally keep both in my camera bag and use them with near equal frequency.

That said, if you’re only able to purchase one lens right now, both lenses have situations in which they outshine the other, so it’s important for you to think realistically about your preferences and the way you’ll use a portrait lens most often in order to get the most bang for your buck!

If you have one of these lenses – which do you use the most for people photography?

The post Comparing a 50mm Versus 85mm Lens for Photographing People by Meredith Clark appeared first on Digital Photography School.


Digital Photography School

 
Comments Off on Comparing a 50mm Versus 85mm Lens for Photographing People

Posted in Photography


Alpha-better: Sony a9 versus a7R II

26 Apr

Sony a9 versus a7R II

The Sony a9 is a masterpiece of technology. Even if you have no intention of ever dropping $ 4500 to buy one, you have to admit that its key specifications are impressive. Aimed squarely at action photographers, it’s much faster than the a7R II, with a more sophisticated AF system, but it can’t match the older camera for sheer resolution.

In this article, we’ll be comparing the a9 and a7R II directly, looking in detail at exactly where their differences lie. For some photographers, the a9 might meet their needs admirably, whereas for others, the older a7R II might be just as good – or better. Read on to decide for yourself. 

Resolution

Perhaps the most fundamental difference between these two cameras is their sensors. The a9 offers a resolution of 24MP, putting it in the middle of the pack in terms of full-frame cameras’ pixel-count.

On the other hand, the 42MP sensor inside the 7R II offers the highest resolution of any Sony Alpha. In the entire full-frame market, it is second only to the Canon EOS 5DS/R when it comes to nominal resolution.

Having so many pixels at your disposal is great for certain kinds of photography, like landscape and studio work, but of course it comes at the expense of large file sizes, and reduced operational speed.

Our verdict: If you need the pixels, save some cash and buy an a7R II. If you need speed, read on…

Speed

The a9, on the other hand, features a significantly lower-resolution 24MP sensor, but one that’s been optimized for speed, rather than pure resolution. A maximum frame rate of 20 fps makes the a7R II look prehistoric, and 60 fps live view is available even during burst shooting. You don’t need that kind of performance for landscapes, but for sports and action, it’s extremely appealing. You can thank a stacked CMOS design, with built-in buffer memory for these tricks. In the image above, the sensor (1) sends data the signal processing circuitry (2) and on to a buffer (3) before pushing this data to the Bionz processor (4).

But of course, a fast frame rate isn’t useful without…

Autofocus

…a decent autofocus system.

The a7R II impressed us when it was released, offering probably the best all-around AF performance of any full-frame mirrorless camera. Its 399-point on-sensor PDAF system is very capable, and allowed for very good autofocus with adapted Canon EF lenses, as well as lenses from Sony’s own A-mount line. 

The a9 takes things to a whole new level, offering 693 phase-detection points (represented above). Sony claims that autofocus acquisition has been improved by 25%, and eye and face-detection rates have improved by 30% compared to the a7R II.

Autofocus

We’ve yet to formally test the a9, but impressions from our initial shooting are extremely favorable. While it’s too early to say whether Canon and Nikon sports photographers will be tempted to make the switch, it certainly looks like the a9 can hold its own when it comes to capturing fast action.

For Sony shooters though, if autofocus performance is a priority, the a9 is a clear winner.

Ergonomics

In terms of body design and handling, the a9 is a mixed bag when compared to the a7R II. Cosmetically, the two cameras are similar, but the a9 feels heftier and a little more substantial (it’s barely any larger, but it is slightly heavier). The most important changes are in how the controls work and feel, and the addition of a much more streamlined GUI. 

For starters, the buttons and dials on the a9 just feel nicer than they do on the a7R II. Less mushy, more ‘clicky’. This, coupled with the reduced lagginess in control response makes the a9 feel more responsive than the a7R II even before you’ve taken a picture. The addition of an AF positioning joystick is another welcome improvement over the a7R II, which will be appreciated by all photographers – not just sports and action shooters.

The a9’s menu system is vastly improved compared to the a7R II – a long overdue change that we’re very pleased to (finally) see.

Viewfinder

The a7R II’s viewfinder is really nice, but the a9’s is better. It offers greater resolution (3.7 million dots as opposed to 2.3M) and a higher framerate of 120 fps. This drops to 60 fps during continuous shooting, but a 60 fps refresh rate during 20fps shooting is nothing to sneeze at.

LCD

The a9’s rear LCD may sound like it only offers only a modest increase in resolution compared to the a7R II (1.44M dots compared to 1.23M) but there’s been a move from a 640 x 480 pixels to 800 x 600, which should be appreciable. The difference is that the previous panel had red, green, blue and white dots at each position, whereas the new screen uses three dots per pixel (red, green and blue, with some green positions replaced by white).

Furthermore, the addition of touch-sensitivity is a welcome (and again, overdue) upgrade compared to the older camera. Finally, it seems, Sony is getting the message that all the features in the world can’t make up for a poor user experience.

PC sync socket

Well now, this is interesting… the action-oriented a9 has an ethernet socket, which makes sense for pro sports photographers, but it also has a PC sync socket, while Sony’s high-resolution flagship studio camera, the a7R II doesn’t?

We’d be pretty confident that few, if any a9 buyers will ever use their camera’s PC sync socket. Many won’t use the Ethernet port either, but at least it’s an indication of the intended user-base. To us, the addition of a PC sync socket is a pretty good indication that a higher-resolution sister model is on its way. The a9 represents the third ergonomic iteration of the full-frame Alpha series, so it makes sense that physically, any future a9-series models will share the same basic chassis. Is there a higher resolution a9R in the works? If Sony’s past release schedules are any guide, we’d say it’s a near-certainty.

Video

As well as being highly capable stills cameras, the a9 and a7R II both offer advanced 4K video specifications. In terms of sheer output quality, the a9 is likely to offer the best-looking footage, thanks to 2.4X oversampling from 6K with no pixel-binning, no line-skipping, and no crop factor. The incredibly fast readout speed of the new sensor means that there’s little or no impact from rolling shutter, too.

Both cameras offer headphone and microphone ports, plus HDMI and USB (the a9 is pictured above), although it’s a shame that even the a9 is still limited to an old-style micr USB 2 port. Despite the incredible speed of the camera, we’ll have to wait for a super-high-speed USB 3.0 interface.

No S-Log

Oddly though, the a9 lacks S-Log, and does not feature any of the Picture Profiles found on previous a7-series cameras (an example of what ungraded S-Log footage looks like is shown above). This limits its usefulness as part of a professional video rig, because it reduces the potential for grading footage in video editing software. Sony says this is because the a9 is offered primarily at stills photographers, but then why add 2.4X oversampled 4K video at all?

Whatever the explanation, we’re hoping that S-Log will be added via firmware. Unless, of course, its exclusion leave room for an a9S or some other, more video-centric model?

Our verdict: If you can live without S-Log, the a9 will capture better full-frame 4K video. Oh, and there’s something else it has to offer, too…

Card slots

The a9 offers twin card slots, one of which supports UHS-II media. This is an obvious improvement over the a7R II’s single slot, and one that might prove to be a big deal depending on the kind of photography you do. Having two slots is always useful for redundancy if nothing else, and for mixed stills and video shooters, it’s handy to be able to record movies to one card, and stills to the other. 

We wish the a9 offered support for the much faster XQD card format, but we suspect that if it comes at all, XQD will arrive in the next generation of Alpha bodies. For now, two slots of any kind are definitely better than one. 

New battery

Oh happy day – we had almost given up hope. One of our perennial complaints about the a7-series was battery life. The weedy little FW50 inside the a7R II provides enough endurance for a couple of hundred stills, but for video work its low capacity of 7.7Wh meant frequent battery swapping during a typical day of filming.

The a9 is introduced with a new NP-FZ100 battery, providing more than twice the capacity (16.4Wh). The boosted battery capacity, and a claimed 40% general reduction in power consumption compared to the a7R II should mean that the new camera will last a lot longer on a single charge.

The introduction of a separate external 4-battery power pack, aimed at videographers and compatible with the a9 and all previous a7-series bodies is good to see, too.

Final verdict

The a9 is faster in all respects than the a7R II. Judging by our initial impressions, it should be a very capable tool for sports and action photography, certainly compared to its predecessor. Whether it can compete against the likes of Canon’s EOS-1D X Mark II and the Nikon D5 is another matter of course, and we’ll be testing that soon enough.

From a more general user experience point of view the a9 is improved, too. Finally, a full-frame Sony camera with a menu system that doesn’t make us want to scream, and a touch-screen! Wonders will never cease… 

Is there anything the a7R II can do that the a9 can’t? Not much, but the differences are important.

Having almost 20 million more pixels means the a7R II can produce bigger prints, which might be a big deal for landscape and studio photographers. The a7R II’s autofocus system isn’t as good as the a9’s, but it’s still very good, and 5 fps is enough for most everyday shooting. For general photography (and more specialized high-resolution work) the a7R II will do the job admirably, for a lot less money than the a9. For now at least, the option of shooting in S-Log might make the a7R II a more attractive camera for video professionals too, despite the better resolution offered by the a9’s oversampled footage. Its lower capacity battery life is still a limitation, but the release of the NPA-MQZ1K Multi-Battery Adaptor Kit will definitely help.

Ultimately, for Sony shooters that really need speed, the a9 is clearly a better camera than the a7R II. The option of 20 fps continuous shooting with a 60 fps live view feed should prove addictive for anyone shooting fast action. The a9 also looks like a better camera for 4K video, thanks to 2.4X oversampling from 6K, and a new – larger – battery. 

What do you think of the new a9? Let us know in the comments.

Articles: Digital Photography Review (dpreview.com)

 
Comments Off on Alpha-better: Sony a9 versus a7R II

Posted in Uncategorized


Primes Versus Zoom Lenses: Which Lens to Use and Why?

06 Apr

Which type of lens is better, a prime lens or a zoom lens? This is one of the most debatable topics in photography. Some of you might choose a zoom lens and others may choose a prime lens, it all depends on what and where you are going to shoot.

It is really important to know what each of the two types of lenses are, and which type should be used during a given situation. This article will help you in this area.

Primes versus zoom lenses

What is a Prime Lens?

A lens that has a fixed focal length is known as a prime lens. So if you want to change your view of the frame, you will have to go closer to, or farther away from the spot where you are standing. As the focal length is fixed, there is no zoom ring on the lens.

There is a wide range of prime lenses available on the market, ranging from wide-angle prime lenses (such as 14mm and 24mm lenses) to medium and long range telephoto prime lenses (such as 135mm and 400mm lenses).

Primes versus zooms Sigma 20mm

A Sigma 20mm prime lens.

What is a Zoom Lens?

A lens which has a variable range of focal lengths is known as a zoom. Using such a lens, you do not need to move from your spot, and adjusting the zoom ring allows you to get a wider or narrower angle of view. So by using a zoom lens, you can change the focal length in order to adjust the angle of view.

There is a broad range of zoom lenses available, be it a wide zoom lens (such as the 12-24mm or 16-35mm lenses), the telephoto zoom lens (such as a 70-200mm, 100-400mm, and 150-600mm lenses), or the multi-purpose zoom lens (such as the 18-300mm and 24-105mm lenses).

Primes versus zooms tamron 18 200mm

Tamron 18-200mm zoom lens.

Benefits of Using a Prime Lens

Wide Aperture at a Lower Cost

One of the biggest advantages of using a prime lens is that you get to use a wide aperture (small f-number) such as f/1.8 and f/1.4 at a reasonable cost. For example, the Canon EF 50mm f/1.8 STM Lens (only $ 125) and the Sigma 85mm f/1.4 DG HSM Art Lens ($ 1199 compared to the Nikon version at $ 1599 or the Canon one at $ 1899). Whereas, a zoom lens such as the Canon EF 70-200mm f/2.8L does not allow you to shoot wider than f/2.8, and that will burn a hole in your pocket (close to $ 2000).

Prime lens 1

Shallow Depth of Field

A prime lens allows you to use an aperture value as low as f/1.2 or f/1.4, thus providing a really shallow depth of field. Using such wide aperture opening, you can get more of a bokeh effect which means that your subject would be in focus and the background/foreground is blurry. Comparatively a zoom lens may only allow you to go a wide as f/5.6, f/4 or f/2.8, resulting in a wider depth of field as compared to a prime lens.

Therefore, if you are planning to get shallow depth of field (more bokeh effect) then using a prime lens would fulfill your requirements.

Primes Versus Zoom Lenses

Shot at f/1.4 using the Sigma 20mm f/1.4 DG HSM Art Lens.

Better Low Light Photography

As mentioned above, a prime lens can let you use an aperture value as low as f/1.2-1.8 which lets more light into the camera. While shooting in low light conditions using a prime lens you can use a faster shutter speed as it lets in 3-4 more stops of light (f/1.4 > f/2 > f/2.8 > f/4 > f/5.6 – a 50mm f/1.4 lets in 4-stops more than a standard f/5.6 kit lens) compared to a zoom lens.

So if your zoom lens at f/4 is giving you a shutter speed of 1/20th, using a prime lens at f/1.4 would allow you to use a shutter speed of 1/160th. If you are in a situation where the lighting is low and you do not have a tripod, using a prime lens would have an added benefit as it allows more light into the camera.

Primes Versus Zoom Lenses

Better Sharpness and Image Quality

There are fewer lens elements inside prime lenses, each placed to perform a specific role. This is the reason why a prime lens produces less optical flaws such as chromatic aberration and lens distortion, thus resulting in better image quality.

The number of lens elements in a zoom lens is more because it has to provide variable focal lengths, resulting in decent sharpness. However, even zoom lenses are getting better day by day in terms of image quality and sharpness to closer match the results captured by prime lenses.

Primes Versus Zoom Lenses:

Benefits of Using a Zoom Lens

Versatility

One of the biggest advantages of using a zoom lens is that it allows you to change focal lengths without changing your lens. A zoom lens provides a range of variable focal lengths which can be adjusted using the zoom ring on the lens, the range depends on the lens model. To name a few zoom lenses, you can get 18-55mm, 16-35mm, 24-70mm, 70-200mm, 100-400mm, and 18-300mm lenses. While using a zoom lens you can even go from a wide angle view to a telephoto view without even changing the lens.

So if your shoot requires you to switch between various focal lengths then it is better to use a zoom lens to save time and to avoid missing any important moments. In wedding photography, sports, and while traveling you should be using a zoom lens the most, because if you switch between multiple prime lenses then you might end up missing the moment.

Primes versus zooms - lens Range

This image shows the range of focal lengths the Tamron 18-200mm F/3.5-6.3 Di II VC lens provides.

Portability

A zoom lens such as the Canon EF 70-300mm f/4-5.6 is basically five prime lenses in one as it covers some of the most commonly used focal lengths such as; 85mm, 100mm, 135mm, 200mm, and 300mm. Imagine how easy and light it would be to carry a single lens in comparison to carrying five in your camera bag. Though the zoom lens would not allow you to use a wide aperture or give amazingly sharp images as a prime lens would, but it would surely help you pack light. Now it is all up to you, either choose the advantage of the portability of a zoom lens – or carry the extra weight if you are not willing to compromise on image quality.

If you are a frequent traveler who likes to pack light and can compromise a bit on the image quality and the ability to shoot a wide aperture, then a zoom lens is an ideal choice for you.

Primes versus zooms 2

All in all, a less expensive deal

As stated in an example above, the Canon EF 70-300mm f/4-5.6 IS USM Lens is basically five in one (or even more). So now if you do the math, a $ 449 zoom lens can allow you to use any focal length ranging between 70mm and 300mm. Whereas, if you buy five or more prime lenses then you might end up spending over $ 4000.

A zoom lens would be ideal for you if you have just started in photography and want to explore different genres of photography. First invest in a decent zoom lens such as the 18-55mm, 18-300mm, 55-250mm lens or the 70-300mm lens. Then once you are sure about what genre of photography you want to go ahead with then you can buy your next lens accordingly.

Primes versus zoom lenses

Conclusion: A Prime Lens or a Zoom Lens?

There is no doubt that prime lenses are superior when it comes to sharpness and image quality. However, zoom lenses are improving constantly, but still not close enough perhaps. Though some premium zoom lenses such as the Canon EF 70-200mm f/2.8L and Canon EF 24-70mm f/2.8L II USM produce images with brilliant sharpness and less optical aberration.

If you are looking for that beautiful bokeh effect which can only be achieved at wide aperture then you will have to go for a prime lens. It will allow you to choose aperture values such as f/1.2, f/1.4, or f/1.8. Similarly, to shooting in low light conditions a prime lens will give you the added advantage of using a faster shutter speed, thus resulting in sharp pictures.

Primes versus zooms 3

But if you are a frequent traveler or are not familiar with the location, then using a zoom lens will be a safer option as it is a versatile as well as a portable option. Even at weddings or while covering events you cannot rely on a prime lens as there are limitations of moving around the area, therefore using a zoom lens is a wiser choice.

Please share your thoughts on the prime versus zoom lens discussion below. Which lenses have you opted to use?

The post Primes Versus Zoom Lenses: Which Lens to Use and Why? by Kunal Malhotra appeared first on Digital Photography School.


Digital Photography School

 
Comments Off on Primes Versus Zoom Lenses: Which Lens to Use and Why?

Posted in Photography


The Pros and Cons of Black and White Versus Color for Street and Travel Photography

10 Jan

The question of whether to shoot street and travel photos in black or white or color is an eternal one that isn’t going to go away. But one of the interesting things about digital photography is that it lets you decide whether to process a photo in black and white or color after the photo has been taken. Unlike film photography, there’s no need to commit to one or the other until you open the photo in Lightroom.

The Pros and Cons of Black & White Versus Color for Street and Travel PhotographyBut is that a mistake? I think it is because black and white photography and color photography are two different mediums. If you are working in color, then you need to pay attention to the colors in the scene and how to use them to create an interesting composition. But in black and white, you need to pay more attention to textures, contrasts, and shapes in order to create a strong composition.


That’s on top of the task of capturing the expressive moments that the best street and travel photos reveal.

There’s a lot to think about, and as black and white and color photography require different mindsets, it’s a good idea to make the decision about which you are going to shoot before you press the shutter button.

Having said that, it is also helpful to think about the following factors when you are processing photos. It may be that you were working in color, but realize afterward that a particular image would work very well in black and white. The same considerations apply, except that you have more time to think about it.

3 Reasons for working in black and white

1. To capture character

Many street and travel photographers, street photographers especially, chose to work in black and white. If your aim is to make a candid portrait that captures something of the person’s character or soul, then black and white is an excellent choice. There is something timeless about black and white that helps reveal character.

That’s why I shot the following photo in black and white.

The Pros and Cons of Black & White Versus Color for Street and Travel Photography

2. To simplify the composition

Black and white is a form of simplification. Skilled street photographers learn to create images that are uncluttered and that contain as few distractions as possible. Color can be extremely distracting, and sometimes it’s easier to ignore color completely and work in black and white.

For example, let’s say you make a portrait of somebody on the street, but there is a red poster on a wall behind them. In a color photo, that’s likely to be very distracting. But convert it to black and white and the distraction goes away. The viewer’s attention goes back to the person, where it belongs.

If you are working in an area with lots of potentially distracting colors, working in black and white may be the way to go. For example, this scene in Bolivia was quite colorful, and I felt that black and white removed the distractions of those colors.

The Pros and Cons of Black & White Versus Color for Street and Travel Photography

3. To evoke atmosphere

Color photos can be tremendously evocative, but so can black and white ones. I think it’s because a black and white image leaves something for the imagination, or perhaps because we associate it with photos taken in the past. So, if you are working somewhere with lots of old buildings, then black and white photos can be a tremendously moody way of capturing the atmosphere of that place.

I chose black and white for this photo, taken in the Argentina, because the stirrup is handmade, and looks ancient, as if it were made many years ago.

The Pros and Cons of Black & White Versus Color for Street and Travel Photography

3 Reasons for working in color

Color is very powerful and used wisely it can elevate your images to another level. Yet, if it is not used thoughtfully, it can take away from the impact of your photos.

1. The colors of the location are part of its character

For example, last year I visited Beijing and noticed that red is a very common color in that city. It denotes power and wealth and has an important part in Chinese culture. I realized that it is possible to create a series of interesting photos with red as the dominant color.

For example, this photo (below), taken in the Forbidden City in Beijing, makes use of the striking contrast between the red walls and the yellow tiles (matched by the boy’s shorts).

The Pros and Cons of Black & White Versus Color for Street and Travel Photography

2. The light is beautiful

Color photos are at their strongest when the light is beautiful. This is usually during the golden hour close to sunset, or early morning just after sunrise. The light at these times is warm and golden, and tremendously evocative. This could be a good time to work in color.

I took this photo close to sunset. The light was soft and its warmth helped lift the scene.

The Pros and Cons of Black & White Versus Color for Street and Travel Photography

3. You are shooting at dusk

Dusk and early evening are good times to work in color as it gives you the opportunity to work with the natural color contrast between the orange light cast by tungsten light bulbs and the natural blue color of the ambient light.

This photo below was taken in the early evening. The hat and t-shirt of the man in the foreground are colored blue by the ambient light outside, while the rest of the scene is lit by artificial light. I retained the orange color in post-processing to keep the atmosphere.

Color vs black and white in street and travel photography

Commit

The process of deciding to shoot in black and white or color involves assessing the scene and the situation, and deciding which one to use, taking into account the reasons listed in this article and your personal preferences. The key is then to commit to the process. Work the subject and do your best to create the most powerful images possible.

If you’re working in color, think about the colors present in the scene and how you can use them effectively. Your mind will engage and start looking more deeply at the colors around you.

If you’re working in black and white, look for interesting textures, tonal contrast, and shapes. Again, once you commit your mind will start looking for compositions that work well in monochrome.

Your turn

What do you think? Do you prefer to make street and travel photos in black and white or color? Let us know in the comments.


If you enjoyed this article and would like to learn more about street and travel photography then please check out my ebook The Candid Portrait.

googletag.cmd.push(function() {
tablet_slots.push( googletag.defineSlot( “/1005424/_dPSv4_tab-all-article-bottom_(300×250)”, [300, 250], “pb-ad-78623” ).addService( googletag.pubads() ) ); } );

googletag.cmd.push(function() {
mobile_slots.push( googletag.defineSlot( “/1005424/_dPSv4_mob-all-article-bottom_(300×250)”, [300, 250], “pb-ad-78158” ).addService( googletag.pubads() ) ); } );

The post The Pros and Cons of Black and White Versus Color for Street and Travel Photography by Andrew S. Gibson appeared first on Digital Photography School.


Digital Photography School

 
Comments Off on The Pros and Cons of Black and White Versus Color for Street and Travel Photography

Posted in Photography