RSS
 

Posts Tagged ‘Using’

Flashgun Accessories for Using and Controlling Light

20 Nov

A flashgun attached to your camera can help to illuminate your subject in low-light scenes and night-time shots, but often the direct nature of the beam can create prominent or unflattering shadows, rob backdrops of ambience, flatten textures, plus dilute the skin’s natural hues and tones.

One of the solutions is to use a light modifier, which can be attached simply and quickly to a flashgun, and are used to control the strength, shape light and concentrating of light. The portable nature of these accessories also means they can be easily stowed away in a camera bag to be taken on location, and what is more – a growing number of manufacturers are producing these lighting accessories to give amateur photographers more choices to use light creatively to generate more professional looking results.

Here is a brief guide to some of the more common modifiers for flashguns to help you get started, but there are lots more out there to try:

Snoot

Like its studio equivalent the flashgun snoot is a dark conical device strapped to the light source to generate a concentrated narrow beam of light. The spill of light is fiercely controlled and can be directed to illuminate areas of a scene shrouded in dim light or darkness like a spotlight. This particular accessory is fantastic for using for boudoir photography and even some stylistic-heavy fashion shoot.

Example: Honl 8” gold-silver reflector speed snoot, £28/$ 29.95, www.honlphoto.com
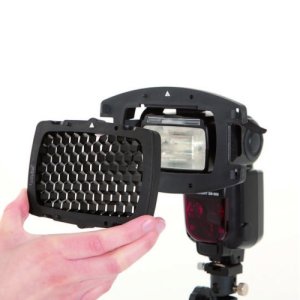
Honeycomb grid

Like the snoot, the honeycomb grid directs light with minimal fall off but isn’t as strongly controlled, plus instead of creating a circular field of light the result is more rectangular. Photographers can slot in patterned metal sheets to add an extra level of creativity, plus warm, cool or colour the light using coloured gels.

Example: Lastolite Strobo, £120/ $ 195, www.lastolite.com
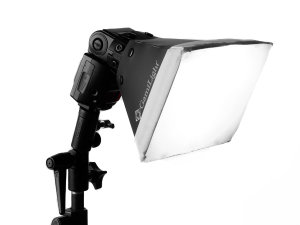
Softbox

Just like soft boxes that are used in studio environments, photographers on the go use these shoot-through mini-versions by strapping them on to the head of the flash gun. The large flat white panels of the box diffuse the beam of light cast, spreading it more evenly for a flattering result. Thanks to the delicate nature of the light generated, soft boxes are the perfect accessory for shooting portraits of any kind, indoors and outdoors, and can be teamed with natural light to rid the model’s face of shadows cast by the sun.

Example: GamiLight softbox, £32/$ 53, www.gamilight.com

Bounce, Reflectors

A bounce is usually a flat or slightly angled surface that once attached to the flash gun is used to control the shape and angle of light. Photographers position the bounce so that the beam of light from the gun reflects of the surface and ‘bounces’ either directly on to the model, or for a softer result that comes from another direction, off of a wall or ceiling. Bounce’s can also come in coloured version such as an amber hue, to add warmth to the light.

Example: Rogue FlashBenders Large reflector, £30.99/$ 39.95, www.expoimaging.com

Globes, Domes

Similar to a soft box, globes and domes are made of opaque plastic and are designed to be shot through to diffuse the power of the light, and spread it across the scene more evenly thanks to their globe or dome like design. Depending on the construction of thick plastic, most globes and domes will result in one stop light loss for noticeable softer results. Wedding photographers will often use such devices during the first dance or evening parts of the celebration to gently light the subject’s whilst retaining the ambient light of the location.

Example: Gary Fong Lightspere Collapsible, £99/$ 59.95, www.garyfongstore.com

Post originally from: Digital Photography Tips.

Check out our more Photography Tips at Photography Tips for Beginners, Portrait Photography Tips and Wedding Photography Tips.

Flashgun Accessories for Using and Controlling Light


Digital Photography School

 
Comments Off on Flashgun Accessories for Using and Controlling Light

Posted in Photography


Make 3D Photo using 3DMasterKit software and Lenticular lenses

19 Nov

3DMasterKit, is a comprehensive and powerful stereo imaging suite that provides you with a broad range of image editing capabilities. It primary purpose is the creation of realistic and detailed lenticular prints with a variety of effects: flip, animation, morphing, zooming and more. The application is capable of encoding images for a number of viewing methods, including stereoscopes, anaglyph and LCD shutter glasses and, of course, «glasses-free» lenticular lenses viewing. Download 3DMasterKit from www.triaxes.com
Video Rating: 4 / 5

Here’s the tutorial I’ve been promising on how to make 3D with just one camera and a compositing program like CompositeLab Pro from FXHome.com Also a good source for cheap anaglyph 3D glasses too

 
Comments Off on Make 3D Photo using 3DMasterKit software and Lenticular lenses

Posted in 3D Videos


Using a super clamp to mount your Zoom H4n on your boom pole – DSLR FILM NOOB

18 Nov

www.dslrfilmnoob.com Super Clamps are handy little devices. You don’t have to use them with a manfrotto magic arm for them to come in handy. One Great use for them is mounting your zoom h4n. Using the stud that comes with your super clamp you can mount a threaded cold show adapter rcm.amazon.com or threading it into the super clamp stud: rcm.amazon.com Either way provide you with a great way to mount your zoom h4n to your boom pole. The zoom h4n is light enough that you wont be over taxed by the extra weight, and with the multiple mounting options on a super clamp you could always mount a wireless transmitter/receiver to send audio out or bring it in from other sources. When i have to operate the boom mic from long distances I often attach a wireless transmitter to send my audio back to the camera. That way my 7d has a good solid sync track for dualeyes to work with. Equipment used in this video: Canon t2i canon 35mm f1.4 Zoom h4n Cowboy super clamp and manfrotto super clamp Sennheiser g2 wireless transmitter

 
Comments Off on Using a super clamp to mount your Zoom H4n on your boom pole – DSLR FILM NOOB

Posted in Nikon Videos


Using LiveView – Part 2 of 2

08 Nov

This Tutorial continues from part 1 and shows you how to use LiveView features with ControlMyNikon. ControlMyNikon allows you to remotely control your Nikon DSLR with your PC. For more information, check out www.controlmyikon.com
Video Rating: 5 / 5

great buy from jacks camera shop~ 3ish off ebay with a lil over 143k shutter count. sadly after using it for a bit that night i found that i got either full black pics, half black half super over saturated, or half black and half green lol messaged them back and they said they would replace the body for me which im freggin happy about, so theres gonna be another d2h unboxing in about a month lol. anyways super satisfied with the d2h~ screw your 0 point and shoots LOL and heres the pics of the fail shutter i51.tinypic.com i51.tinypic.com i56.tinypic.com
Video Rating: 4 / 5

 
Comments Off on Using LiveView – Part 2 of 2

Posted in Nikon Videos


Canon E-TTL and Nikon CLS System explained using Nikon D7000 and Nikon SB700. Beginner Lesson

08 Nov

razzi.me www.facebook.com www.PhotographersOnUTube.com This video explains how Canon E-TTl and Nikon CLS ( Creative Lighting System ) work.

 
Comments Off on Canon E-TTL and Nikon CLS System explained using Nikon D7000 and Nikon SB700. Beginner Lesson

Posted in Nikon Videos


Creating Anaglyph Images Using Autodesk Composite

08 Nov

Level: Intermediate Recorded In: 3ds Max 2011, Autodesk Composite 2011 Files used: areadownloads.autodesk.com Description: This movie shows how to create anaglyth(3D) images using the Composite map. Anaglyph images provide a stereoscopic 3D effect when viewed with red & cyan glasses. The benefit of the technique shown here is that it uses features built in 3ds Max, instead of relying on commercial applications or plugins. You will need a pair of anaglyth glasses in order to experiment the end results seen here. If you don’t have any, run an internet search for “3D anaglypth glasses”. Many sites sell inexpensive paper glasses that work well. In order to try the technique shown here, you need to have Autodesk Composite installed on your system. Autodesk Composite can be found on the 3ds Max Install DVD.
Video Rating: 5 / 5

 
Comments Off on Creating Anaglyph Images Using Autodesk Composite

Posted in 3D Videos


Flash Photography Tips – Controlling ambient light through Shutter Speed when using speed light

06 Nov

razzi.me www.facebook.com www.PhotographersOnUTube.com https
Video Rating: 4 / 5

 
Comments Off on Flash Photography Tips – Controlling ambient light through Shutter Speed when using speed light

Posted in Nikon Videos


Post Processing an Image using CS4 and Nik Color Efex/Viveza

05 Nov

Just a quick video on how I transformed a flat image into one that really POPS with color and contrast just by using Photoshop and the Nik filters Color Efex pro and Viveza

 
Comments Off on Post Processing an Image using CS4 and Nik Color Efex/Viveza

Posted in Retouching in Photoshop


Removing Background Using Refine Edge [Tagalog] Part 2

04 Nov

in this video you will learn how to use the refine edge and apply it in the real world projects like us on facebook: facebook.com
Video Rating: 3 / 5

 
Comments Off on Removing Background Using Refine Edge [Tagalog] Part 2

Posted in Retouching in Photoshop


Long Exposure Photography at night (BULB mode) using Moonlight only.

03 Nov

razzi.me www.facebook.com www.PhotographersonUTube.com https
Video Rating: 4 / 5

Official video of “get get get” by Tantrum to blind. directed by Rasmus Wassberg. follow Tantrum to blind: www.tantrumtoblind.com www.myspace.com/tantrumtoblind www.youtube.com/TTBchannel
Video Rating: 4 / 5

 
Comments Off on Long Exposure Photography at night (BULB mode) using Moonlight only.

Posted in Nikon Videos