RSS
 

Posts Tagged ‘Using’

Colour Composition: Using Subtle Colour

11 Jul

A photo with subtle colour

In my last article I wrote about using colour boldly. Today I’m going to look at ways you can use colour in a much subtler, gentler fashion.

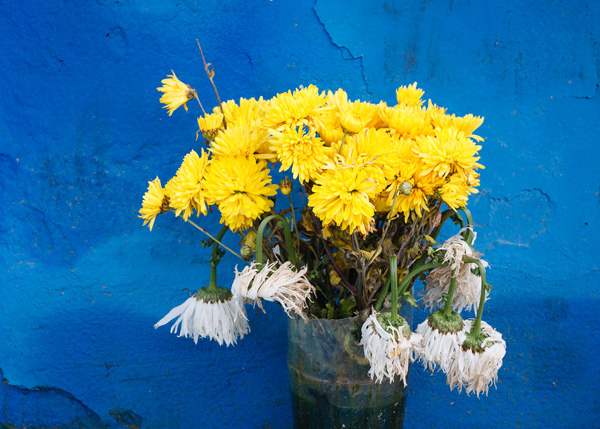
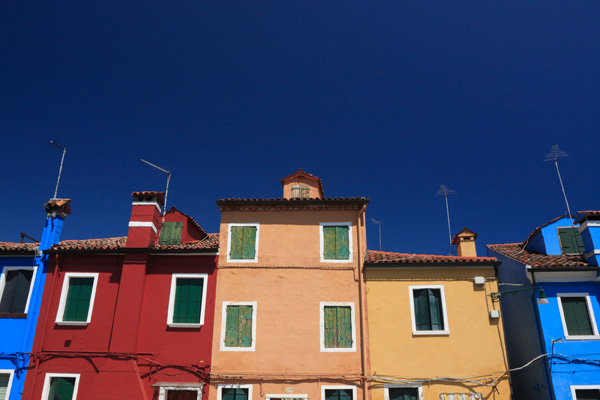
Bold colours are most often found in man-made objects. If someone paints a wall bright red, for example, and you take a photo of it against a deep blue sky, then you are using colours that are just about as strong and deep as it is possible to get.

In nature though, colours are often much more subtle. And there are ways that you can use the subtlety of colour found in nature to create photos that capture the mood of the scene.

Let’s look at some examples to explain what I mean:

A photo with subtle colour

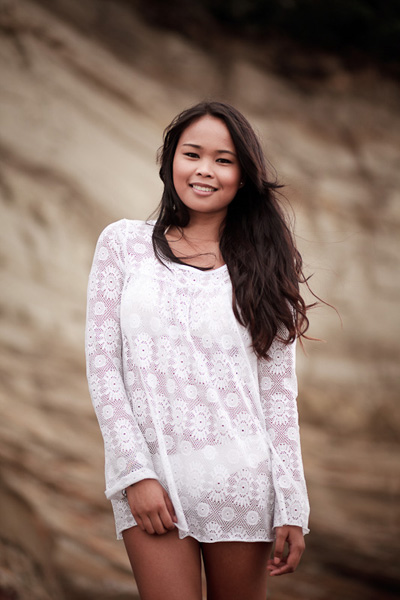
For this portrait I photographed my model against a cliff and use the cloudy white balance setting to warm it up. The background and the model’s skin and hair are all shades of brown. Apart from white, I don’t think there’s another colour in the image.

A photo with subtle colour

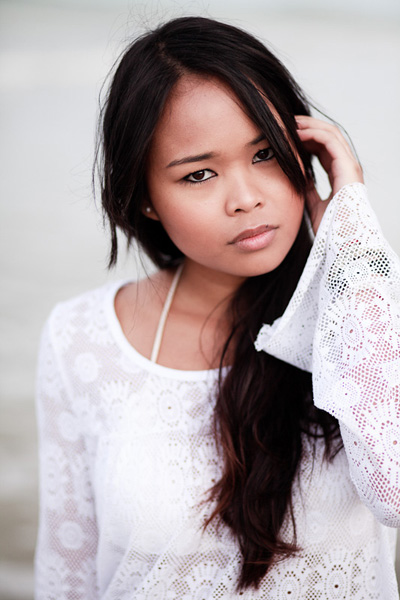
Here’s another portrait taken the same afternoon. The background in this photo is the sea, although it’s difficult to recognise as it’s out of focus. It was overcast, so the sea has come out grey rather than blue. But it suits the image. Just like the previous portrait, the colour palette is limited.

A photo with subtle colour

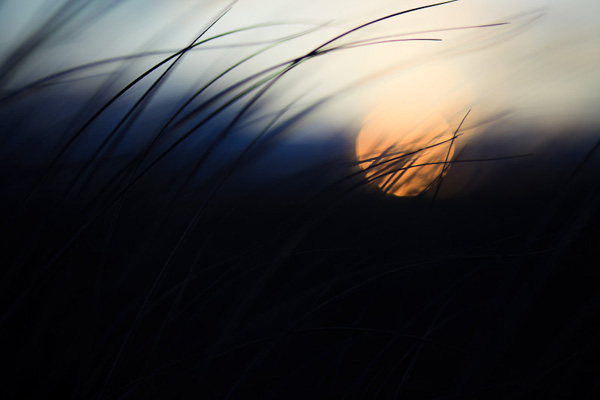
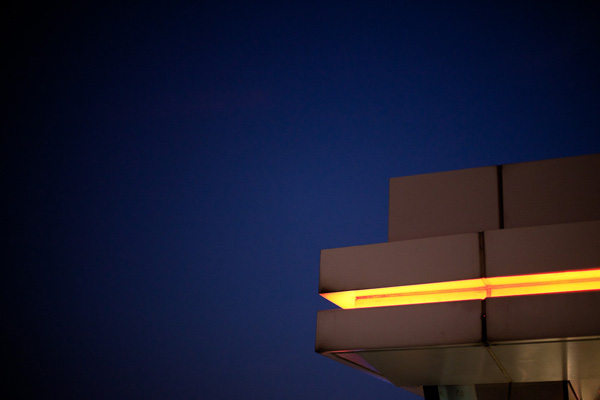
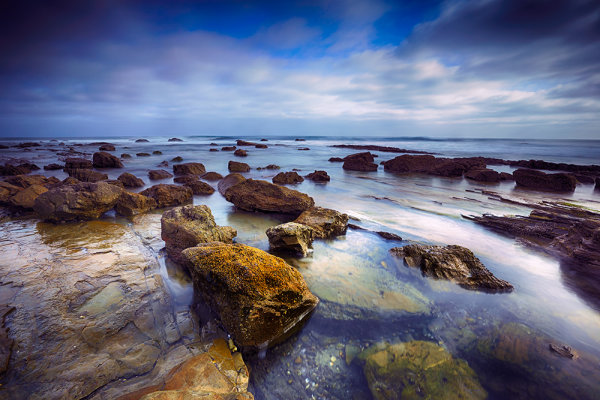
I created this photo by focusing on the grass in the foreground and using a wide aperture to defocus the setting the sun. I applied a low colour temperature in post-processing to give the scene a cool feel. Even though it is sunset, the colours are subtle.

A photo with subtle colour

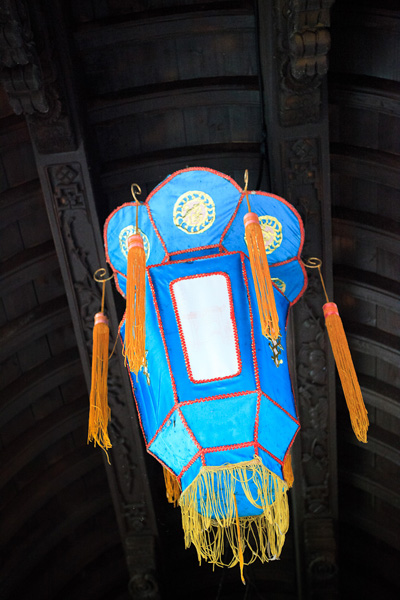
Here is a close-up photo I took in a local museum. The colour palette is very subtle. The box is cream, and the background is green. There is some nice tonal contrast going on in this image.

So far, the examples I’ve given have all used soft or pastel colours. But you can still use bright colours such as red in a subtle way. Here’s an example:

A photo with subtle colour

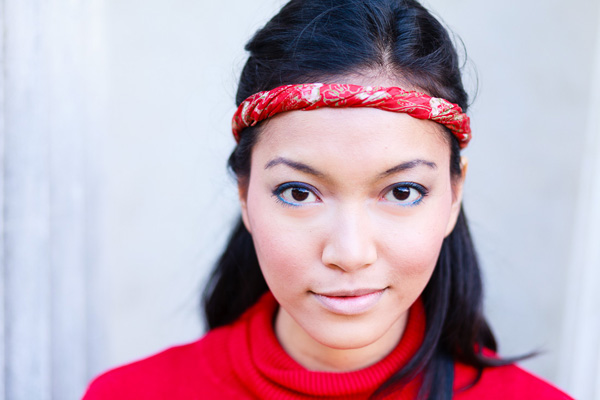
My model was wearing a bright red jumper and headband, so I positioned her against a white coloured building to provide a neutral background. The neutrality of the background colours emphasise the strength of the red.

I hope the photos in this article and the last have given you some ideas about using colour in your photos. It’s a little more difficult to use colour with subtlety that it is to fill the frame with bright colours. But it does give you an extra tool for expressing yourself with. And don’t forget, you don’t have to settle for the colour palette that nature provides. Feel free to make the colours in your images more subtle by desaturating them in post-processing.

Mastering Photography

A photo with subtle colour

My latest ebook, Mastering Photography: A Beginner’s Guide to Using Digital Cameras introduces you to digital photography and helps you make the most out of your digital camera. It covers concepts such as lighting and composition as well as the camera settings you need to master to take creative photos like the ones in this article.

Post originally from: Digital Photography Tips.

Check out our more Photography Tips at Photography Tips for Beginners, Portrait Photography Tips and Wedding Photography Tips.

Colour Composition: Using Subtle Colour


Digital Photography School

 
Comments Off on Colour Composition: Using Subtle Colour

Posted in Photography


French student creates SLR using 3D printer

09 Jul

3d-camera-top.jpg

We normally don’t cover film cameras on DPReview, but this one’s too cool to pass up. Twenty-four year old Léo Marius has created a 35mm film SLR using a 3D printer, complete with a viewfinder and compatibility for any lens mount (once the appropriate mount is created and attached, of course). The camera isn’t available for sale, but Marius provides instructions for creating your own. Click through for more details, and pictures of the homemade camera. 

News: Digital Photography Review (dpreview.com)

 
Comments Off on French student creates SLR using 3D printer

Posted in Uncategorized


Using Colour Boldly

04 Jul

Bold colours

In my previous article I explored some of the ways that you can use two contrasting colours, orange and blue, that appear in nature to create atmospheric images full of emotion.

Today I’m going to look at ways you can use other bright colours effectively.

Let’s start with a simple example. Flowers are a common, brightly coloured subject. If it is summer where you live right now you there may be public gardens close to you where you can practise taking photos like the one below. One of my favourite techniques is to photograph red flowers against a green background:

Bold colours

Bold colour is part of the composition of this photo. To see why, let’s take a look at the colour wheel again:

Bold colours

The colour wheel tells us that certain colours have a dynamic relationship. Colours that are on opposite sides of the wheel, such as red and green, are said to be contrasting colours. That’s just a way of saying that the human eye can easily distinguish between these colours. So, in the above photo, it’s easy to tell the red flower from the green background, and that makes the photo more interesting to look at.

Man-made colours

Now, the most likely place to find bold colours is with man-made objects. Humans have a tendency to make brightly coloured objects, and we can take advantage of that. Here are a few examples to show you what I mean:

Bold colours

The blue colour in this Chinese lantern is very intense. It helps that the tassels and trim are yellow, a colour that contrasts with blue (see the colour wheel). It also helps that the background is a neutral shade. It doesn’t compete with or distract attention from the lantern.

Bold colours

Here’s another example of the blue/yellow dynamic in action. The flowers are natural, of course, but the background is man-made. Intense colours like this shade of blue occur rarely in nature.

Bold colours

Blue and red is another powerful colour dynamic.

Bold colours

This is a photo I took in Burano, an island near Venice known for its colourful buildings. I made the most of the colours by using a polarising filter on my lens.

Polarising filters work by eliminating glare from reflective non-metallic surfaces. This results in deep blue skies and more saturated colours. It’s an effect that can’t be replicated in post-processing, making a polarising filter an essential piece of gear for taking photos like this.

Using colour boldly

The way I see it, there are are two ways to utilise strong colours. The first is the one that we’ve seen so far – using bold colours to create strong images where the use of colour is an important part of the composition.

The second is use colour boldly. The idea is to create near abstract images that are very much about the colours and little else. They probably wouldn’t work in black and white, or if the colours were subtle rather than strong. Here are some examples:

Bold colours

This is a close-up I took of a vase in a pottery store. I closed in and created a composition that is really about the streaks of colour and little else.

Bold colours

A photo taken in Hong Kong. There are no clues to the location in the photo – it is simply a photo of an orange light against the night sky. Very abstract, and almost entirely about colour.

Bold colours

I took this photo close to my home. It was dark and the glow from the neon light caught my eye.

Simplicity

On a final note I’d like to mention that throughout this article the photos have benefitted from keeping the composition simple. There is little to distract from the main subject and the use of colour.

Mastering Photography

Bold colours

My latest ebook, Mastering Photography: A Beginner’s Guide to Using Digital Cameras introduces you to digital photography and helps you make the most out of your digital cameras. It covers concepts such as lighting and composition as well as the camera settings you need to master to take photos like the ones in this article.

Post originally from: Digital Photography Tips.

Check out our more Photography Tips at Photography Tips for Beginners, Portrait Photography Tips and Wedding Photography Tips.

Using Colour Boldly


Digital Photography School

 
Comments Off on Using Colour Boldly

Posted in Photography


How To Improve an Image with 2 Steps in Photoshop Using Screen Mode

03 Jul

A Guest Post by Sergey Sus/

Before after

Wanted to share a very simple way for improving a photo without having to change the exposure. I use this method quite often and sometimes even after adjusting exposure.

The image is of a small hillside town in North California called Sausalito taken while on vacation.

Here the SOOC (straight out of the camera) image before any adjustments are applied or any cropping. It is just a bit under exposed and very flat looking.

Img sooc

Certainly there are many ways to brighten a photo in Photoshop like using Curves, Levels or Shadow layers. For this tutorial, we will be using a duplicate layer and then change the overlay to Screen mode to brighten up and give it a bit of a punch. I’ve seen many professional photo retouchers use this technique on both landscape and portrait photography as a starting point for retouching. This method works really well on jpgs as well!

1. Open image in Photoshop. Then duplicate layer by pressing Ctrl+J (Win) / Command+J (Mac)

Img dup layer

2. Change blend mode to Screen and and then set Opacity to 50%.

Img screen

Starting out with Opacity set to 50% and adjusting the slider for more or less brightness. For this image the opacity is about right at 50% for my eyes. See how this new layer in Screen mode added a subtle contrast and brightness.

Img ps screen

Give this technique a try even if the image is not under exposed as it will brighten up overall highlights and will slightly increase perceived contrast. Make sure to experiment with different opacity values for different looks. Here is the final image cropped and with a bit more processing – how I remember Sausalito looking that day.

Img final

Let me know in the comments how this has worked for you or if you have questions.

Sergey Sus is a Los Angeles based photographer telling telling real stories, individual, professional and family. Problem solver, artist and teacher. His work can be found on http://www.sergeys.us/.

Post originally from: Digital Photography Tips.

Check out our more Photography Tips at Photography Tips for Beginners, Portrait Photography Tips and Wedding Photography Tips.

How To Improve an Image with 2 Steps in Photoshop Using Screen Mode


Digital Photography School

 
Comments Off on How To Improve an Image with 2 Steps in Photoshop Using Screen Mode

Posted in Photography


The Basics of Using ND Grads to Improve Your Landscapes

02 Jul
For this image, I used a 4-stop hard-edged ND grad to hold back the sky.  I also used a 5-stop ND filter to slow the exposure enough to get the water silky smooth. 6 seconds, f/16, ISO 100. EOS 5D Mark III with EF 16-35mm f/2.8L II.

For this image, I used a 4-stop hard-edged ND grad to hold back the sky. I also used a 5-stop ND filter to slow the exposure enough to get the water silky smooth. 6 seconds, f/16, ISO 100. EOS 5D Mark III with EF 16-35mm f/2.8L II.

As I’ve written before, the hardest part of landscape photography is retaining detail in a bright sky with a darker foreground.  There are several ways to deal with this issue. The newest ways involve various post-processing techniques in Photoshop or Lightroom, or using High Dynamic Range photography to blend several exposures together, retaining both shadow and highlight detail from these exposures.  There is nothing wrong with these techniques, and in fact there are times where these may be the best method for keeping detail in the sky. There are issues with both blending and HDR.  HDR tends to have a very processed look to it when not done well, and blending takes time to do well. I am not one who likes to spend much time in Photoshop with my images.  In addition, you still need to be sure that you somehow capture enough information in the sky that you are not simply darkening down white pixels.

On the left is a 2-stop, hard-edged ND grad.  On the right is a soft-edged 2-stop ND grad.

On the left is a 2-stop, hard-edged ND grad. On the right is a soft-edged 2-stop ND grad.

To ensure you’re capturing enough detail, the use of graduated neutral density filters is needed. Graduated Neutral Density Filters (ND grads, for short), are pieces of glass or photographic resin that are half clear, and gradually gets darker as it moves to the other end.  This darkening begins in the middle of the piece of glass.  First of all, these filters come in two forms.  The first of which is a typical screw-on filter that screws onto the front of the lens. While this style is fine for polarizers or skylight filters, it’s problematic for ND grads, because the horizon can’t be repositioned.  The other way these filters come is in 4×5 or 4×6 inch glass or resin.  These pieces of glass are then placed in holders, and the horizon can be repositioned as needed. The biggest advantage these filters have over the screw-in kind is the fact that they allow you freedom of composition to put the horizon where you want.   The most popular holders and systems for this type of filter are the Cokin systems, which come in various sizes, and the Lee system, which typically accepts a 4″ wide filter.  The Cokin systems tend to be a bit cheaper both in terms of cost of the holder and cost of the filters.  The Lee system is a bit more expensive on both fronts.

Once you’ve decided on which system to use, there is then the choice of which ND grads to choose. There are several companies that manufacture these filters, from  Cokin for their systems, to Lee, to to Formatt Hi Tech, to Schneider Optics, among others.  The prices vary, depending on whether you’re buying photographic resin or glass.  Resin filters tend to be cheaper while glass is most expensive. Resin doesn’t break when dropped but can scratch more easily than glass does. ND grads are available in various densities, including  2 stops, 3 stops, and 4 stops.

The selection doesn’t stop there, however. In addition to choosing which density you need, you also must choose how gradual the density is. Graduated neutral density filters come in both hard-edge and soft-edge graduations.   You would use hard-edge filters when you have a clear horizon and no object in the foreground intersects it.  You would use soft-edged filters when there is an object that intersects the horizon.  Soft-edge filters have a much smoother gradation, which allows it to look more natural when used in a photo.  A hard-edged filter will create a more definitive line between light and dark in the image.

These filters have become some of the most important tools in my bag when creating landscape photos. If you’re just starting out, get an inexpensive set of filters- there is no “one size fits all” to ND grads.   However, if you can only start with one, I’d suggest a soft-edged three stop ND grad. The hard-edged can be limiting at times, and two stops never seems to be enough on its own.  I often stack ND grads to get the effect I’m looking for.

Happy shooting!

Because Haystack Rock stood above the horizon line, and was quite a bit darker than the sky behind it, I had to use a 3-stop, soft-edged ND grad filter here. 1/20, f/16, ISO 100. EOS 5D Mark III with EF 16-35mm f/2.8L II.

Because Haystack Rock stood above the horizon line, and was quite a bit darker than the sky behind it, I had to use a 3-stop, soft-edged ND grad filter here. 1/20, f/16, ISO 100. EOS 5D Mark III with EF 16-35mm f/2.8L II.

Post originally from: Digital Photography Tips.

Check out our more Photography Tips at Photography Tips for Beginners, Portrait Photography Tips and Wedding Photography Tips.

The Basics of Using ND Grads to Improve Your Landscapes


Digital Photography School

 
Comments Off on The Basics of Using ND Grads to Improve Your Landscapes

Posted in Photography


How to Make a Mini Light Studio Using School Supplies

28 Jun

When school’s out, most kids are thinkin’ “Oh man, summer’s here!”

Us? We’re thinkin’ “What are we gonna do with all these binders???”

Staring at binders all summer long is no fun, so our buddies Chris Rutter and Jeff Meyer (of Digital Camera World) showed us how to turn them into a sweet light tent — perfect for casting beautifully diffused light onto your photo subjects.

That means your photos won’t have harsh shadows from the sun, and your camera will catch all of your subject’s details.

Everyone has a binder or two at home, so you can start this project today!

Plus, this portable light tent gives you great lighting on flowers, insects, and other small stuff without having to pluck them out of the ground.

Throw it in your bag, and you’ve got a mini studio wherever you go this summer.

How to Turn Binders into a Light Tent

Ingredients

  • 3 white, translucent binders
  • 8 1/2″x11″ colorful cardstock
  • Duct tape (grey is good!)
  • A camera
  • Optional: small hand-sized beanbags

Step 1: Tape it together

beforeLay one binder open and flat.

Grab a second one and lay it open and flat. Keeping them open, overlap the cover of one binder on top of the back cover of the second.

Use your duct tape to keep them connected at their folds (check out the photo). You should have three panels.

Cut the front cover off your third binder and attach it to the center panel at its top edge. It’ll act like the roof to your light tent.

Try standing your light tent up, and if the roof is too floppy (flappy?), tape it down to help the tent keep its shape.

Step 2: Pick something to shoot

beforeTake a peek outside.

Scratch that. Take a good long look! We bet there’s something hidden out there that’d make a great photo subject.

Jeff found this budding flower, but maybe you’ll catch a rollie pollie unfurling or a butterfly snacking on a daisy.

If you’re not feeling the outdoors, set up a fun miniature scene with figurines, knick knacks, and stuff around your house. Slinkachu’s rad inspiration for that.

You can also practice your product photography by throwing almost anything in your light tent and playing around with getting the best even lighting on it (think setting it by a window, taking it outside, setting something reflective under it or playing around with the angle of the flaps).

Step 3: Make it pretty with a background

beforeNow that you have your thing-to-photograph picked out, observe its beautiful array of colors and what kind of background you think would complement it.

Perhaps take a gander at the Color Wheel, a diagram for figuring out which colors are complementary and which might clash.

The blue-yellow combination here goes pretty good, we’d say.

You can go with a piece of card stock or a color folder, even. Get more use out of those school supplies!

Place your background over the back panel and use use tape or a paperclip to keep it in place.

Step 4: Mad Props

beforeNow, prop it up! It’s a tent, after all.

Place it over your subject so that your subject sits in the center of your “tent.”

If you have nice cushy grass to work with, then getting it to stand on its own might be easy. If your surface is smooth, prop it up with paperweights or small hand-sized beanbags on either side of each flap.

Step 5: Get your camera ready

beforeOnce you have everything just how you want it, grab your camera and put it on manual mode, so you can figure out the best settings for your snap.

For this shot, Jeff used an aperture of f/5.6 and shutter speed 1/200 at 200 ISO. A low ISO worked here because the sunlight was aplenty, but if your photo looks too dark, you might need to raise your ISO to 400 or so.

Play around with your settings ’til it’s how you envisioned.

Take it further

before

  • Ever wanted to set up a mini studio in your home? Here are the 5 things you’ll need.
  • Teresa Franco shoots amazing macro photos of all the little things we miss under our feet.
  • How to make macro photos without buying an expensive lens

Related posts:

  1. Turn Your Tablet Into a Studio Light Extra photos for bloggers: 1, 2, 3 Your iPad is…
  2. DIY: Make Crazy Detailed Light Paintings with Photo Light Stencils Extra photos for bloggers: 1, 2, 3 Ever tried painting…
  3. You Only Need 5 Things to Make Your Own Home Studio Extra photos for bloggers: 1, 2 Photography doesn’t have to…


Photojojo

 
Comments Off on How to Make a Mini Light Studio Using School Supplies

Posted in Equipment


How to Create a Beam of Light in a Photo using Photoshop [Video Tutorial]

24 Jun

Have you ever wanted to create a beam of light in a photo using Photoshop? Me neither – but after watching this tutorial I think I’ve found a little project to try – check it out!

Post originally from: Digital Photography Tips.

Check out our more Photography Tips at Photography Tips for Beginners, Portrait Photography Tips and Wedding Photography Tips.

How to Create a Beam of Light in a Photo using Photoshop [Video Tutorial]


Digital Photography School

 
Comments Off on How to Create a Beam of Light in a Photo using Photoshop [Video Tutorial]

Posted in Photography


Hell is Other People: Avoid Your Friends Using Social Media

14 Jun

[ By Steph in Gadgets & Geekery & Technology. ]

Hell is Other People Smartphone App 1
Social media was invented to bring people closer, but the more antisocial among us can use it in a different way: to avoid the people we know. ‘Hell is Other People‘ is an interactive smartphone app that will show you exactly where your friends are based on Foursquare check-ins, and provide ‘safe zones’ where you can hang out without fear of being recognized.
Hell is Other People Smartphone App 2

Using the GPS function on your phone and your contacts’ public check-ins or location updates on Facebook, Twitter, Foursquare and other social media, the app will show you yellow points on a map that indicate where your friends are. The green points represent ‘safe zones.’
Hell is Other People Smartphone App 3

Of course, the map only works if your friends are avid social media users, checking in to virtually every place they go, and you still run the risk of running into them when they’re in route. You also might be relegated to unexpected places in the city. But as creator Scott notes in the video, “It’s kind of nice that I’ve been pushed into parks.”

Share on Facebook


[ By Steph in Gadgets & Geekery & Technology. ]

[ WebUrbanist | Archives | Galleries | Privacy | TOS ]


WebUrbanist

 
Comments Off on Hell is Other People: Avoid Your Friends Using Social Media

Posted in Creativity


Achieving a ‘Big’ Look with little Gear | Using What You Have

04 Jun

A Guest post by Judd Green

Bandshoot

There’s always, always an upgrade that I ‘need’ or a new lens I ‘can’t do without’. And I could easily convince myself, and the boss (the wife) I can’t do my next shoot without getting this strobe or lens or wireless system, it would make the shoot awesome! Turns out the gear doesn’t make you awesome, you make you awesome. I have consciously decided to not upgrade any of my gear yet, I’ve made the decision to push my knowledge and the gear that I have to achieve what I want to achieve.

I recently had a band approach me to do some promo shots for them. All they gave me to work with was ‘classy with an edge’ which sounded like fun. Straight away I’m thinking I wanted the ‘look’ of a big production, I organized to do the shoot in a warehouse to give the ‘edge’ and have a set up with a lounge, side table and lamp to add some class. I’ve seen with something like this you’d have strobes and reflectors and assistants running around everywhere. I had my 580exii, a $ 100 strobe I bought off ebay and my mate Dylan.

I did the shoot with my 5d2 (would love to get the mark 3) and a cactus v4 wireless system (would love to get a pocket wizard system) and my 24-70 lens that I have dropped in the past (would love to upgrade that too) and my 580exii and a cheap strobe.

1

We had no ambient light to work with and in order to light every band member up perfectly I had to shoot them one at a time as a composite image so it would be a simple cut and paste job later. One good tip also when doing this style of shoot is to get a ‘clean slate’ shot, a shot with nothing in it but the background, it just makes it easier to cut and paste onto.

2

Don’t let only having little gear stop you from achieving what you want to achieve, but make sure you work it all out before hand, you can never be too prepared when it comes to shoots as to not waste your clients time.

3

Pushing boundaries and my knowledge is what I love about photography, I had an idea and a goal set and then just made it happen. Learn the gear you have and become excellent at it. It’s always nice to get the latest and newest gear, and it often helps and makes things easier, but it’s not the gear that makes you awesome, it’s you.

4

Judd Green is a Photographer from Brisbane Australia. See more of his work at www.juddricphotography.com

Post originally from: Digital Photography Tips.

Check out our more Photography Tips at Photography Tips for Beginners, Portrait Photography Tips and Wedding Photography Tips.

Achieving a ‘Big’ Look with little Gear | Using What You Have


Digital Photography School

 
Comments Off on Achieving a ‘Big’ Look with little Gear | Using What You Have

Posted in Photography


Thinker Thing: 3D-Printed Object Made Using Brain Waves

31 May

[ By Steph in Gadgets & Geekery & Technology. ]

3D Printed with the Brain 1

Small electrical impulses detected by a brain-computer headset produce strange and amazing 3D printed objects in a new project by George Laskowsky of Thinker Thing.  The Emotiv EPOC headset analyzes brain patterns and uses it to understand the wearer’s emotional response to certain features in visual stimuli; in this way, the wearer is able to ‘grow’ a three-dimensional model with their mind.

Laskowsky successfully created the first real physical object made with brain patterns in May, and set out to fund the project on IndieGoGo. Thinker Thing will take the invention to Chile, where children will use the technology to create fantastical creatures, which will be exhibited in a gallery.

3D Printed with the Brain 2

How is it possible to create an object with the mind? “We use your brain patterns to evolve a 3D model from a genetic seed, which can then be made real with a standard 3D printer. The DNA seed defines the start point of an evolutionary chain for the object. Dinosaurs are very diverse, for example, but they can be traced back to a single common dna ancestor. We create this first DNA definition as the first building block from which all future objects evolve.The DNA of the object is then mutated over each generation, and how well that new mutations does, whether it lives or dies, is determined by the mind.”

3D Printed with the Brain 4

“We are all born creative, our brain begins like an open field and can make connections in many directions, it is only later we become stuck in the ruts and troughs of the paths that our mind constantly treads, paths so deep we are sometimes unable to see that there is still an open field around us. Mistaking skill (a learned ability) with creative imagination is like believing walking in a deeper rut gives you greater freedom of movement across the field.”

3D Printed with the Brain 3

Learn more at IndieGoGo.

Share on Facebook


[ By Steph in Gadgets & Geekery & Technology. ]

[ WebUrbanist | Archives | Galleries | Privacy | TOS ]


WebUrbanist

 
Comments Off on Thinker Thing: 3D-Printed Object Made Using Brain Waves

Posted in Creativity