RSS
 

Posts Tagged ‘Using’

Tips for Using Legacy Lenses and Shooting in Full Manual

19 Jan

Shooting Manually

Full manual. Two words. Ten letters. Yet those words can be some of the most discouraging for new photographers to ingest. There has long been a perceived over complication concerning shooting in Manual Mode. Personally, I always leave my camera set to manual. Granted, I dont shoot many fast-paced sporting events that require speedy autofocus, or many situations where there is constantly fluctuating light. Still, the idea of controlling the aperture, shutter speed, ISO, and focus, all independently of your camera’s computer, unsettles even experienced photographers at times. Happily though, not only is there a swelling community of photographerss who are embracing the somewhat challenging, but highly organic and rewarding, benefits of shooting manually…but also upping the ante by adapting completely analog legacy lenses for use with their cameras.

image

In this article, you will learn how to enjoy what might be considered a devolved methodology of making photographs using legacy lenses, and shooting in full manual mode. Full manual lenses, are generally built to exacting quality standards, but are relatively low-priced, which makes them great for beginners, and those shooting on a budget. Furthermore, adapters are available for virtually all mirrorless and digital SLR camera systems, so that you can start making great photographs using these low-tech lenses. Let’s jump right in.

What are Legacy Lenses?

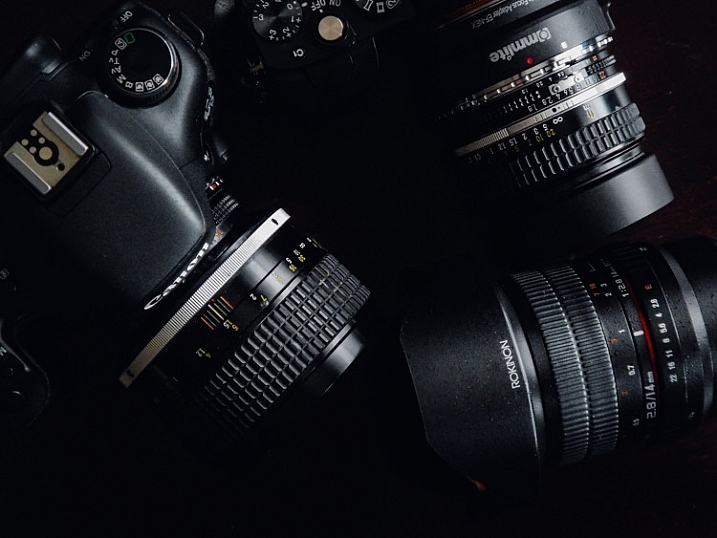
Lenses that were geared for use with older film camera (35mm or medium/large format) systems are called legacy lenses. Glass of this type are non-motor driven, and operate autonomously of your camera. This means that the focus and aperture selection are all accomplished inside of the lens, which is controlled by you. There is no electronic communication between the lens and the camera. You must use the lens’s aperture, and focusing ring, to produce the desired depth of field and focus. Legacy lenses are generally made of metal, making them relatively heavy, but heartily constructed.

Which lenses are fully manual?

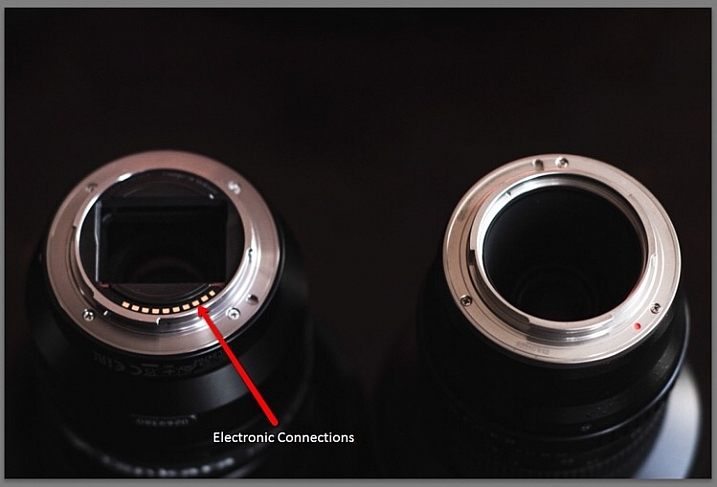
Full manual lenses does certainly not include all legacy lenses. Many manufacturers still make completely manual lenses, engineered specifically for the digital camera market. A lens is designated as being fully manual when there is no control being provided by the camera. However, there are quite a few fully manual lenses which have incorporated focus indicator chips into their design. While remaining fully manual, these types of lenses will communicate with your camera when focus has been achieved.

image

Adapting lenses to your camera

In a previous article on dPS we discussed how easy it really is to use legacy lenses (and other non-native glass) with your digital camera. The same holds true. All that is needed to enable the use of fully manual legacy lenses to be used with your modern digital camera body is a simple adapter.

image

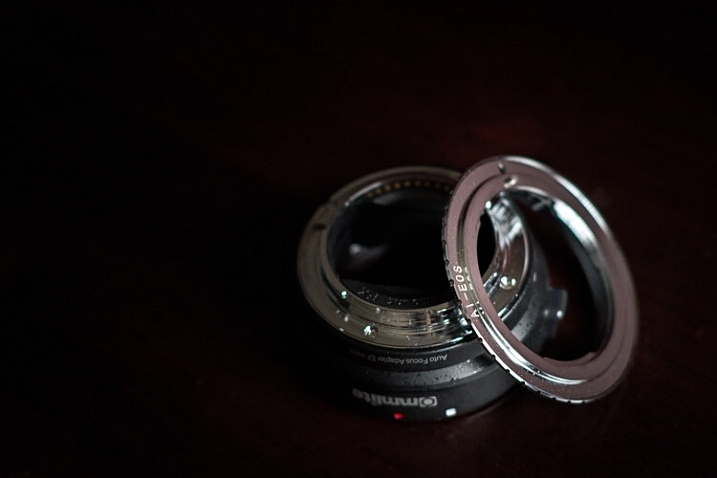
These adapters vary in capability from simple adapter rings, to advanced electronic contraptions, with focus indicator chips of their own. Keep in mind though, there are a few things to consider before adapting any non-native lens to your camera. More on that shortly.

Using your camera in full manual mode with manual lenses

image

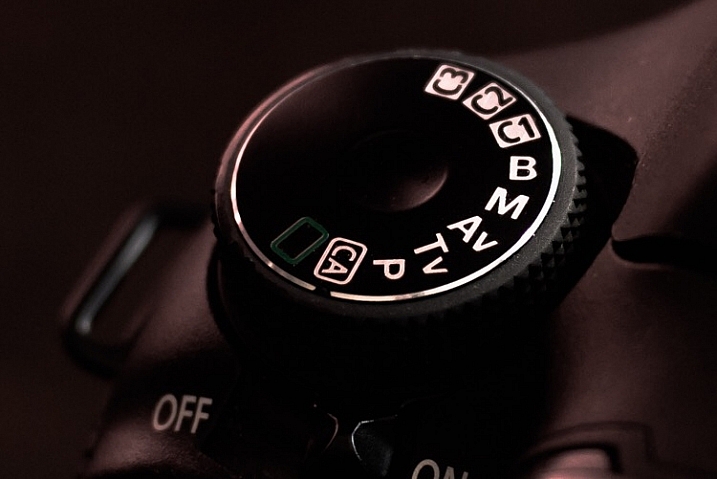
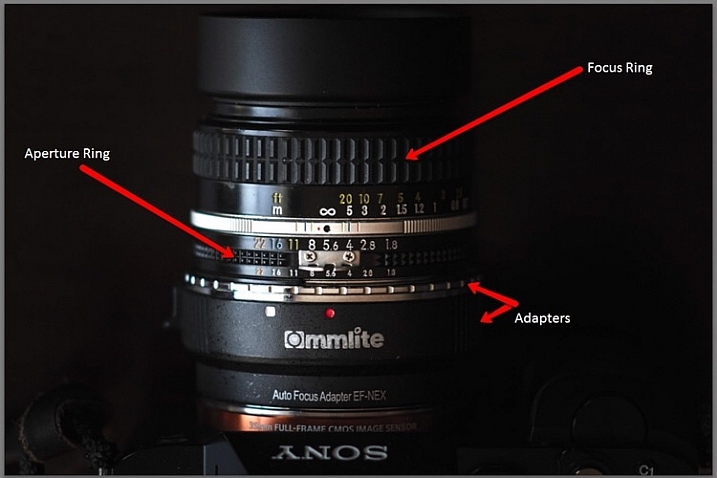
You’ve found an elegant legacy lens and located the appropriate adapter for your particular camera system. You’re excited and ready begin shooting completely manually, so now what? Well, take a breath and exhale a well deserved sigh of relief, because all of that was the hard part. Now all that’s left are a few quick steps. The first of those steps is to switch your camera into Manual Mode. This is almost always done by moving your selector wheel to M for manual mode. This will give you, the courageous photographer, complete control over all aspects of the shot. If you are using a completely manual lens, or a legacy lens, everything except the shutter speed will now be manipulated using the lens. The aperture will be controlled using the aperture selector ring, and so too will be the focusing.

This is a breakdown of the essential features found on an adapted, full manual legacy lens (in this case a Nikkor 50mm f/1.8).

image

Here are a few tips for using your camera in full manual mode, in conjunction with a fully manual or legacy lens:

Focus Peaking Function

Some cameras now incorporate a technology called focus peaking which visually outlines the edges of the most in-focus area of a scene,, before the shutter is ever released. The technology detects the area of the most contrast between pixels, thus determining what region is most in focus. Though not perfect, this a great option to aid with manual focusing.

Focus Magnifier

Not all camera bodies come equipped with the focus peaking feature, but most modern digital cameras are capable of focus magnification. This lets you digitally magnify the scene, and inspect areas for proper focus. I use focus magnification in all of my landscape work. It is a great way to achieve pin point focus on the areas where precision is a necessity. (Note: this is usually available in LiveView mode).

Shoot RAW

Yes, the old shoot RAW lecture again. Even though focus correction can’t be achieved, even in RAW format files, it will however give you much more room to work on contrast and clarity. This will sometimes help to salvage an image that may otherwise be culled.

Things to consider before using legacy lenses

Along with all the benefits of shooting manually with legacy and full manual lenses, there are also some things to remember before, and during shooting times.

Complete Autonomy of the Camera

There is of course no electronic communication between the lens and the camera, unless you have chosen an adapter or lens equipped with focus indicator technology. So there will be no way to use your shutter priority or aperture priority modes.

Physical Considerations

Some lenses will obstruct the mirror function of digital SLRs. This is one of those things that carries a little bit of buyer beware baggage. Make absolutely sure that the lens you are adapting to your camera does not physically occlude the operation of the mirror, this will damage your camera, possibly beyond repair. This becomes less of an issue with mirrorless camera systems.
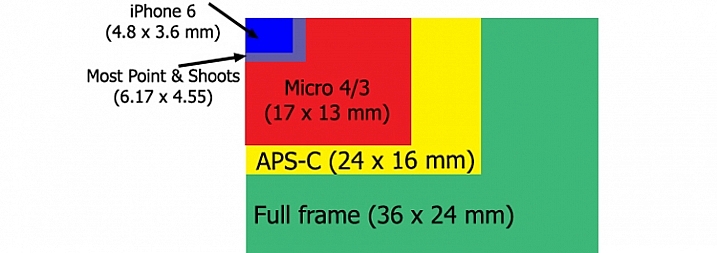
Crop Factor

The crop factor of any lens is dependant on the size of the image sensor (or film) being used. Always be mindful of the interactions between your lens, and whatever size sensor you are using, be it full frame of APS-C (cropped). Most legacy lenses were intended for use with 35mm film. This will play a major role in your practical focal length, when shopping for lenses of the prime variety.

image

Fully manual and legacy lenses have a firm grasp on today’s digital world. Though viewed as antiquated by some, the essential elements of this type of photography can produce exceptional images. Shooting in Manual Mode gives you ultimate generalship over your work, and allows you to take every aspect of photo making into your own hands. Not only is the use of legacy and manual lenses a cost efficient way to make photographs, but it is also a reflection of a time when the buck stopped with the photographer, not the camera.

Newer isn’t always better. And even though manual shooting might not be the most effective course in some situations, there is no reason why it should be discounted in today’s modern era. Full manual shooting allows you to use lenses of extremely high quality to fully realize your creative vision, in ways you may not have otherwise been able to accommodate. Take your photography back to the future, and go beyond the realm of the automatic.

Do you have a favorite manual setup that you use regularly? Share it in the comments below!

googletag.cmd.push(function() {
tablet_slots.push( googletag.defineSlot( “/1005424/_dPSv4_tab-all-article-bottom_(300×250)”, [300, 250], “pb-ad-78623” ).addService( googletag.pubads() ) ); } );

googletag.cmd.push(function() {
mobile_slots.push( googletag.defineSlot( “/1005424/_dPSv4_mob-all-article-bottom_(300×250)”, [300, 250], “pb-ad-78158” ).addService( googletag.pubads() ) ); } );

The post Tips for Using Legacy Lenses and Shooting in Full Manual by Adam Welch appeared first on Digital Photography School.


Digital Photography School

 
Comments Off on Tips for Using Legacy Lenses and Shooting in Full Manual

Posted in Photography


Tips for Using a Handheld Light Meter

17 Jan

In modern DSLRs they all have a light meter built-in to the camera. But sometimes you want a more accurate reading, or to measure the amount of light when using flash (your camera can’t do that), in which case you would turn to a handheld light meter.

Check out this video from Adorama TV (host Daniel Norton) for some light meter basics.

This second video is more advanced. Once again from Adorama TV, with host Mark Wallace, this one covers how to meter for light ratios. Read more about ratios here: Lighting Ratios to Make or Break your Portrait.

In the video above he is using the Sekonic L-358 light meter. Here are a couple other choices, also made by Sekonic. I personally use the L-308 and it works just fine. You don’t need one that’s really fancy but the one he used does have the memory storage for comparing the light, the L-308 does not. So if you want that feature you may want to opt for the L-358.

Have you used a light meter before? If you are shooting with speedlights or studio lights you may find it necessary, but if you shoot landscapes and use mostly natural light you probably do not need one. Let us know your experience in the comments below.

googletag.cmd.push(function() {
tablet_slots.push( googletag.defineSlot( “/1005424/_dPSv4_tab-all-article-bottom_(300×250)”, [300, 250], “pb-ad-78623” ).addService( googletag.pubads() ) ); } );

googletag.cmd.push(function() {
mobile_slots.push( googletag.defineSlot( “/1005424/_dPSv4_mob-all-article-bottom_(300×250)”, [300, 250], “pb-ad-78158” ).addService( googletag.pubads() ) ); } );

The post Tips for Using a Handheld Light Meter by Darlene Hildebrandt appeared first on Digital Photography School.


Digital Photography School

 
Comments Off on Tips for Using a Handheld Light Meter

Posted in Photography


How to Make a Little Planet Using Photoshop

06 Jan

Photography doesn’t always have to be serious, sometimes it is nice to do something just for fun. Making a landscape look like it is a little planet is one of those things. There aren’t any uses for it, and you wouldn’t spend your photography career doing this. It is, however, one of those photography tricks that a lot of people like to try.

LeanneCole-landscape-sphere-done-0033-dps717px

A Landscape turned into a sphere or little planet.

Landscape images work best. The photo should have a foreground, a horizon, and a sky. If you have trees or buidings in the image that go out the top of the image it may not work as well. It is all experimental, so you should try images like that, but it does seem to work best with images that look like the one below.

LeanneCole-landscape-sphere-done-0035-dps717px

This image was chosen because it has all of those elements; the river is in the foreground, there are buildings along the horizon, and there is a sky. There is also nothing going out the top of the image. As the photo is going to connect from one end to another, it has to be an image that has similar ends.

How to create a Little Planet

Open the photo you want to use in Photoshop.

1-leannecole-tutoria-photo-sphere

Open photo in Photoshop.

The first thing to do is to duplicate the layer by pressing Ctrl+J (CMD+J on Mac). It can also be done by going up the main menu, clicking Layers > Duplicate Layer.

16-leannecole-tutoria-photo-sphere

Duplicate Layer

You may need to make the image smaller on the screen using the magnifying tool. Make it small enough to only fill part of your current view, like so:

Screen Shot 2015-12-21 at 1.18.59 PM (2)

Turn on your rulers (Cmd+R on Mac, or Control+R on PC). Once they appear, right click on one and select percent to display on the rulers.

Make sure you are on the Background Layer, and select the crop tool (keyboard shortcut is C). Click on the image to bring up the cropping frame. Grab the right edge marker, and drag it it to the right to enlarge the frame to twice the size of the image (watch the number as you drag, go until you get to 200%). Look at the following image.

17-leannecole-tutoria-photo-sphere

Extending the Image

Next, highlight the duplicated layer in the Layers panel, by clicking on that layer.

4-leannecole-tutoria-photo-sphere

Select the duplicate layer

This duplicated layer needs to be flipped horizontally. Go to: Edit > Transform > Flip Horizontal.

5-leannecole-tutoria-photo-sphere

Use Transform to flip the duplicate layer.

Select the move tool (keyboard shortcut is: V) and move the duplicated image over to the right side until you have the two images touching in the middle.

6-leannecole-tutoria-photo-sphere

Use the move tool to put the duplicated, flipped image, into place.

Figure out where you want the images to meet in the middle. Sometimes overlapping them can make it look a little better. You will need to crop the image to remove some of the extra area that you created earlier.

7-leannecole-tutoria-photo-sphere

Crop the image to the edges of the image.

To make the sphere, the image needs to be square, so go to the top menu and click Image > Image Size. When the window pops up, you need to unlock the part that automatically changes the height when you change the width (maintains the proportions). Click the lock (chain) icon to unlock it. Make the width the same as the height, and press okay.

8-leannecole-tutoria-photo-sphere

In the Image Size window the height and width are locked.

9-leannecole-tutoria-photo-sphere

Click on the lock to unlock image to make width the same as height.

Before you can make the sphere you should combine the layers. Go up to: Layers > Flatten Image. An easier way is to press Shift+Ctrl+E (Shift+Cmd+E on Mac), this will make them one layer (it merges all visible layers).

10-leannecole-tutoria-photo-sphere

Combine the layers.

You will also need to flip the image vertically. Go back to the main menu, select Image > Image Rotation > Flip Canvas Vertical.

12-leannecole-tutoria-photo-sphere

Flip image vertically.

Next, go to Filter >Distort > Polar Coordinates….

11-leannecole-tutoria-photo-sphere

Select Polar Coordinates in the Filter, Distort menu.

When the popup window appears, select the option: Rectangular to Polar. Press OK.

13-leannecole-tutoria-photo-sphere

Choose rectangular to polar.

Voila, your landscape sphere, which now looks like a little planet.

14-leannecole-tutoria-photo-sphere-dps717px

The world turned around.

But, there is a gap where the images meet. This can easily be fixed with the Spot Healing Brush Tool. It is in the toolbox on the left side of the windows panel. Run the tool along where the images don’t quite connect.

LeanneCole-landscape-sphere-done-0033-dps717px

Landscape turned into a sphere or little planet.

There you have your landscape sphere, or little planet image.

You may want to crop it a little to make the planet bigger in the image, and to remove any things that have happened in the corners. You may also want to rotate it to get the view you want.

You can do this with other types of images as well. You could try it with a panorama, then you don’t have to do the part where you copy the layer. However, you need to be aware that it may not come out as you expect, it can come out distorted.

If you don’t flip the image vertically before applying the filter it will do the image in reverse. The image that I used for this article would then have the river on the outside, and the sky in the center (see image below).

LeanneCole-landscape-sphere-done-0034-dps717px

Result done the other way.

As you can see there are no real uses for this except as a fun project. Try it and see what you can come up with, and please share your images in the comments below.

googletag.cmd.push(function() {
tablet_slots.push( googletag.defineSlot( “/1005424/_dPSv4_tab-all-article-bottom_(300×250)”, [300, 250], “pb-ad-78623” ).addService( googletag.pubads() ) ); } );

googletag.cmd.push(function() {
mobile_slots.push( googletag.defineSlot( “/1005424/_dPSv4_mob-all-article-bottom_(300×250)”, [300, 250], “pb-ad-78158” ).addService( googletag.pubads() ) ); } );

The post How to Make a Little Planet Using Photoshop by Leanne Cole appeared first on Digital Photography School.


Digital Photography School

 
Comments Off on How to Make a Little Planet Using Photoshop

Posted in Photography


How to Create a Vintage Look for Your Image Using Photoshop

23 Dec

Creating a vintage look for an image is now easy, without having to shoot with an old film camera. Although I would recommend any photo enthusiastic to try! I have a an Agfa camera ISOLA that I use every now and then. I love the contrasty, grainy black and white pictures it allows me to shoot. I usually ask advice regarding the film I can use depending on the sought-after result (contrast- grain – ISO).

With a few easy steps in Photoshop you can make a textured, desaturated vintage look for any of your pictures. I’m going to show you how I did it with a self-portrait, but you can really do it with any picture as this technique really creates a great feeling to any image, whether it is a portrait or a landscape.

Vintage images are usually not so sharp, so I chose an image with some motion blur. You can add some directly in camera playing with slow shutter speeds and creating some motion. To edit this image, we are going to change the color using a gradient map adjustment, add some textures, and finally add a vignette to get a vintage look image.

Setting the mood for creation before Setting the mood for creation after

Step one: Modifying the color tones using gradient map

There are many ways to desaturate an image. I love the gradient map adjustment because it allows me to desaturate the image, to add some color tones, and also to adjust its contrast. Hopefully, you will love this tool if you haven’t tried it yet.

Vintage images are usually desaturated – it could also be sepia. To get the desaturation you can go to Layer > New adjustment layer > Gradient Map (as shown below).

01

Or you can go to your layer tab and select new Gradient Map layer (as below).

02

In the properties tab (screenshot below) you can see what gradient has been applied. By default it will be a foreground to background color, so usually black and white (the color squares on the bottom of your tools bar). You can also set the gradient color by changing your background and foreground color.

03

Photoshop then offers you 2 different options:

  • The Reverse option will change the gradient and give you a negative of your image, as in this case I add white into the black and black into the white (below).04
  • The Dither option will mix in noise to help blend the gradient more smoothly. So you can check any of those options depending on the effect you want to achieve.

Edit your gradient by clicking on it (click on the gradient color bar); the gradient editor will then open.

05

The gradient editor window shows you on the left the color applied to your blacks, and on the right the color applied to your whites. To modify the gradient you have two options:

First option, you choose one of the available presets. You click on a preset to apply it to your image. Second option is to create a custom gradient. Simply double click on one of the color stops, and choose a new color among the color pop-up menu.

You can also create a new color stop/intermediate by clicking below the gradient bar to define another one wherever you want (remember on the left are your shadows/black tone – in the middle mid-tones, and on the right your highlights/white tones). Once the new color stop is set you can also move it so it affects more of your dark or light tones.

In case you want to save the created gradient as a preset, name it, then click New after you have finished. It will then appear in your presets.

This is a powerful tool to adjust any color tone in your images. In this case I will first use the black and white gradient. When using this option the image is then turned into a black and white picture.

06

As it is not what we intended to do, lower the opacity of the adjustment layer.

07

I set it to 68% in this case, but you can choose whatever number gives a nice look to your image – play with the opacity to decide which one best suits the image you are editing.

You can add also a touch of color. Keep it very soft to achieve a vintage look. To bring back some color, you can add a second Gradient Adjustment layer. After you add another layer, click on your gradient and choose a yellowish/brownish option to get a sepia tone, one in the presets or make a custom one.

08

Once again you can lower the opacity of the adjustment layer to have a softer effect.

09

You can also add a different color according to the mood you want to set in your image. In this case I decided not to add further color tones so I added only the black and white gradient.

Step two: Adding texture to give the image a vintage feel

Now that you have achieved the color you want, it is time to add some texture to your image.

Personally I always shoot my own textures, but you can also find great textures on the internet on stock image sites. Or shoot your own pictures: walls, old paintings, grounds, wood, leaves, etc., any textured surface you can find. It is very easy, and can help you find some inspiration.

10

You drag and drop using your move tool or copy and paste a textured photo on top of your main picture. Then mix it by using the layer Blending Mode, try Overlay or Soft Light. I really recommend you to go through all the blending options to see how they blend the texture with your image (each image is different, and each mode can create a different look).

11

I always add textures to my personal works to give a painterly effect to my images. To have a lighter effect you can lower the opacity of your layer. To have a stronger effect you can repeat this step and add several textured layers.

You can modify the effect by adjusting your texture image. Select the texture in your layer’s tab and go to: Image > Adjustment > Curves/Levels.

12

Playing with Curves or Levels will help you to bring back, or soften, some details in the texture. You also can add a Gaussian Blur filter if there are details that are too sharp in your texture image.

13

Select the area where you want to show or not show the texture. You can add a layer mask on the texture layer and by painting with black or white on the layer mask, you add (show) or remove (hide) areas where the texture appears.

Select your texture layer and click on add a layer mask. Lower the opacity of your brush tool, and keep its hardness to 0% to get very smooth edges. Now you can start painting in black over the areas where you want less or no texture.

14

Everything is in the details, and Photoshop allows you a full control over your images. Usually to still have a “clean” image, and not to lose some details, you can mask areas such as skin, eyes, lips, etc., when editing a portrait.

So take your time to play with your textures. Try different types of shapes and contrasts. You can desaturate your textured image, or keep it in color. I find it easier when the texture is desaturated so you can fully control the color tones of your image separately, but it is up to you, and to the image you have in mind. As with any creative exercise, it is a matter of taste and style.

Step three: Finishing your image by adding a vignette

Vignetting can be an unintended, and undesired effect, caused by camera settings or lens limitations. However, you can also introduce it for creative effect, such as to draw attention to the center of the frame. You can choose a lens which is known to produce a vignette, or a filter to obtain the same effect.

Obviously, as we are going to do now, you can also add a vignette by post-processing your image in Photoshop. You have many options in Photoshop to vignette your images. In this case we are doing something very uneven so the vignette also helps to create a strange atmosphere.

Grab your lasso tool and draw very random lines around the edges of your image. It looks weird, but it is quite effective.

15

Go to Layer > New adjustment layer > curves. Darken your mid-tones by pulling down your curves to about one third (or to any darker/lighter spot according to your taste).

16

Whenever you select an area of your image, and have this selection active when you create a new adjustment layer, Photoshop automatically creates a layer mask on the new layer from your active selection.

Remember – on your layer mask white is where the effect will be applied, and black where the effect will not be applied. Here you want to apply the effect on the edges of the image, not in the center- if need be invert your layer mask by selecting the layer mask and pressing: CMD/CTRL+I.

Then double click on your Curves layer mask and feather your selection (around 87 pixels here).

17

You can once again play with the opacity of your layer to lighten the vignette.

I hope you enjoyed this article. Feel free to share in the comments your usual steps to crete a vintage look to your images. Share your images as well using this technique if you give it a go.

googletag.cmd.push(function() {
tablet_slots.push( googletag.defineSlot( “/1005424/_dPSv4_tab-all-article-bottom_(300×250)”, [300, 250], “pb-ad-78623” ).addService( googletag.pubads() ) ); } );

googletag.cmd.push(function() {
mobile_slots.push( googletag.defineSlot( “/1005424/_dPSv4_mob-all-article-bottom_(300×250)”, [300, 250], “pb-ad-78158” ).addService( googletag.pubads() ) ); } );

The post How to Create a Vintage Look for Your Image Using Photoshop by Amélie Berton appeared first on Digital Photography School.


Digital Photography School

 
Comments Off on How to Create a Vintage Look for Your Image Using Photoshop

Posted in Photography


Using Smart Objects to Add Text With a Reflection in Photoshop

21 Dec

Photoshop is a massive program, with many ways to do things. To help you learn Photoshop it’s great to just pick one thing, one new tip, and try it out.

In this video from Phlearn Aaron Nace will show you how to add text with a reflection to an image, but with a neat little twist that allows you to edit the text any time and have it update your finished image automatically using Smart Objects. Have a look:

He even goes over the steps as a summary at the end of the video.

This is a fun project to try on a rainy day – give it a go.

If you want more Photoshop tutorials check out these:

  • Create Your Own Watermark using a Custom Shape in Photoshop
  • Photoshop Tip: Using the High Pass Filter to Sharpen Images
  • How to use Color Grading for Effect and Tone Control in Photoshop
  • 5 Tips for Using the Blend If Feature in Photoshop
  • 5 Photoshop Tips You Probably Didn’t Know

googletag.cmd.push(function() {
tablet_slots.push( googletag.defineSlot( “/1005424/_dPSv4_tab-all-article-bottom_(300×250)”, [300, 250], “pb-ad-78623” ).addService( googletag.pubads() ) ); } );

googletag.cmd.push(function() {
mobile_slots.push( googletag.defineSlot( “/1005424/_dPSv4_mob-all-article-bottom_(300×250)”, [300, 250], “pb-ad-78158” ).addService( googletag.pubads() ) ); } );

The post Using Smart Objects to Add Text With a Reflection in Photoshop by Darlene Hildebrandt appeared first on Digital Photography School.


Digital Photography School

 
Comments Off on Using Smart Objects to Add Text With a Reflection in Photoshop

Posted in Photography


PIX 2015: C.C. Chapman on using photography to drive change

20 Dec

Writer and photographer C.C. Chapman is a savvy businessman and creative thinker. He is the author of the bestsellers Content Rules and Amazing Things Will Happen, and his work has appeared on the pages of Rolling Stone and The Wall Street Journal. But when you meet C.C. you quickly realize that his real passion is helping other people use their creative abilities to drive positive change in the world. In this presentation from PIX 2015, C.C. shares his thoughts on how to use photography to influence social change, even if it’s only in your own backyard.

Articles: Digital Photography Review (dpreview.com)

 
Comments Off on PIX 2015: C.C. Chapman on using photography to drive change

Posted in Uncategorized


Tips for Using Flash to Enhance Outdoor Nature and Landscape Photography

13 Dec

Late on a winter evening, I was photographing atop a ridge in Colorado’s Front Range. I had been working on some landscape shots, but with the light fading from the sky, the thought of beer and food was beginning to overwhelm my desire to stay out. The colors were shifting to the deep tones of blue hour, and the light was long gone from the hills. About to give up and head home, I spotted a lone juniper atop a rocky outcrop, perfectly silhouetted against the deep blue of the mountain sky. I sighed, tempted to ignore the scene, but instead put my camera back on the tripod, walked over and composed a shot. With a click, I snapped the shutter.

CO KenCaryl evening 30Dec2011 6

The image was decent, nice blues with a clean black foreground, but it needed some warmth, an element to contrast with the abundant cool tones. “If only I could get a beam of sunlight to reach back above the horizon…” I thought to myself.

Wait a second… I didn’t need the sun, I had a flash and a remote trigger in my bag. I pulled it out, all thoughts of beer and food forgotten, and placed the flash on a boulder a few feet to my left. I set it low, to 1/4 of full power, then took a shot.

Better, I thought, looking at the image glowing on the back of my camera, but still not right. The light coming from the flash was too cool, lacking the warmth I wanted. Digging back in my bag, I emerged with a pack of gels and slapped a half cut of CTO (color temperature orange) over the flash, and clicked off another.

CO KenCaryl evening 30Dec2011 7

“Now we’re talking”, I muttered. A warm beam of light crossed the rocky foreground to light up the tree. Never mind that the actual sunlight disappeared 45 minutes before, I could re-create it with a little artificial light trickery. A few adjustments to the flash’s positioning and brightness, and I had my keeper shot. Finally, I could go home.

Using Flash Outdoors

For most photographers, flash is relegated to the studio, and if used outside it is usually restricted to portraiture. But there is so much more potential for artificial light. Landscape and wildlife photography can often benefit from a little flash, and with some creativity, it can bring out the best in your images. Here are a few tips to help you get using flash for your outdoor nature and landscape photography.

To get started, you’ll need a few things in your bag:

  • At least one flash
  • Some kind of remote trigger (I use cheap and simple wireless triggers I found on Amazon for a few bucks)
  • A selection of multi-colored gels
  • A flash stand or assistant
  • For night photography, a strong headlamp or hand-held flashlight is a good addition to the kit
A windmill stands in the garden of the Finca Santa Anita in Salta Province, Argentina.

A windmill stands in the garden of the Finca Santa Anita in Salta Province, Argentina.

General Guidelines

As with almost all flash use, for best results, you’ve got to get the light off your camera. On-camera, straight flash, looks weird and unnatural. I like to say that photographic rules are meant to be broken, but this one seems universal: get the flash off your camera.

Get the flash off your camera

Direction of light, and how much to use it, is a matter of your personal vision, but here are my thoughts: Artificial light should either look so natural, you don’t notice it comes from a bulb, or so obvious, that it’s clear the scene was lit for artistic reasons. Anything in between usually doesn’t work.

As with all successful photography, you need to think through your image, and the story you are trying to tell. Do you want a natural-looking scene or are you aiming for an artistic portrayal of your subject? Once you have an answer to that question you can move forward.

Scrubby pines grow from the rocks of the Dakota Hogback in the foothills of Colorado outside Denver, late evening.

Scrubby pines grow from the rocks of the Dakota Hogback in the foothills of Colorado outside Denver, late evening.

Imitating Natural Light on the Landscape

The near-dark hours before dawn and just after sunset, or full night, are the most suitable times to add a bit of light to a scene. A natural look is usually subtle and may rely heavily on the light that is already available to you. In my example of the juniper tree, I kept the flash setting low, and warmed the light with a gel to get a sun-like look. Finding the right balance between flash and ambient light is critical.

The further you get from the flash, the dimmer, and harder the light becomes. A flash aimed toward the ground will be very bright close to the strobe, fading quickly to invisibility. When setting your scene, use the test button to look at the throw of light across your subject. Aim it carefully, and take advantage of the flash’s zoom to consolidate the beam just where it is needed.

A Western Scrub Jay perches in a tree in the foothills of the Rocky Mountains outside Denver, CO, USA.

A Western Scrub Jay perches in a tree in the foothills of the Rocky Mountains outside Denver, CO, USA.

Adjusting Exposure

Once set, pop a shot or two, and check the results on your LCD. Almost always, you’ll find you need to adjust the flash brightness, placement, or the ambient light exposure.

When using flash remember this: adjust ambient light with the shutter speed, and flash with the f-stop (aperture).

For example, if you want to bring out more brightness in the sky, lengthen your shutter speed, if you want to increase the apparent brightness of your flash, open up the aperture. This is effective for small adjustments in camera, and keeps you from having to constantly readjust flash settings.

Lighting Your Vision – Artistic Styles

An artistic look is more straight forward, but light direction, intensity, and color are just as important. I often photograph the northern lights around my home in Fairbanks, Alaska. Often the moon, stars, or aurora itself, are sufficient to illuminate the foreground, but at times, it fades to black as you can see below.

AK FAI aurora 112073 17

In such cases, a splash of light is just what I need. When photographing the aurora, or the night sky in general, I rarely carry an actual flash, but I’m always wearing a headlamp. During a typical 5-10 second exposure, if I need a little extra texture or warmth, I can pan the beam quickly over the foreground, “painting” it with light as I did in this image.

AK FAI aurora 112073 18

Light from a typical LED is very cool, but cover it with CTO gel, and nice warm tones result. Light painting is a popular technique, but one that requires some practice to make sure your subject is evenly lit, and not too bright. Mixing light painting and ambient can be very effective to even out brightness in an image, and compensate for highlights. In Argentina, a few years ago, I was shooting a historic farmhouse during the late evening. Bright porch lights on the house needed to be evened out, so I painted some key parts of the scene.

Arg Salta SantAnita house night 104133 18

A warning: painting light can mess with the color of a digital image. If you use your camera’s automatic settings, as I do, light painted images will often require some color correction in post-processing. Shoot in RAW to be sure you retain this flexibility.

Wildlife

Flash can also play an important role in wildlife photography. Birds in particular are often down low in dark forests, where natural sunlight is rarely found. The flat, boring light beneath the foliage can be replaced by the directional light of a flash.

CO Dec2009 AMRO 3

When using flash with a long telephoto, you can often get away with on-camera, or bracket-mounted flash, as I did of the portrait of the American Robin above. Using camera-mounted flash is easy with TTL (Through The Lens) compatible strobes. In fact, this technique is so easy, that I’m not even going to go into it, because more interesting possibilities exist.

Where I live in Alaska, the winters are long, and during the few hours of daylight, the sun is often hidden behind trees or clouds. The birds I love to photograph are usually stuck in flat, gray light. There are a few trees in my yard that the birds prefer. By setting up a flash (or two), gelled with CTO to emulate the absent sun, I’ve managed to create some well lit portraits of these guys.

RBNU 21Dec2011 2

The method is similar to lighting a landscape. You’ve got to choose your flash placement to avoid shadows, and since there is rarely a chance to replicate a poorly exposed shot, it’s best to get your settings right and then leave them in place throughout the shoot. In this case, I was going for an almost studio-like look, so I took advantage of the white snow as a background, making the final image appear almost as a cut-out.

ORJU 22Dec2011 2

I like to put my flashes atop a tall stand to get them over my head like a low angle sun. Done right, the set up and exposure takes only a few moments, and the results can be great.

Conclusion

Artificial light in the outdoors offers a great opportunity to create unique images. Think through your shots, consider where extra light can be added, and what role it will play in the final image. Not every situation requires it, in fact, most don’t. But there are times when that extra pop of light can take a photo from mundane to extraordinary.

Have you tried using flash with your nature or landscape photography? Please share your tips and images in the comments below.

googletag.cmd.push(function() {
tablet_slots.push( googletag.defineSlot( “/1005424/_dPSv4_tab-all-article-bottom_(300×250)”, [300, 250], “pb-ad-78623” ).addService( googletag.pubads() ) ); } );

googletag.cmd.push(function() {
mobile_slots.push( googletag.defineSlot( “/1005424/_dPSv4_mob-all-article-bottom_(300×250)”, [300, 250], “pb-ad-78158” ).addService( googletag.pubads() ) ); } );

The post Tips for Using Flash to Enhance Outdoor Nature and Landscape Photography by David Shaw appeared first on Digital Photography School.


Digital Photography School

 
Comments Off on Tips for Using Flash to Enhance Outdoor Nature and Landscape Photography

Posted in Photography


6 Benefits of Using Cameras With Larger Sensors

08 Dec

With ever increasing megapixel counts in smartphone cameras, do you need a dedicated camera at all? Or perhaps could you just get a really tiny compact camera?

At this point in time at least, the answer is probably no. Or at least not if you really want consistently good image quality. The reason is, that these devices don’t have large enough digital sensors.

The digital image sensor is the part of the camera that actually captures the image, from the light that is reflected onto it by the lens. The sensors are of a good size in any DSLR or mirrorless camera you are likely to buy, but in an iPhone or compact camera they are tiny.

It may be obvious to you that a larger digital sensor might result in higher resolution in your pictures. But, there are other benefits of a larger sensor that you might not be aware of, which go well beyond resolution. Therefore, in this article, I want to explain why a digital sensor is so important to your photography. The fact is it may be the most important factor to consider when purchasing a new camera.

1. Larger sensors generally provide higher resolution

Sensor size comparison chart

Sensors in DSLRs and mirrorless cameras are generally either Micro Four Thirds, APS-C, or Full Frame. Any of these will usually work fine, and as you can see they are all of good size. The sensors for smartphones and compact cameras, on the other hand, are extremely small in comparison.

Let’s start with the obvious thing – resolution. Having a digital sensor with a larger surface area provides the opportunity to include more pixels. Assuming the pixels are the same size, having a digital sensor that is 40% larger, reads that there can be 40% more pixels. That means higher resolution for your images, which in turn means more detail and the ability to make them larger.

A larger sensor can also lead to larger pixels, which has significant benefits for your pictures. If you see a Full Frame camera with the same number of megapixels as an APS-C camera, that doesn’t mean they will have the same image quality. Rather, that means the pixels will have been spread out over a larger surface area in the Full Frame model, and as you will see in the remainder of this article, having larger pixels spread out over a wider surface area has a whole host of benefits for your photography.

2. Larger sensors result in improved low-light performance

The number one predictor of whether a camera will have good low-light performance is the size of the digital image sensor. The camera testing that has been done shows a direct correlation between larger image sensors, and improved low-light performance.

A company called DxO Mark tests all digital cameras and assigns them a low-light performance score, which it calls its “sports” score (presumably because using high ISO is important to sports shooters, who often face poor light and need to use fast shutter speeds). This score is actually an ISO value. Specifically, the score is the highest ISO at which the camera will create a picture, without noise becoming too large of an issue (there is actually a technical formula they use involving decibels and signal to noise ratio, but that is my layperson’s definition of their score). The higher the score, the higher the useable ISO for that camera. For example, if a camera scores 900, that means the highest usable ISO for that camera is ISO 900. A camera with a score of 1250 would mean that its low-light performance was better, and performed well up to ISO 1250. And so on.

When comparing the scores for the current models of DSLRs and mirrorless cameras being sold right now, and then separating the results by sensor size, the result is rather striking:

Low light performance by sensor size
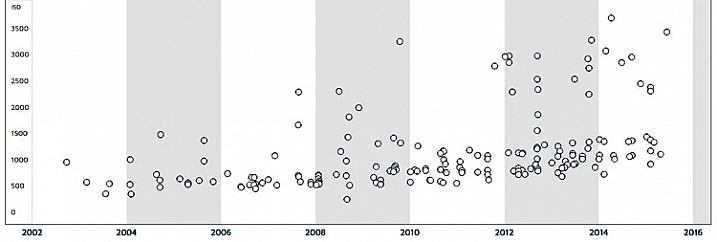
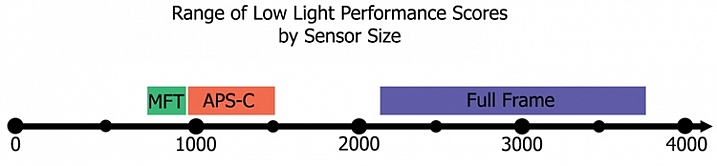
To explain this chart a little further, the range on the bottom is DxO Mark’s “sports scores,” which as mentioned above are really ISO values. Each camera was assigned a score, and I sorted them by sensor type. The range of values for Micro Four Thirds cameras is between ISO 757 and 896 (with the average at 825). The range for cameras with APS-C sensors is ISO 915 – 1438 (with an average of 1161). The range for full frame cameras is ISO 2293 – 3702 (with an average of 2811).

Notice that even the lowest rated APS-C camera performs better than the highest rated Micro Four Thirds camera. Similarly, even the lowest rated full frame camera performs better than the highest rated APS-C camera. When it comes to low-light performance, sensor size appears to make all the difference.

3. Dynamic range will likely be increased with larger image sensors

A larger digital image sensor also appears to lead to an increase in dynamic range for your camera. This is the range of tones that your camera can capture between pure white and pure black. The wider the range, the better.

There is no simple measurement for dynamic range, so comparing cameras is difficult. Finding the low-end of the spectrum (black) has a lot to do with the low-light performance of the camera, because digital noise increases when capturing very dark tones. At some point, the noise overwhelms the picture, so the bottom end of the dynamic range scale is not really “pure black” but rather “usable black.” What that means for us is that low-light performance determines part of the dynamic range of the camera, and as we saw in the previous section, low-light performance is largely a function of sensor size. Therefore, it would appear that a larger sensor would mean a higher dynamic range.

The digital image sensor testing done by DxO Mark bears this out. They call this their “landscape” score, and their results show a correlation between sensor size and an increase in dynamic range. The average for Micro Four Thirds cameras I looked at was 12.5 stops of dynamic range. That increased a bit to 13.0 for cameras with APS-C sensors, and then to 13.4 for full frame cameras. Therefore, a camera with a larger digital image sensor is very likely to have a larger dynamic range.

Comparison of dynamic range in digital cameras

All these scores are pretty comparable, and my point is not so much to compare these sensors (which will all get the job done), but rather simply to show that sensor size matters. Based on this, we can see that a camera with a much smaller image sensor (like a phone or compact camera) would not perform as well when it comes to these measures of image quality.

4. A larger sensor lets you create more background blur

If you want an appreciable degree of background blur in your images, you will need to use a larger digital image sensor. It is not just a function of aperture size (although that is obviously a very big part of it). In fact, it is virtually impossible to achieve a strong amount of background blur with a camera that has a tiny image sensor.

The relationship between digital image sensor size and background blur has actually been tested by the folks at DP Review. Here is a link to their testing and results. Be warned that they use a lot of math and technical terms. Here is a chart with some of their results:

DP-Review-Background-Blur-Chart


The results are that cameras with very small digital image sensors like smartphones and compact cameras are worthless if you aim to include background blur in your pictures. They go on to show that the larger the digital image sensor, the more blur you can include in your pictures. Therefore, sensor size is an important consideration if you want to achieve any amount of background blur in your photos.

5. A larger sensor can mean less diffraction

One other impact that the size of the digital image sensor has on your photos – and one of which you might not be aware – is on the amount of diffraction in your photos.

This may come as a surprise to you, if you are somewhat familiar with diffraction, because it is largely a function of using a very small aperture. Here’s how diffraction affects your pictures: When you use a small aperture, light reaching the edges of the image sensor can only get there after passing through the small aperture and then spreading out. That spreading of light causes the light rays to hit adjacent photo sites. Essentially, this spreading causes the light to sometimes hit the wrong photo site and leads to blur.

What does that have to do with the digital image sensor? Remember that diffraction is caused by a scattering of light across photo sites. Therefore, if you cram a lot of megapixels on a digital image sensor, the photo sites will be very small, and the scattering of light will cross over onto other photo sites more easily. That will mean an increase in diffraction. But in a camera where megapixels are more spread out, the same amount of scattering, will have less of an impact on your pictures.

As a result, larger image sensors where pixels are more spread out, tend to result in less image diffraction.

6. Larger sensors reduce the crop factor

Finally, let’s not forget about the crop factor that results from using a smaller digital image sensor. This chart shows the impact of crop factors. Notice in particular the yellow square in the center that shows the range of view for compact cameras:

Impact of crop factors

Of course, camera manufacturers have adapted to this by introducing extremely wide angle lenses which are designed for cameras with smaller sensors. Still it is generally much easier to obtain wide angle pictures using a larger image sensor.

Conclusion

It is not my intent to trash any particular camera, or system. The fact is that any camera is better than no camera, so use what you have. What I want to show here is that there are significant benefits to lugging around your DSLR, or mirrorless camera. That is true whether it is a Micro Four Thirds, APS-C, or a Full Frame camera. The benefits go well beyond resolution, and affect your overall image quality.

Larger sensors help you take better pictures in low-light, capture a greater dynamic range of tones, result in reduced diffraction, and let you achieve more background blur. So keep lugging around those cameras rather than trying to get it done with a phone or a compact model.

Do you have any additional data or questions you’d like to add? Please share in the comments below.

googletag.cmd.push(function() {
tablet_slots.push( googletag.defineSlot( “/1005424/_dPSv4_tab-all-article-bottom_(300×250)”, [300, 250], “pb-ad-78623” ).addService( googletag.pubads() ) ); } );

googletag.cmd.push(function() {
mobile_slots.push( googletag.defineSlot( “/1005424/_dPSv4_mob-all-article-bottom_(300×250)”, [300, 250], “pb-ad-78158” ).addService( googletag.pubads() ) ); } );

The post 6 Benefits of Using Cameras With Larger Sensors by Jim Hamel appeared first on Digital Photography School.


Digital Photography School

 
Comments Off on 6 Benefits of Using Cameras With Larger Sensors

Posted in Photography


Create Your Own Watermark using a Custom Shape in Photoshop

04 Dec
Transparent-watermark

Big transparent type copyright watermark that you would use send to clients for proofing.

I know there are many ways of creating a watermark. Using the Watermark Editor in Lightroom for example allows you to add your own text or graphic to your images. In general there is a lot of debate whether or not to add a watermark to images.

This article isn’t going to discuss the pros and cons of watermarking your images. Instead, I will demonstrate a step-by-step tutorial using the Custom Tool in Photoshop.

Whether you upload your images to the various social media platforms, or you want to send a client a high resolution image for proofing. This easy tutorial will show you how to create your own watermark using the custom tool in Photoshop.

For a while, my method was opening an image file where I had my own custom copyright information on a text layer. So that I could easily drag and drop this text layer onto a new image. This made more sense and took less time to add a watermark image rather than creating it every time. That is until one day, I couldn’t find the file!

Here are my four easy to follow steps to creating your own custom watermark using the Custom Tool in Photoshop. I prefer to use a custom shape over a custom brush. Shapes are vectors which means they scale up or down without losing quality.

Step 1 – Create a new document

Open Photoshop and create a new document. Make it 1000 pixels wide, by 300 pixels high.

Step 2 – Add text

Press the letter D on your keyboard, to make sure your foreground color is black. Choose whatever font you like, then press T to select the type tool. Hold down ALT key on a Mac and press G (Alt+0169 on a PC). This brings up the copyright symbol, add a space and type your name and year.

Alt+G-type-your-name-and-year

Holding down the ALT key on a Mac and press G brings up the copyright symbol (Alt+0169 on a PC).

Step 3 – Convert the layer to a shape

Go over to the layers panel. Right click on the text layer and go down to Convert to Shape.

Convert-text-layer-to-shape

When you have typed your watermark. Right click on the layer and select Convert to Shape.

This icon appears in the thumbnail to show that the layer is now a shape layer.

This-icon-shows-the-layer-is-a-shape

This icon in the thumbnail layer tells you that this is now a shape(vector) layer.

Step 4 – Save as a custom shape

Go up to Edit menu and select Define Custom Shape. A Shape Name dialog box appears – type in Watermark and click OK. This now adds your type as a custom option in your Shape Presets Library.

Define-custom-shape-under-edit

This is how you save your watermark custom shape in the presets library to use again and again.

Shape-name-dialog-box

Give your watermark a name so that you can find it easily. Plus you may decide to have a few.

That’s it. It took just four steps to create your own custom copyright watermark. Let me show now how to access, and add it to your images.

Apply your watermark to images for online viewing

Open an image that you want to share on Facebook, Flickr, etc. Create a new layer in the Layers Panel. Choose the Custom Shape tool in the toolbar (press Shift+U)

Custom-shape-tool-highlighted-in-toolbar

This is where you find the Custom Shape Tool in the Toolbar.

Go up to the Options Bar and click on the thumbnail next to the word Shape. This brings up the Shape Presets Library dialog box. At the very bottom, you will find the shape called Watermark.

Watermark-shape-at-the-bottom-in-presets-library

Custom shapes will always appear at the bottom in the presets library.

Now press and hold the Shift key, click and drag the watermark shape across your image. The Shift key ensures the shape remains in proportion. Don’t worry about the size just yet. Place it in position – in this case, I placed the watermark bottom right.

Now as the foreground color was set to black, I want to change the color to white. Go up to the Layers Panel and click on the Layer thumbnail and the color picker dialog box appears. You can choose whatever color you want here.

Changing-color-of-watermark-to-white

You can customise your watermark shape with any colour or style effect.

Go back up to the Layers Panel and reduce the opacity to your desired setting. I chose 40%.

Opacity-reduced-to-40-per-cent

Reducing the opacity allows for your watermark to be more discreet.

I now want to reduce the size of the watermark. Go up to the Edit menu and choose Free Transform Path (Cmd+T on a Mac). Holding down the Shift and Alt keys, drag any of the corners of the transform handles in towards the centre. This reduces the size while keeping the aspect in proportion. Press Enter or the Commit Transform button up in the Options Bar. Go up to File and Save for the Web.

Apply to high res images for proofing

Okay, so let’s say you want to send a higher resolution image to a client. Open up the image. Click on the Custom Shape Tool (Shift+U). The watermark shape is already selected, so hold the Shift key and click and drag right across the image. Leave the color as it is.

This watermark is going to be transparent. Click on the Add a Layer Style icon at the bottom of the Layers Panel and select Bevel and Emboss. The Layer Style dialog box appears. Increase the size to 8 pixels and change the direction to down.

Bevel-and-Emboss-layer-style

Layer styles can be found by clicking on this icon at the bottom of the layers Panel. Alternatively, go up to Layer menu and choose Layer Style.

Bevel-and-Emboss

The Bevel and Emboss is a good effect to add to your watermark if you want to make more transparent, while still protecting your image.

Next go over to the left and click on the Blending Options: Custom, which is directly above the Bevel and Emboss. Under Advance Blending bring the Fill Opacity slider down to zero and click OK. Go back up to Opacity in the Layers Panel and reduce to 68%.

Blending-Options-Custom-2

Reducing the Fill Opacity hides the colour and just leaves the effect.

Tip:

To place your Custom Watermark Shape at the top in the Presets Library, click on the thumbnail right of the word Shape in the Options Bar. The Shape Presets Library dialog box appears. Click on the gear icon and select Preset Manager, the Preset Manager dialog box appears with all the shapes. The Watermark shape is the very last one, click and drag it up to the top and click the Done button.

Location-of-Presets-Manager

By clicking on the gear icon, the pop-out menu where the Preset Manger is located appears.

Moving-watermark-shape-to-top-Presets-Manager

Here in the Preset Manager, you can rearrange the shapes inside of the dialog box. Just click on any shape and drag it where you want it. I moved the watermark shape to the top for easy access.

Do you use watermarks on your images? Why or why not?

What techniques do you use? Please share in the comments below.

googletag.cmd.push(function() {
tablet_slots.push( googletag.defineSlot( “/1005424/_dPSv4_tab-all-article-bottom_(300×250)”, [300, 250], “pb-ad-78623” ).addService( googletag.pubads() ) ); } );

googletag.cmd.push(function() {
mobile_slots.push( googletag.defineSlot( “/1005424/_dPSv4_mob-all-article-bottom_(300×250)”, [300, 250], “pb-ad-78158” ).addService( googletag.pubads() ) ); } );

The post Create Your Own Watermark using a Custom Shape in Photoshop by Sarah Hipwell appeared first on Digital Photography School.


Digital Photography School

 
Comments Off on Create Your Own Watermark using a Custom Shape in Photoshop

Posted in Photography


6 Tips for Using ISO Effectively With Your Camera

02 Dec
Taken at ISO 800 (shutter speed of 30 seconds and aperture at f/8.0)

Taken at ISO 800 (shutter speed of 30 seconds and aperture at f/8.0)

ISO has long been called the third corner of the exposure triangle, but was it really? In the film days you couldn’t even change your ISO, except by changing your film. In the early days of digital, you could change your ISO after each shot, which was a definite improvement. But, if you dared to increase the ISO, your picture would probably end up with a lot of digital noise in it. The reality is that most of us were confined to a very narrow range of ISO values when making our exposures.

Times have changed though. Newer cameras offer a lot more flexibility when it comes to ISO. First of all, they are capable of taking pictures at higher ISOs. Cameras now will routinely shoot at ISO 25,600 (and higher), which was almost unheard of just five or six years ago. Secondly, when newer cameras do shoot at higher ISOs, they produce less digital noise. Check out this chart from DxO Mark showing the ability of cameras to shoot at higher ISOs without being ruined by noise:

DxO-aging-chart

The chart shows the maximum useable ISO for given cameras introduced over the last 12 years. Notice how the dots are higher on the chart the further you go to the right.  The newer cameras are to the right of the graph and the tests show that they can shoot at higher ISO values with less digital noise.

In addition, seemingly mindful of the desire of photographers to change their ISO more frequently, camera manufacturers have made it easier to change ISO on the fly. Some, like Fujifilm, have even put ISO on par with shutter speed and aperture by giving ISO its own dial. As a result, it is easier to change the ISO and it truly has status as an equal partner in the exposure triangle.

Even beyond cameras, however, we now have a much greater ability to remove digital noise from our pictures. Much of this improvement is thanks to Lightroom. With a quick slider adjustment, we can eliminate much digital noise from our pictures, without making them blurry. Further, if you have a severe noise problem, there are dedicated plug-ins like Noiseware and Photo Ninja, designed to reduce noise in your pictures, which have continued to improve.

As a result of all of this, you have a lot more flexibility when it comes to ISO. But how does this really impact your photography? And where should you set your ISO in different situations?

If you are just getting started, you might be bewildered by the numbers, or perhaps don’t even know where to start. If you have been shooting for a long time, you may be locked into some habits that were engrained before all these changes in technology. Either way, here are some tips to help you put ISO to work, to improve your photography.

Tip 1: Start with ISO 200

If you have been shooting for a long time, you might be in the habit of keeping your ISO at 100 to keep noise out of your pictures. As mentioned above, given the state of camera technology, this was a prudent practice. Now, however, there is almost no discernible difference between a shot taken at ISO 200 and ISO 100 in most cameras. You may as well use ISO 200 as a default to give yourself an extra stop of light. It will result in better pictures. How so? In one of two ways:

  • It will allow you to use a faster shutter speed, which will make your photos sharper if you are hand holding
    AND/OR
  • It will allow you to use a larger aperture to increase your depth of field

By using ISO 200 instead of 100, you will enjoy a little extra flexibility in your exposure settings, without an increase in digital noise. It is pretty much a case of something for nothing.

Tip 2: Use ISO 400 for clouds or dusk

Do not hesitate to move the ISO up to 400 (or even higher depending on your camera) when the need arises. If you are outdoors and there are any clouds, or if the sun is starting to move toward the horizon, go ahead and move to ISO 400. You will find there is very little increase in digital noise in most cameras at this level.

Even though this was a bright, sunny day, the need for a super-fast shutter speed meant that I needed to increase my ISO to 400 to get this shot.

Even though this was a bright, sunny day, the need for a super-fast shutter speed meant that I needed to increase my ISO to 400 to get this shot. Exposure info: 1/8000th, f/2.8, at ISO 400

Tip 3: Crank it up to stop the action

Previously, you faced a dilemma when trying to stop the action. Should you:

  1. Increase the ISO and risk having the picture ruined by noise, or
  2. Keep the ISO low and risk having the picture ruined by blur because of the slower shutter speed you would be forced to use?

Obviously, neither choice was ideal. But now, with better cameras and noise reduction tools, there is no reason not to increase your ISO when you are photographing action (assuming you are not trying to blur it). In that case, start by moving the ISO up to 800.

Tip 4: Start with ISO 1600 indoors

As soon as you move indoors, increase your ISO to 1600 if there is reasonably good light. Move it even higher if the lighting is poor. There is a lot less light indoors, even though it often doesn’t look that way to you (your eyes adjust very quickly).

It was not possible to use a tripod in the Opera Garnier in Paris. Hence, ISO 3200 for this picture (actually pictures, since it is many pictures stitched together)

It was not possible to use a tripod in the Opera Garnier in Paris. Hence, ISO 3200 for this picture (actually pictures, since it is many pictures stitched together)

Note: If you have, and can use a tripod then keep your ISO lower if possible (there is no moving subject).

Tip 5: Don’t be afraid to use 6400

I was recently trying to take pictures of a high school play, featuring my daughter. I faced a toxic combination of extremely low light, and a moving subject (flash was not allowed). I had a pretty fast lens, opened all the way up to f/2.8. To keep the subject from being blurred, I needed to use a shutter speed of at least 1/400th of a second. To get a proper exposure, I required ISO 6400. I used it, and then gave it a dose of Lightroom noise reduction later, to get the following picture.

Hannah-Play

Exposure info: 1/500th, f/2.8, at ISO 6400

Perfect? No. But if I had hedged at all, it would have been blurred and completely ruined. The point is that ISO 6400 might not get you perfection, but it will get you a shot, when the alternative is no shot at all.

Tip 6: The same applies for higher ISOs

Nobody wants to use very high ISO values. But when you’re faced with the choice of a shot at ISO 6400 or 12,800 (which will probably have a noise problem), versus a blurry shot from using too slow of a shutter speed, take the noisy picture every time. You have some hope of curing a noisy picture in Lightroom. You have no hope of fixing a blurry subject.

This was shot through a window from inside the Louvre, and using a tripod was not possible. Since I was hand holding, I needed to use ISO 3200. I didn't like using an ISO that high, but it beats not getting the shot at all (or having it blurry from too slow of a shutter speed)

This was shot through a window from inside the Louvre, and using a tripod was not possible. Since I was hand holding, I needed to use ISO 3200. I didn’t like using an ISO that high, but it beats not getting the shot at all (or having it blurry from too slow of a shutter speed). Exposure info: 1/8th, f/4, at ISO 3200

Conclusion

I recognize that, in a sense, this entire article could be summarized as: It is okay to increase your ISO. There is more to it than that though, and that is particularly true if you are just starting out, or getting used to a new camera. I have used hard values in this article to give you default numbers, for some different scenarios. That said, of course, every situation you will face as a photographer is different. Just use these as starting points and adjust from there. In time you will get your own starting points.

Further, your use of ISO will depend on your camera as well. Obviously, newer and more expensive cameras have better low-light performance. How does yours stack up? You can check the DxO Mark rating to start. The best thing to do is to test your camera, which is easily done by taking the exact same picture at different ISO values (while adjusting shutter speed to keep the exposure the same) and then comparing them on your monitor (at 100%). Having done so, you will be well poised to use ISO to improve your pictures.

googletag.cmd.push(function() {
tablet_slots.push( googletag.defineSlot( “/1005424/_dPSv4_tab-all-article-bottom_(300×250)”, [300, 250], “pb-ad-78623” ).addService( googletag.pubads() ) ); } );

googletag.cmd.push(function() {
mobile_slots.push( googletag.defineSlot( “/1005424/_dPSv4_mob-all-article-bottom_(300×250)”, [300, 250], “pb-ad-78158” ).addService( googletag.pubads() ) ); } );

The post 6 Tips for Using ISO Effectively With Your Camera by Jim Hamel appeared first on Digital Photography School.


Digital Photography School

 
Comments Off on 6 Tips for Using ISO Effectively With Your Camera

Posted in Photography