RSS
 

Posts Tagged ‘Using’

How to Create Your Own Style by Using LUTs in Photoshop

03 Jun

It is important to have your own style. Everybody says that. It is one of the most important factors to avoid drowning in millions of other photos from other photographers. A style is many things. It is your compositions, what you shoot photos of, what light you shoot in, but one of the most important factors is, how you post-process your photos. In this article, we will look at a post-process technique that can give you your own unique look to all of your photos using LUTs in Photoshop.

There are many ways to apply a certain look to your photos, some are better and some are simpler than others. You can pick up a filter or a preset in some tool and it might look pretty good. But it will not really be your style no matter how cool it looks. Anybody with that tool can click that exactly same preset and have the same look.

mountains at dusk and reflections - How to Create Your Own Style by Using LUTs in Photoshop

Create your own look

If you want to have your own style or look, you will have to create it. A great way to do that is by creating your own “Color Look -Up Table” or simply called LUTs. This is a fairly easy way to make a quite drastic look which will be unique to your photos. This is also called color grading.

A LUT is a Color Look-Up Table, it maps one color into another. It is a technique used in the movie industry, to create certain styles to movies. The same technique can be applied in photography to create a distinctive and professional look to your photos.

In this article, you will first learn how to use LUTs, and then how to create your own LUT files. The LUT is your post-processing style. This technique requires Photoshop or GIMP (or any program that uses layers – Luminar is also capable of using LUTs). The examples in this article were done with Photoshop.

Before we start, remember that when you are post-processing not to overdo it only “do it” enough, or subtly.

The Vista Point - How to Create Your Own Style by Using LUTs in Photoshop

How to use a LUT

Photoshop comes with a number of LUTs out-of-the-box, you apply them as an adjustment layer. They will change the colors of the image and some of them will also change the contrast. Let’s see how to add LUTs to a photo.

Path into the unknown - How to Create Your Own Style by Using LUTs in Photoshop

Step 1 – Open a photo in Photoshop

Start by opening a photo, maybe one that you have post-processed a bit to balance the contrast, highlights, and shadows.

Open a file in Photoshop - How to Create Your Own Style by Using LUTs in Photoshop

Step 2 – Add an Adjustment Layer

Then add an Adjustment Layer – choose “Color Lookup Adjustment layer”.

Add LUT adjustment layer - How to Create Your Own Style by Using LUTs in Photoshop

This layer will use a LUT file to make magic changes to your photo.

Step 3 – Pick a LUT

Make sure that you have the Properties tab of the adjustment layer opened. Click on the 3DLUT file drop-down menu and a list will appear. The list you see include the default LUTs shipped with Photoshop.

Open properties - How to Create Your Own Style by Using LUTs in Photoshop

Pick one and see what happens. Play around and try different default LUTs and see what happens.

Pick a LUT - How to Create Your Own Style by Using LUTs in Photoshop

Some are very dramatic, like for instance EdgyAmber, while others are a bit more subtle.

See the result of EdgyAmber - How to Create Your Own Style by Using LUTs in Photoshop

Resulting image using the EdgyAmber LUT.

At first, you may think that the dramatic ones are not useful at all, but try changing the layer opacity to 30% while you have the EdgyAmber LUT selected.

Change the opacity of the layer - How to Create Your Own Style by Using LUTs in Photoshop

As you can see the dramatic LUTs can also become subtle.

Change opacity Result - How to Create Your Own Style by Using LUTs in Photoshop

EdgyAmber LUT applied at 30% opacity.

Step 4 – Combining several LUT files

You can also create your own unique look. One that you can use for a particular series or even apply it on all of your photos as your style. You can do that by combining several Color Lookup (LUT) adjustment layers.

On each one, change the opacity level to something rather low, probably in the 5%-40% range. Once you have 4-6 layers, you can be pretty sure that the exact combination of layers, their order and opacity is unique.

Combined LUTs - How to Create Your Own Style by Using LUTs in Photoshop

Combining four LUTs for a unique look.

This is a pretty effective, yet simple, way to process your images to make them look like professional photographs.

Advanced tip!

You can also use some of the other kinds of adjustment layers to change the colors, to make more exact fine-tuning tweaks. Good adjustment layers for doing this are Selective Colors, Channel Mixer, and Color Balance. There are others, but they are even more advanced.

Once you have a selection of Color Lookup Adjustment (LUT) layers that you like, you can save this combination as your own LUT. This way you can achieve the same look on another photo, simply by applying just one LUT. It is almost as simple as clicking a preset button.

House in Hamburg - How to Create Your Own Style by Using LUTs in Photoshop

Requirement 1 – Your photo must be the Background Layer

To make this work, it is a requirement that the original image is the Background Layer. This will always be the case if you have opened the image normally.

Background layer - How to Create Your Own Style by Using LUTs in Photoshop

Requirement 2 – Do not use masks

Whatever color grading adjustment layers you use to change the colors, do not use any masks. Using masks will confuse the Color Look Table export tool and your LUT will probably not be usable.

The Lock House - How to Create Your Own Style by Using LUTs in Photoshop

Step 5 – How to use your own LUT

Once you have made a set of adjustment layers to your photo, you can save it to a LUT file by going to: File > Export > Color Lookup Tables…

How to save the LUT - How to Create Your Own Style by Using LUTs in Photoshop

In the export dialog box, you can name your LUT. You can also change the Grid Points. 64 is a good compromise between size/performance and quality. Finally, make sure that you have 3DL checked.

How to save LUT - Settings - How to Create Your Own Style by Using LUTs in Photoshop

If you save all your own LUTs to the same folder, they will be easy to access and find later. You can make a shortcut to the folder and very quickly apply one of your own LUTs to another image.

Step 6 – Using your own LUTs

It is very simple to use your newly created LUT file. Open a new image in Photoshop, add a Color Lookup Adjustment Layer and click Load 3D Lut.

How to load LUT - How to Create Your Own Style by Using LUTs in Photoshop

As you can see, it instantly transforms your photo.

Custom LUT loaded - How to Create Your Own Style by Using LUTs in Photoshop

If you apply this LUT to any photo they will share a common look and feel.

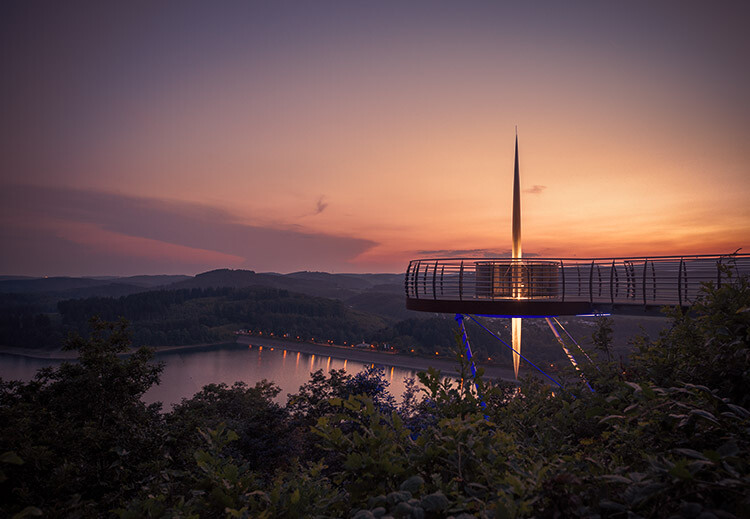
All the photos in this article are processed using the same LUT and the familiarity is easy to spot. The results are dark moody images with a yellow/orange tint in the highlights and a blue/purple ting in the shadow areas.

They were all created with just some basic contrast, highlight and shadows adjustments applied in Lightroom, before importing them into Photoshop. The post-processing need not stop here, but for the purpose of the example, these images were kept simple.

The outer Pier - How to Create Your Own Style by Using LUTs in Photoshop

Conclusion

By creating and using LUT files you can create a look for all your photos or even just to a series of images, that is unique. The LUT could be just a part of a more complex post-processing method or it could be the one spice that makes it your signature look.

As you grow more familiar with them you can create LUTs that you use for particular types of photos. One for sunny daytime photos, one for pre-sunrise, one for nighttime, etc. Have fun and be creative with using LUTs.

More LUTs

You can find tons of LUTs available on the internet. Some are free, some are not. However, I still recommend that you try to create your own, make it your style.

If you have any questions about creating or using LUTs, please ask in the comments area below.

The post How to Create Your Own Style by Using LUTs in Photoshop appeared first on Digital Photography School.


Digital Photography School

 
Comments Off on How to Create Your Own Style by Using LUTs in Photoshop

Posted in Photography


Tips for Using On-Camera Flash for Beginners

26 May

Flash is a challenging subject and can be confusing if you’ve never used it. These two videos will give you an overview of some flash basics you need to know, and how to take the next step when using flash – bouncing it for better lighting.

On-Camera Flash Basics

In this video, Chris from The Camera Store gives you a crash course in some on-camera flash basics. He covers what you need to know to get your flash photos looking better and more natural so you don’t have subjects with deer in the headlights looks or black cavernous backgrounds with no light.

?

Flash for new users

?

Next, this video from Mark Goodin of RealWorld will walk you through understanding some of the settings on your flash and how to use it to make better light on your subject. He even gives a couple tips for diffusing your on-camera flash (the built-in one that pops up) so it isn’t so harsh.

Want more?

If you want more flash photography tips, try these dPS articles:

  • A Quick Guide to Using Bounce Flash for More Natural-Looking Photos
  • How to use Off-Camera Flash to Create Dramatic Images with Cross Lighting
  • What is a Flash Bracket and Why Do You Need One?
  • How to Understand the Difference Between TTL Versus Manual Flash Modes
  • Flash Shopping Guide – 5 Things to Consider When Buying a Speedlight
  • Tips for Using Speedlights to Create the Right Lighting for Outdoor Portraits

The post Tips for Using On-Camera Flash for Beginners appeared first on Digital Photography School.


Digital Photography School

 
Comments Off on Tips for Using On-Camera Flash for Beginners

Posted in Photography


SLC-0L-02: Shiny Object, Using an iPhone and the Sun

26 May

Whether photographing people or objects, how you approach your lighting is far more important than what camera and lighting gear you use.

To illustrate, today we are going to photograph a complex, mirrored surface—an alto saxophone—using just an iPhone for our camera and the sun as our light source. Read more »
Strobist

 
Comments Off on SLC-0L-02: Shiny Object, Using an iPhone and the Sun

Posted in Photography


Using four Godox EC-200 extension heads as a quad-flash for beauty and close-up lighting

25 May

Flashpoint/Godox have just announced the EC-200 extension head, adding an effective and extremely low-cost tool for cosmetic and macro photography. These heads are exclusively designed for the Evolve 200 / AD200 pocket flash, a widely popular and highly efficient product, operated by long-lasting lithium batteries.

Throughout my career I have used various types of ring flashes and parabolic umbrellas. I also collaborated with Swiss lighting manufacturer Broncolor for over a decade on countless marketing and promotional projects, and shot their launch campaigns for the original Para 330 and Ringflash C.

Super model Iman for DeBeers global campaign (2003), shot with Broncolor Para330, and Fujifilm GX680III, on Fujifilm Provia film.

These types of lights are often used by fashion photographers, as they are both easy to work with and offer many options—the Broncolor Paras in particular, which range from the 88 to 330, can produce a wide variety of effects. However, neither types are ideal for extreme close up work when balanced, even front-lighting is required.

The new remote heads from China on the other hand, are small and light enough to allow for several of them to be mounted on a camera flash bracket and rail.

Selecting tiny but wide-angled reflectors, the resulting light is much less harsh, and more feathered than the output from a ring flash, in very close distance. The total weight of, let’s say, four extension heads with the small reflectors and including the bracket/rail set is just about 24 ounces, making handheld shooting is easy.

This new kind of ‘Quad Ring’ set up offers also the additional advantage over traditional ring flashes of allowing individual control of each of the flash heads in turn, which permits me to limit the output of the flash hitting the model’s face from underneath.

This is not as easily achieved with a ring flash.

Placed on tripod, the four extension heads are still mounted on the bracket and rail, but the camera is hand-held, so the four lights hit from a slight angle.

Fujifilm GFX 50S, GF 250mm lens, F8, 1/4000 sec, ISO 100

The Evolve 200 / AD200 pocket flash performs extremely well and reliably in HSS (High Speed Sync) mode, and when used for this ‘Quad Ring’ arrangement, provides output powerful enough to completely black out direct midday sunlight.

This four-light arrangement also makes an excellent off-camera light by simply setting the contraption on a tripod and shooting from various angles around it.

The ‘Quad Ring’ is also off-centered in this image. This time it’s placed to the camera angle, resting on a tripod.

Fujifilm GFX 50S, GF 120mm macro lens, F11, 1/125 sec, ISO 100

As evident by the unusual catchlights, the four extension heads are mounted on bracket and rail around the lens here.

Fujifilm GFX 50S, GF 120mm macro lens, F11, 1/125 sec, ISO 100

The announcement of the new remote heads is timely. The recent release of new macro extension tubes by Fujifilm for the mirrorless medium format GFX 50S (and the release of the GF 120mm macro lens) have ushered in a new era for macro photography. One can now easily shoot 1:1 handheld, with very fast and reliable autofocus, or manually focus while zoomed in.

Compared to previous systems, macro photography with medium format mirrorless cameras has become easy and accessible. Adding the creative options created by the convenient new remote heads, it has never been more fun to shoot close up!


About the Author: Markus Klinko is an award-winning, international fashion/celebrity photographer and director, who has worked with many of today’s most iconic stars of film, music, and fashion.

Klinko has photographed the likes of Beyonce, Lady Gaga, David Bowie, Jennifer Lopez, Britney Spears, Mary J. Blige, Mariah Carey, Kanye West, Anne Hathaway, Kate Winslet, Will Smith, Eva Mendes, Kim Kardashian, Naomi Campbell, and Iman. His editorial clients include Vogue, GQ, Vanity Fair, Harper’s Bazaar, and Interview magazine.

You can find more of his work on the Markus & Koala website or by following him on Instagram.

Articles: Digital Photography Review (dpreview.com)

 
Comments Off on Using four Godox EC-200 extension heads as a quad-flash for beauty and close-up lighting

Posted in Uncategorized


How to Take Amazing Photos Using the MIOPS Splash Water Drop Kit

22 May

Water droplet photography is a dream for almost every creative photographer. When a water drop collides with another drop, it creates beautiful crowns and other shapes that look fabulous. Capturing those moments is a very satisfying experience for a photographer.

MIOPS Splash water droplet

Taken by Andrea Laybauer using MIOPS Splash Water Drop Kit

Until now it was not easy to create such shots, but thanks to the advancement of technology, now we have some gadgets that could make this process almost effortless for us. One such gadget is the MIOPS Splash Water Drop Kit which is the world’s first water drop photography gear that can be controlled by your smartphone.

It not only controls the size and timing of drops with great precision, but it also controls your camera or flashes so that you can focus on other creative tasks like lighting, background, and different settings to create unique pieces of art.

So, let’s find out how you can create extraordinary splash photographs using this amazing device.

Photo credits: In this article, we are featuring examples done by myself, as well as three photographers and MIOPS Splash Water Drop Kit customers; Andrea Laybauer (a specialist who shoots drops and splashes), Jos Daanen (a primarily wildlife photographer), and Paul Lindqvist (a specialist in food, stop-motion products, and portraits).

MIOPS Splash Water Drop Kit - blue drops

Taken by Ramakant Sharda using MIOPS Splash Water Drop Kit

What you need:

A Quiet Room:

First, you’ll need a room that can be darkened where you can create a lot of mess in that room. It’s better to choose a spare room as you may need to keep your equipment setup for a few days.

Camera and Lens:

You can use any DSLR camera for water droplet photography, or any other camera that has manual controls. Lens choice is important as you need one with a longer focal length and shorter minimum focusing distance so your camera is safe from water splashes but you can still fill the frame with splashes. I found that a 100mm macro lens is the best option for this project.

Flashes/Speedlights:

Next, you need flashes with manual control over power. You are going to use the flashes at the lowest power setting so you need a minimum of two flashes. If you have more, that is even better.

Taken by Andrea Laybauer using MIOPS Splash Water Drop Kit

Taken by Andrea Laybauer using MIOPS Splash Water Drop Kit

Tripod:

A steady tripod is a must for the camera so you can focus on other aspects of the shoot. You also need an extra tripod for attaching the MIOPS Splash Water Drop Kit device.

Water Containers:

You may use a glass bowl, wine glass, or a designer cup. But if you don’t want to show the container in the picture you need around an 8×12″ glass tray with two-inch depth. You can get it from your local aquarium shop (or a similar baking dish).

Taken by Jos Dannen using MIOPS Splash Water Drop Kit

Taken by Jos Daanen using MIOPS Splash Water Drop Kit

Backgrounds:

You also need some colorful background images. Go to Google and search for “blur abstract background” and you’ll get an idea about what type of images you require. You can buy similar images from stock sites or there are some sites that provide images at no cost. You now have two options, you can print these images on paper or transparencies.

MIOPS Splash Water Drop Kit:

Finally, you need a MIOPS Splash Water Drop Kit to control the water drops and your camera. It comes with a holder kit so you can easily fix it on a tripod.

MIOPS splash dark

Other than these items, you need a few more things like a milky white acrylic sheet (Plexiglass) to attach backgrounds. Something to hold the acrylic sheet, a dry cloth, some clamps or clips and a shutter release cable.

Setup:

Now you have everything ready, so let’s start. First, place the acrylic sheet as the background, making sure to leave at least two feet at the back for placing the flashes. Now place a tripod at the front of this and attach the MIOPS Splash Water Drop Kit on it. The distance between the background and the point where your drop will fall should be around 12-15 inches.

Now put your water container below it and ensure that the drop falls in the center of this container. Also, align your background with it.

Next place your flashes. If you are using transparencies for the background, place the flashes behind the glass, at a distance of around 12 inches. If you are using a paper background, place the flashes at a 45-degree angle on both sides. Make sure to cover your flashes with a plastic bag.

Water droplet splash Setup 01

Setup using a transparent background with the flashes behind it.

Water droplet splash Setup 02

Setup using a paper background with the flashes in front of it. Notice the flashes are being protected from any water drops that might splash and land on them, potentially damaging your delicate electronic equipment.

One flash will be the master and it’ll attach with MIOPS Splash Water Drop Kit and the other flashes will be in slave mode so they fire automatically when the master flash fires.

Lastly, fix your camera on a tripod and attach a shutter release cable. It’s better to create this setup on a table because you need to work for a long time and if this setup is on the ground, you’ll get tired quickly.

Settings:

At this point, you may want to take a break and have coffee but if you are like me, you probably dying to see your first image. So, let’s talk about all the settings.

First, set your flashes at 1/32 power. If you are using four flashes, you may need to lower the power to 1/64 or 1/128. The lowest power setting will give you shortest flash duration and your photos won’t have any motion blur.

Next set your camera to Bulb Mode, set ISO to 100, choose an aperture between f/11-f/16 and attach the shutter release cable. Now put a pencil or something else where your drop will fall and focus manually on that spot, and leave the camera.

Taken by Andrea Laybuarer using MIOPS Splash Water Drop Kit

Taken by Andrea Laybuarer using MIOPS Splash Water Drop Kit

You can also control your camera using the MIOPS Splash Water Drop Kit, but it’s always better to set your camera to Bulb Mode and fire flashes instead. It will give you accurate results as there will be no shutter lag.

Lastly, you need to do the MIOPS Splash Water Drop Kit settings. You are going to set the size of the first drop, the delay between two drops, size of the second drop and finally the flash firing time. Open the MIOPS Mobile app on your phone and you’ll find some settings. Set the first drop size to 25 milliseconds, the second drop size to 50 milliseconds and delay to 100 milliseconds. Finally set Trigger to 350 milliseconds and set mode to flash.

These settings are just a starting point and you need to do some fine-tuning. If your nozzle is too high or low, you need to change delay time according to that. For the above settings, the distance between nozzle and water container is around two feet.

Workflow:

Now you need to open the shutter using the shutter release cable and tap on the Start button in the app and close the shutter when flashes are fired. Since your room is dark and you are using a narrow aperture, the ambient light won’t affect the shot.

Taken by Andrea Laybauer using MIOPS Splash Water Drop Kit

Taken by Andrea Laybauer using MIOPS Splash Water Drop Kit

Taken by Jos Daanen using MIOPS Splash Water Drop Kit

Taken by Jos Daanen using MIOPS Splash Water Drop Kit

So, take a shot and check if the lighting is good or not. If your picture is too dark, increase the ISO or move the flashes a little bit closer. Keep in mind that you should not increase the power of your flashes above 1/32 or you’ll start getting motion blur. If your picture is too bright, lower the flash power to 1/64 or 1/128 or move them back.

Once the light is okay, take another shot and see if it’s properly focused. If not, focus again.

When everything is set and you get your first shot, it’s time to do some experiments to create different masterpieces. Change the size of drops to see what difference it makes. Remember that first drop size won’t make any major difference, it’s the size of the second drop what will create different shapes. Now change the delay time, every time you change it, you’ll get different shapes.

Now experiment with both drop size and delay between drops. Each change will give you different results. Just keep in mind that you should make small changes like 5-10 milliseconds.

Taken by Andrea Laybauer using MIOPS Splash Water Drop Kit

Taken by Andrea Laybauer using MIOPS Splash Water Drop Kit

Once you understand the process and take enough shots, experiment with different backgrounds and light positions. You can place the flashes at the back and front or you can use gels on them to get different results.

Taken by Paul Lindqvist using MIOPS Splash Water Drop Kit

Taken by Paul Lindqvist using MIOPS Splash Water Drop Kit

At last, I am going to tell you a little secret to get outstanding photos. If you add a few drops of liquid soap in the water, you’ll start getting some totally unique shapes.

So, let’s get started, please share your masterpieces in the comment area below.

More about the photographers:

Andrea Laybauer started to photograph in 2001. However, since 2009, she has dedicated herself to shooting drops and splashes. View her website here and Instagram to see more of her work.

Jos Daanen is primarily a wildlife photographer. He did his utmost best to get some collisions of droplets… For these featured photos, he ordered the MIOPS Splash Water Drop Kit unit which was released at the beginning of 2018.

Paul Lindqvist is a commercial photographer who specializes in food, stop-motion, product photography, and portraits.  He loves using technology to create his images, and always find new ways to use it to his advantage. View his website and Instagram

Disclaimer: MIOPS is a paid partner of dPS.

The post How to Take Amazing Photos Using the MIOPS Splash Water Drop Kit appeared first on Digital Photography School.


Digital Photography School

 
Comments Off on How to Take Amazing Photos Using the MIOPS Splash Water Drop Kit

Posted in Photography


How to Make a Composite Wine Bottle Image using Photoshop Layers

19 May

A wine bottle is always a tricky subject to photograph. The highly reflective nature of the glass makes it hard to use frontal lighting, while backlighting will not reach the label.

In short, the perfect light for the glass will usually not work for the label and vice-versa, often leading to the capture of various images that are later on composited in post-production, creating the final image in this manner.

Photograph wine bottle composite

In this article, I will show you step-by-step, how this image was photographed and composited using Photoshop.

Image capture

This image was photographed with a full frame DSLR, a 100mm macro lens, and two speedlights.

wine bottle photograph seen in the camera - How to Make a Composite Wine Bottle Image using Photoshop

One of the speedlights was fitted with a yellow filter, this provided the background light. The other speedlight was fitted on a stripbox and provided the light on the bottle in different positions for different shots.

Light areas

Planning ahead and deciding which areas to light are key factors for the success of the final image composite.
In this particular image, the areas that were lit for each image were as follows:

  • The label
  • Gold logo
  • The embossed letters
  • Light side light
  • The background

Photograph wine bottle composite 03

None of these images look good by themselves, but each adds its own contribution for the final result.

Raw image development

This is the stage where the Raw images are processed and the basic adjustments are applied. I start by adjusting the “background” image which will be the base for the composite.

Even though the yellow filter used on the speedlight created a nice warm tone on the image background, I decided to make that tone even warmer, adjusting the yellow and green hue to orange, giving it a vintage ambiance.

Photograph wine bottle composite 04

The compositing process

After developing the RAW images, it’s now time to start merging all of the different images.

I start by opening the “Background” image and giving it some basic corrections, like completing the right edge reflection with the clone stamp.

Photograph wine bottle composite 05

Next, I load the “Embossed Letters” image as a new layer that will stay on top of the “Background” layer and start the compositing process. For this process to work, it is imperative that all the images have the same framing and neither the camera or the object is displaced between shots.

Layers and masking

Even though there are many ways to create a composite in Adobe Photoshop, my favorite, and the one that allows more control, is the layer mask function.

This masking process hides parts of the image while revealing the information that exists on the underlying layer. Just click on the layer mask icon in the layer panel, and a mask will be added to the selected layer. It might look complicated but it is, in fact, a simple process.

White areas of the mask show what is on that layer, black areas show what is on the underlying layer (think of it as a hole you look through to see the layer below).

Photograph wine bottle composite 06

In this particular case, it is easier to invert the mask from white to black (Image>Adjustments>Invert) and paint in the areas you want to reveal from that layer by using a white brush.

The exact same process was applied to the “label” and “gold Logo” layers. The “Left Side Light” layer was used to create just a fine rim light on the left edge of the bottle and give it a better separation from the background.

Photograph wine bottle composite 07

Refinements

Now that it all starts to look much better, with all the bits and pieces that were used from each layer to form the composited image. So it is time to pay attention to the small details like small imperfections on the bottle, smudges or dust specs that may need to be fixed.

Photograph wine bottle composite 08

A higher zoom (100% or 1:1) will likely reveal problems that need to be solved.

The icing on the cake

Even though I could consider the image editing process finished by now, there is still a small but really important detail in my opinion – the table’s smooth wooden texture was not the right fit for the look I was trying to achieve.

So, the right thing to do was to photograph an old beat up piece of wood that would fit the look of the overall image and replace the existing tabletop.

Photograph wine bottle composite 09

Now I load it as a layer on the final image and use the perspective command (Edit>Transform>Perspective) to adjust the flat wood image to match the perspective of the tabletop.

Photograph wine bottle composite 10

And for the final touch, I changed the blending mode of the “Wood” layer to darken, in order to make it blend smoothly with rest of the scene.

Photograph wine bottle composite 11

Final thoughts

Even though I always try to get things as right as possible during the photography process, and leave as little as possible for the post-processing phase, the truth is that this compositing technique amazes me every time I try it. It is incredible the amount of detail control it offers.

Give it a try, I am sure you will be amazed too.

The post How to Make a Composite Wine Bottle Image using Photoshop Layers appeared first on Digital Photography School.


Digital Photography School

 
Comments Off on How to Make a Composite Wine Bottle Image using Photoshop Layers

Posted in Photography


4 Tips to Help You Love Using Manual Mode

07 May

In this article, I’d like to share with you a few tips on how to utilize some of your camera’s functions to help you come to grips with shooting in Manual Mode.

Sometimes stripping back to the basics and only using minimal, older equipment with none of the modern features new cameras possess, can help you grow as a photographer. Sometimes making good use of selective technology on your digital camera can also help you learn and create more accurate exposures more easily than is ever possible with older cameras.

Asian woman holding an old 35mm film camera - 4 Tips to Help You Love Using Manual Mode

I started learning on a camera which had no auto anything. There were no options other than to learn Manual Mode. I still use shoot manual 99% of the time.

During the photography workshops we run, I love to encourage people to switch to manual and commit to it for a period of time. If you try Manual Mode once or twice for a short time it’s likely you will not “get” it. You need to commit and using only Manual for most of what you photograph for long enough until you feel you are making progress.

man taking a photo - 4 Tips to Help You Love Using Manual Mode

1. Live View/Electronic View Finder

Many cameras now have LCD screens/electronic viewfinders which display how the exposure will look when you take a photo in Manual Mode. If your camera has this function it pretty much eliminates the need to look at the exposure meter or change your metering mode to obtain well-exposed photographs.

By focusing your attention on the exposure of the image on your LCD screen or in your electronic viewfinder while you are adjusting your aperture, shutter speed, and ISO settings you can easily see when your photo will look good.

Asian woman photographer 4 Tips to Help You Love Using Manual Mode

You need have your screen or viewfinder set so it’s neutral, not too bright and not too dark. To check this you can take a few test photos and then review them (on the computer). If they are over or underexposed adjust the brightness value of your camera’s LCD screen and/or viewfinder until your photos have the same exposure value you are seeing in the viewfinder or on your monitor in Live View mode.

2. Use Your Spot Meter

If you prefer not to use Live View or do not have an electronic viewfinder which displays the changes to the exposure value as you adjust your controls, using the spot meter can help you achieve more accurate reading and set your exposures more precisely.

Woman selling mangoes - 4 Tips to Help You Love Using Manual Mode

Modern cameras have a selection of metering modes which include a spot meter. Most often using the averaging mode, which takes a reading from multiple segments of the image area and gives an exposure value the camera calculates, is sufficient.

However, in some situations, particularly if your subject is back-lit or contrast in the scene you are photographing is high, using the spot meter setting will allow you to make a reading off the area of the image which is most vital to you.

For example, making a portrait where your background is significantly lighter or darker than your subject it is best to take a spot meter reading from their face as this is usually the most important part of your image. Using the averaged setting your camera’s meter will also read from the background and calculate that into the result it returns, potentially giving you a less than satisfactory exposure.

Karen woman smoking a pipe - 4 Tips to Help You Love Using Manual Mode

Learning to use your spot meter will assist you in creating more accurate exposures. I have one of the function buttons on my cameras set to switch to spot metering, allowing me to quickly and easily take a reading from any particular part of my composition.

3. Review Your Photos

It’s not a healthy practice to always be checking your camera’s monitor after every photo you take, as this can interrupt your attention from your subject. But it can be helpful to review your first few images after making adjustments to your exposure settings.

Taking a look at the results after changing your aperture, shutter speed, or ISO will give you a clear idea as to whether your settings are suitable for the photos you want to create. If you see a photo that’s too bright or too dark overall or in a part of the composition you prefer to see well exposed, then you will need to make some adjustment to your settings.

Asian woman reviewing a photo on a DSLR camera monitor - 4 Tips to Help You Love Using Manual Mode

As you practice this technique you may start to find you can estimate how much you need to alter your exposure settings rather than consulting your exposure meter again. This does take some practice, but if you form a habit of doing this, you will find this is a quick and easy way to achieve a better exposure.

4. Check Your Metadata

Our digital cameras record an incredible amount of metadata, associated information about each photograph you take. Learning to read and understand even a small amount of this information can assist you in producing more consistently pleasing exposures.

Back of a DSLR camera at dusk - 4 Tips to Help You Love Using Manual Mode

Being able to freely review the exposure value for any photo you have taken can help you understand why it’s good or maybe why it needs improving. I find this information most handy when I am sitting at my computer reviewing my images from a photography session.

Comparing photos made with different exposure values and looking at the metadata can help you have a better understanding of what settings you can use next time.

In Conclusion

Evening photo with bold colors taken during a Chaing Mai Photo Workshop

Autofocus, Facial Recognition, Auto White Balance, and ISO flexibility are all modern advancements in camera technology which make using Manual Mode easier. Because you don’t have to pay so much attention to these things and can better concentrate on setting your exposure well.

Exposure is one of the key elements of every photograph. Learning to understand how you can use the various features of your camera to assist you in making better exposures will help you become a more creative photographer.

?

The post 4 Tips to Help You Love Using Manual Mode appeared first on Digital Photography School.


Digital Photography School

 
Comments Off on 4 Tips to Help You Love Using Manual Mode

Posted in Photography


Facebook is using Instagram photos to train its image recognition AI

04 May

At its F8 developers conference Facebook not only revealed a number of new Instagram features, the company also talked about how it is using the billions of images on Instagram to train the world’s most accurate image recognition systems.

Training deep learning models for image and object recognition is typically a very labor-intensive task, as each training image has to be looked at and labeled by human workers. This is a serious limitation to the size of training image databases; however, Facebook has found a way to reduce human supervision in the training process by using images that are already labeled… with Instagram hashtags.

Its researchers used 3.5 billion Instagram images with approximately 17,000 hashtags to train deep learning models and the results have been encouraging.

A computer vision system that had been trained with one billion images and 1,500 hashtags, achieved 85.4 percent accuracy on the ImageNet benchmarking tool, outperforming the previous leading system by 2.3 percent.

It will be important to manage the disadvantages of less curated labels but the Facebook research shows that less supervised training of image recognition systems could be a step into the right direction, allowing for the use of much larger and databases and therefore improved image and object recognition and classification.

Translation: finding that photo you never tagged that’s buried miles deep in your archive might soon get a whole lot easier.

Articles: Digital Photography Review (dpreview.com)

 
Comments Off on Facebook is using Instagram photos to train its image recognition AI

Posted in Uncategorized


Wildlife Photographer of the Year winner disqualified for using stuffed animal

28 Apr

The winner of the Environment category of the prestigious Wildlife Photographer of the Year competition has been disqualified after the competition’s organizers discovered the anteater starring in his dramatic nighttime image is stuffed. According to the competition, photographer Marcio Cabral—who had won £1,250 and a place in the awards exhibition in London’s Natural History Museum with his image ‘Night Raider’—was found to have included a ‘taxidermy specimen’ taken from the entrance to the park in which his picture was created.

Organizers’ suspicions were raised after an anonymous tip off that came supported by a picture of the anteater in question occupying its usual role as a greeter at the Portão do Bandeira gate of the Emas National Park in Brazil. Five independent science experts were called in to conduct a ‘thorough investigation’, and they concluded that the pose, markings, shape and fur patterns of the stuffed creature and the subject of Cabral’s picture were simply too similar—they had to be one and the same animal.

Cabral continues to plead his innocence, despite not being able to show a raw file that includes the anteater other than the shot he entered in the competition. Cabral provided a witness who testified that they saw the live animal, but the organizers were not convinced. Cabral had his award removed and is banned from entering ever again.

This isn’t the first time the competition has been struck by such circumstances. In 2009, the overall winning image was found to include a zoo wolf called Ossian being passed off as a wild animal. The photographer on that occasion, Jose Luis Rodriguez, also claimed he hadn’t cheated, but the judges concluded it was likely the wolf had been hired for the shot and the photographer was disqualified, leaving the competition with no winner for that year.

For more information on the disqualification, read the press statement below. And if you want to see the other, legitimate winners of this year’s WPotY, visit the competition’s website.

Press Statement

Press statement: Wildlife Photographer of the Year image disqualified

After a careful and thorough investigation into the image ‘The night raider’, taken by Marcio Cabral, the Natural History Museum, owner of the Wildlife Photographer of the Year competition, has disqualified the photograph, which was selected as winner of the 2017 Animals in Their Environment category.

Evidence was presented to the Museum by third parties that it is highly likely the animal in the awarded photograph is a taxidermy specimen. After a thorough investigation taking just over three weeks, the Museum has concluded that the available evidence points to this allegation being true. As a result, the Museum believes that the image breaches the competition rules. The rules clearly state that ‘entries must not deceive the viewer or attempt to misrepresent the reality of nature.’

The Natural History Museum is a world-leading scientific research institution. The team of scientists involved in the investigation comprised of two mammals experts and a taxidermy specialist at the Museum, plus two external experts; a South American mammals expert and an expert anteater researcher.

Evidence examined included high resolution photographs of a taxidermy anteater that is kept on open display in the educational collection at a visitor centre located at the Portão do Bandeira gate, one of the entrances of the Emas National Park – the large park where ‘The night raider’ was taken.

The anteater in the awarded image was compared to the taxidermy anteater depicted in the photographs received by the Museum. The five scientists, working independently of each other, all reached the same conclusion that there are elements in overall posture, morphology, the position of raised tufts of fur and in the patterning on the neck and the top of the head that are too similar for the images to depict two different animals. The experts would have expected some variation between two individuals of the same species.

The Museum also considered the responses to specific questions put to the photographer Marcio Cabral, who cooperated fully in the investigation, and who supplied RAW image files he claims were taken of ‘before’ and ‘after’ the winning shot was taken – none of which included the anteater. Mr Cabral did provide an explanation as to why he had no other images of the anteater. He also provided a witness who claims he saw the live anteater.

Mr Cabral strongly denies that the anteater in the image is a taxidermy specimen.

The competition rules clearly state that photographs achieved through unethical practices will be disqualified. The competition rules are available to all entrants including versions translated into several languages, including Brazilian Portuguese.

Wildlife Photographer of the Year is the world’s most prestigious photography competition of its kind and any transgression of the competition rules is taken very seriously. The image will be removed from the exhibition and tour.

Articles: Digital Photography Review (dpreview.com)

 
Comments Off on Wildlife Photographer of the Year winner disqualified for using stuffed animal

Posted in Uncategorized


How to Easily Watermark Your Images Using Lightroom

17 Apr

In this article, I’m going to show you just how easy it is to watermark your images using Lightroom.

With photography, it’s the simple things which often become the most important. Simple moments like the sun shining through that perfect wisp of cloud and plain objects shot with elementary techniques. Perhaps one of the simplest, and yet at the same time most important, additions you can make to your work is helping to protect it from unwanted uses while at the same time making sure people know who made your wonderful image.

How to Add Watermarks to Your Images Using Lightroom

Watermarks and logos (we’ll just use the term “watermark” for this article) help to keep your images from being used without your permission. Of course, nothing is bulletproof in the digital age but adding a watermark to your photos is one of the easiest ways you can impart a little security to your images before you send them out into the world.

Watermarks in Lightroom

Watermarks can be added to your images during the exportation process, but the watermarks you make and store in Lightroom are available anytime.

To access the watermark creation section dialog at any time in Lightroom, from your top menu bar go to Edit > Edit Watermarks (note: on Mac you need to go to Lightroom > Edit Watermarks).

How to Add Watermarks to Your Images Using Lightroom

Once in the watermark creation dialog, you have quite a few options for constructing your watermarks. The two main choices will be whether to create a text watermark or to import a graphic from somewhere else on our computer.

I’ll begin by showing you how to make a simple text watermark (which I use) and then move onto importing a graphic.

How to Create a Text Watermark

Making a text-based watermark right in Lightroom is extraordinarily easy. Essentially, all you need to do is type in the box provided and place the watermark where you want it to appear on your image.

For our example, let’s type in a simple watermark. Make sure the “Text” option is selected as the Watermark Style at the top right of the window.

How to Add Watermarks to Your Images Using Lightroom

Next, choose what font, color, style, and orientation you would like to use for the text. The orientation is less of an issue because you will be moving the watermark yourself later.

How to Add Watermarks to Your Images Using Lightroom

To shadow or not to shadow? This is just a drop-shadow to make the text appear more three-dimensional and I usually leave this option unchecked. If you choose to add a shadow, there will be some basic positioning and opacity options for you to adjust to suit your tastes.

How to Add Watermarks to Your Images Using Lightroom

Add a drop-shadow here.

Set the size

Now you will need to decide what size to make the watermark relative to your photo. Generally, keeping the watermark sized proportionately is best but you can also choose to “Fit” or “Fill” the text to the photo. Usually, the “Fill” option will be seldom used as it obnoxiously enlarges the watermark.

How to Add Watermarks to Your Images Using Lightroom

The Fill option is a bit too in your face.

Position the watermark

The “Inset” sliders control how far inside the frame the watermark will be positioned. I’ve found this is best left until the end so we’ll adjust this later.

How to Add Watermarks to Your Images Using Lightroom

The final set of options in the watermark dialog is the anchor point selection.

set the anchor points - How to Add Watermarks to Your Images Using Lightroom

Picture that center dot as being the middle of your photo. You can choose whichever location you prefer but I like to position my watermarks in the bottom right corner and also vertically orient them. Use the arrows to rotate your watermark.

How to Add Watermarks to Your Images Using Lightroom

Watermark rotated and placed in the lower right corner.

Before you save your new watermark, I want you to adjust the inset just a tad vertically to move it back from the edge of the image. This is where those inset sliders from earlier come into play.

Now is the time to make some final tweaks to the size and opacity of the watermark once it is fully positioned.

How to Add Watermarks to Your Images Using Lightroom

To save this for use later (more on this shortly) simply click “Save” and give your freshly-minted watermark a name.

How to Add Watermarks to Your Images Using Lightroom

How to Create a Graphic Watermark

You might not believe it, but using your own graphical watermark is just as easy as making its textual counterpart. To start, simply select the “Graphic” option at the top of the watermark dialog box.

How to Add Watermarks to Your Images Using Lightroom

Next, click “Choose…” and find the graphic you want to use on your computer. Keep in mind it will need to be either in a JPG or PNG file format.

For this tutorial, I made a quick 3D watermark in Photoshop. Once you’ve selected the file you want to use, Lightroom will do the rest. This is my graphic before it was nested into the image.

How to Add Watermarks to Your Images Using Lightroom - 3d graphic

And here it is after it has been placed and positioned. The text left in the box will have no effect since the Graphic Watermark option is selected.

How to Add Watermarks to Your Images Using Lightroom

From here you have many of the same options for opacity, positioning, and sizing as you did for the text watermark. Saving the graphic watermark is done exactly the same way as you saved the text watermark as well.

How to Apply Your Watermark During Export

Now that you know how to create and save your watermarks in Lightroom, it’s time to stick them onto your images during export which is also super easy.

Open the Export dialog box by choosing File > Export. Near the very bottom of the dialog box in the right-hand box, you’ll see the Watermarking drop-down menu.

Select the watermark you would like to apply. In this case, add the graphical watermark you saved earlier.

How to Add Watermarks to Your Images Using Lightroom

Click export and your image will be exported with your watermark lovingly placed!

Final Thoughts on Making Watermarks in Lightroom

Watermarks are a great way to sign and protect your photographs. While there are no real rules for applying your watermarks, I would urge you to adhere to the “less is more” mentality. Do not plaster your watermark obtrusively over your images like most of the samples in this tutorial, which were done for demonstration purposes only.

Make your photo the center of attention with your watermark as more of an afterthought. That being said, feel free to experiment with your own creative watermarks. As you’ve just seen, they are incredibly easy to apply in Lightroom.

The post How to Easily Watermark Your Images Using Lightroom appeared first on Digital Photography School.


Digital Photography School

 
Comments Off on How to Easily Watermark Your Images Using Lightroom

Posted in Photography