RSS
 

Posts Tagged ‘Tutorial’

Getting Started with Layer Masks in Photoshop – a Beginners Tutorial

09 Mar

Barn-DPSexample

Much of the power of Photoshop comes from its use of layers, which can best be thought of as transparency over your image. Layers have lots of benefits, like the fact that you can work on your image without affecting the pixels in the underlying image. But perhaps the most powerful aspect of layers, is your ability to affect exactly where, how, and how much of your changes will affect the underlying image. That is all done through layer masks. In fact, it might be fair to say that layers are really only effective because of layer masks.

What are layer masks? Think of them as filters that let you control the impact of the changes you make to your image. Just like you can change ordinary filters to determine what gets through them, so you can adjust a layer mask to control what changes. If that sounds confusing, don’t worry, and I will walk you through the basics of layer masks now.

How Layer Masks Work

To understand layer masks, it is best to start with the simplest form. A mask that does nothing – that is, it lets absolutely everything through from the layer you are working on, to the layer underneath – it is represented by solid white. This is referred to as a “reveal all” layer mask in Photoshop. When you look at your layers palette with a white/reveal-all layer mask, it will look like this:

Graphic1-WhiteLayerMask

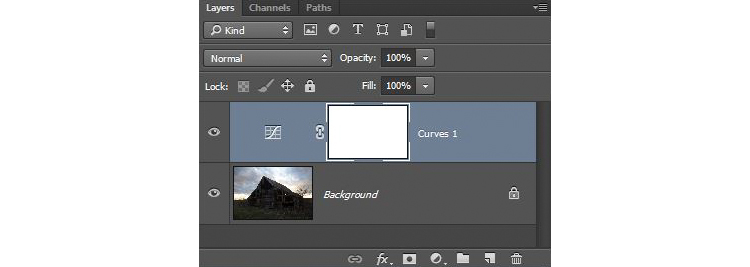
When your mask is all white, any change you make on that layer, will apply to the underlying image. How do you create an all white image layer mask? Very often – as in the case of adjustment layers – one will automatically be created for you. Or, to add one yourself, just go to Layer > Layer Mask > Reveal All. You can also click on this button at the bottom of the layers palette to create one on the layer you have selected

Graphic2-LayerMaskButton2

An all-white layer mask is actually pretty useless. The utility of the layer mask comes when we start masking (hiding) things off. Before we get into that, however, let’s talk about how to create an all-black layer mask. As you might expect, a black layer mask works the opposite way as a white one, and lets absolutely nothing through to the layer underneath. You can make all the changes you want to this layer, and it will have no impact on your underlying image. Here is how it will look when you create one:

Graphic3-BlackLayerMask

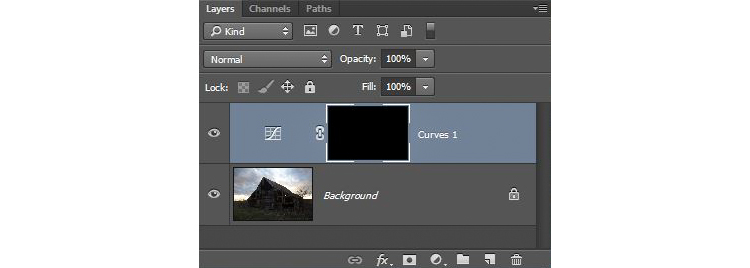
To create an all-black layer mask, just go to Layer > Layer Mask > Hide All or press ALT while clicking on the same button used in the graphic above to make a white layer mask. Now that you know what layer masks are, and the basics, we can get into the real fun of them, which is where you have blacks, whites, and even tones of gray in the same mask.

Masking

Layer masks allow you to apply changes to some parts of the image, but not others. Just remember that wherever your layer mask is white, it will let the changes you made to the layer through, so that they apply to your image below. Wherever your layer mask is black, it will not let the changes through, so they will not apply to the image. Before we get into how to do that, let’s talk about when you might want apply changes to only part of your image.

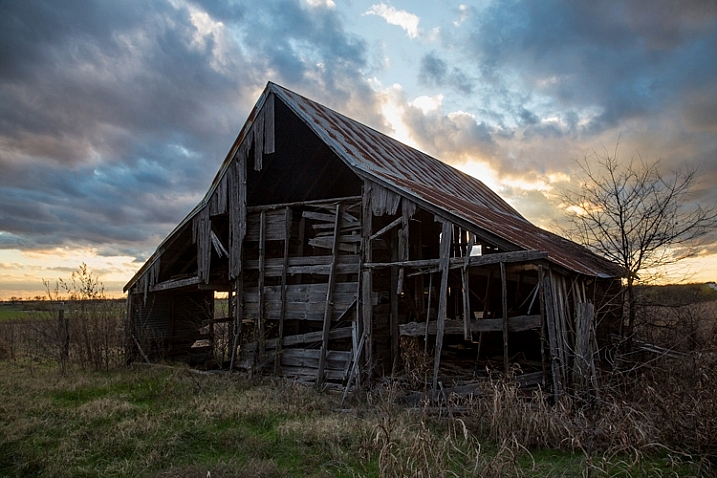
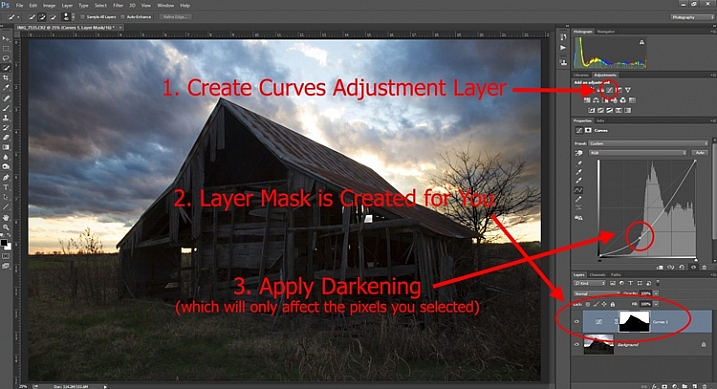
Let’s take this picture of an old barn. I’m choosing this image because it will be simple to adjust using masks, as it only involves two main areas. As you can see, the sky is too bright, while the barn and foreground are too dark. In doing this for yourself for the first time, use a simple picture like this to get started.

Graphic4-BarnOriginal

As you probably know, you do not want to edit these two areas in the same way, so a global adjustment to the whole image won’t help. You can, however, use masks so that edits only apply to the areas you want. For example you might darken the sky like this:

Graphic5-SkyDarkened

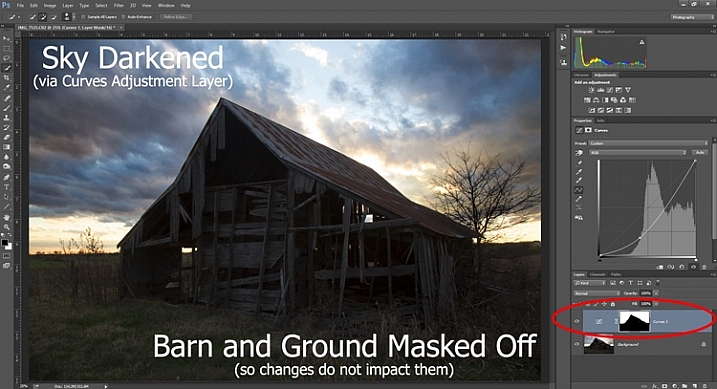
Here I masked off the barn and foreground so that the darkening only applies to the sky. I used a quick Curves Adjustment layer to darken the image. As you can see, the mask of the sky is white (so the changes affect the image in that area), while the mask of the barn and foreground is black (so the changes do not affect that part of the image).

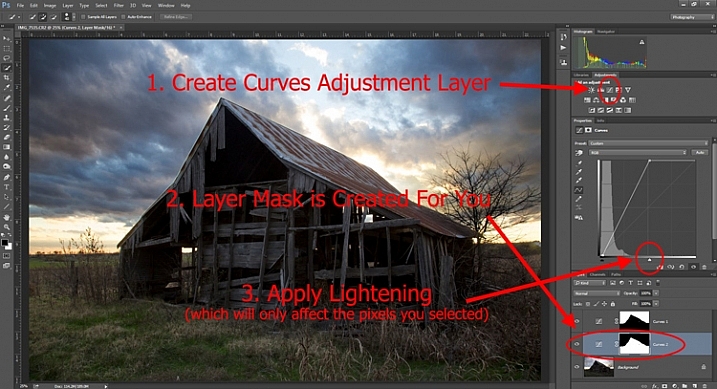
Now let’s do the opposite to brighten up the barn and the foreground. Once again, I’ll use a layer mask so that my changes only affect the barn and the foreground, so that it looks like this:

Graphic6-ForegroundBrightened

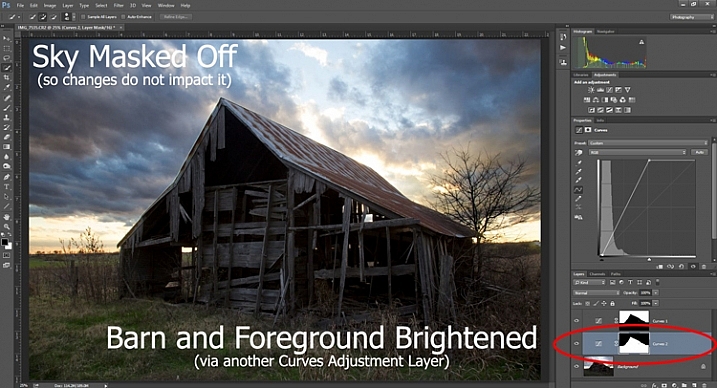
This is the same move I made above, but in reverse. I created another Curves adjustment layer to brighten up the image. Now the layer mask is white over the barn and foreground, which means the brightening effect shows through in those areas. The layer mask is black over the sky though, so the brightening effect does not impact the sky (which is already bright enough).

But how do you do go about creating these layers and masks? Let’s find out now.

Creating a Layer Mask with Defined Edges

There are different ways to mask off portions of your images. Sometimes you will want to create a mask with a hard or definite edge, while other times you will want to gently blend in the effect to a portion of your image. In this article I will cover how to create a mask on an image with a hard edge (I will get into blending in changes in a later article). The photo of the decaying barn used above will work just fine for this, so let’s stick with that photo as our example.

Step 1: Make Your Selection

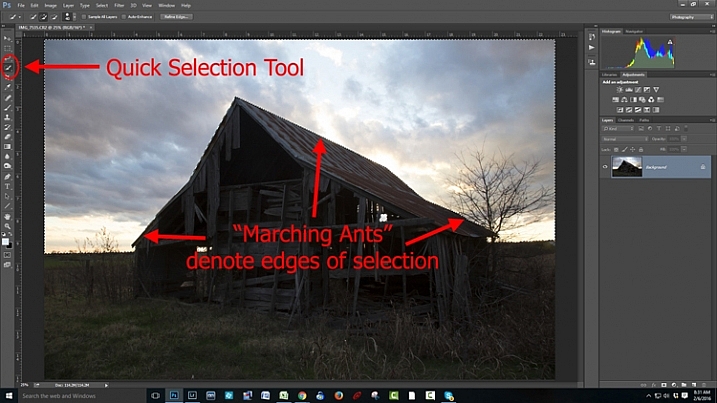
To darken the sky in the image, the first thing you need to do is select the sky. To do so, click on the Quick Selection tool from your tools panel. Then click anywhere in the sky, and while holding the mouse button down, move around where you want to select pixels for your selection. Photoshop will automatically detect edges. To make the Quick Selection tool larger or smaller, use the square bracket ( [ and ] ) keys. If you end up selecting pixels you don’t want for your selection (and you inevitably will), press the ALT key (Option on a Mac) while clicking and it will remove them.

Graphic7-MarchingAnts

Photoshop is famous for providing several different ways of accomplishing the same thing. Making selections with hard edges is just such a case. You don’t have to use the Quick Selection tool. You can also use the Magic Wand tool, which will select similarly-toned pixels. Or you could use the Pen tool, or the Magnetic Lasso tool to draw the edges yourself. I could actually see a good case here for the Color Range command (Select > Color Range), which selects pixels of similar colors. Any one of those tools could work. While I want to point that out, I don’t want to get bogged down covering each of them. For now, just know that while I typically use the Quick Selection tool and did so here, there are other tools you can use to make the selection.

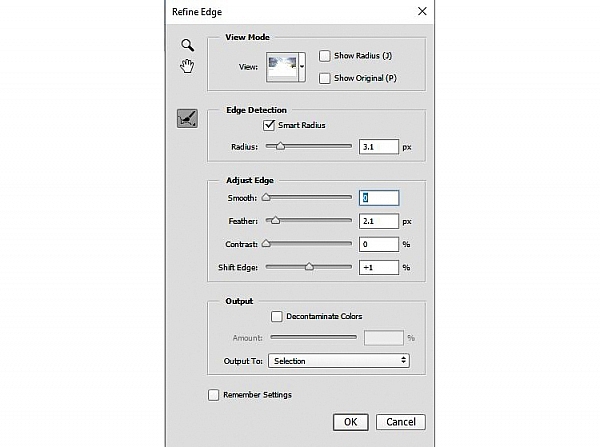
Step 2: Refine Your Selection

Once you make your selection, you can refine it a bit if you wish. Just bring up the Refine Edge dialog box and make adjustments there.

Graphic8-RefineEdge

If you do not like the selection, you can always clean it up a bit later. Once you have made the adjustments, you can use the Brush tool to add or subtract parts of the image from the mask (more about that in a minute).

Step 3: Apply the Effect

Now that your selection is created and refined, you are ready to put it into action. What we want to do is darken the sky. There are different ways to go about doing that, but what I’m going to use is a Curves adjustment layer. You don’t have to use this tool though, this same process will work when you create any sort of adjustment layer. If you are more comfortable using Levels or Brightness/Contrast, for example, use those.

In any case, all you will do now (with your selection still active) is click to create the Curves adjustment layer (or whatever type of adjustment layer you are comfortable with) and voila, the layer is created with a mask that has hidden the pixels you don’t want to change. It will look something like this:

Graphic9-HardEdgedLayerMask

If you use a Curves adjustment layer like I did, you just pull the line down to darken the picture. Pull it down to the left of the main cluster of pixels so that the curve is steepened through that main cluster. Of course, you may be using Levels or some other darkening tool, so just use those in whatever way you are comfortable.

Step 4: Repeat for Other Areas

In our example, we have now darkened the sky, but there are other problems with the picture. In particular, the barn and foreground are still too dark. How do we go about changing that? Pretty much the same way we did for the sky.

Start by making the selection. You can do it the same way as you did for the sky if you want. Just grab the Quick Selection tool and click around in the dark areas to create the selection. In this case, you can also just create a selection that is the opposite of the selection we previously created. That is, you previously made a selection of the sky and left everything else alone. Now you want to make a selection of everything else and leave the sky alone. To do that, you can just call up your old selection (Select > Reselect) and then tell Photoshop to reverse it (Select > Inverse). You now have a selection of everything but the sky, which is what you want.

From there, just create a Curves adjustment layer (or whatever tool you prefer to use) and apply the effect. Once you brighten the foreground, here is how it looks:

Graphic10-Lightening

Step 5: Cleaning up Your Masks

You may find, when you are done, that there are parts of the image that don’t look quite right. Perhaps there are pixels included in one of your masks that you didn’t want, or conversely you missed pixels that should have been in the image. You can clean up the mask after the fact. I find that the easiest way is to use the Brush tool.

Graphic11-Brush

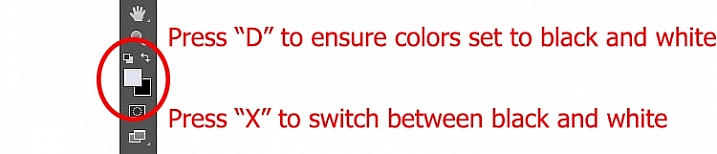
Select the Brush tool on the tools panel. Once you do so, pay attention to the foreground color, that which the brush will use. If you set the brush to white, it will add to a selection (show the layer through the mask). If you set the brush to black, it will remove pixels from the selection (hide the layer with the mask). Some keyboard shortcuts to keep in mind are B to bring up the Brush tool in the first place, then D to make sure the colors are set to the default (black and white), and finally X to switch between black and white.

Graphic12-BrushControls

The Brush tool is great because you can set the hardness of the edge. Start by keeping it at its softest setting, and just changing the size of the Brush by using the bracket keys [ and ]. Use it to touch up the selection (mask) where needed (make sure you are painting on the mask NOT on the actual layer). Another tip is to press ALT (option on a Mac) while clicking on the mask in your layers palatte, which will cause the screen to display the mask only. That way you can see exactly where your mask is being applied. Press ALT again while clicking on the mask to go back to normal view.

Moving on From Here

This exercise will get you started using layer masks to make adjustments to portions of your pictures. Once you have done this a few times and start to master it, there are a lot of other additional techniques you can add to further enhance your photos. For example, while this article showed you how to use masks where you have defined edges, you can gradually blend in effects using masks as well. Further, while in this article we only affected brightness, you can use layer masks to affect color, brightness, and contrast to a great degree.

Of course, masks are not just for adjustment layers either. You can make changes on layers and control where and to what extent, the change gets applied. For example, you might sharpen or blur a layer, and then use a mask to apply that effect to only a portion of the picture. It also works well by making changes with a plug-in to a duplicate layer, then creating a mask to control the application of that plug-in’s changes.

When you use layer masks, you are well on your way to unleashing the full power of Photoshop. Get started with the techniques in this article, then you can add on other aspects from there.

googletag.cmd.push(function() {
tablet_slots.push( googletag.defineSlot( “/1005424/_dPSv4_tab-all-article-bottom_(300×250)”, [300, 250], “pb-ad-78623” ).addService( googletag.pubads() ) ); } );

googletag.cmd.push(function() {
mobile_slots.push( googletag.defineSlot( “/1005424/_dPSv4_mob-all-article-bottom_(300×250)”, [300, 250], “pb-ad-78158” ).addService( googletag.pubads() ) ); } );

The post Getting Started with Layer Masks in Photoshop – a Beginners Tutorial by Jim Hamel appeared first on Digital Photography School.


Digital Photography School

 
Comments Off on Getting Started with Layer Masks in Photoshop – a Beginners Tutorial

Posted in Photography


How to Use the Hue Saturation Adjustment in Photoshop – a Video Tutorial

06 Mar

Learning to understand and master the hue/saturation settings in both Lightroom and Photoshop can help you take your editing to the next level. If you want to see how it’s done in Lightroom check out: Understanding the HSL Panel in Lightroom for Beginners.

Hue Saturation Adjustments in Photoshop

If you prefer Photoshop, watch this video from Phlearn on how to use the Hue/Saturation adjustment tools in Phtoshop to change colors both globally, and locally in your image. He also goes over the Colorize function, and painting on your image with a color.

Have you experimented with Hue Saturation in Photoshop? Tell us what you’ve learned, and you’ve applied it to your images. Share the in the comments below as well.

googletag.cmd.push(function() {
tablet_slots.push( googletag.defineSlot( “/1005424/_dPSv4_tab-all-article-bottom_(300×250)”, [300, 250], “pb-ad-78623” ).addService( googletag.pubads() ) ); } );

googletag.cmd.push(function() {
mobile_slots.push( googletag.defineSlot( “/1005424/_dPSv4_mob-all-article-bottom_(300×250)”, [300, 250], “pb-ad-78158” ).addService( googletag.pubads() ) ); } );

The post How to Use the Hue Saturation Adjustment in Photoshop – a Video Tutorial by Darlene Hildebrandt appeared first on Digital Photography School.


Digital Photography School

 
Comments Off on How to Use the Hue Saturation Adjustment in Photoshop – a Video Tutorial

Posted in Photography


How to Shoot a Pine Cone Time-lapse: A Mini Tutorial

03 Mar

This week over at our sister site, SnapnDeals, we have a great deal running where you can get 20% off Time-Lapse Photography: A technical and practical time-lapse tutorial guidebook for all skill levels designed to get you out the door and shooting now!

How to Shoot a Pine Cone Time-lapse
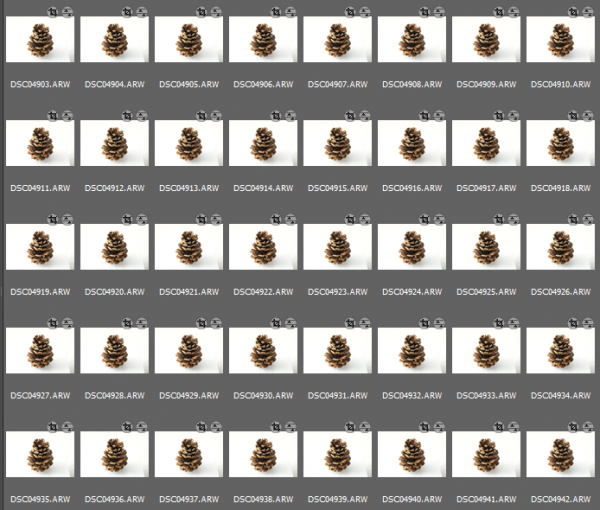
In this lighthearted mini-tutorial we’ll take an 80/20 approach to creating a simple time-lapse of a common pinecone (in this case a Black Pine).

For a more general introduction to time-lapse photography view: Time-lapse Photography Tutorial: An Overview of Shooting, Processing and Rendering Time-lapse Movies.

You already know that pine cones are nature’s mysterious seed pyramids, but did you know they have a gender? Yes, there are both female and male pine cones. Did you also know that pine cones are an interesting time-lapse subject? Go get a female pine cone, and give it a shot. Let this whole male/female Nature Notes youtube revelation be your last straw, or should I say pine needle that breaks your procrastination. Here was my result:

Here’s how to make your own pine cone time-lapse:

Step 1. Find pine cones

Collect some good looking pine cones (preferably female: watch the Nature Notes video above). Look for good cones in fresh condition, without rot or discoloration, uniform shape, and bottoms that provide support for upright standing. I’d grab two or three for variety, and a dog chew backup. Here’s an example of an open found pine cone.

Pinecone bts1

Step 2. Make them close

Pine cone motion is all about moisture, it’s a hydromorphic response. In high moisture environments pine cones close. In low moisture, over time, they open. This video showing both opened, and closed cones, with visible moisture is a perfect learning example.

To close a cone, simply put it in a cup of water and leave it for an hour or two. That’s it.

Step 3. Prepare for the opening shot

Key thoughts: Steady (consistent) lighting, simple background, camera position, power. Let’s take these one by one.

Steady light: Light fluctuations in a sequence of time-lapse images are bad, as they create unappealing bright and dark frames in the rendered movie, better known as time-lapse flicker (learn much more about that here). Chose a room that you can cordon off for a day or so to prevent disturbances, and block all light from any windows. Move any light sources near the photo white box, to provide a constant uniform brightness, then adjust their positions to eliminate shadows.

Background: Completely up to you creatively. I chose a minimal white background, using a simple inexpensive white box. By slightly overexposing each shot, you can effectively eliminate almost all appearances of a background.

Camera position: Choose one or more angles from which to shoot. I chose first, a front downward angle, and a second fully vertical angle from above.

Power: A pine cone bloom from closed to opened may last anywhere from 8-24 hours, so you’ll need an AC adapter for your camera to make sure it keeps going.

Step 4: Craft the time-lapse and begin

We talked a little bit about avoiding stray light sources in the room where you are shooting, as these changes introduce time-lapse flicker into the image sequence. Having your camera in any automatic mode may also introduce flicker. To get the best possible consistent exposure over many frames, shoot in manual mode, set a manual white balance, manual ISO, and manual focus. In the example video above I used a Sony A7s and FE 90mm f/2.8-22 Macro G OSS lens.

Pine cone bts2

Exposure: Six seconds at ISO 200, f/22, produced a great image, and just started to wash out the brighter white background. You can push the whites a little further in post-production, and really create a clean image background.

Time-lapse interval: To be honest I didn’t know how long I would be shooting, or when the action would begin. Times will vary, as no two cones and no two climates, or indoor humidity levels are exactly alike. The side angle pine cone shot took from about 9:00 a.m., to 3:00 a.m. the following morning, approximately 18 hours. I chose a 30 second interval, and set the shot count to infinity, so it would continually shoot until it was manually turned off. When unsure of how quickly to shoot, or how many frames to capture, it’s always good to capture more, rather than less. You can always speed up a time-lapse with too many frames, but if you don’t get enough shots and miss important movement, you are usually stuck.

Capture

These 30 second exposures, over 18 hours, resulted in about 3,246 images. That’s a lot of frames. Pine cones are slow. Much slower than I anticipated, and my interval was pretty fast capturing more frames than necessary for smooth movement. For your experiment I’d recommend increasing your interval time to about 50 seconds, or one minute. Having a longer interval time will result in less photos, and with the slow moving nature of the bloom it will not result in a jumpy or less smooth cone opening video.

Step 5: Adjust the exposures and render the time-lapse

The beauty of Lightroom, or Adobe Bridge and other applications, is that you can adjust the exposure on a single reference photo, then apply those changes across all your photos. Simple – and so is rendering the basic time-lapse. There are several different applications to choose from, to turn your collection of images into a video – varying from free and inexpensive, to not so inexpensive. Fear not, you can learn much more about time-lapse rendering in previously mentioned article, but the diagram below provides an overview of time-lapse software and applications.

Timelapse Photography by Ryan Chylinski Book Preview6

Patience is your most valuable commodity for this project. From pine cones to The Milky Way, I hope this mini peak into the world of creative time-lapse photography has ignited your curiosity to learn more. Time-lapse has a way of slowing the world for the photographer, while at the same time accelerating it for everyone else. I shoot time-lapse because it alters the way I think, it challenges my view of the world, and teaches me things I can bring back and share with everybody else. It’s a real honor and privilege to partner with you on this training journey. I hope is helpful and I would love to hear from you in the comments below.

This week over at our sister site, SnapnDeals, we have a great deal running where you can get 20% off Time-Lapse Photography: A technical and practical time-lapse tutorial guidebook for all skill levels designed to get you out the door and shooting now!

googletag.cmd.push(function() {
tablet_slots.push( googletag.defineSlot( “/1005424/_dPSv4_tab-all-article-bottom_(300×250)”, [300, 250], “pb-ad-78623” ).addService( googletag.pubads() ) ); } );

googletag.cmd.push(function() {
mobile_slots.push( googletag.defineSlot( “/1005424/_dPSv4_mob-all-article-bottom_(300×250)”, [300, 250], “pb-ad-78158” ).addService( googletag.pubads() ) ); } );

The post How to Shoot a Pine Cone Time-lapse: A Mini Tutorial by Ryan Chylinski appeared first on Digital Photography School.


Digital Photography School

 
Comments Off on How to Shoot a Pine Cone Time-lapse: A Mini Tutorial

Posted in Photography


How to Create a Lightsaber in Photoshop Video Tutorial

10 Jan

With all the recent hype and talk about the newest installation in the Star Wars movie empire (The Force Awakens), I thought this might be a fun project to do.

If you’ve followed along with the saga you know about lightsabers, the weapon of choice for the Jedi knights. Even if you aren’t a fan, you’ve likely heard of it, or had your kids or grandchildren request a toy version for themselves. So how fun would it be to add one to your photos.

Here are two videos that take slightly different approaches to creating a lightsaber in Photoshop. You can learn some new techniques and see which method you prefer.

This one by Adam from Photoshop Tutorials:

And another with Andrew from Creative Edge Studios:

If you give this a try, please share your images in the comments below. See how creative you can be, and how realistic you can make your lightsaber look. Have fun!

googletag.cmd.push(function() {
tablet_slots.push( googletag.defineSlot( “/1005424/_dPSv4_tab-all-article-bottom_(300×250)”, [300, 250], “pb-ad-78623” ).addService( googletag.pubads() ) ); } );

googletag.cmd.push(function() {
mobile_slots.push( googletag.defineSlot( “/1005424/_dPSv4_mob-all-article-bottom_(300×250)”, [300, 250], “pb-ad-78158” ).addService( googletag.pubads() ) ); } );

The post How to Create a Lightsaber in Photoshop Video Tutorial by Darlene Hildebrandt appeared first on Digital Photography School.


Digital Photography School

 
Comments Off on How to Create a Lightsaber in Photoshop Video Tutorial

Posted in Photography


How to Transfer a Photo to Wood – Video Tutorial

17 Aug

This is a good rainy day (or weekend) project for you to try at home. All you need is a print of your image (reversed, demonstrated in the video) on regular paper, a piece of wood, and a couple of other supplies (listed below the video).

Step by step – transfer a photo to wood

This video by SLR Coaching takes you through all the steps to print out your photo and get it transferred and applied to a piece of wood. He’s using pixlr.com to rotate and change the image, you can use that or your preferred photo editing software. If you don’t have Photoshop or Lightroom some other good free options include PicMonkey and Canva.

The mediums he used for the transfer are:

  • Medium gel (you can get matte or glossy finish and can only use it on top of the image as well)
  • PVA glue (although he recommends using a varnish in the second video below – you can get it in matte or glossy finish, spray or paint it on. If you use the paint on and put it on a bit heavier you’ll get a texture on the surface like a painting.)
  • Block of wood (get one at your local hardware or craft store)

Updated video with a few extra tips such as: best type of wood to get, coating the photo afterwards, and a few others.

If you “have a go” as he says, share a photo of your completed project below.

googletag.cmd.push(function() {
tablet_slots.push( googletag.defineSlot( “/1005424/_dPSv4_tab-all-article-bottom_(300×250)”, [300, 250], “pb-ad-78623” ).addService( googletag.pubads() ) ); } );

googletag.cmd.push(function() {
mobile_slots.push( googletag.defineSlot( “/1005424/_dPSv4_mob-all-article-bottom_(300×250)”, [300, 250], “pb-ad-78158” ).addService( googletag.pubads() ) ); } );

The post How to Transfer a Photo to Wood – Video Tutorial by Darlene Hildebrandt appeared first on Digital Photography School.


Digital Photography School

 
Comments Off on How to Transfer a Photo to Wood – Video Tutorial

Posted in Photography


How to Light a Beer Bottle – a Video Tutorial

02 Aug

If you’ve ever wanted to photograph a bottle (beer, wine, soda, ever water) and make it look like they do in the magazines or advertisements you’ll want to watch this!

In this video tutorial Lee Morris from Fstoppers shows how to light a beer bottle, step by step, one light at a time. See what each is doing as he adds them one by one. Check it out and scroll down below the video to get links to some of the gear he mentions in the video.

Things mentioned in the video:

  • Yongnuo flash
  • Flash Disc by Fstoppers
  • PocketWizard triggers
  • C-stand
  • Magmod grid
  • Acrylic Ice Rock Cubes 3 Lbs Bag, Vase Filler or Table Decorating Idea- Clear

Want to see more beverage images – have a look here.

googletag.cmd.push(function() {
tablet_slots.push( googletag.defineSlot( “/1005424/_dPSv4_tab-all-article-bottom_(300×250)”, [300, 250], “pb-ad-78623” ).addService( googletag.pubads() ) ); } );

googletag.cmd.push(function() {
mobile_slots.push( googletag.defineSlot( “/1005424/_dPSv4_mob-all-article-bottom_(300×250)”, [300, 250], “pb-ad-78158” ).addService( googletag.pubads() ) ); } );

The post How to Light a Beer Bottle – a Video Tutorial by Darlene Hildebrandt appeared first on Digital Photography School.


Digital Photography School

 
Comments Off on How to Light a Beer Bottle – a Video Tutorial

Posted in Photography


How to do Milky Way Photography – A Comprehensive Tutorial

31 Jul

How to Photograph the Milky Way

You’re spinning through our solar system on a gorgeous blue marble which offers jaw dropping views of an astronomical phenomenon we call The Milky Way. Wait for our marble to line up just right, and you’ll have a perfect opportunity to create awe inspiring images that harness that galactic chandelier hovering over your head.

My students are often delighted to learn that capturing spectacular images of The Milky Way is easy, once you know a few essential tips. Planning when and where to do Milky Way photography is just as important as the techniques and equipment you’ll be using.

If you want to get truly majestic shots of The Milky Way you’ve really got to consider your location and timing. I’ll tackle that first, before we move on to the shooting technique.

1 – Where and when to see the galactic core

How to Shoot the Milky Way

The full galactic core is only visible during certain months, at certain locations. You can see the rest of The Milky Way throughout the year, but for truly eye-popping results it’s the galactic core that you’ll be hunting for, so let’s discuss the best times of year to see it in all its glory.

Northern Hemisphere

The Big 'C' of the Galactic Core

Parts of The Milky Way are visible all year round but the galactic core is present only from late April to late July and can be seen in the southeastern to southwestern sky. That’s when you’ll get to see what I call The BIG C. As the summer progresses, you’ll see the core move west so that by the end of summer it appears to rise in the southwestern sky.

You have no chance of seeing the galactic core in winter.

Southern Hemisphere

Photographers who live in the southern hemisphere are lucky because they get to see the core from February right through to October, with peak visibility being in June and July. I’m rather jealous.

Don’t forget lunar phase

For super clear Milky Way photography you’ll need minimal light pollution, which means you’ll want to avoid a bright moon. However, I’ve actually captured good shots of The Milky Way even with a first quarter moon in the sky (so don’t feel like it’s not worth shooting when the moon is present) but obviously a full moon is to be avoided.

Milky Way Photography Tutorial

The other thing to consider is the position of the moon in relation to The Milky Way. For example , a first quarter moon isn’t such a problem if it’s way off in the west while your Milky Way appears in the southeast. But, if the moon lines up dead centre in the Milky Way, it could be too bright, right where you don’t want it.

How do you know where The Milky Way is going to be?

There are a multitude of phone and desktop apps that can help you to plan your Milky Way shoot but my favourite is the free app called Stellarium. There’s a phone and desktop version, I prefer the latter to plan my shoots.

Milky Way Photography Tutorial - Stellarium

You can enter a location and time to see when and where things are going to line up. You’re mainly looking to see where the galactic core is present during a darker lunar phase. Stellarium will show you a picture of The Milky Way, and its position, at the times you specify. You can also see where and how bright the moon will be.

Check out some of the other popular apps like; The Photographers Ephemeris and Starwalk.

2 – Find a dark location

Purists will say that you MUST be in a dark sky area and of course that will give you a much clearer shot, but don’t let a little bit of distant light pollution stop you from shooting The Milky Way. If you can see it, you can shoot it. The image I shot below in Death Valley shows light pollution from two large cities and I honestly think it adds to the contrast in the image. That glow on the horizon adds a great separation of earth and sky.

Milky Way Photography Tutorial - Death Valley

If you want to discover the best dark sky locations, the International Dark Sky Places site is a great resource.

3 – Wait for clear weather

Most landscape shooters love clouds and hate blue skies. Once you get into shooting nightscapes, you’ll quickly reverse that thinking.

Astrophotography Tutorial - Gavin Hardcastle

In this shot of Mono Lake the small clouds actually added a little interest to the shot, without obscuring too much of the galactic core.

A blanket of cloud is bad news if you want to get clear shots of The Milky Way, but don’t be put off by the presence of light cloud cover. Sometimes a few clouds can add drama and framing to a Milky Way shot so it’s still worth shooting if the clouds aren’t completely blanketing the entire sky.

4 – The Milky Way is only half the shot

For me, the most awe inspiring Milky Way images are those that show the galactic core in relation to earthly locations and objects. Something as mundane as a person on a camp chair can look really dramatic when framed by the phenomenon of The Milky Way.

Photographing the Milky Way - Tutorial with Gavin Hardcastle

Think hard about what you’d like to put in the foreground of your Milky Way shot. If you get perfect conditions and execute perfect technique you’ll still get a boring shot if you don’t put something else in your frame to ground the viewer. Pick an interesting foreground feature and maybe try a little light painting to make your Milky Way shots truly awesome.

That could be anything from an interesting rock formation like a sea stack or arch, right through to a derelict shed, or an interesting tree. Think about locations that feature a point of interest and then consider how that place lines up with The Milky Way.

5 – Using the right gear

Lens choice

While there’s something to be said for using the gear you’ve already got, night photography is something of a challenge because of the absence of light. You’ll need a fast lens that ideally has a maximum aperture of f/2.8, or even brighter like an f/1.4.

Super wide angle lenses are ideal for shooting nightscapes because they don’t usually produce much bokeh. By that, I mean that even when set to maximum apertures of f/1.4 you’ll still be able to get a great deal of your image in focus – if you focus correctly. The last thing you want is a sharply focused Milky Way with a foreground that is completely blurred in soft, creamy bokeh, so leave the lovely Sigma 85mm f/1.4 at home.

The other great thing about super wide lenses is that you can fit a lot of The Milky Way into your frame, and there’s less magnification which allows for longer shutter speeds before the stars in your shot begin to trail.

It’s not the end of the world if you’ve got a standard, all-purpose, kit lens that isn’t very fast. You’ll still get some decent Milky Way shots because you’ll be using long exposures and high ISO settings to maximize your camera’s sensitivity to light.

Astrophotography Lens Choices

On the left we have the Rokinon/Samyang 24mm f/1.4 ($ 549) which costs a third of the price of the Canon 24 mm f/1.4 ($ 1549).

If you really get into shooting nightscapes you’ll be glad to learn that some of the most popular wide angle lenses for nigh photography are actually quite affordable.

Rokinon (AKA Samyang/Bower) offer two lenses that have something of a cult following among night shooters with their 14mm f/2.8 and their 24mm f/1.4 lenses. The build quality is atrocious but as long as you treat them with kid gloves (carefully), they usually perform well.

These are popular because they offer sharpness, speed, a wide field of view, and much less coma than other more costly lenses. Coma is the amount of elliptical aberration around stars in the corners of the frame. Some more expensive lenses, like the Canon 16-35mm f/2.8, have really bad coma on stars in the corner of the frame, which isn’t the end of the world, but it’s not ideal.

6 – Camera choice

With night photography you’ll be forced to use high ISO settings during your long exposures so it’s vital to have a camera that can operate at ISO 3200 and above, but more importantly still produce good image quality. No matter what camera you use, the image quality will take a major hit when you start to crank up the ISO numbers, that’s unavoidable.

Camera sensors have come a long way in the last couple of years so even if your camera isn’t top of the range you might be pleasantly surprised at the image quality of your high ISO images.

The Sony A7S for Astrophotography

The Sony A7S has become something of a legend among astrophotographers but it isn’t cheap.

Some of the best performers of the last couple of years have been the Sony A7R, Nikon D810 and the absolutely brilliant Sony A7S, which is known for its amazing low light capability. These are all full frame cameras, and will deliver the best image quality as they typically offer better noise performance. But if you’re rocking a MFT (mirrorless four thirds) or APS-C sensor, don’t let that stop you from going out and getting some Milky Way action.

Don’t feel that you absolutely MUST have the most expensive gear. Work with what you’ve got, then upgrade when you become addicted, and can’t resist the temptation to splurge.

The one thing you’re going to really need your camera to have is a good Live View screen or an EVF (electronic viewfinder). You will use this to focus and compose your shots.

7 – You need a tripod

It’s dark, you’re going to be doing long exposures, and that means you have to use a tripod. Read my article on the reasons why a good tripod is essential for any kind of outdoor photography. For night photography a tripod is obligatory.

Shooting technique

Ok, you’ve planned everything right, The Milky Way is looming large above you, and you’ve framed up a lovely composition of it with some fascinating foreground object. It’s time to set up your camera for Milky Way shooting. Here’s where I start:

NOTE: For now you’ll want to turn off your in-camera noise reduction, as this will just slow down your test shots.

Shooting in Manual Mode
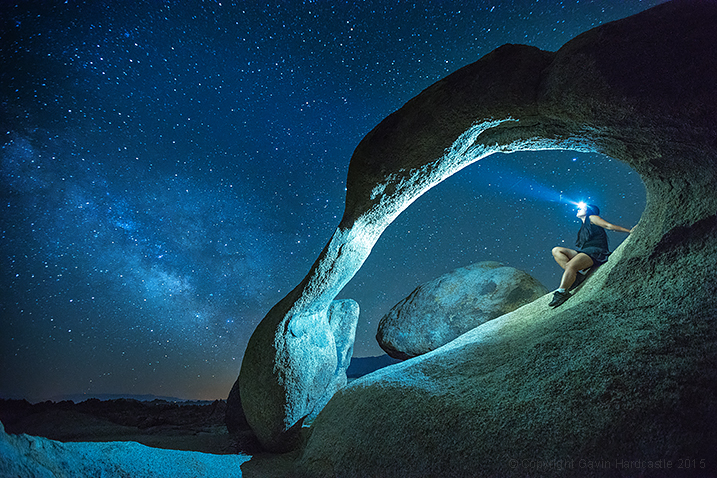
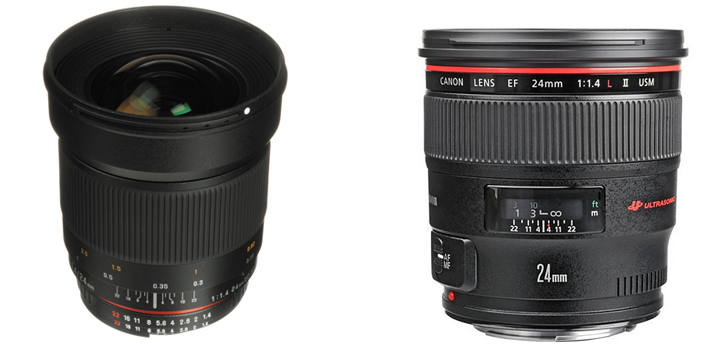
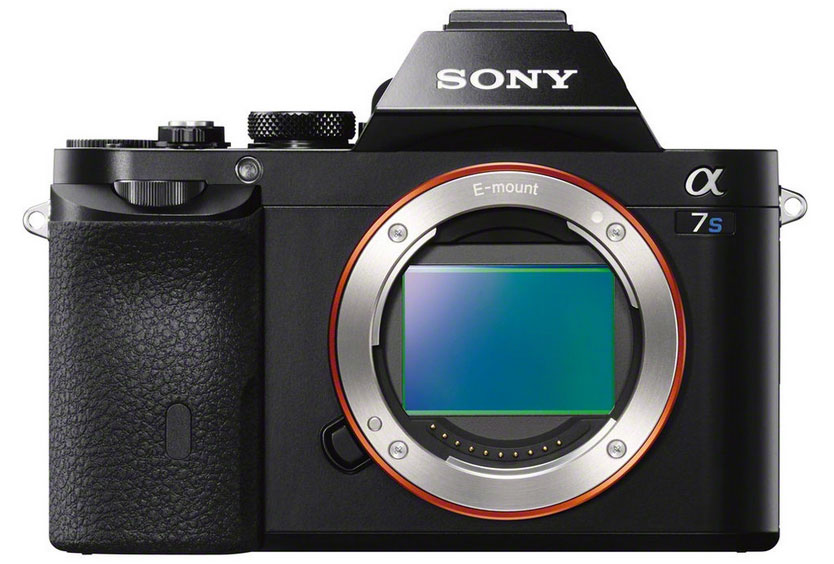
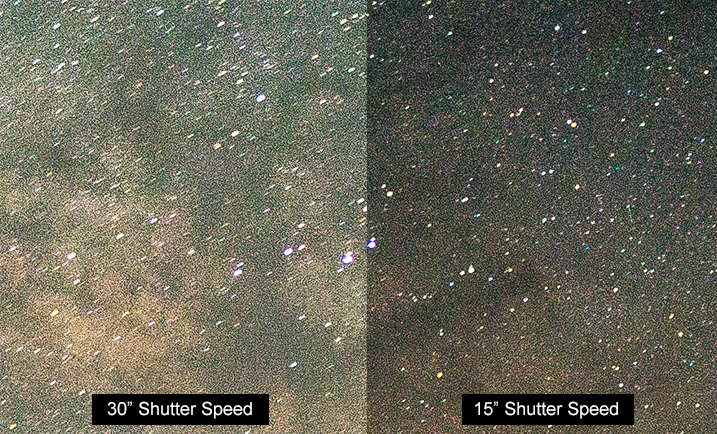
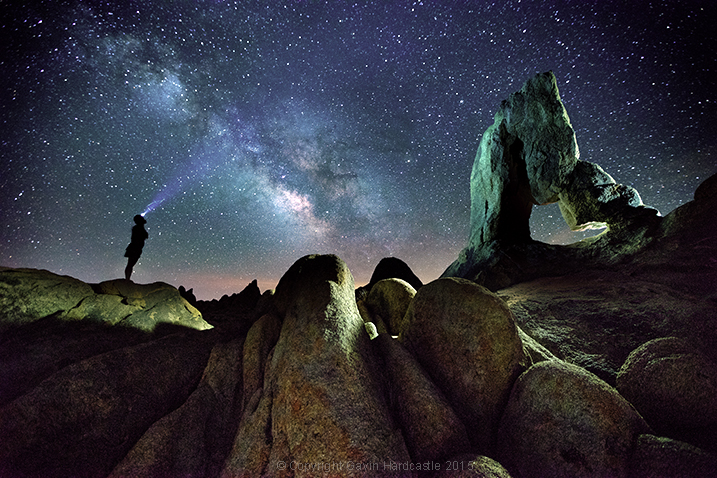
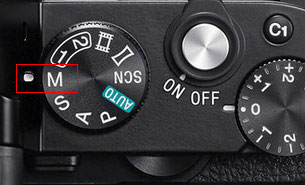
8 – Shoot in M (Milky Way Mode) and Shoot RAW

You want full control over every aspect of your shot so set your camera to Manual mode. This allows you to control the ISO, the shutter speed, the aperture and white balance. Always shoot in RAW.

9 – Use Live View or the EVF (if you have one)

This is where we’ll set our focus. Make sure you switch auto-focus OFF as we’ll be focusing manually. Before we do this you need to crank your ISO up to something like 5000 to make your sensor really sensitive to light.

10 – Set your focus on a star

Set your aperture to the widest, fastest setting it can achieve (smallest number such as f/2.8). This wide aperture will expose your sensor to the maximum amount of light.

Using your camera’s Live View or EVF, point it at the brightest star you can see until a small dot of light appears in the centre of your view. Zoom in (magnify the view NOT zoom the lens) so that you see that tiny little dot as large as possible. Now turn the focus wheel on your lens until the star becomes a sharp, tiny pin-point of light. Try turning the focus wheel passed that point until the star blurs again and you’ll have gone too far, so just back it up until you’re able to get the star as sharp and small as possible. Don’t rush this, take your time and get it right.

If your camera has a feature called Focus Peaking or Focus Assist, that can sometimes help you to determine perfect focus on a star. If you’re into calculating hyperfocal distance, you could do that too, but I prefer this method.

Whatever you do, don’t blindly set your focus to infinity by cranking your focus wheel until it reads Infinity (?), you’ll just end up with blurred images.

11 – Compose your shot

Now that you’ve focused your lens on the brightest star, it’s time to compose your shot. Use your headlamp to illuminate the scene so that you can see what you’re looking at in your Live View. If your camera has a digital level for perfect horizon lines use that – if not, you might want to invest in a bubble level for your hot shoe attachment.

Set your shutter speed to about 10 seconds (at ISO 5000 if you have it), and take a test shot. At this point all you’re doing are some rough test shots to get your composition sorted, so there’s no point in shooting a full 30 second exposure and waiting around while you take a whole bunch of test shots.

Once you’ve finished taking test shots and made your final tripod adjustments for the perfect composition, it’s time to dial in your camera settings.

13 – White Balance

When shooting The Milky Way I prefer to shoot with my White Balance set to Incandescent (aka Tungsten) which I believe is Sony’s version of Tungsten. I like the blue hue and it also displays a lot of contrast in my camera’s EVF so that I can clearly see The Milky Way. When I process my images later I often reset the White Balance back to Auto (AWB) mode for a more realistic neutral color temperature.

White Balance Settings for Milky Way Photography

This RAW file was shot with Incandescent White Balance. You can see how it looks in Adobe Camera RAW when set to Auto.

I advise you to experiment with different WB settings to get the colour temperature you like best. Shooting with the Incandescent/Tungsten prest will almost always produce good, neutral results, which you can change later in Lightroom or Adobe Camera RAW.

14 – Set your ISO

You used ISO 5000 for the test shots so that you could compose your shot quickly. But, for your actual Milky Way shot you want to use the lowest ISO setting you can get away with so dial it down to ISO 2000 and see if that gives you good results. You can always increase it to ISO 3200 after a few more test shots. I personally rarely go above ISO 3200 as my RAW files tend to degrade significantly at that point.

15 – Shutter speed versus ISO

From this point on you’re going to be juggling your shutter speed and ISO setting to get the most light sensitivity, while still having a shutter speed fast enough to avoid getting star trails. Star trails are great if you’re going for the that effect (read my star trails photography tutorial here) but even a very small star trail just results in a Milky Way shot that lacks clarity. That may just be okay for web images, but for prints you’ll want more sharpness.

Try to limit your shutter speed to a maximum of 15 seconds so that you can keep the stars in your image sharp and trail free.

Shutter Speeds for Milky Way Photography

As you can see, the 30 second exposure on the left has a motion trail on each star. The 15 second exposure on the right has sharper stars, although it is darker.

With a shutter speed of 15 seconds, take a look at your camera’s light meter reading. If it’s telling you that the image is overexposed you might be able to dial your ISO number down a bit, or shorten your shutter speed to 10 seconds.

Sometimes I like to overexpose the image and ignore my light meter reading entirely. When shooting the Milky Way I’m guided more by what I see in my test shots than what my light meter is telling me to do. With my Sony cameras I use Multi metering mode, for what it’s worth.

After your shot is complete and you’re reviewing it, be sure to zoom in and check the details.

16 – Try a 30 second exposure

Milky Way Photography Tutorial - Alabama Hills, Gavin Hardcastle

I know I just said to keep your shutter speed to a maximum of 15 seonds but I always like to take an additional shot with a 30 second exposure to capture a much brighter Milky Way. I do this if I’m planning on publishing a web-only (low resolution) image because the slight star trail caused by the longer exposure won’t be very evident in a low-res web image. The stars will still look sharp enough but will have a much brighter appearance than a 15 second exposure. For prints, I’ll almost always use the 15 second exposure version for the extra sharpness.

In-camera Noise Reduction

Some cameras do a great job of processing and reducing noise reduction. But, this will double the amount of time it takes to complete your shot, so it’s always a good idea to switch this function off, at least temporarily. If you like the results of your in-camera noise reduction you can always switch this function back on once you’ve finished all of your test shots.

I personally prefer to do my own noise reduction in Adobe Camera Raw and Photoshop which gives me more control and allows me to shoot faster while on location.

Now it’s your turn

Okay, so now you know how to get gorgeous clear photos of The Milky Way. I hope you get some great results and have as much fun as I do when shooting this awe inspiring sight. If you’d like to learn how I process my Milky Way shots please post a request in the comments and if there’s enough interest I’d be delighted to share my techniques.

googletag.cmd.push(function() {
tablet_slots.push( googletag.defineSlot( “/1005424/_dPSv4_tab-all-article-bottom_(300×250)”, [300, 250], “pb-ad-78623” ).addService( googletag.pubads() ) ); } );

googletag.cmd.push(function() {
mobile_slots.push( googletag.defineSlot( “/1005424/_dPSv4_mob-all-article-bottom_(300×250)”, [300, 250], “pb-ad-78158” ).addService( googletag.pubads() ) ); } );

The post How to do Milky Way Photography – A Comprehensive Tutorial by Gavin Hardcastle appeared first on Digital Photography School.


Digital Photography School

 
Comments Off on How to do Milky Way Photography – A Comprehensive Tutorial

Posted in Photography


One Speedlight Portrait Lighting Tutorial

25 Jun

If you’ve ever wondered how to improve the look of your portraits using only one speedlight, then make sure you read every single word on this page. It isn’t so much the type or quality of the speedlight you are using; it is more about how you modify and shape the light, that will help you to improve the overall look of your portraits.

Craigbecktabts

Let’s break speedlight portrait lighting down into three simple action steps that are easy for you to follow:

Step 1: Get the speedlight off-camera

Start by first getting your speedlight off of your camera. In order to trigger your strobe once it is off of your camera, you will need a remote trigger such as a Cactus V6 that I am using in the video below. You can also use a Pocket Wizard or any number of different triggers that are available on the market. The key is to be able to remotely fire your speedlight, so you are free to modify, and position your light source for more flattering results.

Check out the video below for a video demonstration of a one light, speedlight beauty lighting set up.

Step 2: Add a light modifier

Next step is to increase the size of your light source by using a speedlight modifier. The key to improving the quality of the light is this; the larger the light source and the closer the light is to your subject, the softer the light will appear. As a general guideline for a starting position, I suggest you put your light roughly the same distance as its diameter from your subject.

CraigBeckta1

For example if your speedlight modifier is three feet (36″) in diameter (or 91cm), you can start by placing your modifier the same distance from your subject. In the image above I placed my light in the butterfly lighting position and used a white reflector for fill. This type of lighting is often referred to as ClamShell lighting or Beauty lighting.

Craigbeckta2

Step 3: Place your focus on the subject

Once you have your lighting in place, shift your focus to making a connection with the person you are photographing. Pay close attention to the pose and the expression; tests have shown that 60% of people look more attractive from their left side. So make sure you experiment with your subject to find their most flattering side right at the beginning of the portrait session. You can ask them if they have a side they prefer, or you can make a guess based on where they part their hair.

Once you have that figured out, focus on capturing an expression that makes them appear confident in from of the camera. You can have the best lighting in the world ,but if you don’t nail the right expression, you will miss the shot. Look for the position of their eyes and mouth, confidence is portrayed from the eyes and it is something that can make or break a shot.

Craigbeckta3

Any article about photography isn’t complete unless we talk about the gear used to create the shots. The first image in this series was shot on the Canon 5D MK III with the Canon 100mm Macro lens at ISO 100, f/5.6 and shutter speed 1/160th. The reason you should use a shutter speed of 1/160th on the Canon 5D MK III is to stay within the flash sync-speed. If you shoot at a shutter speed of 1/200th, or faster, you may see a black line in your image because are shooting at a faster shutter speed than your camera can handle when using flash.

Screen Shot 2015 06 01 at 8 19 33 AM
Lighting diagram showing the setup for these images.

The other two images in this series were both shot on the Canon 5D MK III with the Canon 135mm f/2 lens. Both lenses are tack sharp and are great portrait lenses but if you prefer a better bokeh, then I would choose the Canon 135mm f/2. The reason is that the lowest aperture is f/2, and the longer focal length of 135mm will give you a more out of focus background when shot at f/2.

CraigBecktaDPS

If you have any questions about the video or article above, I would be more than happy to answer them for you. Just post your questions in the comment section below.

googletag.cmd.push(function() {
tablet_slots.push( googletag.defineSlot( “/1005424/_dPSv4_tab-all-article-bottom_(300×250)”, [300, 250], “pb-ad-78623” ).addService( googletag.pubads() ) ); } );

googletag.cmd.push(function() {
mobile_slots.push( googletag.defineSlot( “/1005424/_dPSv4_mob-all-article-bottom_(300×250)”, [300, 250], “pb-ad-78158” ).addService( googletag.pubads() ) ); } );

The post One Speedlight Portrait Lighting Tutorial by Craig Beckta appeared first on Digital Photography School.


Digital Photography School

 
Comments Off on One Speedlight Portrait Lighting Tutorial

Posted in Photography


Easy Portrait Retouching Tutorial without Losing Skin Texture

18 Jun

When it comes to skin retouching, less is more. Retouching skin is tricky. You want to enhance it, not beat it to death, make it fresh and glow-y, while still keeping the integrity of the skin. You want to soften wrinkles, not obliterate them. And to bring out their eyes and natural beauty while keeping them looking like themselves. Even Continue Reading

The post Easy Portrait Retouching Tutorial without Losing Skin Texture appeared first on Photodoto.


Photodoto

 
Comments Off on Easy Portrait Retouching Tutorial without Losing Skin Texture

Posted in Photography


5 Photoshop Layer Mask Tricks – Video Tutorial

26 Apr

Photoshop has many features that can make photo editing both non-destructive and creative. Using Layer masks is one such feature. Masks can also be confusing to understand and they have many ways to apply and use them.

In this video tutorial Joshua Cripps goes over five layer mask tricks – I even learned a couple things I hadn’t seen before, so thanks for that! See if you can pick up some things you can use for post-processing your images:

Menu > Image > Apply image = brilliant!

Try and see for yourself. Do you have any other Photoshop layer masking tips or tricks? Please share with us in the comments below. There are a million ways to do things in Photoshop, no one can know them all so show me something else I haven’t seen!

googletag.cmd.push(function() {
tablet_slots.push( googletag.defineSlot( “/1005424/_dPSv4_tab-all-article-bottom_(300×250)”, [300, 250], “pb-ad-78623” ).addService( googletag.pubads() ) ); } );

googletag.cmd.push(function() {
mobile_slots.push( googletag.defineSlot( “/1005424/_dPSv4_mob-all-article-bottom_(300×250)”, [300, 250], “pb-ad-78158” ).addService( googletag.pubads() ) ); } );

The post 5 Photoshop Layer Mask Tricks – Video Tutorial by Darlene Hildebrandt appeared first on Digital Photography School.


Digital Photography School

 
Comments Off on 5 Photoshop Layer Mask Tricks – Video Tutorial

Posted in Photography