RSS
 

Posts Tagged ‘Tutorial’

Video Tutorial – How to Work a Scene to Find the best Light and Composition

23 Sep

In this short video tutorial, photographer Mike Brown takes you on a photo walk looking for images. Watch as he scans the scene and finds the best camera angle, waits for the right light, and frames the shot for the best composition.

Go on a photo walk and see how Mike goes about working a scene, before quickly snapping a photo and moving on. Take your time, look around. If you see something interesting explore the scene a little. Have patience as well.

Some key points you can learn from this tutorial include:

  • Sometimes you need to wait for the light to change.
  • Simplification is often a good thing.
  • Move around the scene, and put things in the foreground as well.
  • Use shadows for more creating more dramatic images.

The post Video Tutorial – How to Work a Scene to Find the best Light and Composition by Darlene Hildebrandt appeared first on Digital Photography School.


Digital Photography School

 
Comments Off on Video Tutorial – How to Work a Scene to Find the best Light and Composition

Posted in Photography


Tutorial: How to shoot a martini splash photo using only speedlights

03 Sep

Photographer Dustin Dolby of workphlo is back with another of his straightforward, easy-to-follow lighting tutorials. This time, he’s showing us how to shoot (and post-process) a professional-looking splash photography shot—a very popular ad style—using just the affordable speedlights in his home studio.

As usual, his setup is extremely affordable. To start, he places the empty glass-and-lime combo onto a sheet of plexiglass, with two diffusers behind it and a cheap Yongnuo speedlight behind that. Then he uses a second speedlight off to the side to light the garnish, and that same speedlight is what he’ll use to light the splashes once he adds water and begins throwing in his fake ice cube.

From start to finish, here are all of the exposures he captured and combined in post to create his final image:

$ (document).ready(function() { SampleGalleryV2({“containerId”:”embeddedSampleGallery_8047647474″,”galleryId”:”8047647474″,”isEmbeddedWidget”:true,”standalone”:false,”selectedImageIndex”:0,”startInCommentsView”:false,”isMobile”:false}) });

Along the way Dolby offers a bunch of little tips and tricks that help really round out the final image, and produce something beautiful. Here’s the final shot, after a bit of post-production magic:

To see the full tutorial, click play above. And if you love product photography his YouTube channel is definitely worth a look.


All photographs by Dustin Dolby/workphlo and used with permission.

Articles: Digital Photography Review (dpreview.com)

 
Comments Off on Tutorial: How to shoot a martini splash photo using only speedlights

Posted in Uncategorized


Adobe launches new ‘3, 2, 1 … Photoshop!’ tutorial series on YouTube

03 Aug

Adobe launched a new YouTube tutorial series for Photoshop beginners this week. It’s called ‘3, 2, 1 … Photoshop!’ and it covers some basic tips on how to use different features of the image editor—from the crop tool, to layer groups, to brushes and beyond.

Advanced users probably won’t get much out of the new series (although, to be fair, you never know what basic tip you’ve been overlooking), but beginners will find it extremely useful. Over the years Photoshop has gotten more and more advanced and complicated. The tutorial series helps cut through the clutter and offer a few top tips from the makers themselves.

You can watch the first video in the series, Three Tips for Photoshop’s Crop Tool, up top. To see the rest, keep on scrolling down.

Five Tips for Working with Brushes

Six Easy Ways to Select Colors in Photoshop

10 Tips for Working with the Layers Panel

Three Ways to Quickly Zoom in Photoshop CC

Five Reasons to Use Smart Filters in Photoshop CC

Eight Reasons to Use Layer Groups

If you like these videos and you want to see more like them, check out the Adobe Photoshop YouTube channel and keep your eyes peeled for more ‘3, 2, 1 … Photoshop!’ tutorials in this playlist.

Articles: Digital Photography Review (dpreview.com)

 
Comments Off on Adobe launches new ‘3, 2, 1 … Photoshop!’ tutorial series on YouTube

Posted in Uncategorized


Tutorial: How to photograph wine on clear plexiglass

17 Jul

Photographer Dustin Dolby of the YouTube channel workphlo is used to doing a lot with a little. In this tutorial, he uses a couple of flashes, a piece of clear plexiglass, and his know-how as a product photographer to capture a classic wine look, taking you along every step of the way. He even shares a neat trick for capturing a perfect masking frame for use in post.

The tutorial is a little over 19 minutes long, so we wouldn’t call this “quick and easy,” but Dolby does show you the entire process, sharing a ton of great techniques along the way.

The first part of the tutorial covers all of the frames Dolby needs to shoot to put together the perfect wine shot later. That includes a main shot, a brighter photo to bring out details in the label, and three frames with a stripbox placed directly behind his bottle to create a perfect high-contrast black-on-white masking frame to use in Photoshop later.

Then, starting at the 6:25 mark, he jumps into Photoshop to show you how to create that perfect mask and then run you through the many cleanup, correction and compositing steps that turned these two photos:

Left: Main lighting setup | Right: Label detail shot

Into this final shot:

The final photograph after cleanup and compositing in Photoshop. © Dustin Dolby

Watch the full tutorial above to see how this shot came together from start to finish, and then leave Dustin a comment or question either on this post, or on his YouTube videos.

Articles: Digital Photography Review (dpreview.com)

 
Comments Off on Tutorial: How to photograph wine on clear plexiglass

Posted in Uncategorized


Video tutorial: how to make a double exposure in Photoshop

17 Jun

Youtube user Eye Stocker makes a lot of useful Photoshop tutorials and we found this one in particular to be valuable. Even if you are not well-versed in the program, this double exposure tutorial is easy enough for anyone to follow along. And for those already comfortable with PS, it’s still full of useful tips and advice.

After all, one of the beautiful things about this Adobe staple is there are a near infinite number of ways too accomplish a task. And it’s always nice to watch someone else achieve an outcome in a completely different way than you might.

To get started, all you will need to make a cool double exposure is two images that pair well, a copy of Photoshop and a desire to learn. There’s also written steps, which some might find easier to follow.

Articles: Digital Photography Review (dpreview.com)

 
Comments Off on Video tutorial: how to make a double exposure in Photoshop

Posted in Uncategorized


Tutorial – How to Use the Lightroom Map Module

25 May

The Lightroom Map Module lets you add your photos to a map so you can search and organize them by location. It’s quite a cool feature, so let’s take a look at the best ways to make use of it.

1. Using the Lightroom Map module if your camera has built-in GPS

Photos taken with a camera or mobile that has built-in GPS are the easiest to work with in the Lightroom Map module. As long as GPS is enabled, the camera saves the exact location an image was shot in the photo’s EXIF data. Lightroom reads the data when you import the photos and automatically adds them to the map.

For example, I made this photo using an iPhone SE.

Lightroom map module

Lightroom automatically reads the GPS coordinates embedded in the photo’s EXIF data. The yellow square marks the spot where the photo in the filmstrip was taken.

Lightroom map module

Note: Lightroom uses Google maps and an internet connection is required for the Map module to work.

2. If you have a secondary GPS unit

Some camera manufacturers make GPS units that you can connect to the camera body. If you have one of these it does exactly the same as a built-in GPS unit. It embeds the camera’s coordinates in the EXIF data of your images. That data is then read by Lightroom when you import the photos.

3. If you have an app or sports device that records your movements in a GPS file

Most mobile phones have built-in GPS. You can download apps that record your route and let you export that information in a GPS tracklog (extension type .gpx) file that you can import into Lightroom. Some fitness devices like sports watches and fitness bands have the same functionality.

The effectiveness of this depends on how often the app or device records your location. If your camera has built-in GPS, for example, the location of the camera is always recorded accurately as the camera takes a GPS reading when you press the shutter.

When you use an app to do so, the app doesn’t record your location continuously. Instead, it takes a reading every few seconds. This creates a set of dots that can be joined together to show your approximate route. It’s how apps that record walking routes or running times work. That means that you can’t rely on this method for pinpoint precision, but it does help you with an approximate location.

The screenshot below shows a series of photos taken on a Canon camera that does not have GPS. The location information came from a .gpx file generated by a tracking app on my phone.

Lightroom map module

4. If your camera doesn’t have GPS but your mobile phone does

Here’s an easy method to add GPS data to your photos if you have a mobile phone with built-in GPS. All you have to do, whenever you take a photo with your camera, is remember to take an additional photo with your mobile phone. You can import these into Lightroom and add them to the same Collection. Once you have done so, simply drag the photos taken with your camera, those without GPS data, to the locations on the map indicated by the photos that do have GPS data (those taken with your phone).

Here’s a landscape photo I took in northern Spain.

Lightroom map module

Here’s another that I took with my mobile phone.

Lightroom map module

This screenshot shows exactly where I took the photo with my mobile phone.

Lightroom map module

The other photo in the Collection was made with my Fujifilm X-T1 camera, which doesn’t have GPS. I added location data to the Fuji image by dragging it onto the icon representing the location of the photo taken with my mobile phone at the same spot. The yellow icon now displays the number 2 to indicate that there are two photos in that location with the same GPS coordinates, as seen in the Lightroom Map Module below.

Lightroom map module

Lightroom automatically adds the GPS coordinates to the photo’s EXIF data.

Lightroom map module

This method requires the most effort and relies on you to remember to take a photo with your phone whenever you take one with your camera. This isn’t always practical and is most suited for landscape photography, where you have the time to take an additional photo with a mobile phone.

Conclusion

The Lightroom Map module is an often under-utilized but surprisingly useful tool. Using these ideas you can add Gcoordinatestes to any photo, even those taken by a camera without GPS. In years to come, you can find out exactly where your photos were taken, even if you can’t remember. It makes revisiting your favorite locations a much easier and more enjoyable task.

Do you have any questions about the Lightroom Map Module? Please let me know in the comments below.


Would you like to learn about Lightroom’s under-appreciated features? Then check out my Mastering Lightrooom ebooks and start getting more out of Lightroom now.

The post Tutorial – How to Use the Lightroom Map Module by Andrew S. Gibson appeared first on Digital Photography School.


Digital Photography School

 
Comments Off on Tutorial – How to Use the Lightroom Map Module

Posted in Photography


Step by Step Tutorial for How to Shoot Tethered

04 Oct

Tethered shooting is a photography technique that has been practiced by many professional photographers for years. In short, tethering allows you to connect your camera to a computer or tablet and almost instantly view your digital images on the device within seconds after it is captured. Due to expense and accessibility, tethered-shooting was generally reserved for photographers who do a lot of studio work and high-end commercial photo shoots. However, as tethering technology became significantly cheaper and easier to use, tethered shooting as been practiced by professionals and enthusiasts alike.

If you’ve ever been curious about tethered shooting, this article will give a brief overview of the process as well as some steps to easily get started.

Tyler Ingram

By Tyler Ingram

What is tethered shooting?

Tethered photography is the process of connecting your camera to a computer, tablet, or even a smartphone using either a cable or wireless app. After a successful connection between the devices, any new image captured by the camera is then passed directly to the computer and saved in a pre-designated folder. You’re then able to see the image fully displayed on the computer screen and even do some post-processing to the image.

Benefits of tethered shooting

The main benefit of tethered shooting is the ability to quickly preview the image on a large monitor within seconds of capturing it with your camera. This allows both you and a client to scrutinize your images on a big screen, allowing you to make adjustments to the photo shoot as it’s taking place. Depending on the tethering software you’re using, you might even be able to do quick edits to the photo on-site. Both you and the client can see exactly what’s being photographed and can make sure your visions for the shoot are in alignment. Overall, this type of collaboration should lead to a better result.

Photographer

By Photographer

Downsides of tethered shooting

The ability to almost instantly preview photos as they’re being captured does come with a few downsides.

First, either you or your client could get too caught up in little details while inspecting the photos, and this can stall a photo shoot. Thus, it’s important to set expectations with your client and be able to push forward without focusing too much on details. Second, tethering can suck the battery life out of both your camera and your connected computer. If your tethered photo shoot may take longer than an hour, you’ll want to have extra batteries on hand and be shooting near a wall socket in case you need to plug in. Lastly, tethering software can be notoriously finicky and is prone to not working for no apparent reason, so you’ll want to have a backup plan in case of an outage.

What you need for tethered shooting

The traditional and most reliable way to connect your camera to a computer or another device is by using a cable. There are a variety of different cables and ports available, so which cable you use will depend on your exact devices. Some DSLRs with built-in Wi-Fi even offer wireless tethering or remote shooting, but this is typically limited to being used on a tablet or mobile device only, not a laptop computer.

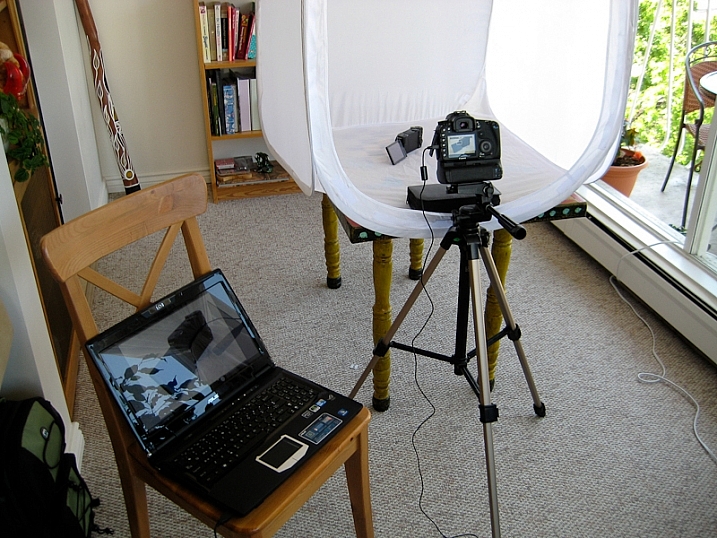
In this particular instance, we’ll assume the camera is a DSLR and the connected device a laptop computer, as this is a very common tethered shooting setup. In this case, you’ll need:

  • An extra long (ie. 15 feet) USB cable to connect your camera to your laptop
  • Tethering software, such as Adobe Lightroom or Canon EOS Utility 3
  • Optional – a portable table to hold your laptop such as Tether Tools’ Aero Table
  • Optional – a JerkStopper to prevent accidentally yanking your USB cable from your camera
Tether Table Aero for tethered shooting

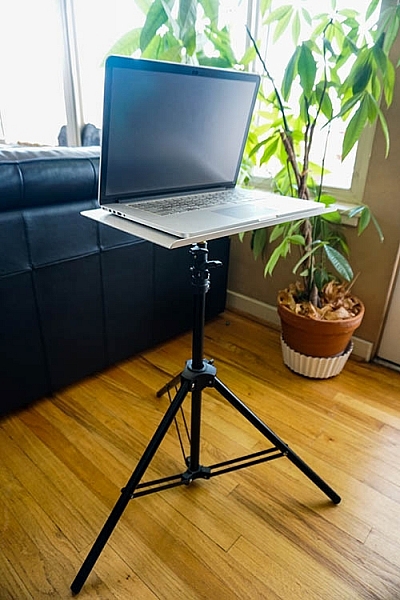
Tether Table Aero is a lightweight, durable aluminum platform that attaches to almost any tripod or light stand, turning it into a handy utility table for holding a laptop or extra camera gear.

Tether Table Aero for tethered shooting

To be clear, there are many tethered shooting programs available, but this article will highlight two low-cost, simple methods in particular: Adobe Lightroom and EOS Utility 3.

Simple tethered shooting with Lightroom

The quickest and arguably the easiest way to start tethered shooting is by using Adobe Lightroom’s Tethered Capture feature. Follow these steps to set it up:

Step 1 – Connect the camera to the laptop

Connect your DSLR to your laptop with a USB cable. Then turn the camera on.

Step 2 – Start Tethered Capture in Lightroom

Open Lightroom and navigate to File > Tethered Capture > Start Tethered Capture

Step 3 – choose tethered settings

In the Tethered Capture Settings dialogue box, you have the option of choosing a Session Name (e.g., “Tethered Shooting Test,” specifying the photo names, choosing a destination for your photos, and adding metadata and keywords. Be sure to pay particular attention to where the photos will be saved so you can find them later. After setting your options, click OK.

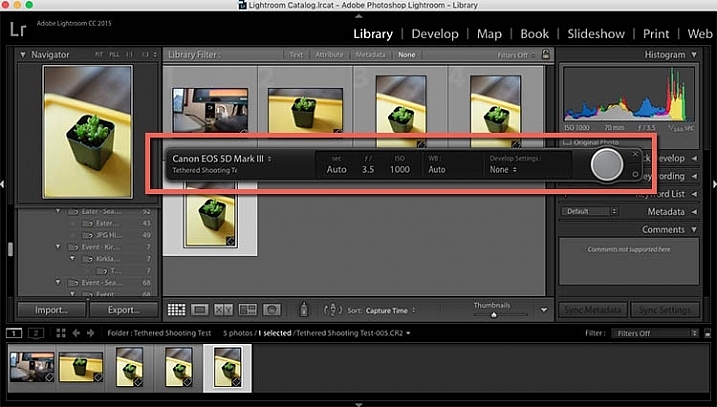
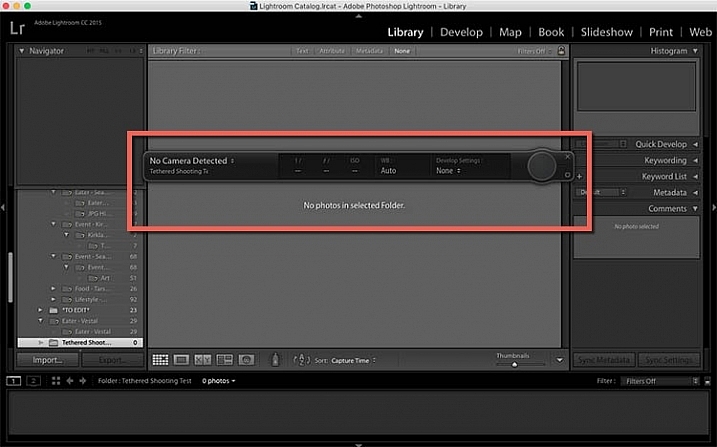
If all goes well, the screen below will pop up, giving you a narrow control panel (outlined in red below) for some light remote shooting options, and a Library in which photos captured via the tethered shooting connection will populate.

tethered-03b

However, it’s not uncommon for Lightroom to have difficulty detecting the connected camera. If you follow the above steps and still see this screen below, try troubleshooting by first making sure your version of Lightroom and your camera’s firmware are both updated. Also, check compatibility to ensure your camera can tether capture with Lightroom. Note: there are third party plugins available for other non-compatible cameras such as the Fuji X-T1, do a search for your camera model and you may find a solution (Pentax here, Sony here.

Finally, try rotating through several different USB cables to make sure they’re working well. But if you’re looking for a more consistent way to tether shoot, check out the other option below.

tethered-04b


Reliable Tethered Shooting with EOS Utility 3

If you shoot with a Canon DSLR, whip out that CD that came with your camera and install the EOS Utility 3 onto your computer. When your Canon DSLR is connected to your computer, you’ll be able to use this program to control your camera remotely and shoot tethered. This method is much more reliable and consistent than using Lightroom’s tethered capture option.

Steps for using EOS Utility 3 for tethering:

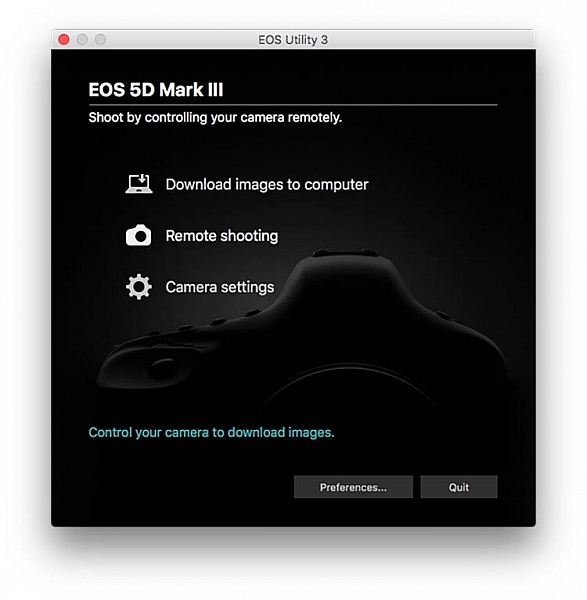
  1. Start by downloading the EOS Utility 3 and opening it on your computer. Click on the “Remote shooting” option.Tethered shooting
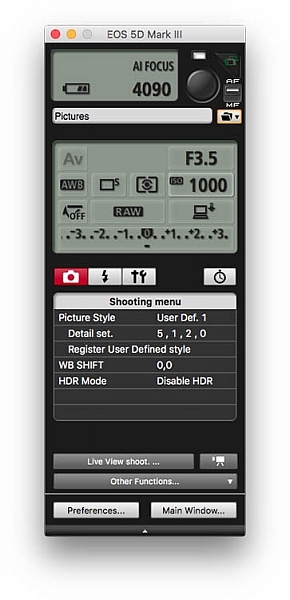
  2. Selecting that option will display the following interface. The display gives you the ability to alter some settings such as white balance or drive mode on your camera directly from this interface, but there are still some functions, such as lens zooming, that you’ll have to do manually.Tethered 05
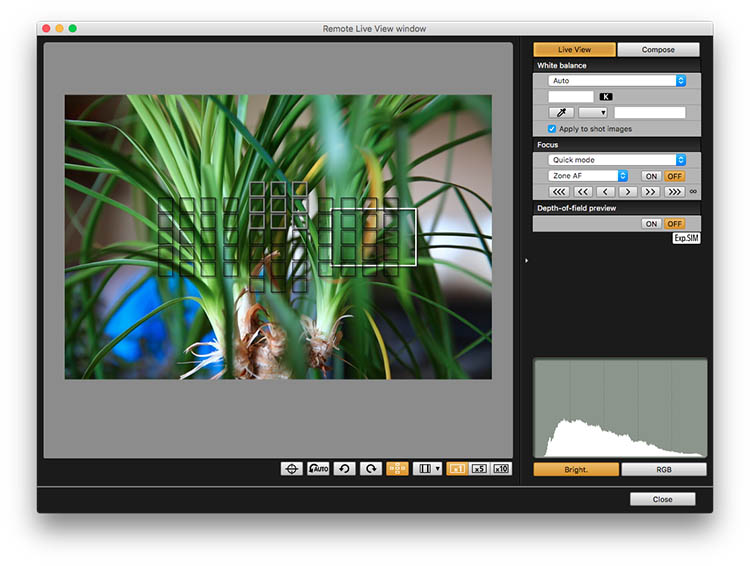
  3. While still in the Remote Shooting setting of EOS Utility 3, set your camera to Live View mode, and tethered shooting will be enabled. In this case, Live View will appear directly on your computer screen so you will see exactly what your camera sees. When you take a photo in tethered shooting mode, the captured photo will appear on your desktop.Tethered 09

Over to you

These are just two of many options available for tethered shooting. Do you frequently shoot tethered? If so, what types of programs do you use for reliable results? Please let us know your tethered shooting tips and tricks in the comments below.

googletag.cmd.push(function() {
tablet_slots.push( googletag.defineSlot( “/1005424/_dPSv4_tab-all-article-bottom_(300×250)”, [300, 250], “pb-ad-78623” ).addService( googletag.pubads() ) ); } );

googletag.cmd.push(function() {
mobile_slots.push( googletag.defineSlot( “/1005424/_dPSv4_mob-all-article-bottom_(300×250)”, [300, 250], “pb-ad-78158” ).addService( googletag.pubads() ) ); } );

The post Step by Step Tutorial for How to Shoot Tethered by Suzi Pratt appeared first on Digital Photography School.


Digital Photography School

 
Comments Off on Step by Step Tutorial for How to Shoot Tethered

Posted in Photography


Looking Sharp: A focus stacking tutorial

29 May

This was taken in the deserts of Southern Utah at Snow Canyon State Park near St. George, Utah. 

 Photo: Chris Williams Exploration Photography

Background: Understanding the Process

One of the questions that I receive quite often from beginner photographers is “How do I produce tack sharp images from front to back in challenging shooting conditions or in cases where the foreground fills up nearly half the frame?” The answer in short is to utilize a process known as focus stacking. The answer is simple but the process can be very labor intensive from a shooting and processing standpoint.

Even when working with a large depth of field there may be occasions where you still have to take more than one image due to low light, wind and or large foreground subjects. Most technique books will tell you that this is easily accomplished by stopping down to a very small aperture such as F22, focusing on a set focal point at about 1/3 of the way into the frame or determining the spot from your hyperfocal distance (the distance between a camera lens and the closest object that is in focus when the lens is focused at infinity), focus at that spot and take your image.

Here’s one of the images that I used during focus stacking.  This was shot at 35mm and at f/2.8 due to conditions at the time of shooting.  As you can see it was impossible to achieve sharp focus throughout the image.

In principle this sounds like a very quick and easy fix to a somewhat complex problem that plagues most landscape photographers. In practice, however, it comes with a couple of big issues. Not only can using an aperture this small decrease image quality due to diffraction, it doesn’t actually deliver the maximum possible depth of field. That’s where stacking comes in. In the digital age we can now improve upon this technique and produce higher quality, tack sharp images from the front to the very back of the frame.

Before diving into this process I should mention that you may not always need to use this technique and this process is really up for interpretation in regard to what you define as a ‘sharp image’. The lens quality and aperture play a huge role in whether or not you wish to go through the work of focus stacking an image. In general, I always use this process now as I want my images to look tack sharp even when printed at very large sizes.

Selecting the Aperture

Choosing the aperture is an important first step to this process. I always try to choose an aperture in the ‘sweet spot’ of the lens. This is a bit of a loaded term; you have to decide whether you are after maximum resolving power or greater overall focus in your image. These differences may be subtle in some cases, but regardless I always try to choose optimal sharpness over depth of field in an individual image, bearing in mind that I’m going to be stacking multiple images. I would rather take a few extra shots to ensure that the RAW files are of the highest quality I can achieve given the conditions.

Generally speaking, the sweet spot of a lens is about 2.5 to 3-stops from the maximum aperture. This does vary from lens to lens however; for example, I normally shoot between f/8 and f/11 when possible on my Canon 16-35mm f/2.8L ii to achieve the sharpest results possible (which I know is a few stops greater). The bottom line is to get to know your lens! You can even run it through an aperture progression and compare the images to find that coveted lens ‘sweet spot’.

Behind the Lens

Focus stacking can be very tricky when you’re out in the field. I use the following steps to ensure that I don’t miss a focus point and to make adjustments on the fly in changing conditions such as light, wind and rain.

  • Find your desired composition and make sure that your tripod is in safe position that won’t allow for any movement or shifting while you’re performing the in camera focus stacking.
  • Place your camera on your tripod, turn on live view, switch your lens to manual mode, make sure that your camera is set to manual and dial in your composition.
  •  Once you have the composition dialed in lock your camera down on your tripod and make sure that your ball-head or camera mount is completely locked down so no movement can occur during this process (if some movement does occur you can try to correct this using Auto-Align in Photoshop, but I always try to avoid this to the best of my ability).
  • Use either your camera’s in camera timer (set for 2-10 seconds) or use a remote shutter trigger to avoid any camera movement issues.
  • Once you are 100% sure that you’re happy with the composition it’s time to adjust your settings; I always fire a few test shots to ensure that I can freeze the foreground subject (flowers etc.) and to see what I can get away with in regard to ISO/Aperture/Shutter-speed while still yielding an acceptable result with respect to proper exposure and the signal to noise ratio.
  • This may sound trivial but play with your settings a bit to find the right exposure/sharpness balance; aim to keep the ISO at base and the aperture as close to the ‘sweet spot’ as possible (f/8-f/11 in most cases) this may not be possible depending upon conditions, so make adjustments as you see fit.
  • Adjust your CPL or lens filter (ND etc.), if you’re using one, to give the foreground more pop etc.

The Progression

Now comes the fun part: how do you make sure that you have everything in focus and that you don’t miss a focus point? There’s definitely more than one way to go about doing this, but I generally focus on the foreground elements that are closest to the lens; normally near the bottom 1/3 of the frame in live-view.

I normally zoom in to my area of interest in Live-View and dial in my focus point using manual focus.  After taking the image I repeat the process for my next focus point.
  • While in live-view, zoom in to the bottom most portion of your foreground subject and manually adjust the focus until everything is sharp and adjust your settings depending upon conditions (wind etc.)
  • To find your next focus point stay in live-view, zoom in to the same area you just photographed and move up in the frame to find your next focus point
  • Repeat this process until you reach the background elements in your image and take your final exposure.
  • You may want to bracket your last exposure to keep the highlights and shadows from clipping or to catch a sunstar; if you’re shooting on a camera that has a great deal of dynamic range (like a Sony a7r/ii or Nikon D810) then you may be able to do this with one exposure; it’s completely up to you

The toughest thing about focus stacking in the field is dealing with changing conditions such as wind, rain and light. When wind is an issue I always run through at least two or three focus stacking progressions to ensure that I have a sharp frame at each focus point. Even in perfect conditions I still run through a focus point progression at least twice to ensure that I haven’t missed a point. There’s nothing worse then getting home after a long day of shooting only to find that you completely missed a focus point.

Once you take your camera off of your tripod or move your tripod, it will be a huge pain to get everything lined up again and you may not even be able to in most cases. Double and triple check your exposures to ensure that you’ve got all of your focus points nailed down before moving your camera and packing up your gear.

Articles: Digital Photography Review (dpreview.com)

 
Comments Off on Looking Sharp: A focus stacking tutorial

Posted in Uncategorized


A Landscape Photography Tutorial (from a Portrait Photographer Trying Something New)

06 May

landscape-photography-tutorial

Sometimes when you’re in a rut the best way to get out of it is to do something completely out of the box and try something new – something a little risky.

Portrait photographer Sean Tucker changed things up recently but setting out on a landscape photography road trip.

He videos the experience and I think the result is fascinating – both to see how he approached his landscape photography but also to hear his insights on stepping outside his comfort zone to approach a new type of photography for him.

I like what he wrote in his blog about the experiment:

“There was no guarantee the trip wouldn’t be a waste as I’m not a professional landscape photographer by any means, but I think the best creativity will always come out when you are taking risks.”

Grab a cup of your favourite beverage and settle down to journey with Sean. The end results are at the end of the video.

Have you ever stepped out of your normal type of photography to try something new like Sean did?

Further Reading for helping you to break out of a photography rut:

  • 10 Tips to Motivate You out of a Photography Rut
  • 5 Ways To Break Out of a Creative Photography Rut
  • Are You in a Photography Rut? 11 Tips to Get Out of It!

googletag.cmd.push(function() {
tablet_slots.push( googletag.defineSlot( “/1005424/_dPSv4_tab-all-article-bottom_(300×250)”, [300, 250], “pb-ad-78623” ).addService( googletag.pubads() ) ); } );

googletag.cmd.push(function() {
mobile_slots.push( googletag.defineSlot( “/1005424/_dPSv4_mob-all-article-bottom_(300×250)”, [300, 250], “pb-ad-78158” ).addService( googletag.pubads() ) ); } );

The post A Landscape Photography Tutorial (from a Portrait Photographer Trying Something New) by Darren Rowse appeared first on Digital Photography School.


Digital Photography School

 
Comments Off on A Landscape Photography Tutorial (from a Portrait Photographer Trying Something New)

Posted in Photography


Fire Spinning with Steel Wool – A Special Effects Tutorial

17 Mar

Sometimes you can find ways of taking amazing pictures without spending much money at all, and one of the best examples of this is a technique called fire spinning. This usually involves just a couple of basic items, available at any hardware store and grocery market, and with a little creativity you can create some pictures that are downright otherworldly.

50mm, f/13, 30 seconds, ISO 200

50mm, f/13, 30 seconds, ISO 200

Safety warning – please abide:

Before I go into detail about what it takes to create an image like this, I need to make it abundantly clear that fire spinning is dangerous, not only to yourself, but the area around you, and even your camera equipment.Please follow these safety precautions:

  • Take care to only do this where you have plenty of open space, and nothing around you that will catch on fire.
  • Make sure that you wear thick clothing such as full-length pants, closed-toe shoes, a long-sleeved shirt, and something to cover your eyes (glasses or safety goggles) and hair.
  • Never do this in a field of grass or near a house, dry wood or brush, or near anything that could potentially catch on fire.
  • Also make sure to put plenty of distance between your camera and the sparks, as they fly farther than you might think!

The images you see in this article were all taken at night, on a deserted beach where nothing else could start burning, and my camera was far enough away from the subject to avoid any wayward flying sparks or smouldering embers.

What you will need

You may already have some of the items necessary for a fire spinning photo, but if not, you can easily find everything you need for only a few dollars. You can add additional things such as multiple chains and whisks to create different effects and styles, but for a basic fire spinning shoot you can start with the following trinkets:

A chain, wire wisk, connector, and steel wool are all you need to create amazing fire-spinning images.

A chain, wire whisk, a connector, and steel wool, are all you need to create amazing fire spinning images.

  • A few lumps of fine steel wool (thick stuff works okay, but the finer steel wool is better: 0-0000 grade)
  • A small chain, roughly half a meter in length (1.5′)
  • A wire whisk commonly used in baking
  • A small clasp or carabiner to faster the chain to the whisk
  • Something to light the steel wool on fire (cigarette lighter, grill lighter, etc.)

Other items necessary for the shoot include:

  • A tripod for your camera
  • A wide-angle lens (I shot the top picture at 50mm, but I would have preferred something wider like 35mm)
  • A flashlight, so you can see as you’re setting up your camera and planning the shoot
  • A friend who is willing to hold a spinning fiery object attached to a chain

Once you have all the things you need, preparing for your photos is fairly simple. Stuff a wad of steel wool into the whisk (fluff it up a bit so it gets some air), attach the whisk to the chain, and you’re all set. Fine steel wool is better (I used grade 00 for these images) because it will burn easier, and send more sparks flying around during your shoot. The basic idea involves lighting the steel wool, which will cause it to smoulder, then spinning it around in the air, which will cause sparks to shoot off in every direction.

While the steel wool won’t exactly burn like a piece of paper, twirling it in the air will cause sparks to fly all around. By using a long exposure on your camera, you essentially take a time-lapse image of the sparks, which results in an incredibly dynamic image not unlike something you might see during a fireworks display at an independence day celebration.

fire-spinning-single-spiral

50mm, f/9.5, 20 seconds, ISO 200

The fire-spinning method

After your chain, whisk, and steel wool are ready, you will need to find a location, and decide how to frame your shot, which is why it can be handy to have a friend help you out. You can do fire spinning photos by yourself, but it really helps to be able to direct someone else who’s doing the spinning, so you can get everything positioned exactly how you want in the shot. It helps to draw some lines in the sand or dirt so your helper knows precisely where to stand, and depending on how dark it is, you may need to use your flashlight to help get everything positioned just right.

The rest of the process is fairly simple, but it will probably take a great deal of trial and error to get the shots you want. Set your camera and tripod low on the ground, several meters away from your friend, and have him shine a flashlight on his body so you can lock focus (either use autofocus to lock, then switch it to manual – or try back button focusing). Large apertures should be avoided, since you want a very wide depth of field, and you don’t need to worry about gathering enough light because the sparks will be plenty bright to show up even with small apertures. Use a long exposure time of 20 or 30 seconds, and a low ISO of 100 or 200.

When you are ready to take the shot, have your friend hold the lighter under the steel wool until it starts glowing. That’s your cue to press the shutter button, then just stand back while your friend spins the chain and the sparks start flying. One final trick is to use your camera’s 2-second self-timer so your friend has a bit of time to light the steel wool on fire before the actual exposure begins.

fire-spinning-beach-sparks

35mm, f/10, 6 seconds, ISO 200

Once you get the hang of the basics the rest is all about finding a technique that works, to get the shots you want. You can try lots of variations to get different photos such as:

  • Stand in place and twirl the chain in a circle
  • Stand in place and twirl two chains, one on each side
  • Walk across the frame while spinning the chain to create a giant glowing tube
  • Have multiple people in the shot spinning multiple chains
  • Flash an off-camera speedlight on rocks or other background elements to add depth to the shot
50mm, f/13, 20 seconds, ISO 200

50mm, f/13, 20 seconds, ISO 200

With a little practice you can get some astounding results, and it’s always good to shoot in RAW so you can tweak the colors, and pull some details from the shadows later on if you want. If you search online for “fire spinning photos” (or steel wool spinning) you will find thousands of images, using all sorts of variations on this basic technique. I realize it’s somewhat cliché to say this, but the possibilities really are endless.

Have you ever tried fire spinning before? What are some of your favorite tips and tricks that others should know? Share your thoughts and any of your favorite photos in the comments section below!

This is the second of a series of articles we will be featuring this week on dPS all about special effects. Check out the last one: How to Photograph the Full Band of the Milky Way

googletag.cmd.push(function() {
tablet_slots.push( googletag.defineSlot( “/1005424/_dPSv4_tab-all-article-bottom_(300×250)”, [300, 250], “pb-ad-78623” ).addService( googletag.pubads() ) ); } );

googletag.cmd.push(function() {
mobile_slots.push( googletag.defineSlot( “/1005424/_dPSv4_mob-all-article-bottom_(300×250)”, [300, 250], “pb-ad-78158” ).addService( googletag.pubads() ) ); } );

The post Fire Spinning with Steel Wool – A Special Effects Tutorial by Simon Ringsmuth appeared first on Digital Photography School.


Digital Photography School

 
Comments Off on Fire Spinning with Steel Wool – A Special Effects Tutorial

Posted in Photography