There are plenty of places on the web to post a photo your friends will “like.”
Our pals at Exposure have created a way to share photos that’ll make your friends straight up marvel!
Exposure is a super simple way create a photo narrative with your photos. Drag and drop your very best shots onto the page and an algorithm arranges them for you.
Type in a few words and you have a beautifully laid out photo story ready to share.
It takes the tricky out of making a stunning spread so you can concentrate on having adventures and taking great shots.
For inspiration, check out the very best Exposure photo stories already created.
Exposure is rolling out invites as we speak and we’ve got a link that’ll get you to the front of the line.
Sign up for Exposure, Share Your Photo Stories
Related posts:
Turn Your Photos into Beautiful Glass Etchings! Extra photos for bloggers: 1, 2, 3 Before printers spewed…
DIY: Turn Photos Into Beautiful Watercolor Portraits Extra photos for bloggers: 1, 2, 3 Photography and stencil…
Black and White Conversion: The Best Ways to Turn Color Digital Photos Into Beautiful B&W ~Have a cool photo product or site? Reach 270,000 photo…
If romantic comedies have taught us anything it’s that getting a beautiful bouquet of flowers is pretty darn special.
Flowers brighten up your day, but they tend to do that one pesky little thing — dying once they’re cut.
Making flowers out of photographs is a fun and cheeky way of telling that special someone you are smitten.
Plus, these flowers will go on living as mini photographic reminders of beautiful things that have happened in your life.
Learn how to make a super fun and simple bouquet of photo flowers to cheer up your living space, a loved one, or a stranger on the street. (Because we’d all like to feel like we’re in a romantic comedy once in a while.)
Learn How to Make Flowers out of Photographs
Why It’s Cool
Flowers are beautiful and the tend to make everyone pretty stinkin’ happy.
It’s awesome how placing a vase of flowers in a room makes it feel a little more put together than it did before.
These photo flowers will achieve that higher level of design sophistication all the while displaying images of things you love.
They’re simple and elegant with a touch of whimsy that’ll make all your friends ask “How did you do that?”
The best part of the photo flowers is that they will live forever. They wont go rotting away in a vase that you just keep “forgetting” to clean out.
Ingredients:
Photos you want to turn into flowers*
Scissors
Floral Wire
Floral Tape
Glue
Pen or Pencil
Circular object for tracing
*Photos printed on computer/copy paper or vellum work the best.
STEP 1: Round and Round
Use a circular object to trace a circle on your printed image.
Choose carefully where you trace, as the middle of the circle will be the middle of the flower.
STEP 2: Get to Cutting
Time to get crafty. Take up your scissors!
Cut out the circle you just traced.
Don’t worry if it’s not perfectly cut out. The imperfection will add to the charm of the flower.
STEP 3: Go Halfsies
Fold the circle in half.
STEP 4: And Again…
Fold the half-circle in half.
You’re getting so good at this.
STEP 5: One more time
Fold it in half again.
Your circle will now look like tiny little fan.
STEP 6: Shape it up
Cut the top of the circle from end to end to create a cone shape.
The finished result will look an ice cream cone.
You can play around with how you cut the top as this will be your petal shape. Try a few shapes to see what petal cut out you like best.
STEP 7: Make Your Mark
Unfold your circle and you will find 8 petals.
Mark off your least favorite petal and the top half of the petal next to it with a pen or pencil.
STEP 8: Just a Little off the Top
Cut out those one and a half petals. Buh-bye petals.
You will be left with 6 and a half petals.
The half petal will be the anchor of your flower (and it will look a little like a triangle).
STEP 9: It’s all Coming Together
Put a dab of glue on the half petal.
Glue the petal next to it (across the gap) on top of the triangular half petal.
STEP 10: Create Some Texture
Pinch each petal, making a crease down the middle to give them a little extra texture and shape.
STEP 11: A Little Loopy
Make a simple loop in the top of the floral wire with your scissors.
STEP 12: A Flower Grows
Poke the end of the floral wire that does not have a loop in it through the center of the flower.
STEP 13: The Finishing Touch
Cut a 2 inch strip of the floral tape and wrap it around the base of the flower to secure it to the top of the wire.
Yippee! You just made your first flower out of a photo! Feels good, right?!
If you aren’t super stoked on your first attempt don’t give up hope. It may take a couple of tries to get the hang of this. Don’t discard the flowers you don’t like ’cause they will look cute among the flowers you do like when they are all put together in a bouquet.
Taking It Further
Print your photos double sided so that you will have images on the top side of the flower as well as the bottom side of the flower.
Make a garland of photo flowers by twisting the wire together.
Make all types of flowers. A quick google search on how to make paper flowers will give you a plethora of tutorials on crafting different types of flowers.
Make a wreath or head piece of photo flowers.
Related posts:
DIY: Turn Digital Photos into Vintage-like Prints with Mulberry Paper Extra photos for bloggers: 1, 2, 3 What is it…
Frame Your Photos with a Paper Craft Photo Globe Extra photos for bloggers: 1, 2, 3 With the holidays…
DIY Photo Wrapping Paper — Wrap Gifts in Your Very Own Photos! Extra photos for bloggers: 1, 2, 3 Free shipping on orders over $ 100!…
If you have a digital SLR and don’t want to blow two grand on an underwater housing, check out the alternative the folks at Digital Camera World came up with. Just put your camera into a clean fish tank, attach a remote shutter release cable, lower the tank into the water, and fire away. Naturally, this only works in calm water, so don’t take it into the ocean unless you fancy buying a new camera. Details and a photo after the link.
Summer days are here! With the sun setting so late, there are more phone calls, Instagrams, texts, and all sorts of things that give your phone a good ol’ workout.
What’s that? Your phone is buzzing in your pocket for some relief! After a long, long day, it deserves some rest. Pamper your phone with a swanky charger dock made from your favorite antique camera!
Plugging it in and leaving it on the table is such a lonely way to relax. In this project, you’ll be making a super retro dock from a camera to charge your phone in style. You get to work with your hands and some rockin’ power tools, and by the end of it your phone will be thanking you for its sweet new digs.
Be careful though — your phone is gonna look so awesome in its new dock that you might not want to take it out for the next summer adventure!
Make a Phone Dock Out of a Camera
p.s. We’re hiring for an amazing opening at Photojojo. We’re looking to re-invent what/how/where we publish online, and we’re seeking one amazing somebody to lead the charge as Editorial & Community Lead.
WHY IT’S COOL:
Remember that camera you once loved but broke somewhere along your many escapades? Instead of letting it collect dust or throwing it away (gasp!), this tutorial will help you turn it into a beautiful charger for your phone! It’s like, the coolest way to recycle. Besides, all your friends will be totally jealous.
Fact: phones are better propped up. Friends texting you? Now you don’t have to crane your head to read ‘em – cause your phone is already standing up.
This project might seem kinda scary and complicated, but it’s not! If you can hold something steady for 10 seconds, then you can definitely do this. It’s only a few steps and at the end of it you’ll be an absolute pro at turning anything (that can be drilled) into charger docks. That way, you can make ‘em for all those friends you made jealous.
By the way, this project was inspired by Roberto Altieri and his Etsy shop. His craftsmanship is top notch, so take a look around. Thanks, Roberto!
Ingredients
Old camera that doesn’t work*
Phone charger cable
Power drill with the proper drill bits (varies depending on the size of the opening)
Gorilla glue
Metal file
*We used an old Kodak Instamatic and an iPhone USB Lightning Cable. We recommend a camera that’s made mostly of plastic, because metal parts can’t be drilled into/are difficult to drill into. Make sure the area you’re drilling into is all plastic.
PREP MAKES PERFECT:
The most complicated (and it’s not! Really!) part is to figure out where you wanna drill. We used a plastic camera, and so that was as simple as finding a spot that didn’t have a ton of metal in it. We recommend a camera that’s more plastic-y, that way it’ll be easier on you!
Figure out how you want the camera to sit on your desk when you’re done. Think about where you want the phone to be, and where that cable will come out of the camera! The back of cameras, where the film goes, is the easiest place to drill into because it’s just an empty space. part of your cord will live in here! Also, think about where the cable comes out! We did ours on the side, where the door is.
When it comes to the phone charger cord, you can get an extra cord from Amazon or your local gadget store if you don’t want to use the cord you already have.
STEP ONE: DRILL ONCE
See your phone charger cord? Pick out a drill bit that matches the width of the part that plugs into your phone. If you don’t have a drill bit that exact size, remember that smaller is better than bigger! Be very, very careful (watch those fingers!) and drill the first hole. Make sure you’re drilling completely through, the cord’s gotta go somewhere!
STEP TWO: DRILL TWICE
Now, connector parts are usually ovals, and drill bits are circles. Unless you have some sort of space-age-can-drill-whatever-shape-you-want drill, the workaround is like this: 2 circles next to each other = 1 oval!
Drill a second hole next to (slightly overlapping) the first hole. We’re doing this directly alongside the first hole so that the opening is wide enough for the connector port.
STEP THREE: FILE THOSE EDGES!
Get your metal file and file away at the hole where the cord will come out. Careful! The goal is to make it the shape of your connector, but not too big! Check that your connector bit fits snugly into the opening.
STEP FOUR: KEEP UP THE STELLAR FILING!
This is a continuation of Step Four; file the inside part of the hole you drilled. It can be wider here, doesn’t have to be as snug as the opening. The goal is to get your cable through without snags.
STEP FIVE: GET GLUING!
Push the connector port through the drilled hole. After you’re sure that’s where it wants to be, place a dab of glue and wait for it to dry (depends from glue to glue!).
STEP SIX: MAKING A FASHIONABLE EXIT
Now we are gonna figure out where the cable comes out! When that’s figured out, drill a hole that is the width of your cable. Ours comes out the side of the camera where the door closes, and we recommend this.
STEP SEVEN: CHARGE IT!
Now you have the exit hole, place the cable through and there we go! Close the back of the camera, make sure the cable isn’t being pinched (ow!) and charge your phone to your vintage heart’s content.
TAKE IT FURTHER:
Although we made a phone dock, you can make a dock for just about anything that uses a cord to charge. Tablets, game systems, camera batteries, anything!
Make a dock out of different things! Old radios, televisions, and to be extra ironic, an old telephone!
Related posts:
How to Turn Your Phone Into a DIY Photo Projector for $ 1 Extra photos for bloggers: 1, 2, 3 Slide projectors are…
DIY: Turn Phone Photos into Mural-Sized Prints! Extra photos for bloggers: 1, 2, 3 What’s on every…
How To Make Your Cell Phone Look Like Your Favorite Camera! Extra photos for bloggers: 1, 2, 3 Photographers. We’re a…
As if the plethora of blurry cat photos flooding social photo sharing sites weren’t enough, a new app promises to deliver even more by helping furry felines capture their own self-portraits. You just have to laugh, and for a few more giggles, click over to connect.dpreview.com to see how Snapcat works.
In a world that can feel visually oversaturated with images, some photographers are seeking solutions that draw viewers’ attention and ask them to linger a little longer. Model Coco Rocha recently shared her take on the dynamic image trend, exploring how animated GIFs, Cinemagraphs, Lytro images and interactive 360-degree panoramas are helping photographers stand out. We take a longer look at connect.dpreview.com.
[ By WebUrbanist in Gadgets & Geekery & Technology. ]
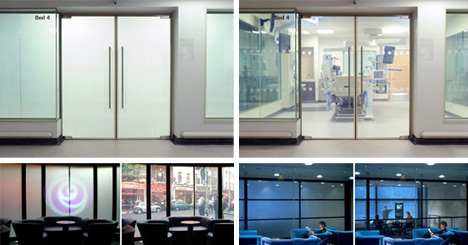
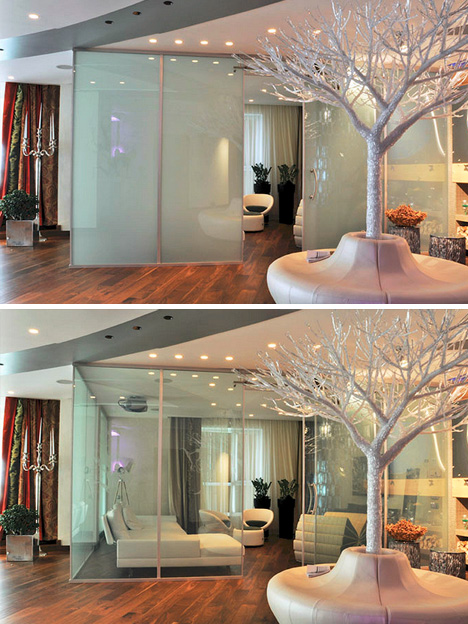
Kiss curtains, blinds and shades goodbye – smart glass is not just an Xbox enhancement. Smart glass technology is evolving and faster than ever. It can shade rooms on demand, making them transparent and reduce thermal gain … all just by flipping a switch or even turning a key in a door.
There are various methods employed to make the transition, but one of the most fascinating involves low-power electrochromatic devices that can be activated in a variety of clever ways.
Essentially, a current is passed through the window panel to turn it from transparent to translucent then back again – the voltage does not need to be sustained in between.
Aside from micro-blinds and mechanical smart windows, other variants on this technology include suspended-particle devices, which can be finely-tuned to allow in (and block out) desired levels of light, heat and glare.
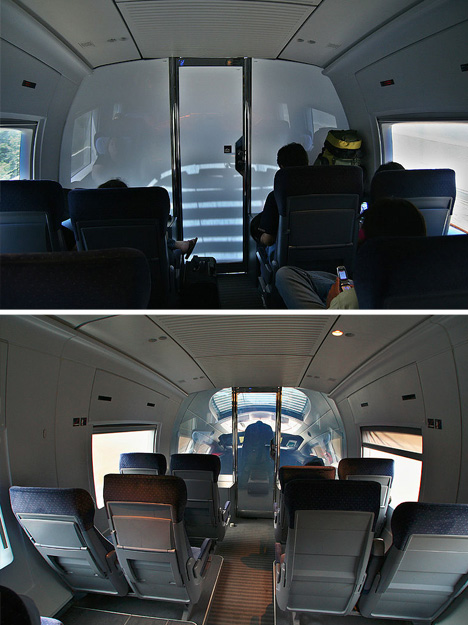
Applications to date include commercial windows and doors in places ranging from private skyscraper offices and public restrooms to hospital rooms high-speed trains. Smart glass can also be found in luxury sunroofs, meeting spaces, projection screens and television studio surfaces. As it becomes easier and cheaper to produce, the applications are limitless (above images by Sebastian Terfloth).
[ By WebUrbanist in Gadgets & Geekery & Technology. ]
Those Star Trek special effects guys are going to feel pret-ty foolish when they find out about Adam Kennedy.
Turns out you don’t need years of computer-generated image training to create breathtakingly detailed alien planets.
Adam finds his planets on the street! Fire hydrants, my friends.
He photographs, the rusted, peeling spheres that sit atop fire hydrants and edits them into wonderfully awe-inspiring habitats.
The best part about Adam’s planet project is that it started with a single imaginative thought.
It’s what inspires street art, photographers, and artists of every kind.
So the next time you think, hey that thing looks like that other thing, you know exactly what to do.
(Make art!)
Planets Made Out of Fire Hydrants
p.s. Wedding season is here! Get 40% off pro photo prints from Nations Photo Lab with code PHOTOJOJO.
p.p.s. We’re hiring A WEB DEVELOPER and AN EVANGELIST/BIZ DEV HERO. If you love photography and San Francisco, APPLY HERE.
Related posts:
The Ultimate Tool for Street Photography, Kid Photography, and the Camera-Shy Welcome back to returning sponsor Lensbaby and their cool new…
Low-Fi Street Lenticulars = Photo Inspiration in Street Art ~ BACK IN STOCK! The Chalkboard Speech Bubble (Our oh-so-popular-but-we-kinda-wish-you-weren’t-because-we-can’t-keep-you-in-stock…
How to Make Tiny Planets in Google Street View Hackers do more than type fast and indiscriminately hax0r the…
Hong Kong has to be one of the most-photographed cities on Earth, but these shots present a rarely-seen perspective by documentarians or pedestrians … unless they look straight up.
From Vertical Art Space: “Romain Jacquet-Lagreze is a French graphic artist with a Masters in multimedia and art from East Paris University. His interest in photography began during his period of working in Los Angeles and Tokyo, and subsequently blossomed into a passion after his arrival in Hong Kong.”
His Vertical Horizon series emphasizes the vast scale of tall structures, but also the “heterogeneous character” of the built environment – traditional alongside modern, scrappy versus refined, small set against large.
While some of his images are taken from the top down, or at an angle, many of the most powerful ones are straight-up vertical captures. Somehow, these more predictable approaches lack the striking gravitas of their deceptively-flat cousins.
Your iPad is your Sunday Times. Your game console. Your encyclopedia. The guardian of your deepest, darkest secrets. (Better put a password on that!)
And now, it’s your new studio light!
It’s true. Your tablet is powerful enough to illuminate your subject in almost any photo situation.
This guide will show you how a tablet can super charge your shots with creative backdrops, custom light shapes, and pop art colors.
Just when you thought your tablet reached peak awesomeness, it suddenly got so much awesomer.
Turn Your Tablet Into a Studio Light
p.s. Our Phoneography 101 course for both Android and iPhone students is starting April 1st! The last days to enroll are coming up quick, so make sure to enroll today!
Why It’s Cool:
Studio lights and softboxes are big, cumbersome, and cost a bundle!
By comparison, your tablet is like a cheetah vs a hippo. It’s quick, versatile, and light on its feet.
Download backdrops for free and create customized shapes and reflections that will make your photos stand out from the crowd.
The Ingredients:
Tablet
Phone, compact camera, or DSLR
iOS: Softbox Lite (Free)
Android: Softlight (Free)
Shape It Up
With a little help from your tablet you can add shiny shapes to your reflective subjects.
For this shot you will need a something reflective like a camera lens or a wine glass.
Download a simple shape like a star or a triangle or select a shape on your lighting app.
Setup your tablet at an angle so that it bounces off your subject and into the cameras lens.
It takes some experimentation to get the angle just right so if you are using a DSLR try turning on live view on your rear LCD screen.
This should make it easier to see the reflections.
Glitz Up Your Portrait:
For a playful sparkle in the eye and dramatic portrait lighting, look no farther than your tablet!
A tripod is helpful if you are doing a self portrait and you will need to shoot this pic in a dark environment.
Select a shape on your tablet and setup your camera with a short timer.
Focus the camera on your face and shuffle just slightly to the right.
Hold your tablet out in front of you and up to the left and let the magic happen.
Open That Aperture:
This technique will leave you with a softly glowing background like the embers of a camp fire.
First, pick a subject with some depth to it like a large leaf or a clump of berries.
Put a circular pattern on your tablet that complements your subjects color.
Get up close and open your aperture as wide as possible.
This shot works great with a DSLR and a macro lens but is more difficult with a phone’s camera which produces very little shallow depth of field.
Double Glow:
If you have two tablets you can make a light tepee for bright and shiny macro closeups.
Place your tablets with their screens turned inward so they make a roof over your subject.
Hold the tablets together at the top with your fingers or use a little tape.
Now shoot your subject down the corridor of your glowing cyber tunnel.
Make a Silhouette
Like the iPod commercials of yesteryear you can use your tablet to create cool silhouette style photos.
Put a solid color on your screen and place your subject halfway between your camera and tablet.
If you have a DSLR change your light metering to spot and aim your focus point at the tablets glowing screen.
You may want to focus manually since the room will need to be pretty dark.
Shine Up Your Food Shots:
Give your food shots that extra sparkle by zapping your snack with a tablet softbox.
Place your food items against a black backdrop in a dark room.
Set a long exposure, maybe 25 seconds, f/11, ISO 200.
Start your exposure and paint your food with your tablet making sure the screen is facing away from your camera.
This trick work great with a phone too!
Pick a Backdrop
A matching background will do wonders to enhance your macro shots.
Simply download a backdrop and place your subject on top of your tablets screen.
If you are shooting with a DSLR use a small aperture, maybe f/22.
Phones will work great for this shot as they already have a wide depth of field.
You can avoid glare by shooting your tablets screen at a sharp angle instead of straight on.
Incorporate Movement
Create ghostly effects in your photos by moving your tablet through the background of your shot.
To achieve this pic you will need a completely dark environment so decide on your camera settings before you turn out the lights.
First set your camera for a long exposure maybe 20-30 seconds and pick out a pattern on your tablet.
Mount your camera on a tripod, focus on your subject, and then switch your camera to manual focus so auto focus doesn’t kick in with the lights off.
Hit the lights, press the shutter button, and move your tablet through the back of your shot while the shutter is open.
You can use a phone set to a white screen to paint in your subject with light.
Shine a Spotlight
A circular shape is a great way to highlight your subject with dramatic lighting.
First select a shape from your softbox app or download a picture from the internet.
Place your subject on top of your tablet so that it’s illuminated from beneath.
Setting your camera to center weighted light metering will allow you to just capture light from your spotlit subject and keep out background light.
If the object you’re shooting is clear, you get a cool glowing effect all the way up to the top.
Take it further
Shoot one subject lit with a variety of colors. Then combine the images into a photo square with Photoshop or Pic Stitch.
Jesse Rosten takes it to a whole nother level with an all iPad photo shoot.
Make 3D light paintings with your iPad using apps like Holographium.
Thanks to the members of the Softbox Pro Flickr group for their photo inspiration!
Related posts:
Turn Your Laptop into a Photo Light Box Could you pick your laptop out of a lineup? We’ll…
DIY: Make Crazy Detailed Light Paintings with Photo Light Stencils Extra photos for bloggers: 1, 2, 3 Ever tried painting…
You Only Need 5 Things to Make Your Own Home Studio Extra photos for bloggers: 1, 2 Photography doesn’t have to…
 Extra photos for bloggers: 1, 2, 3


 Use a circular object to trace a circle on your printed image.
 Time to get crafty. Take up your scissors!
 Fold the circle in half.
 Fold the half-circle in half.
 Fold it in half again.
 Cut the top of the circle from end to end to create a cone shape.
 Unfold your circle and you will find 8 petals.
 Cut out those one and a half petals. Buh-bye petals.
 Put a dab of glue on the half petal.
 Pinch each petal, making a crease down the middle to give them a little extra texture and shape.
 Make a simple loop in the top of the floral wire with your scissors.
 Cut a 2 inch strip of the floral tape and wrap it around the base of the flower to secure it to the top of the wire.

 Extra photos for bloggers: 1, 2, 3
 Remember that camera you once loved but broke somewhere along your many escapades? Instead of letting it collect dust or throwing it away (gasp!), this tutorial will help you turn it into a beautiful charger for your phone! It’s like, the coolest way to recycle. Besides, all your friends will be totally jealous.
 The most complicated (and it’s not! Really!) part is to figure out where you wanna drill. We used a plastic camera, and so that was as simple as finding a spot that didn’t have a ton of metal in it. We recommend a camera that’s more plastic-y, that way it’ll be easier on you!
  See your phone charger cord? Pick out a drill bit that matches the width of the part that plugs into your phone. If you don’t have a drill bit that exact size, remember that smaller is better than bigger! Be very, very careful (watch those fingers!) and drill the first hole. Make sure you’re drilling completely through, the cord’s gotta go somewhere!
  Now, connector parts are usually ovals, and drill bits are circles. Unless you have some sort of space-age-can-drill-whatever-shape-you-want drill, the workaround is like this: 2 circles next to each other = 1 oval!
  Get your metal file and file away at the hole where the cord will come out. Careful! The goal is to make it the shape of your connector, but not too big! Check that your connector bit fits snugly into the opening.
 This is a continuation of Step Four; file the inside part of the hole you drilled. It can be wider here, doesn’t have to be as snug as the opening. The goal is to get your cable through without snags.
 Push the connector port through the drilled hole. After you’re sure that’s where it wants to be, place a dab of glue and wait for it to dry (depends from glue to glue!).
 Now we are gonna figure out where the cable comes out! When that’s figured out, drill a hole that is the width of your cable. Ours comes out the side of the camera where the door closes, and we recommend this.
 Now you have the exit hole, place the cable through and there we go! Close the back of the camera, make sure the cable isn’t being pinched (ow!) and charge your phone to your vintage heart’s content.


 Studio lights and softboxes are big, cumbersome, and cost a bundle!
 With a little help from your tablet you can add shiny shapes to your reflective subjects.
 For a playful sparkle in the eye and dramatic portrait lighting, look no farther than your tablet!
 This technique will leave you with a softly glowing background like the embers of a camp fire.
  If you have two tablets you can make a light tepee for bright and shiny macro closeups.
 Like the iPod commercials of yesteryear you can use your tablet to create cool silhouette style photos.
  Give your food shots that extra sparkle by zapping your snack with a tablet softbox.
 A matching background will do wonders to enhance your macro shots.
  Create ghostly effects in your photos by moving your tablet through the background of your shot.
 A circular shape is a great way to highlight your subject with dramatic lighting.
You must be logged in to post a comment.