RSS
 

Posts Tagged ‘tripod’

Choosing a Tripod

23 Sep

For lighting photographers, the first thing to consider about a tripod is this: a tripod is your most powerful light.

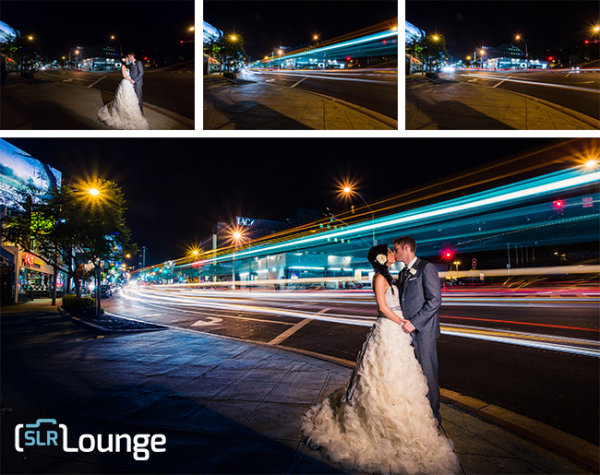
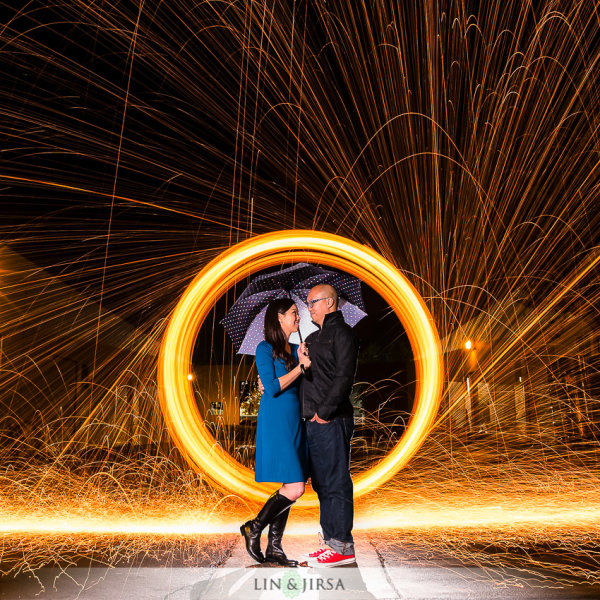
That’s because time (AKA shutter speed) is what we use to bring up the exposure in a large environment, which we then tweak/improve with judicious use of added flash. It is very difficult to light a large space, so just let the ambient do the heavy lifting and finish it off with your lighting genius.

And even when you are not lighting, you’ll frequently need a tripod for a variety of reasons. And when you do, you want it to hold your camera still.

To that end, every photographer needs good sticks.

There are a couple of schools of thought about how to choose a good tripod. But no matter which way you go, the most important thing is this: don’t waste your time and money on a piece-of-crap version. You’ll just have to re-buy it later.

Ask any photographer who has been around long enough to make mistakes, and you’ll probably hear tales of woe over misspent dollars in an attempt to save money on tripods. Alas, good tripods aren’t cheap and cheap tripods aren’t good.

I just had a direct experience with this problem on a recent series of assignments for Lynda.com, wherein we were traveling around the world shooting and filming in various cities. My (young) shooting partner saved some money by buying an inexpensive, “feature-ladened” tripod.

Actually, scratch that obfuscation. Let’s name names. He bought a “Vanguard” Tripod, and it turned out to be a piece of crap. (Don’t judge. It’s a common mistake.) The Vanguard was wobbly up top, and very quickly, one of the legs would not grab and click into the open position.

(You had ONE JOB, Vanguard tripod…)

After much swearing on Andrew’s part (and general uselessness on that of the tripod) he looked into repairing the probably-not-worth-fixing piece of gear. Though clearly defective—and still in warranty—Vanguard wanted Andrew to pay shipping both ways for the repair. Essentially, he’d be buying the cheap tripod again.

Ugh.

Look, don’t do this. Just don’t. Instead, do your research, ask around, buy a good tripod and be done with it.

To Start…

Independent of the factors listed below, here’s my first advice: go for a name brand with a good reputation.

Manfrotto, Gitzo and Induro are good examples. None of them are cheap, but they are also likely to not let you down. They are supported by a great reputation and solid service, the same way your camera is supported by a good tripod.

Don’t save money by buying a tripod that is spec’d to do less than you need it to do. That’s another mistake. And you may find there is not a one-size-fits-all tripod for you. The optimal tripod for your big bird-watching rig might be overkill for your travel photography needs.

Similarly, a tripod designed for travel photography—even if a quality brand—might be way under-sized for your big lens work.

So like most shooters you’ll probably end up with two tripods. One as a heavy-duty platform and one that is much more portable.

General Purpose Tripods

Your first tripod will probably be one that can do everything well, but maybe sacrifices extreme portability. And that’s a good strategy.

Again, go with a good brand and buy enough support for your needs. If money is tight, rather than skimping on the brand I would suggest buying good quality, but buying used.

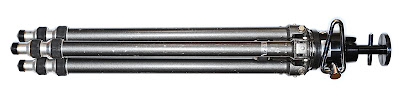
The 20-yr-old old metal (more on that variable below) Gitzo Reporter Performance pictured above is total, rock-solid support. It was bought used (eBay) reasonably and will last me the rest of my life and well into someone else’s.

Used quality is a better choice than new crap. But if you have the money to spend, by all means take some time and test drive some new tripods in person. You’ll quickly get a feel for the solidity and quality of the various options.

But go with a brand that has a good reputation. Or skimp, curse a little and get it right on round two.

Specialty Tripods

By specialty, we generally mean portability: small, light, reverse-folding, etc. This is the tripod you take with you when you travel, or when shooting smaller mirrorless cameras. Or both, obviously.

For extreme portability in addition to solid support at the mirrorless level, I like the MeFOTO Backpacker, ($ 139 – Amazon) seen above. It is not full-sized, as it only goes to about chest-height.

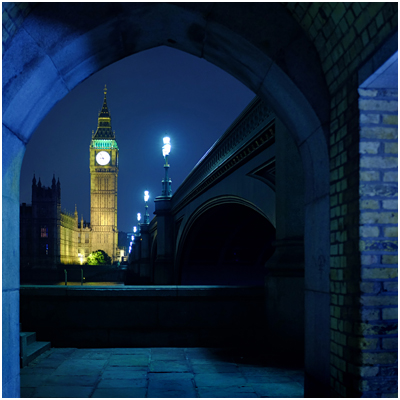
But—BUT—it reverse folds to a very compact 12.6″, which makes it a total win for travel or backpacking (duh, the name) with mirrorless cameras. It is super-compact, and well-built. I used it with a Fuji X100s to make the photo of London’s Big Ben, above.

If you shoot full-sized DSLR, I would suggest stepping up to a MeFOTO GlobeTrotter. It is bigger, more stable, goes up to 64″ in height and has a retractable center column while still keeping the reverse-fold design. Even still, it folds to just 16.1″ long. ($ 209 – Amazon). As a bonus it converts to a monopod, which is nice.

You can spend an extra $ 160 on the GlobeTrotter and go carbon fiber, which saves you a pound. But for that price you can literally buy both and have $ 20 left over. Or $ 160 would get you a great, second general-purpose tripod used.

Speaking of…

Carbon Fiber or Metal?

Tough choice. Carbon fiber is more expensive—sometimes shockingly so. For instance, an Induro (carbon) CT-214 cost $ 400—for just the legs (no head). But you can get the same legs (an AT-214) in aluminum for $ 149.

Those are both great supports. And identical, except for the material used in the legs. But is the weight difference, at 3.3 vs. 4.4 lbs, worth that much to you? Or, perhaps will the size of the tripod itself be the limiting factor in your suitcase or backpack that outs it from travel for you?

If the carbon version really fits your total needs and you can afford the price tag, maybe that’s cool. Or maybe you buy metal for big support and a MeFOTO for travel. You would save money (over $ 100 in this example) in the process.

And honestly, that’s what I’d do.

Either way, the worst, worst, worst thing you can do is to throw money away on a crap tripod. Consider my lessoned learned (and that of literally millions of photographers before you) sufficient warning.


Strobist

 
Comments Off on Choosing a Tripod

Posted in Photography


Manfrotto announces carbon fiber BeFree tripod

14 Aug

Manfrotto has announced a carbon fiber version of its BeFree tripod, previously available only in aluminum. The lighter carbon fiber BeFree weighs 1.1 kg/2.4 lbs (as compared to the 1.4 kg/3 lb aluminum version) and features a reverse folding design that allows it shrink to 15.7 inches (~40cm) in length when collapsed and stored. Designed for travel, it can hold up to 4 kg/8.8 lbs and is available now in the US for $ 389. Read more

Articles: Digital Photography Review (dpreview.com)

 
Comments Off on Manfrotto announces carbon fiber BeFree tripod

Posted in Uncategorized


Vanguard releases new Alta CA tripod kits with pistol-grip head

27 Jul

Tripod and bag manufacturer Vanguard has launched a new range of tripods that are fitted with the company’s latest pistol grip style GH-30 head. The aluminium Alta CA leg-set comes in three or four-section options to achieve maximum heights of either 1565mm (61.6in) or 1550mm (61in) though both models are designed to carry a payload of up to 11lbs (5kg). Click through for more information.

Articles: Digital Photography Review (dpreview.com)

 
Comments Off on Vanguard releases new Alta CA tripod kits with pistol-grip head

Posted in Uncategorized


eMotimo TB3 Review – Robotic Tripod Head and Time-lapse Movie

02 Jul

I’d forgotten all about my childhood dreams of achieving world domination using my very own robot army until I switched on the TB3 from eMotimo. As soon as I synched up the wireless remote and started panning and tilting this robotic tripod head, I was transformed into a grinning 8 year old boy who believed he could do anything.

I expect that the eMotimo exhibit at trade shows is usually ringed by a troupe of grinning time-lapse photography nerds like myself, who just realized they stumbled upon a truly legendary tool for photographic creativity.

My example footage

The short time-lapse movie above was made entirely using the TB3 with my Sony A7R Camera mounted on the Rhino Slider Pro 4ft. What started out as a couple of quick test shots turned into a fully fledged trailer when I realized what I could achieve with the TB3. Once I stuck it on a slider, things got awesome real quick.

What does the TB3 do?

Emotimo TB3 Review

Pictured on the left with a Canon DSLR

For those of you who have no idea what’s so great about a device like this, let me throw the term ‘Motion Control’ at you. If you want to shoot videos or time-lapse movies that offer the viewer a more captivating perspective than just a plain old dolly/slider shot, you’ll be wanting one of these TB3′s.

The TB3 from eMotimo allows you to add high production values to your footage by moving your camera along two axes while shooting. It can pan AND tilt all at the same time. Combine this device with a slider and you’ve got yourself a powerful three axis rig for making fascinating cinematography and time-lapse photography. Your footage will appear to have been shot with a camera that magically floats through the air.

Motion Control Timelapse- TB3 Review

The TB3 shown here with a Canon DSLR and a Rhino Slider Pro 4FT.

Create multi-gigapixel panoramic photos

It’s not just about time-lapse and video. The TB3 also allows you to take multi-gigapixel images such as panoramas. For landscape shooters who want wall-filling image resolution, this feature is a major bonus. When you add in the awesome time-lapse and video shooting capabilities, you’re getting a lot of functionality for just under a $ 1000 USD.

Programming interface

Programming the movement of the TB3 requires a small learning curve. The interface is a very basic LCD screen with abbreviated titles and you navigate through this by using the included remote control joystick. It takes a while to get used to but if you’ve ever used a video game joystick you’re already half way there.

Emotimo TB3

Two-point or three-point movement and reverse moves

You can decide how many points of location your film sequence will have. If you want a simple A to B movement you select a two-point move. You tell the TB3 where you’d like to start and where you’d like to end, and the TB3 fills in the blanks.

With a three-point move you can get more creative by adding a less obvious direction to your movement. You could even program the TB3 to go into reverse after you’ve reached point two, or point the camera in the opposite direction, whatever you like. This is great for taking your audience on an unpredictable ride through your scene.

‘Reverse’ moves come in really useful when you’re using a slider and need to save valuable battery life by cutting out the ‘return to start’ move that the TB3 has to do once you’ve programmed in your move. You basically work backwards and tell the TB3 to start shooting from your last position. This is essential when doing vertical ‘jib’ shots on a slider which sucks a LOT of battery power.

The TB3 by eMotimo

At the beach shooting a Timelapse sunset with the TB3 from eMotimo on a Rhino Slider.

Ramp

When I first saw the word ‘Ramp’ in the interface I thought it referred to Bulb ramping or ‘Bramping’ for time-lapse, but it actually refers to the degree of acceleration used when the TB3 moves to its start and end points. This is a really cool feature as it gives your camera motion a very smooth, but dynamic movement, as the TB3 gradually speeds up and then slows down to its end point. Most of the scenes in my video feature a ramp setting of 70.

Lead in-out

Another great feature of the TB3 is that you can specify a static ‘no movement’ period to either end of your shooting sequence. This is great if your sequence ends and you then fade up some titles in your video but want to keep the movie playing in the background.

Emotimo TB3 shooting a timelapse

Smartphone shot. The TB3 almost going for a swim while shooting a time-lapse at Jack Point, Nanaimo (Canada).

Build quality

This is a sturdy unit. It kind of looks like something you’d expect to find under the skin of a young Arnold Schwarzzeneger during his debut as the world’s favourite cybernetic assassin. It’s built for functionality, not looks, and I expect it will appeal to the gadget geek in all of us due to its no nonsense appearance.

As well built as the TB3 is, I wouldn’t want to drop it. There are lots of exposed moving parts so it’s best to handle it with the care and attention it deserves. Encasing it in rubber would perhaps give it more protection but would add more weight. The interface cable that connects the moving parts to the brain of the unit could be more rugged as it’s already started to fray after light use.

Rugged Build Quality on the TB3

Smartphone shot. Semi-vertical jib style shots like this require more battery power so the TB3′s reverse 2-point move helped save me a little battery life.

Weight and size

Lets face it, if you’re doing serious time-lapse movies or cinematography, you long ago accepted that you’d be lugging heavy gear around. The TB3 isn’t that heavy in itself but it’s yet another bag to carry along with your camera bag, tripod(s) and slider. For what this gadget does, I think they’ve packed a lot of tech into a relatively small device but I can’t wait to see a ‘Sonyfied’ future version that won’t add to my chiropractor bills. Till then, just deal with it.

Battery pack required

Yet another essential accessory for the time-lapse and video shooters – the external battery pack. eMotimo were kind enough to lend me the ‘Anker Astro Pro’ battery pack which powers the TB3 and many other devices such as your phone and camera. Although this adds yet more weight to carry, it’s great to know that when my Sony A7R battery inevitably lets me down (which it does daily), the battery pack will allow me to recharge in the field.

Shooting a timelapse with the Emotimo TB3

Smartphone shot. You can see I’ve written down all my interval settings for the 7 second sequences featured in my film.

Compatibility

The TB3 is compatible with most major camera systems but as you’d expect, the best compatibility is reserved for the two major giants Canon and Nikon. I’m a Sony shooter so this posed somewhat of a problem for my plans to shoot the time-lapse movie shown above. eMotimo managed to get around this problem by providing a simple IR (infrared) transmitter cable that I taped to the IR receiver port on my Sony A7R. Not as slick as the Canon/Nikon cabled version but it did the job. I’d like to see a wired solution from eMotimo pretty soon though as it looks like Sony is starting to gain traction with their new range of cameras.

For time-lapse shooters that use advanced bulb ramping devices like the ‘Promote Control’, you’ll be glad to know that this can be integrated with the TB3. eMotimo also provides motor accessories for various popular sliders so you have some different options for the 3-axis motion control shown in my example video.

Waterfall timelapse with the TB3

Smartphone shot. My favourite angry tree stump gets the time-lapse treatment with the TB3 carefully balanced on the stump.

Things I love about the TB3

  • Super smooth motion – this really is the most important part of any motion control device. It may not look like it in my video, but before the dreadful internet compression butchered my film, I can assure that the footage is buttery smooth. Not all motion control devices are made equal and eMotimo have totally nailed this most essential aspect.
  • Rugged, no-nonsense construction. I filmed time-lapse sequences in all kinds of weather, even heavy rain. The TB3 handled it all with indifference.
  • The cool little sound effects that it makes while you pan/tilt the head using the joystick.
  • Tech support – eMotimo is a small company in San Francisco with a very hands-on approach. All of my foolish newbie questions were answered with patience and resolved quickly.
Forest timelapse movie

Smartphone shot. I found that hanging the battery pack off the slider caddy gave the best results.

Things I don’t love about the TB3

  • The carry case seemed like an afterthought. It doesn’t fit very well and I was forever worried about accessories falling out. I’d rather buy a larger all-purpose camera bag and put the TB3 in that.
  • The programming procedure could be more accommodating. The TB3 has a cool ‘repeat/reverse’ function that you can set off immediately after your time-lapse sequence is finished. Sadly, I couldn’t figure out a way to edit the settings, which is essential after the sun has gone down and the light has changed. Maybe a firmware update could fix this?
  • The ‘Fotomate’ mounting plate onto which you attach your camera was a little fiddly.

Emotimo TB3 Review

Would I buy the TB3?

Absolutely. The TB3 has enjoyed something of a cult following among the rockstar time-lapse and DLSR video shooters. It’s not just because eMotimo were there during the early years of the time lapse video phenomenon, it’s because they make a very versatile and rock solid product. When you factor in the sub $ 1,000 price point and the awesome tech support, I really don’t see any other contenders.

My star rating

Our rating system doesn’t allow for a 4.9 so I’m forced to give the TB3 5 stars. I could have given it 4.5 stars but that just wouldn’t be enough. If eMotimo can fix my two main gripes of having a better carry case and some form of improvement on the Fotomate mounting plate, the TB3 would be perfect and fully deserving of 5 glorious shining gold stars.

Want some time-lapse tips? Try these:

  • Timelapse Photography Tutorial: An Overview of Shooting, Processing and Rendering Timelapse Movies
  • Capturing the Northern Lights in Timelapse Video
  • Discover the Wonder of Time-Lapse Photography

The post eMotimo TB3 Review – Robotic Tripod Head and Time-lapse Movie by Gavin Hardcastle appeared first on Digital Photography School.


Digital Photography School

 
Comments Off on eMotimo TB3 Review – Robotic Tripod Head and Time-lapse Movie

Posted in Photography


Syrp Genie Robotic Tripod Head Review

16 May

If you’re in the market for an ultra portable robotic tripod head that pans and tilts and is super easy to setup, you’ll be wanting to take a look at the Syrp Genie. The guys at Syrp have done their Kickstarter backers proud with a solid product that looks as good as it performs.

While it can’t pan and tilt at the same time, the Genie has a little trick up its sleeve to add an extra layer of motion control to its arsenal.

When you want to put the Genie on to a slider you won’t need any extra motors or cables to get things moving. The Genie comes complete with the linear accessory which utilizes a thin yet strong rope which you attach to either end of your slider. The motor inside the Genie will then pull the unit along the slider to add production value to your video recordings or time-lapse footage. You could even put the genie on a skate board or cart and then attach the ropes to trees or fences while it pulls itself through your scene.

While this might not be the most advanced method of motion control, you’ve got to love the sheer simplicity of the Genie, and with its built-in battery it really takes up very little space in your camera bag. If you’re off on a long haul flight and don’t relish the idea of packing lots of complex toys, you’ll appreciate the compact form of this device.

Syrp Genie Review - Gavin Hardcastle

Build Quality

I was really impressed with the build quality of the Genie and its accessories. The packaging was like something you’d expect from Apple and everything has a solid, ruggedness about it that feels reassuring. I had some problems with the battery on the first unit that I received so Syrp promptly replaced it and the second unit had no problems with the battery lasting as advertised.

Ease of Use

The Genie is about as easy as it gets. Time-lapse photographers will love the presets and how the time calculations are adjusted based on your input. The interface is really easy to navigate and pretty intuitive. I only had to refer to the manual on a couple of occasions. Setting up a panning shot is pretty easy but I found the tilt shots more of a challenge to get things lined up with the horizon and also struggled a little with the ball head that Syrp kindly included. Once you’ve done it a few times it gets easier.

Syrp Genie Motion Control Review - Gavin Hardcastle

Accessories

My first impression of the ball tripod head that Syrp included was that it might not be up to the job. After putting it to some serious stress tests it turned out to be a very sturdy little head that can handle a lot of weight and some hefty abuse.

Syrp Genie Review Ball Head

The infra red transmitter stalk is a really cool addition for time lapse photographers who don’t fit into the Canon/Nikon mold and can’t connect up to the Genie with a cable. The IR transmitter plugs into the Genie and then sticks out of the side like one of those gooseneck desk microphones. The idea is that you point it at the IR receiver on your camera and it triggers the camera for time lapse shoots. I shoot with a Sony A7R so this was essential for me. I just wish the IR transmitter was a couple of inches longer so that I didn’t have to strap it to my lens with an elastic band. Anyway, it works and is much easier than fiddling about with a long IR cable.

The rope that you use for linear motion on sliders is really good quality and you can order different lengths to suite your needs.

Tech Support

I found the tech support from Syrp to be pretty quick and effective. When I had any big problems they jumped on it quickly and were patient when I was just being thick and didn’t get how things worked. I get the impression that even if I wasn’t a writer for dPS, I’d still get taken care of well.

Is it Worth the Price?

This is a tricky one and it really depends on your needs. Currently priced at $ 890 USD, the Genie cannot pan and tilt at the same time. It can only pan, tilt or slide. There are other robotic ‘motion control’ heads out there that offer more functionality for around the same price, but it’s kind of unfair to compare the Genie to more advanced units because they don’t have the built in battery and they require motor accessories in order to slide. With that in mind your decision to buy the Genie might come down to its two greatest features – simplicity and portability.

The Results

Here’s some quick and rough test footage that I shot with the Genie straight out of the box. Please watch at 1080p.

I am a confessed pixel peeping perfectionist. A snob of the worst kind when it comes to image quality and the finished product of a shoot.

My main use of the Genie was for shooting time-lapse sequences and I have to say that the results I got were not as smooth as I’ve had with other devices on the market. I don’t know if this can be fixed with a firmware update or if it’s down to a mechanical limitation of the Genie design. That being said, whether or not my obsessive ‘buttery’ motion requirements would make much of a difference once a finished video is butchered by the compression ogre from Vimeo or YouTube remains to be seen.

I suspect that for most time-lapse and video shooters, the motion of the Genie will be more than sufficient. I’m just a picky bugger.

Things I Love

  • Portability
  • Ease of use
  • The Preview Function (others could learn from this)
  • Build quality
  • Built in battery

Things I Don’t Love

  • Can’t pan and tilt at the same time
  • Not the smoothest results for time-lapse
  • The little bit of ‘play’ that makes the first few frames of your time lapse completely static. You can see this in the second clip of my test footage video above.

All in all, the Genie is a really cool product that I feel is ideal for time lapse beginners and budding cinematographers. When you factor in the portability and the ease of use, the Genie comes in at a very fair price point with excellent build quality. Time-lapse shooters that are looking for something more advanced will have to spend a little more to move up to the next level of production value. I give the Syrp Genie 4 out of 5 stars.

More time-lapse tips and info here:

  • Time-Lapse Photography Equipment Guide to Getting Started
  • Discover the Wonder of Time-Lapse Photography
  • 10 Pro Motion Control Time-Lapse Tips

The post Syrp Genie Robotic Tripod Head Review by Gavin Hardcastle appeared first on Digital Photography School.


Digital Photography School

 
Comments Off on Syrp Genie Robotic Tripod Head Review

Posted in Photography


3 Ways to Get Killer Portraits Using a Tripod

21 Apr

As photographers, you’re all looking to “wow” the people we’re taking pictures of, whether they’re clients or just friends. When you show final images, there’s that sense of anticipation, excitement and nervousness as you gauge reactions. And when you hear the words “amazing” or “I love them,” it’s truly a great feeling. So how do you get the “wow” and avoid the “just okay?” Well that’s not always easy. With so many good photographers out there and so much of their work getting exposure via social networks, expectations for good photography is as high as it’s ever been.

shutter-drag-wedding-photography

Here are three ways to achieve killer portraits with the use of a tripod that we use in our studio. These include the following, all of which we’ll show you – keep reading:

  1. Shutter Drags
  2. Composites
  3. HDRs

Required Equipment

  • Sturdy tripod – that old hand-me-down tripod might not be stable enough, as any movement will show in the images
  • Shutter release – using a cable release will help you avoid touching the camera and causing movement
  • Wide angle lens – as you can see from the images in this article, a wider lens is going to bring out many of the “wow” elements like the clouds, the ocean, the streaking lights, and more
  • Camera – as with any type of photography, the camera is only as good as the photographer. You can get amazing results with both entry level DSLRs and full frame cameras.

1. Shutter Drags (Long Exposure Photography)

Dragging the shutter refers to using slower shutter speeds to capture movement. This captures motion of anything in your frame that is moving, while keeping the static objects in the scene nice and crisp. If you can get your couple to hold still, you have the opportunity to create awesome effects with moving people, cars or waves like you see in the image below. Additional saturation and contrast is added in post production using some Lightroom Presets.

wedding-photography-los-angeles

Shutter Drag Quick Tips:

  • How slow do you go? – well that depends entirely on how fast the other elements in the scene are moving. If cars are zooming by, you can get away with faster shutter speeds like 1/60 or 1/30, but if you are capturing moving people and they are slowly strolling, you may have to drop it even lower like 1/10th or even lower. For water, like the shots above, we are generally around 1/2 to 1 second.
  • Ensure that your subjects are holding really still – instruct your subjects to hold very still, avoid blinking during the shot or sequence of shots, and even hold their breath.
  • Utilize static poses –  posing for these types of photos will have to be static. Dips, jumps, and walks will add too much motion in the scene and result in blurry photos. However, static does not have to mean boring. You can still have them in flattering, romantic poses.
  • Snap a few extra shots to ensure you have one crisp photo – take a few extra shots because a photo may look crisp on the back of your camera, only to show noticeable motion blur as it’s taken into post production.

2. Composites

wedding-photography-composites-1

Compositing multiple photographs into one is sometimes the best solution when it’s unreasonable to have your couple hold still for as long as you need to achieve the desired effect. For example, if you’re looking to capture the beautiful stars in a night sky or if you’re looking combine multiple streaks of passing car lights –  the five, ten, or even 30 second exposure time is much too long to expect any live subject to be still. Below is an example where our couple would have had to hold still for around 15 seconds as we spin flaming steel wool just behind them.

wedding-photography

Composite Tips:

The tips for capturing composites are actually very similar as the tips for capturing shutter drags. For example, you still need a sturdy tripod and a shutter release; and you should certainly snap a few extras to make sure you have enough choices to work with in post-production. In addition, here are some more quick tips for capturing composite photos.

  • Expose for the couple’s skin tones first – your lighting can be anything from flash to constant lights; but the most important thing is to focus primarily on the subject.
  • Have the subjects exit the scene – after you’re sure you have a shot with a good pose and good lighting, you can have them exit the scene.
  • Then adjust your settings as needed to expose for the background and create your desired effects. For example, if you’re looking to capture the streaking lights, adjust your shutter speed down and wait for the cars to pass.
  • If you can keep the overall exposures identical between shots, compositing will be incredibly simple. Just layer the images in Photoshop, and then mask in and out elements on each layer. However, if the exposures and look of each image varies, then it will require quite a bit more advanced compositing work which would be beyond the scope of this article.

3. Try HDR Portrait Photography

hdr-wedding-photography-1

While HDR Photography gets a bad rap sometimes for being gaudy and fake, when done correctly, you have the opportunity to create memorable, distinct photography. This is especially true with outdoor scenes on a cloudy day. Grab your tripod, pose your couple in a static pose, dial in the right settings, and shoot away. What are the right settings? Well start with ISO 100 and a decent aperture (f/4 and up). From there, the shutter will vary depending on the brightness of the scene. For more information, feel free to check out some of these HDR tips on dPS.

hdr-architecture-wedding-photography

HDR Quick Tips:

Here are a few more things to keep in mind.

  • Study how to bracket exposures on your specific camera. Almost all cameras have the AEB (Auto Exposure Bracketing) feature, but you will need to know how to access it to dial in the correct settings.
  • Keep your minimum shutter speed at 1/200 or higher. Any movement in the couple or background can cause unnatural “ghosting,” so keeping the shutter speed high will really help you save time in post production.
  • Avoid strong and overpowering flares. If you’re shooting into the sun, strong flares can desaturate your image and create a loss of sharpness. If you are shooting into the sun for compositional purposes, choose an angle where the flare isn’t going to distract from the subject.
  • Choose the right time of day. Sunrise and sunset are still going to one of best times to shoot, as you are most likely to have amazing color in the sky during that time. Remember that the same general photography rules still apply when shooting HDR, we simply are using the HDR process to bring out more detail.
  • Watch the weather report. Partly cloudy days are great times to shoot HDR photography. Capturing all of the contrast and interest in the clouds, as you see in the sample images in this article, really add the “wow” factor.

Conclusion

intimate-hdr-poses

By no means are these three techniques enough for a solid session. In fact, the majority of the photos you take during any portrait session should revolve around candid posing, story-telling, and emotion. For us, we use these dramatic environmental shots to “set the stage” in a final album, canvas mural or other print medium. They are the big grand images that sets the scene, and they are followed by the close up candid images showing the couple interact in said scene and environment.

These techniques are also wonderful in creating “wow” shots, i.e. the shots they share on Facebook and the shots they end up printing on a canvas at their wedding. The shots that make everyone else go, “how’d they do that!?”

Do you have any other killer tips you’d like to share? Please do so in the comment section below.

sunset-hdr-wedding-photography

The post 3 Ways to Get Killer Portraits Using a Tripod by Post Production Pye appeared first on Digital Photography School.


Digital Photography School

 
Comments Off on 3 Ways to Get Killer Portraits Using a Tripod

Posted in Photography


Low Light Photography: How to Shoot Without a Tripod

22 Jan

A tripod is my most valuable photo accessory. In fact, I view it as an essential item, and not an accessory. But sometimes using one is just not practical. Sometimes you get caught without it unexpectedly, and sometimes they even break. It’s good to know what to do in these situations so you don’t miss any photo opportunities.

Sunset in The Valley of Fire, Nevada by Anne McKinnell

While shooting in the Valley of Fire, Nevada, I broke my tripod. Of course, there was a spectacular sunset that night. I was able to make this photo by increasing my ISO to 2000 and using a wide aperture of f/5.0 (the widest aperture for the lens I was using) when normally I would have used a much small aperture for this scene.

If you don’t have your tripod with you, or you’re trying to make do without one, you still have some options for low-light photography.

1. Use a wide aperture

If you want to handhold your camera in low light, you’ll have to work with a wide aperture, a high ISO, or both. Often landscape photographers want to use a small aperture such as f/18 to get maximum depth of field, but that isn’t practical for low light situations. Instead, use your camera’s widest aperture (the smallest f number) and focus on the most important feature in the frame.

Most standard kit lenses don’t perform very well in the dark, so if you do a lot of this type of photography, consider picking up a simple 50mm f/1.8 lens; nearly every brand has a cheap one and they’re well worth it for their sharpness and low-light capability. The maximum aperture of f/1.8 is a full 3.5 stops (lets in 12x more light!) wider than a standard 18-55mm kit lens at the same focal length.

2. Use Image Stabilization

The rule of thumb for shutter speed is that if you want a sharp image, the shutter speed should be no slower than the same fraction as your focal length – that is, if you’re using a 50mm lens, set your shutter speed to 1/50 second. However, if your lens has image stabilization, the shutter value can be two or three stops slower than this. This leeway makes a big difference in low light situations.

3. Use proper camera holding techniques

In low light photography, learning the proper stance and camera holding technique can give you even more leeway when it comes to preventing camera shake. It’s all about stability – plant your feet firmly, about shoulder width apart. With your right hand on the shutter button, hold the lens with your left hand, to steady it. Tuck your elbows tightly into your chest and control your breathing, shooting after you exhale whenever possible. All these things will contribute to your own stillness, minimizing handshake blur.

New York New York, Las Vegas by Anne McKinnell

In Las Vegas, I wanted to make an image with a fairly long shutter speed to blur the motion of the cars. However, I was standing on a bridge that had a chain link fence, and it was also a narrow pedestrian bridge with lots of pedestrians. Using a tripod was not practical. Instead using ISO 1250 and proper camera holding techniques allowed me to hold it steady for half a second.

3. Use a high ISO setting

ISO refers to the level of light sensitivity of your camera. The higher the ISO the more sensitive the sensor is to light, therefore the less light is needed to make a good exposure. The downside is that the higher the ISO, the more “noise” you will find in your image. Noise is a grainy look as opposed to a smooth look. Some noise is okay and it can often be removed in post processing.

When photographing in low light, turn your ISO up as high as you can before the image quality gets too noisy. This setting is different on every camera and an acceptable amount of noise is different for every photographer.

I recommend that you do an exercise so you know the maximum ISO for your camera, that results in a noise level you think is acceptable. Take the same shot at a number of different ISO settings and when you view the photos on your computer later (view at 100% size or 1:1), you will see at what point image quality begins to deteriorate. With today’s cameras this point is probably higher than you might think. Often with ISO 800 or 1600 you will see some noise, but not so much that you can’t fix it in post processing. It’s a good idea to try this exercise both in good light, and low light situations.

Canada Geese at Sunset by Anne McKinnell

Photographing Canada Geese flying overhead at twilight meant that I needed a relatively fast shutter speed to stop the motion. Therefore, I had to use a high ISO and a wide aperture to enable the faster shutter speed. This image was made at ISO 1600, f/4.5 1/200 second.

Noise is not necessarily a bad thing and can be used for creative purposes. If you are using a very high ISO, try shooting in black and white – it removes the colour from the noise and instead gives your photos an old-school grainy look.

Some of the most beautiful landscape photographs are made in low light, so learning these techniques will help you take advantage of low light opportunities and get that great shot even when you don’t have a tripod.

Further reading on low-light photography:

  • A guide to outdoor low-light photography
  • Better low-light photos without a flash
  • 15 tips for low light landscape photography

The post Low Light Photography: How to Shoot Without a Tripod by Anne McKinnell appeared first on Digital Photography School.


Digital Photography School

 
Comments Off on Low Light Photography: How to Shoot Without a Tripod

Posted in Photography


The Glif: A Stand and Tripod Mount For All Phones

21 Jan

Extra photos for bloggers: 1, 2, 3

We found it! The photo gizmo with the highest usefulness to square-inch ratio. The Glif is a tiny little thing, with a trillion useful uses.

It’s a pocketable phone stand and tripod mount that’ll prop up absolutely any phone, cased or uncased, at any angle.

Prop your phone vertically or horizontally or mount it to a tripod.

Record shake-free videos. Combine it with a self-timer app for flawless selfies and big group photos. Or, just keep your phone at the perfect angle to watch a movie.

This handy gadget adjusts to hold your iPhone in an Otterbox case, your friend’s phone nekked, your mom’s Android … Glif’s usefulness knows no bounds.

Learn More About the Glif
$ 30 at the Photojojo Shop


© laurel for Photojojo, 2014. |
Permalink |
No comment |
Add to
del.icio.us

Post tags:


Photojojo

 
Comments Off on The Glif: A Stand and Tripod Mount For All Phones

Posted in Equipment


The 3Pod P5CFH Fold-Flat Tripod – A Review

12 Jan
The 3Pod P5CFH tripod folds flat, providing an innovative and reliable option for photographers looking for an affordable carbon-fiber tripod system.

The 3Pod P5CFH tripod folds flat– providing an innovative and reliable option for photographers looking for an affordable and compact carbon fiber tripod system

In a recent review of another tripod, I pointed out that writing a tripod review is actually more difficult than it sounds. The primary reason is that not much seems to change. The concept is simple, right? Legs. Head. Plate. On the surface, there’s not much new to write about. Companies like Manfrotto, Induro, 3 Legged Thing, and others are constantly coming up with new ideas for materials, colors, and other cosmetic features, but to the casual observer, innovations to the actual setup are seemingly few and far between. That’s why I got excited about test-driving this new 3Pod fold-flat travel tripod from Flashpoint. A recent newcomer to the Tripod Thunderdome, Flashpoint has a new line of six different tripods, designed around the needs of professional and hobbyist photographers and videographers. For this review, we’ll be getting up close and personal with the P5CFH Flat-folding Tripod with the K2 BallHead.

The Legs

A new flat design makes the P5CFH easier to pack.

A new flat design makes the P5CFH easier to pack.

This tripod offers full-featured camera support, balancing an innovative new design with carbon fiber construction, to provide a great combination of strength and stability. Being able to fold a tripod flat makes it easier to pack, and therefore increases its portability– as well as your chances of actually taking it out on location when you need it. The high cost of light-weight, carbon fiber construction is usually the factor that keeps many photographers from purchasing carbon fiber legs. A comparable tripod from one of the big-name companies could set you back up to $ 400, dropping it down a notch or two on your list of priorities. The P5CFH from 3Pod, however, cashes out at only $ 150, including the K2 BallHead.

On the left, legs that adjust to three different angle positions. On the right, an integrated bubble level and compass for nature photographers, as well as a ballast hook for adding weight and extra stability.

On the left, legs that adjust to three different angle positions. On the right, an integrated bubble level and compass for nature photographers, as well as a ballast hook for adding weight and extra stability.

As I pointed out in the earlier review, the low cost had me a bit skeptical. Something had to be wrong with it. What kind of carbon fiber rejects were they using, anyway? Thankfully, I didn’t let my skepticism get in the way of giving these tripods a fair shot. Let’s take a look at some of the specs and what comes in the box:

  • Carbon fiber construction
  • Double-jacketed, wear-resistant leg locks
  • Three independently adjustable/lockable leg angles
  • Height 56.5″ fully extended, 13.5″ folded
  • Capacity: holds up to 20 lbs.
  • Extendable/detachable dual-section center column
  • Outdoor-ready spiked feet with removable rubber grip covers
  • Hook for adding stabilizing weight
  • Integrated bubble level and compass on tripod legs
  • K2 hydraulic ball head with built-in bubble level
  • Allen wrench set for tightening connections
  • Padded carrying case
3pod-fold-flat-tripod-review-dps-004

The fold-flat design means the center column has to be removed to get it down to its compact and packable 13.5″.

Because of the fold-flat design, the center column cannot slide down through the hub between the legs. In order for it to break down to its 13.5″ packable size, the two-section center column actually detaches by unscrewing it from the rest of the assembly. This could be a negative, since it means keeping track of two pieces, rather than one. The trade-off, however, comes in the form of a tripod that takes up significantly less room than its traditional counterparts. I put it through its paces with several different Think Tank camera bags, and I was able to pack it comfortably inside a wide variety of backpacks and shoulder bags.

The Head

The K2 ball head provides a secure, sturdy platform for mounting your camera.

The K2 ball head provides a secure, sturdy platform for mounting your camera.

The K2 ball head is an Arca-Swiss compatible tripod head with a sliding quick release plate and universal 1/4″ mounting screw. It’s got a solid design, and handled weight distribution very well with various camera configurations (i.e., with and without battery grip). It’s made of scratch-resistant carbon, with a hard, protective finish for a (hopefully) wear-free appearance. Landscape and panoramic photographers will find the smooth, 360-degree rotation helpful, as well as two separate bubble levels.

Wrap-up and Recommendations

I’ve only been using  this tripod for a couple of weeks, but so far it’s been sturdy, secure, light-weight, and convenient. With built-to-last, high-quality construction, it’s tough to find much in the way of fault. What we ask of our tripods is both very basic and incredibly important. While you may be hesitant to trust a $ 150 tripod with your $ 2,000 camera, if you’ve been looking for a reliable, affordable, and compact, carbon fiber tripod, the 3Pod P5CFH is a great place to start.

3pod-fold-flat-tripod-review-dps-007

On the left: Think Tank Airport Commuter backpack. On the right: Think Tank City Walker 30 shoulder bag.

The post The 3Pod P5CFH Fold-Flat Tripod – A Review by Jeff Guyer appeared first on Digital Photography School.


Digital Photography School

 
Comments Off on The 3Pod P5CFH Fold-Flat Tripod – A Review

Posted in Photography


Accessory Review: Vanguard Abeo Pro Tripod kit

06 Jan

Vanguard-Abeo-Pro-1.jpg

The Vanguard Abeo Pro 283CGH tripod kit ($ 498) is a three-section carbon fiber tripod with a pistol grip ball head and an Arca-Swiss compatible quick-release plate. Other features include three foot options, an articulating center column, and a built-in shutter release, giving the Vanguard Abeo Pro plenty of options for customization. Click through for our detailed review.

News: Digital Photography Review (dpreview.com)

 
Comments Off on Accessory Review: Vanguard Abeo Pro Tripod kit

Posted in Uncategorized