RSS
 

Posts Tagged ‘tripod’

Edelkrone Wing adds non-motorized gliding to any tripod

25 Aug

Edelkrone has launched Wing, a non-motorized sliding armature that attaches to a tripod and glides a camera in a straight line without rails.  Wing has a total gliding range of 40cm / 16in and is made from CNC machined lightweight aluminum. According to Edelkrone, Wing is designed to stay out of the shot at all points.

When collapsed, Wing measures 147 x 45 x 66cm / 5.7 x 1.7 x 2.6in and weighs 0.54kg / 1.2lb. The unit features a 3/8”-16 mounting port on the bottom and a standard 1/4”-20 mounting screw on the top, as well as locking and drag adjustment mechanisms to fix the camera in place or alter the amount of friction.

Wing is available to purchase now for $ 249.

 
Via: Gizmodo

Articles: Digital Photography Review (dpreview.com)

 
Comments Off on Edelkrone Wing adds non-motorized gliding to any tripod

Posted in Uncategorized


SLIK introduces SLIK LITE tripod line

21 Jul

Tripod maker SLIK has introduced its new LITE series. The new models feature a ball head and come in a variety of sizes. Both aluminum and carbon fiber versions are available. All models feature a detachable LED flashlight in the bottom of the center column which should make it easier to find and setup your equipment in the dark.

The Rapid Flip Mechanism (RFM) comes with a newly designed lever which makes locking and unlocking of the tripod legs faster and easier than on previous models. It also allows for flipping of the legs by 180 degrees, offering easier storage and improved portability.

“We are extremely excited about the design of the LITE series […] SLIK’s long history allows it to spot trends in camera support and improve on those trends, bringing better designed tripods to photographers. The new easier to use Rapid Flip Mechanism and LED Flashlight in the center column make the LITE series the best travel tripods available.”

Michael Burnham – SLIK Marketing Manager.

The SLIK LITE tripods are available now at slikusa.com and at photographic retailers. Pricing ranges from $ 99.95 for the 40-inch aluminum model LITE-AL-420S to $ 329.95 for the 70-inch carbon fiber model LITE CF-422.

SLIK USA Introduces New Tripod Line: The SLIK LITE Series

HUNTINGTON BEACH, Calif., July 20, 2016 /PRNewswire/ — SLIK USA, manufacturer of tripods for various uses, is launching its latest line of tripods for photographers: The SLIK LITE Series. This new line of tripods, which is available now at slikusa.com and other retailers, brings to the table a variety of innovations,

The LITE Series features a detachable LED light, which is an industry first. It was designed to help photographers find their gear in darker settings. No more fumbling around for a flashlight or your iPhone. The Rapid Flip Mechanism (RFM)

SLIK USA, Inc. is a leading manufacturer of high performance tripods for all levels of photographers. SLIK Tripods was founded in Japan in 1948 and for the past 68 years has been an industry leader in camera support innovation. Over that time, SLIK products have received numerous design awards. The USA imprint of SLIK has brought this technology to the US and begun to expand its brand.

Articles: Digital Photography Review (dpreview.com)

 
Comments Off on SLIK introduces SLIK LITE tripod line

Posted in Uncategorized


FLM CP-Travel tripod aims for ultimate in portability and versatility

08 Jul

$ (document).ready(function() { SampleGalleryV2({“containerId”:”embeddedSampleGallery_4816728746″,”galleryId”:”4816728746″,”isEmbeddedWidget”:true,”standalone”:false,”selectedImageIndex”:0,”startInCommentsView”:false,”isMobile”:false}) });

German photo accessory manufacturer FLM is launching a new travel tripod on indiegogo. The CP-Travel will be made of ten layers of carbon fiber and will be able to support up to 10kg/22lb of gear. When fully collapsed, the tripod will fit in a carry-on suitcase, with a maximum height of 142cm/55.9in when completely extended.

The CP-Travel offers interchangeable rubber and spiked feet, using a revamped changing system that the company calls more secure and better able to dampen vibrations. Seeking funding to send the CP-Travel tripod into production, FLM is offering early bird discounts to its first backers. The company anticipates a final $ 635 MSRP when it becomes available in October.

Articles: Digital Photography Review (dpreview.com)

 
Comments Off on FLM CP-Travel tripod aims for ultimate in portability and versatility

Posted in Uncategorized


How to Create a Silky Water Effect in Post-Processing without Using Filters or a Tripod

17 Apr
Affiniy-photo-mean-stack-mode

Smooth water effect edited in Affinity Photo using the Live Stacks feature.

Even if you don’t shoot landscape photography, photos of waterfalls with the smooth water and glassy appearance are awesome. The gist to achieving this, and I do stand corrected if I have this wrong, is as follows:

  • Slow shutter speeds – the need for a tripod
  • A remote shutter release or your camera’s timer
  • Wide angle lens and the camera settings using a small aperture of f/22, ISO 100
  • Neutral Density and/or polarizer filters, as you’ll be shooting long exposures during the day
  • Of course the scene and by all accounts patience too

However, I personally don’t own ND or polarizer filters. These type of filters are required for long exposures during the day, so that your shutter speeds are slow enough, possibly one minute or more to get that misty look. On top of which, you have to get the exposure right, which requires a bit of math and experimentation. ND filters block out the light in terms of stops.

So taking long exposures during the day is an involved process, especially if you want to create that smooth, silky water effect in-camera. But, is there a way to simulate this effect in Photoshop or other post-processing software? Yes there is! It does require that you take multiple shots. I’m not advocating that this technique in post editing is a replacement to going out and achieving long exposures out in the field, far from it. But, I hope this technique may serve as a stepping stone or inspiration to go out and capture silky waters, clouds etc., in-camera.

This article will demonstrate how you can achieve a similar result by taking a bunch of photos in continuous mode without using any filters or a tripod. Although, I would recommend you use a tripod.

First, I’ll demonstrate this effect using a manual method in Photoshop CS6 (standard version). There is an automated way to do this with the Stack Mode feature, which I believe is in Photoshop CC. If you have previous versions of Photoshop, the Stack Mode feature is only available in extended versions, not standard, unfortunately. However, Gimp has this Stack Mode feature and it’s free. Then, I will compare the manual method in Photoshop with Affinity Photo, using Live Stacks. I was really impressed with this feature.

Photoshop manual method

Let’s begin. On the day I took these images, I was pressed for time. So I took a series of shots in continuous mode, and handheld the camera while I focused on this part of a small river. I would recommend that you use a tripod and give yourself some time. It will be easier to align the images later.

small-river-handheld

I took a bunch of images in continuous mode of this small river, close-up deliberately for this article.

You will need to load your images as layers into one document in Photoshop, as follows:

file-scripts-load-files-into-stack

Loading multiple images into one document in Photoshop. File>Scripts>Load Files into Stack

Go up to the Menu Bar > File > Scripts > Load Files into Stack. As I didn’t use a tripod, I selected all the layers to align them. Go to Auto-Align under Edit. As you can see, Photoshop had its work cut out trying to align the images.

images-after-auto-align-photoshop

I handheld my camera when I took a bunch of shots in continuous mode. As you can see from this screenshot, I needed to use Auto-Align Layers in Photoshop. If you use a tripod the alignment will be much easier.

Now that the layers are stacked on top of each other. Start at the bottom and leave this layer at 100%, go to second layer above and reduce the opacity by 50%(100÷2=50). Continue with the next layer and reduce the opacity by 33%(100÷3=33).

percentages-opacity-reduced

Reducing the opacity of each layer by dividing the number of the layer into 100%. The bottom layer remains at 100%. The second layer is 50% and so on.

Therefore, depending on the amount of layers you have, and where they come in the stack, divide this number into 100. So if you had 30 images, the opacity for the top layer in the stack will be 3% (100÷30=3). Remember the bottom layer is always 1=100%. What this is doing is averaging out the layers. This may sound complicated, but in practice, it’s more straightforward. Although it is a bit more tedious than the automated way.

This is the effect of averaging out the layers in Photoshop - reducing the stacked layer's opacity by X amount. I also had to crop this image, whereas the same image when edited in Affinity Photo kept more of the image. See below.

This is the effect of averaging out the layers in Photoshop – reducing the stacked layer’s opacity by X amount. I also had to crop this image, whereas the same image when edited in Affinity Photo kept more of the image. See below.

I have been keeping a close eye on Serif’s Affinity Photo. So I took the plunge and purchased it for (€39) $ 44 USD. That was a discounted offer. At such an affordable price, I was curious to see how this software performs and what it can do.

In Affinity Photo, there is a Live Stacks feature which is similar to Stack Mode in Photoshop. It was easy and simple to use, and the process was fast.

Affiniy-photo-mean-stack-mode

Affinity-photo-new-stack

The equivalent Stack Mode feature in Photoshop is called Live Stacks in Affinity Photo.

Go to File > New Stack. The pop up dialog box appears where you select your images. Make sure Automatically Align Images box is ticked. Click Ok. This takes a couple of seconds. It defaults to Median in the Live Stack Group, but scroll up to the next one and this is Mean. That’s the one you want.

Affinity-photo-auto-align-images

images-selected-after-new-stack

When you create a New Stack, the pop up dialog box appears. Select your images on your computer and click Open.

Affinity-photo-live-stacks-mean

The stacked images are grouped into a folder called Live Stack Group. The different stack options are located by clicking on the small icon, circled in blue. It defaults to Median but I changed it to Mean.

The cool thing about this feature is when you scroll through each of the different stack modes, it shows the different results live.

Affinity-photo-live-stacks-maximum

Different stack options can be scrolled through one by one, and the results can be seen live, which is impressive.

When I compared the two results from Photoshop and Affinity Photo, I could see no obvious difference, with the exception that I had to crop the image of the river more in Photoshop, whereas the auto alignment in Affinity Photo meant I didn’t lose much of the image at all.

second-river-original

Here is another example of moving water.

The same image as above edited in Affinity Photo using Mean in Live Stacks. I got the same result using the manual method in Photoshop.

The same image as above edited in Affinity Photo using Mean in Live Stacks. I got the same result using the manual method in Photoshop.

Take away tip:

In my examples, I didn’t use a tripod. I would recommend using one. I also took only a series of 8-10 shots. I would recommend taking at least 15 or more.

I found this technique interesting and fun, and I am now inspired to go out and take images of waterfalls. The good thing about this technique is if you don’t have ND or polarizing filters, it doesn’t prevent you from going out and taking shots of waterfalls. Then when you get back to your computer, you can create your own silky, smooth effect.

Let’s see some of your examples below.

googletag.cmd.push(function() {
tablet_slots.push( googletag.defineSlot( “/1005424/_dPSv4_tab-all-article-bottom_(300×250)”, [300, 250], “pb-ad-78623” ).addService( googletag.pubads() ) ); } );

googletag.cmd.push(function() {
mobile_slots.push( googletag.defineSlot( “/1005424/_dPSv4_mob-all-article-bottom_(300×250)”, [300, 250], “pb-ad-78158” ).addService( googletag.pubads() ) ); } );

The post How to Create a Silky Water Effect in Post-Processing without Using Filters or a Tripod by Sarah Hipwell appeared first on Digital Photography School.


Digital Photography School

 
Comments Off on How to Create a Silky Water Effect in Post-Processing without Using Filters or a Tripod

Posted in Photography


The 3Pod P3COR Tripod and SH-PG Ball Head Review

06 Mar

In one of my previous articles, while reviewing the Nitz Strap heavy-duty camera strap, I mentioned that straps fall into the category of accessories most of us photographers hate to spend money on. We know that we need them, and we know that we usually get what we pay for, but our minds don’t connect the piece of hardware that doesn’t technically take the image we’re capturing, and the image itself.

Tripods seem to fall in that category as well. We know that a sturdier tripod can lead to a sharper, clearer image, yet we cringe at the thought of dropping $ 200, or more, on one. My first tripod was a wobbly Velbon50 that I picked up for $ 10 at a local garage sale. It helped me along through my first landscape images, but I didn’t actually think about the fact that my images could suffer from using unsturdy equipment.

3pp3cor_12

Image courtesy Adorama and 3Pod

Of course, the images from less sturdy tripods can be perfectly acceptable, and you can make the argument that there are some excellent tripod setups to be had for $ 100 or less. But, once you’ve used a beast of a piece of hardware, such as the 3Pod Orbit 3 Carbon Fiber setup I’ll be discussing here (see photo above), it’s really hard to go back, and makes you wonder why you didn’t buy something this solid in the first place.

When I received my tripod (Orbit 3 Section Carbon Fiber, P3COR) and head (Pistol Grip Ballhead, SH-PG) from 3Pod, the first thing I noticed was the heft. Pulling the tripod itself out of the box, I got the feeling I was handling a piece of military equipment – tough and rugged.

3pp3cor

Image courtesy Adorama and 3Pod

The tripod weighs in at 4.25 lbs. (1.9kg), while the head was a considerable 1.85 lbs. (0.84kg) so it’s clear from the beginning, this isn’t a nimble photographer’s setup. The P3COR is meant to be an absolute oak, to mount heavy camera and lens combinations on top of, without so much as a wobble. Carbon fiber is the material choice (lighter and sturdy, but more costly) for this tripod, as opposed to the usual aluminum setup.

3pp3cor_2 3pp3cor_4

The tripod features the Orbit Overhead Shot System, which means the vertically-adjustable center column, and its accompanying standard direct-mount plate, can be pivoted at almost any angle (see photos above, images courtesy Adorama and 3Pod), allowing for some interesting composition possibilities.

013016__myshot-600

The three carbon fiber legs are rated to hold 18 lbs. (8.16kg), and the unit can be extended to a maximum usable height of just over 69 inches (1.75m), while collapsing to a very manageable 28.5 inches (0.72m). The legs use a standard flip lock, for raising and lowering, and they work very well. The locks aren’t too simple to disengage, but don’t take a ton of strength either, making them easy to manage while giving you peace of mind.

The screw mount itself is reversible from 3/8″ to a 1/4″  variety, by flipping the mount block upside down. I found the mount easy to remove and lock, and my Canon 60D felt very sturdy when locked into the mount. Coverable foot spikes allow you to ensure stability in any situation, from dirt, rocks and sand, to smooth indoor floors, without worrying about damaging any sensitive surfaces.

3pp3cor_6

Attractive appearance (Image courtesy Adorama and 3Pod)

With appearances having absolutely no impact on the functionality of a tripod, it must be said that this particular 3Pod model is beautiful, with metallic red color accents, against dark carbon fiber pieces. An attention-getter at the local beach, let me tell you!

013016__myshot-3-cropped

013016__myshot-4

This was my first experience with a pistol-grip type tripod head, and let’s just say I’m sold on the concept. The 3Pod SH-PG is a delight to use. No more hassling with various screws on various planes of movement to get the perfect horizontal and vertical positions; simply squeeze the trigger on this unit, adjust to the desired angle, and release. The position is set in stone, and you’re free to concentrate on your primary focus, taking a great picture.

The advantage of this setup, is the ability to compose your image with one hand, freeing up the other to operate the camera itself. The mount is situated directly on the ball, and can be moved to allow for several configurations, including left-handed, right-handed, and traditional joystick orientation (see example photos below). A thumb-operated dial on the grip allows for modifying tension within the handle; lighter camera setups can use less tension, for more precise adjustments.

3pshpg_11

Image courtesy Adorama and 3Pod

3pshpg_04

Image courtesy Adorama and 3Pod

The rotation of the ball head is a full 360 degrees, with -20 to 90 degrees of tilt. The head features the expected quick-release plate, and a bubble level, separate from the tripod body. The head itself weighs in at 1.85 lbs. (0.84kg), and supports up to 11 pounds (4.99kg) of camera body and lenses, although it feels as if it would support more weight.

I tested the head and tripod legs at a couple of different locations, as well as indoors. I was pleased at how well the unit gripped all surfaces. The legs predictably sank and settled perfectly into beach sand, as well as a grassier area just inland. I place the tripod in a rather sandy/muddy situation as well, and again, found the support for my camera to be very sturdy. Finally, covering the adjustable leg spikes allowed me to use the tripod indoors in a carpeted area, with no worry of damage to the fibres.

3pp3cor_10

Carbon fiber legs with flip lock mechanisms (Image courtesy Adorama and 3Pod)

3pp3cor_11

Spikes and covers on the legs (Image courtesy Adorama and 3Pod)

I was met with the usual high winds on the beachfront, and found I was able to capture standard shots, as well as long exposures without any issue. Images were crisp and clear. As solid and hefty as the unit is, I was able to collapse it down to its smallest size, and carry it over my shoulder with my 60D still attached, for the long walk back to the parking lot, fairly easily.

This particular setup will set you back $ 249.95 USD for the tripod and $ 39.95 USD for the pistol-grip head. Many photographers won’t scoff at a $ 300 USD entry price for a very solid piece of hardware, but some beginners/enthusiasts may not feel such a price is doable for their first tripod. As we discussed in the beginning of this article, some accessories have qualities that reflect their price point, and we see that here with 3Pod’s offerings.

3pshpg_1

Image courtesy Adorama and 3Pod

At the end of my review period, I boxed up the 3Pod with a bit of a heavy heart, as I had no desire to send it back. For me as a photographer with a focus on landscape and nature, the Orbit 3 and pistol grip head are the perfect combination, and I can see how owning this particular setup will make my photography immensely easier, and therefore more enjoyable and satisfying. Which means one thing – I’ve got a new spot in my budget for a purchase this year.

Have you used 3Pod tripods and heads before? What has your experience been? Sound off below and let us know how these quality pieces of hardware have helped your photography.

Editor’s note: these products were loaned to our author by Adorama at no cost, but in no way influence Tim’s review and opinion of this tripod and head combination.

googletag.cmd.push(function() {
tablet_slots.push( googletag.defineSlot( “/1005424/_dPSv4_tab-all-article-bottom_(300×250)”, [300, 250], “pb-ad-78623” ).addService( googletag.pubads() ) ); } );

googletag.cmd.push(function() {
mobile_slots.push( googletag.defineSlot( “/1005424/_dPSv4_mob-all-article-bottom_(300×250)”, [300, 250], “pb-ad-78158” ).addService( googletag.pubads() ) ); } );

The post The 3Pod P3COR Tripod and SH-PG Ball Head Review by Tim Gilbreath appeared first on Digital Photography School.


Digital Photography School

 
Comments Off on The 3Pod P3COR Tripod and SH-PG Ball Head Review

Posted in Photography


Polaroid launches Eyeball panoramic tripod head

27 Feb

A remote control spinning tripod head that is said to be ideal for shooting panoramas has been launched in the US and UK by Polaroid. The Panorama Eyeball Head fits on a tripod or stands freely on its own feet, and can accommodate DSLRs as well as compacts. The control unit connects with the head via an IR link and manages both the speed and direction of rotation. 

The head is capable of turning a full 360° and the company says that careful gearing ensures the motion is always smooth. There are five speed modes as well as a mode that provides three fixed viewpoints up to 75° apart. 

The head is powered by a built-in rechargeable battery that is said to provide up to five hours of standby time, and which can be recharged via a powered USB port. 

The Polaroid Panorama Eyeball Head costs £44.99/$ 49.99 through Amazon. 


Press release:

RIDGEFIELD PARK, NJ – The versatile Polaroid remote-controlled 360° panorama eyeball head accessory is a compact, portable freestanding mini tripod that can also be placed on a tripod, slider or even selfie stick. Designed for Polaroid cameras, other small popular cameras and SLRs, the Polaroid remote-controlled 360° panorama eyeball head is ideal for creating the perfect panoramic video or picture. IR remote controls offer five speed modes, clockwise and counter clockwise rotation, as well as a triangle mode up to 75°.

Panoramic Shooting Made Plenty Fun

For the contemporary videographer, being able to capture expansive panoramic vistas without any shake or distortion is an absolute must. Thankfully, the Polaroid remote-controlled 360° panorama eyeball head delivers effortless and precisely controlled results. It is compatible with a range of action cameras such as the Polaroid Cube lifestyle action camera line and smaller digital cameras (with ¼” threaded hole). Attachment comes included.

Turns on a Dime – or Quarter

The Polaroid remote-controlled panorama eyeball head rotates your camera in its place, clockwise or counterclockwise, for smooth shooting action. Users can easily control the turning degree from 0 to 360°.

Heeds Your Need for Speed

Using the remote, shooters can also control the exact rotational speed. Press a button to speed up, and press a button to slow down. And thanks to finely calibrated gears, the action always remains perfectly smooth.

Functions Free or Mounted

At the top, a ¼” threaded screw connects to a wide variety of cameras. A padded platform prevents motion-related scratches. At the bottom, a ¼” threaded hole accepts tripod and slider connections for greater application flexibility.

Runs on Built-In Battery

To make this already compact and pocket-sized head as portable as possible, the built-in battery is rechargeable from any USB port or power outlet. A single charge provides five hours of standby and over three hours of non-stop runtime.

The Polaroid remote-controlled 360° panorama eyeball head accessory is available now for $ 49.99.

Articles: Digital Photography Review (dpreview.com)

 
Comments Off on Polaroid launches Eyeball panoramic tripod head

Posted in Uncategorized


Review of the Manfrotto 322RC2 Joystick Tripod Head

31 Jan
Manfrotto-322RC2-Joystick-head-in-horizontal-position

Manfrotto 322RC2 Joystick Tripod Head

I don’t use my tripod extensively in the same way a landscape shooter does, but I do consider a tripod an essential part of a photographer’s arsenal.

With regard to tripod heads, I have used a ball head for many years and they are extremely versatile. They’re very quick and easy to adjust. The most basic models having a single locking screw or lever; release it and you get a full range of pan, tilt, and swivel adjustments. Once you have the camera in position, you simply tighten the screw/lever to lock the head in place.

I use my tripod essentially in the following ways:

  • When the shutter speed is too slow to hand hold my camera, and I want to get a tack sharp image (s), or shooting in low light conditions.
  • Framing the shot through the viewfinder and then taking in the scene with my eyes without having to hold my camera, or having it on me. I like to see the shot I want to to take, rather than take the shot that I see through the viewfinder.
  • Most simply to act as a perch for the camera, ready to go. I spend most of my time prepping the shot before taking it.

The ball head that I used was the Manfrotto 486RC2 compact ball head which has now been discontinued and replaced by the 496RC2.

Manfrotto-496RC2-Ball-Head-2

Image courtesy of Manfrotto

Over recent months, I have found this system of loosening the screw/lever on the ball head to make small adjustments frustrating, due to the weight of the camera and lens. I had to hold the camera with one hand and move the lever with the other. This was cumbersome at times, as the lever was sometimes too tight.

This may sound fickle. But I like my gear to work efficiently, and for me not be conscious of it, or thwarted by it. I prefer to concentrate on the shot I am about to take.

It was time for me to purchase a new head but I was undecided over whether to stick with the ball head type, or try a different style head altogether. Recently, I was working on a job in tandem with another photographer. He had the joystick type head on his tripod. I gave it a go, and found it it incredibly intuitive to use.
Talk about being smitten. I just loved it. It turned out to be the Manfrotto 322RC2.

Build

Manfrotto-322RC2-Joystick-head-in-vertical-position

The Manfrotto 322RC2 is built out of magnesium. It weighs 1.43 lbs (.70kg).

The 322RC2 is made of magnesium, and is designed to keep the weight of your kit as close as possible to the tripod’s centre of gravity, by way of its reduced height. It weighs 1.43 pounds (.70kg), and while it’s not lightweight, it doesn’t feel heavy either, and the accompanying literature states that it can accommodate up to 11 lb. (5kg).

Camera-in-horizontal-mode

I have my Nikon D750 with the 24-120mm f/4G ED VR attached which is roughly 1.510kg (just over 3 lb.).

Key Features

Let’s take a closer look at the key features:

  • One single lever for quick control of all movements
  • Quick release plate with built-in secondary safety pin
  • Built-in bubble spirit level
  • Friction control, adjustable for different camera weights
  • Customizable for left or right handed use, in a vertical or horizontal position
Top-view-of-322RC2-joystick-head

Top view of the Manfrotto 322RC2. The trigger is big so that all your fingers rest against in when squeezing it.

Camera-in-vertical-mode

Going from horizontal to vertical mode is so easy using this joystick head.

Straight out of the box, I was able to attach the head to my tripod. It does come assembled for right-hand users, but the 200PL quick release plate assembly can be removed and positioned for left-handed use. Uniquely, it can also be placed on the top of the grip in a vertical position like the traditional 222 design, but when used in this position the maximum load reverts to 2.5 kg capacity.

Where-the-200PL-assembly-plate-sits-on-the-grip-handle

Top view of the end of the grip on the Manfrotto 322RC2, where you can attach the 200PL assembly plate, so that the camera sits on top, similar in deign of the 222 model by Manfrotto.

I was able to adjust the friction wheel by turning it either to the right or left. I then placed my camera and lens onto the quick release plate, and made further adjustments allowing for the weight of both. This friction control wheel lets you regulate the power of the blocking mechanism to match the weight of your camera/lens, which is key to its design.

close-up-of-tension-indicator

The friction wheel scrolls to the right or left. The small red strip is the tension indicator which moves to the left or right as you adjust the friction wheel.

The built-in bubble spirit level is a nice touch. There wasn’t one on the ball head, so this feature just makes orientating your camera, horizontally or vertically, quick and easy.

Spirit-bubble

The bubble spirit level is a handy feature, especially if you are adjusting your camera positions between landscape and portrait modes.

Observations

I’ve only had this joystick head a mere six weeks, so I can’t really comment on what the cons may be at this point. Obviously, this type of tripod head may not be to your liking, or suit your photography needs.

Although, this tripod head isn’t lightweight, I feel the weight justifies what it will be holding, especially when you combine the weight of a DSLR body and a large zoom lens. That said, from my experience, I only wish I had come across it sooner. The two areas I find it most useful are:

Title-Manfrotto-322RC2-Joystick-head

  • It is easy and intuitive to use
  • It offers very flexible camera positioning, using just one hand

In fact, the more I use it, the more I like it. Maybe over time, I will encounter some negative aspects, one thing I noticed is that it doesn’t fit into my existing tripod case with the head attached. By placing the head in a vertical position, this adds another nine inches to the total length.

I didn’t want to buy another dedicated camera tripod bag, as they can be expensive. So instead, I just bought a Hockey bag ($ 16.00) to store my tripod away when not in use, or to bring to location shoots. I now use my old tripod case for my small light stands and umbrellas.

There isn’t an independent pan lock. This doesn’t bother me, but I can see this being a necessary feature for some photographers who shoot panoramas, and so forth.

Conclusion

I would definitely recommend this tripod head, but I think the best advice is to test it out first. This type of tripod head is a matter of personal choice. Plus, this head is not new on the market, so check around for deals.

Disclaimer: I was not contacted or sponsored to test the above equipment. Opinions are purely by the author only.

googletag.cmd.push(function() {
tablet_slots.push( googletag.defineSlot( “/1005424/_dPSv4_tab-all-article-bottom_(300×250)”, [300, 250], “pb-ad-78623” ).addService( googletag.pubads() ) ); } );

googletag.cmd.push(function() {
mobile_slots.push( googletag.defineSlot( “/1005424/_dPSv4_mob-all-article-bottom_(300×250)”, [300, 250], “pb-ad-78158” ).addService( googletag.pubads() ) ); } );

The post Review of the Manfrotto 322RC2 Joystick Tripod Head by Sarah Hipwell appeared first on Digital Photography School.


Digital Photography School

 
Comments Off on Review of the Manfrotto 322RC2 Joystick Tripod Head

Posted in Photography


Manfrotto introduces carbon fiber version of its 190Go travel tripod

30 Jan
The new carbon fiber version of the Manfrotto 190Go, with the existing aluminium version behind it

Manfrotto has launched a new lighter version of its 190Go travel tripod that is made with carbon fiber. The new model joins the aluminum version of the existing 190Go, and is essentially the same other than the amount it weighs – and costs. While the aluminum version weighs 1670g / 58.9oz, the new carbon fiber model is notably lighter at 1350g / 47.61oz. Both can manage 7kg / 15.43lbs of equipment and have a maximum shooting height of 147cm / 57.87in.

The 190Go Carbon fiber will be available legs-only or in a kit with the 496RC2 ball and socket head or the new 804 Mark ll 3-way pan-and-tilt head. UK prices are as follows (US pricing is yet to be announced): 

  • 190Go! Carbon fiber 4-section – £309.95
  • 190Go! Aluminium 4-section (for reference) – £159.95/$ 199.99
  • 190Go! Aluminium kits with 3 way head or ball head – £214.95
  • 190Go! Carbon fiber kits with 3 way head or ball head – £359.95

For more information visit the Manfrotto website. 

Articles: Digital Photography Review (dpreview.com)

 
Comments Off on Manfrotto introduces carbon fiber version of its 190Go travel tripod

Posted in Uncategorized


Hands-on with the Miggo Splat Flexible Tripod

15 Dec

I’ll admit that the inside of my camera bag can yield some interesting surprises. Sometimes they are slightly less interesting objects, like half eaten apples and business cards for people I don’t remember.

More often, however, the items are far more practical (I guess apples can be considered practical) such as colored gels, diffusers, and waterproof camera covers. Another handy little gadget I often roll around with is a small GorillaPod. Although it is useless for supporting my hulking DSLR, it does come in handy for off-camera flash placements and shooting with a GoPro.

Since I’ve been using this little tripod for years, I jumped on the opportunity to take GorillaPod’s new competitor, the Miggo Splat for a spin.

What is the Miggo Splat Travel Tripod?

The Splat Flexible Tripod, a recently released product from a newly established (2014) company called Miggo, is similar to a GorillaPod but has flat, flexible, rubber-covered metal legs – opposed to the ball-and-socket setup that GorillaPods utilize.

the miggo splat tripod

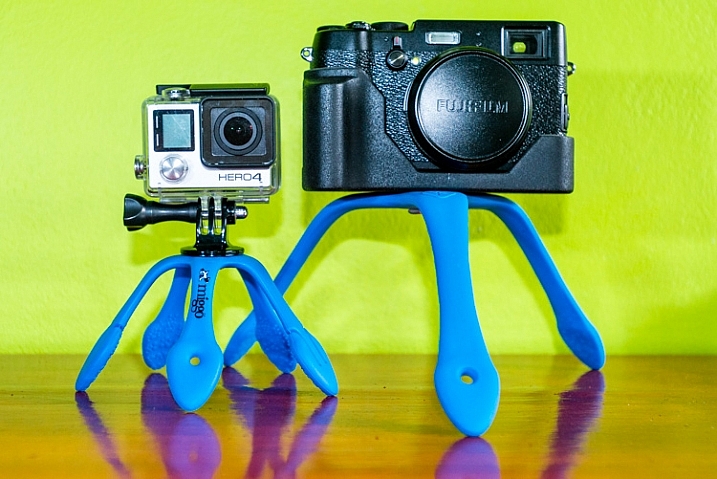
The Miggo Splat is a portable tripod with flexible metal legs covered in rubber.

At the time of writing, Miggo has three options of the Splat Flexible Tripod available: one for DSLRs with three legs ($ 25), a mirrorless version and an Action cam (GoPro) version both with five legs (both are 10.99 on Amazon.com). Although I only have the DSLR and action cam versions for review, the specifications of the mirrorless and action camera versions appear identical on Miggo’s website.

  • Maximum load is 500 grams/1.1 lbs for the Splat Flexible Tripod for Go-Pro and Action cameras, and the Splat Flexible Tripod for P&S and Mirrorless Cameras (so if your mirrorless system is more than 1.1 lbs opt for the DSLR version)
  • Maximum load is 1200 grams/2.6 lbs on the Splat Flexible Tripod for DSLR Cameras

First Impressions

I immediately liked the idea of the Miggo Splat. Sometimes the GorillaPod needs too much tweaking to get all the ball-and-sockets lined up.

Although they are not heavy (75 grams/0.16 lbs for the action cam, 111 grams/0.24 lbs for the DSLR version), both of the tripods seem to be very solid, intended to last a while. I did wonder if you were to bend the legs in the same direction many times, how long it would take for the metal to weaken and break. However, shortly thereafter I learned that they offer a five year warranty so that put my worries at ease.

the splat beside a gorillapod

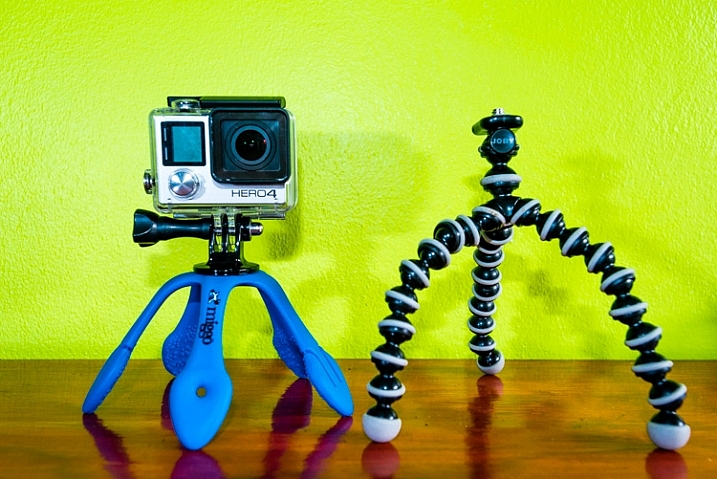
The Splat Flexible Tripod for Go-Pro and Action cameras, shown beside the GorillaPod equivalent.

I had two other immediate concerns about the Splat: the legs on the action cam version seemed a little short, and the rubber coating didn’t seem very sticky, which may allow it to slide around too easily.

I did like the addition of a hole at the end of one of the legs which enables you to hang it from a nail, stick, etc., or move the mounting screw and place the camera on that arm. Two feet on the action cam version have two small tabs that can be used for further creative placements.

In the Field

Mounting the cameras on the tripods, I was disappointed that there is no quick release, just a threaded screw. The DSLR Splat has a little hinged ring on the screw head to aid in attachment, but the Action Cam version leaves you fumbling around for a coin or key as a makeshift screwdriver to affix the camera.

GoPro and Action Camera Splat

The Splat Flexible Tripod for Go-Pro and Action cameras comes with a standard GoPro mount with female threads to enable you to attach the camera to the tripod since GoPro doesn’t provide one for you (seriously GoPro???). The disappointment here is that it is only a simple swivel and not a 3-way adjustment so it can be a bit of a pain to get level shots. I would be surprised if Miggo didn’t introduce a small ball head for their tripods in the near future – it would be immensely more versatile with one.

To circumvent the problem of not having a ball head, you can mount the camera on the end of one of the arms. This works pretty well with the action cam, as the leg is short and you have more of them, and the camera is light. The other advantage is the ability to have the camera protrude forward of the tripod so to avoid capturing the tripod in images, due to the extreme wide angle of view with these cameras. However, curving the leg creates a nice little spring so if there is any movement, or even a moderate breeze, the camera bounces around.

miggo splat action cam version

You can mount the camera at the end of one of the Splat’s legs to level it.

Having five legs is definitely the way to go; any less and the Splat would take a serious hit in practicality. It’s a bit tricky to get a firm attachment while wrapping the legs around objects. I tried to mount the GoPro on the handlebars, and elsewhere, of my motorcycle but the metal springs outward slightly when trying to wrap tight and the top-heavy setup slides around.

Folding the legs all together under the camera creates a nice handle for getting more stable videos. As such, I used the Splat in this fashion while going out for a snorkel and it does help greatly. Unfortunately, the attachment screw (made from brass according to their website) rusted immediately.

rust on the miggo splat

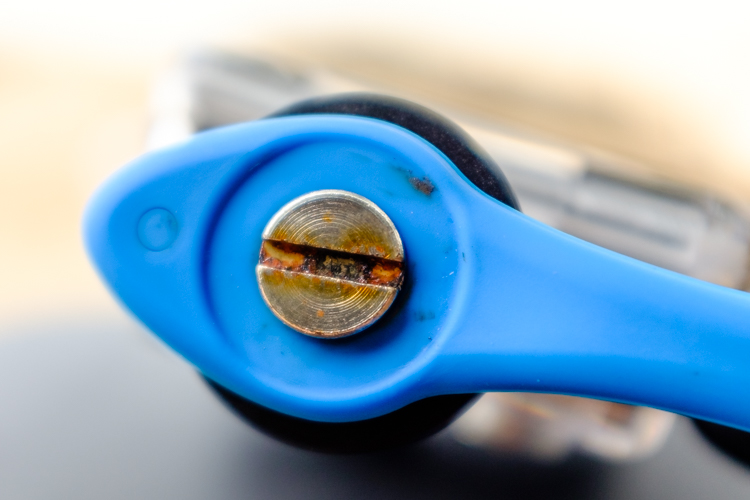
Apparently the Splat isn’t designed to be submerged in salt water.

Folding the legs the opposite way encapsulates the camera adding a layer of protection. I assumed this to be a gimmick but it proved to be one of the best features of this gadget.

DSLR Splat

As soon as I laid eyes on this tripod I knew they screwed up only giving it three arms.

First of all, if you try to mount the camera on the end of the arms (there is a hole to accommodate the mounting screw or to hang the tripod off of a nail) it is very difficult to stabilize the camera and it just bounces around or the arm slowly bends.

the miggo splat attached to a tree

Although it’s uses are limited, the DSLR Splat can come in handy.

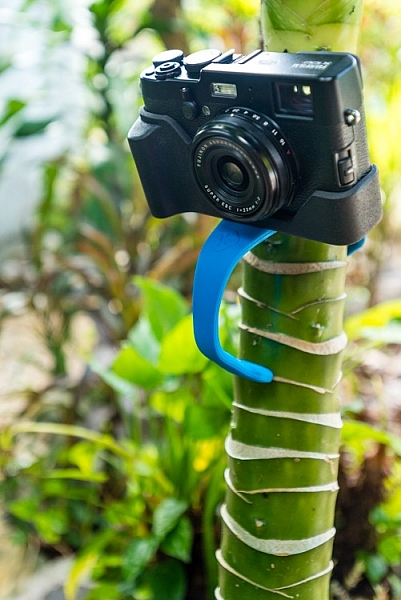
Since my DSLR is too heavy for this version of the Splat, I took it for a spin with my Fujifilm X100T, which it handled with ease. Again though, with only three legs and no ball head, it took way too much fumbling around in most cases to get a well-framed shot, while keeping the camera level and stable. However, it is a good compact, lightweight, and sturdy option to tote along for selfies, to get sharper images, for low light shots, and for HDR or time-lapse. It slides perfectly into the back of my camera bag where I don’t even notice it.

the miggo splat for selfies

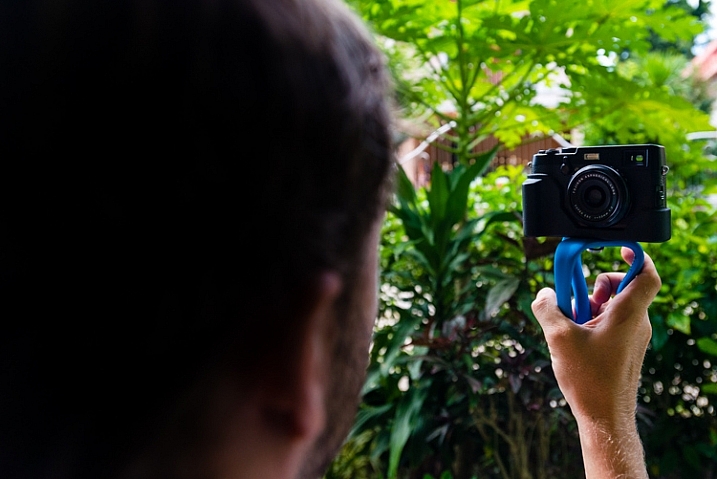
The Splat can be contorted into a useful handle.

As I had presumed, for my needs this tool would prove way more useful to support off-camera lighting. My largest speedlight (Nikon SB-900), with a wireless trigger, easily fit within the weight capacity of the Splat.

the miggo splat holding a speedlight

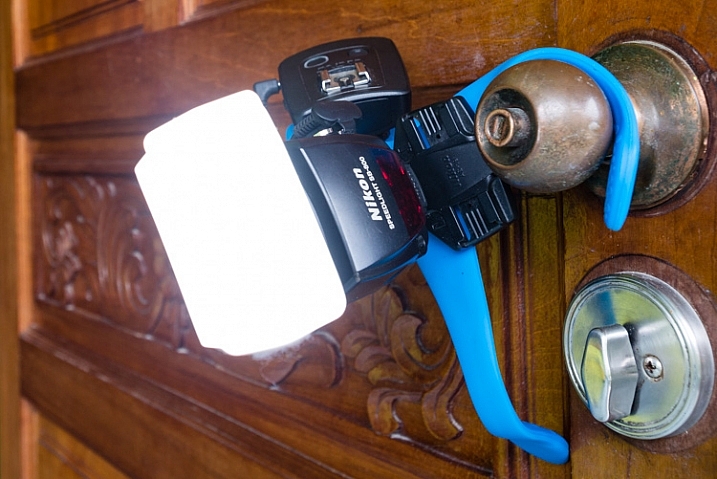
I found the DSLR Splat far more useful for creative speedlight placements.

It also doubles as a way to simply keep equipment off the ground where it is dusty, muddy, or wet.

Conclusion

With the addition of accessories to enhance the usefulness of these tripods, they will be very cost-effective, quality tools to add to your gadget bag.

As it stands I feel that the action cam version is the better of the two for actually taking pictures or video. I could easily see leaving my GoPro attached to the Splat most of the time. It’s light, unobtrusive, and protects the lens.

the miggo splat protecting a gopro lens

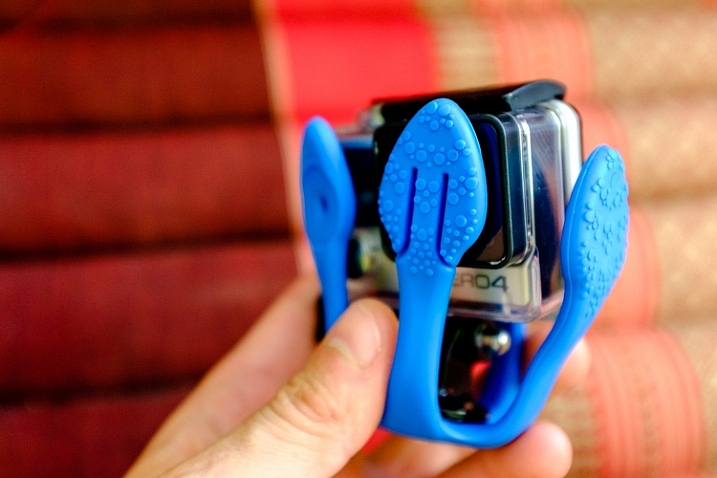
The Splat doubles as protection for your camera.

The DSLR version I find fairly useless for actual photography but everyone’s needs vary. If you want something inexpensive, light, and simple, it’s a good option for the price. However, if you want a convenient means of expanding your creative off-camera lighting techniques, I definitely recommend the Splat.

Does the Miggo Splat Flexible Tripod seem like the kind of accessory that you would find useful?

Ratings:

  • Splat Flexible Tripod for Go-Pro and Action cameras: 4.5 STARS
  • Splat Flexible Tripod for DSLR cameras: 2.5 STARS

googletag.cmd.push(function() {
tablet_slots.push( googletag.defineSlot( “/1005424/_dPSv4_tab-all-article-bottom_(300×250)”, [300, 250], “pb-ad-78623” ).addService( googletag.pubads() ) ); } );

googletag.cmd.push(function() {
mobile_slots.push( googletag.defineSlot( “/1005424/_dPSv4_mob-all-article-bottom_(300×250)”, [300, 250], “pb-ad-78158” ).addService( googletag.pubads() ) ); } );

The post Hands-on with the Miggo Splat Flexible Tripod by Jeremie Schatz appeared first on Digital Photography School.


Digital Photography School

 
Comments Off on Hands-on with the Miggo Splat Flexible Tripod

Posted in Photography


Tripod Review: Gorillapod Focus Field Test

25 Oct

I personally have one of these guys and find it extremely handy for travel and using in places where you either aren’t allowed to have a tripod, or don’t want to haul a big heavy one around. Check out what you can do with the Gorillapod Focus with X ball head kit in this video from Big Iris Productions.

They put it in some pretty challenging situations and gave it a mixed review. I would add that I find it to work great just to put your DSLR onto and walk around with. I did that while travelling in Spain – put the camera on Gorillapod, and the strap around my neck as usual  – but then just rested the legs of the tripod on my hip. It takes all the weight off your neck and I found it really comfortable to walk around that way, ready to shoot.

googletag.cmd.push(function() {
tablet_slots.push( googletag.defineSlot( “/1005424/_dPSv4_tab-all-article-bottom_(300×250)”, [300, 250], “pb-ad-78623” ).addService( googletag.pubads() ) ); } );

googletag.cmd.push(function() {
mobile_slots.push( googletag.defineSlot( “/1005424/_dPSv4_mob-all-article-bottom_(300×250)”, [300, 250], “pb-ad-78158” ).addService( googletag.pubads() ) ); } );

The post Tripod Review: Gorillapod Focus Field Test by Darlene Hildebrandt appeared first on Digital Photography School.


Digital Photography School

 
Comments Off on Tripod Review: Gorillapod Focus Field Test

Posted in Photography