RSS
 

Posts Tagged ‘tripod’

How to do Night Photography With No Tripod – and a Little Photoshop Help

02 Jul

In this article I am going to show you how you can do amazing night photography with no tripod and not too much grain.

How to do Night Photography Without a Tripod

In this photo I was on the Academia Bridge in Venice, the place to be to catch the sunset. There were tons of photographers taking long exposure photos, so many that I couldn’t squeeze in to put my tripod down. So I put my camera at f/4, went to 1/10th of a second and shot at ISO 1250.

These settings froze the boat and the water is still nice and smooth. But the thing that I was really happy about was the light reflection in the water; it was not too strong. If I had done a long exposure the light reflection in the water would have made big blots of light which is very catchy to the eyes and creates a lot of contrast, which I don’t like.

Like on this photo below:

How to do Night Photography Without a Tripod

Extremes

Let me show you in this extreme case:

How to do Night Photography Without a Tripod

For the image above, I had a zoom lens on so the widest I could open up my aperture was f/5.6. My shutter speed was 1/25th of a second at 2500 ISO, and I set my camera on high speed burst mode, which allows the camera take several shots quickly. But unfortunately at 2500 ISO there is going to be a lot of noise. So to show how noisy this photo is, let me do my basic retouching.

How to do Night Photography Without a Tripod

How to do Night Photography Without a Tripod

As you can see it is very grainy/noisy.

How to do Night Photography Without a Tripod

Even if I try to use the noise reduction it doesn’t look that great:

How to do Night Photography Without a Tripod

The solution

So what you can do in this situation is to select all the photos you took in Continuous Shouting mode, I am selecting five here. Then click on sync, Check All, and select synchronize.

How to do Night Photography Without a Tripod

Once you have done that, right-click select Edit In > Open as Layers in Photoshop.

How to do Night Photography Without a Tripod

Now that we are in Photoshop, you can see that each photo has its own layer. Select them all, then go to Edit > Auto-Align Layers.

How to do Night Photography Without a Tripod

You can click on auto here. If you are shooting handheld it is important to have all the layers aligned. Here you can select all the layers again, right-click and select Convert to Smart Object.

How to do Night Photography Without a Tripod

Then you are going to select your layer and go to Layer > Smart Object > Stack Mode > Median.

How to do Night Photography Without a Tripod

What’s that is going to do is Photoshop will detect the common pixels from a photo to another and then remove the noise and any people that moved from frame to frame, which is pretty cool. You can see the before and after below.

How to do Night Photography Without a Tripod

After this technique has been applied, you can see that the water is nicer on the eyes and there is almost no noise in the image.

How to do Night Photography Without a Tripod

How to do Night Photography Without a Tripod

Before

How to do Night Photography Without a Tripod

After

Summary

So this is a good way to avoid noise in a low light situation where you don’t have a tripod. Let me review the important points for you:

  1. Set your camera on Continuous Shooting Mode (burst).
  2. Open your aperture as wide as you can to f/2.8 or f/4.
  3. Set your shutter speed to around 1/30th of a second and boost the ISO to between 2000 and 3000.
  4. Take at least five photos minimum.
  5. Take the first photo, retouch it and synch your edits to the others, using Lightroom.
  6. Open all the images as layers in Photoshop.
  7. Align the photos/layers.
  8. Select the layers and convert to Smart Objects.
  9. Got to Layer > Smart Object > Stack Mode > Median or see which setting works best.

And voila. See below for the video walk through of this technique as well.


photoshop for photographersIf you enjoyed this tutorial and want to learn more about how to use Photoshop, check out Serge’s course Photoshop for Photographers 2017. Use the special promotional code – DPS65 – to get 65% off as a dPS reader!

The post How to do Night Photography With No Tripod – and a Little Photoshop Help by Serge Ramelli appeared first on Digital Photography School.


Digital Photography School

 
Comments Off on How to do Night Photography With No Tripod – and a Little Photoshop Help

Posted in Photography


New tripod tech

07 May

Cinema5D recently posted a video look at the new Manfrotto Nitrotech tripod head, which uses a ‘nitrogen piston mechanism’ to push up against the bottom of the tripod head where its horizontal axis would normally be. You can read the full article along with the video here.

What do you think? Does the Nitrotech head look like something you would use?

Articles: Digital Photography Review (dpreview.com)

 
Comments Off on New tripod tech

Posted in Uncategorized


Overview of the Vanguard VEO 235AB Aluminum Travel Tripod

16 Feb

If you’re constantly on the go like me, carrying a tripod is always an exercise in endurance and determination. As primarily a wilderness and adventure shooter, I’m constantly working from a backpack where space and weight come at a premium. Lately, I’ve been looking for ways to carry less weight but certainly not at the cost of sacrificing the quality of my gear, and not spending a small fortune in the process.

When it came time to downsize my tripod, my research pointed me to this – the Vanguard VEO 235AB Aluminum Travel Tripod with TBH-50 Ball Head. It looked great on paper, small, light, and more than capable of supporting my mirrorless (Sony A7R) camera setup. Being a long-time user of more robust tripods, I was skeptical when the Vanguard arrived due to its conspicuously small size.

Vanguard VEO 235AB tripod

Here are the specifics of the Vanguard 235AB Tripod:

Vanguard VEO 235AB tripod specs

First Impressions

Right out of the box the tripod was delightfully attractive. The look of the entire contraption was clean and professional. The color is a nice matte black with blaze orange accents. Simply put, the tripod has great visual appeal if that is important to you. Also included was a fairly nice storage and travel bag, which was of surprisingly good quality as well.

Vanguard VEO 235AB wide

Load capacity and sturdiness

The Vanguard is capable of supporting just over 13 pounds (13.3 or 6kg). All the flip locks clamp smoothly, and lock firmly into place to secure the leg sections.

Vanguard VEO 235AB folded

Vanguard VEO 235AB clamps

Ball head

The ball head included with the tripod looks small but locks in place extremely securely. The base plate incorporates a safety pin so that even if the clamp loosens the camera will not slide off the tripod laterally.

Vanguard VEO 235AB ballhead

Vanguard VEO 235AB ballhead 2

Maximum and minimum height

The overall height with the center column extended is nearly 57 inches (145 cm), which works great for the majority of scenes with minimal stooping over, even at my 6’4” height. Also, the ball head features a bullseye-style bubble level for aid with levelling the camera.

The folks at Vanguard have even included an additional “low angle” angle adapter which allows you to achieve very low perspective shots close to the ground. It should also be noted that the included ball head can be replaced with another of your own choosing if you see fit.

Vanguard VEO 235AB 2

The tripod folds down small enough to fit into carry-on luggage and the weight makes it feel extremely portable. Even without practice the set up time for the Vanguard VEO 235AB is lightning fast. The center column swings up into position and is variable in height. This is an interesting design concept which helps make the entire package very compact while maintaining ease of set up.

Vanguard VEO 235AB base

The legs

The legs of the tripod itself are able to be positioned at independent angles depending on the situation by depressing the lock buttons for each leg.

Vanguard VEo 235AB 3

When locked, the legs feel extremely sturdy. One of the three legs is equipped with a rubber wrap to aid gripping during wet or exceedingly cold conditions. To top it off, the rubber feet of the tripod retract to reveal traction spikes should you really find yourself shooting in difficult terrain.

Vanguard VEO 235AB feet

Some final thoughts

So far I haven’t found any situation where the tripod would not suffice for a multitude of uses. Outdoor photographers will love its compact size for hiking, and photographers on the go will dig its stashability.

The 235AB appears to be a fantastic little workhorse that strikes a keen balance between strength, style, and portability. I’m excited to put it to work out in the field and judging by the first impressions it shouldn’t disappoint.

At under $ 150 USD the Vanguard VEO 235AB is one of the better bargains to be had in the lightweight tripod market. Users of smaller DSLRs or mirrorless camera systems should strongly consider the Vanguard VEO 235AB as an option when searching for a sturdy option for a versatile, lightweight travel tripod.

googletag.cmd.push(function() {
tablet_slots.push( googletag.defineSlot( “/1005424/_dPSv4_tab-all-article-bottom_(300×250)”, [300, 250], “pb-ad-78623” ).addService( googletag.pubads() ) ); } );

googletag.cmd.push(function() {
mobile_slots.push( googletag.defineSlot( “/1005424/_dPSv4_mob-all-article-bottom_(300×250)”, [300, 250], “pb-ad-78158” ).addService( googletag.pubads() ) ); } );

The post Overview of the Vanguard VEO 235AB Aluminum Travel Tripod by Adam Welch appeared first on Digital Photography School.


Digital Photography School

 
Comments Off on Overview of the Vanguard VEO 235AB Aluminum Travel Tripod

Posted in Photography


5 Tips to Get Sharp Photos While Using a Tripod

11 Feb

We all love to admire landscapes and cityscapes. The moment we witness the beauty of nature we instantly take out our camera and start clicking photos. If you are travelling with a tripod you would most probably be using it to take photos in low light conditions or to capture creative long exposure shots.

Shooting with your camera mounted on a tripod might seem easy and a quick fix, but it is equally important to know a few things in order to capture sharp photos. Simply follow these five tips and by end of this article you may be able to figure out why you were not able to capture sharp photos using a tripod before.

Tips sharp photos tripod 01

1. Extend the tripod legs only when needed

While buying a tripod we all research about the maximum height and how tall it can stand, which is completely fine. I have seen many budding photographers extending the legs of their tripod fully the moment they take it out to shoot. But, it does not mean that you always have to fully extend the legs just because your tripod allows to do so.

As you go on extending the length of the lens, the stability and sturdiness of your tripod starts reducing. This gets worse when you are shooting landscapes or stars at a windy location. Even if you wish to extend the legs, start opening up the top (larger/thicker) most section of the legs and then move to the lower (thinner) ones. The last thing to extend should be the neck of your tripod, as it is most prone to causing shake.

Tips sharp photos tripod 02

2. Switch-off image stabilization while using a tripod

It is fairly possible that you possess a lens which features image stabilization (IS or VR) and there are fair chances that you may be using your lens with IS/VR switched on. It is fine when you are shooting at a high shutter speed using a tripod, but as you slow things down, that’s when the real problem starts.

Check your lens for the IS or VR switch.

When you are shooting with IS/VR switched on, your lens generates a minor shake (meant to counter-act your hand movements) which ultimately reaches the camera. This minor vibration can introduce shake in your photos when shooting on a tripod, especially at slower shutter speeds.

While shooting landscapes in the evening, star trails, light trails, or any long exposure shot, you need to slow down your shutter speed. As you cannot shoot these types of photos handheld, you will need a tripod. I would advise you to switch off the IS/VR on your lens in order to eliminate the minor shake that would have been generated otherwise.

Tips sharp photos tripod 03

3. Use the mirror lock-up feature on your camera

You may be aware of the fact that there is a mirror inside your digital camera (except for mirrorless cameras) that moves to expose the image sensor when you press the shutter release button. This movement of the mirror can cause a minor shake while the camera is mounted on a tripod, thus affecting the sharpness of your photos.

This shake caused by the mirror may not affect your photos while you are shooting at a fast shutter speed, but as you slow down the shutter speed the shake would become visible in your photos. In order to eliminate this, you can manually lock the movement of the mirror. This can easily be done by activating the mirror lock-up feature (look through your camera’s menu settings or consult the user manual).

Tips sharp photos tripod 08

As you activate the mirror lock-up feature on your camera, the camera will raise the mirror up and keep it there until you disable the feature. So when you press the shutter release button the mirror will not move and the chances of minor shake being generated would be eliminated.

Mirror Lockup feature on Canon

Mirror Lockup enabled.

Note: This works differently on some camera models. Some the mirror stays up until you release it, on others you press the shutter button twice – first one lifts the mirror, second one takes the shot and lowers the mirror. The latter requires you to do it each time, but you can see your scene through your viewfinder between shots. In the former you cannot as the mirror blocks light coming to the eye piece.

Tips sharp photos tripod 04

4. Use the 2-second timer or a remote shutter release

Do you use the shutter release button to take a photo when the camera is resting on a tripod? If you said yes, then make sure that you switch on the 2-second timer in your camera. Do not assume that if the camera is on a tripod there will be no shake no matter what. When you press the shutter button you introduce a minor shake by applying some pressure to the camera. By using the 2-second timer feature you can do away with the camera shake as you are allowing 2 seconds for the camera to absorb that minor shake before exposing the photo.

Use a remote trigger or your 2-second timer to eliminate camera shake.

If you want to be extra cautious and not take any chances, you can use a remote shutter release or cable. The remote allows you to go wireless and click photos without even touching the camera, thus ensuring that your images will be crisp and sharp. A wired trigger is equally useful except for the fact that there is a cable attached to the camera, otherwise it functions exactly the same as a remote.

Tips sharp photos tripod 05

5. Shoot at the lowest ISO possible

The lower the ISO, the less sensitive the camera’s image sensor is to light and the chance of noise and grain is lessened. While you are shooting with your camera on a tripod, likely you may be working in low light conditions or doing long exposures. You would usually shoot at high ISO in order to compensate for slow shutter speed, but that is not necessary while using a tripod.

If you are shooting in low light conditions, using high ISO would obviously introduce noise or grain into your images. As you are already using a tripod, you do not have to worry about camera shake because of slow shutter speed. Without any second thoughts set the ISO sensitivity to the minimum value available on your camera, this will result in a sharp and grain free image.

Tips sharp photos tripod 06

Conclusion

So if you have had issues getting sharp images while shooting with a tripod, I hope these tips will help you solve them. Please share your comments and thoughts below.

googletag.cmd.push(function() {
tablet_slots.push( googletag.defineSlot( “/1005424/_dPSv4_tab-all-article-bottom_(300×250)”, [300, 250], “pb-ad-78623” ).addService( googletag.pubads() ) ); } );

googletag.cmd.push(function() {
mobile_slots.push( googletag.defineSlot( “/1005424/_dPSv4_mob-all-article-bottom_(300×250)”, [300, 250], “pb-ad-78158” ).addService( googletag.pubads() ) ); } );

The post 5 Tips to Get Sharp Photos While Using a Tripod by Kunal Malhotra appeared first on Digital Photography School.


Digital Photography School

 
Comments Off on 5 Tips to Get Sharp Photos While Using a Tripod

Posted in Photography


Hitch Hiker balanced-motion tripod head boasts smooth, uniform rotations

15 Dec

A new Kickstarter project is seeking funding for Hitch Hiker, a tripod head said to offer smooth and precise uniform rotations thanks to its ‘balanced-motion’ design. Unlike conventional tripod heads, Hitch Hiker is said to be capable of simultaneous vertical and horizontal motions without the need for clamping or locking to hold a specific position.

Hitch Hiker is made from CNC-machined aircraft-grade metal with an anodized finish and preloaded roller bearings. Levers are used to ‘fine-tune’ the way movements on each axis feel, while motion is accomplished via a knurled-grip guide handle. The tripod head has an overall weight of 2.5lbs / 1.1kg and can handle cameras or other items (including a smartphone or GPS unit) weighing up to 7lbs / 3.2kg. The model attaches to a tripod via a 3/8-16 screw.

The team behind the Hitch Hiker is seeking funding for production on Kickstarter, where a single unit in a clear/black finish is promised in exchange for a $ 499 or greater pledge, and a model in all-black finish for pledges of $ 529 or more.

Via: Kickstarter

Articles: Digital Photography Review (dpreview.com)

 
Comments Off on Hitch Hiker balanced-motion tripod head boasts smooth, uniform rotations

Posted in Uncategorized


How to Build the Ideal Tripod

14 Dec

When I got into photography more than 20 years ago, I remember spending all my hard earned money on a brand new camera. It was a shiny beautiful brand new Pentax K1000 with a great 50mm f/1.8 lens. I was almost flat broke and all I could afford to buy after that was a roll of B&W Ilford HP5 film to try the camera out. Some time went by until I could afford to buy anything else photography related, but I remember that the next item on my list was a tripod.

I bought one of those cheap aluminum tripods that lacked a lot on the steadiness side. It served me well for a few years until one day it totally fell apart with my precious camera mounted on it. Of course, nothing serious happened because those cameras were built like a tank. It’s amazing the kind of abuse they could take and just keep on working flawlessly like a Swiss clock, but that day I promised myself I would never buy another cheap tripod again in my life.

Building the Ideal Tripod

What is the perfect tripod?

As I started growing up in the photography business, I tried out a lot of different things, from really light carbon-fiber tripods to huge studio columns for large format cameras. The fact is that there is no perfect tripod out there.
Different cameras and different situations require different tripods.

You have to accept that it is a compromise between lightness, steadiness, and versatility, and make your choice.

Honestly, I own more tripods than I would like to admit. The fact is that I always have a really hard time picking the right tripod every time I have to go out on an assignment. So recently I put myself on a quest to search for a nice tripod that would fit most of my needs and would not break my piggy bank.

Building the ideal tripod

The shopping list I am about to describe was made after some serious research. I kept in mind the best price, quality products, and the kind of work I do, which ranges from portraiture to architecture, with a lot of landscaping in between, mostly done on the go. So these choices may not be everyone’s cup of tea, but they work great for me.

Best tripod 01

The Fotopro CT-5i tripod.

If you take a look around, you’ll see that there are hundreds of tripod manufacturers on the market. If you eliminate the top brands and focus on the regular consumer brands, you’ll see that many times the same product is sold under different brand names, many times with very different prices.

The thing is that most of these products are made in China, and then exported around the world and sold under the name of local brands. To buy this kind of product is a game of chance because they range from fairly well-made to really bad knock-offs of famous brands made with cheap materials.

Starting with the Fotopro CT-5i tripod

The Fotopro CT-5i I decided to buy is a really good compromise of a good product with a really nice price tag. This particular tripod configuration is used by different manufacturers. You can find this product being sold under different brand names with slight differences.

It is a four-section aluminum tripod that weighs 1.38kg (3.04 pounds) and is as small as 43cm (16.9 inches) when folded. It is able to support up to 8kg (17.6 pounds) and extend up to 1.57 meters (5.15 feet).

These specifications are perfect if you want a transportable tripod that is sturdy enough to hold a DSLR with a heavy lens, with the ability to remove one of the legs and convert it into a monopod, which is a major plus in my opinion. It also comes with a transport bag and a few handy accessories such as:

  • A belt holder for transport or for a monopod steady stand
  • A couple of hex wrenches for tripod maintenance
  • Hand strap
  • A sturdy hook to hang some weight and make the tripod steadier

Best tripod 02

It has a moveable central column and a really clever latch design that opens the legs in three different angles.

Best tripod 03

Customizing my ideal tripod

Even though the design of the product is really good, after using it for a couple of months, I realized I could improve it with a few simple modifications that would make my job easier.

The first task was to remove the original rubber feet and replace them with a set of spigots with a 3/8″ thread.

Best tripod 04

Best tripod 05

With a little bit of grinding they get a tight fit inside the tube, and now they just give me new attachment possibilities, like these spikes or rubber feet that I can use in different types of ground.

Best tripod 06

Or I can add a 3-legged locking base to the monopod.

Best tripod 07

It’s a simple modification that adds a lot of versatility, enabling features that are only seen in really high-end brands.

Best tripod 08

The monopod can also be used as a boom arm or, if I’m in a rush, I even use it as a light stand attached to something like my hard case with a heavy duty clamp.

Best tripod 09

You can also improve the steadiness of the tripod by just hanging something on the hook of the central column like for instance your photo bag.

Best tripod 10

Accessories

The ball head is a medium size one, with an Arca Swiss style plate able to perform smooth panning movements, even though I have to admit that the knobs don’t offer the best grip, but they do the job.

The bubble levels on the plate base are a good help when you need to check your horizontal or vertical indicators. It seems very well balanced and steady with a DSLR with a heavy 70-200mm f/2.8 lens using the collar attachment.

Best tripod 11

It doesn’t perform that well when you use the camera base screw attachment and turn it to the vertical position, making it totally out of balance. This is the reason why I use an L-Bracket most of the time.

Best tripod 12

The bracket keeps the camera in line with the tripod column, making it balanced and not tilted off-side when you use it in the vertical position.

Best tripod 13

Bottom Line

Sometimes you have to adapt the tools you use to your needs. These customs modifications and add-on accessories just made this tripod a lot more useful to me, making my job much simpler when I have to use one.

What about you, have you done any custom adaptations to your tripod? Please share your ideas in the comments below.

googletag.cmd.push(function() {
tablet_slots.push( googletag.defineSlot( “/1005424/_dPSv4_tab-all-article-bottom_(300×250)”, [300, 250], “pb-ad-78623” ).addService( googletag.pubads() ) ); } );

googletag.cmd.push(function() {
mobile_slots.push( googletag.defineSlot( “/1005424/_dPSv4_mob-all-article-bottom_(300×250)”, [300, 250], “pb-ad-78158” ).addService( googletag.pubads() ) ); } );

The post How to Build the Ideal Tripod by Ivo Guimaraes appeared first on Digital Photography School.


Digital Photography School

 
Comments Off on How to Build the Ideal Tripod

Posted in Photography


Product Review: Polaroid Carbon-Fiber Travel Tripod and Varipod

02 Dec

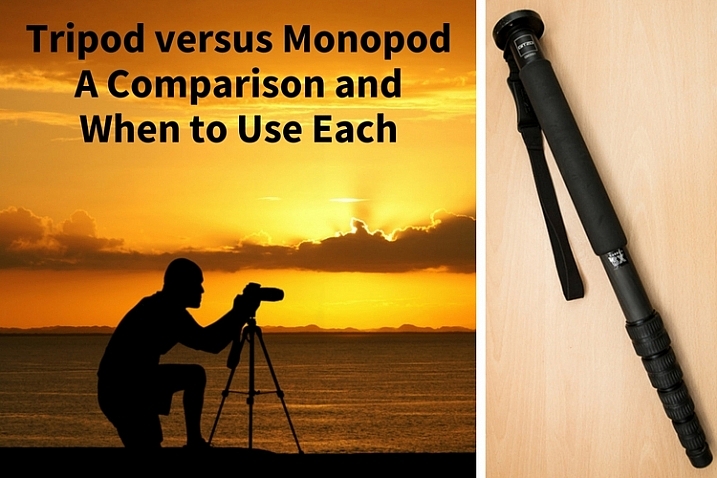
First a little background: I’m a wilderness photographer. I spend time, a lot of time, every year on multi-day river, backpacking, and winter trips in Alaska. This past summer, between June and mid-September, I spent more than 60 days in the backcountry. On every one of these trips, to one degree or another, weight was an issue, and I’m always on the lookout for good, light equipment that might suit my travels. With that in mind, on to the review of two new support products from Polaroid, the Polaroid Pro Series Carbon Fiber Travel Tripod, and the Varipod.

ak-homer-109256-sunset-48

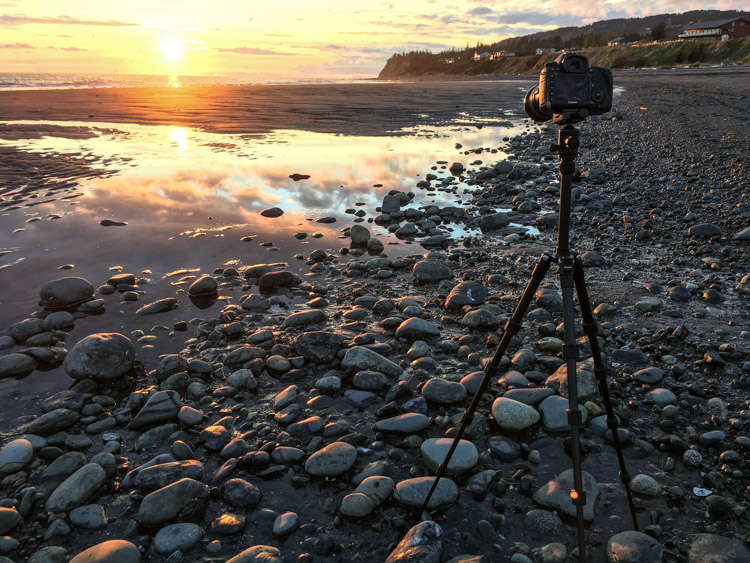
Image made using the Polaroid Pro Series Carbon Fiber Travel Tripod (ISO100, 1/5th sec @ f22)

Polaroid Pro Series 55″ Carbon Fiber Travel Tripod With Removable Ball head

polaroid-tripod-review

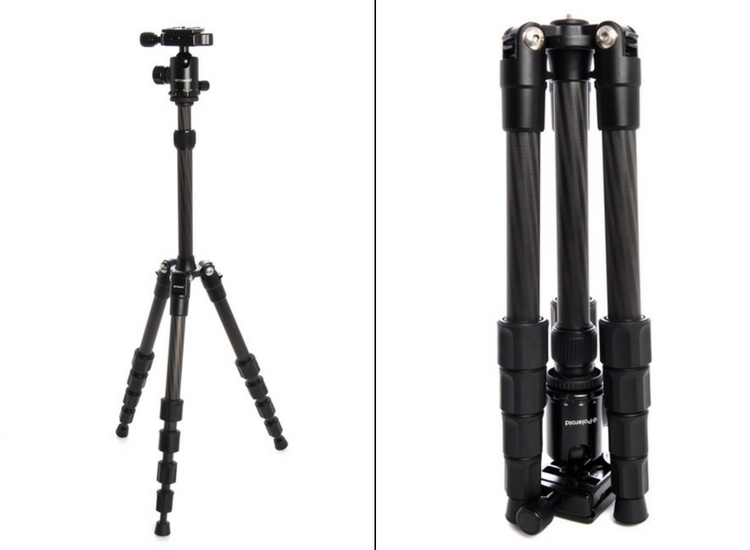
I was excited to open up the box containing Polaroid’s new carbon travel tripod. Upon first inspection, I was impressed. There are five leg segments, each about eight inches in length making the tripod very compact. Additionally, it is designed so the legs fold back over the center post and included ball head, making the fully collapsed tripod very small indeed.

Build

The leg segments are of the twist-lock variety, ergonomic, and very effectively hold the sections in or out with a simple, quick twist. The numerous legs section means that the lowest sections are thin, giving the impression of flimsiness. However, after several days of use, they did not strike me as fragile.

img_3264

The legs of the tripod, even when fully extended are not very long. Polaroid has made up for this shortcoming by having a fixed center post that extends up another foot or so from the top of the tripod, adding substantially to the height. The post itself is expandable, allowing the very compact tripod to stretch almost to my eye level (I’m six foot). Though using this extendable system reduces stability.

polaroid-tripod-review-01

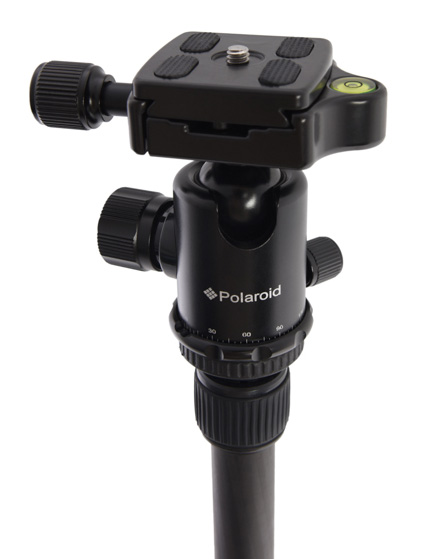
The included ball head is the highlight of this tripod. Made of machined aluminum, it’s designed much like the large Kirk Industries head on my full-size tripod. Polaroid’s version uses three knobs, one to lock the quick release (similar to Arca-style plates), one to control the rotation, and one to lock and unlock the ball itself. One side cut allows for vertical compositions. Simply, it’s a great little ball head that held my big Canon SLR easily. In fact, it was so good, I wish I could purchase it separately to replace the flimsy head atop my current compact tripod. As the head is the point where many light and entry-level tripods fall short, I was impressed and surprised by this one.
img_3248

Usability of the tripod

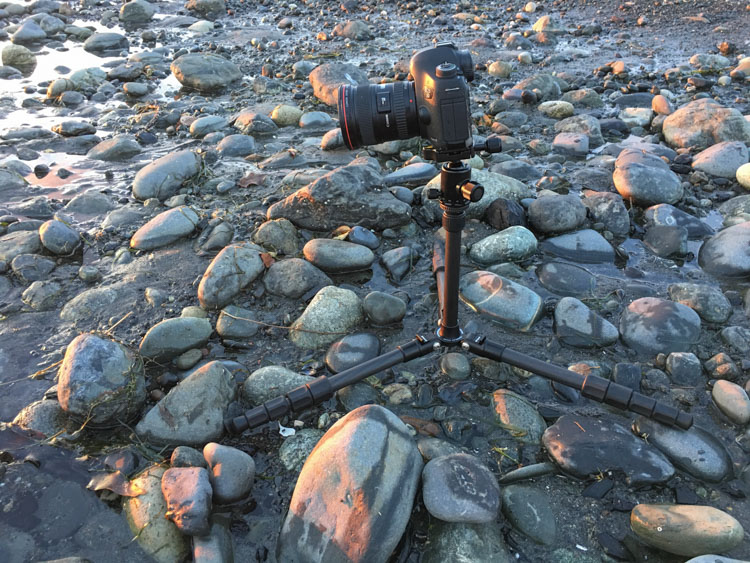
I put this tripod to use a number of times over a couple of weeks, including a couple of sunset photo shoots on a beach, and two evenings photographing the aurora borealis. In bright conditions and relatively fast shutter speeds, the tripod worked well. The height adjusts easily and quickly, though the center post system does limit how low the camera can go. (At its lowest, the camera is still 12-15 inches off the ground, see photo below.)

img_3255

During my sunset photo shoots, the system worked fine at a variety of heights, and I was able to use shutter speeds down to about 1/5th of a second, and still maintain sharp images (see top image in this article).

pltric-90-final

Image showing the design of the non-retractable center post on the Polaroid Carbon Travel Tripod.

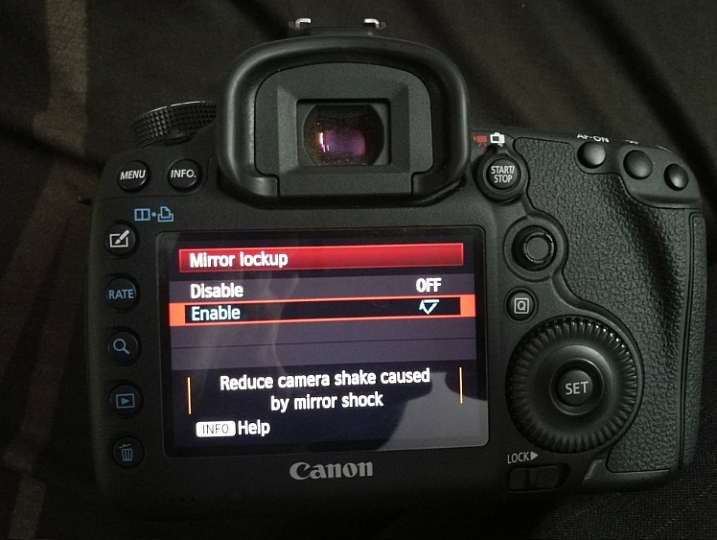
It was when I tried to shoot the northern lights that the tripod showed its one flaw – instability with a heavy camera. The non-retractable, non-removable center post, make the tripod a bit jiggly when used with a full-size DSLR. A point and shoot, or mirrorless system would not likely have the same trouble. However, even with the heavy camera, I was able to attain sharp images when I used a remote shutter release and the mirror lock-up function of the camera.

To maintain sharpness, I was forced to use the camera's timer and mirror lock-up functions.

To maintain sharpness at extended shutter speeds, I used the camera’s timer and mirror lock-up functions.

Conclusion

If it weren’t for that wobbly center post, I would give this small, light tripod, with an awesome ball-head, a glowing review. I’d like to see Polaroid include a system to retract the center post to add stability when I drag the shutter. If the next version of this tripod includes such a feature, I’ll strongly consider adding it to my quiver. In the mean time, I can easily recommend this tripod to anyone shooting with a light-weight camera system. If you are working with a point and shoot, or mirrorless, the simplicity, flexibility, and the particularly impressive ball head make the Polaroid Pro Series Carbon Fiber Travel Tripod a contender.

Rating 3.5 out of 5 stars.

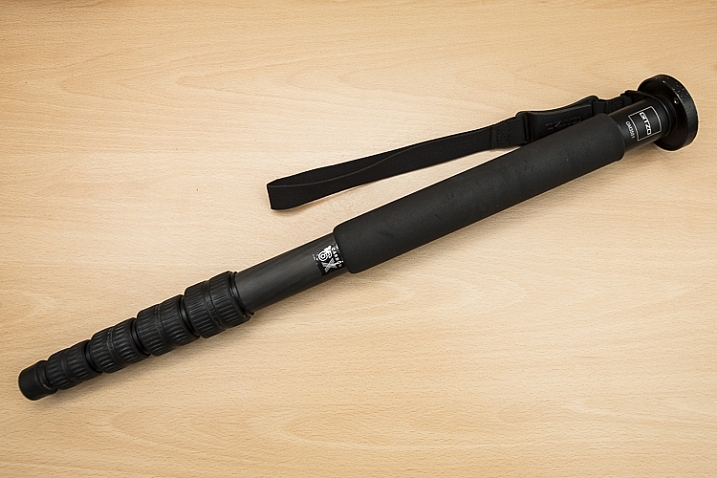
Polaroid 65″ VariPod

2-in-1 Telescoping Camera Monopod with Removable Tripod Balance Stand Base

varipod-polaroid

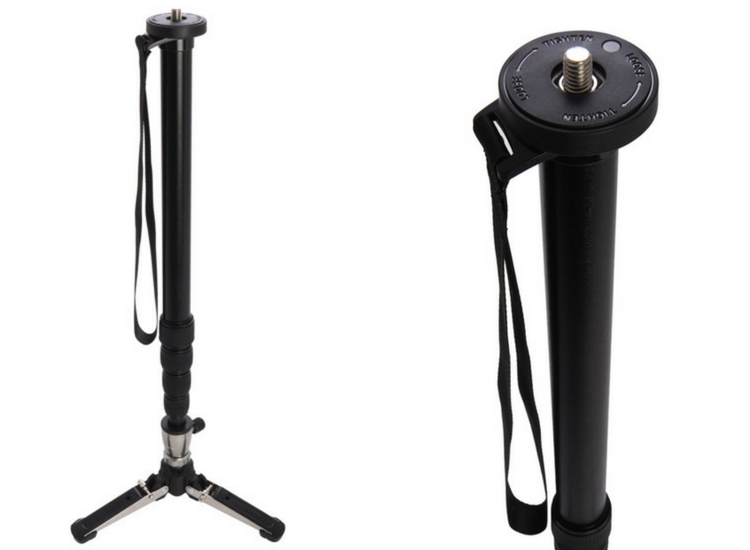
Out of the box, Polaroid’s rendition of this classic long-lens tool, the monopod, looked more or less like a standard version of the product, with one exception. The foot of the monopod incorporates a removable, articulated, three-legged base. At first, I didn’t understand the purpose of this feature, but later, as I used the Varipod outdoors, I figured it out (more on that in a moment). The expandable leg, like the tripod reviewed above, uses a twist-lock system that holds the aluminum tubes firmly extended. I had no issues with segments collapsing, even with a heavy lens and SLR.

In the field, the monopod worked well. The removable foot is articulated so it doesn’t interfere when you tip the monopod forward or back. Though at first confused by this seemingly unnecessary add-on, as I shot with a 500mm f/4 on a sandy beach, the usefulness of the stand was obvious; the monopod foot didn’t sink into the muck. This could be useful to anyone shooting in soft terrain, whether the sidelines of a sports field or a muddy wetland.plmonstand-66-final

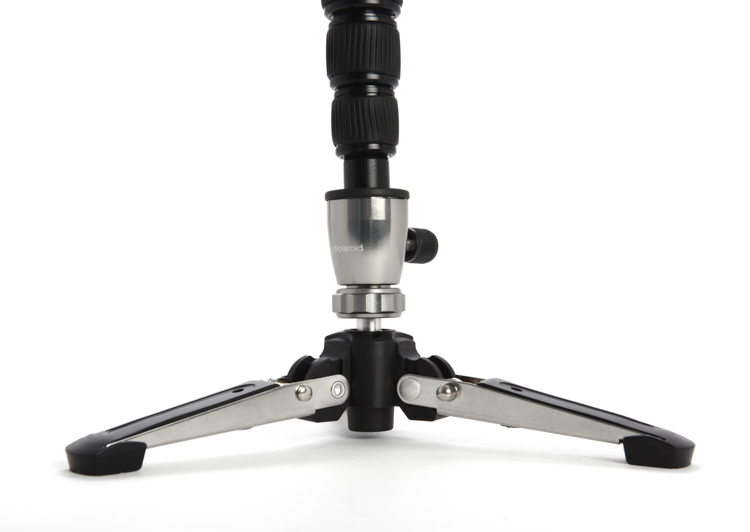
The foot system did seem overly complex. It is made of aluminum with various hinges and springs. Though effective at providing support in soft terrain, it also got dirty and was very difficult to clean. The foot had to be blown out, rinsed, and shaken before I eventually managed to remove all the grains of sand.

The support provided by the monopod allowed me to achieve sharp images with my 500mm f/4 at shutter speeds as low as 1/30th, opening up creative composition possibilities with moving subjects. The monopod is also far lighter and maneuverable, though of course less stable, than a full-size tripod.

Conclusion

The Polaroid Varipod works. The articulated foot provides support in soft terrain, and the legs are sturdy and easy to adjust. My main complaint is the complexity of the foot and difficulty in cleaning. I’d like to see this made simpler, with fewer parts that can jam with sand and dirt. Otherwise, it’s a solid contribution to the market.

Rating 4.5 out of 5 stars.

googletag.cmd.push(function() {
tablet_slots.push( googletag.defineSlot( “/1005424/_dPSv4_tab-all-article-bottom_(300×250)”, [300, 250], “pb-ad-78623” ).addService( googletag.pubads() ) ); } );

googletag.cmd.push(function() {
mobile_slots.push( googletag.defineSlot( “/1005424/_dPSv4_mob-all-article-bottom_(300×250)”, [300, 250], “pb-ad-78158” ).addService( googletag.pubads() ) ); } );

The post Product Review: Polaroid Carbon-Fiber Travel Tripod and Varipod by David Shaw appeared first on Digital Photography School.


Digital Photography School

 
Comments Off on Product Review: Polaroid Carbon-Fiber Travel Tripod and Varipod

Posted in Photography


Cokin launches vintage-styled Riviera Classic tripod

29 Nov

$ (document).ready(function() { SampleGalleryV2({“containerId”:”embeddedSampleGallery_5732238301″,”galleryId”:”5732238301″,”isEmbeddedWidget”:true,”standalone”:false,”selectedImageIndex”:0,”startInCommentsView”:false,”isMobile”:false}) });

If putting your gorgeous retro-styled camera on an ugly, modern tripod just bums you out, filter maker Cokin has a solution. They’ve worked with Slik to produce the Riviera Classic, a tripod designed to match your rangefinder-esque mirrorless camera with vintage touches like a wooden tightening handle and faux-leather leg section covers. The whole thing comes with a handsome carrying pouch. No word yet on pricing or availability.

Press release

Cokin introduces RIVIERA Classic

Modern tripod for retro cameras. And vice versa.

PARIS—November 24, 2016—Cokin is proud to announce the first tripod to adopt the look of current retro cameras.

Inspired by old camera design, Riviera Classic is the only tripod to combine leather and wood elegancy with aluminum sturdiness in a timeless design.

Incredibly stable and extremely stylish, with metal tightening dials similar to those found on antique manual cameras, Riviera Classic is the tripod that was missing to affirm the neo retro look of current cameras. Although traditional in its approach, Riviera Classic provides nevertheless all the features of a modern tripod: telescopic sections, inversible central column, multi-actions head, ergonomic wooden tightening handle, unlockable angles etc.

Made of Iroko wood, known for its exceptional durability, and hand crafted by Atelier Farol at La Rochelle, France, the Riviera Classic handle has been designed to provide optimal control. Over time, and upon usage, the wood patina will make it even more unique.

Covered with a material similar to that found on premium camera bodies, the Riviera Classic leather-inspired sections are both elegant and delightful to handle. Once opened, they reveal the brilliance of brushed aluminum, contrasting with the tripod body. Each section ends with a high density nonslip rubber cap insuring the best support on all types of field.

Every details have been carefully thought, right down to the tightening dials of the Riviera Classic, inspired by the ones found on retro cameras. Made of knurled aluminum, they offer an excellent grasp in order to precisely adjust sections and central column.

We have brought the same care in the making of the soft pouch that comes with Riviera Classic, made of leather-inspired and hessian fabric. The cord is robust and comfortable, to carry it anywhere, with style.

It was very natural that Cokin collaborated with Slik to develop Riviera Classic. Founded in 1948, Slik is renowned for its unique know-how in long lasting tripods making.

Named after its founder Jean Coquin, a famous french photographer of the 70’s, Cokin is the inventor of the innovative Creative Filters System (adaptor ring + filter-holder + filters), the most popular filter system in the world.

Technical specifications:

  • Maximum operating height: 160 cm – 63 in
  • Folded tripod length: 60 cm – 23.6 in
  • Maximum center column extension: 29.7 cm – 11.7 in
  • Weight: 1.54 kg – 3.4 lbs
  • Maximum loading capacity: 5 kg – 11 lbs
  • Multi-action head with 360° plate
  • Carrying case included

Articles: Digital Photography Review (dpreview.com)

 
Comments Off on Cokin launches vintage-styled Riviera Classic tripod

Posted in Uncategorized


Tripod versus Monopod – a Comparison and When to Use Each

12 Oct

Tripods and monopods, you’re very likely to have seen them. They both have their uses and their purposes for existing. But when do you use one over the other and what advantages do each have? In this article, I’ll look to explain when you would use a tripod versus a monopod and how they’re not necessarily exchangeable in their properties.

Tripods

Jake Khuon

By Jake Khuon

Uses and pros of tripods

Let’s start off with tripods. You know, those three legged stands that nearly all photographers have?! They provide your camera with a sturdy platform to which you attach your camera. Tripods come in all different sizes and have a huge variety of heads (the actual mounting point) to suit different shooting styles. They are especially helpful for avoiding camera shake when using slow shutter speeds. This is most useful when you want to blur water in a stream, show car light trails at night or simply do a long exposure.

tripod versus monopod - use a tripod for long exposures

With this frame, I used a tripod to prevent camera shake that would have been caused by the 3.2 second shutter speed. This shutter speed was used to blur the water.

Tripods can also be extremely helpful with macro, still life, and studio photography as they hold the camera in the exact spot you want while you set your shot up. Time-lapse photographers can also benefit from using a tripod over a monopod as it will ensure that there is no jumping between each frame as the camera is securely locked in one position. However, tripods are not without their cons.

tripod versus monopod

Use a tripod for long exposures like this.

Cons of tripods

However, tripods are not without their cons. They can be heavy to carry around and take some time to set up. Depending on which head you are using, tripods can also be very limiting for quick camera movements which you may need when photographing moving objects. Everything about using a tripod is slower. So if it’s speed, and ease of portability that you’re looking for and stability isn’t your main priority, then perhaps a tripod is not the best item for you.

Monopods

tripod versus monopod - use a monopod for more mobility

This is the monopod I use. Here, it is compacted (54cm/21.26″) but it extends to be 192cm (6’2″). It is made of carbon fibre and weighs in at only 620g (1.36lb) but can hold up to 18kg (39lb).

Uses and pros of monopods

When a rock solid platform for stability isn’t a priority many photographers turn to a monopod for their camera support needs. Just as the TRI in tripod means three, the MONO in monopod means – you guessed it – one! They are simply a single leg support on which you can mount your camera and/or lens. They too come in different sizes and will support different weight limits.

Monopods are perfect for taking the weight of a heavy lens/camera combination to stop aches and pains from a long day of shooting. If you’ve ever seen sports photographers with their long lenses, then you may have noticed that they are often being supported by a monopod. Monopods also offer much more versatility in movement as you now have only on one leg, not three, and they are much quicker to set up than their three-legged brethren.

tripod versus monopod - use a monopod for more mobility

This photo was taken using a 400mm f/2.8 lens. These lenses are quite heavy, so using a monopod is a great way to take the weight off your arms. Daniel Smith/Getty Images.

Cons of monopods

A monopod, however, will not offer you the same stability as a tripod, so if you’re considering a monopod as a lighter alternative to a tripod, do remember this. If it’s milky streams and flowing car lights that you’re after, a monopod will not help you here at all; you will still need a tripod.

But if your arms get tired from holding your camera up all day, then a monopod may well be very suited to your needs.

Conclusion

tripod-versus-monopod

While tripods and monopods offer extra support and in some cases, stability for your camera, there are times when one is more useful than the other and one cannot always be used in place of the other. Generally, for very long shutter speeds or time-lapse photography you’ll want to use a tripod to avoid camera shake and to maintain consistency between each frame. But if it’s a little extra support and to take the weight of a camera/lens combination, you can’t go wrong with a monopod.

Do you have either or both of monopod and tripod? How do you find using each of them?

googletag.cmd.push(function() {
tablet_slots.push( googletag.defineSlot( “/1005424/_dPSv4_tab-all-article-bottom_(300×250)”, [300, 250], “pb-ad-78623” ).addService( googletag.pubads() ) ); } );

googletag.cmd.push(function() {
mobile_slots.push( googletag.defineSlot( “/1005424/_dPSv4_mob-all-article-bottom_(300×250)”, [300, 250], “pb-ad-78158” ).addService( googletag.pubads() ) ); } );

The post Tripod versus Monopod – a Comparison and When to Use Each by Daniel Smith appeared first on Digital Photography School.


Digital Photography School

 
Comments Off on Tripod versus Monopod – a Comparison and When to Use Each

Posted in Photography


Gitzo updates Systematic tripod range with new materials, big feet and Easy Link sockets

05 Oct

Gitzo has introduced a new range of Systematic tripods that it says are more stable and stronger, and which feature new locking mechanisms for the leg sections. The latest models use what the company calls Carbon eXact for the leg tubing, which it claims offers improved ‘balance between rigidity and weight’. The Systematic range is Gitzo’s top end series and the tripods are designed for heavy cameras and long lenses. Larger feet have been introduced for the new models to prevent slipping and for making uneven ground more easy to rest on, and the twist-lock leg sections have been given G-lock Ultra clamps that Gitzo says are quicker and easier to use.

The company has also added a connector for the Manfrotto Easy Link system in a first for the Gitzo line-up. This threaded socket allows accessory arms and clamps to be attached to the casting of the tripod so reflectors, flash units, trays and other accessories can be held in place.

The new models will be priced from $ 799.99/£649.95 and a new range of monopods will start at $ 319.99/£214.95.

For more information see the Gitzo website.

Press release:

Gitzo introduces:
The New Generation of Photography Support Solutions

October 2016 – Gitzo, pioneers in developing some of the most advanced and revolutionary technologies for professional camera equipment, proudly introduce the new generation Systematic tripod family and the latest Monopod family, setting new industry standards in premium photography equipment.

The iconic Gitzo Systematic tripod family is the high-end choice for exacting professional photographers who use long lenses and heavy cameras and require extreme precision – down to the smallest detail – in their work and equipment. The new Gitzo Systematic tripods leverage the latest innovation for the greatest performance ever: the leg tubes are upgraded to Gitzo’s latest generation Carbon eXact, improving the balance between rigidity and weight. New, 50mm diameter big feet enable ultimate stability, preventing slipping and movement. The new G-lock Ultra allows even more comfortable operation and protection while the leg angle selectors guarantee a quicker switch between leg angles – further enhancing ergonomics. Moreover, the new Gitzo Systematic models feature the Easy Link attachment, a 3/8” thread through which a rich array of innovative photography accessories can be attached to facilitate the most advanced shooting techniques. The tripods are offered in a new sizing assortment.

The new Gitzo Monopods are designed to guarantee unfailing support for the highest quality equipment, enabling professional photographers to comfortably capture the golden moment. They are the ideal combination of rigidity, light weight, precision, rapid set up speed and ergonomics. Now even stronger than before thanks to state-of-the-art Carbon eXact tubing and G-lock Ultra leg locks, their new big foot ensures rock-solid footing on any surface while providing smooth movement with its integrated ball; the new models also feature enhanced aesthetics and improved sizing selection.
Series 4 Gitzo Monopod models (top leg diameter 37.0mm) replace the previous Series 5 models; the slimmer top tube contributes to an easier grip and lighter weight, while ensuring rigidity from the stiff Carbon eXact tubes.

Underscoring Gitzo’s dedication to groundbreaking excellence, the refinements to the new Systematic tripods and Monopods – in terms of strength, stability and rigidity, safety and security, set-up speed, ease of use and ergonomics – set new paradigms in the photography equipment market.

Gitzo photography products are superbly engineered to withstand the roughest handling. Precision assembly, high quality materials and fine control are distinguishing qualities that represent a market leader that has been unsurpassed for over half a century.

Pricing for the new Systematic tripods starts at £649.95. The new Systematic monopods are available from £214.95.

More information on the new Gitzo Systematic tripod and Monopod ranges can be found online at www.gitzo.co.uk/tripods-systematic

Articles: Digital Photography Review (dpreview.com)

 
Comments Off on Gitzo updates Systematic tripod range with new materials, big feet and Easy Link sockets

Posted in Uncategorized