RSS
 

Posts Tagged ‘Tricks’

4 Fun Tricks to Enhance Your Photos With Lightroom’s Graduated Filter Tool

18 Jul

A few weeks ago I shared some key tips on how to get a lot out of Lightroom by using only a handful of sliders and while this is a great place to start eventually you’ll want to get a bit more creative with the software. Today I’m going to show you four different things that you can accomplish by using Lightroom’s Graduated Filter tool.

4 Creative Ways to Use Lightroom’s Graduated Filter

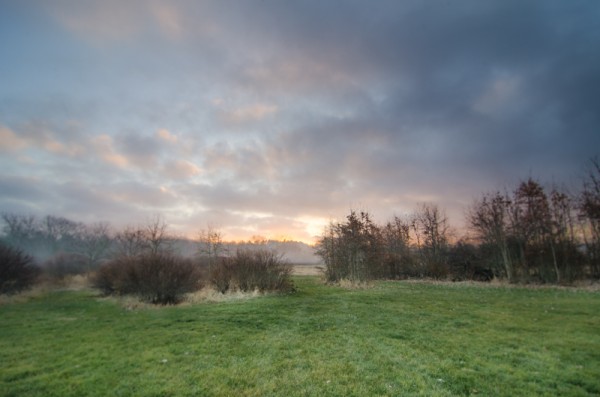
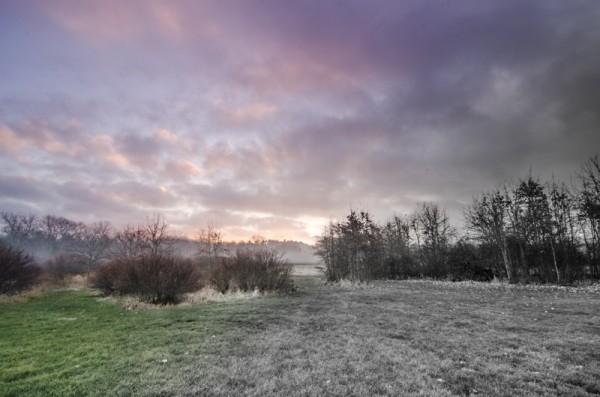
Split White Balance – This technique can be a powerful one when trying to get some interesting colors out of the sky, but retaining the natural colors of the earth. In the photo below I’ve added some pinks and purples to the sky, but was able to retain the natural green color of the grass.

whitebalanceb&a  

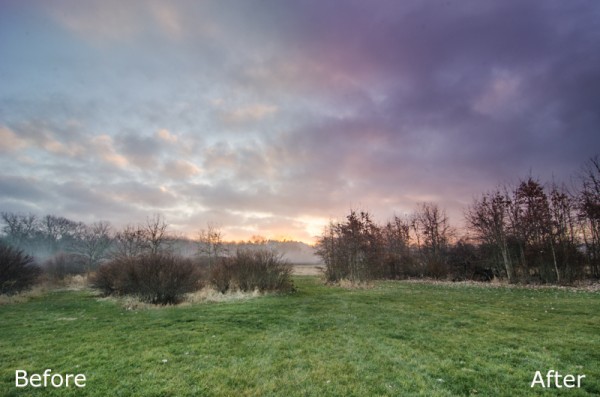
How I Did It – The graduated filter was dropped in from the top and rests just above the horizon line. I then made adjustments to the temperature and tint sliders until I was happy with the colors. Note: if there are objects that fall within your graduated filter’s effected zone you can correct it by using the adjustment brush and adjusting the tint & temp sliders locally for that specific area.

Direct the Light – By applying multiple filters to your photo you can create spot light like effects, leading lines and even your own very customizable vignette effect like seen below.

directing eyes

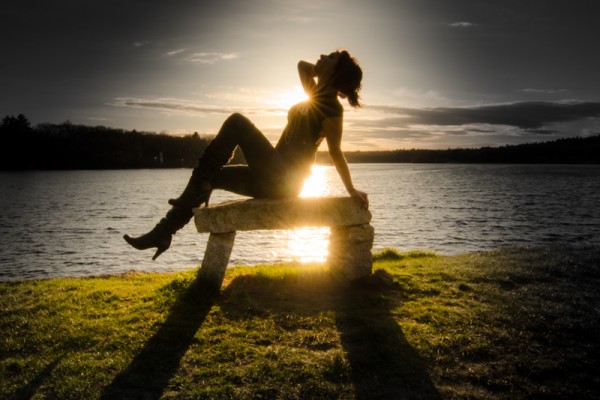
How I Did It – Here I’ve dropped in four different filters which all work together to create the final effect. There are two that are pulled in from the sides of the frame to drop the exposure of the edges. Then I dropped one in from the top and placed it almost at the bottom of the frame I use this one to increase the exposure of the overall photo excluding the very bottom of the frame. However, once this one was applied the top of the frame was over exposed so I then apply one more filter, again dropped in from the top, but placed towards the middle of the frame. This time I drop the exposure to cancel the effect of the previous filter and thus create the vignette effect. Yikes that was a mouthful!

Soften Your Borders – Sometimes you might want to soften the borders of your photo to draw in more attention to the center of the frame.

soft borders

How I Did It – This is a fairly simple process of dropping two filters in one from each side of the photo and then reducing the sharpness and clarity on both of them to -100. This effectively blurs out the sides of the frame and draws your attention to the middle.

Create a B&W to Color Transition – A very cool effect can be the black and white to color transition. It’s  not something that’s going to be used on every photograph you produce, but when you do use it it will often get people to look twice.

Black & White Color

How I Did It – The black and white to color transition is done by using one single graduated filter and dropping the saturation to -100. It’s up to you where you want it placed and how dramatic you’d like the transition to be – a narrow filter makes for a more dramatic transition.

For Those Who Prefer Video

If you’re anything like me it is so much easier to learn this kind of thing when things are in motion and therefore I’ve included a video which walks you through everything I talked about above, plus a few other Lightroom goodies as well. Enjoy!

Post originally from: Digital Photography Tips.

Check out our more Photography Tips at Photography Tips for Beginners, Portrait Photography Tips and Wedding Photography Tips.

4 Fun Tricks to Enhance Your Photos With Lightroom’s Graduated Filter Tool


Digital Photography School

 
Comments Off on 4 Fun Tricks to Enhance Your Photos With Lightroom’s Graduated Filter Tool

Posted in Photography


Three Tricks for Faking Depth of Field in Your Photos

29 May

Extra photos for bloggers: 1, 2, 3

There was a time when you’d want to stare at a photo for hours but couldn’t quite put your finger on why.

Then you taught yourself a little bit about photography and realized it was a photo’s dreamy depth of field that reeled you in — razor sharp details with a background that slowly fades to a wonderfully creamy blur.

To get really fantastic depth of field, photographers invest in pricey lenses. The good news is there are ways to create the illusion of depth of field without forking over the moola.

We’ll show you three totally accessible tools that’ll help you get a similar effect and will be fun to experiment with, too!

How to Fake Depth of Field

p.s. WE ARE HIRING A WEB DEVELOPER. If you love photography and San Francisco and codes, APPLY HERE.

p.p.s. WE ARE ALSO HIRING AN EVANGELIST/BIZ DEV HERO. Creative deal-maker types, APPLY HERE.

Why It’s Cool

When you look at a picture, your brain does all kinds of neat things to figure out what’s going on, and it just about does it all in a single instant.

Well, we just happen to speak brain! It turns out there are a bunch of cool tricks that can really please your viewer’s eye without them knowing you didn’t use a fancy lens.

We are going to show you three simple creative cheats to control the viewer’s perception of depth of field in your photos. That means you’ll be able to create the illusion that parts of your photo are out of focus while your main subject is crisp and clear.

The Ingredients List!

  • A camera
  • A glass window
  • Or a translucent glass window (or steamed up glass)
  • Or a foggy day

The Fog Method

beforeFog can be a bummer when you’re wishing for sunny weather, but here’s one way to embrace it: use its diffusing super powers to your advantage when you’re out shooting.

When it’s foggy out, objects near you appear clear and things further away are, well, foggy.? That’s the simple principle you’re working with.

Wide open spaces such as lakes or the coast work really well for playing with this concept as mist tends to be heavier over water.

Experimentation is the key, so do try setting your point of focus and exposure at a few different places in the picture to see what effects you get.

TIP: If you find a subject you really like, it can be worth waiting or coming back as the density of fog or mist can change over the course of a few minutes.

Diffuse Details with Glass

beforeGlass is a super accessible tool to get your subject to pop. All you need to do is sit your person just behind the glass.

There are two ways glass works to make your subject stand out.

The first is that anything reflected in the glass is by default slightly diffused. Juxtaposed, your person, who we’ll assume is in focus, looks extra sharp. Simple!

The second is your setting. If the interior that sits behind the glass is dark (which it normally is since it sits farther away from the sunlight that streams in), then your subject will pop for that simple reason.

You’ll create a perceived depth of field by having your subject well-lit and in focus against a dark backdrop and out-of-focus reflections.

TIP: Car windows work really well. The trick with a car is to setup the shot and then to try covering any widows which are letting light fall onto anything but the subject. You’ll be amazed at the effect of simply hanging a jacket to cover the light of an opposite-facing car window.

Translucent Glass for Mega Blur

beforeThe third method is placing your subject behind translucent glass. You might be able to find translucent glass in a store front, a shower door, or create your own by fogging up clear glass with steam.

The way this method works is a little more obvious — translucent glass obscures details as they get further away from it.

?You’ll notice that the hands are in focus, but the body which is only slightly further back starts to get dramatically blurry.

?In this picture, we placed a bedside table lamp in the shower (to the right of the models feet, pointing upwards) to add drama and illuminate her shape. The light from behind the model was from an open window.

Taking It Further

  • Turn a foggy picture upside down to give it an extra ethereal look (like we did above!).
  • Using the third method, Anastasia Mastrakouli made this beautiful alphabet out of photos of nude silhouettes.
  • Another method of getting faking depth of field is the Brenizer Method! Check out our guide.

Related posts:

  1. Get Greater Depth of Field with the Brenizer Method Extra photos for bloggers: 1, 2, 3~Have a cool photo…
  2. Get Sharp Photos with These Easy Tricks Extra photos for bloggers: 1, 2, 3 Getting a once-in-a-lifetime…
  3. 3 Tricks to Turn a Spring Clamp Into Your Best Photo Accessory ~Have a cool photo product or site? Reach 270,000 photo…


Photojojo

 
Comments Off on Three Tricks for Faking Depth of Field in Your Photos

Posted in Equipment


Pre-Photoshop tricks and the apps you can use today

19 Mar

logatto.png

The Metropolitan Museum’s ‘Faking It: Manipulated Photography Before Photoshop’ exhibit includes some heavily manipulated imagery created long before the days of digital. We look at a selection of these photo illustrations and suggest how they might be easily created today using mobile image editing apps available for mobile devices. Check out the five apps that could be used to make similar photographic illustrations today at connect.dpreview.com

News: Digital Photography Review (dpreview.com)

 
Comments Off on Pre-Photoshop tricks and the apps you can use today

Posted in Uncategorized


6 Tricks for Shooting Steady Shots Without a Tripod

22 Dec

Once upon a time, every photographer needed a tripod. Early cameras were too bulky and heavy to hold by hand. Later, it was absolutely essential to have a tripod in order to get a steady shot. Indeed, tripods can help achieve sharp, crisp shots with your DSLR camera. However, tripods aren’t without fault. They can be expensive. Tripods can also Continue Reading

The post 6 Tricks for Shooting Steady Shots Without a Tripod appeared first on Photodoto.


Photodoto

 
Comments Off on 6 Tricks for Shooting Steady Shots Without a Tripod

Posted in Photography


When to use Exposure Compensation. Canon Nikon tips tricks

19 Dec

Exposure Compensation www.elitevideo.com . When do you use it? The answer is, When you are taking a series of photos in a setting that has a lot of darkness around a subject, or a lot of brightness around your subject. If it is too dark or bright around your subject, then every picture you take will be over exposed or under exposed, because the camera does not know what light level to concentrate on. With exposure compensation, You are telling the camera, “Give me a little more or a little less light that you have been in this situation- on every shot.” The best way to determine if you need exposure compensation is to do a test shot in the enviornment that you will be shooting. For example Snow (lots of white), a theater (lots of dark), etc.
Video Rating: 5 / 5


Photography Tips and Tricks – Episode #1

10 Dec

See more episodes at kelbytv.com Welcome to Photo T&T: the weekly podcast that offers tips and techniques for taking the best photos you have ever taken. This week, landscape photographer Bill Fortney offers 3 tips on using the new Nikon D-600 menu functions, RC shares a tip on setting up bracketing on your camera, and Scott explains how easy it is to use wireless remotes to fire your camera. Tune in for these tips, plus a contest with prize and two photographers to check out for inspiration.
Video Rating: 4 / 5

 
Comments Off on Photography Tips and Tricks – Episode #1

Posted in Nikon Videos


Tips & Tricks – DSLR Import in Final Cut

08 Nov

Abe from the CMF Team answers a question that many current student filmmakers are having while shooting on Canon’s DSLR cameras, such as the 5D, 7D & 60D. Created by CMF Tips & Tricks at CMF Central in 2012 as part of Campus MovieFest, the world’s largest student film festival. Tips & Tricks – DSLR Import in Final Cut Cast & Crew : Abe Mohammadione – Captain with ———- Become a Fan of CMF on Facebook: www.facebook.com Follow CMF on Twitter: @campusmoviefest www.twitter.com Subscribe to CMF on YouTube: www.youtube.com To learn more about CMF please visit: www.campusmoviefest.com More info – CMF Campus MovieFest movie short film festival fest five minutes ‘5 minutes’ ‘short film’ ‘one week’ university college coed student ‘film festival’ ‘world’s largest’ CMF Central 2012 ‘7 days’ seven
Video Rating: 5 / 5

 
Comments Off on Tips & Tricks – DSLR Import in Final Cut

Posted in Nikon Videos


Windows 7 – Title Bar Tricks and Tips Including Keyboard Shortcuts

25 Aug

Other ways to maximize windows and bring up window options in Windows 7.

Here are a couple of tricks with window title bars in Windows 7 – some of these tips may work in other Windows versions:

* Double-click the title bar of a window to maximize it (if the current window supports maximizing). Double-click the title bar again to restore the window to its previous size. …

Read more at MalekTips.
New Computer and Technology Help and Tips – MalekTips.Com

 
Comments Off on Windows 7 – Title Bar Tricks and Tips Including Keyboard Shortcuts

Posted in Technology


Nigel Barker: How To Take Wedding Photos – Wedding Photography Tips and Tricks

01 Jul

bit.ly ? Nigel Barker: How To Take Wedding Photos – Wedding Photography Tips and Tricks Weddings are full of magical moments and every bride and groom hopes their photographer will capture them on film. Using different lenses, angles and perspectives can ensure that those spontaneous…

www.nwf.org – You don’t have to be a pro to take great pictures of nature and wildlife. Get tips from the experts at National Wildlife magazine on how to take great nature photos and even win (!) a photo contest. For more tips go to www.nwf.org This video shows examples of prior Photo Contest winning images and provides insights from National Wildlife’s Editors on what made the judges pick these photos as winners. The photos themselves are remarkable to see!


Grey background lighting tips and tricks — Quick Shots 08

27 Sep

When it comes to choosing a background for your studio portraits white or black are most photographers first choice, but what about grey? Professional photographer Gavin Hoey www.gavtrain.com demonstrates some great strobist tricks and tips for turning the humble grey background into a black, white or even pink seamless backdrop.