RSS
 

Posts Tagged ‘Tips’

11 Tips for Shooting Travel Stock Photography to Make Money

30 Sep

The post 11 Tips for Shooting Travel Stock Photography to Make Money appeared first on Digital Photography School. It was authored by Kav Dadfar.

Stock photography is a tough industry to master. The competition is fierce and prices have been falling over the last decade. But if you are willing to put the effort in and have a long term plan, you can certainly reap the rewards. As a photographer who has been involved in stock photography for over a decade, I have certainly seen the highs and lows. So here are my top tips for shooting travel stock images and how to make money from it.
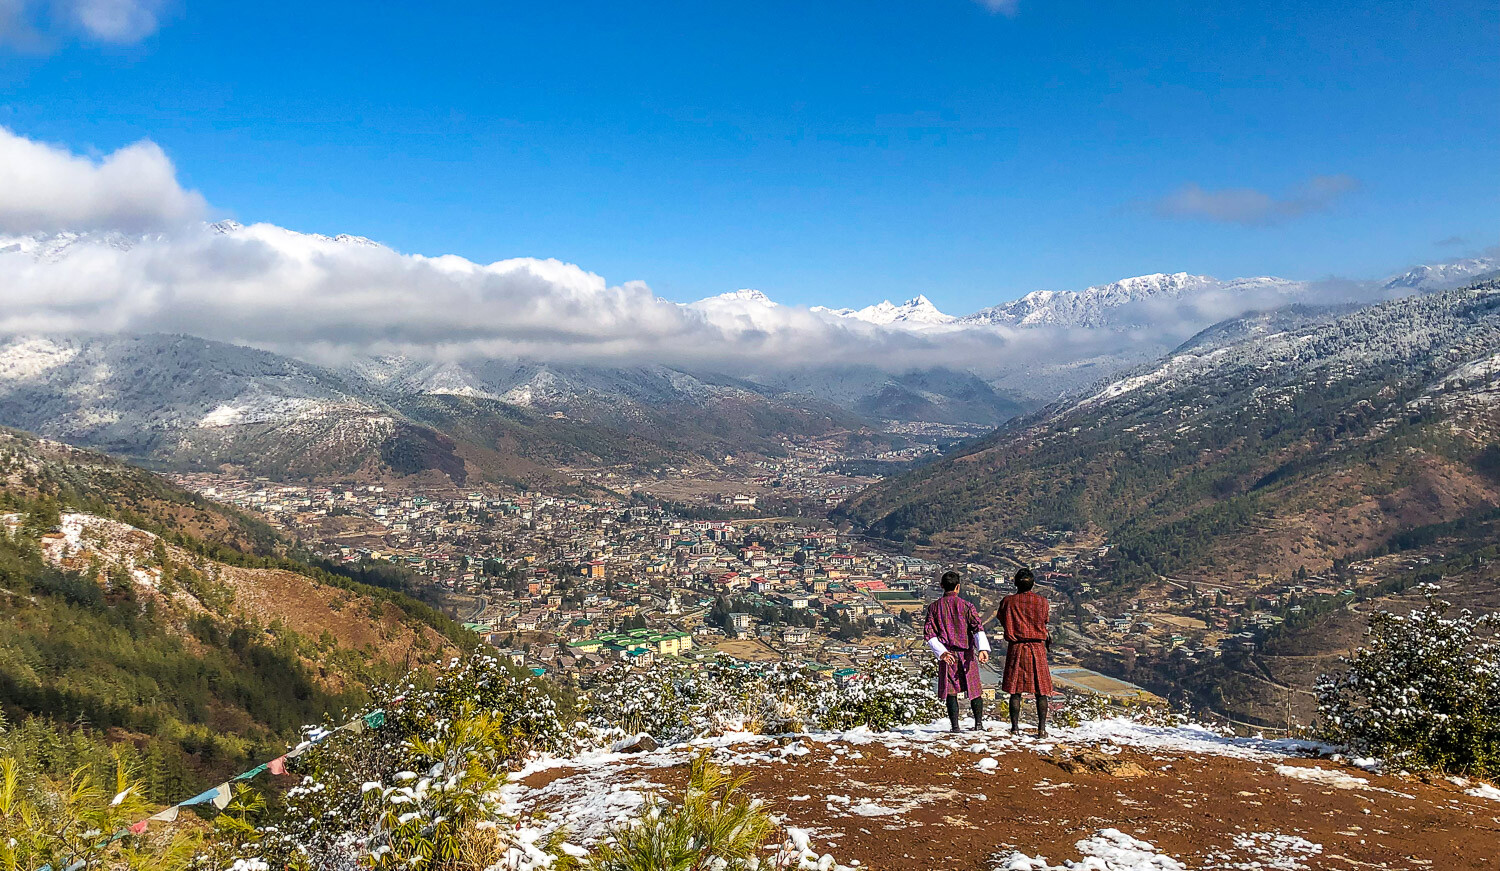
shooting-travel-stock-photography

1. Include people

Picture buyers are always looking for something new and fresh. Including a person can often be what makes your images unique to the thousands of others that already exist. Including a person in the shot also gives the image some context and shows more of an experience rather than just documenting a place.

Some scenes are busy enough that you don’t need someone to pose. But if you do need someone, don’t be afraid to ask a stranger. Rarely have I found that anyone says no. I always offer to send them a copy of the image to sweeten the deal. This doesn’t mean you shouldn’t take the more generic-type shots. It more about maximizing your sales potential by shooting a variety of different images.

shooting-travel-stock-photography

2. Get a model release

So once you have included a person when shooting travel stock photography, it is a good idea to get a model release. If the person or people are mainly unrecognizable, or if you intend to sell your shot for editorial purposes only, you won’t require one. But be aware that some stock agencies will require a model release even if it is someone’s hand showing in a photo. Of course, there are times where it simply isn’t feasible, for example, if you are photographing a crowd of people. Getty Images have a great model release form that you download here.

shooting-travel-stock-photography

3. Shoot portrait and landscape

When shooting travel stock photography, you should always shoot a landscape and portrait version. Not all scenes work in both landscape and portrait, so sometimes it might not be possible. But if you can, it will come in really useful.

But not only portrait and landscape, try to capture some different compositions. For example, place your point of interest on the left or right. Leave room above and below. You are already at the location so you might as well cover as many possibilities as you can. You never know when a buyer will ask if you have that image in a different crop. Doing this will mean that for example, your image may get used as a double-page spread or a front cover.

11 Tips for Shooting Travel Stock Photography to Make Money

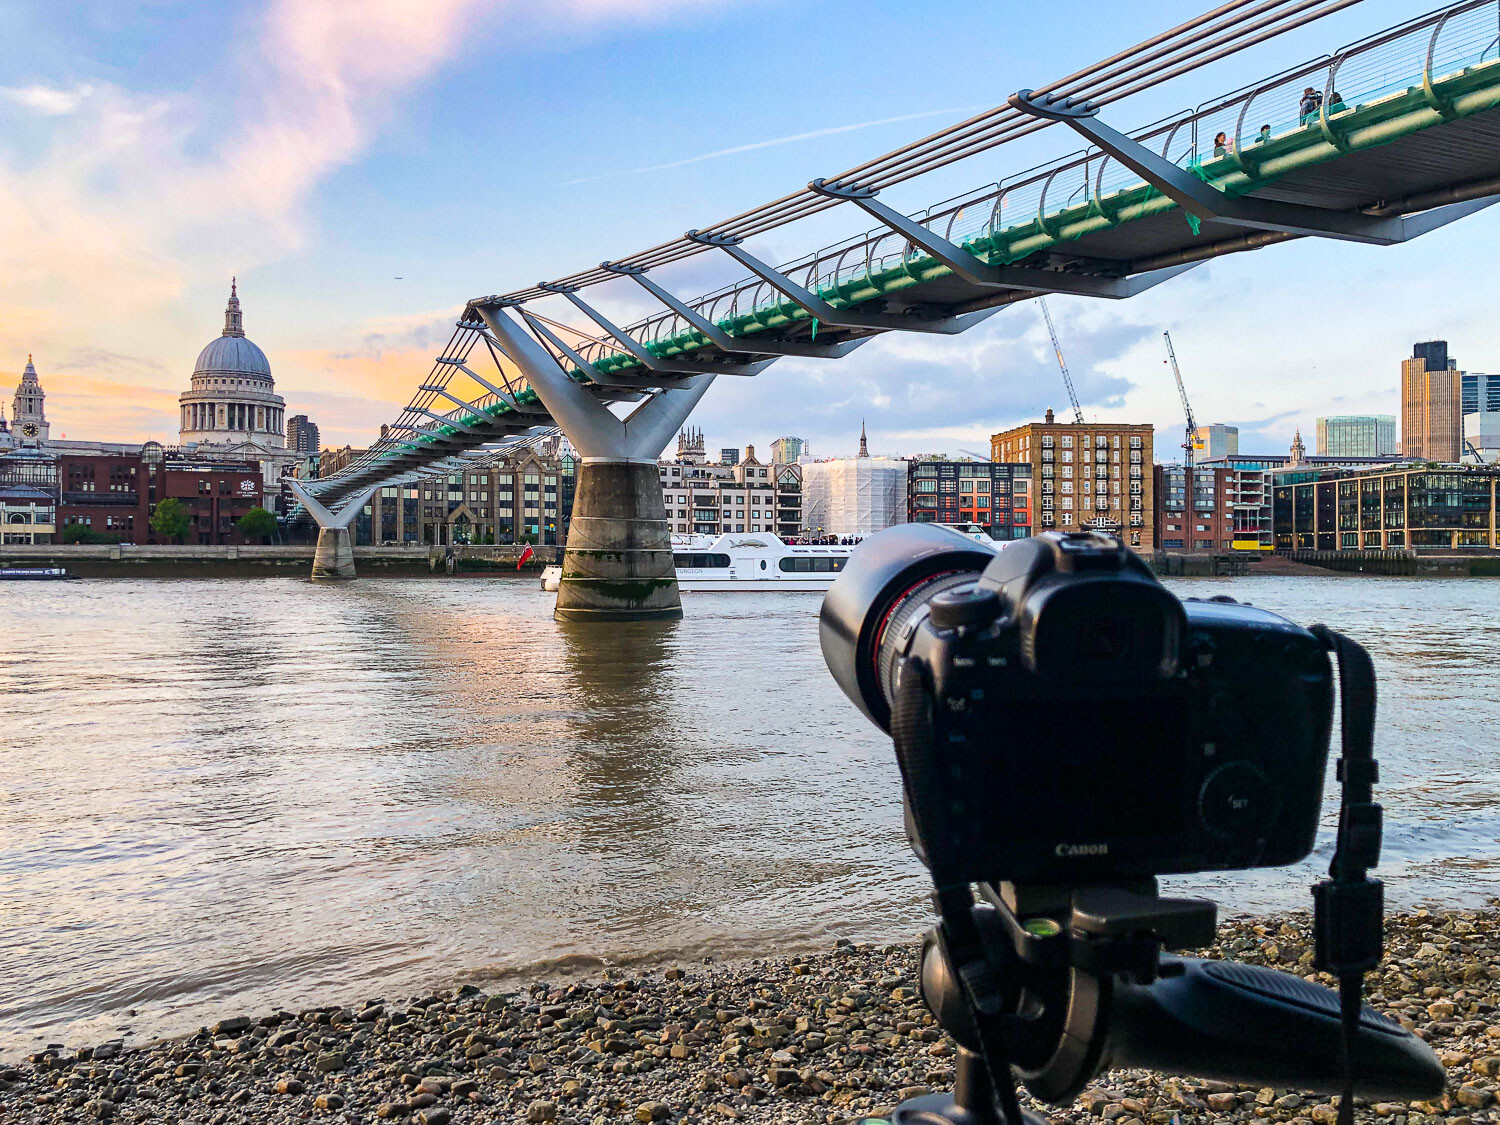
4. Leave space for copy

It is important to shoot images with dead space to allow for copy or headlines to be put in. Sometimes this can mean breaking those all-important rules of composition you have spent years perfecting. But it’s worth it to make those sales.

As mentioned above, you can always shoot multiple versions of the same shot. Try to imagine where and how your image will be used in a publication (or even a website), and compose your shot with that in mind.

Image: There was plenty of free space at the top of this image for the copy to be placed.

There was plenty of free space at the top of this image for the copy to be placed.

5. Choose the right agency

This might be pretty obvious, but it’s important to submit your images to the correct stock photography library. If you shoot travel stock photography, then a specialist travel site is best. If you shoot still life, then an agency that specializes in this would be more successful.

Beyond that, spend some time researching the agency that you are thinking of submitting to. For example, are you happy to see your images sold for a few cents? Consider what your commission rate will be as well as they vary greatly from one agency to another.

shooting-travel-stock-photography

6. Think carefully before submitting to Microstock

Every single person I have ever spoken to who submitted to microstock sites regrets doing so down the road. Of course, there are probably some photographers out there who are very happy with their returns. The problem is that you will need such a huge collection of images with a wide coverage to see any returns that will be worth your time. This is because microstock sites sell images for cents. Ask yourself, would you prefer to sell one image at $ 25 or 250 at 10 cents?

11 Tips for Shooting Travel Stock Photography to Make Money

7. Find fresh angles

If you really want to make your images stand out and catch the buyer’s eye, photograph it differently! Every picture buyer has seen the classic shot of the Eiffel Tower, and it has been on the cover of hundreds, if not thousands, of publications. So the same is not likely to catch many prospective client’s attention. It’s not always easy, but if you can capture something different or unique, you might end up with a few sales from it. This could be as simple as photographing something from lower down or higher up.

11 Tips for Shooting Travel Stock Photography to Make Money

8. Unique location

As well as finding fresh angles, find new locations. Iconic locations such as London or New York, are constantly changing, so there are always potential new places from which to capture photos. This could be from a new rooftop bar with a unique view of Manhattan or new art installation on the streets of London. Even if your location isn’t ever-changing, finding somewhere with a view that not everyone photographs can be very useful.

shooting-travel-stock-photography

9. Quality over quantity

This is often a bit of a contradiction when it comes to stock photography because stock photography is a numbers game. The more images you have, the better your chances of making a sale. However, the key is that they have to be quality shots that people would be willing to pay for. This is the reason that it will take most stock photographers a few years to get a wide enough coverage of images to see a decent return.

Try to always shoot the best locations at the best possible time of day. More often than not, this will be sunrise or sunset, but you will need to assess each scene individually. Your aim should be to capture each shot in a way that you can sell it.

11 Tips for Shooting Travel Stock Photography to Make Money

10. Stay local

Shooting good travel stock photography doesn’t always mean jetting off to far-flung locations. You can often produce great travel stock images a lot closer to home. If, like me, you are lucky enough to live near an iconic place (for me it is London), then you already have endless photo opportunities.

Shooting locally has other benefits as well.

You can revisit locations easily if the weather wasn’t great. You don’t have to worry about the additional travel expenses that eat into your profits. In fact, you will probably find that your local shoots end up having a far better ROI (return on investment) than traveling to other places.

11 Tips for Shooting Travel Stock Photography to Make Money

11. Do something different

Another way that you can try to capture different types of images is to use different technology. For example, drones have now been around a while and can offer a completely new and unique view of something that may have been photographed a lot. But there’s no denying it’s getting harder and harder to fly drones in many places. So if it’s something you are interested in, it’s probably a good idea to get a license. But drone images do sell pretty well, so it is worth considering.

shooting-travel-stock-photography

Conclusion

For most people stock photography will never be the main source of income. However, with some preparation and planning, you can certainly make some extra money from your hobby or profession. The key to being a successful travel stock photographer is to treat it like a business as much as possible. Keep your costs as low as you can, and shoot as often as you can.

Do you have any other tips you’d like to share? Do you make money from shooting travel stock photography? Share with us in the comments!


shooting-travel-stock-photography

The post 11 Tips for Shooting Travel Stock Photography to Make Money appeared first on Digital Photography School. It was authored by Kav Dadfar.


Digital Photography School

 
Comments Off on 11 Tips for Shooting Travel Stock Photography to Make Money

Posted in Photography


7 Tips for Stunning Black and White Photography (Comprehensive Guide)

15 Sep

The post 7 Tips for Stunning Black and White Photography (Comprehensive Guide) appeared first on Digital Photography School. It was authored by Jaymes Dempsey.

How do you achieve stunning black and white photography?

stunning-black-and-white-photography

Black and white photography is one of the most intimidating genres out there, mostly because it’s associated with lots of established names, as well as the “fine art photography” label.

But here’s the thing:

Black and white photography isn’t actually difficult. In fact, it’s just like any other genre of photography: There are a few tips and tricks that, once you apply them to your shooting process, will instantly improve your black and white photos.

And that’s what this article is all about. I’m going to share with you seven tips for stunning black and white photography. And you’ll come away with the ability to take masterful black and white photos wherever you go.

Sound good?

Let’s dive right in:

1. Shoot in high-contrast light for the most impactful photos

Here is the number one thing you need to remember about black and white photography:

It’s all about the contrast.

In fact, if that’s all you take away from this article then you’ll have profited enormously, because contrast is the lifeblood of black and white photography.

7 Tips for Stunning Black and White Photography (Comprehensive Guide)

Now, there are a number of ways to create contrast in your photos. And I’ll explore these different techniques below.

So let’s start at the very beginning:

With light.

If you can’t make the light work for you, your black and white photos are just going to look like a muddy mess. Instead, you need to recognize the type of light you’re working with, and you need to try to use that light to achieve as much contrast as possible.

The best light for black and white photography is (no surprise!) high-contrast light. More specifically, light on sunny days.

If you’ve explored other genres of photography, you’ll know that light on sunny days is harsh, it’s unpleasant, and it just doesn’t look good.

Unless you’re a black and white photographer.

7 Tips for Stunning Black and White Photography (Comprehensive Guide)

Because bright, sunny light enhances dark tones and creates intense light tones. This looks amazing in black and white photos, and it’ll really take your black and white images to the next level.

If you want to do some shooting but end up with softer golden tones from later in the afternoon or early in the morning, you can try using heavy backlighting to create additional contrast.

2. Find contrast-heavy tones and put them together

You already know about the importance of contrast in black and white photography. And you know about the importance of using contrast-heavy light.

But even once you’ve got the best light, you still have to make sure that the tones of your photo lend themselves to the overall black and white look.

7 Tips for Stunning Black and White Photography (Comprehensive Guide)

Now, the best black and white tones are very dark and very light. For instance, a great black and white might include a white sky and a dark house, or a bright character standing in front of a black building.

So when you’re out and about, look for tones that contrast. Try not to think in terms of colors, because the colors will just distract you. Instead, think about the relative brightness of tones.

And look for blacks and whites that go together.

stunning-black-and-white-photography

Once you’ve found them, however, you’re going to need to follow a piece of compositional advice:

3. Simplify your black and white photos as much as possible

All photography, for the most part, benefits from a simple composition.

However, black and white images benefit from a simple composition the most. This is because black and white photography is meant to be simple. It has no complex colors. No chaotic color-contrasts.

Instead, it’s just…black and white.

7 Tips for Stunning Black and White Photography (Comprehensive Guide)

So whenever you go to take your black and white shots, stop and think. Consider whether there are ways to simplify the shot.

Could you remove something distracting in the background? Could you use a wide aperture to make the background blur more? Could you change your angle so as to create a more non-distracting option!

Do anything you can to make your shot simple.

Simpler is better, all else being equal.

4. Try to capture raw emotion for compelling black and white photography

Here’s one of the great things about black and white photography:

It’s a genre that loves to capture emotion.

The smile of a person on the street. The laugh of a person crossing the road. The frown of a sad child.

stunning-black-and-white-photography

These are all very photographable moments, moments that you shouldn’t miss out on. And black and white is the perfect way to record it.

In fact, I recommend you try to capture emotion with black and white photography. The somber look of a high-contrast black and white will take emotion and make it even more powerful in a photo. It might even give you a three-dimensional effect.

5. Use minimalism to make your compositions stand out

What is minimalism?

Minimalism is a compositional technique that emphasizes intense simplicity. And not the simplicity as I explained above, but a true, deep simplicity – one that’s built into the composition.

Let me explain:

Minimalism uses lots of white space to draw attention to your main subject. White space is just empty space in a photo. (It doesn’t have to be white – it can just easily be gray or black, as long as there’s nothing going on in that part of the image).

This is a minimalistic photo:

7 Tips for Stunning Black and White Photography (Comprehensive Guide)

Minimalistic photography uses the weight of negative space to emphasize your subject. So you don’t have to be afraid of photos that are extremely minimalistic. And they’re pretty easy to pull off.

To create minimalist black and white photos, I recommend you find a background that’s smooth and pure, such as a white sky. Then place your main subject small in the frame, along one of the rule of thirds power points (or even just above or below the power point).

If all goes according to plan, then you should have a beautiful minimalistic photo! Don’t be afraid to play with the placement of your subject.

7 Tips for Stunning Black and White Photography (Comprehensive Guide)

6. Shoot against the sky to achieve a silhouetted look

In the previous tip, I mentioned that a white sky makes for a nice minimalistic background.

And it’s true. A bright white sky can be used in a black and white photo to emphasize a darker subject, which is exactly what you want to do! When the sky’s especially bright, you might even produce a partial silhouette, where the main subject has no detail but stands out against a white background.

So here’s how it works:

Find the main subject. It can be any color, but darker tones work best.

7 Tips for Stunning Black and White Photography (Comprehensive Guide)

Then get down low, so that the main subject is framed by the sky. If you’re shooting on a cloudy day, you’ll have plenty of bright light behind your subject (even if it doesn’t seem like it). If you’re shooting on a sunny day, a bright part of a blue sky should do the trick.

Experiment with different possible angles, while making sure that your main subject doesn’t overlap with anything around it or behind it.

7 Tips for Stunning Black and White Photography (Comprehensive Guide)

Then experiment with different exposures. Take a few shots that are drastically underexposed, a few shots that are nicely exposed for the subject, and a few shots that are overexposed.

Eventually, you’ll find a technique you’ll like!

7. Shoot in color, then use post-processing to convert your photos

I’ve been talking all about capturing amazing black and white photos in-camera.

But a big part of the black and white photography process is the post-processing. After all, this is where you should be converting your color images to black and white shots!

When you first open your photos in an editing program, they may look bland. They might even look a little bad.

stunning-black-and-white-photography

But don’t worry. Because here’s what you do:

First, you drop the saturation all the way down, until it’s completely gone. This should give you a photo that’s full of grays.

Then you lift the contrast so that contrast shines through, and makes the photo pop off the page.

I also recommend boosting the Whites and lowering the shadows. This will add further contrast to the photo. It also ensures a greater tonal range overall, which looks quite good!

Conclusion

If you’re looking to create stunning black and white photography, then you’ve come to the right place.

You hopefully now know all about black and white photography.

All that’s left…

…is to get out and start doing some shooting of your own. Amazing photos await!

stunning-black-and-white-photography

The post 7 Tips for Stunning Black and White Photography (Comprehensive Guide) appeared first on Digital Photography School. It was authored by Jaymes Dempsey.


Digital Photography School

 
Comments Off on 7 Tips for Stunning Black and White Photography (Comprehensive Guide)

Posted in Photography


Tips for Creating Awesome Double Exposures In-Camera

13 Sep

The post Tips for Creating Awesome Double Exposures In-Camera appeared first on Digital Photography School. It was authored by John McIntire.

Tips for Creating Awesome Double Exposures In-Camera

Techniques for creating double exposures have been around since the beginning of film photography. While the days of being able to expose the same frame of film multiple times are mostly gone, a great many digital cameras do offer that functionality. While the technique can be unpredictable and hard to get right, that’s part of the charm of it (in my opinion) and what makes it so fun. This article provides you with a few tips to help you create double exposures in-camera.

What about Photoshop?

double-exposures-in---camera

Photoshop (and alternatives) offer an infinite number of ways to blend exposures, but doing it in-camera can lead to spontaneous and unpredictable results.

Of course, you don’t need to do it in-camera. The almighty powers of Photoshop absolutely give you a great deal of control over blending images. You didn’t need to do it in-camera in the film days either as you could sandwich negatives together in the darkroom before putting them in the enlarger. So yes, by all means, use Photoshop to your heart’s content, but if you want to inject a bit of unpredictability and spontaneity to the process, do think about trying to create a few in the camera.

Understand the functionality in your camera

This first step may seem obvious, but every camera that I’ve run across handles the settings for double exposures in different ways. Taking the time to learn and understand how to set up your camera for multiple exposures ensures that when you get out to start creating the images, you know exactly what’s going on. For example, unless I turn on the right setting, my camera will take a single sequence of images and then revert back to normal settings. This can be (and has been) frustrating when I’m lining up a second exposure of a moving subject and find that I’m back to taking a single image.

This is probably just a matter of reading your manual and then putting it into practice a few times in your backyard or somewhere where the results don’t matter.

Start simple

double-exposures-in---camera

While getting to grips with the technique, you can start simple with just a few moving elements to help you understand the process better.

When getting started with a technique like multiple exposures, it is easy to start snapping away without putting too much thought into it. The results can be less than inspiring and may even make you second guess the technique.

Try to keep it simple in the beginning. Instead of many exposures layered together, try to keep it to a simple double exposure until you figure out how the exposures work with one another. Of course, the results are almost always going to be unpredictable, but once you start to take a lot, you will quickly learn how to judge what two frames might look like on top of one another.

Look for bold shapes and textures

Image: Mixing silhouettes and textures is an effective way of creating bold double exposure images.

Mixing silhouettes and textures is an effective way of creating bold double exposure images.

One of the easiest ways to get results with double exposures is to overlay a texture onto a recognizable shape. Silhouettes of people work great for this. If you start your sequence with a  silhouette, you can then take a photo of something with a lot of texture and the shadows of the silhouette will reveal that texture in the final image.

Another simple one for you to try is to layer your main image on a background of clouds. The whole concept is simple and done a lot, but it is still effective. If you start with these simple processes, you will quickly start to see how you can use the technique for more complicated images.

Think in terms of design

Image: Finding things that match up together to make a cohesive image can be tricky, but when it hap...

Finding things that match up together to make a cohesive image can be tricky, but when it happens, the results speak for themselves.

Because you are layering your images, it can help if they work together with a theme or if the final image helps to convey a message. Keeping the various elements in your images (whether that be the subjects, colors, lighting, etc) in line with your intended end result can help for better images. It also helps to start with your final composition in mind. How will the various elements line up? How will they react and line up with one another? Is there a particular sort of framing that would help tie the whole thing together? Asking yourself these questions before your camera is even out of the bag can help your final images be the best they possibly can.

Go abstract

Image: The double-exposure effect can be weird and sometimes it’s best to embrace that weirdne...

The double-exposure effect can be weird and sometimes it’s best to embrace that weirdness.

Now, your images don’t have to be of anything at all. Don’t be afraid to go for the abstract (or non-objective if you prefer). You can layer a bunch of modern buildings (or the same building) together for some interesting effects where there is no real focal point.

You can do the same with multiple textures. Just roll with it and see what happens. You might find you have a bunch of images that don’t work, but you might also find that one that really, really does. Try looking for things with lines or shapes, without too much texture, that can overlap one another.

Block your lens

double-exposures-in---camera

To manage your backgrounds while creating a double exposure in the studio, cover a portion of your lens with a black card to avoid the background being exposed twice. In the top middle of the frame, you can see where that has happened.

Block your lens if you want to photograph the same subject, human or inanimate, multiple times in one frame. You can use this trick for photographing fireworks to help control your exposure. When you’re lining up your first exposure, cover your lens with a piece of black card so that you are blocking the part of the frame that will contain the subject of your second exposure. In a double exposure, this will stop the background being exposed twice. Your backgrounds will be darker, but your subject will also be clearer where it appears in the frame.

Use grids

double-exposures-in---camera

Turning on guides and grids in your camera can help you line up subjects between the multiple frames.

If your camera has the option for a grid overlay (rule of thirds) in the viewfinder, turning it on can help you to line up various elements throughout the multiple exposures.

It’s okay to post-process

Image: Not everything is going to go right all the time. If something doesn’t line up, like To...

Not everything is going to go right all the time. If something doesn’t line up, like Tower Bridge in this image, don’t be afraid to use Photoshop to help you get the results you were after.

Although this article is about creating double exposures in-camera, there is nothing wrong with taking your results and fine-tuning them afterward.

Did you overlay a silhouette with a texture but you don’t want the texture elsewhere in the frame? Photoshop can help. If it helps you to create what you had in your head, by all means, go for it.

That’s it

Creating double exposures in-camera is a finicky technique, but sometimes the results can be incredible. More important, it’s a technique that’s a lot of fun. I encourage you to go out and give it a try for yourself, and hopefully, some of these tips will make your results a bit more predictable.

Please share your results with us in the comments section – we’d love to see them!


double-exposures-in---camera

The post Tips for Creating Awesome Double Exposures In-Camera appeared first on Digital Photography School. It was authored by John McIntire.


Digital Photography School

 
Comments Off on Tips for Creating Awesome Double Exposures In-Camera

Posted in Photography


Top Tips for Photographing the Best a City has to Offer in 48-hours

12 Sep

The post Top Tips for Photographing the Best a City has to Offer in 48-hours appeared first on Digital Photography School. It was authored by Matt Murray.

photographing a city-matt-murray

Always be on the lookout for interesting scenes in cities. I saw this view in Taipei from a metro train and went back at dusk.

You have two days and two nights to photograph a city you’ve never been to before. How will you make the most of this opportunity and come away with amazing photos?

You could just turn up without much advance thought and deliver a stunning set of images that fits the brief perfectly. Leaving things to chance is not always the best plan, though. You will be better prepared and more confident if you research and plan your trip in advance.

Whether you’re working for a client, an editor, or taking photos for your own portfolio, these tips will help you make the most of your trip. Here is a guide to photographing a city and the best it has to offer in 48 hours.

photographing a city-matt-murray

Find what is unique about your destination and capture it.

What’s unique about the city?

The first question you need to ask is what makes the city unique? Does it have stunning architecture? An incredible food scene? Unique modes of transport? Vibrant markets? Make sure you keep this in mind as you plan your trip.

What types and styles of images are you being asked to deliver?

What type of shots are you, your client, or your editor expecting? Find out what their expectations are in as much detail as possible. Is there a particular style or theme you need to shoot for? Will your images be used to accompany a story on a particular subject, for advertising, or as a standalone photo essay?

Think of the final use of your photos. Will you need to capture landscape or portrait orientation photos? Do you need to shoot images with negative space to allow for text to be overlaid?

Image style is an important consideration. Is your client looking for bright, colorful photos? Images showing well-known landmarks? Hidden gems? Photos with a shallow depth of field? Moody black and white images? Photos of people experiencing the city? It’s important to get agreement on this too.

Create a mood board

Visualizing your shots before you go can help the planning process. One way you can achieve this is by creating a mood board for the trip, showing the types and the style of photos you will aim to produce. The good news is, it’s easy to do with a tool such as Pinterest.

A mood board can also be handy if you don’t have a formal brief. If you create one for yourself or your client showing the type and style of images you propose to take, this can stimulate further discussion. It might be exactly what they’re after, or it could prompt them to get involved in the process and suggest changes.

photographing a city-matt-murray

On my list of shots for Taronga Zoo was an iconic view of the Sydney with animals – thankfully, this giraffe helped me out!

Weather and climate

The next thing to research is the expected weather and climate at your destination. Bear in mind, some destinations, such as London and Melbourne, are notorious for variable conditions all year round. Getting a sense of what to expect will help with your daily planning and can guide your choices for clothing and equipment.

For example, if you’re heading to Asia during the wet season, you’ll need to think about taking clothing and camera gear that is water-resistant, whereas if you’re on a trip to somewhere hot and dry, such as Dubai or Death Valley, you may need to consider a hat and sunscreen.

Next, look at the sunrise and sunset times for the city when you will be there and plan your day accordingly. Make a note of them and think of the most important shots you need to capture at those times. These times will also indicate the number of daylight hours you have on location.

photographing a city-matt-murray

Autumn in Sydney was a good opportunity to capture golden leaves.

Online planning resources

Two resources that can help you are the Photographers Ephemeris and PhotoPills. These handy guides for photographers also give you information like how long the blue hour and golden hour last for, the direction of the sun at sunrise and sunset, and much more. This can be very helpful, though, remember, in built-up environments, you’ll never truly know how the light falls on your scene until you’re there.

Background city research

Researching your destination is one of the most important things to do before you leave. Learn as much as you can. Potential sources of information include travel magazines, travel blogs, official tourism websites, and YouTube videos. It’s also worthwhile downloading guidebooks from companies such as Lonely Planet, or if you’re on a tight budget, you could borrow them from a friend or your local library.

As you’re doing this research, make a note of previous coverage the destination has had in published articles or photo essays. If you plan to use the same or similar angle, aim to capture the destination in a unique or better way.

photographing a city-matt-murray

Image research

Pay close attention to the types of images used to illustrate and promote this city. What style are they? Do they fall into a particular genre? What kind of lenses do you think the photographer used? This is all useful information.

Then turn to more visual references. What kind of images show up for your destination using a Google image search? Is there a famous view of the city you’d like to capture? Next, search on Instagram. Look at images used by the official city or country accounts, popular hashtags for your destination and even geolocation image searches.

Take a look at recent Instagram posts, carefully reading the description. Was the image taken in the last few days? If it was, this might help you understand the weather or lighting conditions at your destination. If there is no context to when the image was taken, it could’ve been from last month or last year.

Another key place for researching your destination is stock photography sites. What images are the best sellers for the city? Keep these in mind when you’re shooting. As well as your main client, think of other markets where you could sell your images such as stock libraries.

photographing a city-matt-murray

Always look for detail shots at your destination that show the way of life.

Create your shot list

I love travel photography as it includes so many other genres. On a single assignment, you can include landscapes, cityscapes, street scenes, portraits, food shots, detail shots, architecture, and documentary-style images. Remember this as you create your shot list.

First, lock in the locations you need to be for sunrise and sunset and have a rough plan for the rest of the day. Plot these locations on a map and make sure you’re leaving yourself enough time to look around and photograph unexpected sights. Sometimes the best shots at a destination are not the things you expect to see, but things you didn’t expect to see.

Then list the next most important shots for you or your client. Make these a priority.

Try to capture well-known landmarks in a new or interesting way. This could be through the frame of a doorway or window, a reflection, or a completely different angle or viewpoint not used before.

Jot down a reminder to get a good variety of images at each location you visit – landscape orientation, portrait orientation, images with negative space, and images that crop well for Instagram. Also, think back to why this city is unique or exotic and make a note to get images of the food, people, clothing – anything that’s different.

photographing a city-matt-murray

Booking your hotel

Now you’ve created your shot list, look at the key locations on your map, and book a hotel nearby. It can be tempting to save money by staying at a hotel further away, but being close to your proposed photography locations is a huge advantage. Not only will it cut down on travel time, but you will also have the advantage of popping back to your room whenever you like throughout the day.

Quite often when I’m photographing a city, I head back to my hotel for a break. You can have a quick rest, grab a hot or cold drink, back up your images, and review the progress you’ve made ready for the next round of photos. You may even need time to warm up or cool down depending on the weather.

With your hotel search, always be on the lookout for historic or beautiful hotels that could provide additional photographic opportunities for you. Also, remember to choose a hotel where you feel like your gear will be safe when you’re not there.

photographing a city-matt-murray

Carry a travel tripod so you can capture scenes with a slow shutter speed.

Packing your kit

Versatility is the key when packing your kit. Fast zoom lenses are generally the travel photographer’s best friend. Also, look at the notes you made during your research. What type of lenses do you think the photographers used? Does your client expect any images with a very shallow depth of field? Do they want images taken with long telephoto lenses or ultra-wide angle lenses?

Plan your kit, taking into account these considerations along with the expected weather conditions. For a two-day trip, I would typically take the following:

  • Two camera bodies that use the same batteries and lenses, at least one of which is weather resistant.
  • Two zooms covering a wide focal range, at least one of which is weather resistant.
  • One or two small fast prime lenses – these are very handy for low light conditions and shallow depth of field shots.
  • As many reliable high-quality SD cards as you have. Make sure you format them before your trip.
  • As many batteries as you have for your camera system.
  • A small travel tripod and some neutral density filters.

You can see more about the travel kit I take in my article, The Best Fujifilm X-Series Kits for Travel Photography

photographing a city-matt-murray

Sydney Opera House sails with the Sydney Harbour Bridge in the background.

Traveling to your destination

As your trip approaches, keep an eye on the weather and current events for the city you’re heading to. Will this present any issues or challenges? Is there other gear you may need to bring? As I write this, I am preparing for a few days in Hong Kong, where there are currently protests taking place. I don’t think these protests will affect my trip or what I plan to photograph, but it’s good to always good to stay up-to-date with what’s going on.

Before I arrive at my destination, I always sort out some way to use my iPhone when I get there. This can mean either having a SIM card for the country I’m visiting or setting up international roaming before I go.

On the way from the airport or train station to my hotel, I look for interesting things to photograph. I have my phone at the ready with maps loaded up tracking the journey I’m taking. If I see something interesting, I screenshot the map, so I have the exact location on my phone for future reference.

photographing a city-matt-murray

Children playing in the Faroe Islands photographed on a telephoto lens.

Once you’ve arrived

You’ve arrived at your hotel, dumped your bag and are now ready to hit the streets and tick off that shot list. Before you go, make sure you have everything you need and leave anything you won’t need at the hotel. Remember to go easy on the air conditioning or heating – extreme temperature changes can fog up your camera lenses.

Take a few minutes to double-check your camera (especially your ISO and image quality settings), make sure you have fully-charged batteries and formatted memory cards. Then synchronize the clocks on your cameras at local time.

Regardless of the time I arrive, I always try to hit the streets as soon as I can to get a feel for the place. In tropical locations, shooting conditions are not always ideal during the middle of the day when it’s very bright with the sun overhead. It’s still possible, however, to look for opportunities to keep shooting. On a recent trip to Indonesia, I found the most beautiful light in a semi-covered market place in Borobudur. I took some of my favorite shots of the trip at that market.

photographing a city-matt-murray

Borobudur Market.

After the sun is well and truly below the horizon, you may think it’s time to head back to the hotel, but always see if there are opportunities to photograph food vendors or night markets. You’ll need either a fast prime or zoom lens in conjunction with using a higher ISO to capture handheld shots or a tripod for longer exposures.

Backups

When you’re finished shooting for the day, it’s time to head back to your hotel and backup your images.

For each trip, I create a new Lightroom catalog on my laptop. I then import the images into Lightroom, specifying that the images should be copied from my SD cards to an SSD hard drive plugged into my MacBook.

After the import, I copy these folders and the Lightroom catalog to a second SSD drive. I always keep these SSD hard drives in separate locations – one with me in my camera bag, and one in my luggage. As I review my shots in Lightroom, if there are any that I think are perfect for my needs or my client, I make another backup of those select images to DropBox. When I get home, I transfer the folders and Lightroom catalog from my laptop straight to my desktop computer.

photographing a city-matt-murray

Final thoughts

I hope these tips will help you think about what you need to plan and research when you’re in a city for the first time on assignment.

Always remember, though, despite the amount of research and planning you do, things are often out of your hands. If you can’t get that iconic shot due to weather conditions, street closures, scaffolding or who knows what else, don’t beat yourself up too much about it. Instead, concentrate on other opportunities that you can capture while you’re there to make the most of your time.

Do you have any other tips you’d like to share on photographing a city in 48 hours? Share with us in the comments!


photographing a city in 48 hours

The post Top Tips for Photographing the Best a City has to Offer in 48-hours appeared first on Digital Photography School. It was authored by Matt Murray.


Digital Photography School

 
Comments Off on Top Tips for Photographing the Best a City has to Offer in 48-hours

Posted in Photography


5 Top Tips for Marketing Your Photography Business Successfully

11 Sep

The post 5 Top Tips for Marketing Your Photography Business Successfully appeared first on Digital Photography School. It was authored by Darina Kopcok.

Marketing is something that often falls by the wayside for photographers. We push it aside when we’re busy, only to find the clients aren’t there when things slow down.

The best marketing efforts are those that are organic and purposeful. There is no quick fix. Promoting your work is not as simple as “build a website and they will come.” It takes consistency and effort to keep your name out there, no matter how long you’ve been in the business.

Here are my five top tips for marketing your photography business the right way.top-tips-for-marketing-your-photography-business-the-right-way

1. Curate your online portfolio

As a professional photographer, you need an attractive, well-curated website to highlight your work.

Your website will brand you as either a professional or an amateur. It will serve as the first impression of you and your work. You need to pay attention to every detail, from the template you choose, to how your images flow together to create a cohesive narrative of who you are as an artist.

Put only your best work in your online portfolio, but try to approach your images as a potential photo buyer might. It’s easy to get emotionally attached to certain photographs, but sometimes your favorites are not the ones that are going to resonate with your target market. Create galleries that organize your photos into a grouping that make sense. Pay attention to the colors, shapes, and lighting that flow well together. Create an experience for the viewer as they move through your body of work.

If you feel you can’t see the forest for the trees when it comes curating your work, hire a photo consultant who can give you an unbiased and expert opinion.

Starting an online portfolio from scratch? You might want to choose a web builder made for photographers, such as Photoshelter or Format, as they also offer various tools to help sell and distribute images.

Squarespace is popular with a lot of photographers because of their beautiful, minimalist and modern templates. Wix is also another site that has improved in leaps and bounds in the last couple of years. It is highly customizable and unlike some of the other options, offers tons of different templates to choose from.

5 Top Tips for Marketing Your Photography Business Successfully

2. Print your work

The demand for digital imagery is huge, however, print is not dead.

If you’re a commercial photographer, having a print portfolio is essential for meeting with clients. Showing up at an agency meeting with an iPad to show your work will make you look like an amateur.

In the commercial and advertising world, agencies want to see how your images hold up in print because any flaws become much more obvious. It’s important for them to see how your work translates into print before they hire you.

Creating a top-notch portfolio can be very expensive, but there are several sites like Artifact Uprising and Blurb where you can have good quality photo books printed at a reasonable price.


top-tips-for-marketing-your-photography-business-the-right-way

If you’re looking for commercial work and want to work with ad agencies, design firms, or magazines, you’ll also need to send out printed promos to your target market three or four times a year.

It’s said that it takes an average of seven contacts with someone before they buy from you, so this tactic may not pay off immediately.  However, never underestimate the silent watchers.

If you work on the retail level, such as in wedding photography or portraiture, it’s still useful to have printed work to show prospective clients. People love to see something tangible, something they can hold in their hands that will help them experience your work in a more direct way. The photographers who make a lot of money in these niches print out their photographs to show to clients in-person, which drives sales exponentially.

5 Top Tips for Marketing Your Photography Business Successfully

3. Create a quarterly email campaign

Do you have a ‘subscribe to email list’ on your website? If not, you should. Nothing converts like email. An engaged list is far more important than any form of social media. The changing algorithms and whims of companies like Instagram and Facebook can leave your business incredibly vulnerable if you depend on them.

By sending out a regular newsletter or a PDF mailer to your past clients and other relevant business contacts, you appear busy and relevant. Fresh content helps you connect to your audience.

Research whom you want to work with, and regularly make contact with them. Keep track of these contacts via a spreadsheet or CRM (customer relationship management), so you know who has received your previous mailing.

Hire a designer that can create a template for you. This will allow you to swap out pictures every time you do a new campaign with new work. Include your logo on the front and a short bio inside, along with your contact information. Alternately you can create a promo “newspaper” or magazine through a company like Blurb or Newspaper Club. 

Your email promo should look as professional as possible. The email campaigns should go out to your target clients every quarter to keep you top of mind when they’re looking for a photographer.

Even if you send out printed promotions, you should also send out email campaigns.

Printed promotions are expensive, which means you can only send them out to a select group of people – your most ideal clients. But with email, you can send out a promotion such as a PDF mailer to hundreds or prospective clients.


5 Top Tips for Marketing Your Photography Business Successfully

4. Use social media strategically

Everyone is complaining about their love/hate relationship with social media, but if you’re using it for business, it’s non-negotiable. The keys to success are your perspective and using social media the right way.

It’s best to pick one or two social media channels and concentrate on bringing up your visibility there. Start by asking yourself what you want to achieve?

Do you want to:

  • Drive traffic to your site?
  • Connect with agencies and brands?
  • Connect with potential brides or portrait clients?

Put aside time every day to post and engage with your target market by leaving thoughtful comments. 

Know that the path from a “like” to any “purchase” is a really big leap. Social media should be part of a wider strategy of creating visibility and engaging with a community. It’s great to follow other photographers and support one another, but most of them won’t be your potential clients. Avoid the big time suck of social media and focus on the people that are likely to hire you.

top-tips-for-marketing-your-photography-business-the-right-way

5. Write a WordPress blog

I’m always going on about writing a blog. I think most photographers should have a blog.

One reason is that if you have a WordPress blog connected to your site, you can get a massive boost to your SEO. Updating the blog regularly will get you a higher ranking in search results.

Writing a blog will also help you connect with your audience and build trust. Your clients will feel like they have come to know you.

If writing is not your strong suit, you don’t need to write a lot. In fact, your posts should have lots of images instead. You can share about a family or personal branding session. You can share shots and a short narrative about the latest wedding you shot or write about how you recommend clients dress for their personal branding session.

However you decide to approach it, make sure that your content adds value for the people reading it.

5 Top Tips for Marketing Your Photography Business Successfully


To sum up

Marketing gets a bad rap. As an artist, you may feel like a used car salesman when you’re trying to sell your services. However, think of marketing as a way of putting yourself in front of people and letting them know you’re there.

The most successful photographers are those that demonstrate that they can add value and solve a specific problem.

By taking a more curated, thoughtful approach to promoting yourself, you’ll be able to build a business that stays strong in the face of trends and stands out amongst your competitors.

Do you have any other Tips for Marketing Your Photography Business? Share with us in the comments!


top-tips-for-marketing-your-photography-business

The post 5 Top Tips for Marketing Your Photography Business Successfully appeared first on Digital Photography School. It was authored by Darina Kopcok.


Digital Photography School

 
Comments Off on 5 Top Tips for Marketing Your Photography Business Successfully

Posted in Photography


3 Tips for Capturing your Holiday with the Nikkor 60mm Micro Lens

10 Sep

The post 3 Tips for Capturing your Holiday with the Nikkor 60mm Micro Lens appeared first on Digital Photography School. It was authored by Lily Sawyer.

Going on holiday is so exciting for me. It’s a chance to unwind and take it easy. The one thing I don’t want to do on holidays is carry heavy equipment for my photography. I do that already as my day job and heavy cameras paired with heavier lenses are a drag. When on holiday, I usually take one camera body and one small prime lens with me. That’s it!

dps-3-tips-capturing-holiday-60mm-micro-macro-lily-sawyer-photo

This article is about capturing your holiday photos with the simplest of gear: a camera and lens. I used my Nikon D750 full-frame camera and a Nikkor 60mm micro prime lens for all the photos featured in this article. The combination is small in size and light in weight. Just a note though, as the D750 has a full-frame sensor, the 60mm viewed through it is a 60mm. If you use a cropped-sensor camera, this 60mm becomes a 90mm when viewed through the smaller sensor. Therefore it’s not something I recommend as a holiday combo. If you only have a cropped-sensor camera, then you are better off going with a 35mm fixed lens.

dps-3-tips-capturing-holiday-nikkor-60mm-micro-macro-lily-sawyer-photo

Why Nikkor 60mm?

You may ask why 60mm, not 50mm, not 35mm? That’s a valid question. I used to take the 50mm as that focal length is most versatile and I love it’s lightness too. I have previously written an article here on the 50mm and its versatility. But I have swapped this for my 60mm as my go-to holiday lens recently.

1. The 60mm medium focal range is versatile

Landscape

If you have enough space to back off from the subject, you can take a good landscape photo without distortions (like cropping out too many tourists for example) and without it being too unnecessarily wide. Landscape in wide-open areas is easy. You can do more “considered” compositions because of the viewpoint the focal length allows. You can also “crop” in-camera just by moving forward or backward to include or exclude areas within the frame.

dps-3-tips-capturing-holiday-60mm-micro-macro-lily-sawyer-photodps-3-tips-capturing-holiday-60mm-micro-macro-lily-sawyer-photodps-3-tips-capturing-holiday-60mm-micro-macro-lily-sawyer-photo

Portraits

A portrait, by strict definition, is usually a view from the shoulders to the head. However, you can loosen it up a bit by going half body or even full-body! It’s not close-up nor too wide. The Nikkor 60mm Micro is the perfect focal length for a portrait. Because it’s an f/2.8 lens, you can still get shallow depth of field and achieve a pleasing background compression for a flattering image. This is especially so when I want to accentuate the subject and blur the background.

dps-3-tips-capturing-holiday-nikkor-60mm-micro-macro-lily-sawyer-photodps-3-tips-capturing-holiday-nikkor-60mm-micro-macro-lily-sawyer-photo

Close-Up

Because the Nikkor 60mm Micro has a micro/macro lens capability, I can capture close-ups (including extreme close-ups) with it too. The photos below are of a wall covering at Peterhof Palace in St. Petersburg, Russia. We were passing through the darkly lit rooms (no flashes allowed) in a tour group so there was no stopping for a long time. It’s quite literally aim, shoot and go! I wanted to capture the intricate embroidery on these fabric wall coverings and a patch of the design. The Nikkor 60mm Micro gives fairly heavy vignetting, especially when shooting close-ups in low light. Close-range photography usually requires more light which wasn’t available here. However, the vignetting created works for me because I wanted to focus on the central areas of the patterns.

dps-3-tips-capturing-holiday-nikkor-60mm-micro-macro-lily-sawyer-photo

All in all, the Nikkor 60mm Micro is light and nifty and has macro capabilities. With it, you can shoot really close-up details, through to much wider views, as shown in the photo below.

dps-3-tips-capturing-holiday-60mm-micro-macro-lily-sawyer-photo

2. Shoot to tell a story

I have recently written an article, 3 tips in photographing details in a scene, where I talked about shooting to tell a story. This is essentially utilizing the elements of story-telling as you visually capture scenes. So, you can tell the beginning, middle and end of a story effectively just by using photos.

Varied angles

You can make a story more interesting by employing a variety of angles. Think of a film being shot. You often have several cameras with various lenses coming in from different angles: wide, medium, high, low and close-up. These viewpoints offer new and different insights into the scene at hand.

dps-3-tips-capturing-holiday-60mm-micro-macro-lily-sawyer-photodps-3-tips-capturing-holiday-60mm-micro-macro-lily-sawyer-photodps-3-tips-capturing-holiday-60mm-micro-macro-lily-sawyer-photo

Emotions

Capturing moments that carry emotions is a surefire way of immortalizing memories in our minds. Action photos often help with these. The photos below of my daughter blowing soapy suds will remind her of her delight upon seeing a fountain overflowing with foamy white stuff! It was a marathon day when we visited Tallinn, Estonia. Crossing roads was tricky with all the runners zooming past too. A nice smile at the camera when we got on a train, and a much-needed rest from miles and miles of walking while sightseeing. All precious memories.

dps-3-tips-capturing-holiday-60mm-micro-macro-lily-sawyer-photdps-3-tips-capturing-holiday-60mm-micro-macro-lily-sawyer-photodps-3-tips-capturing-holiday-60mm-micro-macro-lily-sawyer-photo

Series

A series of shots showing a progression or a beginning, middle and end can also be a fun and interesting way of telling a story of a moment. It doesn’t have to be a complicated moment. A snapshot of something that catches your eye will do, like the little scene below. Including a couple of other shots of the same material but from a different perspective will bring new interest.

dps-3-tips-capturing-holiday-nikkor-60mm-micro-macro-lily-sawyer-photo

3. Don’t forget the details

Details help us remember and set memories firmly in our minds so we can chat about it for years to come. I make annual family albums which my kids love to pore over and talk about regularly. They give us a lot of laughter as we recall the fun events of our holidays and reminisce the special moments. Still life, scenery, close-ups…they all play a part in helping us capture details more effectively to tell stories of our lives.

dps-3-tips-capturing-holiday-60mm-micro-macro-lily-sawyer-photodps-3-tips-capturing-holiday-60mm-micro-macro-lily-sawyer-photodps-3-tips-capturing-holiday-60mm-micro-macro-lily-sawyer-photodps-3-tips-capturing-holiday-60mm-micro-macro-lily-sawyer-photodps-3-tips-capturing-holiday-60mm-micro-macro-lily-sawyer-photodps-3-tips-capturing-holiday-60mm-micro-macro-lily-sawyer-photo

I hope you found this little article on how to capture your holiday photos with just one lens, such as the Nikkor 60mm Micro helpful. Do share more tips in the comments below.


nikkor-60mm-mico-lens

The post 3 Tips for Capturing your Holiday with the Nikkor 60mm Micro Lens appeared first on Digital Photography School. It was authored by Lily Sawyer.


Digital Photography School

 
Comments Off on 3 Tips for Capturing your Holiday with the Nikkor 60mm Micro Lens

Posted in Photography


Gimbal Tips And Advice – Why you Need to Invest in One

03 Sep

A gimbal is a device that enables you to keep your camera stable while shooting video. It can also be useful when it comes to capturing high-quality still images. A combination of three gimbals will enable you to obtain a smooth movement of your handheld camera in three different directions, thanks to the three rotation axes. In this article I Continue Reading

The post Gimbal Tips And Advice – Why you Need to Invest in One appeared first on Photodoto.


Photodoto

 
Comments Off on Gimbal Tips And Advice – Why you Need to Invest in One

Posted in Photography


5 Basic Post-Processing Tips to Instantly Improve Your Photos

02 Sep

The post 5 Basic Post-Processing Tips to Instantly Improve Your Photos appeared first on Digital Photography School. It was authored by Nisha Ramroop.

Are you a beginner looking to improve your post-processing skills?

That’s what this article is all about. In it, you’ll discover five post-processing tips that will immediately take your photos to the next level. Best of all, these tips aren’t even difficult to follow, and they require nothing more than the most basic image-editing program.

Let’s dive right in.

post-processing tips boats on water edited

1. Straighten your horizon for professional-looking photos

When the horizon isn’t straight, even the untrained eye picks up that something is off. They might not know exactly what’s wrong, but they’ll be aware that the scene seems out of order.

Which is why you absolutely must make sure your horizon is straight.

Fortunately, it’s very easy to correct the horizon; you can do it in any post-processing program.

Here are the instructions for straightening the horizon in Photoshop:

Step 1: Select the Crop tool

Step 2: Click the Straighten option at the top

Step 3: Click one side of your horizon and drag across the horizon line before you release

Your horizon will instantly straighten!

straightening boats in photoshop

2. Adjust the white balance for natural-looking images

White balance is a setting used to balance the color of the light you shoot, in order to get it close to a neutral white.

You see, when the color of your subject is distorted by the existing lighting conditions, you need to use the white balance setting to save the day.

Now, one way to set the white balance correctly is to get it right in-camera. However, some photographers prefer to shoot in RAW with an auto white balance setting, and then adjust the white balance afterward.

If that’s your preference, then you’ll need to choose your white balance in a post-processing program. It’s generally easy to select a white balance option that adjusts for the lighting of your shot. You’re also free to experiment with different white balance options so you can choose the one that most reflects your creative vision.

For instance, the scene below has a Fluorescent white balance applied to it using Adobe Camera Raw.

adobe camera raw white balance

And here’s the same scene but with a Shade white balance applied:

white balance adobe camera raw post-processing

3. Boost your contrast to create images that pop

Do your images look a little flat?

One of the simplest ways to make your photos pop is to adjust the contrast. A contrast adjustment further separates the darkest and brightest areas of your image. In other words, it makes the dark tones darker and the light tones lighter.

beach scene

Increased contrast, therefore, makes tones stand out and gives your photos a more three-dimensional feel. Compare the image above to the image below; I added contrast to the second image, which gives it a subtle pop.

beach scene with increased contrast

Pretty much every image editor has a contrast slider. And boosting the contrast is often as simple as pushing the slider to the right.

So just remember:

If you’re struggling to make your photos more lively, try increasing the contrast. It’s a simple post-processing tip, but one that really works!

4. Boost the saturation or vibrance sliders for better colors

The saturation and vibrance adjustment sliders usually sit next to each other and can be confusing. Both of these add an extra color punch to your image, but they do so in different ways.

You see, saturation adjusts the intensity of all the colors in your image at once. If you push the saturation slider, you’re going to see color saturation increase across the board. Therefore, it’s an adjustment you want to use sparingly.

Vibrance, by comparison, is a “smarter” saturation tool, one that adjusts only the duller colors in your image. Increasing the vibrance will boost the less-saturated colors, but won’t affect colors that are already saturated.

Look at these two photos:

lighthouse with increased colors

I boosted the saturation of the photo on the left, and I boosted the vibrance of the photo on the right.

Note that when you lower the saturation of your colors, your image takes on a more muted effect, like this:

reduced saturation lighthouse

In general, boosting the vibrance or the saturation will instantly improve your images.

5. Sharpen your photos for the best display on the web

Your images are most likely going to be displayed on the internet.

However, when you export your photos from most image-editing programs, you’re going to end up with blurry photos. Unless you sharpen for the web, that is.

There are a few ways to sharpen in Photoshop. Here is one you can try:

Step 1: Resize your image to the size you want it displayed. (If you sharpen your high resolution/original image and then resize it, the image will appear to lose its sharpness. Sharpening an image at your display resolution works better.)

resizing images post-processing tips

Step 2: Duplicate your layer.

Step 3: Desaturate your new layer (from Menu, Image > Adjustments > Desaturate).

sharpening your images

Step 4: Change your blend mode to Overlay. (Alternatively, you can use the Soft Light blend mode for a more subtle effect.)

Step 5: Now apply a High-Pass filter (from Menu, Filter > Other > High Pass) and choose a radius around 2.0 for an image of 730 pixels (on the long side). The Overlay option you chose above allows you to see how the radius affects the image so you can play around with it.

Note: The bigger your image, the larger your radius will be.

If the sharpness doesn’t look good on the entire image, you can use a layer mask and paint black over the areas where you want to hide the effect.

Step 6: Save for the web (from Menu, File > Save for Web). Check the Convert to sRGB box if unchecked.

Conclusion

If you’ve just begun your photography journey or if you’re looking to improve your basic editing skills, then these post-processing tips are a great place to start.

In fact, basic editing is often all you need to dramatically improve your photos.

So follow these tips, and watch as your images improve!

The post 5 Basic Post-Processing Tips to Instantly Improve Your Photos appeared first on Digital Photography School. It was authored by Nisha Ramroop.


Digital Photography School

 
Comments Off on 5 Basic Post-Processing Tips to Instantly Improve Your Photos

Posted in Photography


3 Tips for Becoming a Unique and Successful Photographer

02 Sep

The post 3 Tips for Becoming a Unique and Successful Photographer appeared first on Digital Photography School. It was authored by Kevin Landwer-Johan.

If you want to become a successful photographer, then there are a few things you absolutely must know.

That’s what you’re going to learn in this article:

Three key tips for becoming a truly masterful photographer.

successful photographer two people with bright clothing

© Kevin Landwer-Johan

Will it be a fast journey? Probably not.

But it doesn’t have to be difficult, either. If you enjoy photography, then you’ll have a ton of fun!

So if you’re ready to become a unique and successful photographer…

…then let’s get started.

Tip 1: Don’t get hung up on what you ‘should’ do

Many photographers read tutorials and watch videos. Then they try to mimic exactly what is being taught. They try to create the same photos the instructor is telling them to.

But if you learn photography this way, you’ll end up having photos that look like everyone else’s. You won’t discover a unique style of your own.

Sure, it’s good to study and learn from those who have more skill and understanding. But there is no formula for perfect photography. There is no absolutely correct way to make a picture.

Whether you’re taking a senior portrait or photographing products for a catalog, there are no hard and fast rules. There are guidelines. If you follow some of them you’ll make sharp, well-exposed photos that are well-composed. But if you try to rigidly stick to a method, you will not make creative photos.

Thai Model and Elephant

© Kevin Landwer-Johan

Every scene you photograph is different. Even if you photograph the same garden or building every day, things will change. The light will be different. It may be sunny one day and raining the next. Your subject may change over time.

So you must take what you’ve learned and adapt it to the situation. Apply photography techniques that best suit your subject and the current circumstances.

Inle Lake Fishermen

© Kevin Landwer-Johan

Obtain the skills and learn the rules. Know these things well, so your thoughts aren’t consumed by them each time you want to take a photograph.

But don’t apply a set of rules to your photography. Doing this may bring technically correct results. But often photography which is only technically correct is rather dull and boring.

You can find examples of very similar sets of images posted on social media and photo-sharing sites, and in all manner of ‘how to’ photography books. They all look repetitively similar because the photographer has only followed the rules.

Instead, apply your own creative thinking. Consider the rules, but don’t apply them unless they enhance your photo the way you want them to.

Tip 2: Put feeling into your photography for masterful images

If you want to be a truly great photographer, learn how to infuse your photography with feeling. Put something of yourself into your pictures.

This is what will make your photos unique. Nobody else has the same worldview you do.

This is not an easy concept for many photographers to grasp, but all you need to do is look at some of the best photos. The ones which attract you the most.

Ask yourself why you like them so much. Look at the greats. Admire the work of Irving Penn, Ansel Adams, Henri Cartier-Bresson, and the like. What is it about the way they have seen the world and photographed it that makes their photographs special?

boys in sunbeams

© Kevin Landwer-Johan

Look at favorite photos you have taken. What’s special about them? Are they only technically correct, or is there more to them? Do they capture a unique moment? Do they include feeling?

Photos which embody emotion are more powerful. Capturing the moment that conveys emotion, regardless of technical considerations, often results in the most compelling photographs.

Technical imperfection can even enhance the feeling in a photograph. A moment of laughter mistakenly overexposed can add to the spirited feeling. An underexposed photo of someone feeling sad will add to the expression of their despair.

portrait of a young girl

© Kevin Landwer-Johan

Here’s the bottom line:

If you can include feeling in your photos, if you can communicate something to viewers about your perspective, then you’ll be well on your way to being a truly successful photographer.

Tip 3: Study your craft and photograph often

Here’s the great thing about photography:

The more you pick up your camera, the faster you will develop as a photographer.

Your technical skills will improve, and your ability to see what makes a great photo will improve, too.

cultural abstract

I suggest you commit yourself to learning a new photography technique every month, or even every week. Get the new technique ingrained into your subconscious mind so you don’t have to concentrate on what camera settings to use. Then the settings will come to you automatically, even when you do choose to use Manual mode.

Reaching a high level of ability takes time. Like any artist, you have to start by mastering the essentials. Once you have, you will be free to express yourself.

Learning to play the piano or to dance well involves hours and hours of patient, determined practice. Photography is the same! The more you study and practice with your camera, the more expressive you will become with it. The less you have to think about the adjustments you need to make, the more focus you can give to being creative.

So engross yourself in your favorite genres of photography. Photograph often and with the desire to make improvements each time you do.

Over time your photographic skills will advance.

And, pretty soon, you’ll be a successful photographer.

Laughing Lady with umbrella

© Kevin Landwer-Johan

Conclusion

I believe we are all inherently creative. We are created to be creative.

This means that every one of us has the potential to be a great photographer.

You just have to work hard at your photography.

Eventually, you’ll be creating stunning, unique photos.

How to become a Unique and Successful Photographer Iron Bridge in Chiang Mai

The post 3 Tips for Becoming a Unique and Successful Photographer appeared first on Digital Photography School. It was authored by Kevin Landwer-Johan.


Digital Photography School

 
Comments Off on 3 Tips for Becoming a Unique and Successful Photographer

Posted in Photography


5 Tips for Shooting Waterfront Cityscapes at Blue Hour

28 Aug

The post 5 Tips for Shooting Waterfront Cityscapes at Blue Hour appeared first on Digital Photography School. It was authored by Joey J.

When you hear the term “cityscape photography,” what kind of image comes to your mind? It could be those photographed from elevated viewpoints or light trail of city traffic. To me, nothing beats the beauty of waterfront cityscapes – especially those photographed at blue hour.

waterfront-cityscapes-at-blue-hour

Hong Kong skyline (18mm, f/10, 199 seconds, ISO100)

Gyeongbokgung Palace (Korea) (24mm, f/8, 30 seconds, ISO100)

Gyeongbokgung Palace (Korea) (24mm, f/8, 30 seconds, ISO100);

waterfront-cityscapes-at-blue-hour

Shanghai skyline (18mm, f/11, 164 seconds, ISO100).


In order to capture stunning waterfront cityscape photography, there are a few key points to get right.

Shooting Waterfront Cityscapes at Blue Hour

1. Good sky and light

Michael Freeman, the author of Capturing Light: The Heart of Photography, has this to say.

“In almost all photography it’s the quality of light that makes or breaks the shot.”

This is very true with waterfront cityscape photography as well. If you want your photo to look good, only shoot on a (mostly) clear evening (dark clouds are our nemesis!). The quality of light on sunny evenings is much nicer than that of cloudy evenings, which can be easily noticeable in the resulting photos.

2. Sunset direction

Over the years of shooting cityscapes at blue hour, I’ve come to realize one thing affects the results rather significantly – where the sun has set. If the sun has set towards the direction you’re shooting, you typically see beautiful twilight hues leftover from the fading sun, which makes your blue hour photos extra special.

Image: Singapore skyline (18mm, f/5.6, 409 seconds, ISO100). The sun went down on the right edge of...

Singapore skyline (18mm, f/5.6, 409 seconds, ISO100). The sun went down on the right edge of the frame, adding a beautiful gradient of colors ranging from reddish-orange to deep blue.

On the contrary, your cityscape photos at blue hour will look dull and monotonous if the sun sets behind you (i.e., you’re shooting towards the sky that is 180-degrees opposite of where the sun has set).

In such a scenario, the quality of light is inevitably affected. The sky lacks the beautiful hues you typically see in the sun-setting side of the sky. With the sky like that, your photos won’t get much better no matter how hard you try editing in post-production.

Image: Shanghai (China) skyline (18mm, f/13, 163 seconds, ISO100). Despite shooting on a clear eveni...

Shanghai (China) skyline (18mm, f/13, 163 seconds, ISO100). Despite shooting on a clear evening, the sky looks noticeably dull, as this is the sky that is 180-degrees opposite of where the sun went down (the sunset occurred behind me shooting).

3. Long exposure

What I particularly like about waterfront cityscapes is it lets me create silky smooth water effects by doing a long exposure. As seen in the photo below, such smoothed-out water adds a dreamy feel that is very distinctive to long exposure photography. It’s the very reason I fell in love with waterfront cityscapes.

Image: Marina Bay (Singapore) (35mm, f/11, 194 seconds, ISO100).

Marina Bay (Singapore) (35mm, f/11, 194 seconds, ISO100).

By default, the limited available light at blue hour allows your shutter speed to naturally get longer, especially with the use of a small aperture like f/13. That said, without using a neutral density (ND) filter, the shutter speed probably won’t go beyond several seconds. This isn’t long enough to achieve a silky smooth water effect that you see in the photos above.

Image: Marina Bay (Singapore) shot with 2 seconds of exposure (at f/13) without using any neutral de...

Marina Bay (Singapore) shot with 2 seconds of exposure (at f/13) without using any neutral density filter. This is way too short to a create silky smooth water effect.

If you don’t own an ND filter yet, get yourself one! There are different densities available (2, 3, 6 and 10-stops are popular), but I’ll recommend a 6-stop ND filter (especially if you’re only getting one), as it hits a sweet spot for photographers shooting waterfront cityscapes.

Let’s say that you get a base shutter speed (when no filter is attached) of 2 seconds, which is quite a typical scenario around 10 minutes before the end of dusk (check your local dusk time at gaisma.com).

As seen in the photo above, 2 seconds of exposure hardly smooths out the water, but by attaching 6-stop ND filter, the exposure gets extended to 128 seconds (2 minutes 8 seconds). Each “stop” of ND filter approximately doubles the exposure time (2 seconds > 4 seconds [1-stop] > 8 seconds [2-stops] > 15 seconds [3-stops] > 30 seconds [4-stops] > 64 seconds [5-stops] > 128 seconds [6-stops]), which is long enough to create silky smooth water effect.

Image: Neutral density (ND) filters help extend shutter speed lengths by reducing light entering the...

Neutral density (ND) filters help extend shutter speed lengths by reducing light entering the camera lens.

I own 3 and 10-stop ND filters as well, but the 3-stop is too mild (2-second exposure can be extended to 15 seconds only) while 10-stops is way too strong (2-second exposure can be extended to a whopping 34 minutes, 8 seconds).

I have found 2 to 3 minutes of exposure is enough to create a silky smooth water effect. You could go longer like 5 to 6 minutes (I won’t go beyond 7 minutes, as long exposure noise starts to creep in), but it won’t change much beyond 2 to 3 minutes.

4. Reflections on water

Colorful reflections of city lights reflected on the water are one thing that gives your blue hour photos a “WOW” feeling. That said, this doesn’t always happen. Even when you shoot the same city view from the same spot for two evenings in a row, you may get completely different results when it comes to the clarity of reflections on the water.

To achieve good photographic results, like in the first photo below, the water has to be relatively still. If the water surface is rough, you hardly get any reflections (the second photo below). Unfortunately, this isn’t something we can control, so we need a bit of luck here.

waterfront-cityscapes-at-blue-hour

Marina Bay (Singapore) (TOP: 18mm, f/13, 142 seconds, ISO100;

waterfront-cityscapes-at-blue-hour

19mm, f/13, 162 seconds, ISO100).

5. Having thin clouds

While long exposure works best with water, it also works well with clouds, too. This might not be as important as other points above, but if the sky has some clouds, long exposure helps get them rushing across the sky. It adds interesting movement to your photos, as seen below.

waterfront-cityscapes-at-blue-hour

Singapore skyline (18mm, f/10, 257 seconds, ISO100).

Alternatively, if you want a greater effect, try evenings with more clouds. That said, if too cloudy, your photos will look just flat and ugly (as the quality of light is severely affected) or might come out crazy like the photo below. I prefer a clear sky with no clouds or just a little bit of thin clouds.

waterfront-cityscapes-at-blue-hour

Singapore skyline (20mm, f/5.6, 412 seconds, ISO100).

Conclusion

I hope these tips help you capture epic waterfront cityscape photos at blue hour! Looking back, my love for waterfront cityscapes comes from earlier days shooting sunny beachscapes, which was the primary reason I got into photography a decade ago.

Over the years, my interest has shifted from sunny daytime beachscapes to cityscapes at blue hour, but I’m still in love with water! I frequent cityscape photography spots located at the waterfront locally as well as on trips abroad.

Lastly, if you have any questions or info to share about shooting waterfront cityscapes at blue hour, feel free to do so in the comments below.


waterfront-cityscapes-at-blue-hour

The post 5 Tips for Shooting Waterfront Cityscapes at Blue Hour appeared first on Digital Photography School. It was authored by Joey J.


Digital Photography School

 
Comments Off on 5 Tips for Shooting Waterfront Cityscapes at Blue Hour

Posted in Photography