RSS
 

Posts Tagged ‘They’

Lensrentals shares photos of destroyed camera gear they got back after the eclipse

02 Sep

$ (document).ready(function() { SampleGalleryV2({“containerId”:”embeddedSampleGallery_9619240233″,”galleryId”:”9619240233″,”isEmbeddedWidget”:true,”standalone”:false,”selectedImageIndex”:0,”startInCommentsView”:false,”isMobile”:false}) });

Our friends over at Lensrentals shared an entertaining-if-a-bit-depressing post today: rental camera gear destroyed during the solar eclipse of 2017. It seems that, despite plenty of warnings from other websites and Lensrentals itself leading up to the incredible celestial phenomenon, not everybody got the message that you always need to use a solar filter to shoot the eclipse.

As such, Lenrentals got back everything from melted aperture systems, to burned shutters, to a fried mirror—ostensibly because people were shooting in live view.

LR is careful to specify that they actually got very few damaged units back given just how much gear they rented ahead of the eclipse, and that this post is meant to entertain not criticize:

“Please keep in mind, this post is for your entertainment, and not to be critical of our fantastic customer base,” writes Zach Sutton. “With this being the first solar eclipse for Lensrentals, we didn’t know what to expect and were surprised with how little of our gear came back damaged.”

So, entertain away. You can see a few of the images in the gallery above, or visit the full Lensrentals blog post for more pictures and descriptions of the damage the sun can do to expensive camera gear when you’re not properly equipped to shoot it.

Articles: Digital Photography Review (dpreview.com)

 
Comments Off on Lensrentals shares photos of destroyed camera gear they got back after the eclipse

Posted in Uncategorized


Report: Bowens employees not paid for July, told they must continue to work unpaid

04 Aug

A bombshell of a report on PetaPixel reveals just how sudden last month’s closure of 94-year-old UK photographic lighting company Bowens has been, especially for its employees. An infuriated UK employee reached out to the photography blog to share their story, and the whole workforce of Bowens China has sent an email to the company to complain about how the process is being handled.

The UK employee, who wished to remain anonymous, expressed anger at how the liquidation has been handled, specifically citing issues with pay. According to them, “26 of the most hard working members in the UK […] were in complete shock [on July 14th] to be informed that they will be unpaid for the previous month, and will have to continue to work through a consultation process unpaid.”

The employee claims the UK crew was told they would have to continue working because they are bound by contract. Staff are reportedly considering legal action.

These claims are backed up by an email sent to Bowens and Calumet distributors by the workforce of Bowens China, and acquired by PetaPixel.

The letter claims employees of Bowens Suzhou were “suddenly abandoned” with “no July wages, no social insurance, [and] no updated information since Germany let us stop work [on the] 17th July.” The employees took to the streets and the German embassy to protest what they’re describing as “dishonest betrayal” and “bloody exploitations” by Aurelius and Calumet.

For their part, Calumet did respond to PetaPixel’s request for comment. The company sent a statement in which it re-states the reasons for closing Bowens (“the result of far reaching changes affecting its market”) before addressing the concerns in China, saying:

“As part of the decision to discontinue its operations Bowens consequently also decided to discontinue the manufacturing operations in China […] The liquidation process is handled according to all local laws and requirements and the employees will be informed in due course on next steps.”

You can read Calumet’s full statement on PetaPixel. However, DPReview has reached out to Calumet for comment as well, specifically asking Calumet to address the claim that employees were not paid for July and are contractually bound to continue working without pay.

We will update this post if and when we hear back.

Articles: Digital Photography Review (dpreview.com)

 
Comments Off on Report: Bowens employees not paid for July, told they must continue to work unpaid

Posted in Uncategorized


You mean they made cameras, too? A tribute to the Samsung NX10

06 Jul

When Samsung left, it left quietly. I was reminded recently by a senior executive that the company never announced that it was officially exiting the camera industry, but even so, right now the chances of us ever seeing an NX2 seem pretty slim. Which is a shame, because the NX1 was a great camera, and a rumored full-frame NX2 might have been just the shot in the arm that the camera industry badly needs.

But there’s no point wishing on what might have been. Samsung may only have been in the mirrorless interchangeable lens camera business for a little over five years, but it achieved a lot in that short time. And it all started with the NX10.

Traditionally, the camera industry has been a bit dismissive of Samsung. Even after the premium-priced NX1, the company never entirely managed to shed its ‘they make fridges, don’t they?’ image. A slight hint of cynicism towards Samsung’s attempts to be taken seriously as a camera maker can even be detected in DPReview’s coverage of its first mirrorless model, the NX10. In retrospect, that tone is hard to justify.

The NX10 was the first mirrorless model from any manufacturer to offer an APS-C sensor (Sony’s NEX system was launched later the same year), and the ~50% increase in sensor area compared to Micro Four Thirds was a pretty significant technical achievement. The NX10 also offered a fairly high resolution (for the time) electronic viewfinder, a fixed OLED rear screen, and excellent build quality. This – ahem – ‘little Korean camera’ (in the words of our announcement coverage) packed a lot of technology into its impressively compact body.

Samsung NX10 Samples Gallery (2010)

$ (document).ready(function() { SampleGalleryV2({“containerId”:”embeddedSampleGallery_5616261218″,”galleryId”:”5616261218″,”isEmbeddedWidget”:true,”standalone”:false,”selectedImageIndex”:0,”startInCommentsView”:false,”isMobile”:false}) });

The NX10 was announced immediately before CES 2010, and we took a working sample to the show. I had recently joined the DPReview team, and Richard, Lars and I added a couple of days of vacation in LA’s Koreatown to the trip.1

Our plan was to get some sunshine, enjoy some of the area’s famous food, and shoot enough images on the NX10 to create a samples gallery.2 During that time, the NX10 was mostly in my possession, and I ended up really liking it. Samsung’s lens lineup was paltry at the point of announcement, but the tiny 30mm F2 pancake was (and remains) a lovely lens for casual everyday shooting with such a small camera.

The Getty Center, in the hills overlooking Los Angeles. It’s worth visiting LA for the Getty Center alone. I certainly wouldn’t go back for the breakfasts.

Flashback to the mid 2000s: Back when it was still rebadging Pentax DSLRs, Samsung used to run private brainstorming sessions in the UK (and I assume elsewhere) with technologists and industry journalists to come up with ideas for the future of camera design over dinner. It also used to sponsor competitions in design schools, to the same end. Possibly as a result of the prodigious consumption of free booze3 the results of these consultations and design experiments invariably ended up looking something like the famous Luigi Colani concepts for Canon, which eventually became the delightfully curvy (but still basically SLR-shaped) T90 in the early 1980s.

Another shot from the Getty Center. I really like the Getty Center.

Having attended a couple of those brainstorming sessions in 2007/8 (hey – I enjoy a free dinner as much as anyone) I remember being a bit surprised that the NX10 ended up looking so conventional. Like the contemporary Panasonic Lumix DMC-G2, it looked and handled like an unusually small DSLR. That said, the NX10 was a perfectly pleasant camera to use, with very few significant frustrations.

Overall, the NX10 offered very good image quality, fast, responsive AF (‘DSLR-speed’ as we admitted in our review) and for the time, an excellent rear display. We complained about its Auto ISO implementation and aggressive noise-reduction4 and the video mode had some kinks that needed to be worked out, but for a first attempt, it must be said that Samsung got a lot right.

In pretty short order, the NX10 became the NX20, which became the NX30. Then in 2015 came the NX1. And the rest is (sadly) history.

Read our Samsung NX10 review (2010)


1. I’m pretty sure the location was just a coincidence, but Richard’s boundless enthusiasm for puns may have extended to the trip planning – my memory is unclear on this point.

2. Barring one memorably unpleasant Denny’s breakfast, we succeeded in all three aims, despite what sounded like a near riot in the early hours of the morning at our very cheap and not at all secure hotel.

3. On the part of the industry insiders, I mean, not the design students. Although let’s be honest, we’re talking about design students here – they were probably even more hammered than we were.

4. Remember that we’re talking about DPReview in 2010 – when complaining about Auto ISO systems and noise reduction represented a large portion of our total site output.

Articles: Digital Photography Review (dpreview.com)

 
Comments Off on You mean they made cameras, too? A tribute to the Samsung NX10

Posted in Uncategorized


Video: Those ‘Shot on iPhone’ ads are not what they seem

02 Jul

Anybody who knows about the technique and gear involved in capturing great photos and video knows to look at those ‘shot on *insert smartphone here*’ ads with a bit of skepticism. Yes, they were technically shot on those phones, but many people don’t realize the amount of extra gear and software that goes into the final product.

There is a disclaimer at the end of these videos, of course, but it’s easy to miss or subconsciously ignore it when you’re hoping against hope that your iPhone 7 Plus will be the last camera you’ll ever need.

Have you noticed this disclaimer at the end of the ‘Shot on iPhone’ ads?

In this short video, YouTuber Marques Brownlee sheds a bit of light on the matter, sharing a little behind the scenes look at some of the really intense gear these commercials use, before diving into some more affordable options that can help get your smartphone video—shot on iPhone or otherwise—closer to those professional grade commercials.

Because while you’ll probably never use a rig this advanced:

It’s not unthinkable that you could buy yourself a DJI Osmo Mobile and some Moment lenses to help get your shaky hand-held attempts a little closer to the results you see in Apple and Samsung’s professional ads.

Just don’t beat yourself up if your first few tries don’t live up to this level of quality. We don’t know exactly what gear Apple used on its latest ‘Shot on iPhone’ commercials, but we’re betting it’s closer to the crazy rig you see above, than the pared down little stabilizer and smartphone lenses Brownlee touts in his video.

Articles: Digital Photography Review (dpreview.com)

 
Comments Off on Video: Those ‘Shot on iPhone’ ads are not what they seem

Posted in Uncategorized


Optical Illusion Architecture: These 11 Buildings Are Not What They Seem

08 Jun

[ By SA Rogers in Architecture & Public & Institutional. ]

Pinched, warped, rippled, steeply angled and mirrored until they disappear into the sky, these buildings are not quite what they seem at first glance. Sometimes, it takes a nice long look at their outlines and proportions to determine where their facades actually begin and end, and how they can possibly be balanced so precariously.

Rachel Raymond Mirror House

In the space once occupied by the historic Rachel Raymond House in Belmont, Massachusetts, a beautiful mirrored illusion rose: ‘Mirror House’ by Pedro Joel Costa Architecture and design, which pays tribute to the original home’s modernism while looking to the future.

The Dancing House, Prague

Prague’s ‘Dancing House,’ also known as ‘Fred and Ginger,’ is actually the Nationale-Nederlanden building by architect Vlado Milunic, built in cooperation with Frank Gehry in 1996. One of the dual towers of the building appears to be warped and distorted, as if someone squished it up against the other.

Australian Customs Service Building, Melbourne

From most angles, it’s virtually impossible to tell what’s going on with the facade of the Australian Customs Service Building in Melbourne, clad as it is in an unusual graphic black and white pattern. The theme is reportedly repeated inside.

Pinnacle at Symphony Place, Nashville, Tennessee

The tall and thin mirrored Pinnacle at Symphony Place almost manages to disappear into the sky altogether when conditions are just right, becoming like a ghostly suggestion of a building instead of something decidedly solid and real.

Lucid Stead by Phillip K. Smith III, Joshua Tree, California

Alternating its logs with long stretches of mirror, artist Phillip K. Smith III makes his Joshua Tree installation ‘Lucid Stead’ blend with its environment so effectively it seems to be little more than a few dark brown lines floating in the desert.

Next Page – Click Below to Read More:
Optical Illusion Architecture These 11 Buildings Are Not What They Seem

Share on Facebook


[ By SA Rogers in Architecture & Public & Institutional. ]

[ WebUrbanist | Archives | Galleries | Privacy | TOS ]


WebUrbanist

 
Comments Off on Optical Illusion Architecture: These 11 Buildings Are Not What They Seem

Posted in Creativity


Guardians of the Galaxy team reveals why they chose an 8K Red camera

09 May

If you’re a Guardians of the Galaxy fan, you’re no doubt looking forward to seeing Volume 2 in the series, which was released last weekend. If you find yourself standing in line at the theater, you can even impress your friends with some movie trivia: Guardians of the Galaxy Volume 2 is the first feature film shot on the RED Weapon camera using the 8K RED DRAGON VV sensor. They’ll either be seriously impressed at your informed insider knowledge, or they’ll slowly move away and pretend not to know who you are. YMMV.

If you’re the gear-freak we think you are, watch this behind the scenes video of Director James Gunn and Director of Photography Henry Braham talking about their decision to use the camera, praising it for its large format look, small size, and high degree of usability. Oh, and as a bonus you’ll get to see actors flying around in front of blue screens as well.

Articles: Digital Photography Review (dpreview.com)

 
Comments Off on Guardians of the Galaxy team reveals why they chose an 8K Red camera

Posted in Uncategorized


Photojournalists reveal their favorite publications to work with and what they pay

02 May
Photographer Genna Martin on assignment for Seattle PI.

Columbia Journalism Review recently surveyed a group of photojournalists on their favorite publications to work with based on several criteria, including arguably the biggest one – pay. As a result, they’ve published an article revealing the day rates for some top publications as well as some insight into other factors, such as balancing a lower day rate with exposure to a wider audience.

So by the numbers, how do top publications stack up for freelance photographers? CNN comes out on top with the best day rate at $ 650, though National Geographic is close behind with typical rates between $ 500-650. Harper’s Magazine’s rate was hard to pin down but reported rates varied from $ 500 up to $ 1000 per day. 

The New York Times’ recently boosted rate of $ 450 per day makes it more competitive with the top-paying outlets, but CJR notes that the photographers they spoke with acknowledged the Times’ wider reach and top-notch editorial staff go a ways to compensate for the lower pay. Coming in with the lowest day rate of the bunch is the Washington Post, offering $ 350. 

Check out the full article at Columbia Journalism Review for some interesting insights on working for these top publications.

Articles: Digital Photography Review (dpreview.com)

 
Comments Off on Photojournalists reveal their favorite publications to work with and what they pay

Posted in Uncategorized


Advanced Shooting Modes: What They Are and When to Use Them

06 Apr

Are you ready to get off Auto? When most people get started in digital photography, the first thing they do is set the shooting mode dial on the top of the camera to Auto. It makes sense to let the camera make decisions about things while you’re just getting used to using it.

In Auto mode, the camera makes decisions not only on the Aperture, Shutter Speed, and ISO but also on many other factors such as White Balance, Focus Mode, Focus Points and Metering Mode.

After awhile, you might start to choose one of the automatic scene modes such as portrait, sports, landscape or night, if your camera has those options. This gives the camera a bit more information about what you’re shooting so it can make better decisions for you.

But at some point, you are going to want to take control and make those decisions for yourself. Your camera is smart, but it’s not an artist! This is where the advanced shooting modes come in.

The Exposure Triangle

Before we get into discussing advanced shooting modes, you need to understand the concept of how the exposure triangle works.

First, there is shutter speed – the length of time that the shutter is open. This is the easiest part of the triangle to understand; the longer the shutter is open, the more light comes in and hits your camera’s sensor.

The San Diego skyline by Anne McKinnell - Advanced Shooting Modes: What They Are and When to Use Them

ISO 100, 24mm, f/22, 80 seconds

Second, there is the aperture – the variable opening in your lens through which the light passes. The opening is round and works just like the pupils in our eyes. On a bright day, you squint, making the pupil smaller to let in less light. When the light is dim, your pupil is larger to let in more light.

Generally speaking, a small aperture opening and a long shutter speed may allow the exact same amount of light in as a large aperture opening and a short shutter speed. Choosing this balance between aperture and shutter speed is the key, and your choice will depend on what you are trying to achieve with your photograph.

The third and final factor in determining exposure is ISO – the sensitivity of your camera’s sensor to light. For those of you who remember the film days, ISO is similar to ASA, the speed of the film. Essentially, it’s best to leave ISO at a low setting such as 100 (other photographers will recommend using high ISO as needed – do your own research and experiment with your camera). But if you’re in a low-light situation, you might need to increase it so that less light is required to make a good exposure.

Advanced Shooting Modes: What They Are and When to Use Them

Big Bend Ranch State Park, Texas. ISO 200, 10mm, f/18, 1/10th of a second.

Advanced Shooting Modes

There are five main advanced shooting modes available on most digital cameras:

  1. P for Program Mode
  2. A or Av for Aperture Priority Mode
  3. S or Tv for Shutter Priority Mode
  4. M for Manual Mode
  5. B for Bulb Mode

Many professional photographers frown upon using anything other than Manual Mode. But I respectfully disagree. A camera is just a tool and a smart one at that! There’s nothing wrong with letting your camera do what it’s good at as long as you are controlling the factors that are important to you.

Program Mode

In Program Mode, your camera chooses the shutter speed and aperture. You can control other factors like white balance, focus mode, focus points and metering mode. Program mode is a good place to start when you’re just coming off of auto mode and learning how to use your camera settings. But it isn’t where you want to stay because aperture and shutter speed are the key to taking control of your images.

Aperture Priority Mode

When you use Aperture Priority Mode, you tell the camera what aperture you want to use, and it will calculate the appropriate shutter speed to make a good exposure. The size of the aperture affects depth of field, which is a critical concept when you want to take creative control of your images.

When you have a very large aperture opening, such as f/2.8, you are going to have a shallow depth of field. That means that whatever you focus on will be sharp, but everything in front and behind it will be out of focus.

On the other hand, when the aperture opening is small, such as f/22, you have a large depth of field, so more things that are in front and behind your focus point will also be sharp.

The difference between large and small apertures - Advanced Shooting Modes: What They Are and When to Use Them

Try them all

The best way to understand this is to try it out for yourself. Put your camera in Aperture Priority Mode and take the exact same photograph using each aperture setting. Then look at the photos on your computer and you’ll see the effect that aperture has on the depth of field.

What you’ll find is that photos with a large aperture have a soft background and photos with a small aperture have a background that is in focus. For me, depth of field is the most important factor in my photography, so I almost always use Aperture Priority Mode.

Organ Pipe Cactus National Monument Arizona - Advanced Shooting Modes: What They Are and When to Use Them

ISO 100, 33mm, f/18, 1/25th of a second. For this image, it was important to keep everything sharp from the closest cactus in the foreground to the mountains in the background. So I chose a small aperture to ensure I had good depth of field.

F-Numbers are Tricky

Before we leave this topic, there’s one thing that many people find confusing and that is the f-stop numbers. A large aperture opening is represented by a small number and a small aperture is represented by a large number. I don’t want to get into too much math here, but my trick for remembering how this works is to think of it like a fraction. 1/2 is larger than 1/8, so f/2 is a larger opening than f/8.

Shutter Priority Mode

When you use Shutter Priority Mode, you tell the camera what shutter speed you want to use, and it will calculate the appropriate aperture to make a good exposure. This mode is most useful when you have moving objects in your frame and you want to either freeze the motion or blur the motion.

For example, if you are photographing a bicycle race, you probably won’t be happy with just any old shutter speed. You’ll likely want to use a relatively long exposure, such as half a second or one second, to blur the motion of the bicycles going by. Or you’ll want a fast shutter speed such as 1/500th of a second to freeze the motion. Anything in between would look out of focus.

Shooting waterfalls is another good example of when to control the shutter speed for the silky water effect.

Englishman River Falls, Vancouver Island, British Columbia - Advanced Shooting Modes: What They Are and When to Use Them

ISO 100, 180mm, f/22, 1/10th of a second.

Manual Mode

When you are in Manual Mode, you must tell your camera both the aperture and the shutter speed you want to shoot at. You will use your camera’s light meter to determine whether the settings you have entered will create a good exposure, then adjust the settings based on whether you have too much or not enough light.

In Manual Mode you are in complete control and practicing with it will give you a good grasp on how aperture and shutter speed work together. Once you understand this, it may be more convenient to use either Aperture Priority Mode or Shutter Priority Mode to accomplish your goals.

Bulb Mode

Bulb Mode allows you to extend the shutter speed beyond the camera’s built-in limit, which is usually 30 seconds. You can use this mode to photograph the streaks of clouds moving across the sky, or at night to photograph star trails.

To use Bulb Mode, press the shutter button and hold it down. The shutter will open and stay opened until you release the shutter button. But of course, this method isn’t practical because you can’t just stand there holding the shutter button down for 10 minutes! Plus, having your finger touching the camera during a long exposure will cause camera shake and your photo would be blurry.

Star trails at Joshua Tree National Park, California - Advanced Shooting Modes: What They Are and When to Use Them

This photo was made using an intervalometer programmed to make a 7-second exposure every 15 seconds for two hours. Then all the images were stacked to create the star trails.

The best way to use Bulb Mode is to use a shutter release cable (or a remote trigger). This allows you to press the button on the cable to open the shutter and then lock it opened so you can walk away and come back later to release it. Another option, instead of using a cable release, is to use an intervalometer which will allow you to program how long you want the shutter to be opened and even program multiple shots. For example, you can set it to take a 2-second exposure every 5 minutes for an hour.

Conclusion

Remember, the camera is your tool to use any way you like to make your art. The shooting modes are just some options that are available to you so you can accomplish your creative goals. Have fun and experiment!


Shooting modes are just one of the camera settings you’ll want to master to take control of your camera and your photography. My new eBook Taking Control: Essential Camera Skills for Beginners will help you understand what all the knobs and dials on your camera do and how to use them for creative control over your images.

The post Advanced Shooting Modes: What They Are and When to Use Them by Anne McKinnell appeared first on Digital Photography School.


Digital Photography School

 
Comments Off on Advanced Shooting Modes: What They Are and When to Use Them

Posted in Photography


Toy Photography Lets Hobbyists Work While They Play

11 Jan

Chris McVeigh didn’t reach paid photography through any of the usual routes. He didn’t study photography, didn’t work as an assistant and he didn’t even have photography as a goal. His background was in writing for technology magazines and providing illustrations and animation for online advertising. It was only when the economic downturn left him with less demand from his regular employers, and more free time for creative experimentation, that he turned towards picture-taking. His images have since become regular additions to Gizmodo, they’re sold on RedBubble and Society6, and Lucasfilms has even put one of his photos on the front page of StarWars.com.

His success has been helped by the fact that Chris skirted around the competition for landscape photographs and wedding shoots. He produces a nearly unique set of pictures that he calls “toy photography.” He creates sets out of Lego figures and uses them to illustrate scenes.

Chris’s interest in Lego started as suddenly as his interest in photography. Like most people, Chris had left playing with plastic bricks in his childhood. Some friends, though, bought him some Star Wars Lego sets for Christmas… which he then ignored for about a year before assembling them.

“When I did finally break open the boxes and put them together, it was like a spark ignited within me,” Chris recalls. “However, it would be another few years and a dozen Star Wars sets before I was really hooked again.”

At the same time, Chris was playing around on Flickr, creating a series of comical self-portraits as part of a daily photo challenge. That series built an audience, won plaudits and gave him the confidence to buy his first DSLR.

breakfast

Photography: Chris McVeigh

Each Set Takes Two to Three Weeks to Build

It wasn’t long before his growing interest in photography met the fun he was then having with Hasbro Star Wars figures. Lego, though, offered a more flexible platform, with parts that were interchangeable, allowing Chris to reuse pieces from any Lego theme from Batman to Harry Potter.

The props might be toys but creating the images isn’t child’s play. Chris usually has plenty of ideas but he starts designing using a Lego CAD app called Lego Digital Designer. That allows him to experiment with the build without spreading all the bricks in front of him. Once he’s happy with the design, he creates a test build in the real world then works to optimize the parts usage.

Some designs, he says, take as little as 24 hours but most require a development of two to three weeks before they’re ready to be photographed.

The shoot is a whole different challenge. Legos’s bricks are highly reflective, especially the darker colors, says Chris, so he has to be very careful about how he uses light and where he positions his panels. It’s no surprise that he typically builds and photographs new models just once a month at the moment, although he might produce a number of models concurrently and photograph them at the same time.

The result is a mixture of whimsy and smart photography. Scenes include a version of American Gothic, a reconstruction of Michael Jackson’s Thriller video (complete with dancing zombies) and a bowl of milk filled with floating stormtrooper heads. Reconstructions of early technology, including a Leica M9-P Hermes and a (sort of) working Polaroid Land Camera are popular too.

Chris’s intention when he began creating and photographing his models was little more than to enjoy some creative experimentation. But when he uploaded them to Flickr, the pictures continued to win attention, including from buyers.

“One of Gizmodo’s editors was a contact of mine on Flickr, and was impressed both with my capacity to design my own models and my ability to present those models with my photography,” Chris said. “So he contacted me through Flickr to see if I’d be interested in contributing to Gizmodo.”

From Lego to Kozik’s Mongers Menthols

The technology website has published dozens of Chris’s pictures using them to illustrate articles about water pressure as well as explanations of the difference between GSM and CDMA. The site made a point of linking to Chris’s Web pages and even mentioned that he was able for commissioned work.

His work for Lucasfilms also came about as a result of his presence on Yahoo’s photo sharing site. Bonnie Burton, formally of the Official Star Wars blog, contacted Chris on Flickr after seeing his Star Wars action figure/chipmunk photography on Digg.

Chris isn’t the only photographer who has managed to make money setting up toys and taking their picture. Ryan Roberts paints with a slightly different canvas, using collectible figures from Japan and China’s urban vinyl toy culture that was popular in the 1990s. They might include the Kozik’s Mongers Menthols series that contained a smoking pile of poop, Domo’s Acid Sweeties, or Pete Fowler’s Monsterism.

“These figures went way beyond my childhood toys with so much color and attitude,” says Ryan on his website. “They were already tiny works of art by giant artists from other genres such as painting, illustration, silk screening, and street art.”

Ryan’s broader choice of figures gives his scenes a greater freedom of expression even if the models themselves are less familiar than the Lego characters used by Chris McVeigh. He sells his prints from his websites, has a DVD of toy-based shorts and markets a calendar of his images that costs $ 45.

What both these photographers have in common is the combination of a passion for a hobby — in this case a particular kind of children’s toy — and a knowledge of photography. Bring those two together and add the kind of photography-loving networking that can still be found on sites like Flickr and while you might not find yourself traveling down the usual route taken by professional photographers, you could well find yourself winning commissions, landing sales making some money doing a photo-based activity you love.


Photopreneur – Make Money Selling Your Photos

 
Comments Off on Toy Photography Lets Hobbyists Work While They Play

Posted in Equipment


The 5 Best Google Nik Color Efex Pro 4 Filters and How They Can Amplify Your Images

21 May

The Google Nik collection has been considered one of the top photographic effect plugin suites for a few years now, and it just got better in a big way – as of March 24th, 2016, it’s available free of charge.

This move has been applauded by many, yet accompanied by caution with by some, since a few analysts see this as the beginning of the end for the software suite. This is all speculation of course, and regardless of what the future holds for the Nik collection, it is a highly useful set of tools that can benefit any photographer, of any skill level.

Nik color efex pro

Color Efex Pro

The highlight of this set has always been the all-around workhorse, Color Efex Pro. The current version, Color Efex Pro 4, is a complete package in itself, featuring a variety of effects of the highest quality. Although you can sort the list of effects by photo type (landscape, portrait, etc.), there is a lot to explore.

Let’s go through five of the most useful and effective tools available in this package, and see how they can boost the appearance and effectiveness of your images.

Foreword

As with all of the tools within this suite, the filters described below include a Control Points feature within the panel of individual filter controls. This feature is invaluable, and allows you to add positive or negative points anywhere in the image, adding or reducing the effect of the filter in targeted areas. Each point can be individually controlled to modify range of effect and opacity. Combining these points with the filters gives you almost unlimited control of how the filters will effect your final photograph. I encourage you to play around with the control points, and you’ll quickly see how they can help you turn your image into the picture you initially envisioned.

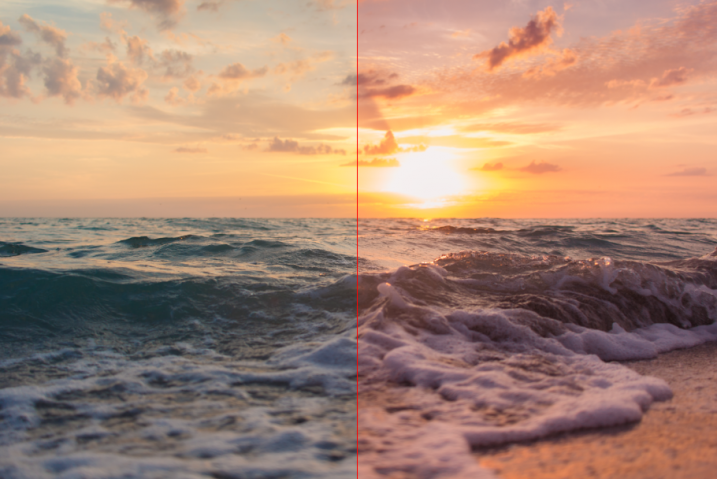
1 – Bi-Color Filters

This filter is meant to simulate standard bi-color filters that would normally be affixed to your camera lens. Two preselected colors are blended together along a plane and mixed with your original image, creating a very customizable look that can completely change the tone of the photograph.

Although another bi-color filter is available that allows you to choose the two colors to be blended, the original filter has already selected many color combinations divided into five shade groups, such as browns, cool/warm, violet/pinks, and so on.

Nik color efex pro

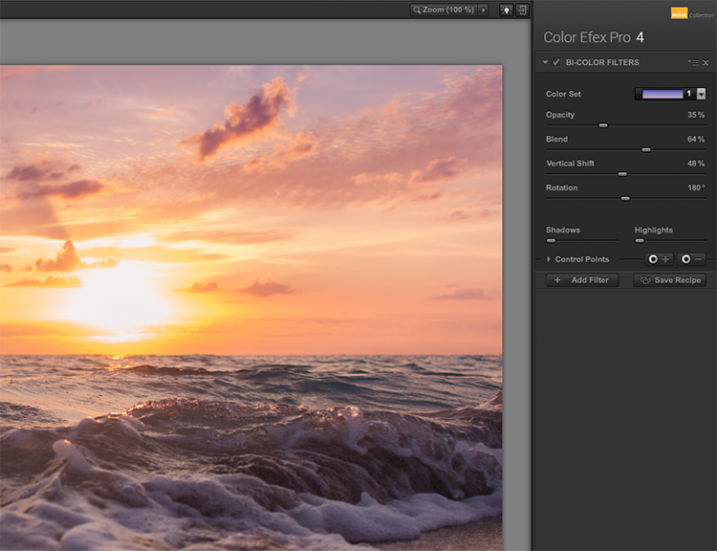
Once you have selected a color set, you can further modify the appearance of the filter by adjusting several sliders, including Opacity which allows you to increase or decrease the intensity of the overall effect, and Blend slider, which softens or sharpens the line between the two colors. The entire effect can be rotated around the image using the Rotation slider.

article_cep4_screen6

Once you have mastered the controls for adjusting the bi-color filter effect, you can then move on to the User Defined Bi-Color Filter, which has similar controls, and allows you pick any two colors to blend with your image.

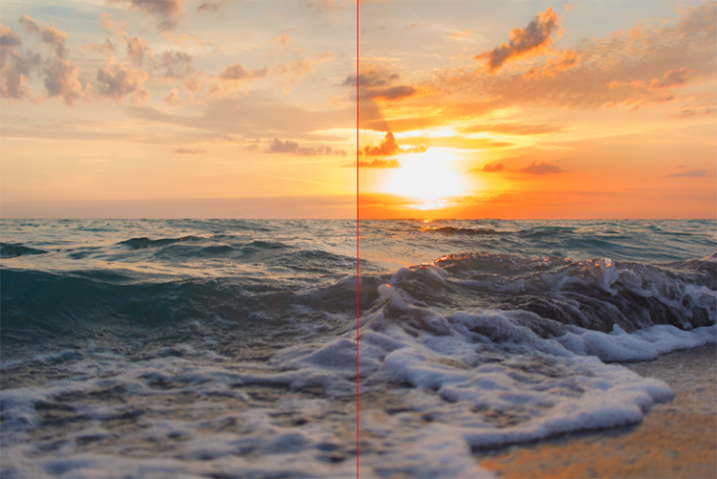
2 – Contrast Color Range

The Contrast Color Range filter allows you to selectively modify contrast within certain colors of a photo. Selecting a color will cause that color range to become lighter or less saturated, and colors opposite of it to become darker or more saturated. For example, selecting a blue or purple color range in an image featuring a sunset (with a lot of orange within the photo) will intensify the red and orange colors, making the sunset much more dramatic.

Nik color efex pro

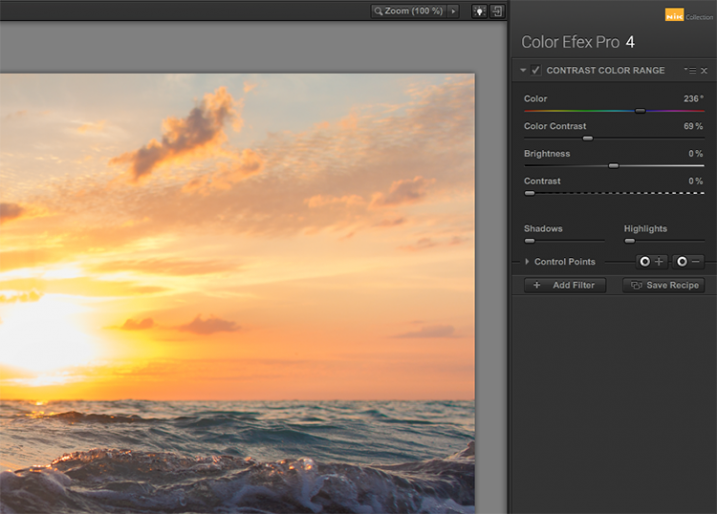
The two main tools to understand here are the Color, and Color Contrast sliders. The Color slider will select the color range, while the Color Contrast slider will adjust the intensity of the effect by increasing or decreasing the contrast between the color selected and its reciprocal.

Nik color efex pro

Below these are controls for Brightness and Contrast, which behave similarly to their counterparts in Photoshop or Lightroom.

3 – Detail Extractor

While most users might argue in favor of using the excellent Pro Contrast filter (discussed below) over the Detail Extractor, I’d argue that it depends on what look you’re going for. For a smoother, less enhanced result, Pro Contrast would definitely be the way to go, but to add insane levels of drama to your image, the Detail Extractor is just what the doctor ordered.

Nik color efex pro

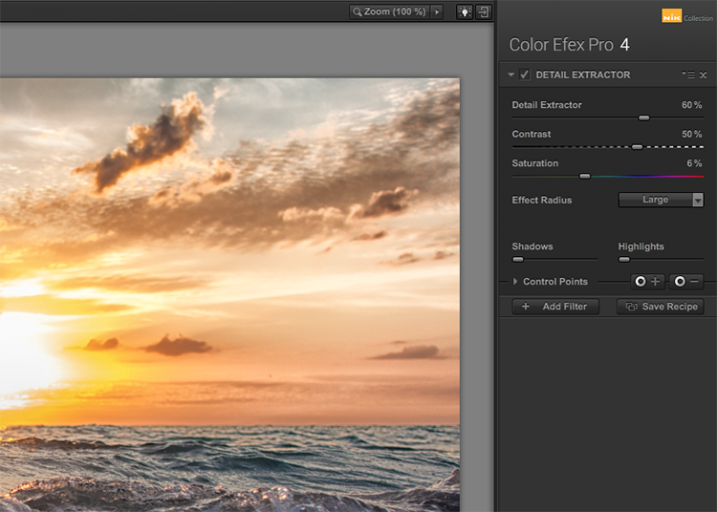
This tool adds that drama by disrupting the balance of shadow and light within the photo, to pull much more detail, giving you a dark and gritty stylized result that can really grab the viewer’s eye.

Nik color efex pro

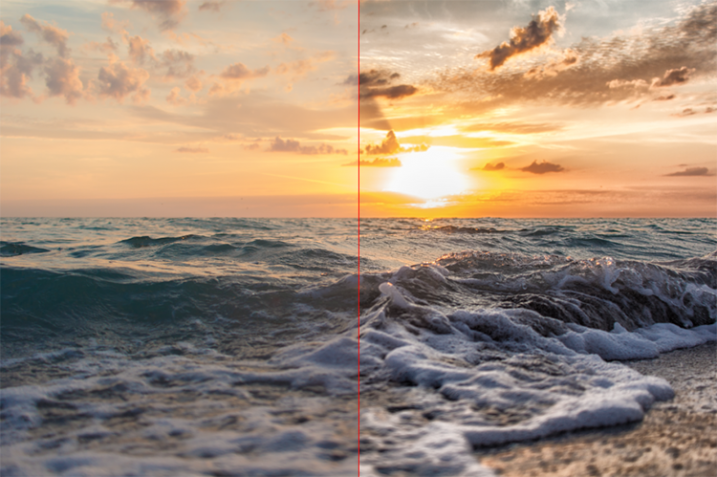
The main control used to create the effect here, is the Detail Extractor slider. Moving it to the right increases the amount of details highlighted. In addition to Contrast and Saturation adjustments, there is also an Effect Radius adjustment available, which allows you to target whether fine or large elements within the image are modified.
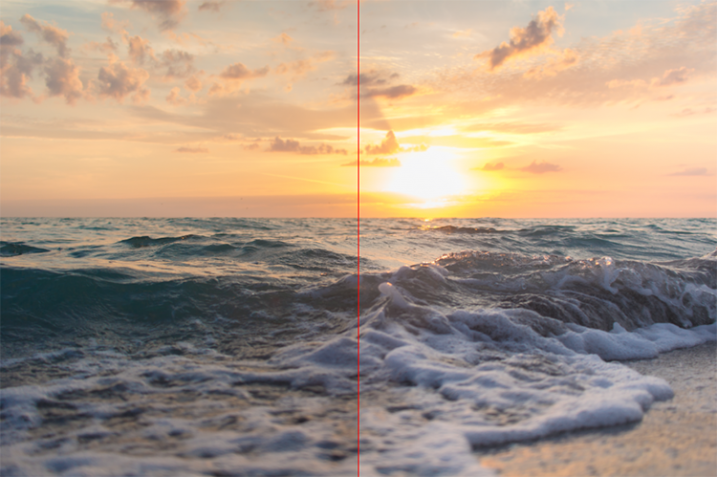
4 – Pro Contrast

Without a doubt, the Pro Contrast module in Color Efex 4 is my favorite filter by far. Admittedly, half of my interactions with the Nik Filters involve me making all of my adjustments in Lightroom, and using Color Efex 4’s phenomenal Pro Contrast to add the bit of drama and flair I’m looking for, without going over the top and getting an overcooked result.

The tool analyzes the image to determine how the contrast adjustment will affect the loss in detail inevitable in this type of correction, and minimizes it. The filter can turn a flat, lifeless, image into a colorful and vibrant photo with almost perfect levels of contrast.

Nik color efex pro

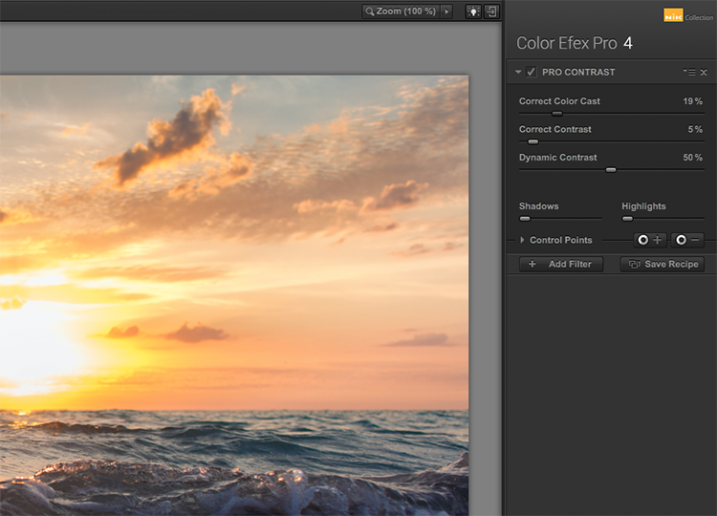
Pro Contrast features three sliders, each one of them important to the final result. Correct Color Cast analyzes the photo, and produces an algorithm to remove any inherent color cast it finds. Moving the slider to the right will reduce this cast and smooth out the tonal scheme of the image. In the ocean sunset image shown here, applying Correct Color Cast removes the orange hue cast upon the waves in the foreground, and returns them to their proper blue.

Nik color efex pro

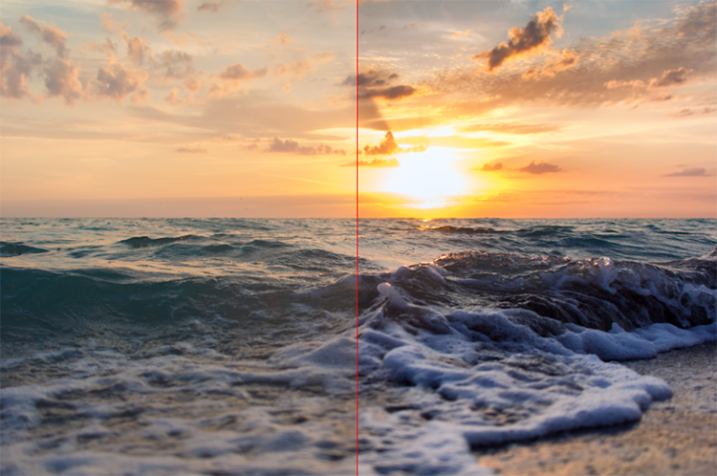
Correct Contrast applies a general contrast adjustment based on the tonality of the image, as analyzed by the software. Finally, Dynamic Contrast introduces the real magic; areas of the photo that are flat are boosted in contrast, while areas already featuring high contrast are not. This allows for a rich, beautiful enhancement, without muddy tonal structures and details that might normally be lost.

5 – Reflector Efex

We all understand the need for a reflector when creating portraits; whether it be a natural-light or studio situation, certain areas of our subject (usually a person’s face) are befallen with shadows due to the interaction of the subject with the light being used. Reflectors allow us to bounce light onto our subject, and target it to fill in these areas of shadow, producing an even layer of light.

Nik color efex pro

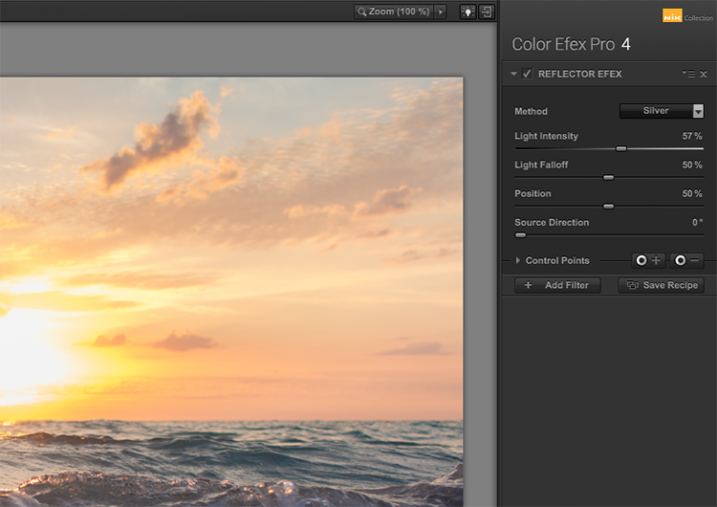
The Reflector Efex filter takes that concept and turns it up to 11, by simulating a silver or gold reflector’s use within your image, and allowing you to modify it in a number of ways to illuminate the photo exactly as you envision it.

First, you select a Method, which is effectively picking which color of reflector to use; gold, soft gold, or silver. You’ll then use the Intensity slider to select how much light will be bounced onto the image. This is equivalent to adjusting power output of a studio light, or the harshness of sunlight in an outdoor situation.

Nik color efex pro

The Light Falloff and Position sliders allow you to adjust how softly or sharply the effect of the bounced light trails off, as well as the position of this falloff. Finally, the Source Direction adjustment lets you change the position of the reflector; if you need light directed to your subject’s left side, you would position the Source Direction between 270° and 360°, which is the bottom, to bottom right corner of the frame.

Conclusion

We don’t know what the future holds for the Nik collection, as a price reduction to zero doesn’t bode well for continued enhancements or updates of any kind. But, for users of the software this may not matter, as it is already an integral part of many photographer’s toolkits, amateurs and professionals alike. The entire collection is of incredible value. But, Color Efect Pro 4 in particular, features these, and many more tools that can be incorporated into your everyday photographic workflow from Lightroom or Photoshop, and give your images a competitive edge!

What about you? Do you already use Google’s Nik Collection? If not, will you try it now after it has been changed to a free product? Are there other filters within the collection you find just as useful for your own workflow? Sound off below please, ladies and gents!

googletag.cmd.push(function() {
tablet_slots.push( googletag.defineSlot( “/1005424/_dPSv4_tab-all-article-bottom_(300×250)”, [300, 250], “pb-ad-78623” ).addService( googletag.pubads() ) ); } );

googletag.cmd.push(function() {
mobile_slots.push( googletag.defineSlot( “/1005424/_dPSv4_mob-all-article-bottom_(300×250)”, [300, 250], “pb-ad-78158” ).addService( googletag.pubads() ) ); } );

The post The 5 Best Google Nik Color Efex Pro 4 Filters and How They Can Amplify Your Images by Tim Gilbreath appeared first on Digital Photography School.


Digital Photography School

 
Comments Off on The 5 Best Google Nik Color Efex Pro 4 Filters and How They Can Amplify Your Images

Posted in Photography