RSS
 

Posts Tagged ‘These’

Use These Few Lightroom Sliders To Make Your Image Pop

19 Sep

One of the most used tools in Lightroom to bring attention to the subject is the vignette tool. However, unless you are very subtle with the vignette tool it will be very obvious what you did to the image to make the subject pop. If you overdo it, the vignette tool will leave a distinct dark circular frame near the Continue Reading

The post Use These Few Lightroom Sliders To Make Your Image Pop appeared first on Photodoto.


Photodoto

 
Comments Off on Use These Few Lightroom Sliders To Make Your Image Pop

Posted in Photography


Use These Few Lightroom Sliders To Make Your Image Pop

16 Sep

One of the most used tools in Lightroom to bring attention to the subject is the vignette tool. However, unless you are very subtle with the vignette tool it will be very obvious what you did to the image to make the subject pop. If you overdo it, the vignette tool will leave a distinct dark circular frame near the Continue Reading

The post Use These Few Lightroom Sliders To Make Your Image Pop appeared first on Photodoto.


Photodoto

 
Comments Off on Use These Few Lightroom Sliders To Make Your Image Pop

Posted in Photography


Display your camera collection in style with these 3D-printed wall mounts

30 Aug

$ (document).ready(function() { SampleGalleryV2({“containerId”:”embeddedSampleGallery_4952012233″,”galleryId”:”4952012233″,”isEmbeddedWidget”:true,”standalone”:false,”selectedImageIndex”:0,”startInCommentsView”:false,”isMobile”:false}) });

Looking for a sleek, minimalist display for your vintage camera collection? LaudWorks, a purveyor of DIY project tools, has launched a small accessory called Hangie for easily mounting a camera on a wall. The 3D-printed mount is offered in both steel and plastic versions with multiple color options, and is nearly invisible when used, giving the impression that the camera is floating on the wall.

The Hangie mount is simple to install: first, attach the mount to a wall using two screws, then secure the camera using a tripod mount screw. The metal version of Hangie is made from bronze-infused stainless steel and is designed for heavier cameras; LaudWorks says it tested this version with a Canon EOS 7D and a EF-S 17-55mm lens attachment (1500g / 3.3lb). The plastic version, meanwhile, is made from white nylon plastic and is made for ‘small, lightweight cameras.’

Both products are available from Shapeways; the plastic version is $ 4 and the metal version is $ 21. 

Via: PetaPixel

Articles: Digital Photography Review (dpreview.com)

 
Comments Off on Display your camera collection in style with these 3D-printed wall mounts

Posted in Uncategorized


Don’t Delete Your Failed Images – Instead Learn from Your Mistakes with These Tips

28 Jul

I know you’ve done it. It’s okay to admit it. I’ve done it too! We all have! You’ve shot some terrible photographs.

Perhaps you shot the whole time in the wrong white balance, or you didn’t pay attention to shutter speed and everything is blurry. When this happens it’s incredibly disappointing. Frustrated and angry with yourself, you consider the experience a write-off, and delete the images. Then you head for the snack cupboard searching for some kind of solace.

But, everyone makes mistakes when they shoot, even professionals. There are times when we get excited and forget to check our settings, or make sure we are using the right lens for the right moment. It happens.

Image 1

We were canoeing and in my rush to get an image of a small bird I underexposed the shot.

These failures don’t have to be a complete waste though. There’s nothing negative about making mistakes. Willie Nelson once said, “Once you replace negative thoughts with positive ones, you’ll start having positive results.”

So with that in mind, start looking at every photograph you take, as a step forward. Don’t delete those mistakes right away. You can learn a lot about taking good photographs from the missteps you make. I’ve met some photographers who have created a special file for all of their failures. Then when they have a little bit of time, they peruse through the collection and reflect upon them. This type of exercise can help you grow as a photographer.

There are lots of ways to reflect on your images. Some people make mental notes about their images. Others like to use a written journal format. I know of a few photographers who use the keyword section in Lightroom to make notes. I’ve even seen a detailed scrapbook in which the photographer printed out his failures and scribbled notes beside each. Just be sure to pick a format that works for you. Regularly reflecting on your work is important.

To start you down the path here’s a list of questions that you can use to help you reflect on your images.

Reflection Tips

  • In the first few seconds of viewing the photograph, what was the first emotion you experienced? Why? Now let it go. Detach from the emotion and be critical.
  • Why do you consider this image a failure? Don’t analyze too much just scribble down the first thought that comes to your mind. Try to make this part of the analysis a stream of consciousness.
  • What were your goals or intentions when you shot this image? Why were you unable to meet those goals?
  • If you could turn back time and reshoot the image what would you do differently?
  • Think carefully about the image and come up with one key piece of learning that you can take away from this experience.

Now let’s practice your reflection skills. It’s not easy to analyze your own photographs; it can take some time to perfect. Let’s analyze some of my failures, and some successes.

View each image, and really look at it in a critical sense. You can use the guiding questions from above to help you. After you’ve finished your reflection, scroll down and take a look at my notes, see if you agree with my thoughts. Perhaps you noticed something different then I did.

Image 2

What did you come up with? Keep in mind there’s no right or wrong to this whole process. Some people might argue the image isn’t a failure. I personally, hate it.

Notes about the image

  • I cut off the hockey stick, it’s bad framing.
  • She’s looking down at the puck, there is no eye contact.
  • Loss of impact or connection with the viewer.
  • The edge vignette makes it too dark.

Ways to improve

  • Mark out the ice and give players a guideline for where to stop.
  • Remind players to look at the camera at all times.
  • Remove one complication by having kids skate without the puck (Photoshop the puck into the image in post-processing).

Image 3

Compare the shot above, with the previous image. It was taken in the same arena a few months later. Do you think there’s a difference? The framing is certainly better and he makes eye contact with the camera. Have I improved over the first shot?

Let’s consider another mistake. This image was shot for a magazine article. Can you tell why it’s a fail?

Image 4

Notes about the image

  • Her face is slightly out of focus.
  • The client wanted a unique angle for the shot but the focus is on the ball.
  • The houses behind in the background don’t suggest or support that we are on a soccer field.

Ways to improve

  • Ensure the focus is on the correct part of the scene by using back button focus.
  • Always take the time to set up the scene. Remember that the background is as important as the foreground.
  • Direct the player more to remain in a certain area.

Here’s the image the magazine chose to use for the article. You can see how the background gives this image more context than the previous shot.

Image 5

The more you reflect upon your images, the more you will grow as a photographer. If you find you are stuck in a rut, this kind of activity may just be a way to move forward. Coming back to images after a few days, or weeks, is always a good idea. By separating yourself from the image it will help you to analyze it more carefully.

I’ve posted a few more images here for you to reflect upon below. Once you’ve finished analyzing my work, try it on some of your own shots. Leave some examples in the comments below, and include your reflections.

Image 6

Image 7

Image 8

This is an opportunity to grow and become a stronger photographer. I expect that everyone who shares will be heartened by the fact that they are not the only ones to have taken a bad photograph. If you choose to reply to other people’s posts, please be kind and be constructive. This is all in the name of learning, we are not here to criticize each other.

Keep in mind, even geniuses have some failures!

“I have not failed. I’ve just found 10,000 ways that won’t work.” – Thomas Edison

googletag.cmd.push(function() {
tablet_slots.push( googletag.defineSlot( “/1005424/_dPSv4_tab-all-article-bottom_(300×250)”, [300, 250], “pb-ad-78623” ).addService( googletag.pubads() ) ); } );

googletag.cmd.push(function() {
mobile_slots.push( googletag.defineSlot( “/1005424/_dPSv4_mob-all-article-bottom_(300×250)”, [300, 250], “pb-ad-78158” ).addService( googletag.pubads() ) ); } );

The post Don’t Delete Your Failed Images – Instead Learn from Your Mistakes with These Tips by Erin Fitzgibbon appeared first on Digital Photography School.


Digital Photography School

 
Comments Off on Don’t Delete Your Failed Images – Instead Learn from Your Mistakes with These Tips

Posted in Photography


How to Get the Correct Exposure at Night with These Helpful Tips

25 May
Tappan zee bridge

Colorful lights on the Tappan Zee Bridge reflected in the Hudson River at night. Behind the shot: ISO 200, aperture f/8, shutter speed 90 seconds, White Balance tungsten, lens used 80-200mm f/4.5 manual Nikkor zoom.

Exposing your photos correctly at night can be a bit challenging, and will certainly require some trial and error. In this article, you will learn helpful information to minimize the learning curve. Follow the tips outlined below and you will be taking better night photographs in no time.

Tappan zee bridge at night

View of the Tappan Zee Bridge and surrounding landscape at night. Behind the shot: ISO 400, aperture f/8, shutter speed 10 seconds, White Balance auto, lens used 105mm f/2.8 Nikkor.

Claiborne pell newport bridge

Night-time view of the Claiborne-Pell Newport Bridge and Narragansett Bay, taken in Jamestown, Rhode Island. Behind the shot: ISO 200, aperture f/8, shutter speed 25 seconds, White Balance fluorescent, lens used 50mm f/1.8D Nikkor.

Things You’ll Need

A Tripod

If you’re shooting at night, your exposures are going to be pretty long (anywhere from one to 30 seconds, or more). Since it is impossible to hold your camera perfectly still for that long, you will need a sturdy tripod, so that your camera does not move at all during the exposure. For added stability, you can hang your camera bag (or another somewhat heavy object) from the hook on your tripod’s center column. This is especially handy in windy conditions.

Plants at night

Long exposure of plants illuminated by streetlight at night in Nyack, New York. Behind the shot: ISO 400, aperture f/4, shutter speed 30 seconds, White Balance tungsten, lens used 50mm f/1.8D Nikkor.

Illuminated plant at night

Golden plant illuminated by streetlight at night in Nyack, New York. Behind the shot: ISO 400, aperture f/4, shutter speed 30 seconds, White Balance tungsten, lens used 50mm f/1.8D Nikkor.

Remote Shutter Release

With a long exposure, any camera movement can ruin the shot, making it soft or blurry. To ensure you get a sharp image, use a remote shutter release (remote trigger). The best type of shutter release to use is the kind that functions as a timer remote as well. If you don’t have a remote shutter release, you can use your camera’s self-timer. The only downside to using the self-timer is that you will have to keep your shutter speed at 30 seconds or less. If you don’t have too much light, you can always increase your aperture (decrease the f-stop) or increase your ISO to speed up your shutter speed.

Colors of night

Assorted foliage illuminated by streetlights in Nyack, New York. Behind the shot: ISO 200, aperture f/5.6, shutter speed 30 seconds, White Balance fluorescent, lens used 24mm f/2.8D Nikkor.

Colorful night

Colorful plants and trees in Nyack, New York. Behind the shot: ISO 200, aperture f/5.6, shutter speed 30 seconds, White Balance fluorescent, lens used 24mm f/2.8D Nikkor.

Camera Settings

Shoot RAW

Keeping image quality in mind, you should always strive to shoot in RAW format. It records more pixel information, and does not compress your images at all. RAW provides you with more post-processing options, including white balance correction. If you happen to under or over expose an image, you can easily adjust the exposure if your image is in RAW format.

ISO

When taking photographs with little available light, you are better off using a low ISO (400 and below) and longer exposure times. This is important so you don’t get too much noise (or grain) in your images. Also, make sure you have Long Exposure Noise Reduction turned on in your camera’s settings.

Yellow leaved tree moving clouds at night

Yellow-leaved tree and moving clouds at night in Nyack, New York. Behind the shot: ISO 200, aperture f/5.6, shutter speed 30 seconds, White Balance tungsten, lens used 50mm f/1.8D Nikkor.

Tree in wind

Tree in wind at night in Valley Cottage, New York. Behind the shot: ISO 400, aperture f/2.8, shutter speed 30 seconds, White Balance tungsten, lens used 50mm f/1.8D Nikkor.

Use Manual Mode

While shooting in very low light, your camera’s light meter may not read the scene too well. Your best bet is to use Manual mode, where you control both the aperture and the shutter speed. To find a baseline for the correct exposure, you can use the following trick (which I learned in this blog post):

  1. Set your ISO to 6400
  2. Set the aperture you would like to use
  3. Set your shutter speed at one second

Take a test shot using these settings to get an idea of what your image will look like. Note, these settings are almost equivalent to a 1-minute exposure at ISO 100, a 30-second exposure at ISO 200 and a 15-second exposure at ISO 400, etc. If your scene is too bright with these settings, you can see what a half second exposure at 6400 looks like. This would equal a 30-second exposure at ISO 100, a 15-second exposure at ISO 200 and a 8-second exposure at ISO 400. This baseline is a great guide, you can easily take test shots to figure out what shutter speed to use.

Autumn leaves in motion

Autumn leaves in motion at night in Valley Cottage, New York. Behind the shot: ISO 400, aperture f13, shutter speed 30 seconds, White Balance fluorescent, lens used 24mm f/2.8D Nikkor.

Tree at night

Tree and clouds in motion at night in Nyack, New York. Behind the shot: ISO 400, aperture f/5.6, shutter speed 30 seconds, White Balance tungsten, lens used 50mm f/1.8 manual Nikkor.

If you use the above trick, you won’t unnecessarily waste time taking a bunch of long test exposures. As it is, long exposure night photography is rather time-consuming. Make sure you switch your ISO back to 400, or below, before you start taking photos that you intend to keep.

In scenes where you have a decent amount of available light (e.g. places with numerous streetlights), you may be able to use Aperture Priority mode instead of Manual mode.

In Conclusion

Night photography can be rather tricky, and requires a good amount of practice. In time, you will have a feel for the amount of light in various night scenes, and be able to figure out accurate camera settings with relative ease. Hopefully, the information contained in this post will help you capture great long exposure night shots, that don’t need much post-processing.


googletag.cmd.push(function() {
tablet_slots.push( googletag.defineSlot( “/1005424/_dPSv4_tab-all-article-bottom_(300×250)”, [300, 250], “pb-ad-78623” ).addService( googletag.pubads() ) ); } );

googletag.cmd.push(function() {
mobile_slots.push( googletag.defineSlot( “/1005424/_dPSv4_mob-all-article-bottom_(300×250)”, [300, 250], “pb-ad-78158” ).addService( googletag.pubads() ) ); } );

The post How to Get the Correct Exposure at Night with These Helpful Tips by Marshall Reyher appeared first on Digital Photography School.


Digital Photography School

 
Comments Off on How to Get the Correct Exposure at Night with These Helpful Tips

Posted in Photography


Mobile Cabins: Go Off Grid in These 12 Rustic Modern Designs

03 Mar

[ By Steph in Architecture & Houses & Residential. ]

mobile cabins walden 2

Load up a prefab cabin on a truck and drop it virtually anywhere you want to be. Rustic lodgings in remote locations aren’t what they used to be now that modern mobile housing is available in so many forms and price ranges, from tiny houses on wheels costing just $ 11,000 to ultra-narrow habitable garden sheds to cabins shaped like actual logs to take the typology to its extreme.

Escape Vista
mobile cabin escape vista

mobile cabin escape vista

mobile cabin escape vista 3

mobile cabine scape vista 4

The Escape Vista is a 160-square-foot, cedar and cortex steel cabin on wheels that can be towed to the location of your choice to take advantage of its many large windows offering views of your surroundings. There’s room for one or two, and despite its small size, you’ll have a bed, kitchen, dining or work table, lounge area and bathroom. The open interior is finished with aspen wood, and luxury features include solid butcher block tops, designer faucets, integrated solar power, a washer/dryer combo and a pop-up flatscreen television. It starts at $ 39,900.

Pircher Oberland
mobile cabins hangar

mobile cabins hangar 2

mobile cabins hangar 3

mobile cabins hangar 4

Hangar Design Group created this prefabricated, mobile metal-clad cabin for Picher Overland to blend into rocky mountain environments. Vertical wooden siding on either end mimics tree trunks, and the interior is lined in natural wood flooring and synthetic stone-toned tiles.

Flake House by Olgga Architects
mobile cabin flake house

mobile cabins flake house 2

mobile cabins flake house 3

This nomadic dwelling by Olgga Architects is like a modern take on the log cabin, camouflaged on the outside by fully-round timber siding. It stands on the site of Frossay in France, open to anybody who needs a simple shelter overnight. The proposal is “based on the concept of the ‘foil’, where the wooden structure is broken in two halves establishing a radical spatial boundary while materializing an unexpected entry sequence. an object, recalling a broken branch, whose unconventional scale is the main idea of the project: to be built-up, taken down, moved, pt down, left behind or taken along, inhabited or left to its surrounding.”

The Wedge: Luxury Rolling Cabin
mobile cabin wedge 1

mobile cabin wedge 2

mobile cabin wedge 4

mobile cabin wedge 5

This 400-square-foot luxury turnkey cabin by Wheelhaus features a spacious bedroom with a king-sized bed, standard-sized bathroom, fireplace, large windows, high ceilings and a private deck. Base prices start at $ 89,500.

Next Page – Click Below to Read More:
Mobile Cabins Go Off Grid In These 12 Rustic Modern Designs

Share on Facebook


[ By Steph in Architecture & Houses & Residential. ]

[ WebUrbanist | Archives | Galleries | Privacy | TOS ]


WebUrbanist

 
Comments Off on Mobile Cabins: Go Off Grid in These 12 Rustic Modern Designs

Posted in Creativity


Is it Time to go Full Frame? Weight These Pros and Cons Before You Decide

24 Jan

Has anyone ever said to you, “That’s a nice photo, you must have an expensive camera!”?

According to photography legend Ansel Adams, “The single most important component of a camera is the twelve inches behind it!”  

Your camera is simply a tool, that you use to create your vision of the scene in front of you. A camera can only do what you tell it, so it’s not going to capture that “nice photo” all by itself. But, what if the camera doesn’t perform up to your expectations? Then, it may be time for an upgrade.


Captured at ISO 6400 this image shows great tonal range with very acceptable noise levels.

Captured at ISO 6400 on a Nikon D750 full frame, this image shows great tonal range with very acceptable noise levels.

I recently made the jump from a cropped-sensor camera to a full frame body (a Nikon D750, used in all the images below). For the purpose of this article I am not going to get into a technical discussion about the differences between a crop sensor (APS-C), and full frame camera (the main one being is that the full frame has a larger sensor, the size of a frame of 35mm film).

But how do you know if, and when, upgrading to a full frame camera is desirable? What follows are some points to consider if you’re on the fence.

Advantages of full frame

  • Improved low light performance: Because of the larger sensor size, a full frame camera is able to capture more light, which allows it to attain focus in darker environments.
  • Higher ISO performance: The larger sensor of a full frame has larger pixels, which creates less digital noise at higher ISOs. In most cases you will get a one or two stop improvement in high ISO noise, over crop sensor cameras, though many new models of APS-C models have a much improved performance in noise reduction.
  • More control over depth of field: This is a commonly misunderstood benefit of full frame, because the larger sensor does not really affect the depth of field of an image. However, with the larger sensor of a full frame, you can move closer to the subject which causes the depth of field to become smaller. This, in turn, creates a smoother bokeh.
  • Improved dynamic range and color depth:  A full frame sensor can record more tonal range within shadows and highlights. Detail and color are much improved at both ends of the spectrum.

Disadvantages of full frame

Bird in fight was captured here at high ISO to achieve fast shutter speed to capture a very sharp image.

This heron in flight was captured at high ISO to achieve the fast shutter speed needed to get a sharp wildlife image.

  • Expense: Not only is the cost of the full frame DSLR higher than a crop sensor, you will most likely need to make additional investment in compatible lenses.
  • Size and weight: Not only are the sensors larger in a full frame DSLR, the overall size and weight are as well. Also, the lenses have more glass elements, and are also larger and heavier. This may not matter to many photographers, but when carrying gear for long distances it could be a factor to consider.
  • No crop factor: The telephoto reach of a full frame DSLR is lessened by not having a crop sensor. For example: a 200mm lens on full frame doesn’t have the reach of the approximate focal length on a cropped sensor  camera (about 300mm).
  • Slow frame rate in burst mode: Because a full frame DSLR has a larger sensor, there is more information to record to the memory card. Therefore, it will take longer to save images to the card, resulting in fewer frames per second when you are shooting in burst mode.

So, how do you know if you are ready to make the jump to a full frame camera? Ask yourself these questions:

How much will it cost?

As mentioned above, the cost of buying a full frame camera is significantly more expensive than a crop sensor one, plus new lenses will most likely need to be purchased. There isn’t much use in changing to full frame if you are not going use high quantity lenses designed for full frame cameras. If you plan to make the jump to full frame, you may want to begin by upgrading lenses to those compatible with full frame DSLRs.

Choosing a smaller aperture of f/22 gave enough depth of field to keep both the boys and the waterfalls in focus.

Choosing a smaller aperture of f/22 produced enough depth of field to keep both the boys and the waterfalls in focus using a full frame Nikon D750.

What type of photography do you enjoy shooting?

Full frames have advantages and disadvantages for different types of photography.

  • Landscape: Low light performance, more detail and improved ISO performance are all great advantages of full frame for landscape photography. The only possible drawback here is the effectively shallower depth of field, but this can be compensated for by using a smaller f-stop.
  • Portraits: The larger sensor size of a full frame will result in a shallower depth of field. For portraiture this means the backgrounds can feature more blur and make the subjects stand out better.
  • Wildlife: A full frame camera loses the telephoto reach that a crop sensor has. Nevertheless, a lot of wildlife photography is shot in low light situations, where a full frame gives a much improved advantage.
  • Sports: As in wildlife photography, limited reach and low light factors apply to sports photography. Shooting with a full frame, the improved focusing in low light is a helpful benefit for sports. However, the slower frame rates of a full frame can be a drawback in photographing a fast moving sport.

If you are a portrait or landscape shooter, there are many benefits that might convince you to make the switch to full frame.

This scene was captured with at 24mm on full frame Nikon D750. The white line shows how much of this image would be captured on a crop sensor from the same location.

This scene was captured at 24mm on a full frame Nikon D750. The white line shows how much of this image would be captured on a crop sensor from the same shooting location.

This image was captured at 600mm with a Nikon D750. The white line shows the extra reach that a crop sensor camera would give you. This image was also captured in low light conditions with ISO of 2000 with very acceptable noise level.

This image was captured at 600mm with a full frame. The white line shows the extra reach advantage that a crop sensor camera would provide. Still, capturing this image in low light conditions with an ISO of 2000 results in a desirable noise level.

Is your current camera holding you back?

Every camera has a limited number of shutter releases, so if your camera is nearing the end of its life cycle, it might be time to consider an upgrade. If your older crop sensor DSLR is limiting your results in low light, and you are constantly frustrated by high levels of noise, you might benefit from an upgrade to full frame.

Keep in mind that it’s convenient to blame a camera for taking poor images, but it may not be the camera holding you back. Many times photographers don’t get the results they expect by underutilizing high-end equipment. No matter what type of camera you shoot with, get to know it, and how all of its features work, before moving on to a different one.

shooting here in low light, this shot was able to be captured in low light by increasing the ISO without adding digital noise to the image.

This cityscape was captured with a full frame in low light by increasing the ISO, without adding digital noise.

What is your level of photography experience?

A full frame camera is probably not the best one to use as a beginner. Start shooting with a more entry level DSLR, and work up to a full frame model. If you are looking for a camera to take photos of family and friends, a crop sensor DSLR is a very satisfactory choice. Having a good handle on the exposure triangle (aperture, shutter speed and ISO) and how they work together is a must if you’re going to take advantage of all the benefits of full frame. You must be comfortable with shooting in manual mode. If you earn any part of your income from photography, you may benefit from switching to a full frame camera.

Do you make large prints?

A full frame sensor has a larger pixel size, which will capture more light and detail, which results in sharper images that are conducive to making large prints. If you never make any prints larger than 8×10″, then a full frame DSLR may not be of benefit to you.

Here this sunrise shot has a nice range of tones without any noise in the shadows that you might get with some crop sensor cameras.

Captured with full frame Nikon D750, this sunrise image reveals a nice range of tones, without any of the digital noise in the shadows likely to be present with some crop sensor cameras.

Will purchasing a full frame make you a better photographer?

You may have heard this quote, “Skill in photography is acquired by practice, not by purchase.”

Do you need a full frame camera to capture great images? No, of course not! Most new crop sensor cameras on the market today are engineered to take beautiful images! But if you are an experienced photographer who makes money with your camera, you may gain an advantage by switching to full frame.

The bottom line

If you are thinking of upgrading from a crop sensor camera, be sure to consider the price, lens compatibility, and type of photography you do, before you make the change to full frame. Jumping to full frame can be quite a leap! But if you are ready for that big step, the results can be rewarding.

Are you ready to go full frame? Please leave your comments below.

googletag.cmd.push(function() {
tablet_slots.push( googletag.defineSlot( “/1005424/_dPSv4_tab-all-article-bottom_(300×250)”, [300, 250], “pb-ad-78623” ).addService( googletag.pubads() ) ); } );

googletag.cmd.push(function() {
mobile_slots.push( googletag.defineSlot( “/1005424/_dPSv4_mob-all-article-bottom_(300×250)”, [300, 250], “pb-ad-78158” ).addService( googletag.pubads() ) ); } );

The post Is it Time to go Full Frame? Weight These Pros and Cons Before You Decide by Bruce Wunderlich appeared first on Digital Photography School.


Digital Photography School

 
Comments Off on Is it Time to go Full Frame? Weight These Pros and Cons Before You Decide

Posted in Photography


Do These 5 Quick Exercises to Learn What Your New Camera Can Do

13 Jan

new=-camera-experiments-1Have you learned everything your new camera can do yet? If not, then you’ve found the right article.

I present you with five quick exercises you can try right now, to help you better understand your new camera, and how it captures light. I’ll give you some hints about what is happening, but you will need to come to your own conclusions.

If you get stuck after running the experiment, there are answers at the bottom of the article. Don’t cheat! You have to try to come to the conclusion yourself first, you will learn more if you can do that.

To do these exercises your camera will need to have a shutter (although mirrorless cameras will work here), variable aperture, and adjustable ISO. It will also be helpful if you have a Program Mode, Aperture Priority, Shutter Priority, and Manual Mode. Check your user manual to see if these exist on your new camera.

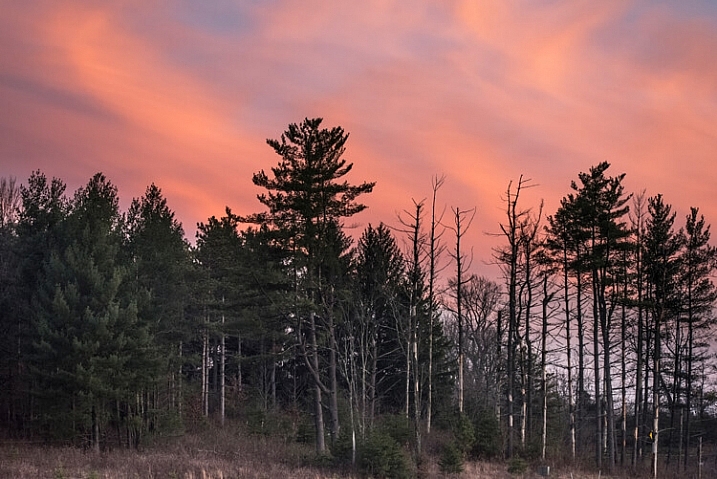
1. Play with depth of field using the aperture

You might have learned a little about your camera’s aperture in this DPS article: Seeing in Depth of Field: A Simple Understanding of Aperture. If not, take a quick look.

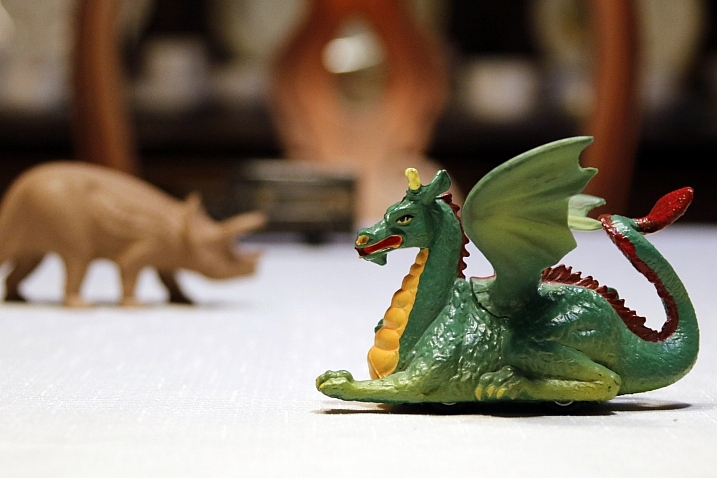
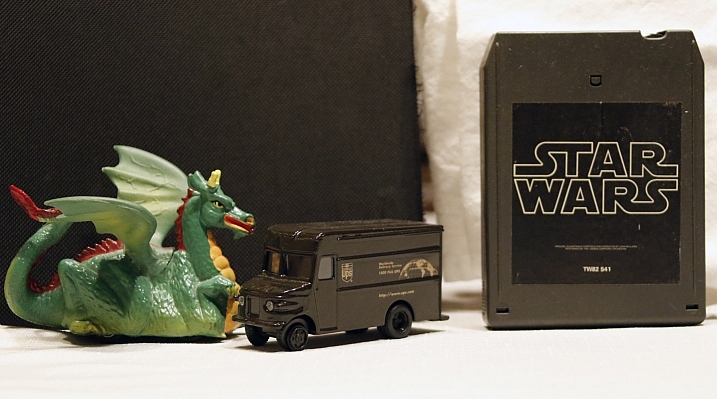
This first exercise is easy. I want you to line up three objects on a table in front of your camera. Make sure the objects are something easy to focus upon (have lots of lines or contrast). If you need to, borrow toys from your kids, I find those work best.

During this exercise your camera will not move, so set it on the table in one spot. Place your first object directly in front of the camera, about two feet (0.6 meters) away. Your second object should be one foot (0.3 meters) beyond the first, and the third object, another foot beyond the second. It should look something like this:

new-camera-experiments-2

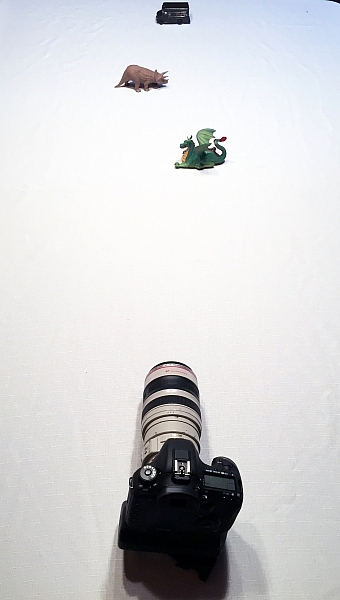
The objects should be staggered sideways to ensure they are all visible from the camera angle.

Set your camera to Aperture Priority mode. You may need to reference your camera’s user manual to find the setting. Usually it is the A or Av label on your camera’s main dial. Then set your ISO to Auto, and your focus dot to the camera’s central focus point. Again, you may need to reference the manual as all cameras are a different in how they choose focus points.

Point your camera at the first object (so the active focus point is on it), so that your camera focuses there. Set your aperture to the smallest f-number your lens can achieve; it will around f/1.8 or f/3.5. If you are using a zoom lens, pick a focal length somewhere in the 40-60mm range.

new-camera-experiments-3

Now take a picture. Without moving your camera, change the aperture to f/8. Take another picture. Then change your aperture to the largest number (smallest opening) your lens can achieve; this might be f/22 or even higher. Take a third picture.

Next, point your focus point at the second object, so it is sharp, and repeat the steps above so you have three new images at a low number aperture (f/3.5), a medium number (f/8), and a high number (f/22).

Lastly, focus on the third object and repeat the steps again.

You should now have nine images; three of each of the objects in sharp focus, at three different apertures.

The aperture on your camera controls the depth of field. What do you notice as the aperture number (or f-number) gets larger? Are more or less things in focus? What about when you focus on an object further away and look at the same aperture setting as a close object? Is more or less in focus?

BONUS EXPERIMENT: Run this experiment again and set your focal length to a smaller number (wide angle view) such as 18mm. What differences do you notice now?

2. Exposure compensation when the exposure is wrong

new-camera-experiments-5This may be disappointing to find out, now that you have a fancy new camera; but your camera is often wrong with its automatic settings. I’m sorry, but it just is. It’s not human and it has limits, but you can get around them.

Choose two objects for this experiment. One should be predominantly white, and the other should be predominantly black. Set them side by side. I chose a black iPad cover and a dish towel in this case.

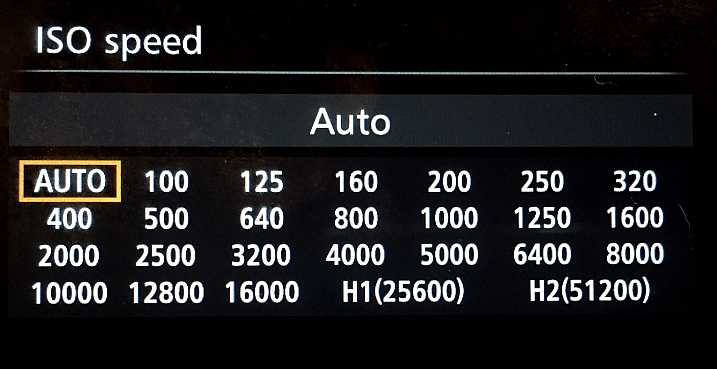
Set your camera to Aperture Priority and choose the lowest f-number you can (e.g. f/1.8 or f/3.5). Set your ISO to 400 and turn autofocus on. Reference your user guide to set your camera’s metering to Spot or Center Weighted. This is typically signified by a small circle in the middle of the viewing area.

new-camera-experiments-4

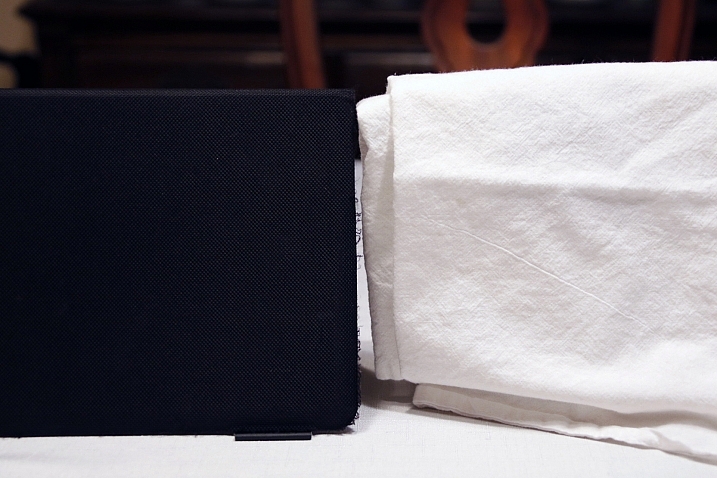
Set up your camera in one position so it doesn’t move much, and point that center metering spot at the black object, so it fills the entire metering area. If you are using Center Weighted metering, fill as much of the center area with the black object. Take a photo.

exposure-compensation
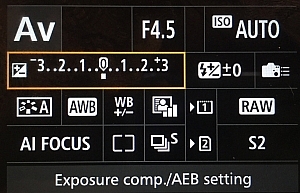
Now find the exposure bias (or exposure compensation) feature on your camera. It will look something like this:

Change the exposure bias/compensation so it is set to underexpose by one stop. This will either look like “-1” or on some cameras there will be a scale with tick marks and one should be labeled “-1”. Move to that point. Take another identical photo of your black object.

new-camera-experiments-6

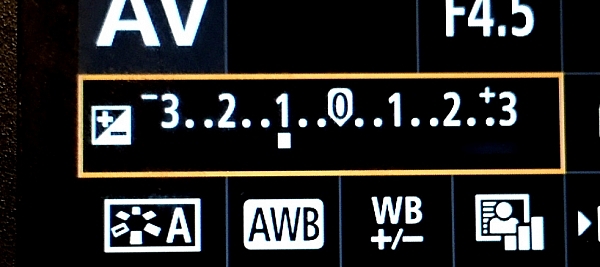
Reset your exposure bias to zero (0) and point your camera over to the white object, so that it fills the metering area; take a photo. Then change the exposure bias/compensation to “+1”.

You now have four images. Looking at the two shots of the black object, which one makes the object look more like its actual color? What about the white object?

3. Test your ISO

Modern cameras have an awesome range of ISO settings, but they still have their limits. Don’t get fooled into thinking you can just shoot at ISO 6,400 in a dark room and things will be peachy. This experiment is set to help you understand what happens when you change ISO, and what your personal limits might be for your camera.

new-camera-experiments-7

Set up a few objects on a table, at one end, and set your camera at the other end. Zoom in so the viewfinder is mostly filled with the scene in front of you. Include white and black objects, and some other colors. Have a couple of lights on in the room so it is normally lit, make sure the camera’s flash does not fire for this exercise.

Set your camera to Aperture Priority and your aperture to f/5.6. Set your ISO at 100 and take a photo. Without moving your camera much, change to ISO 200 and take another photo. Then ISO 400, take photo, ISO 800, take another shot, and so on (doubling the ISO each time) until you run out of ISO settings.

Examine the images, preferably on a computer screen, or use the zoom feature when reviewing images on your camera. You want to zoom in on the darker areas.

new-camera-experiments-8

What do you see happening from low ISO settings to the higher ones? Do you notice a big difference between white areas as compared to black areas?

If you need a hint about what is happening read: 6 Tips for Using ISO Effectively With Your Camera.

4. Add some blur with a slow shutter speed

This one is easy and quick. You may need a willing assistant, or you can find cars moving on a city street. You will want objects moving past your field of view, from side to side (not front to back) at a fairly consistent speed.

Set your camera on a solid object; this can be a tripod, desk, the hood of a car, etc. Point your camera toward the moving objects. Set your camera to Shutter Priority (S or Tv) Mode, ISO should be 100, and set your shutter speed to 1/500th.

Take a photo of the objects passing in front of your camera. Change your shutter speed to 1/60th and take another photo as the objects move.

new-camera-experiments-9

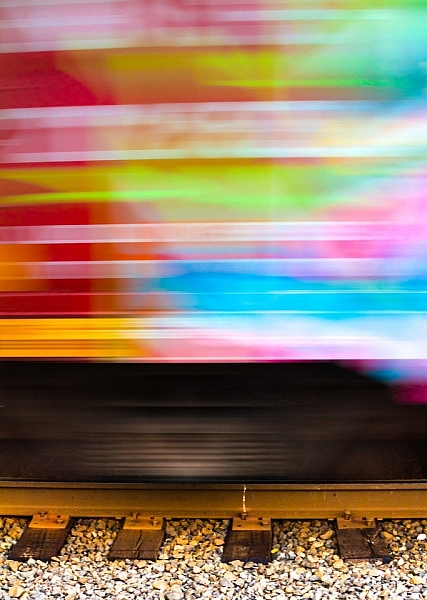
Lastly, set your shutter speed to 1/10th and take another photo. What do you notice happened in the three photos?

BONUS EXPERIMENT: What happens when you keep the slow shutter speed of 1/10th and move with the subject while you shoot?

5. White Balance is important for good color

White Balance is very important if you shoot in a file format other than RAW, such as JPEG. Your camera will usually do a good job of guessing the correct White Balance settings, but it is important to know how to control your camera if it messes up.

You will need a place with three different light sources to make this one work. It’s okay if they are not in the same spot, you can walk around. You will also need a piece of white paper with writing on it, to help focus.

Set your camera on Program Mode. This allows your camera to handle shutter speed, ISO and Aperture automatically, but you are going to take control of the White Balance. Again, you may need to reference your camera’s manual as each manufacturer handles these changes differently.

new-camera-experiments-12

First, find a scene that is lit by daylight. Set your camera’s white balance to the Daylight Preset. It’s setting looks like a little sun in the image above. Take a photo of your white paper with the daylight hitting it. If you can only manage cloudy daylight, that will be okay as well.

Without moving much, set your White Balance to incandescent or tungsten (looks like a little lightbulb). Take the exact same photo you did before. Lastly, set your White Balance to shade (a little house icon with shade next to it). Take the exact same photo.

new-camera-experiments-11

Which White Balance preset under daylight conditions produces this color?

Next, move to an area lit by incandescent or fluorescent light. This would also include compact fluorescent bulbs. You can hold your paper close to the light source for these next photos, just make sure the light is falling on the page and not coming through it.

Run through the same three White Balance settings as before; daylight, incandescent and shade.

new-camera-experiments-10

Which White Balance preset under incandescent lighting produces this color?

What happens to the color of the white paper when each of these changes are made? Its color changes, doesn’t it? When you shot with the shade setting, did things get more blue or more yellow? Think about  how you can use this in your photography once you understand how it works.

Answers and Helpful Hints

Now that you have played around a little, let me help clarify what you should have seen in each exercise.

1. In the first exercise you should see more depth of field (more things in focus, front to back) as the aperture number increases. As you focus further away from the camera, the depth of field also increases at the same aperture. This might be hard to see in this limited of a test, but it is explained better here: How to Control Aperture and Create Images You Love.

2. Your camera is set to expose the world as if it were 18% gray. This means objects that are black are exposed to make them more gray; the same goes for white things. If you are taking pictures of something already gray, like pavement, then there is no adjustment needed. Otherwise, to make white things white, you need to tell your camera to overexpose (that was the “+1”) and to make black things black, you need to under expose (“-1”). More info on exposure compensation is available here: Using Exposure Bias To Improve Picture Detail.

3. As ISO increases, digital noise (not the same as grain in the days of film, but similar) increases. Noise is usually not desired but as time goes on, camera manufacturers get better at reducing it. That’s why camera owners five years ago were told not to go over ISO 800, or there would be too much noise. Now, I regularly shoot at ISO 2000 with results that work for me. It’s important to know the limits of your camera so you are okay with exceeding them in certain circumstances.

4. As your shutter speed gets slower, the chance for blur increases. This can be blur from you moving the camera (we have all done this before) or from your subject moving. Blur is not an inherently bad thing, it can be used with great affect. But it’s important to know when, and how much, works best for you. Play around on this one a little with different subject speeds and shutter speeds.

5. White Balance can be trickiest when there is more than one light source and it’s helpful to know which way to adjust the colors. A lower temperature (incandescent and fluorescent) give more of a yellow/green cast while cloudy and shady gives your more of a blue tone. If you want to eliminate that color cast in your images, move the White Balance toward those settings.

The great thing about photography is it is highly reproducible. When you do this, that happens – and when you do this again, that happens again. That makes it a great art form, in which experimenting can teach volumes, if you keep control of the variables. You might note that only one variable was allowed to change in each of these exercises, that was on purpose.

Go forth and experiment more with your new camera. The more you shoot and the more you experience through the lens of your camera, the more you will learn!

googletag.cmd.push(function() {
tablet_slots.push( googletag.defineSlot( “/1005424/_dPSv4_tab-all-article-bottom_(300×250)”, [300, 250], “pb-ad-78623” ).addService( googletag.pubads() ) ); } );

googletag.cmd.push(function() {
mobile_slots.push( googletag.defineSlot( “/1005424/_dPSv4_mob-all-article-bottom_(300×250)”, [300, 250], “pb-ad-78158” ).addService( googletag.pubads() ) ); } );

The post Do These 5 Quick Exercises to Learn What Your New Camera Can Do by Peter West Carey appeared first on Digital Photography School.


Digital Photography School

 
Comments Off on Do These 5 Quick Exercises to Learn What Your New Camera Can Do

Posted in Photography


48 Hours Left to Save up to 90% on These Great Photography Deals

30 Dec

photography deals

Over the past two weeks we’ve put together some great photography deals to help you improve your photography in the new year but as 2015 comes to a close so will the deals.

As this post goes live you have approximately 48 hours to take advantage of this promotion.

Each year at this time we announce the most popular deals so I thought I’d list them here in order of popularity.

Congratulations to Sebastian Michaels for topping the list again – this year with his new Black and White Photo Artistry course.

  1. Black and White Photo Artistry
  2. Cole’s Classroom Lightroom Course
  3. Landscape Photography Bundle
  4. Mike Newtons 104 Lightroom Presets Pack
  5. Phil Steele’s Event Photography Course
  6. Photography Concentrate Composition Skills and Light Skills Guides (or get the bundle)
  7. Photo Nuts Photography Courses
  8. Natural Light Photography eBooks
  9. Portraits eBook Bundle
  10. 101 dPS Lightroom Presets
  11. $ 10 eBooks Day (plus Ed Verosky eBook Bundle)
  12. Snapn Motion eBook (and Snapn Motion eBook Bundle)

Which deals did you snap up this year?

googletag.cmd.push(function() {
tablet_slots.push( googletag.defineSlot( “/1005424/_dPSv4_tab-all-article-bottom_(300×250)”, [300, 250], “pb-ad-78623” ).addService( googletag.pubads() ) ); } );

googletag.cmd.push(function() {
mobile_slots.push( googletag.defineSlot( “/1005424/_dPSv4_mob-all-article-bottom_(300×250)”, [300, 250], “pb-ad-78158” ).addService( googletag.pubads() ) ); } );

The post 48 Hours Left to Save up to 90% on These Great Photography Deals by Darren Rowse appeared first on Digital Photography School.


Digital Photography School

 
Comments Off on 48 Hours Left to Save up to 90% on These Great Photography Deals

Posted in Photography


Don’t Miss Out: These 12 Photography Deals Will Disappear With 2015

25 Dec

Over the last 12 days we’ve presented you with some amazing daily deals on photography training resources in our 6th annual 12 days of Christmas.

photography deals

The savings this year were our biggest yet and we had a lot of really positive feedback from readers who picked up some fantastic deals.

As in previous years we did get a few sad messages from readers who missed deals along the way asking if there was any way to get them.

As a result – today we’re opening all 12 deals back up again for one last chance.

So if there’s a deal you regret missing or you might have missed one of our emails – you’re in luck. Here they are!

  • Deal 1: Natural Light ebook bargains!
  • Deal 2: 85% OFF Cole’s Classroom Lightroom Course
  • Deal 3: 101 dPS Lightroom presets for ONLY $ 10!
  • Deal 4: The Ultimate Landscapes Bundle!
  • Deal 5: 54% OFF Phil Steele’s Event Photography Course
  • Deal 6: Photography Concentrate Composition & Light guides
  • Deal 7: 104 NEW Hacking Photography Lightroom Presets for $ 10
  • Deal 8: $ 5 Snapn Motion mini-guide
  • Deal 9: dPS Portraits ebooks by Gina Milicia $ 7 each… or 4 for $ 21!
  • Deal 10: dPS Photo Nuts Courses – 2 for $ 30!
  • Deal 11: All dPS ebooks $ 10!
  • Deal 12: Black & White Photo Artistry Course – 60% OFF!a

All these will be available until midnight US Eastern time on 31st of December, after that they will be gone for ever (just like 2015) – so get to it and grab yours today!

googletag.cmd.push(function() {
tablet_slots.push( googletag.defineSlot( “/1005424/_dPSv4_tab-all-article-bottom_(300×250)”, [300, 250], “pb-ad-78623” ).addService( googletag.pubads() ) ); } );

googletag.cmd.push(function() {
mobile_slots.push( googletag.defineSlot( “/1005424/_dPSv4_mob-all-article-bottom_(300×250)”, [300, 250], “pb-ad-78158” ).addService( googletag.pubads() ) ); } );

The post Don’t Miss Out: These 12 Photography Deals Will Disappear With 2015 by Darren Rowse appeared first on Digital Photography School.


Digital Photography School

 
Comments Off on Don’t Miss Out: These 12 Photography Deals Will Disappear With 2015

Posted in Photography