RSS
 

Posts Tagged ‘Test’

Field Test: Birds in flight with the Nikon D500

18 Oct

Nikon’s D500 is a professional APS-C format DSLR, designed for shooting fast-moving subjects in tough conditions. For this week’s Field Test, we brought the D500 to a wildlife reserve in Montana, to meet with National Geographic photographer Ronan Donovan.

Over two days, DPReview Editor Barney Britton joined Ronan to shoot the various bird and animal species that make the reserve their home. Watch the video to see how the D500 performed. 


This is sponsored content, created with the support of Nikon. What does this mean?

Articles: Digital Photography Review (dpreview.com)

 
Comments Off on Field Test: Birds in flight with the Nikon D500

Posted in Uncategorized


iPhone 7 Plus Camera Test

01 Oct

Don’t have an iPhone 7 Plus? Us either … but, we know someone who does!

We got our friend Danny to snap a few pics and show us the magic that is a double lensed camera. *swoon*

Come along and check out that mega zoom, portrait mode and more.
(…)
Read the rest of iPhone 7 Plus Camera Test (571 words)


© laurel for Photojojo, 2016. |
Permalink |
No comment |
Add to
del.icio.us

Post tags:


Photojojo

 
Comments Off on iPhone 7 Plus Camera Test

Posted in Equipment


Field Test: Shooting action with the Nikon D5

06 Sep

Nikon’s D5 is a full-frame professional DSLR designed for shooting fast action in tough environments. To test the D5’s market-leading autofocus system, we took the camera out to Santa Fe, and put one in the hands of professional photographer Michael Clark.

In this field test, DPReview’s technical editor Rishi Sanyal joined Michael to shoot a range of activities, including dirt bikes and white-water kayaking. Watch the video to see how the D5 performed. 


This is sponsored content, created with the support of Nikon. What does this mean?

Articles: Digital Photography Review (dpreview.com)

 
Comments Off on Field Test: Shooting action with the Nikon D5

Posted in Uncategorized


Putting Image Microadjust to the test on the Canon 5D Mark IV

30 Aug

One of the most discussed features of the Canon EOS 5D Mark IV is Image Microadjust. This uses the slight difference in perspective between the left and right-facing halves of the split ‘dual’ pixels to fine-tune the effective focus point of the images.

Like everyone else, we were interested to see what degree of refocusability this gave.

If you’re wondering: ‘will this let me correct which eye my portrait is focused on?’ The answer is a resounding ‘no’. Indeed, even if the question is: ‘can I shift the focus back from the eye lashes to get the iris sharp,’ the answer isn’t much more positive.

Dual Pixel Image Microadjustment

We set up the 5D Mark IV with EF 35mm F1.4L II USM at F1.4, set up at approximately 25x focal length distance from our LensAlign target. The Dual Pixel Raw file was then processed in Digital Photo Professional (DPP) to see how much the maximum backward and forward adjustments could move focus.

+5 (Max backward adjustment) 0 (No adjustment) -5 (Max forward adjustment)

AF (Lens) Microadjustment

For comparison, here’s the amount of adjustment that can be achieved using AF microadjustment – the traditional method for calibrating your lens to your body to correct back/front-focus issues. The rollover starts at +1 as this is the degree of adjustment needed by this lens on this body.

 +20  +10  +3  +2  +1  0  -1  -2  -3  -10  -20

Real-world difference

To demonstrate the real-world impact image microadjust might have on a traditional head-shot portrait, we shot Carey with an EF 85mm F1.8 at F1.8.

This portrait was very slightly front focused, so we tested the degree to which it can be refocused, backwards. For each of the adjustments, ‘Strength’ was set to 10 to maximize the input from one set of pixels.

+5 (Max backward adjustment) 0 (No adjustment) -5 (Max forward adjustment)

Interestingly, it appears the images become noticeably softer when you apply forward or backward adjustment, which may mask some of the advantages of the focus shift (there’s a chance that slightly better-looking results will be possible if you apply higher levels of sharpening to the microadjusted images). However, the degree of correction we’re seeing is so small that we wonder whether it’s worth the additional effort of having to incorporate the DPP software into your workflow, especially given the relatively long opening times required for each image, even on a fast computer. Or the doubling in file size.

Overall, traditional ‘AF microadjustment’ is a much more powerful tool for achieving pinpoint sharpness and ensuring any particular lens is properly calibrated to your body. Dual Pixel Raw’s primary value, in this particular incarnation, is questionable, as it will only be useful for very minor focus shifts, rather than as a general tool for correcting focus error. That said, the technology itself is promising, and we hope to see more capable future iterations as Canon iterates on the technology.

Articles: Digital Photography Review (dpreview.com)

 
Comments Off on Putting Image Microadjust to the test on the Canon 5D Mark IV

Posted in Uncategorized


Don’t get ahead of yourself: Canon EOS 5D Mark IV rolling shutter test

27 Aug

Much of the initial concern about the EOS 5D Mark IV’s video has been about its substantial 1.64x crop (relative to the full width of the sensor, 1.74x compared to the 3:2 region) and its use of the inefficient Motion JPEG compression system (which limits the ability to use SD cards with any dependability).

However, upon shooting with the camera we found it to have significant rolling shutter. We’ve demonstrated the effect alongside the EOS-1D X Mark II, which reads out its sensor fast enough to exhibit pretty low levels of rolling shutter, and the Sony a6300, which shows a relatively high level of rolling shutter.

Obviously we’ve panned faster than you ever sensibly would, to make the difference clearer. If you’re careful with the way you move the camera, this rolling shutter effect may not be too apparent however, for some kinds of shooting, it can be distracting.

Articles: Digital Photography Review (dpreview.com)

 
Comments Off on Don’t get ahead of yourself: Canon EOS 5D Mark IV rolling shutter test

Posted in Uncategorized


Pentax K-70 added to studio test scene

25 Aug

The Pentax K-70 features a 24MP sensor with, for the first time in a Pentax, hybrid AF in live view. It also brings Pentax’s impressive Pixel Shift Resolution mode down to the mid-level DSLR segment. Take a look at how it fares against its competition in our studio test scene.

Raw support is still in progress, so note that we will be adding Raw Pixel Shift shots in the future as support is released. This also means Raw conversions were done with the ‘Embedded’ camera profile, and will be updated once the ‘Adobe Standard’ profile is available.

Articles: Digital Photography Review (dpreview.com)

 
Comments Off on Pentax K-70 added to studio test scene

Posted in Uncategorized


An introduction to our studio test scene

08 Aug

Our test scene is at the core of our camera testing, designed to allow like-for-like comparisons between cameras. Here we explain how the tests are conducted and why we work this way. We will publish a video explaining what we look for in the scene and where we look, in the coming weeks.

Philosophy

Our studio test scene is used to give a consistent and reproducible means of comparing camera output. We have a well-established testing methodology designed to shed light on the performance differences of camera sensors and the results of their JPEG engines. All analyses are cross-checked against our real-world experiences.

To enable comparison between cameras with different pixel counts, we offer a ‘Compare’ mode that re-sizes all the cameras to the largest resolution shared by all the selected cameras.

Lenses and focal lengths

Interchangeable lens cameras are shot using prime lenses that offer around 85mm equivalent field-of-view – a decision that stems from our historical use of each brand’s 50mm lenses on APS-C, which are generally very sharp and consistent across the frame when stopped down a little. The aim is to remove, as much as possible, the impact of the lens. Our testing has shown the use of dedicated own-brand primes to be more reliable than using multiple copies of third-party lenses.

Compact cameras are test-shot across a range of focal lengths and apertures. We then chose the focal length closest to 85mm equivalent that offers sharpness and across-frame consistency that fairly represents the lens performance as a whole. Unlike our ILC tests, any would-be buyer will be forced to use the built-in lens so we aim to include, rather than remove, the lens performance. As such, we do not cherry-pick the best performance if it’s unrepresentative of the rest of the lens’s performance, nor do we rigidly use the 85mm equivalent setting if it’s uncharacteristically poor.

JPEG

JPEG images are exposed assuming that most users will rely either on their camera’s meter or on the histogram and, as such, are shot using whatever shutter speed is required to give correctly exposed middle grey values. White balance is set manually for the daylight scene, and low light is shot using the default Auto White Balance setting, to show the degree to which the camera tries to correct a very orange light source.

Cameras are mounted securely on a macro rail on a heavily weighted-down tripod, to minimize external vibrations. Self timer and any available anti-shock modes are also employed to minimize the impact of shutter shock.

Raw

Raw images are shot using set combinations of shutter speeds and apertures to allow the assessment of sensor performance on a common basis (so at any given ISO, all cameras will receive the same amount of light). At higher ISOs, we reduce the illumination of the scene by up to two stops if a camera doesn’t offer sufficiently fast shutter speeds to allow correct exposure. If this still isn’t sufficient, we then stop down the camera’s aperture, again ensuring that the net effect of illumination, shutter speed and aperture values are consistent across cameras.

These files are processed using the Adobe Camera Raw with noise reduction minimized and with shadows brightened to reveal the difference in shadow performance. All Raw images are white balanced during processing.

How can I check which settings you used?

All relevant shooting settings can be viewed by clicking the [i] icon at the lower right of each comparison window. If the [i] is illuminated in yellow, then some aspect of that particular shot is considered non-standard in such a way that it is not 100% comparable with other images. The cause of this inconsistency should be noted in the information tab if you click on the [i] icon.

Lighting

We offer two lighting conditions, a ‘Daylight’ mode that is illuminated to 10EV using daylight-balanced Kino Flo RF55 lamps, and a low light mode lit by a 25W tungsten incandescent light bulb.

Experimental error

Like all processes there are sources of variation (error), including differences in chart alignment, focus and lens performance over time. While we have done everything possible to minimize the impact of these errors (including using a large, easy-to-align chart, careful manual focusing and selecting copies of lenses that are used only for studio testing), it is impossible to eliminate experimental error altogether.

Our comparison tool makes it possible to identify differences that are within the realms of well-controlled error, so we trust our readers not to read too much into very slight differences in apparent performance.

Consistent comparison

Overall, the aim of the test scene is to provide fair, consistent and comparable images across every camera that comes through our test studio. We endeavor to maintain the highest possible standards and are happy to discuss and investigate any apparent inconsistencies raised by personal message or feedback email.

Articles: Digital Photography Review (dpreview.com)

 
Comments Off on An introduction to our studio test scene

Posted in Uncategorized


Canon EOS-1D X Mark II Field Test: DPReview goes to the rodeo

01 Aug

The Canon EOS-1D X Mark II is a professional full-frame DSLR, and Canon’s fastest, toughest and most capable camera ever. To test out its blazingly fast shooting speeds and advanced autofocus we needed a shooting situation that would really stretch the camera’s abilities.

So saddle up, ya’ll – DPReview is headed to the rodeo…


This is sponsored content, created with the support of Canon. What does this mean?

Articles: Digital Photography Review (dpreview.com)

 
Comments Off on Canon EOS-1D X Mark II Field Test: DPReview goes to the rodeo

Posted in Uncategorized


Real world test: The Panono is a 108MP spherical camera

24 Jul

‘Uh, what is that thing?’

‘What is that thing?’ That’s the question I was asked pretty much every time I took the Panono out shooting. There is a lot of curiosity surrounding 360/VR content and my week spent fielding questions from curious onlookers as I dipped my toes into a new, more immersive photographic world is proof of that. In fact, only once did someone walk up to me and say “Hey I know what that is, its a 360 VR camera!” And it was a 12 year old child.

Damn know-it-all kids making us all look bad…

Yes, it can be tossed in the air to take a picture. 

So uh, what exactly is it? The Panono is the highest resolution 360-degree still camera currently on the market. A grapefruit-sized ball constructed of tough plastic, the Panono contains 36 separate cameras. Each camera uses a 1/4″ sensor (a bit smaller than the sensor likely found in your smartphone) and when the files are combined, the result is a 108MP 360-degree image that allows one to pan and zoom around the scene. 

Panono started off as a thesis project, but was later successfully funded via crowd-sourcing campaigns (DPreview field-tested an early version in 2013). Designed in Germany and constructed in Poland, everything about the camera is surprisingly frustration-free and the controls are intuitive. I say ‘surprisingly’ only because Panono is such a new company and good UI often takes time to get right. But once paired with a smart device, taking shots, processing  and sharing them is all a breeze. 

For optimal viewing, open the 360 in full screen mode. This image was shot using the HDR-setting, which combines a properly-exposed image with one exposed for highlights. 

The design 

The Panono only has a single button on the top. Holding it down for a second turns the camera on and off. When it’s switched on, the button can also be used to take images without the need for a smart device. However, for the best user experience, you’ll want to use the app to set up and control the Panono remotely from a phone or tablet. 

Around the periphery of the Panono’s one and only physical button is a glowing LED. It lights up when the camera is switched on and blinks whenever a photo is taken. If battery or internal space is getting low, part of the LED ring will illuminate red next to the corresponding symbol. While useful in dim conditions, the LED ring is near impossible to see in bright light.

There is a micro-USB port located at the very bottom of the camera for charging. It doubles as a mounting point for the Panono Adapter (to mount it on a tripod) and the Panono stick (a selfie stick). However when plugged into a computer via Micro-USB, the Panono is not discoverable. 

The app

Pairing with a device simply requires turning the Panono on and connecting to it via Wi-Fi. The password to connect is written directly on the side of the unit. Once connected, open up the app. At the bottom of the screen there are five icons. If you’ve properly paired the unit, green lines will appear above the camera icon (which is the shooting screen), indicating you are connected.

Most of the shooting controls are accessed via the center-most camera icon on the bottom. The app is also used to push images downloaded to your device to the cloud for processing. You can also view your processed 360s. 

Simply tap the green camera button to fire a shot. For more control over the camera’s exposure and color parameters, tap the gear symbol. 

To take images from within the shooting screen simply tap the green camera button bottom center. By default the camera will beep and blink when a photo is fired (the beep can be turned off). For more controls, tap the gear symbol in the lower right. There you can control a number parameters, like dialing in a white balance or specific exposure. I found the auto exposure and white balance modes largely worked fine for the majority of the places I shot. But it’s nice that those additional manual controls exist.

There is also a switch to toggle HDR mode on and off. If you’re mainly photographing static subjects, HDR mode is very useful. You can see an example of it on and off below:

The above image was shot as an HDR file, the one below was not.

The camera has 16GB of internal storage. Once an image is taken it is stored locally within the camera and a low-resolution un-stitched version of the image will appear within the app’s shooting screen for quick viewing. If you’re please with the preview, simple tap “download from camera,” and the files are transmitted to your device, but only temporarily – more on that in a moment.

It’s worth noting that if you are shooting a non-HDR image, there is a 10-sec black out time between when a shot has been fired and when an additional shot can be taken. When shooting an HDR image, that time gap is closer to 30 seconds. When the camera is ready to shoot again, the circle around the camera symbol/trigger button will turn from white to green. 

Once back in the comfort of a proper Wi-Fi connection open the “Task” screen (2nd icon from the right). There you’ll find all your transmitted 360’s. With the tap of a finger you can upload them to the Panono cloud where their servers do all the hard work of stitching and processing – you can simply sit back and make yourself a cocktail. In about 10 minutes, your 360s will appear in your Panono account where you can share them either via a direct link, iframe embed or Facebook/Twitter/Google+. It’s really that easy.

Articles: Digital Photography Review (dpreview.com)

 
Comments Off on Real world test: The Panono is a 108MP spherical camera

Posted in Uncategorized


Sony a6300 Mirrorless Camera – Thoughts and Field Test

29 Jun

Sony has spent recent years charging full steam ahead into the full-frame mirrorless camera market. But they have also managed to satisfy the desires of APS-C shooters, mainly through their widely-popular a6000 mid-range mirrorless camera. In March 2016, just two years after the debut of the a6000, Sony released the a6300 with improved features, that still retain many of the characteristics of the older model.

To be clear, Sony doesn’t intend for the a6300 to be a replacement for the a6000, meaning the older camera is still in production and can be purchased at a very attractive price point (around $ 549.00 for the body only).

Sony a6300 Mirrorless Camera

My Camera Background

Before diving into this review, I want to clarify my digital camera experiences to make my perspective more apparent. The Sony a6300 is the very first mirrorless camera I’ve owned, besides my very brief experiment with the a6000 for comparison purposes. Until recently, I’ve shot almost exclusively with Canon DSLRs, namely the 5D Mark III and 6D. As a result, many of the a6300’s features such as its pop-out LCD screen and electronic viewfinder might seem like standard features to other mirrorless shooters, but for a Canon DSLR user like myself, these are newfound novelties that turned my world upside down. With that being said, let’s move on to the a6300’s specs.

Key Features of the Sony a6300

Sony a6300 Mirrorless Camera

The main improvement with the Sony a6300 is a newly developed sensor with a pixel count of 24MP (same as the a6000) that is packed with a whopping 425 phase-detection AF points, which is significantly higher than the a6000’s 179 AF points. According to Sony, the a6300 has the greatest number of phase-detection points to date, on an interchangeable-lens camera ,and makes the a6300 the camera with the world’s fastest autofocus.

Video is another aspect that Sony upgraded on the a6300, with the inclusion of 4k video recording capabilities, the addition of a mic socket, and the ability to record time code. Besides the autofocus and video systems, the a6300 sees an OLED 2.36M-dot viewfinder, an improvement from the a6000’s OLED 1.44M-dot viewfinder. Battery life is also slightly improved at 400 shots versus 360 shots.

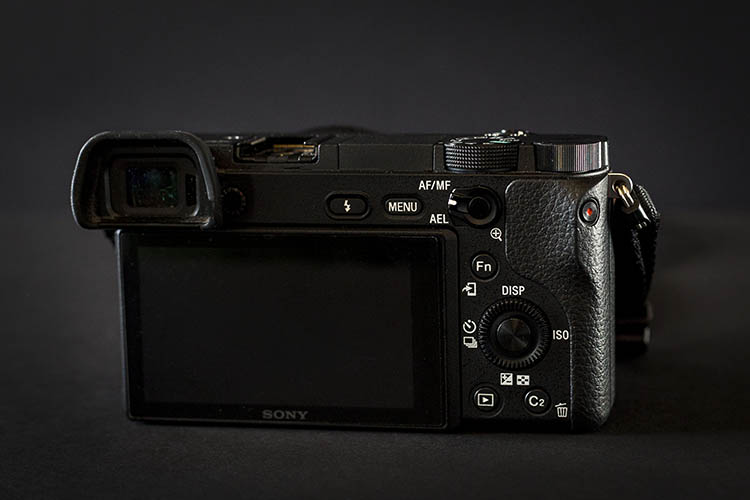
Physically, the a6300 is only 2 ounces heavier than its predecessor, although it feels much more solid with its weather-sealed magnesium alloy build, that was lacking on the a6000. An AEL button with an AF/MF switch has also been conveniently added to the back of the camera, which sports and action shooters should find handy. Other than these few additions, the Sony a6300 doesn’t look or feel much different than the a6000.

Overall, these added features of the a6300 clearly appeal to shooters looking to focus on action, sports, and video.

Sony a6300 Mirrorless Camera

Sample action shot with a Sony 16-50mm f/3.5-5.6 kit lens.

Pros of the a6300

While discussing the pros and cons of the a6300, it should be noted that many of the same features are also available on the a6000.

Extremely compact

As a DSLR shooter, the a6300’s compact size was particularly appealing. While testing the Sony a6300, I used both the kit 16-50mm f/3.5-5.6 retractable zoom lens, and the Sony 20mm f/2.0 pancake lens, and was amazed that both were incredibly lightweight and basically the same size. There is of course, the trade-off of both lenses being made of plastic and not feeling as robust as say a Fujifilm lens, but they both perform very well and weigh close to nothing. Pairing either lens with the a6300 makes for a very compact, low-profile camera system that is perfect for travel.

Sony a6300 Mirrorless Camera

An informal food photo taken at a restaurant table moments before consumption. Shot with a Sony 20mm f/2.8.

Silent Shutter

While many DSLRs offer a Silent Shutter that is still quite noisy, the a6300’s silent shutter feature makes the camera so quiet you wouldn’t even know a photo was being taken. It’s a great feature for undercover or candid photography moments when you truly want no sound associated with taking a photo. With that said, non-silent shooting on the a63000 produces a very crisp shutter snap, especially when firing away at the camera’s highest shutter speed of 11 frames per second.

Panoramic shooting feature that actually works (most of the time)

After consistently trying, and failing, to take advantage of panoramic shooting on a variety of devices from point and shoots to cell phone cameras, I was beginning to think that on-the-go panoramic shooting was a myth, until I tried it with the a6300. Unlike other devices, the a6300 will shoot and stitch together a near-perfect horizontal or vertical panorama even when your manual panning isn’t spot on. There were a few times when the camera insisted that I wasn’t panning straight enough to make a clear pano shot, but most of the time even my wobbly panning techniques were good enough for the a6300 to make sense of.

Sony a6300 Mirrorless Camera

Sample panorama shot with a Sony 16-50mm f/3.5-5.6 kit lens.

Focus Modes + Face Recognition

Easily two of the best features of the a6300 are the Face Registration and Eye AF (autofocus) features, which do pretty much what their names imply. Activating Face Registration allows you to program the a6300 to recognize and prioritize up to eight faces. This feature is incredibly handy when shooting a crowd of people, and the a6300’s accuracy of picking out the correct face is astounding. Eye AF works very similarly, but without the need to register (program them in) the eyes. Simply enable Eye AF on the a6300 and the camera will automatically search for your subject’s eyes and track them using continuous autofocus. This feature is so spot-on that the a6300 will even lock onto artistic renderings of eyes, such as a painted portrait.

Sony a6300 Mirrorless Camera

Sample portrait shot with a Sony 20mm f/2.8 lens.

Quick Wi-Fi connection

Like most newer digital cameras today, the a6300 has Wi-Fi and NFC, to connect with smartphones and tablets for remote camera shooting, and wireless image transfer via Sony’s PlayMemories Mobile app. Setting up Wi-Fi on the camera is very quick and intuitive, and Sony’s accompanying app also includes an array of other options that can further enhance your shooting experience, such as time-lapse and multiple exposure apps, among many others.

Built-in flexible flash

Sony a6300 flash

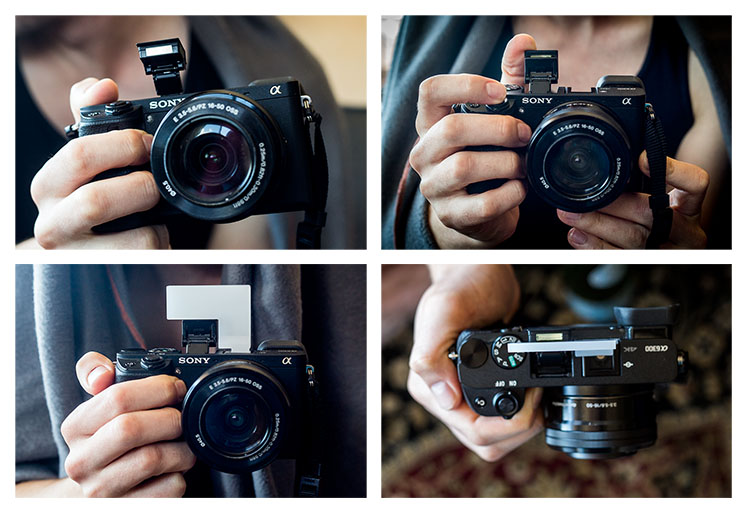
Thankfully, Sony kept one of the a6000’s best features on the a6300: a built-in pop-up flash. Extremely compact and flexible, the little flash can bend 45 degrees to tilt upwards, allowing for bouncing the flash off the ceiling.  Next to the pop-up flash is a hot shoe mount that can fire Canon or Nikon Speedlight flashes when used with an adapter.

One accessory that can help fully utilize the pop-up flash are plastic bounce cards which attach to the a6300 via the hot-shoe mount, and hold the flash in an upright position.

Sony a6300 Mirrorless Camera

Sample night shot with a Sony 20mm f/2.8 lens.

Sony Lens Options

Currently, there are over 70 Sony lenses that you can purchase to go along with your new a6300 body. Options range from compact, low-priced primes and larger, higher-priced zoom lenses. Cheaper prime options include the 16mm f/2.8, 20mm f/2.8, 28mm f/2, 30mm f/3.5 macro, 35mm f/1.8, and 50mm f/1.8, all ranging in price from $ 249.99-$ 449.99. Wide-range zoom lenses, without a fixed f-stop, are also somewhat affordable, such as the 18-200mm f/3.5-6.3 ($ 749.99) or the 24-240mm f/3.5-6.3 ($ 998.99)

Sony 18-200mm f/3.5-6.3 ($ 749.99)

However, Sony’s higher-quality lenses are much higher in price, which may be difficult to swallow if you’re converting from a DSLR kit. Larger, high-quality Sony primes such as the 24mm f/2 and 35mm f/1.4, prices are upwards of $ 1,200.00 and more. The same is true for Sony’s versions of traditional DSLR lenses such as the 16-35mm f/2.8 ($ 2,248.99), 24-70mm f/2.8 ($ 2,098.00), and 70-200mm f/2.8 ($ 2,999.99). If you’re a DSLR shooter with an array of lenses, you can always invest in a converter to use your DSLR lenses with your Sony camera body, but at the expense of slower autofocus.

When you purchase either the Sony a6000 or a6300, you have the option of buying it body-only, or with a 16-55mm f/3.5-5.6 E-mount retractable zoom kit lens, which is valued at approximately $ 260.99 if purchased separately. For its size, range, and overall performance, the kit lens, plus a Sony prime lens, aren’t a bad starter combination, especially if you’re looking to keep your gear compact and lightweight, and aren’t quite ready to invest in higher-priced Sony E-mount lenses yet.

ISO Performance

Sony opted to improve the a6300’s high-ISO performance by including a native ISO range of 100-25,600 with the possibility of extending that ISO to 51,200. While the ability to shoot at higher ISO is great in theory, I found that ISO 6400 was the highest I could comfortably push the a6300 in darker environments, without sacrificing too much image quality. Even my RAW photos shot at ISO 6400 were a little too grainy for my taste, no matter how much noise-reduction I did in post-processing.

Sony a6300 high ISO2

Cons of the a6300

Sony’s bloated camera menu

A common complaint among Sony shooters, that I have to agree with, is that the camera menu is very difficult to navigate. It truly seems like Sony outfitted the a6300 with so many features, and tried to stuff them all into a menu, that it can take weeks for new Sony shooters to get used to using the camera.

This could be easily solved if Sony allowed users to customize the menu a bit more, so that frequently-used features can be quickly accessed. As it stands, Sony only allows assigning custom functions to the camera’s physical buttons, and there aren’t nearly enough of those.

With that being said, the trick to making sense of Sony’s menus is to customize as much of the camera’s settings as possible. Presently, I’ve customized the buttons and settings on the a6300 set to shoot almost identically to the way I shoot with my Canon 5D Mark III, making it easier to switch from one system to another.

Sony a6300 Mirrorless Camera

Sample action shot with a Sony 16-50mm f/3.5-5.6 kit lens.

LCD screen sometimes blanks out

When it comes to the a6300’s LCD screen, I was grateful for its pop-out rotating feature, something that has been sorely lacking on Canon DSLRs. Some other reviewers complained about the a6300 lacking a touch screen LCD, but again, this is something I’ve never had on a camera, so the fact that it’s missing doesn’t bother me.

One feature of the a6300’s LCD that was troublesome, was its occasional blackouts, which usually occurred right after rotating the screen. Oftentimes, the only way to get the LCD working again was to turn the camera off and on. With that said, using the electronic viewfinder (EVF) always worked without fail, even when the LCD blanked out.

Over to you

Do you already shoot with the Sony a6300, or are you considering making the move? What do you love about it, or what hesitations remain? Let me know your thoughts in the comments below.

googletag.cmd.push(function() {
tablet_slots.push( googletag.defineSlot( “/1005424/_dPSv4_tab-all-article-bottom_(300×250)”, [300, 250], “pb-ad-78623” ).addService( googletag.pubads() ) ); } );

googletag.cmd.push(function() {
mobile_slots.push( googletag.defineSlot( “/1005424/_dPSv4_mob-all-article-bottom_(300×250)”, [300, 250], “pb-ad-78158” ).addService( googletag.pubads() ) ); } );

The post Sony a6300 Mirrorless Camera – Thoughts and Field Test by Suzi Pratt appeared first on Digital Photography School.


Digital Photography School

 
Comments Off on Sony a6300 Mirrorless Camera – Thoughts and Field Test

Posted in Photography