RSS
 

Posts Tagged ‘TECHNIQUES’

6 Creative Composition Techniques to Boost Your Images

12 Mar

I am a huge fan of the Canadian rock band Barenaked Ladies. They were very popular in the 2000s and their songs were creative, fun and edgy. They also came up with a children’s album called Snacktime and it was a blockbuster hit. Now you must be wondering what a music band has to do with photography but just bear (pun intended!) with me and keep reading on.

One of the songs on the kid’s album is called “Crazy ABC’s” and it was not the traditional alphabet song. In fact, the whole song used unique and different words that begin with the traditional letters of the alphabet. Are you still with me here? At the end of the song, the lead singer (Ed) encourages kids to think outside the box when it comes to learning. Everyones knows the typical A, B and C words like Apple, Cat, and Ball. But think outside the box and see what a wonderful world it opens up.

Thi is how that example relates to photography. We all know the basic composition techniques – the rule of thirds, center focus, fill the frame, etc. How about we change things up and look at some of the atypical composition techniques – after all, it really is such a wonderful world out there, why see it from a boring frame of reference!! Let’s get creative.

#1 Look for reflections

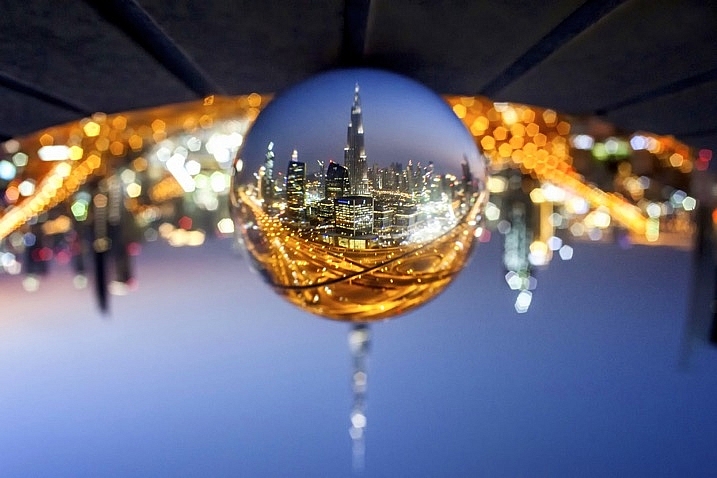
Reflections don’t always have to be done with water. Reflections on water are probably the easiest thing to do if you want to get creative. But following the theme of changing things up, try other surfaces as well. Actually, any reflective surface can be used to add an element of creativity to your frame.

6 Creative Composition Techniques to Boost Your Images - reflections

Nothing wrong with the typical reflection in water shot…the fact that I get to see the snow-capped Himalayas twice over was enough to get me to do the typical/traditional shot.

Karthika Gupta Photography - Memorable Jaunts DPS Article-Creative Composition Techniques-reflection 1

But pushing beyond the boundaries of typical and photographing this lovely couple’s first look on their wedding day, with an added reflection in the glass takes it to another level.

#2 Look for symmetry

Just like in point number one above, symmetry does not necessarily mean centered composition of the subject. As long as you can draw a virtual line across the frame and have two exact replicas of the image, symmetry is achieved. Try to think of creative ways to achieve symmetry.

food - 6 Creative Composition Techniques to Boost Your Images

Food is one of those subjects that lends itself to a multitude of different composition techniques. By isolating these appetizers (don’t they look absolutely delicious) in a central composition, I was able to create symmetry horizontally, vertically and maybe even diagonally! Again, think outside the box.

6 Creative Composition Techniques to Boost Your Images - symmetry

One of my favorite clients from a few years ago…here the symmetry is implied – parents on one end of the spectrum and kids on the other.

#3 Use of negative space

I love the use of negative space to add so much more to an image without any additional weight of other subjects. I am always thinking of ways to use negative space to add that extra special “oomph” factor to my images.

6 Creative Composition Techniques to Boost Your Images - negative space

This little Italian car screamed for my full attention – using negative space with a wall exactly the same color as the car was a little different but this image is all about that car and nothing else!

The Vatican - 6 Creative Composition Techniques to Boost Your Images

Negative space can be used for any genre of photography – people, things, and even places. The Vatican deserves everyone’s undivided attention, there’s no doubt about that!

negative space with a model - 6 Creative Composition Techniques to Boost Your Images

My lovely model from an editorial shoot last year. She totally owned that shoot and this image shows her strength, tenacity, and attitude – the only thing in this image is her, simplified by the use of negative space.

#4 Multiple exposures

This is by far one of my favorite ways to add a little creativity to my images. Don’t feel you need to be limited by using only two exposures in the case of multiple exposures. This works great for three or even four exposures and can be done in-camera as well as in post-processing.

6 Creative Composition Techniques to Boost Your Images - double exposure

A typical double exposure using a textured image and a human element.

6 Creative Composition Techniques to Boost Your Images - multiple exposures

But why stop at two exposures? Here I used three exposures to showcase the active, multi-faceted mind of a creative. A lot of thoughts race through our minds at any given point in time – here is a creative way of documenting that!

6 Creative Composition Techniques to Boost Your Images - multiple exposures

Another three exposure frame – an extension of being creative with your composition.

#5 Slow down your shutter speed

By having a long exposure (slowing your shutter speed) you can add some creativity to your shots. Traditionally we see this with waterfalls or flowing water shots. But try and do this with other subject matter as well. Sometimes that intentional blur can be used just as a creative expression, or to create abstract art in your images.

6 Creative Composition Techniques to Boost Your Images - intentional blur

This was actually taken from a car as we were driving along a California highway. The car was too fast for me to get any sort of sunset shot so I decided to embrace the movement and create an abstract version of what I was seeing.

6 Creative Composition Techniques to Boost Your Images - motion blur

Here motion blur or slow shutter speed was much more intentional. I was camping on the beach along the Oregon coast as the fog was just rolling in and people were walking back to their tents. By slowing the shutter, the waves took on this milky look and the people magically faded away from the shot. For this kind of shot, I used a tripod to make sure the sea stacks were sharp.

#6 Creative framing

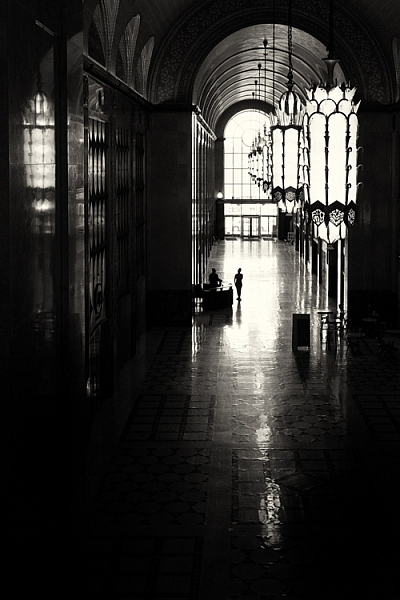
Try and incorporate frame within a frame within a frame or any combination of that in your photos to add a fun element and lead the viewer into where you want them to focus their attention.

6 Creative Composition Techniques to Boost Your Images - framing

My lovely client backlit and framed within the doorway. The sun was too bright behind her and the rest of the room was dark – a perfect recipe for taking a step back and framing the dark against the bright.

6 Creative Composition Techniques to Boost Your Images - framing

Here the happy couple is being framed by the staircase and steps in a more subtle way. The eye is being led down and around the sides of the railing leading the viewer into the bottom of the frame where the couple is taking a moment to be with each other.

6 Creative Composition Techniques to Boost Your Images - framing

This is one of my favorite images of my kids…one of the few times that big sister is being nice to her little brother! The leaves along with the tree frame them, directing your eyes to the center of the frame where they are interacting.

Conclusion

I hope these tips encourage you to think differently when it comes to photographic composition. Sure you likely know the tried and true rules – things that you know will work when all else fails. But you know what? Embrace that failure to grow creatively.

Experiment and try some of these creative composition techniques. In fact, take a chance and maybe try a couple of them together. Who knows what might happen, but at least you will feel like you explored outside your comfort zone. And the best part is that these tips work well for almost any genre of photography. So get out there and create some magic.

The post 6 Creative Composition Techniques to Boost Your Images by Karthika Gupta appeared first on Digital Photography School.


Digital Photography School

 
Comments Off on 6 Creative Composition Techniques to Boost Your Images

Posted in Photography


Video Tips – Two Light Painting Techniques for you to Try

13 Oct

I personally love night photography and one of my favorite things to do at night is light painting. There are a few ways to do it depending on the look you want. Here are two completely different techniques for you to try out.

Make a Light Spiral

In this first video photographer Jason Rinehart shows us how to create a light painted spiral. So there is no subject you are adding light to, the light itself ends up being the subject. See how he does it here:

Light Paint an Old Barn

In this second video, you see a different approach where a flashlight is used to light paint the subject, in this case, an old barn in Ireland. There is a right and a wrong way to do this, and they give good examples of both.

Have you tried light painting before? Which of the two methods do you like better, or do you enjoy doing both styles? Tell us in the comments below.

The post Video Tips – Two Light Painting Techniques for you to Try by Darlene Hildebrandt appeared first on Digital Photography School.


Digital Photography School

 
Comments Off on Video Tips – Two Light Painting Techniques for you to Try

Posted in Photography


Good, Better, and Best Noise Reduction Techniques

07 Aug

When it comes to noise reduction, you always have two goals. First, obviously, you want to get rid of any digital noise in your picture. But secondly, you want to preserve detail. These often work against each other because increasing noise reduction often leads to a loss of image detail, but if you focus on preserving the detail then you may end up with a noisy picture.

Good, Better, and Best Noise Reduction Techniques

So what can you do about it? Different people have different methods, but for me, there is a good, better, and best way to go about noise reduction. As you might imagine, my good way is simple, the better way involves a little more effort, and my best way requires a lot more effort (and can be rather complicated). In this article, I will walk through my favorite options so that you can decide if one of them is appropriate for your own noise reduction workflow.

“Good” Noise Reduction

Lightroom has very good noise reduction tools. They are powerful and really easy to use. They reduce noise and do a decent job of preserving detail. Further, the noise reduction in Lightroom seems to get a little better with each new iteration. If you want a good noise reduction tool that will take up almost none of your time, simply use Lightroom.

Good, Better, and Best Noise Reduction Techniques

Lightroom noise reduction sliders.

The primary slider is the top one labeled Luminance. I think of that as the amount of noise reduction being adding to your photo. From there, you can fine-tune your noise reduction using the additional sliders below it. Frankly, however, if I am using Lightroom for noise reduction, it is because I want it to be quick and easy, so I usually just use the Luminance slider.

Suggested starting points

You may be wondering about a starting point for the amount of noise reduction to apply. Of course, that is hard to do, and it depends on a lot of things. First of all, it depends on the ISO value you used. It also depends on the low-light performance of your camera. However, I hate the “it depends” answer, so to give you an idea of a starting point taking into account those variables, here is a chart with some suggested values for the Luminance slider.

Good, Better, and Best Noise Reduction Techniques

Suggested starting points for noise reduction settings in Lightroom.

Of course, there are other factors involved as well, which this chart does not take into consideration. For example, dark tones will show noise much more than lighter tones, so you may need to increase the amount where you have darker tones. Just use this chart as a starting point, and don’t take it as a definitive range that you must stay within.  Always do whatever the picture requires, even if it is drastically different than what is set forth here.

Read more on noise reduction in Lightroom here: How to do Noise Reduction in Lightroom

Selective Adjustments in Lightroom

The noise reduction settings within Lightroom will apply to your entire picture. We are going to get into selective noise reduction later, but I should mention here that you can also use the Adjustment Brush in Lightroom to selectively add noise reduction.

Select the Adjustment Brush and find the slider labeled Noise. That’s right – you only have one slider for this, so think of it as the equivalent of the Luminance slider you used above. From there, just set your brush size (you can use your left and right bracket keys for this) and paint in the effect where you want it. You’ll see better ways to selectively apply noise reduction in a minute, but if you aren’t too picky about the selection then the Adjustment Brush might be the tool for you.

Good, Better, and Best Noise Reduction Techniques

Noise reduction slider inside Lightroom’s Adjustment Brush.

“Better” Noise Reduction

Normally, when I want to bring out the heavy artillery in any aspect of post processing, I find that I need to head into Photoshop. That is sort of true here, in that we will be heading to Photoshop, but then again not true in that we won’t be using Photoshop’s noise reduction. I find that Photoshop’s noise reduction tools aren’t that great, and Lightroom actually works better (there are plenty of people that disagree with me though, so make up your own mind about that as you use them both).

Instead, I merely use Photoshop to take advantage of third party noise reduction software that works within Photoshop. Yes, you could also use them from Lightroom, but using them within Photoshop will allow you to take advantage of Photoshop’s powerful masking techniques (which you will see in a minute).

Noise reduction plugins

What are these noise reduction applications that are available?  Let’s take a look.

  • Noiseware: First, we have Noiseware by Imaginomic. I mention this first because it is the application I have used for my own noise reduction for the past several years. It works really well, does a great job eliminating noise, is simple to use, and it preserves a lot of detail. There are several presets to choose from and then a few sliders to make adjustments from there.
  • Nik Define: A free option is Nik Define. It is part of the Google Nik Collection, which is now free. It does a nice job of reducing noise, and if you are looking for a free option this is a good one. The downside is that it appears this software is no longer being updated and its days are numbered.
  • Noise Ninja: This is part of the Photo Ninja Suite by Picture Code. The entire suite costs $ 129. I personally have not used it, but the reports I have heard from others and the reviews have always been positive. Read: How to Reduce Noise with Photo Ninja for more info.
  •  Topaz Denoise: Topaz makes a series of plug-ins that do a variety of functions really well. Their noise reduction software is called Denoise and it costs $ 79 (or you can get the whole suite of apps for $ 500).  I haven’t used this one either, but the reviews have been good and my experience with other Topaz apps has been very good.
  • Macphun’s Noiseless: Inside Macphun’s Creative Kit you will find the Noiseless plugin (you can also buy it alone). Read this for more info on this option: Macphun Noiseless Pro Software Review

Any of these will do a nice job.

Good, Better, and Best Noise Reduction Techniques

Screenshot of Noiseware interface.

“Best” Noise Reduction

The best way I have found to apply noise reduction is exactly the same as the way you just saw, except that you apply it selectively. The reason is that noise reduction reduces detail in your image. It is often hard for noise reduction software to tell the difference between noise and important detail. That is particularly true in night sky photos, where the many stars can resemble the random flecks that constitute noise.

Basic Masking

To avoid having your noise reduction software reduce detail, you can use Photoshop to mask off the more important areas of the sky. To accomplish that, you just create a layer mask so that the noise reduction only applies to certain parts – which will be white in the mask – of your image.

A simple, but admittedly imprecise, way to do this is with a brush. If you start with a “reveal all” (white) layer mask, you will then use the brush (color set to black), which will keep the noise reduction from reducing detail in the areas you choose. On the other hand, if you start with a “hide all” (black) layer mask, you will paint the entire mask with white except the part where you want to preserve detail. You can get as course or fine as you want (or time allows).

An example of masking off noise reduction in an area where you want to preserve detail in the picture. This applies to the cliffs picture at the top of this article.

How to do you do it? First create a new layer copy (Ctrl/Cmd+J if your picture only has one layer, or Ctrl/Cmd+Shift+Alt+E if you have multiple layers already), then apply your noise reduction as you normally would. After that, just click on the Add Layer Mask icon at the bottom, which will create a white (reveal all) layer mask (or press Alt while doing so to create a black layer mask to hide all). Then just use your Brush (B) to paint with the opposite color as your mask.

You can get as involved as you want with masking. You likely have your own favorite ways already, so go ahead and use them. There is no right or wrong way to mask.

Applying Noise Reduction

So those are my three ways to apply noise reduction. You can add some quick noise reduction in Lightroom, which takes only a second. For slightly more involved but also more powerful noise reduction, add the addition application of your choice. For your most important pictures – or the ones with the biggest problems – add noise reduction and then use masking to limit the effect to the specific areas you want.

These are just my ways though. Do you have your own special methods that are different?  If so, let us know about it in the comments below.


If you found this article helpful it is just one of 31 tips you will get if you grab Jim’s new dPS course: 31 Days to Becoming a Better Photographer.  Enrollment for this course is only opened for a limited time and closes August 11th (5 more days) so get it now.

The post Good, Better, and Best Noise Reduction Techniques by Jim Hamel appeared first on Digital Photography School.


Digital Photography School

 
Comments Off on Good, Better, and Best Noise Reduction Techniques

Posted in Photography


10 cool DIY photography techniques that anyone can do

18 May
Are you in a creative rut? Do you need some ideas to break out and do something different? This short video by COOPH highlights ten cool photography techniques that anybody can do.
Do you have a favorite DIY technique that’s not in the video? Share it with us!

Articles: Digital Photography Review (dpreview.com)

 
Comments Off on 10 cool DIY photography techniques that anyone can do

Posted in Uncategorized


5 Simple Techniques for Leading the Viewer’s Eye in Your Images

16 Feb

As photographers, it’s easy for us to make conscious composition choices that allow us to balance our photographs or to create harmony within them. It’s is more difficult however to try and lead viewers through your photographs. We rarely consider how to influence the viewers of our photographs. When composing images, we don’t think about the different elements in our images and the order by which we want viewers to see those elements.

This is a common tactic in classic painting, but not used readily by photographers. The reality is it’s hard to influence viewers and to dictate the ways in which they view our photographs.

The lines of the creek lead the viewer’s eye through and into the image.

In many cases, the subject matter we are shooting just happens too fast for us to consciously compose images with the intention of leading the viewer through our photographs. It’s much easier to lead the eye through images we construct like still life or landscape photos. In the case of sports photography, this would only happen by sheer luck or happy accident. But when you have the opportunity, think about using techniques that lead viewers to specific parts of your images.

#1 – Use a brightness gradient

One of my favorite techniques for leading the eye is to use a brightness gradient. The human eye is drawn to the brighter elements, and if you position an area of brightness within your image, the eye will be drawn to that location.

It is important, however, to remember that the key to this technique is to use a gradient of brightness. Small bright areas amidst darker tones will not achieve the same kind of effect. The idea is to make the progression of highlights subtle, like a path through your image. Of course, this technique will not be possible in all situations but if it’s available considering using this method.

5 Simple Techniques for Leading the Viewer's Eye in Your Images

Shot from a kayak during sunrise I wasn’t intending to shoot this image with a brightness gradient. Instead, it’s a happy accident.

#2 – Linear perspective

When using a wide angle lens, you can consciously create linear perspective within images. This technique might be one of the more easily attainable methods of leading the eye. The wide angle lens will exaggerate lines and lead the eye fairly directly through the photograph. You can compose your photographs in such a way that buildings or other architectural features draw viewers through your photograph.

5 Simple Techniques for Leading the Viewer's Eye in Your Images

The line of lights and the line of buildings lead the eye through the photo. The viewer should be stopped by the bright spots of light within the image but then continue on through the rest of the photograph.

I’ve added some arrows to this image so you can see how the lines of the pier point the viewer into the photograph. The teenager in the image is a second way of directing the eye as he stops to view the sunset.


#3 – Use shafts of light

Using shafts of light is another technique for pointing viewers in the right direction. The conditions are very specific, and shafts of light are not always readily available, but they can be a useful tool for pointing out specific directions or objects within a photograph.

The photograph below was taken by my son. His plan when composing was to have the ray of light point towards the people. I must admit I didn’t think of composing in such a manner and when I asked him later he said it was “the natural choice”. Since that time I’ve made conscious decisions to look for and incorporate rays of light into my images.

5 Simple Techniques for Leading the Viewer's Eye in Your Images

There’s a fairly strong lens flare in this image but my son made a conscious choice in how he composed his photograph and I’m proud of him for his decisions.

#4 – Use a blur gradient

Using a blur gradient (shallow depth of field) is another method of leading the eye. I will admit that I don’t use this technique much. I even struggled to find images to use as examples for the article. Part of my reasoning is that I hope I will now be forced to experiment more with this technique.

Using a focus gradient can lead the eye to the important elements of the photograph. Setting up a shot in which the foreground is blurred and slowly recedes through the image to the point of sharp focus will draw viewers to specific objects within the frame.

I used a fairly large aperture here and while the blur gradient isn’t as obvious it is still present in the image.

#5 – Use more than one technique

You can also combine these techniques to help influence eye movement throughout your images. In these two images, the eye moves through the image the light gradient is the most obvious technique but lines of architecture within the building help to draw the viewer down the tunnel. The lights hanging at the top of the image are an obvious line that directs the eye.

Similarly, this image of the couple walking through the image adds to the movement within the photograph. The lines of the path reinforce the direction the viewer should take within the image.

Shot at a provincial park this image combines elements like linear perspective and vectors.

Conclusion

Leading the eye through a photograph is not an exact science. You can’t force viewers to follow the path you set for them. Each person approaches the artwork in different ways. If your use some of the techniques outlined here, it will help you to create compelling compositions. The more thought and purpose we put into creating our images the better they will be. While there may not always be time to use these techniques, it’s always handy to keep them in the back of your mind and use them when the time is right.

The more thought and purpose you put into creating your images the better they will be. While there may not always be time to use these techniques, it’s handy to keep them in the back of your mind and use them when the time is right.

The eye-leading techniques used in this image are a little harder to spot. I used the lines of the barrels and rays of light to direct the viewer’s eye into the center of the image.

googletag.cmd.push(function() {
tablet_slots.push( googletag.defineSlot( “/1005424/_dPSv4_tab-all-article-bottom_(300×250)”, [300, 250], “pb-ad-78623” ).addService( googletag.pubads() ) ); } );

googletag.cmd.push(function() {
mobile_slots.push( googletag.defineSlot( “/1005424/_dPSv4_mob-all-article-bottom_(300×250)”, [300, 250], “pb-ad-78158” ).addService( googletag.pubads() ) ); } );

The post 5 Simple Techniques for Leading the Viewer’s Eye in Your Images by Erin Fitzgibbon appeared first on Digital Photography School.


Digital Photography School

 
Comments Off on 5 Simple Techniques for Leading the Viewer’s Eye in Your Images

Posted in Photography


How to Create Glass Ball Landscapes – 6 Techniques

29 Dec

In photography, creative inspiration can often come from trying something new and photographing a scene with that technique. Creating glass ball landscapes is one example of this, as it allows you to capture a fish-eye like scene, using a telephoto lens. The glass ball creates a mystique, as many people associate looking into a crystal ball with seeing into the future. However, visions inside a glass ball are easy to achieve with a few simple steps!

How to take landscape photos with a glass ball

img_8070-copy

In order to get good landscape photos with the glass ball, you’ll need to apply some basic rules, an understanding of the science at work also helps. If you read my previous article on crystal ball photography you will already be familiar with the 7 steps you can follow to take this type of image. Here’s a quick recap:

  1. Choose a scene that you’d normally shoot with a wide angle lens.
  2. Photograph this scene with the sun behind you, lighting up the scene you wish to shoot.
  3. Place the ball somewhere it won’t fall.
  4. Compose your scene with the glass ball in it.
  5. Ensure the horizon lines inside the ball and in the background match.
  6. Focus the camera on the scene inside the ball, which is best achieved using live-view and manual focus.
  7. Use an aperture of around f/4 as this will keep the ball sharp and the background blurred.
  8. Take the photograph, and repeat if you’re not happy with the sharpness inside the ball.
  9. Rotate your image in post-processing so the scene in the ball isn’t upside down. In some cases, you can skip this step.

Alternative glass ball landscapes, and how to compose them

It’s easy to get it in your mind that every scene or situation needs a crystal ball photo. This is not the case and careful consideration needs to be taken when selecting the photograph you’ll take. The most important thing to do is find a compelling subject that shows prominently inside the glass ball. Once you have this basic parameter established below are some differing ways you can compose your glass ball landscape photograph.

1 – The classic composition

Glass ball landscapes use the rule of thirds. This classic composition shows the entire ball and was shot at 100mm.

Glass ball landscape using the rule of thirds. This classic composition shows the entire ball and was shot at 100mm.

In this type of composition the ball fills the majority of the frame, with the entire edge of the ball visible. This will lead to glass ball landscapes that have an immediate impact and areas to the side of the ball that are blurred out and minimalist in nature. This type of image is most easily taken with a macro or telephoto lens with an aperture of f/4 to create the nice bokeh around the ball.

2- Get in close

Getting closer to the glass ball will emphasize the scene within the ball, this also entails framing that cuts some of the edges of the ball away. A centered composition with both the top and bottom part of the ball can work here, this has the advantage that top and bottom parts of the scene cannot be easily deduced. The other composition follows the rule of thirds, with the edge of the ball showing in the left or right third of the image.

glass ball landscape photography

A closer crop focuses the eye more on the image in the ball.

3 – Give the ball a bit of space

There are many ways to photograph the glass ball, and using a wide-angle lens with this technique can be very effective. In this case, you want the background scene to be minimalist, with the ball becoming an accent in the scene. The scene will not likely be rotated during post-processing, so compose to the scene in the background. In this type of the photo, the ball and the landscape scene should form a balanced composition.

A wider angle of 20mm is used here. The ball is an accent within this frame.

A wider angle of 20mm is used here. The ball is an accent within this frame.

4 – Take it to the high life

Glass ball landscape photographs

Gaining access to the rooftop provided a great vantage point.

As with all landscape photos, a high vantage point for glass ball images works well. Gaining access to a high building overlooking a city, or climbing a hill are both good options. Once at your high vantage point find a good position to place the ball, so you can see the landscape inside it. You need to ensure the ball will not fall, be very careful with its positioning.

5 – Don’t forget the view from the floor

Apartment buildings in Busan, South Korea. This photo shows a glass ball being held by hand.

The view looking up can be just as good as the view looking down.

Deserts and canyons make for great locations to photograph with the ball. In this photo the ball is place on the ground, the stones in the foreground add a nice element to this photo.

In this photo the ball was placed on the ground, the stones in the foreground add a nice element to this photo.

Placing the ball at street level doesn’t always work, as half the scene will be taken up by the ground. That said there are several situations that really work well with the ball on the ground.

  • The ball is ever so slightly higher than the rest of the scene, so it might be at the top of an undulation.
  • There is a reflection in the scene from a marble surface or a puddle.
  • The ground is an appealing element of the photo because it’s a leaf bed for example.

6 – The human element

A friend holding the ball in position is an alternative to putting the ball on the ground.

A friend holding the ball in position is an alternative to putting the ball on the ground.

The glass ball landscapes are not always best suited to having people in them. The blurred background may look less appealing with a human shape included in it. There are a couple of ways to humanize your image, though, while still maintaining a minimal feel.

  • You eclipse the people inside the ball. Use a long telephoto lens, compression will cause people to appear inside the ball. The background will be clean without the shapes of people in it (as below).
  • You take the photo, and someone else is holding the ball. The hand is the human element of this photo, with the landscape still inside the ball (as above).
glass ball landscape photography

Photographing people inside the ball is tricky, but not impossible.

Where to try this technique

The places you’d visit for regular landscapes will also work for glass ball landscapes. The rooftops of tall buildings in cities work very well or a worm’s eye view from street level can be just as good. The beach or the desert are excellent options due to the minimalist nature of those locations.

Sunset photos at the beach with the glass ball are one of the classics in this genre of photography. Mountains and forests make for good locations as well. A lone tree can be a nice subject, as can lines of tree trunks inside the glass ball. Up in the mountains, you can easily fill the scene inside the ball with a large peak jutting up into the landscape.

The snow globe is a well known souvenir gift, which the glass ball can replicate.

The snow globe is a well-known souvenir gift, which the glass ball can replicate.

Getting out with the glass ball

In my last article on refraction I linked to a site selling an 80mm glass ball, this is a great option though it can be heavy to carry. You can also use a smaller ball for many situations, and when you are carrying a heavy bag of camera gear this is a good idea.

Once you have a glass ball it’s best to dive in and see what works best for you. I’d love to see more examples of your work, it was great to see so many pictures last time. One final tip, be careful in the sunlight with the ball. The glass ball acts as a magnifying glass with the sun’s rays and can burn you, or your property.

googletag.cmd.push(function() {
tablet_slots.push( googletag.defineSlot( “/1005424/_dPSv4_tab-all-article-bottom_(300×250)”, [300, 250], “pb-ad-78623” ).addService( googletag.pubads() ) ); } );

googletag.cmd.push(function() {
mobile_slots.push( googletag.defineSlot( “/1005424/_dPSv4_mob-all-article-bottom_(300×250)”, [300, 250], “pb-ad-78158” ).addService( googletag.pubads() ) ); } );

The post How to Create Glass Ball Landscapes – 6 Techniques by Simon Bond appeared first on Digital Photography School.


Digital Photography School

 
Comments Off on How to Create Glass Ball Landscapes – 6 Techniques

Posted in Photography


Stylized Techniques for Editing Portraits Using Lightroom

25 Jul

This is the promised follow-up to my article on Creating Compelling Wide-Angle Portraits Using One Off-Camera Flash. While part one discussed equipment, composition, lighting and posing, this article focuses exclusively on post-processing.

1 Romanian Woman

Let me start by stating the obvious. Everyone has their own unique preferences regarding post-processing. Just read the comments below a posted image that is somewhat heavy on processing and you will see the variety of opinions out there. Personally, I like creating portraits that look somewhat surreal. I achieve some of this look by lens choice and composition and the rest in Adobe Lightroom and Photoshop.

2 Malawian Guy

Rather than go through my entire workflow, I’ll focus on five steps in Lightroom that form the foundation for my portrait processing. If you also like portraits that look a bit surreal, my hope is that you will learn a technique or two here that you find helpful.

This article assumes that you already have some familiarity with the menus and tools in Adobe Lightroom or Bridge.

3 Chinese Guy Hat

Let’s look at the work I did in Lightroom for the above portrait, shot in rural China. First, here is the image right out of camera.

4 Out Of Camera

Step 1. Move the contrast to the mid-tones

One of the first steps was to reduce the overall contrast in the image using the Highlights, Shadows, Whites and Blacks sliders. The image is fairly contrasty, but weighted more towards dark tones. I moved the Highlights and Whites sliders left (only a minor adjustment to Whites) to reduce some of the highlights (bright areas) in the background. I then moved the Shadows and Blacks sliders right (only a minor adjustment to Blacks) to make sure detail can be seen throughout the image, even in the gentleman’s hat.

These initial adjustments gave the image a flat (non-contrasty) look as a starting point. This was intentional, as I planned on building contrast back into the image.

Notice in the image below that the light area in the background is somewhat less distracting, and that there is more visible detail in the background shadows.

5 Global Luminosity

While I removed some contrast at the outer ends of the spectrum, I then added contrast into the midtones by pushing up the Clarity slider. This varies by image, but in this case I moved it to +60 in Lightroom, in order to accentuate facial features. The Clarity slider focuses on the mid-tones while mostly leaving the luminosity of the brighter and darker areas of the image as is. Here are the results:

6 Clarity

Step 2. Reduce saturation globally

For my portraits, I always make an initial global reduction (applies to the entire image) to Saturation and Vibrance. In this case, I reduced Saturation to -10, and Vibrance to -5. The shirt is still too blue in my opinion, but I’ll target that in the next step.

7 Reduce Saturation

Step 3. Make local adjustments using the Adjustment Brush

Using the Adjustment Brush, I made changes to luminosity, saturation and sharpness in targeted parts of the image:

Adjustments to Luminosity – Your eyes usually gravitate towards the brightest areas of an image. So, I used the Adjustment Brush to draw more attention to the subject, especially his face, and less attention to other areas.

I started by brushing over brighter areas that were competing with his face, and darkening them slightly using the local Exposure and Highlights sliders. I also brushed over some darker areas that were missing detail, and pulled the local Shadows slider up slightly. Lastly, I added some overall brightness to the face and a little more to the eyes.

Adjustments to Saturation – I used the Adjustment Brush and local Saturation slider to further desaturate the man’s t-shirt. In this case, I also darkened it, while de-saturating.

Adjustments to Sharpness – I added a bit of additional sharpness to the eyes, eyebrows, and hair using the Adjustment Brush with the local Sharpness slider.

After these local adjustments, here is the image at its next stage:

8 Local Adjustments

Step 4. Create a vignette using the Gradient Tool

In photography, when someone speaks of a vignette, they are usually referring to the darkening of the outer areas of the image, relative to the center of the image. The standard vignette darkens the outer edges equally, usually in an oval shape. However, using several gradients allows you to control the direction, size and strength of the vignette on each side independently.

I clicked on Lightroom’s Gradient Tool, then clicked and dragged from outside the image towards the center, overlapping the subject slightly. Then, I pulled the local Exposure slider down, until I created a subtle edge vignette. I then added a gradient from the opposite side, and a very subtle one from the bottom. Conversely, if the edge of your image is darker than you’d like, you can also increase exposure with the gradient.

Here is the image after adding a subtle gradient vignette:

9 Vignette

Step 5. Create a virtual copy of the RAW file for the background

To add more dimension to this image, I used a different processing treatment between subject and background. I created a virtual copy of the file in Lightroom (Photo > Create Virtual Copy, or use the keyboard shortcut CMD/TRL+’) and named it “Background”. If you use Adobe Bridge, you can create a copy of the RAW file instead. Then, for this second copy, I simply pulled the Clarity slider back to zero, and backed off on the global Sharpness slider as well. No other changes were made.

I then opened both of these file copies into Photoshop as layers, with the sharper rendition as the top layer. With the top layer active, I made a careful selection of the subject and created a mask so that the less sharp bottom layer becomes visible in the background areas. This adds a bit more dimension and helps keep your focus on the subject, as seen below.

10 Imported Photoshop

Background edits applied in Photoshop

4-Out-Of-Camera.jpg

Original out of camera for comparison

Note: If you do not have Photoshop, you can also use the Adjustment Brush inside Lightroom to paint in less Clarity and Sharpness to the background areas.

Although it is beyond the scope of this article, I continued on with processing in Photoshop, including additional adjustments to luminosity and contrast.

3-Chinese-Guy-Hat.jpg

I hope this short overview of my five steps in Lightroom has been helpful and that there was a technique or two that will help you in your workflow.

googletag.cmd.push(function() {
tablet_slots.push( googletag.defineSlot( “/1005424/_dPSv4_tab-all-article-bottom_(300×250)”, [300, 250], “pb-ad-78623” ).addService( googletag.pubads() ) ); } );

googletag.cmd.push(function() {
mobile_slots.push( googletag.defineSlot( “/1005424/_dPSv4_mob-all-article-bottom_(300×250)”, [300, 250], “pb-ad-78158” ).addService( googletag.pubads() ) ); } );

The post Stylized Techniques for Editing Portraits Using Lightroom by Ken Koskela appeared first on Digital Photography School.


Digital Photography School

 
Comments Off on Stylized Techniques for Editing Portraits Using Lightroom

Posted in Photography


4 Batch Processing Techniques to Speed Up Your Workflow in Lightroom

09 Jun

0 copy

Lightroom is a fantastic program for keeping your photos organized, but it also provides many tools to speed up your editing workflow. You can even process many photos at once with batch editing. These techniques are by far the biggest time savers Lightroom provides. Once you start using them you’ll wonder how you ever edited each image individually.

Technique 1: Applying presets on import

Presets are hugely popular, and for good reason. They allow you to apply frequently used edits and adjustments to photos, instead of having to manually adjust the settings for each new image. But did you know you can apply your favorite preset during import and cut out a lot of steps?

1 copy

Step 1: Start an import in the library module

2 copy

Step 2: On the right panel in the import dialog you’ll see the “Apply During Import” module.

Step 3: If you have a base preset, or a most commonly used one, select it here and click import to have it automatically applied to all of the photos as they are imported into Lightroom.

This not only skips a lot of clicks for you, but it applies them faster than selecting them individually in the develop module later.

Technique 2: Apply presets in the Library module

Applying presets on import is great if all the photos are similar, but you may need to use different presets on varying scenes, poses, etc. Instead of applying these one image at a time, you can select them in the library module and apply them in a group. This trick is great for weddings, or similar shoots where you may be inside then outside, or have constantly changing light conditions.

3 copy

Step 1: Click the first image in the set, then hold down the Control button and click any others to which you want to apply the same preset.

4 copy

Step 2: At the top of the Quick Develop panel, click the drop down menu under “Saved Preset” and select the new preset. It will update the settings from that preset to all the selected photos.

5 copy

Step 3: Repeat for each changing scene as needed.

Technique 3: Edit in the Library module

The Library module runs much smoother, and processes changes faster than the Develop module. Since you have already applied your presets to the images, you will mostly need to make broad adjustments to your photos now. The Library module can edit the major adjustments like white balance, exposure, contrast, and more. Even better, you can apply these adjustments to multiple photos at once, making them more consistent, and saving you a lot of time.

6 copy

Step 1: Select a group of images as above (CTRL + click to add to your selection) in the Library module.

7 copy

Step 2: In the Quick Develop panel on the right, click the arrows under Exposure, Contrast, and any other applicable options, to apply the changes to all selected photos at once.

Step 3: You can use the + and – key to enlarge or minimize the library view, allowing you to get a better view of the adjustments you are applying.

Technique 4: Sync adjustments across multiple photos in the Develop module

After applying the broad adjustments, you may need to fine-tune a few things in your images. These may include changes like a curve adjustment, add a gradient filter to fine tune a bright sky, etc. These are changes you have to make in the Develop module, but you can still apply them in batches, instead of doing them one photo at a time.

8 copy

Step 1: In the Develop module, apply the adjustments to a single photo.

Step 2: In the Develop filmstrip or Library grid view, select multiple photos (CTRL + click).

Step 3: At the bottom of the right hand panel, select “Sync”, it will be the left button beside “Reset”

9 copy

Step 4: Check the options that you want to sync with all the selected photos. These should include any adjustments you just made in the Develop module.

10 copy

Keep in mind

When batch editing, be careful you don’t sync anything that you don’t want applied to all of the selected images. If you use the adjustment brush on skin in one photo and sync that to another photo, chances are that the subject has moved slightly, and the brush will be applied to the wrong part of the image.

Stick with it!

Do you think these batch editing techniques have a spot in your workflow? For me, learning to batch edit allowed me to cut my wedding editing time down to a fraction of what it was before. You can focus on the big picture and style of each shoot, and not get lost spending 10-15 minutes on every image. Batch editing lets you get more work done in less time, and that is fantastic!

Do you have any additional tips to add? Please do so in the comments below.

googletag.cmd.push(function() {
tablet_slots.push( googletag.defineSlot( “/1005424/_dPSv4_tab-all-article-bottom_(300×250)”, [300, 250], “pb-ad-78623” ).addService( googletag.pubads() ) ); } );

googletag.cmd.push(function() {
mobile_slots.push( googletag.defineSlot( “/1005424/_dPSv4_mob-all-article-bottom_(300×250)”, [300, 250], “pb-ad-78158” ).addService( googletag.pubads() ) ); } );

The post 4 Batch Processing Techniques to Speed Up Your Workflow in Lightroom by David Childers appeared first on Digital Photography School.


Digital Photography School

 
Comments Off on 4 Batch Processing Techniques to Speed Up Your Workflow in Lightroom

Posted in Photography


6 Advanced Composition Techniques to Improve Your Photos

27 Jan

When you think of composition in photography, what is the first idea that pops into your head? Let me guess – the rule of thirds?

Likely that was true for many of you who reading this, why do you think that is? The rule of thirds is probably the most widely known, and well used compositional tool in photography. Most often, it is the first composition tool we are taught (it was for me anyway). Once we know it, and use it, we don’t really think about it, or about any other compositional techniques.

There are other methods though, using visual design techniques that talk about texture and colour, amongst others. Many photographers simply default to the rule of thirds and take the shot, without trying other compositions. These other techniques can make a difference in your images. This article is about six techniques you can use to improve your compositions, and your photos Some of these would be known as advanced techniques, but once you understand them, they are pretty self explanatory.

1. The Golden Ratio or Fibonacci Spiral

Use the Golden Ratio to enhance your composition

Use the Golden Ratio to enhance your composition

This is a tool that has been used for centuries, as a design principle. Many famous works of art use the Golden Ratio in their composition and it is often seen in nature’s own designs. Think of the spiral of a snail shell, how it curls in on itself. That shape conforms to the Golden Ratio. It is a ratio of 1:1.618 which seems to work really well in design and photography. To read much more detail about this technique check out: Divine Composition With Fibonacci’s Ratio (The Rule of Thirds on Steroids).

2. Unity

Unity is about order. Repetition can be very powerful in this regard. You can repeat shapes, lines, or colours in your image. By doing so you create a unified view of the scene, and this in turn gives a very powerful compositional effect. Unity can bring a calming feel to the image, try and find a subject that portrays this.

The lines and the rivets in the image make it feel uniform, as does the lack of colour

The lines and the rivets in the image make it feel uniform, as does the lack of colour

3. Coherence

Different from unity, coherence is more about similar types of elements or shapes in your scene. Think of a rocky river bed with similar sized rocks and pebbles. This scene would be coherent if the rocks and pebbles are a similar size, shape, and colour. Coherence appeals to the viewer’s sense of order, and can make for very interesting images.

Similar shapes and colours make this image feel more coherent

Similar shapes and colours make this image feel more coherent

4. Balance and Rhythm

Balance is pretty much as it says, the idea here is to try and arrange the elements in your scene so that the image is symmetrical. This can be done using lines and shapes. The ideas is to create a sense of equality in the scene. Rhythm is similar in a sense, but is about a repeating pattern in the scene. These are a little more difficult to find, but often a close up or abstract image can showcase this technique well.

The centred composition of this image of a theatre shows the balance in the scene

The centred composition of this image of a theatre shows the balance in the scene

The curved shapes of the glass buildings gives a great sense of rhythm

The repeated curved shapes of the glass buildings gives a great sense of rhythm

5. Space

Open, or negative space, in your image is sometimes as important as the subject. Negative space gives your subject context, and shows the viewer where or how your subject relates to its surroundings. Quite often, negative space is the sky. It can be tempting to ignore this one, but if it’s used correctly, this can be a very powerful compositional tool.

The texture in the clouds in give this image some gravity. If the sky were simply blue, it would not be as impactful

The texture in the clouds in give this image some gravity. If the sky were simply blue, it would not be as impactful

6. Breaking the Rules

Now that you have some new ideas about how to make better compositions. Knowing these techniques will certainly improve some of your images, but also, knowing how to break them is just as important. In some cases, it will be obvious which technique to use, in others, you may find that putting your subject in the middle of your frame works best. You need to decide what will work for your image. Try techniques like this and see if one works. If not, break the rules and do what you think looks good.

By cropping the building quite aggressively, the image seems unfinished, but the colours and the sky make it work

By cropping the building quite aggressively, the image seems unfinished, but the colours and the sky make it work

googletag.cmd.push(function() {
tablet_slots.push( googletag.defineSlot( “/1005424/_dPSv4_tab-all-article-bottom_(300×250)”, [300, 250], “pb-ad-78623” ).addService( googletag.pubads() ) ); } );

googletag.cmd.push(function() {
mobile_slots.push( googletag.defineSlot( “/1005424/_dPSv4_mob-all-article-bottom_(300×250)”, [300, 250], “pb-ad-78158” ).addService( googletag.pubads() ) ); } );

The post 6 Advanced Composition Techniques to Improve Your Photos by Barry J Brady appeared first on Digital Photography School.


Digital Photography School

 
Comments Off on 6 Advanced Composition Techniques to Improve Your Photos

Posted in Photography


Five Techniques for Creating Impressionist or Abstract Photography

25 Oct

Whether you are new to photography, or have been photographing for a while, I’m sure you’ve gone through times when the ideas weren’t flowing, and inspiration was nowhere to be found. This happens to all of us. So how do you find ways to stay inspired and get the creative juices flowing again? Try abstract or impressionist photography. Finding inspiration isn’t about stepping outside of your box, it’s about stretching your limits, and abstract photography is the best way to learn to see things in a completely new and different way.

1 Look for shapes Irys by Eva Polak

Abstract and impressionist photography leave things to the imagination and help you concentrate on texture, form, and colour. Instead of making everything look real, I invite you to use bold colours, shapes, and lines to make exciting images.

So let’s start exploring the creative process of abstract photography. Here are five easy techniques that will help you to learn new skills and get your creative juices flowing.

1. Look for shapes, patterns and textures

As you go about your daily activities, notice the shapes around you. Your house is full of interesting shapes, patterns and textures that can be used to make abstract photos. Look closely at different objects around you and consider whether there are any reoccurring shapes or themes within the object – then use them to your advantage. Lines can be used very effectively in a photograph, as the eye will tend to follow a line through a shot. Look at the undulating pattern the wave makes (see below), as it breaks into shore. In the city, look for patterns formed by the buildings. Discover different textures in flowers arrangements in the park (see photo above).

1 Look for shapes Waves by Eva Polak

2. Look for reflections

Reflections are one of the best ways to create abstract and impressionist photography. If you look carefully, you’ll see they are everywhere. As you walk around, look for smooth surfaces. Think about how you can use reflections to capture a viewpoint that you simply couldn’t have shot otherwise. Pay attention for colourful reflections in rain-soaked streets, they will create shimmering images with an impressionistic quality. Also, still lakes and rivers can create some wonderful reflective surfaces. When a surface is textured or shaped, unusual and interesting reflections can appear.

2 Reflection Seagull by Eva Polak

2 Reflections Rainy streets by Eva Polak

3. Defocus

Pulling the lens out of focus is a quick way to give a scene an impressionistic look. Use Aperture Priority mode that allows you to set your lens to the widest aperture (small numbers such as f/2.4 or f/4). This is critical because you want a very shallow depth of field. Switch your lens to manual focus and start looking at things through the camera. Turn the focus ring until everything is blurry. Try varying the focus on the same scene to find out how much blur suits your subject best.

3 Defocus Lonly  by Eva Polak

3 Defocus Swimmers by Eva Polak

4. Pan your camera

Panning is a fun technique to learn, and although it takes some practice, it is relatively easy to get started. You can pan running people, bicycles, cars, or just about anything that is moving. Once you have your subject, set the camera to shutter priority with the shutter speed between 1/10th and 1/60th of a second. As your subject approaches, focus on it and start tracking with your camera until you are confident that you are moving in sync with the subject.

4 Pan your camera Flight by Eva Polak

The trick to a successful camera-panning image is in finding a suitable subject. Strong vibrant colours are ideal, and lines through the frame will keep the colours distinct and separated. Apart from panning moving subjects you can use this technique to create beautiful seascapes and landscapes. The subject distortion will emphasize horizontal lines when panning horizontally, and vertical lines when panning vertically.

4 Pan you Camera  Wattle Bay  Eva Polak

5. Zoom

A zoom burst, or zoom blur, is another technique which is simple, fun, and easy to achieve. It involves changing the focal length of your lens (zooming in or out) while you take a photo, causing the shot to blur from the centre outwards, as if the scene is bursting towards you.

5 Zoom Water lily by Eva polak

To use this technique you’ll need a DSLR (or mirrorless camera) with a zoom lens. Set your camera to Shutter Priority. A shutter speed of 1/10th of a second is a good starting point. Compose your photo as you normally would, then just zoom the lens as you press the shutter. The key to success with this technique is to get the amount of zoom burst right. Experiment with zooming speed and direction.

5 Zoom Autumn Leaves by Eva Polak

Spend some time with each technique to discover its full potential. Photograph a lot and often. Don’t judge what you do. Analyze your images and try to improve upon them. But, most of all, have fun!

Tips to remember:

  • Keep an open mind; abstract photography is about seeing the potential in things that other people miss.
  • Spend time exploring everyday subjects and scenes; it’s surprising how many interesting abstracts you will find.
  • Look at familiar things from unfamiliar angles, and you will see them in a completely different light.
  • Forget about what something really is and concentrate on its shape and colour.

googletag.cmd.push(function() {
tablet_slots.push( googletag.defineSlot( “/1005424/_dPSv4_tab-all-article-bottom_(300×250)”, [300, 250], “pb-ad-78623” ).addService( googletag.pubads() ) ); } );

googletag.cmd.push(function() {
mobile_slots.push( googletag.defineSlot( “/1005424/_dPSv4_mob-all-article-bottom_(300×250)”, [300, 250], “pb-ad-78158” ).addService( googletag.pubads() ) ); } );

The post Five Techniques for Creating Impressionist or Abstract Photography by Eva Polak appeared first on Digital Photography School.


Digital Photography School

 
Comments Off on Five Techniques for Creating Impressionist or Abstract Photography

Posted in Photography