RSS
 

Posts Tagged ‘Starting’

5 Things You Should Know About Lightroom Before Starting

27 Feb

So you just installed Lightroom, now what?

You could spend some time just playing around and learning through doing, but if you’re looking for a nudge in the right direction here are a few simple concepts that I wish I’d thought about before starting my own Lightroom journey – hopefully it helps you! Five things you should know about Lightroom before you start:

#1 Your organizational strategy

organize-in-lightroom
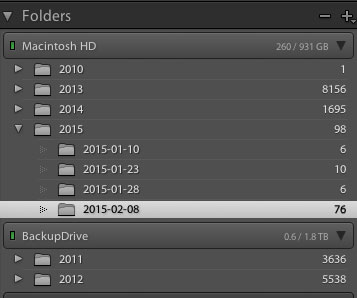
This might not seem important at first, but Lightroom is an amazing organizer of your photographs if you choose to use it as one. So before you start haphazardly uploading photographs into your Lightroom catalog try to come up with some sort of basic organizational strategy first.

Some ideas for organization include:

Organizing by date, by location of shoot, or by specific events. Think about your style of photography and the subject matter you plan on shooting. For example a wedding photographer would probably want to organize by date/bride-groom name, where as a wildlife photographer may organize by location/animal.

Lightroom has many different tools for organizing your photographs from colors, star rating and flags. You could for example use flags as a simple yes/no option to quickly cull images, while colors could be for various states of post production workflow (i.e. blue is for images that need to be processed and green is for images that are finalized and shouldn’t be touched).

This might sound overwhelming at first, but if you get into this habit early on, it will simply become a part of your Lightroom workflow, and trust me an organized Lightroom library makes things a lot easier when you’re dealing with thousands of photographs.

#2 How you want to import photos

This is a simple question, but one that you should know the answer to before you get started with Lightroom. When you first open up the import dialog box you’ll be asked whether you want to Copy as DNG, Copy, Move, or Add. Knowing the difference between these four options will help you make the best choice for your workflow. So here’s the Cliff’s notes version:

  1. Copy as DNG – Converts the file type to Adobe’s .DNG format. Read all about Adobe’s DNG format here.
  2. Copy – Retains the original file type of your image (on your computer or memory card) and copies it to a new location on your computer or hard drive.
  3. Move – Moves the image from one place to another on your computer (or from the memory card).
  4. Add – Adds the image to a Lightroom catalog without moving its physical location on your computer or copying it.

For a more detailed look at importing photographs in Lightroom check out: Quick Tip: Importing to Lightroom Made Easier

#3 How to use the Lightroom Develop Module

lightroom develop module
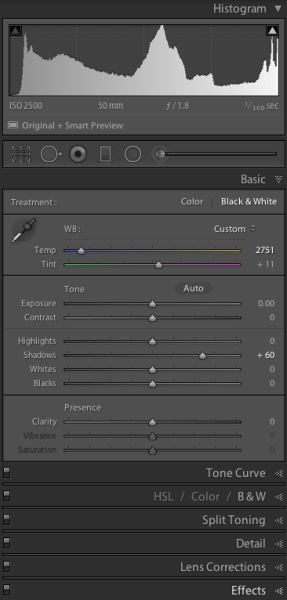
Now that you’ve got your organizational strategy situated you’re starting to get into the fun stuff, before you go all hack and slash post-production on your first photograph it does help to learn some basic fundamentals. Here’s three quick points to get you started.

  1. Learn what the basic tab does – The basic tab is the workhorse of Lightroom it is what will bring your image to life. At a minimum master these five Lightroom sliders and you’ll be on the road to successful image processing.
  2. Learn the art of local adjustments – Once you’re comfortable with Lightroom’s basic tab you’ll probably want to move onto learning things like how to apply adjustment brushes, graduated filters and radial filters to your images. These tools function in much the same way as the sliders within the basic tab, however, they allow you to have more isolated and local control over your images.
  3. Learn the finishing touches – Finally within the develop module you’ll want to learn a bit about the finishing touches that Lightroom is capable of providing. Things like the clone/heal tool, sharpening, and noise reduction are a good place to start. You may also want to learn about how to remove chromatic aberrations and correct for lens distortion as well. These types of tools are subtle, but powerful, and really will bring the entire image together as a final printable work.

#4 What are presets and how you should use them

While you may be tempted to start with presets it’s better that you learn your basic tab and various other tools first – why? Simply because all presets are created from these settings so once you learn those settings not only will you know a lot about the presets you’re choosing, but you’ll also be able to create your own.

When it comes to presets think of them as a starting point, not a finished product. Learn how to use them to speed up your workflow by creating your favorite looks within a preset, then applying what you know about the various sliders in the basic tab to fine tune the results.

For more info on Lightroom presets: A Concise Guide to Lightroom Develop Presets

#5 What your export settings should be

Here you are, ready to export your first photograph from Lightroom, and just when you thought you had everything figured out, this screen pops up. What do you do now?

Lightroom Export

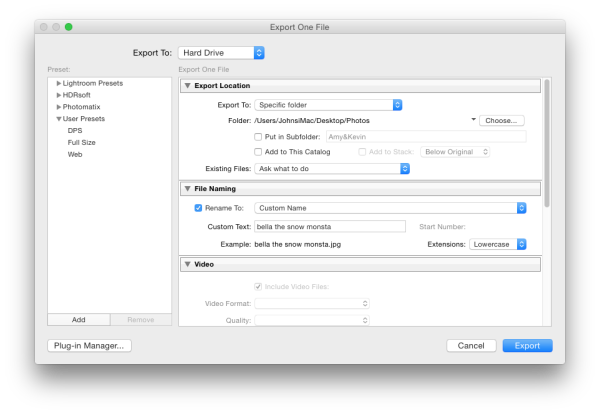
First you’ll want to remember that Lightroom doesn’t save your processed images, only the instructions of how to process them, that’s why you need to export (export = “save as”) a file out of Lightroom. This image is separate from the original camera RAW file, and as a result will need its own name, and place of organization.

You’ll want to determine what file type and size you’re going to export, and whether or not you want Lightroom to automatically add a watermark to your photographs. These things are all going to be preferences for your own work and there’s no right or wrong way to go about doing it, but you should learn about the implications of each before you start exporting hundreds of photographs.

What Else?

What else would you tell someone who’s just getting their feet wet with Lightroom? Leave us a comment below and let us know!

googletag.cmd.push(function() {
tablet_slots.push( googletag.defineSlot( “/1005424/_dPSv4_tab-all-article-bottom_(300×250)”, [300, 250], “pb-ad-78623” ).addService( googletag.pubads() ) ); } );

googletag.cmd.push(function() {
mobile_slots.push( googletag.defineSlot( “/1005424/_dPSv4_mob-all-article-bottom_(300×250)”, [300, 250], “pb-ad-78158” ).addService( googletag.pubads() ) ); } );

The post 5 Things You Should Know About Lightroom Before Starting by John Davenport appeared first on Digital Photography School.


Digital Photography School

 
Comments Off on 5 Things You Should Know About Lightroom Before Starting

Posted in Photography


3 Questions to Ask Yourself When Starting a Photography Business

16 Feb

I have met a lot of people who, upon getting their first DSLR, immediately want to start taking pics of their kids, their friends, some high school seniors, or maybe even a wedding. They want to dive headfirst into the deep end of the photography pool, even if they aren’t entirely sure what they are doing. For the record, I fully support this! Experience can be the best teacher of all, and even if the stakes are high like a wedding or graduation, I admire those who can throw caution to the wind and jump right in, even if they may be a bit unprepared.

father-boy

That sense of excitement and wonder, as well as a willingness to try new things and experiment with your equipment, is something that tends to wane as the years go by and so many cameras start gathering dust on closet shelves. It’s this sense of newness and enthusiasm that, in my opinion, is missing from some of the more seasoned photographic veterans that I visit with from time to time.

However, if you are one of those individuals with a new camera who just can’t wait to start snapping photos of friends and family, and maybe even create a Facebook page for your new photography side project – I would advise you to pause and consider a few questions first. This will help ensure that you are getting your photography business started on the right foot and setting yourself up for long-term success, not just a few bucks on the side and some clicks to your website.

1. What does my client expect?

“Wait a second,” you might be saying to yourself right now. “These people are my friends and family…not my clients!” While this might be true, if you don’t start seeing the people you photograph as clients, you might find it hard to separate your personal relationships from your professional side as you get more established in your craft.

student-fence

The first thing you need to square up are their expectations of what you will provide. Everyone you photograph, whether it’s people you have known your whole life or new clients who found your website or social media account, will have a unique set of expectations for what their photography session will involve. Aunt Ginny might think you will take some tasteful outdoor pics like the ones her sister posted on her Instagram. Your buddy George might want some indoor studio photos of his kids like the ones he saw at an art fair downtown last weekend. Someone named Rachel, who emailed you from your website, would like you take bridal photos like the ones she saw in a wedding magazine. Meanwhile, your own personal style is more suited to newborns and infants since you are not very comfortable directing people and telling them what to do during a photo session.

That’s just the beginning! If you don’t know what these people are expecting, they will likely walk away less than satisfied, even if you think your photos of them are beautiful.

Setting expectations for success

One of the best ways you can manage your clients’ expectations is to provide them with some existing images that showcase your overall style and approach. Plan on giving your clients some examples of the types of photographs you take so they know whether or not you will be a good fit for what they want. You can also visit with them over email, social media, phone, or in person to make sure you can provide the types of photos they are looking for.

family2

If you do not already have a portfolio to show potential clients, you can enlist the help of some friends and family specifically for this purpose–but again, remember to manage expectations. If you take this approach, the goal is to get pictures that you want, not necessarily what your models want. Make sure the people you are photographing in these situations know that they are doing this to serve you and your needs, and if they do happen to like the pictures you take then you could reciprocate by doing a session for them in the future.

The flip side of knowing what your clients expect is making sure that you understand your expectations, which is just as important. Do you want to take photos that are posed or candid? Will you travel outside of your community, and if so, will you charge a fee? Do you plan to do extensive edits after the shoot, or are you the type of person who prefers to shoot in JPG and not alter things afterwards? Will you photograph major life milestones like weddings, if given the chance, or do you prefer more subdued scenarios like casual family photos?

Of course one of the best ways to mitigate any potential problems is to have a contract in place so you can make sure you and your clients are both on the same page. At this point you might be thinking “Why does it have to be so complicated? I just want to go out and shoot photos.” This might all seem like it’s a big hassle, but if you don’t spend some time considering your expectations as well as those of your clients, you are likely going to end up with far worse problems sooner than you think.

student-tree

Being clear on exactly what this young man wanted, as well as what I would do, helped make this high school senior photo session go smoothly.

One of the most painful experiences you can have as a photographer is when your clients are unhappy with their photos. Usually, but not always, this is a result of mismanaged expectations. They were wanting one thing, and you delivered something else. By making sure you understand what your clients want, whether they are family, friends, or perfect strangers, you will make great strides in not only providing the best photos possible, but building long-term relationships that will keep them returning for pictures in years to come.

2. Can I make my camera do what I want it to do?

There is a strong temptation when you first upgrade to a DSLR to put it in Auto and expect your photos to be amazing. To some degree, that can certainly happen–the Auto mode on modern cameras does a good job of getting things like exposure and white balance right, but this is only a small part of the total photographic equation. As a photographer you need to spend time learning not only about the basics of exposure, but how to control your camera in such a way so as to make it do what you want.

Knowing how various f-stops affect the image is one thing, but knowing how to quickly change the aperture while in the middle of a photo shoot is another thing entirely. Less expensive cameras like the Nikon D3300, Canon Rebel T3i, and Sony a6000 are, in many aspects, just as capable as their more expensive counterparts. But many of them require you to use various menus and multi-purpose buttons to change settings instead of having dedicated buttons for things like ISO, White Balance, etc.

I know it sounds elementary, but reading the manual for your camera is a great way to familiarize yourself with its capabilities. Make sure to have your camera in your hands while doing this so you can start to learn not only what your camera can do, but how to make it happen. As the saying goes; practice, practice, practice. If you’re in the middle of a shoot and you need to quickly change from matrix to spot metering, or do some bracketing in order to get the proper exposure, you don’t want to waste time fiddling with buttons and menus while the moment passes before your eyes.

Popular entry-level cameras like the Nikon D3200 have many advanced functions, but their lack of dedicated buttons and dials requires you to use menus to access them.

Popular entry-level cameras like the Nikon D3200 have many advanced functions, but their lack of dedicated buttons and dials requires you to use menus to access them. Make sure you know how to do this before doing a photo session.

As an example, I recently spent some time with my father who is an avid photographer, and throughout the course of our conversation we got to talking about off-camera flash techniques. He shoots with a Rebel T4i, and through some experimentation we discovered that it is capable of triggering an off-camera flash with the built-in pop-up flash. We both thought this feature was reserved for Canon’s more expensive cameras, and he was delighted to find out that he would not need to purchase wireless triggers for photo sessions that require off-camera lighting. The moral of the story is that your camera can probably do more than you think, but it requires some research, experimentation, and the courage to move away from the convenient Auto mode.

With a little practice, you will start to figure out the many capabilities your camera has, and how to use them on photo shoots. If you are trying to achieve a particular look or style when shooting photos for clients, you might not need to buy any new gear at all–you just need to make sure you know all the details of operating what you already own.

Of course it’s also entirely possible that your camera, lenses, or other gear can’t do what you want them to do. Your creative vision and goals for a photo session might be far beyond the reach of what your setup is capable of achieving, and you might discover that in order to fulfill your, or your client’s, wishes you will need to spend hundreds or even thousands of dollars on equipment. But remember the old adage; knowing is half the battle.

You might not need to get any new camera gear in order to pull off a particular photo shoot–you might, instead, have to simply adjust your expectations and make sure to communicate with your client about it as well. Even a DSLR with a basic kit lens can do many things, but there are some limits. Knowing them before you are on location or in a studio with a client will help ensure you can get the most out of what you do have.

canon-70-200-L

Canon’s popular 70-200mm f/2.8 lens is an outstanding workhorse, but costs as much as several less-capable lenses. You might discover that you need to spend money on equipment like this, but it’s also possible that you can get by with what you already own.

3. Am I prepared for the long haul?

It’s such a thrill to start taking photos for other people, and in a way I envy all you new photographers who are reading this while pondering the incredible opportunities in front of you. But if this is you, I would advise you to take a step back and spend some time thinking about your long-term goals so you have a better understanding not only of what you want, but what you will be able to do for your clients.

As you take on more jobs and word begins to spread, you might find yourself becoming far too wrapped up in what was once just a fun hobby. Planning for sessions, re-shooting when things don’t work out, investing in new gear, and spending hours editing and fine-tuning in Lightroom or Photoshop are not the sorts of activities people usually have in mind when they start to get into photography as more than just a simple pastime. But all these elements (and many more) will ultimately become factors in how you approach your photography, so it’s important to think about them upfront.

Before you start spreading the word to your friends about your newfound photography venture, spend some time considering all the other elements besides just taking photos that will come into play as the months and years go by. It’s entirely possible that a month or two down the road you might find yourself dreading the editing process, but so many people like your photos that you are getting dozens of requests for photo sessions. This would put you in a bit of a bind, enough so that you might be tempted to toss your camera aside and wish you had never even started taking photos in the first place!

Considering right upfront whether you are prepared to do this over the long run will help you deal with these situations if and when they arise.

family

Photography can be a lot of work, but it can also be a ton of fun. And it’s such a good feeling knowing you can capture moments that people will have with them for the rest of their lives.

Of course the flip side of all this is that you might be positively giddy at the prospect of meeting with clients, taking photos, editing them, and all the other activities that are involved with photography. But, no one notices. Months go by without getting any clients or photo opportunities and you could find yourself wondering why you bothered to even do this in the first place. Again, you need to have a plan for how you will deal with these types of situations, and figure out if you really are in this for the long haul. The truth of the matter is everyone has their ups and downs, with periods of frantic activity followed by long stretches of finger-tapping. If you spend time thinking about how you will deal with both of these extremes and everything in between, it will help you set yourself up on the road to success from the very beginning.

Of course these are just three questions to consider, and I feel as though we have barely touched the surface. What about you? Are you a seasoned pro with some advice to people just starting out, or are you just beginning to think about doing more with your camera, but wondering what to do? Leave your thoughts in the comments below.

googletag.cmd.push(function() {
tablet_slots.push( googletag.defineSlot( “/1005424/_dPSv4_tab-all-article-bottom_(300×250)”, [300, 250], “pb-ad-78623” ).addService( googletag.pubads() ) ); } );

googletag.cmd.push(function() {
mobile_slots.push( googletag.defineSlot( “/1005424/_dPSv4_mob-all-article-bottom_(300×250)”, [300, 250], “pb-ad-78158” ).addService( googletag.pubads() ) ); } );

The post 3 Questions to Ask Yourself When Starting a Photography Business by Simon Ringsmuth appeared first on Digital Photography School.


Digital Photography School

 
Comments Off on 3 Questions to Ask Yourself When Starting a Photography Business

Posted in Photography


The Foundations of Starting a Photography Business

14 Dec

Starting a photography business can be a very exciting yet scary thing. It’s exciting to share your talents with others, yet the business can be overwhelming!

Sebastien Wiertz

By Sebastien Wiertz

If you’re at all like me when I started a photography business, you are worried that you won’t make any money. Taking pictures was so much fun, but would anyone pay for my work? With a lot of blind faith I jumped in and began working towards my dream. For me that meant many late nights and long weekends, shooting as much as I could and learning as I went along. Through years of growth, mistakes, and many successes, I learned so many things to share with you and help you to start your own business successfully.

Every business needs a solid foundation, so start there. Once you’ve got your feet off the ground, the business triangle will help you build a strong company.

Setting your foundation

Depending on where you live, you will need to be legally set up for business. Check with your city, town, state or province to find out what steps you need to take to be an official business. Learn if you need to pay sales tax. Work with a professional that can help you, like an accountant or attorney.

Once you are set up legally, you can also work through this checklist to get you started:

  • Your branding
  • Set up a website and blog
  • Set up accounts in social media
  • Get business cards
  • Set up a bank account
  • Find out about taxes if applicable
  • Choose a printing lab and packaging
  • Get insurance

The business triangle

After you’ve set up your company, the business triangle is your next step. This business triangle was designed to help you get organized as you start and maintain a photography business. Each of the points represents a different area of your business. If you are weaker in one area, then your business (and the triangle) is in jeopardy of failing. Evaluate yourself with each point to see where your business needs to improve to be stronger. You can use a rating system of one through 10.

Image 1

Confidence

The first part of the business triangle is the center or the core. Like the core of the human body is important for wellness and function, the core of the business triangle (confidence) is important to your business.

Having confidence will help propel you forward on your journey. It can help you turn your stumbling blocks into stepping stones, and take you from one level to the next. If you feel that you’re confidence could use a boost, try a few of these tips.

  1. Recognize all of your wins, big or small.
  2. Focus on your end result.
  3. Always work on your camera skills.
  4. Don’t compare yourself to others.

Image 2

Products

The next part of the business triangle is products. This includes any business products such as your images and the items you sell to your clients, like prints or canvases.

Your images are your number one form of marketing. The better they are, the more clients will want them. This might mean taking classes or workshops and participating in forums to continually get better. Never stop improving your skills.

In addition to improving your photography skills, you also need to provide great products for your clients. Many clients want the digital files which are easy to provide and less hassle. However, there are some benefits to selling prints. One is that you have an opportunity to increase your overall sales. Also, having the actual prints in your client’s home can be great word of mouth marketing. Many photographers today are offering both prints and digital files.

Working in the products category of the business triangle also includes figuring out how to price your work. You want to take into consideration the following:

  • Your time involved
  • Your expenses
  • Your desired income
  • Your local market
  • Your skill level

Carefully analyze each of these categories to come up with a solid pricing structure that will work for you.

Image 2a

Marketing

Next on the business triangle is marketing. Even if you live in a saturated market, if you get your name and your work out there, you will find there is still a need for your photography.

There are three areas of marketing that you will want to focus on with your business; word of mouth, online and local marketing.

The best form of marketing is word of mouth. Because getting photographs taken is so personal, clients will not likely hire just anyone. Instead, they will hire someone who has been recommended by a friend, or someone with an established reputation. These recommendations are earned by creating experiences for your customers that are above and beyond what other photographers are doing.

The next form of marketing is online. In today’s world you need to have a strong online presence. Your clients will be looking for you through a website, blog, and social media. Make sure you are there so they can find you.

Getting into your local community is the last form of marketing. This can be one of the most rewarding ways to build your business. Look for companies in your area that you can partner with to help build both of your businesses. You can partner with any type of business; from dairy farms, to clothing boutiques, or real estate offices. Almost every company needs pictures for their marketing and they have clients that need you.

Customer service

Image 3

The last part of the business triangle is customer service. Creating excellent customer service is the best way to keep your clients around year after year.

The most important thing to remember when building and growing a business is to make your customers feel special. How your clients feel when they leave you will determine how much they will tell their friends and family about you. Those family and friends are tomorrow’s clients!

Use the following ideas to create a memorable experience for your clients that will keep them coming back for years to come:

  • Good communication
  • Honest and sincere compliments
  • Provide excellent products
  • Amazing packaging
  • Bring water bottles to the session
  • Treat them like they are your best friends
  • Give a thank you gift

Image 4

One of my favorite sayings is: “luck favors the prepared”. Although it may seem scary to start a photography business, break down your tasks of getting set up legally, then follow the business triangle to continue to build a strong a solid business.

googletag.cmd.push(function() {
tablet_slots.push( googletag.defineSlot( “/1005424/_dPSv4_tab-all-article-bottom_(300×250)”, [300, 250], “pb-ad-78623” ).addService( googletag.pubads() ) ); } );

googletag.cmd.push(function() {
mobile_slots.push( googletag.defineSlot( “/1005424/_dPSv4_mob-all-article-bottom_(300×250)”, [300, 250], “pb-ad-78158” ).addService( googletag.pubads() ) ); } );

The post The Foundations of Starting a Photography Business by Amy Fraughton appeared first on Digital Photography School.


Digital Photography School

 
Comments Off on The Foundations of Starting a Photography Business

Posted in Photography


5 Fears to Overcome When Starting a Photography Business

31 Oct

As you enter the field of professional photography, there is one thing that will become immediately clear. One of your biggest obstacles will be fear. You will worry that you are not prepared for a job, that you are not experienced enough, that something will go wrong, or that they will not like your images.

Business Portrait

Business Portrait.  Each photography job will have a different makeup and you should create a game plan going in.

This is normal and I have bad news for you; the fear will never fully go away. It will get easier however, and you will become better at pushing through it. As time progresses you will find yourself confidently going into jobs that you used to make you petrified. But even then, a whole new set of fears will arise as you move into more advanced jobs.

This can paralyze you, especially as you are starting out. It is the biggest obstacle that will stand in your way towards becoming successful. But fear not, because you are not alone. Even the more experienced photographers stay up sleepless the night before jobs.

The key is to harness that fear and understand that it is normal. It is good in fact, because it means that you are progressing and trying new things. It means you are doing something interesting that you will be proud about afterwards. As you learn, you will make mistakes, but it is how you deal with those mistakes, how you learn from them, and how you push through the fear that will be the impetus for your success.

Here is a list of my toughest fears to push through as a professional starting a photography business, and how I deal with them.

1. Is my work good enough? What if I’m not experienced enough for a job?

When you begin to think about starting a business the scariest question is whether your work and your abilities are good enough. You may have heard you are talented or that you have a gift for image making, but the reality is that being a good photographer is based on your experience and the amount of effort, thought, and study that you put into your work. Anyone can take a good photograph, but professionals learn to do it day in and day out in a variety of circumstances.

If you are starting out, no matter how good you are, you will have a lot to learn. It is important to know this. Everyone started somewhere. Spend time researching people who do the type of work that you want to do and figure out how they do it. Learn from them. Read about photography and settings and situations. Use websites like dPS to improve your skills. Before you do a job research what you want the photographs to look like and plan out how you will pull them off. Go into the job with a plan.

Portraiture

Environmental Portrait. If you are an introvert like me, interacting with subjects to get them in the right mindset will make you nervous. This will improve with experience and you should study other photographers to pick up tips on how to best interact with subjects.

If you treat your image making like this and put the work into it, even if you are not currently ready, you will be soon. The more prepared you are, the more confident you will be when going into jobs and marketing yourself. All of the information is out there for you to prepare yourself, it is just a matter of doing it.

You will most likely look back on your work two years from now and see how much better you have become, and that is the point. Everyone had to start from somewhere and it is the prepared and thoughtful photographers who ultimately become successful.

2. Am I charging the right amount of money?

Pricing is an artform based on experience. At first it can be scary because you will not have any experience with it. Also, if you are not confident in your work or your ability, then how can you be confident in pricing your work?

If you are entering the professional world you have to understand that you are starting a business. You need a business plan. You have to charge enough to make a living. If you are making the commitment to do this, even if you are not fully comfortable yet, you still have to make a living.

Research other photographers in your area or field and figure out what they are charging. Put yourself in the customer’s shoes and think about what they might be willing to pay. Create a pricing structure based on this and raise your prices as you become more experienced. Some jobs you will lose because you are too expensive. No matter what you charge, there are always people who will think you are too expensive. Do not let these people affect your opinion of what you charge. Other customers will pass you by because you are not expensive enough! That happens.

Portraiture

Environmental Portrait. Some jobs will be much easier than others but always plan for the worst.

Imagine you are hiring a wedding photographer with a budget of $ 5,000 and you like two photographers who seem like they have fairly similar experience, but one charges $ 2,000 and the other charges $ 4,500.  Which one will you hire? Some might hire the $ 2,000 photographer but many would hire the $ 4,500 photographer because they would assume that this photographer was more experienced solely based on the price they command. They would not want to risk hiring the cheaper photographer for the most important day of their lives.

Also, if people tell you your prices are too high, educate them on why you charge what you do. Many people who hire you will not understand photography. There are a lot of people out there who think photography is just about getting a camera, showing up for an hour, going home, and sending the photos. That is so, so far from the truth. Explain what you will be doing for them, the time and knowledge that goes into the job, and why it is priced where it is. Some people will understand, be happy that you explained it to them, and will then hire you. Some will not, but then you don’t want to work with those people in the first place.

Do not be afraid to lose a job because of price. That will inevitably happen and it should not dictate your pricing strategy.

3. Will my equipment break?

This one scares the heck out of me. What if something breaks while I am on a shoot? If you are creating a photography business, you need to have backups in place. A photographer plans based on contingencies. This is not only a vital business practice, but very important for your peace of mind and confidence.

Have an organized system for your equipment and bags and a consistent way of packing them for jobs. Have a backup of everything. If you do the same job regularly, then it is worth it to purchase two of everything that you use regularly. You can consider renting equipment for jobs that you do not do as frequently.

5-engagement

4. The neverending job and difficult clients

I used to have a big problem taking jobs that I shouldn’t have gotten involved in. I would be flattered that someone wanted to hire me and I hated to turn down income, particularly during the lean times. This became a huge problem, especially with the difficult clients who kept changing the job parameters and asking for more. This mistake cost me a lot of time and ultimately money.

Your time is valuable and certain jobs, particularly when you are starting, will not be worth your time. If you are starting a photography business you need to build up a steady stream of clients and having one take up an inordinate amount of your time, particularly if they are not paying you well, is just not worth it. You could be spending that valuable time marketing yourself and building your knowledge and business.

Always get all of the information up front from the client before you quote a price and size them up. It can be obvious, sometimes right away, when a client will be difficult. When you get all of the details stated up front, if the parameters of the job happen to change later in the process, then you will have the grounds to ask for more money for the extra work they are asking you to do. This will keep clients from taking advantage of your time and asking for more than what was agreed upon. Sometimes they will not even remember what they had asked for at the beginning.

An engagement portrait. Some clients will prefer more posed portraiture that looks like it came out of a magazine. Some will want both. The better you know your clients the better you can anticipate what the will want.

An engagement portrait. Some clients will prefer more posed portraiture that looks like it came out of a magazine. Some will want both. The better you know your clients the better you can anticipate what the will want.

5. Will the client like my work?

I have been doing photography jobs for a decade now and I still get nervous every single time I have to press the send button for the final images. No matter how confident I am in them, that fear is never going to go away for me. It might be the same for some of you.

However, it used to be more debilitating than it is now. At the beginning it would cause me to procrastinate and it would cause me to take so much longer editing the images than it should have. I notice that this happens to a lot of photographers. Newer photographers often spend much more time on the editing than the more experienced photographers. Some of this is based on speed and experience, but I find that the biggest factor is that the experienced photographers have their editing process down to a science. There is a structure to the way they do things that makes everything more efficient and having this structure also helps reduce the fear.

Create a consistent structure for how you edit jobs. Here is mine:

  • I first start by choosing my final selection of RAW negatives that I will send to the client. I go through all of the images in Adobe Lightroom and star everything that I think is decent as three stars.
  • I then take a break to clear my head and eyes and go through the three star images and make the best of that bunch four stars.
  • The four starred images will be the ones that I will send the client.
  • I do a second and sometimes a third round through, moving some of the four starred images back to three stars and making the best images five stars. The five starred images are in case I want to send a small edit of the top photos or if I want to access them later for my portfolio.

    Business Portrait

    Friendly and natural business portraits. When you need to create images that feel natural you need a game plan for how you are going to make the subjects feel relaxed. Think ahead of time about what you can say or do to achieve this relaxed environment.

Once I have this done, the path to the finished product is laid out before me. I then go through all of the negatives and get them to the exact crop that I want. I do this because I want to see the whole sequence of images that I will be sending to the client before I start editing the final look of them.

Finally, I go through and edit the images. The hardest aspects for me are getting the color balance, contrast, and exposure to be perfect. Also, one of the toughest things to do is to make all of the photos feel consistent. This is why I like to have the final edit of negatives chosen and cropped before I begin to work on the aesthetics. It gives me a clear path to get to this endpoint.

Do you see how an efficient system can cut out hours and even days of editing time? It keeps you organized and this organization is meant to break through any procrastination and worry about the final photographs. Then, all you have to do is stand up for a second, take a deep breath, close your eyes, and hit the send button.

Take yourself seriously, especially when you are starting out. If you are starting a photography business, commit to it. You are a photographer, you don’t do photography. You have a product that takes a lot of effort, knowledge, and skill. Your product has a lot of value and not everyone with a DSLR can do what you do.

Need more help with business? Try these other dPS articles:

  • 30 Things you Should Know to Help you Start a Photography Business
  • 36 of the Best Online Tools to Boost Your Photography Business
  • 5 Things to Consider Before Starting Your Photography Business
  • 5 Tips to Expand your Photography Business Skills
  • 5 Ways to Dip your Toe into the Business of Photography
  • The Ultimate Guide to Going Pro as a Photographer

The post 5 Fears to Overcome When Starting a Photography Business by James Maher appeared first on Digital Photography School.


Digital Photography School

 
Comments Off on 5 Fears to Overcome When Starting a Photography Business

Posted in Photography


Five Things You Need to Know Before Starting a Pet Photography Business

02 Oct

Pet photography is a fast growing and super fun genre of photography, and it’s awesome to see so many people wanting to celebrate animals and the role they play in our lives! But how do you turn your passion for animals and photography into a thriving and successful business? What do you need to consider before setting up your business? Today I’m sharing the knowledge I’ve gathered over the last three years to help you prepare yourself for what is the best job in the world.

Image Nine

#1 Do you really love animals?

Pet photography is messy, dirty, and at times incredibly frustrating work. You need to be comfortable with being jumped on by Great Danes, pawed by pugs, and scratched by cats. You need to be happy crawling through the mud, and bending and stretching at weird angles.

Image Six

This was shot lying on the wet ground on a freezing cold morning – but totally worth it!

You also need to be exceptionally patient. Often at the start of a shoot your subject will spend about half an hour running around like crazy, and jumping all over the place before finally calming down enough for you to photograph. You also need to accept that you will never have that much control over your subject – try telling a puppy to sit still and tilt his head 45 degrees!

At some point, your camera equipment will get covered in drool, your shoes will get peed on, and you will end up ruining several pairs of pants. So if you don’t really, truly, love animals, you are going to find the whole process miserable and give up very quickly.

#2 Is there a market for it?

I am lucky enough to live in a city (Melbourne, Australia) that has the highest rate of dog ownership in the country. People here absolutely adore their pets. There are high-end pet stores, hundreds of dog friendly cafes and parks, and so many Pet Expos that I have lost count. But that’s not always going to be the case for your area, so do your research. Some good things to find out are:

  • What’s the rate of pet ownership? Your local council is a good resource.
  • What is the general attitude towards pets? Do people see dogs as “just dogs” or are they part of the family or substitute children?
  • Are there lots of pet friendly cafes, restaurants, and parks? What are the pet shops in your area like? Do they sell just the basics or are they a bit fancier?
Image One

Kimbo is most definitely part of the family.

It’s also a good idea to factor in things like the amount of disposable income the average pet owner has, and the general cost of living. One really handy tip – if the area you are in isn’t particularly pet friendly, focus your marketing on areas further afield.

#3 Do you have the right equipment and know how to use it?

Pet photography is similar to sports and wedding photography in the sense that if you miss a moment, it’s not likely to be repeated. We all know that equipment doesn’t make the photographer, but at a minimum you want to have a DSLR, prime lenses that autofocus (the 50mm f/1.4 is a great place to start), a good quality zoom lens, high-speed memory cards, and an speedlight you can use off-camera if necessary.

Image Two

Proof that with the right equipment, you can make it look as if a puppy is standing still.

Get to know your equipment back to front before you start charging for your work. Figure out how to change your shutter speed, aperture, and ISO without looking, and know how to change your lenses quickly. Some of the best shots come without warning, and if you’re staring at your camera wondering why something isn’t working, you’ll miss the shot.

As you know, practice makes perfect, and the only way to get really good at photographing pets and knowing your equipment is to find the most badly behaved animals you can and shoot, shoot, shoot. There’s no point in using well behaved, well trained dogs, because there are so many that aren’t. You know the friend who has a dog that jumps all over the furniture and runs in circles constantly? The friend with the cat who hates everyone? Practice with these sorts of pets and your camera will become like an extension of you before too long.

#4 What’s your style?

You know you’ve made it as a photographer when people can pick out your work from a line up. Having a distinct style is so important for setting you aside from the crowd. Here are some things to consider to help you find your style:

Are you a natural light or a studio photographer?
Do you like clean, clear backgrounds that don’t distract from the pet, or do you like contrasting backgrounds that add to the photo?
Do you like posed shots or natural?
How do you feel about styled shoots? Using props?
Do you want a soft or high contrast feel to your shots?
Do you like obvious post production or a more subtle approach?
Do you want to incorporate the pet owners in the shots?

When I started my business, I saw a gap in the market for really beautiful, shallow depth of field shots of pets. I also happen to love shooting with my lenses wide open, so that became my style. It has been refined over the years, but people hire me because they want beautiful, close up, emotive shots with a sense of warmth and humour to them. I only shoot in soft natural light, no direct sun, and I don’t do high action shots such as agility shows. I also very rarely photograph people with their pets, because it’s not my thing.

Image Four

Props can be an awesome way to bring a bit of humour to your shots.

Remember – do what you love and what feels good for you. Copying another photographer’s style is a waste of time and won’t help you grow.

#5 How are your animal handling skills and knowledge?

This is such an important thing to consider before you start your business. Safety (both yours and your subject’s) is extremely crucial. At best, you can be opened up to a law suit, at worst, you could seriously injure or kill someone’s pet.

Image Eight

When you’re dealing with 40 kilos (88 pounds) of Doberman, you want to be confident with your animal handling skills.

Be honest with your skill level. For example, I have grown up and volunteered around cats my entire life, and I’m very comfortable with them. I also know their body language, signs of stress, and how to play with them properly. But I didn’t know nearly as much about dogs. I volunteered for a shelter walking dogs, taking photos, and doing general handling, which helped me a huge amount. I also did some basic dog handling courses, as well as reading up on different breeds and their personalities. I’m now at the stage where I’m 100% comfortable dealing with all breeds and sizes of dogs.

Image Three

Ellie is fourteen years old, so I was very mindful of her range of mobility. She was happiest lying on her bed, so I shot around this rather than forcing her to stand up.

Even if you grew up with dogs, it’s a great idea to read up on the different breeds and their traits. This will help you so much when you are shooting, and by knowing what makes a certain breed tick you’ll be able to produce some great pictures.

Image Five

Ralph and Gidget were on lead for this session, and the leashes were removed later in Photoshop. We had so much more fun knowing that there wouldn’t be any unforeseen accidents.

Unless you’re shooting in a fenced in, off-lead area, it’s better to be safe than sorry and keep the dog on a long lead. That way you avoid any accidents, and you can always edit leads out later in Photoshop (a big secret of pet photographers). Never, ever force a dog or cat to do something physically uncomfortable.

Lastly, one final safety tip – always talk to the owner BEFORE you start shooting. Find out as much as you can about their pet. That way, if certain things terrify or stress them, you know what to avoid. Always check for food allergies before offering treats!

Image Seven

Did someone say treats??

I hope that this article has given you some things to consider – and most importantly, don’t forget to have fun!

The post Five Things You Need to Know Before Starting a Pet Photography Business by Erin McNulty appeared first on Digital Photography School.


Digital Photography School

 
Comments Off on Five Things You Need to Know Before Starting a Pet Photography Business

Posted in Photography


5 Disastrous Mistakes to Avoid When Starting a Photography Business

02 Jul

While starting a photography business, people don’t always understand how to turn their hobby into a full-time job properly. Most newbie photographers make the same mistakes when starting out that they wish to go back and change. Knowing about these mistakes in advance could help you to avoid them. As they say, “wise men learn by other men’s mistakes; fools Continue Reading

The post 5 Disastrous Mistakes to Avoid When Starting a Photography Business appeared first on Photodoto.


Photodoto

 
Comments Off on 5 Disastrous Mistakes to Avoid When Starting a Photography Business

Posted in Photography


5 Not-So-Obvious Mistakes Photographers Make When Starting a Business and How You Can Avoid Them

29 Jun

By plantoo47

When starting your photography business it’s easy to get caught up in how good your portfolio looks, buying new equipment, or how many followers you have on social media. While these tasks are important, you risk overlooking some crucial numbers that will help you to hold yourself accountable and succeed as a result.

Large corporations have whole departments tracking data to help their CEO’s make better business decisions. So why is this completely overlooked in one-person businesses?

In this article you will learn the Five not-so-obvious mistakes photographers make when starting a business. I will also give you some handy tips on how you can avoid these mistakes in the future.

Mistake #1 – Not knowing your income goal

One of the most common mistakes you can make as a freelance photographer is not setting any targets around how much money you want to make. I think we can all agree that it is an amazing feeling to be able to earn enough money to support yourself.

An effective way to grow your income is to first be aware of how much you’re currently earning so that you can figure out how much you want to earn in the future. Have a good solid brainstorming session about the next 12 months and really ask yourself, “How much do I want to realistically earn this year?”

By Simon Cunningham

Making a million dollars a year photographing would be fantastic, but you have to be realistic about your financial goals. You don’t want to set a figure that is so high that you feel discouraged. You also don’t want to set a figure that undervalues your talent. You want to choose a figure that makes you feel a little stretched but is still achievable with some hard work.

A good place to start is to look at how much income you made in the last year, and then add 30% on top of this amount to calculate how much you’d like to make in the next year. For example, if you earned $ 15,000 last year, your goal this year should be $ 19,500 ($ 15,000 x 1.3).

If you don’t have any income records from last year, just choose a figure that you feel comfortable with, and that is attainable.
After you’ve worked out your target income for the year, the next thing to do is calculate your average fee. You can calculate this by dividing your total income by the number of sales (clients) you had over the last year.

So now that we know what your target income and average fee is, we can move on to calculate the number of photo sessions required to reach your target income goal.

By Historias Visuales

Mistake #2 – Not knowing how many photo sessions you need to do

The number of sessions that you need to do in the next 12 months is dependent on your target income and average fee. For example, to make $ 20,000, you will need to do 40 sessions within the next 12 months to reach your income goals. This is calculated by dividing your income goal of $ 20,000 by your average fee, which in this example is $ 500.

Your required number of sessions may feel daunting at first. It’s important to break it down into smaller increments so that you can visualize these amounts so it appears more attainable, so 40 sessions for the year turns into 3.3 sessions per month. This is calculated by dividing 40 sessions by 12 months.

When you’re setting your income goal, think about how much time you want to take off for the year. You need to give yourself leeway for traveling, illness, recovery, planning and so forth. Just because you’re a business owner doesn’t mean you don’t need
to have time off like the rest of the world.

Going back to the example, the number of sessions required is 3.3 per month. Let’s round this down to three sessions to make things cleaner. This means you need to do 0.75 sessions per week.

By Korry Benneth

If you’re not comfortable with the volume, you could tweak your targets. For example, if you were to get more skilled at charging higher fees, we could set your average fee to $ 1000 instead of $ 500. How would this impact your volume? Well $ 20,000 divided by $ 1000 is 20. That’s 20 less photo sessions you have to do for the year, which equals out to just 1.6 sessions per month or only one photo session every couple of weeks.

So the next question is, should you focus on doing more sessions, or should you learn how to effectively increase your fees? The choice is ultimately up to you, but this example illustrates the importance of knowing your numbers so you can make the necessary adjustments in your business that will help you succeed.

Mistake #3 – Not knowing how many inquiries you need

Inquiries are the first point of contact you have with potential clients. Your main goal when you receive an inquiry is to convert it into a booking.

Measuring the number of required inquiries in your photography business can be a little challenging as some of the people that contact you initially don’t end up booking for various reasons. So as a rule of thumb I like to use a 50% conversion rate. This means that to get three bookings for the month, you need to get at least six inquiries.

As you can see, generating inquiries is easily one of the most important steps in the sales process. When it comes down to it, if you want to achieve your goal of $ 20,000, you need to generate six inquiries per month with an average fee of $ 500. Once again, you will only know this if you are aware of the important numbers in your business, which I’m sure, most of your competition is overlooking.

Mistake #4 – Not knowing how many bookings you need

Converting enquires into bookings is another often overlooked part of the photography sales process. Not only do you get the opportunity for income now, it gives you an opportunity to book future business through referrals.

By Ken Teegardin

The number of bookings required in your business should match the number of sessions required. So if you need to do three photo sessions per month, then you also need to book three clients per month.

Obviously the bookings you get today could help get you more sessions in the future. However, I have found that these numbers tend to correct themselves if you focus on getting your target bookings each and every month. So if you’re not doing enough sessions, you have to revisit your bookings and see how you can increase your inquiries.

Mistake #5 – Not having a method of keeping track of your numbers

Hopefully by now you have a better understanding of the relationship between different targets in your photography business. It is clear that more inquiries lead to more bookings, which lead to more sessions, which ultimately leads to more income.

It’s all well and good to be aware of the numbers, but to make significant change in your photography business requires you to hold yourself accountable and ensure that you’re following through on your goals. There are a couple ways you can do this.

One way is to draw a table in your notebook that displays each target for the month. You then record a dash next to the target when you get it done. So if you have a target of three sessions for the month, every time you do a session you draw a dash next to this target. You can also break this down into weeks if that makes it easier for you to update.

By Wendy House

You could also track your numbers by drawing up your targets on a whiteboard in your home office or studio. This is an excellent idea as you’re constantly looking at it.

Another way to do this is to create a spreadsheet. I know a lot of creative professionals cringe when they hear the word “spreadsheet”. However I encourage you to push through your barriers and use a spreadsheet to track your numbers.

The advantage of a spreadsheet is that it does all the work for you. All you have to do is input your progress and the spreadsheet can tell you how you’re doing. I can just hear what you’re saying at the moment. “Michael, this sounds great, but how do I actually create this spreadsheet you’re talking about?” I thought you might ask, so I’ve prepared a spreadsheet for you to download for you to use in your business. I initially created this spreadsheet for my partner’s photography business to track her numbers, and it really helped change her mindset in her business.

Before using my tool she couldn’t tell me what percentage of inquiries were converting into bookings. After she started tracking her numbers, she felt empowered and knew exactly how her business was going at any given time. Sometimes it was a pleasant surprise to know that she smashed her targets, other times she knew that she had to find ways to generate more business.

You don’t have to look at your numbers daily. I recommend updating your numbers at the end of each week. I also suggest that at the end of each month you send your numbers to an accountability partner. Knowing that you have to submit your numbers will only motivate you more. Choose someone you trust and you’re comfortable enough with to share your goals. This could be your spouse, sibling, good friend or business buddy. Sometimes all you need is some encouraging words to keep you focused in your business.

Bonus mistake #6 – Not tracking your expenses

It can be somewhat soothing to plan and think about how much money you’re going to make. Having said that, it’s just as important to understand how you’re spending your income.

Lots of new and even seasoned professional photographers overlook this highly important step. Reducing your costs is another method of making more money so you can spend it on more important things, like a new lens or a holiday.

By Jorge Franganillo

So how can you go about tracking your expenses? Well it’s quite simple, use accounting software. There are many accounting solutions on the market that are both free and paid. Personally, I recommend going with Wave (because it’s free) or Xero (because it’s awesome). Both systems allow you to automatically pull your transactions from your business account bank statement directly into your accounting software. This means you don’t have to spend hours entering your expenses. Pretty cool huh?

Most photographers get overwhelmed when they think of financial management. But investing time in this area will do wonders for your business.

By far the most important feature of accounting software, is the ability to create reports that allow you to see where, and how much, money you are spending in your business. From there you can make necessary adjustments to cut back on your costs.

By M.Kemal

Bringing clarity to your business

The whole purpose of this article is to bring clarity into your business. A lot of photographers like yourself start a business because you want to earn a living doing something that you enjoy. But you soon come to realize that making a living and growing your business is not easy. It can be overwhelming thinking about how you’re going to get through tomorrow’s to-do list while keeping all of your existing clients happy. This overwhelming feeling often leads to “fog brain” and prevents you from having clarity in your business.

Being aware of your numbers will ultimately help you make better decisions. Instead of spending one hour on Facebook today, you could spend that time contacting potential referral partners for your business.

At the end of the day, activities that generate more inquiries are much more important than getting bogged down with emails, packaging, social media, design and other administrative activities, especially when trying to reach higher income targets. Get someone else to do those things so you can focus on what’s important: servicing your clients, doing sessions, finalizing bookings and generating so you can fund the lifestyle that you want and deserve.

For more photography business tips read these articles:

  • The Ultimate Guide to Going Pro as a Photographer
  • How to Calculate Your Cost of Doing Business – And Other Necessary Numbers
  • 5 Things to Consider Before Starting Your Photography Business
  • 30 Things you Should Know to Help you Start a Photography Business

The post 5 Not-So-Obvious Mistakes Photographers Make When Starting a Business and How You Can Avoid Them by Michael Ofei appeared first on Digital Photography School.


Digital Photography School

 
Comments Off on 5 Not-So-Obvious Mistakes Photographers Make When Starting a Business and How You Can Avoid Them

Posted in Photography


5 Things to Consider Before Starting Your Photography Business

29 Jan

Starting a photography business is extremely easy with the accessibility and affordability of digital cameras and processing programs. Often the lure of entrepreneurship, with these low barriers to entry, leads to many photography business owners of all business experiences. Experience levels range from lack of business competence, to the need for growth in photography skills to a mixture of skills with varying weaknesses and strengths. Before entering into business it is important to evaluate whether you are technically proficient, ready to deal with business legalities, have a good grasp of business operating costs, engaging in market research and client management.

Photography business 05

#1 – Are you technically proficient?

The first step is to determine if technical proficiency is at a level to provide a quality, consistent product to each client that comes through the door. The importance of delivering consistently rests in word of mouth marketing and preventing disappointment when a client’s expectations are not met.

Photography business 04

#2 – Are you ready to deal with business legalities?

After technical proficiency comes the battle of business legalities including (but certainly not limited to: business formation, filing appropriate tax documents, acquiring required permits and licenses and using quality contractual documents. These legalities can be acquired through outsourcing to lawyers and certified public accountants, but a good, knowledgeable grasp of business legalities and the requirements placed on business owners is paramount to the success of your business.

Photography business 03

#3 – Do you know your business operating costs?

Following the previous two business necessities comes the costs of running the business. Having arms around the operating costs will assist you in setting appropriate pricing, and in making future investment decisions. Business operating costs are expenses that are directly related to the operation of the photography business. This is calculated by ascertaining costs of resources used to maintain the existence of the business. Operating costs include: rent, utilities, licenses, fees, insurance, maintenance of equipment, office supplies, income taxes, and wages.

Note: It is a good idea to also include a “rainy day savings” into the operating costs for you to have to fall-back on in times of need.

Photography business 02

#4 – Have you done your research?

An ever-required and demanding aspect of business is the initial and constant research on market influences, demands and overall factors that impact how the business will be maintained and marketed. Engaging in research is an organized effort to obtain information about the local market and potential clients. In order to effectively create and implement a successful business strategy, research must be done. Research should include identifying marketing information, trends, and the SWOT (SWOT = Strength, Weakness, Opportunity and Threats to the business) analysis of competitors. The strategies decided upon from out of this research are a key factor to maintaining a competitive edge over competitors and a higher probability for engaging clients.

Photography business 07

#5 – Do you know how to manage clients?

Juggling all of the previous “business things” can get even more complicated when adding on managing of clients. Having a solid business workflow filled with automation, organization and constant revision is necessity to keep the business moving forward when it becomes easy to be distracted with client management and production of the products and services.

Photography business 06

Having the right answers to these considerations does not guarantee a successful business but will increase probability for success, higher level of client satisfaction and less frustration along the way.

The post 5 Things to Consider Before Starting Your Photography Business by Rachel Brenke appeared first on Digital Photography School.


Digital Photography School

 
Comments Off on 5 Things to Consider Before Starting Your Photography Business

Posted in Photography


Thinking of Starting a Photo Community on the Web? Should You Do It on Flickr or Google+?

15 Dec

Google+ Communities vs Flickr Groups

Google+ launched their new communities last week and I’ve spent a lot of time exploring how they work since launch. I’ve also spent quite a bit of time super active over the past eight years in Flickr groups. Google+ communities are a lot like Flickr groups, but there are key differences, advantages and disadvantages to both. I thought I’d write a post comparing the two. I’ve long held that Flickr groups represent Yahoo’s best chance for social going forward.

So here’s the smackdown.

1. Thread bumping. Flickr wins. Probably the most significant problem with G+ communities is that they do not bump threads. With Google+’s new communities discussion topics are only shown by most recent post. Unfortunately the most recent post is not always the most interesting/engaging post. What’s more, because threads are not bumped upon a new comment, almost every thread over 24 hours in an active community on Google+ dies. Good conversations should last more than 24 hours. Flickr solves this problem by simply bumping each thread back to the top of the discussion forum anytime someone makes a comment on it. This is a far better way to keep a discussion forum active and engaged.

2. Muting discussions. Google+ wins. One of the problem with Flickr is that there is no way to screen out discussions that you are not interested in. If I don’t care about football, why should I have to see a thread about football in my favorite photography forum. At Google+ the answer is simple. Just go to the thread and choose to “mute this post.”

3. Photo pools. Flickr wins. At G+ you are forced to try to use typical discussion threads to post photos. Flickr, by contrast has a group photo pool that is associated with each group. Although it’s tempting to see photo pools as more of a photography niche feature, I’d argue that every community potentially has photos to share. Even if the photos are not artistic oriented photography, every group of people will potentially want to share photos with each other. Ideally, a group/community should be allowed to have more than one photo pool/album with settings to allow how content can be shared in those pools.

4. Community activity. Google+ wins. Even less than two weeks old, communities on Google+ are far more active than Flickr. Individuals are far more engaged and the rate of velocity around community conversations is much higher at Google+.

I started a new community called Light Box on Google+. It’s based on a voting game similar to voting groups I’d created on Flickr in the past. On Google+ the group already has over 4,000 members in less than a week. At Flickr it would take me months to build a group up that large. The G+ community is already 20x more active than any voting group/game I’ve ever seen on Flickr. When it comes to community velocity there is simply no comparison. Google+ communities are some of the most active I’ve ever seen anywhere on the web.

5. Invite process. Google+ wins. Google allows you to invite participants in circles up to around 195 people max. Sending out one invitation to 195 people is a lot easier than the way that Flickr allows you to invite people. On Flickr you can only invite a single member one by one by one by typing their individual name — wayyyyy too much work.

6. Sticky threads. Flickr wins. One of the thing Flickr allows a group owner/moderator to do is to make certain threads sticky so that they always stay at the top of the discussion threads. This is helpful if you have a group/community FAQ or other material that is important to stay prominent to the membership. At present you cannot make sticky threads at Google+.

7. Adult oriented communities. Flickr wins. Although there are some deep underground private communities on G+ focusing on nudes, G+ by TOS doesn’t allow nudity and this content is subject to being removed. On Flickr, they do allow nudity as long as it is properly flagged as nudity. In Flickr’s case this has resulted in both communities discussing artistic fine art nudes, but also a pretty seedy amateur underground porn network as well. Flickr routinely deletes many of the most offensive adult oriented communities, but if fine art nudes are your thing, you’re probably more likely to find these communities on Flickr than G+.

8. Moderating community membership. Flickr wins. It’s much easier to moderate community members in Flickr groups than in Google+ communities. On G+ you must scroll through an entire list of community members in order to find the person you wish upgrade to moderator or ban from your community — page after page after page after page. With any large community on G+ this is a very cumbersome process. Flickr by contrast has a powerful search tool which allows you to search for a member my name to upgrade or ban them.

9. Blocking members. Google+ wins. It cannot be overstated how important a good blocking tool is to community management. Inevitably some community members will not get along. Especially since Flickr allows obvious anonymous troll accounts to inhabit communities, users need some way to immediately protect themselves against bullying and harassment. Flickr’s community blocking tools are weak and non-existent. By contrast Google+ provides users a powerful blocking tool which turns anyone invisible that you choose to block.

Even more important than this user option is the tone that is set in communities because of it. When you know that you can be blocked by other people you are nicer and more polite. I wrote a post a while back about how Google+ is the nicer community for photographers on the web. Flickr groups are routinely full of trolls, jerks and assholes. Even the ones who are tolerable oftentime pride themselves on abusing other community members with their snide, disparaging comments. They think it’s cool to be “snarky.” On Google+ these people are routinely dismissed and blocked and the overall tone is far more positive.

10. Mobile tools. Google+ wins Earlier this week Flickr rolled out a new version of their iPhone app that has a simple thread reader for Flickr groups. The app is AWESOME by the way. When Google+ rolled out communities last week they did not have support for mobile, but today they added it for both iPhone AND Android. I would suspect that a group thread reader will be coming to a future Android app for Flickr.

11. Group/Community recommendation. Google+ wins. On Flickr I am recommended groups that are years old, super dead and with zero activity in them. These are old groups that some Flickr employee chose to highlight years ago. By contrast on G+ I’m recommended communities that really are personally directed and targeted towards me. These are communities that are thriving and active. I’m guessing that there may be some Google curation of these recommendations, but what I’m seeing feels much more algorithmically based and the algorithm recommending communities on G+ feels super smart and personalized to me.

12. Hangouts. Google+ wins. From time to time you will want to get more involved with the members of your community than just discussion threads. With Google+ you can hold a hangout and do live video/voice interaction with other members through Google’s hangout feature. Flickr doesn’t have anything like this.

13. SEO. Google+ wins. While both Google+ and Flickr offer you private communities with an option to not index the community for the web, both also allow public communities that can be indexed for the web. With any public community you will want to have your community index well in search on the web. Google promotes Google+ posts by the people that you follow — if you are searching for a group on the web, there is a much better chance that you will find groups by your friends on Google+. Already my new Light Box group indexes for the first page search results for Light Box when I search regular Google and am logged in. Personalized search gives your group an advantage for being found on Google by your contacts and friends.

The final verdict? Google+ communities win. In my opinion Google+ communities are far more engaging, active, positive places to hang out than Flickr groups. As much as I enjoyed Flickr groups in the past, I think all of my community time going forward will be happening on Google+ instead. While I’m optimistic that team Flickr can/should create a better group experience for users, it may be too little too late at this point.

While Flickr does have Google+ beat on some important features like thread bumping and photo pools, these features are not enough to make up for the current velocity and dynamic advantage that Google+ communities have. Social photographers have been leaving Flickr groups over the past few years as they’ve been setting up camp at G+. Now G+ gives them the one thing that they missed from Flickr, a solid community experience. I suspect that communities on G+ will only get better and better in the weeks ahead. Google+ tends to release things in beta form, bugs and all, and then iterate very rapidly. I’m confident that some of their limitations today will be improved in the future. Hopefully they even give us thread bumping and photo pools like Flickr. :)


Thomas Hawk Digital Connection

 
Comments Off on Thinking of Starting a Photo Community on the Web? Should You Do It on Flickr or Google+?

Posted in Photography


Ah! My Goddess – Ah! Taking an Examination of Love; Starting with a Deviation Value of 30!

04 May

Keiichi rents a movie from a local video store. When he tries to watch the film, a mysterious woman appears on his television screen. The woman identifies herself as Urd, Belldandy’s older sister. She tries to move Keiichi’s romantic intentions forward, and slips him a controlling love potion.

**ThAnKyOu SO MUCH FOR COMMENTING/RATING/SUBBIN/FAVIN** Sundays are cool cause shout outs rule!–XoXo–BLT 🙂 STARRING/EVERYTHING DONE BY Brittani Taylor ANIMATION BY www.youtube.com CHECK OUT MY COOL SHIRTS! (USA and Beyond) www.brittanilouisetaylor.spreadshirt.com (UK and EUROPE) http (EMAIL me pics of you wearing my shirts to brittanilouisetaylorfans@gmail.com) TWITTER www.twitter.com WEBSITE www.brittanilouisetaylor.com MY OTHER CHANNELS http www.youtube.com DAILYBOOTH www.dailybooth.com FACEBOOK www.facebook.com MYSPACE www.myspace.com MUSIC UK Tube www.audiomicro.com Paris Love www.audiomicro.com Kitsch www.audiomicro.com Bubblegum 60 Cut www.audiomicro.com