RSS
 

Posts Tagged ‘Speed’

4 Not-so-Secret Tricks to Speed up Your Lightroom Workflow

22 Jan

Lightroom_iconDo you want to speed up your Lightroom workflow? You’re not alone – I get countless requests from people to help them optimize their photo processing workflow. However, because it is so commonly asked, it is also frequently answered and this makes it difficult to add a fresh spin on a topic that hasn’t changed much over the years.

One of the great things about dPS is the diverse nature of its writers and how we each have our own point of view, own skill set, and own way of explaining a topic. This post won’t be a groundbreaking reveal of some hidden secrets that I just uncovered in Lightroom yesterday, but rather an explanation of some commonly overlooked and ignored features of Lightroom that you’ll want to learn in order to speed up your workflow.

Speed up your Lightroom workflow

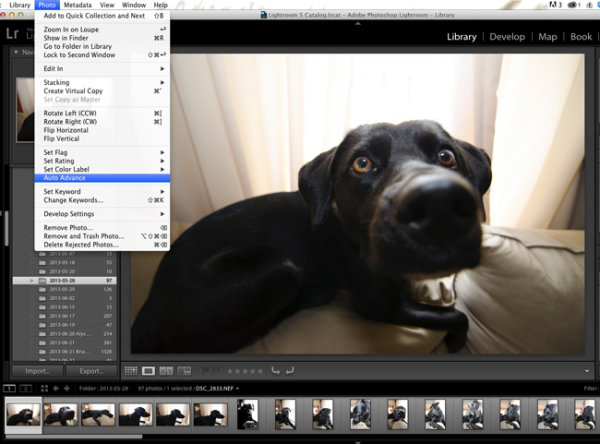
#1 – Auto Advance rating option

This is something that I would have preferred Adobe set to “ON” as default and then give you the option to turn it off if you choose. How many of you rate your photos by selecting a rating, and then pressing the arrow right key to advance to the next photo?

Do that no longer! Simply turn on Auto Advance either by selecting it from the drop down menu under ‘Photo’ or simple turn on CAPS LOCK. Once activated Lightroom will advance you to the next photo in the queue after every successful rating. It’s amazing how fast you can get through a fresh import with this option turned on.

Lightroom workflow use auto advance

#2 – Start with a YES or NO rating system

I like to think of this as keeping it simple. There are so many different rating options (from flags, to stars, to colors) and while each one serves a purpose, I think it’s best to keep it simple the first time you import a new set of photos. Remember tip #1 above and active Auto Advance, and then use the keys ‘P’ or ‘X’ to rate your photos. ‘P’ tells Lightroom that you want to keep that photo and it is flagged as a “Pick”. ‘X’ tells Lightroom that you want to reject that photo, and it is marked as such. Once you’ve made it all the way through your import, press Command + Delete (control on PC). This will remove all of your rejected photos, never to be seen again. (choose “delete from disk” to not only remove from your LR catalog but delete from your hard drive)

I find that this will help to keep your Library cleaner, and easier to manage. It will also allow you to remove a lot of the ‘maybe-I’ll-use-this-photo-sometime’ photos which in most cases just end up wasting your time.

Lightroom-workflow-keep-it-simple

#3 – Learn and use the magic keyboard shortcuts

I’ve already mentioned a couple of the keyboard shortcuts above, but the master list is only a shortcut away. Press Command / (Control / on PC)  in any panel of Lightroom and the index of everything possible within that window is displayed. It’s one thing to learn the keys, and it’s another to work them into your workflow (I’m still slowly learning to do this myself), but once you get it down you will be flying through the panels without even thinking about it.

Lightroom-workflow-learn-keyboard-shortcuts

Press: Cmd / (Control / on PC) to get this to pop up

#4 – Use Solo Mode on the side panels

Another Lightroom setting that I personally feel should have been set as a default option is the Solo Mode option for the various tool panels of Lightroom. This option allows you to automatically minimize a panel when you open another one. For example, if you’re working in the Basic Tab of the Develop Module and want to switch to work on sharpening your photo, clicking on the Detail Tab, Lightroom will automatically close the Basic Tab for you. I find that this keeps the interface a lot cleaner and easier to navigate, especially for someone who’s just starting to get their feet wet with the program (or using a small screen or laptop)

To turn it on simply right click on any of the sidebar panel names (not the triangle) and select ‘Solo Mode’ from the menu that appears. Once activated you’ll probably never go back.

Speed-up-lightroom-workflow-solo-mode

How do you speed up your Lightroom workflow?

These four tips will certainly help you become faster at working through your photos, but there are countless other ways to speed up the way you work. If you are well experienced with Lightroom, what else can you think of to add to this list?

For more Lightroom reading check out these articles:

  • How to Upload Photos to Flickr and 500px using Lightroom 5
  • Lightroom Tips for the Develop Module – the Magic Alt Key
  • Creative Ways to use Keywords in Lightroom 5
  • Use Lightroom Collections to Improve your Workflow

The post 4 Not-so-Secret Tricks to Speed up Your Lightroom Workflow by John Davenport appeared first on Digital Photography School.


Digital Photography School

 
Comments Off on 4 Not-so-Secret Tricks to Speed up Your Lightroom Workflow

Posted in Photography


Think Tank Modular Components and Pro Speed Belt Review

18 Jan

I’ve said it before and I’ll say it again. There are two kinds of reviews. There are first impressions, “fresh-out-of-the-box” reviews, and there are those (usually more useful) that come later, after the reviewer has had a chance to really put the product through its paces. Considering that I’ve been using the Think Tank Pro Speed Belt and Modular Components for almost ten years, I’d say that this review falls squarely within the second category.

think-tank-modular-components-review-001

The Think Tank Pro Speed Belt, combined with elements of the Modular Component System makes carrying and accessing your gear while on location easier and more convenient.

If you’ve been doing this long enough, you know that the right bag for getting you TO the gig is not always the right bag for getting you THROUGH the gig. You event photographers know what I mean. Whether it’s sports, concerts, weddings, or general location shooting, chances are good that at some point your bag has frustrated the hell out of you. Big and bulky may be great for safe transit, but you need lean and convenient once you’re inside the stadium, arena, or church.

My favorite solution to the problem is the Think Tank Pro Speed Belt with the Modular Component System. If you’ve ever wanted to feel like Batman and have a utility belt of your very own, now’s your chance. Think Tank offers a wide selection of components for the belt, ranging from lens pouches and accessory bags, to a holder for your water bottle. The modular components have more padding and removable inserts than the skin set, but both have their pros and cons (e.g., heavier and more protection vs. lighter and less protection).

Note: I should note that in the almost ten years since I started using this system, Think Tank has introduced Version 2, slightly updating each of the components. The pieces you see in the photos are from Version 1, but all are available in the newer models.

This review covers only the six modular components I actually own. I’ve never used all six at once. Just like I have different camera bags for different types of assignments, I can tailor the belt and its components in the same way. All have the high-quality construction I’ve come to expect from Think Tank, from the water-resistant materials and stitching, to the durable zippers and padded inserts. All components have their own removable rain covers, and are designed to either rotate freely around the bag (perfect for redistributing the weight when necessary), or be “locked” in place via the loops on the belt.

The Belt

Made of nylon webbing, three-ply bonded nylon thread, and high-density closed cell foam, the belt is comfortable, durable, and comes in four sizes.

think-tank-modular-components-review-002

Modular components can either rotate freely around the belt, or be “locked” in place using the loops around the padded section.

Speed Changer

The Speed Changer is an incredibly versatile bag, and is my favorite belt component. It’s a bit deceptive-looking, actually capable of holding quite a bit more than it would seem from a quick glance at the outside. This is where I usually pack extra memory cards and batteries, as well as my cell phone, business cards, notebook, pens, lens cloth, energy bar, and more. Removing the padded insert allows enough space for a pro-sized DSLR body without a lens attached and a few small accessories. This is also a great belt pouch for assistants, who are often in charge of keeping spare batteries and accessories close at hand.

think-tank-modular-components-review-005

The Speed Changer is a multi-use pouch that can hold a wide array of necessary accessories.

Lightning Fast (Strobe Stuff in V2)

The Lightning Fast is a pouch designed to hold a standard speedlight (Nikon SB900, Canon 600EX) with the included diffuser attached.

think-tank-modular-components-review-004

The Lightning Fast (Strobe Stuff) holds a professional speedlight with diffuser attached, and has a pocket for extra batteries.

Lens Changer 50

The Lens Changer 50 is designed around wide-angle lenses like the 16-35mm f/2.8 or 17-40mm f/2.8. It’s a great pouch for carrying the lens with either caps and hood in their closed and reversed positions, or with the lens hood in its shoot-ready position.  As shown in the photo, I also occasionally use the LC50 for my 70-200mm f/2.8. It doesn’t fit completely–especially not with the hood in a shoot-ready position–but it still works well when I’m trying to travel light.

think-tank-modular-components-review-010

The LC50 is designed for wide-angle lenses, but can securely hold a 70-200mm as well.

Lens Changer 35

The LC35 is almost identical to the LC50, and holds my 24-70mm f/2.8 with the lens hood in its shoot-ready position.

Lens Changer 75 Pop Down

The LC75 is the one lens pouch in the line that is expandable. In its shorter size, it holds the 70-200mm f/2.8 with the hood reversed. By unzipping the bottom, the pouch expands to accommodate the lens with the hood in its shoot-ready position.

think-tank-modular-components-review-007

The LC75 Pop Down (worn in the middle in this photo), is expandable, able to hold the 70-200mm lens with the hood in the shoot-ready position. The Lens Drop (to the left of the LC75) is a versatile pouch with many uses.

Lens Drop

Don’t let the name worry you. The Lens Drop is a very secure and versatile pouch. Designed primarily for standard zooms and small primes, I’ve used it for every thing from lenses to small water bottles. Most of the time, though, I keep it empty. It gives me a place to put the lens that just came off the camera until I get the new lens on the camera. Without an empty pouch on the belt, I’d have to stop and find someplace to put the lens down until I had a free pouch for it. Keeping an empty pouch available lets me change lenses while I’m on the move. The Lens Drop is pictured above, directly to the left of the LC75 Pop Down.

Also Available But Not Pictured

  • Lens Changer 15 – Great for small primes, teleconverters, and most kit lenses with hood in shooting position.
  • Lens Changer 25 – Holds a regular zoom like the 24-70mm with hood reversed.
  • R U Hot? – Holds a large water bottle (Not included).
  • Stuff It & Little Stuff It – Perfect for small accessories and personal items.
  • Digital Holsters – Available in five sizes, the holsters carry bodies with lenses attached.

My favorite configuration of the bag is the Speed Changer for accessories and the Lightning Fast (Strobe Stuff in V2.0) for my speedlight. I’ll also add on the appropriate lens pouch for whatever back-up I’m carrying. If a traditional shoulder bag or backpack is giving you fits once you get to the shoot, consider the Think Tank Modular Components and Pro Speed Belt for a more convenient and even distribution of the weight around your waist, and for keeping everything at your fingertips.

Just like Batman.

The post Think Tank Modular Components and Pro Speed Belt Review by Jeff Guyer appeared first on Digital Photography School.


Digital Photography School

 
Comments Off on Think Tank Modular Components and Pro Speed Belt Review

Posted in Photography


Toshiba ups capacity and speed of its Wi-Fi SD card

15 Nov

flash-air-marquee-hero.png

Toshiba expanded its lineup up of Wi-Fi enabled SD memory cards with a high capacity 32GB FlashAir II model. The new 32GB card boasts Class 10 speed compared to the previous model’s Class 6 speed. The FlashAir II card features a new ‘Internet pass thru mode’ that enables users to access the card and Internet simultaneously – enabling the ability to upload images in real-time. Learn more

News: Digital Photography Review (dpreview.com)

 
Comments Off on Toshiba ups capacity and speed of its Wi-Fi SD card

Posted in Uncategorized


Need the speed? Sigma 18-35mm F1.8 DC HSM in-depth review

02 Sep

18-35-news.png

Sigma’s 18-35mm F1.8 DC HSM has generated a lot of excitement since its announcement in April, as the fastest zoom ever made for SLRs. Designed for use on APS-C / DX format cameras, it offers a 28-54mm equivalent zoom range, and promises similar depth of field control to an F2.8 zoom on full frame. But can an F1.8 zoom really work? Read our detailed review to find out.  

News: Digital Photography Review (dpreview.com)

 
Comments Off on Need the speed? Sigma 18-35mm F1.8 DC HSM in-depth review

Posted in Uncategorized


Metabones introduces Nikon G-type Speed Booster for NEX and Micro Four Thirds

04 Jul

mb_spnfg-e-bm1_06.png

Metabones has introduced Nikon G-type versions of its Speed Booster lens adapter for Micro Four Thirds and Sony NEX cameras, which include a control ring for aperture setting with lenses that don’t have aperture rings of their own. The Speed Booster itself is a lens adapter that that reduces the focal length by a factor of 0.71x, and increases the maximum aperture by 1 stop, effectively allowing lenses to give very similar angle of view and depth of field control on APS-C mirrorless cameras as they do on full frame. The Nikon G-type adapters are available to buy now for $ 429 from Metabones’ website. 

News: Digital Photography Review (dpreview.com)

 
Comments Off on Metabones introduces Nikon G-type Speed Booster for NEX and Micro Four Thirds

Posted in Uncategorized


Metabones delays shipment of ‘Speed Booster’ for Micro Four Thirds

13 Apr

speed-booster-front.png

Metabones has announced the schedule for the Micro Four Thirds version of its innovative ‘Speed Booster’ lens adapter has slipped to the second half of 2013. Like the existing version for mounting Canon EF lenses on Sony NEX cameras, the forthcoming version will allow the use of full-frame lenses, reducing the focal length by a factor of 0.71x and increases the maximum aperture by 1 stop. The Micro Four Thirds version will give a 1.4x overall ‘crop’ – giving a similar field of view to APS-C stills cameras and the Super35mm video format.(via 43rumors)

News: Digital Photography Review (dpreview.com)

 
Comments Off on Metabones delays shipment of ‘Speed Booster’ for Micro Four Thirds

Posted in Uncategorized


First Impressions: Metabones Speed Booster lens adapter

01 Feb

speed-booster-front.png

The recently released Metabones Speed Booster is a unique lens adapter that promises near-full frame coverage on an APS-C camera and an extra stop of light gathering ability to boot. Intrigued not only by the actual product, but by the potential of the technology behind it, we spent a few days with the Speed Booster, a Sony NEX-6 and our favorite Canon EF lenses. Here’s what we found.

News: Digital Photography Review (dpreview.com)

 
Comments Off on First Impressions: Metabones Speed Booster lens adapter

Posted in Uncategorized


Casio releases Exilim EX-ZR700 and EX-ZR400 High Speed compacts

30 Jan

casio.png

Casio has announced two additions to its High Speed Exilim series, the EX-ZR700 and EX-ZR400. The EX-ZR700 uses a 16.1 MP back-illuminated CMOS sensor, 3 inch LCD and a stabilized 18x, 25-450mm equivalent optical zoom lens. The EX-ZR400 is similar to its predecessor the EX-ZR300, inheriting its 16.1MP BSI-CMOS sensor and 24-300mm equiv. lens, and comes equipped with a long-lasting battery promising 515 photos on a single charge. Both cameras feature the company’s latest Exilim Engine HS 3 processer and new shooting modes including a Premium Auto Pro and an All-In-Focus Macro mode. There is currently no information available about their price and availability.

News: Digital Photography Review (dpreview.com)

 
Comments Off on Casio releases Exilim EX-ZR700 and EX-ZR400 High Speed compacts

Posted in Uncategorized


Lesson 2 – Shutter Speed (Tutorial about Photography)

26 Jan

In this lesson about photography we will talk about shutter speed and i will show you examples on how the slow or fast shutter speed is used. I hope you will enjoy my photography tutorials and can learn how to use your camera better. Music: Kevin MacLeod. (Licensed under Creative Commons “Attribution 3.0”)
Video Rating: 4 / 5

We’ve added a live demonstration of light modifiers for users to see a huge difference how modifiers can do to manipulate a single light source, within the video; many light modifiers had been compared, watch it and see if the video can help you on your decision making. Equitments Lowel Tota-light Lowel Omni-light Linco Fluorescent Light


Longboarding Races, Maryhill Festival of Speed 2011

24 Jan

Maryhill – a dream hill. Whether it’s the (now) bi-annual Maryhill Freerides with hundreds of your friends or the IGSA Maryhill Festival of Speed, it just seems to never get old. Rayne headed out to the IGSA 2011 Abec 11 Marhill FOS and caught up with some of our team and friends for an epic weekend of skating and racing. Watch for Mike Slota, Jake Fast, Cameron Frazier, Luke Melo, Spencer Smith, Michael Bowditch, Dominique Vokurep and Graham Buksa while they push for the podium. Graham takes 4th in the open, with Dom 3rd in Ladies. Introduction voiceover by Rayne rider Cam Frazier, videography/editing by Spencer Smith. Shot on a Nikon D7000. Song: Straight Heat by edIT.
Video Rating: 4 / 5

In this photography tutorial I will summarize everything about aperture, shutter speed and ISO and how they work together to get a good exposure. I will show you an example how aperture influents a DOF and and shutter speed influents moving subject. Music: Kevin MacLeod. (Licensed under Creative Commons “Attribution 3.0”)
Video Rating: 4 / 5