RSS
 

Posts Tagged ‘Software’

Nikon updates software suite to accommodate D7500 – and fix some bugs

31 May

Nikon is preparing for the imminent shipping of its latest APS-C sensor DSLR by issuing updates to some of its supporting software applications. New versions of Capture NX-D, Camera Control Pro, ViewNX-i and Picture Control Utility have been made available in readiness for the Nikon D7500, which will begin to be distributed in early June in some regions.

Most of the updates deal principally with compatibility for the new camera, but Nikon has taken the opportunity to tackle a few bugs and to make some minor improvements to the user experience as well.

At the same time, new firmware has been issued for the KeyMission 170, which Nikon says makes the connection between the camera and iOS version of SnapBridge more reliable.
For more information, and to download the updates, see the support pages of Nikon’s website.

Manufacturer’s information

Capture NX-D

Changes from Version 1.4.3 to 1.4.5

• Added support for the D7500.
• Added support for Picture Control > Auto.
• Changed the Crop tool 11:7 crop to 10:7.
• Improved thumbnail display quality for JPEG images that contain only small thumbnails.

Fixed the following issues:
– White would print as light grey when Use this profile when printing was selected for Color Management > Printer Profile.
– Capture NX-D would quit unexpectedly if the Retouch Brush tool was displayed in full-screen view.

Camera Control Pro 2

Changes from Version 2.24.0 to 2.25.0

• Added support for the D7500.
• Picture Control Utility 2 can now be launched from a Picture Control > Edit button in the Image Processing panel.

ViewNX-i

Changes from Versions 1.2.4/1.2.5 to Version 1.2.7

• Added support for the D7500.
• Added support for Picture Control > Auto.

Fixed the following issues:
– Facebook login could not be used.
– Images modified using Exposure compensation or White balance with On selected for Auto Red-Eye would sometimes not display correctly.

Picture Control Utility 2

Changes from Version 2.2.2 to 2.3.0

• Added support for the D7500.
• With the release of Camera Control Pro 2 version 2.25.0, Picture Control Utility 2 can now be launched using the Edit button next to Picture Control in the Camera Control Pro 2 Image Processing panel.

KeyMission 170 Firmware

Changes from Firmware Version 1.1 to 1.2

• Made improvements regarding an issue which resulted in connections between the camera and iOS 10.2-compatible versions of the SnapBridge 360/170 app becoming unstable.

Note: Users of iOS 10.2 will also need to upgrade the SnapBridge 360/170 app to the latest version, which supports iOS 10.2.

Articles: Digital Photography Review (dpreview.com)

 
Comments Off on Nikon updates software suite to accommodate D7500 – and fix some bugs

Posted in Uncategorized


Fujifilm releases firmware updates for several cameras and software products

26 May

Fujifilm has released firmware updates for its camera models X-T2, X-Pro2, GFX 50s, X-T20, X100F and X-T1. The links below include download links for the updated camera manuals and full details about the updates:

  • Fujifilm X-T2 Firmware ver. 2.10
  • Fujifilm X-Pro2 Firmware ver. 3.10
  • Fujifilm GFX 50s Firmware ver. 1.10
  • Fujifilm X-T20 Firmware ver. 1.01
  • Fujifilm X-T1 Firmware ver. 5.20
  • Fujifilm X100F Firmware version 1.01

In addition Fujifilm has provided updates to several of its software products:

  • Tethered Shooting Software HS-V5 for Windows Ver.1.6
  • Tethered Capture Plug-in for Adobe Photoshop Lightroom Ver.1.6 (Windows / Macintosh)
  • Fuji X Aquire + PC AutoSave

Articles: Digital Photography Review (dpreview.com)

 
Comments Off on Fujifilm releases firmware updates for several cameras and software products

Posted in Uncategorized


Google software engineer shows what’s possible with smartphone cameras in low light

27 Apr
Image: Florian Kainz/Google

On a full moon night last year, Google software engineer Florian Kainz took a photo of the Golden Gate bridge and the City of San Francisco in the background with professional camera equipment: a Canon EOS-1D X and a Zeiss Otus 28mm F1.4 ZE lens. 

When he showed the results to his colleagues at Google Gcam, a team that focuses on computational photography, they challenged him to re-take the same shot with a smartphone camera. Google’s HDR+ camera mode on the Google Nexus and Pixel phones is one of Gcam’s most interesting products. It allows for decent image quality at low light levels by shooting a burst of up to ten short exposures and averaging them them into a single image, reducing blur while capturing enough total light for a good exposure. 

However, Florian being an engineer, wanted to find out what smartphone camera can do when taken to the current limits of technology and wrote an Android camera app with manual control over exposure time, ISO and focus distance. When the shutter button is pressed the app waits a few seconds and then records up to 64 frames with the selected settings. The app saves DNG raw files which can then be downloaded for processing on a PC. 

He used the app to capture several night scenes, including an image of the night sky, with a Nexus 6P smartphone, which is capable of shutter speeds up to 2 seconds at high ISOs. On each occasion he shot an additional burst of black frames after covering the camera lens with opaque adhesive tape. Back at the office the frames were combined in Photoshop. Individual images were, as you would expect, very noisy, but computing the mean of all 32 frames cleaned up most of the grain, and subtracting the mean of the 32 black frames removed faint grid-like patterns caused by local variations in the sensor’s black level.

The results are very impressive indeed. At 9 to 10MP the images are smaller than the output of most current DSLRs but the photos are sharp across the frame, there is little noise and dynamic range is surprisingly good. Getting to those results took a lot of post-processing work but with smartphone processing becoming even more powerful it should only be a question of time before the sort of complex processing that Florian did manually in Photoshop can be done on the device. You can see all the image results in full resolution and read Florian’s detailed description of his capture and editing workflow on the Google Research Blog.

 Image: Florian Kainz/Google

Articles: Digital Photography Review (dpreview.com)

 
Comments Off on Google software engineer shows what’s possible with smartphone cameras in low light

Posted in Uncategorized


Ricoh releases Pentax 645Z and K-1 firmware updates and IMAGE Transmitter 2 software v2.3

22 Apr

Ricoh Imaging has released new firmware for its Pentax 645Z medium format camera and K-1 full-format DSLR. The new firmware makes the cameras compatible with the also freshly released version 2.3 of the company’s IMAGE Transmitter 2 software package.

The latter allows the cameras to  be controlled when tethered to a PC or Mac via USB cable and after the update now offers a range of new tethered control options, including drive mode, white balance, image format, size and quality, memory card slot selection, live view magnification and focus fine adjustment in live view. 

As before, you can also adjust essential settings, such as  aperture, shutter-speed, ISO and exposure compensation, or trigger the shutter. Image Transmitter 2 version 2.3 as well as firmware version 1.41 for the K-1 and 1.23 for the 645Z are now available to download on the Ricoh Imaging website.

Articles: Digital Photography Review (dpreview.com)

 
Comments Off on Ricoh releases Pentax 645Z and K-1 firmware updates and IMAGE Transmitter 2 software v2.3

Posted in Uncategorized


Datacolor updates Spyder5 calibration software to add auto ambient light switching

30 Mar

Calibration company Datacolor has updated the Spyder5 software package that accompanies its Spyder5 monitor calibration devices for Pro and Elite customers. The update sees the packages renamed Spyder5Pro+ and SpyderElite+ to indicate that both now feature automatic ambient light switching and what the company calls 1-Click Calibration. The ambient light feature relies on the Spyder5 calibration device recognising that the lighting conditions in the monitor room have altered to trigger a different monitor profile. In previous versions users had to remember to make the adjustment manually.

The new 1-Click Calibration system is really a 1-click solution for monitors that have already been calibrated by the device before, and allows the re-calibration with a single click without having to go into the menu system. Both versions of the software also provide more in-depth control of saved profiles through an extra profile management tool.

The Elite package additionally offers a better soft-proofing workflow as well as Enhanced StudioMatch which helps users to calibrate multiple monitors so they all look the same.
For more information, including pricing for upgrades for each of the packages, see the Datacolor website.

Press release

Datacolor Announces Spyder5+ Software Upgrade with Enhanced Display Calibration Features

Datacolor®, a global leader in color management solutions, today announced the release of Spyder®5+, the next generation software expertly designed to build upon its popular color calibration tools for photographers, designers, videographers and imaging professionals.

“Spyder5 is already an amazing tool for getting the best color out of your display. With the Spyder5+ upgrade, Datacolor has added several really nice features that are an absolute no-brainer for the price,” said David Cardinal, professional photographer and Datacolor Friend with Vision. “I’ve been using the new capabilities and am really pleased with how much time they’ve saved me, as well as the additional productivity they’ve provided.”

The software upgrade is now available for all existing and new Spyder5 customers, with the option to purchase Spyder5PRO+ or Spyder5ELITE+. Spyder5+ adds unique features to the Spyder5 calibration tools by enhancing users’ digital color workflow, including:

* Automatic Room Light Switching ensures users’ monitor profile changes as the room light conditions shift, with no user interaction required
* 1-Click Calibration streamlines a user’s workflow with a single click to start the calibration without having to re-select saved settings
* Profile Management Tool gives users the ability to edit, remove, rename, locate, and activate each display profile for ultimate control and flexibility

Users who purchase the Spyder5ELITE+ upgrade will have access to all of the above features, in addition to:

* Spyder SoftProof improves “Screen-to-Output” matching with a new workflow to simulate how photos will look on any printer or device – including home printers, online or retail printers, and certain mobile/tablet devices
* Enhanced StudioMatch verifies precise monitor matching and takes the guess work out of making all connected displays look the same – including a new visual verification step that assists you by fine tuning your results

“We’re very excited to add this upgrade to our Spyder5 product line. This new software offers unique tools to ensure color management across all devices, so our customers can remain confident in their decision to choose Datacolor for their color calibration needs,” said Stefan Zrenner, Director Global Sales & Marketing Imaging, Datacolor. “With a competitive set of features, Spyder5+ is the perfect tool for creatives that rely on consistency in their work.”

New and existing Spyder5 customers wishing to purchase the Spyder5+ software add-on can find out more and buy via the Datacolor website. Upon software purchase, customers will receive a software serial number and a step-by-step guide for easy download.

Articles: Digital Photography Review (dpreview.com)

 
Comments Off on Datacolor updates Spyder5 calibration software to add auto ambient light switching

Posted in Uncategorized


Gcam: the story behind the Google Pixel camera software

28 Mar

Google’s now independent X research division, which calls itself ‘the moonshot factory,’ has been publishing a collection of stories about the group’s graduated projects and where they stand today. The latest article in the so-called Graduate Series offers a closer look at Gcam, the software behind the class-leading cameras in Google’s Pixel devices. 

The blog post outlines how the Gcam team was set up back in 2011 to find a solution for the Google Glasses smart goggles’ most pressing challenge: providing a high-quality camera in a very small device. As using bigger hardware wasn’t an option, the Gcam team developed a method called image fusion, which uses multi-frame-stacking techniques to create a single, higher quality image with lower noise levels, better detail and increased dynamic range. 

The technology, which is now called HDR+, quickly grew beyond Google Glass and made it into the Nexus 5 and Nexus 6 cameras and eventually became the default camera mode in the Google Pixel series. The Gcam team now works across a range of imaging-related technologies, including Android, YouTube, Google Photos 360?Virtual Reality projects. If you are interested in more detail you can read the full blog entry on the X blog or find our full Google Pixel XL camera review here.

Articles: Digital Photography Review (dpreview.com)

 
Comments Off on Gcam: the story behind the Google Pixel camera software

Posted in Uncategorized


Overview and Impressions of the new Macphun Luminar Software

16 Feb
Macphun Luminar

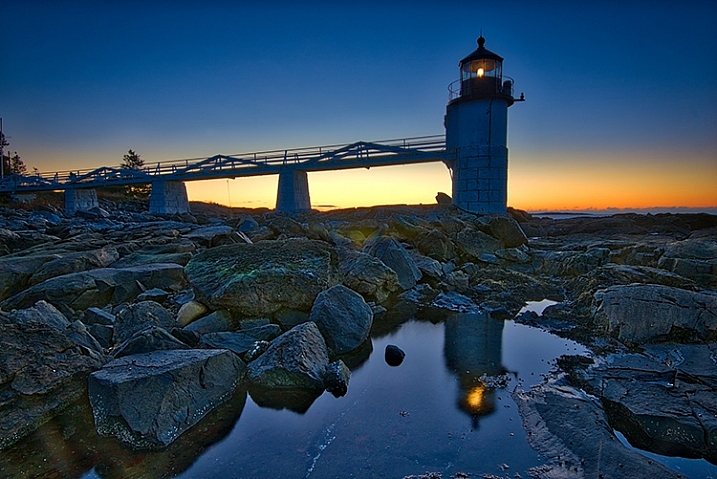
An image edited using Macphun Luminar image editing software.

At some point, after you pick up your first digital camera, the question of image editing arises. For years, the leader has been Adobe with their package that includes Lightroom and Photoshop. However, lately, other software companies have been dipping their toes in the waters of image editing applications. One of the latest is MacPhun, makers of the Macphun Creative Kit.  Their entry into image editing, available for Mac OS X based computers only, is called Macphun Luminar.

Luminar is a standalone application for nondestructive RAW processing and image editing, but can also be used as a plugin for Lightroom, Photoshop, Aperture, and Apple Photos. The application window and tools available are identical whether it runs as a standalone or as a plugin.

Overview

When opening Luminar, you’ll be presented with a window that gives you two options; Load Image or Batch Processing.

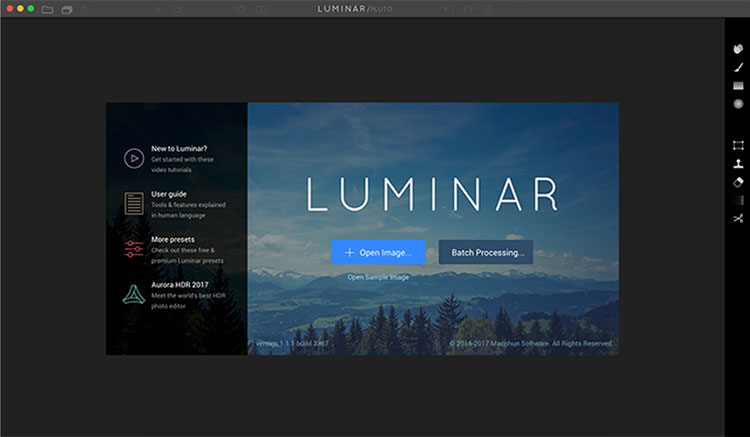
Luminar opening screen

Macphun Luminar workspace

Luminar’s workspace is clean and easy to navigate.

Selecting Batch Processing allows you to drag and drop images, or load them from folders on your computer. You’ll then be prompted to choose certain settings such as a preset to apply (more on the presets later), as well as where you would like the images saved, what type of file to save as, resizing, and file naming. In addition to the opening dialog, Batch Processing is also available from the File menu within the application.

I’m a little disappointed that I can’t see a preview of the preset I’m applying to the batch, but overall, the process is easy to understand and runs pretty efficiently.  I processed a batch of 24 RAW images in just under three minutes on my late 2013 iMac.

The other option you see when starting up Luminar is “Load Image”. This allows you to open a single file and edit it to your liking, and then export it in any number of ways. I kind of wish Luminar had a file browser to allow me to view thumbnails, rather than just the “Load Image” dialog.

Workspaces

Macphun Luminar Portrait Workspace

You can change the workspace according to your subject matter. For instance, selecting Portrait brings up a different set of tools than does Landscape, or Street.

You can customize the application by using one of the workspaces available, which automatically brings up a set of filters appropriate for the subject matter.  The preset workspaces include Black and White, Landscape, Street, and Portrait. You can also create your own workspace based on the filters you find yourself using the most (see above).
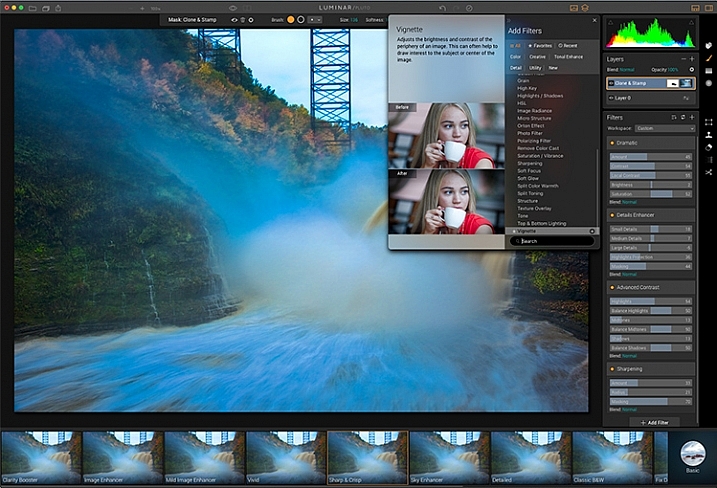
Editing window

Macphun Luminar

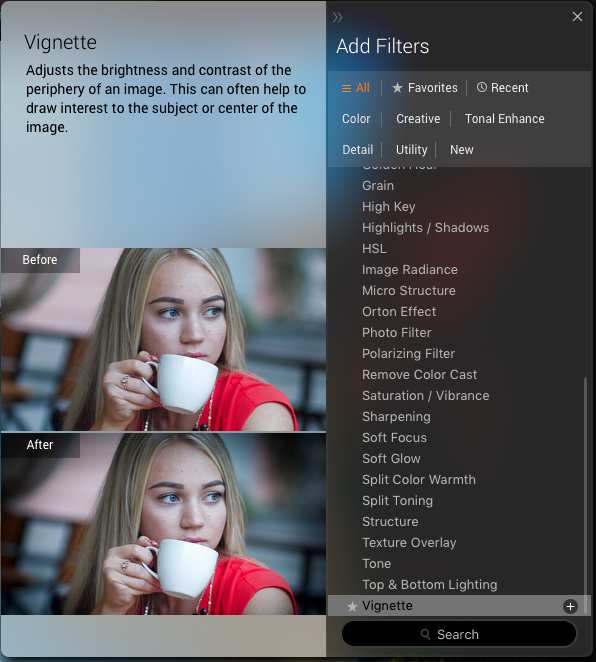
When selecting Add Filter, this window listing available filters appears, allowing you to select from dozens of filters to apply to your image.

Once you have a file opened, you’ll be presented with the editing screen. The main window will show your image. Across the bottom, you’ll see the Preset Panel. This shows various presets that can be applied to your image. In addition to the default presets, Macphun has a selection of preset packs available for download on their website (some are free, some are for purchase). The presets are separated into various workspaces, including Outdoors, Portrait, Street, Dramatic, Basic, and Travel.
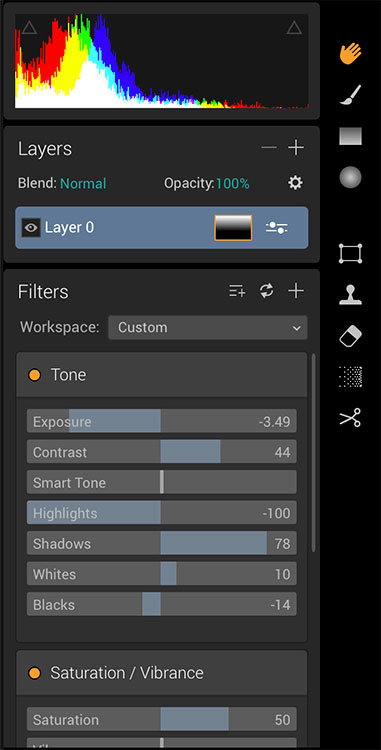
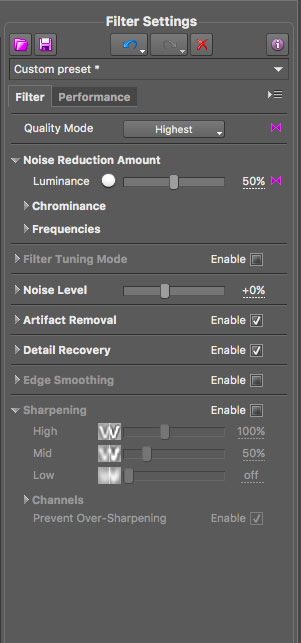
Luminar sliders

On the right side of the screen, you’re presented with the layers panel which shows the different layers you have in your current image. Similar to Photoshop, layers can use different blending modes, and the opacity of each one can be adjusted to give you exactly the look you want. A Transform tool is also available to work with the layers if needed.

Beneath the Layers palette, you’ll find the sliders to adjust the filters currently in use. Each preset uses various filters that can be adjusted using these sliders. You can also create your own look simply by adding the filter or filters of your choice from over 40 available. In addition, each filter has a separate blend mode that can be changed to adjust the look as well.

Macphun Luminar

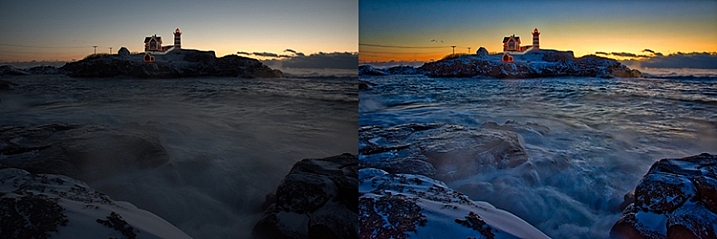
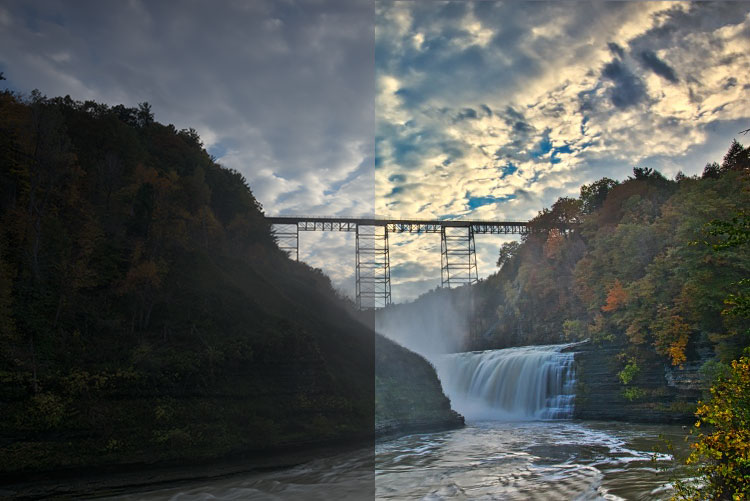
A RAW image before processing with Luminar on the left, and after on the right.

Toolbars and palettes

On the right edge of the screen sits a toolbar, which houses various tools including Move, Masking Brush, Gradient Mask, Radial Mask, Transform, Clone Stamp, Eraser, Denoise, and Crop.

Any of the panels and palettes within Luminar can be shown or hidden with a click of the mouse, making it easy to customize the workspace to your liking.

Luminar-Export-Dialog

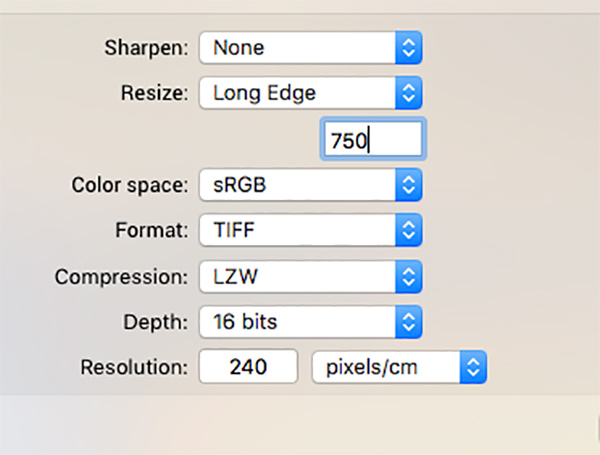
The Luminar Export Dialog

Once you’re done making your edits, Luminar offers an easy interface to share your images to various photo sharing and social media sites, including Facebook, Twitter, 500px, Smugmug, Flickr, Messages, and Mail.

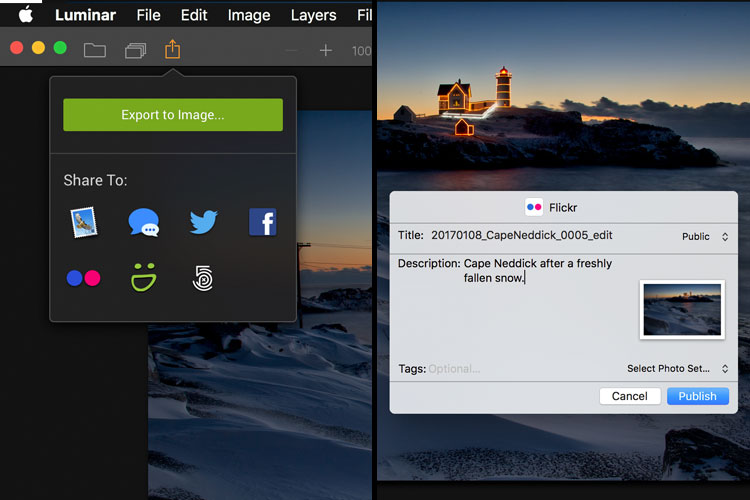
Luminar sharing options.

Macphun Luminar portrait preset

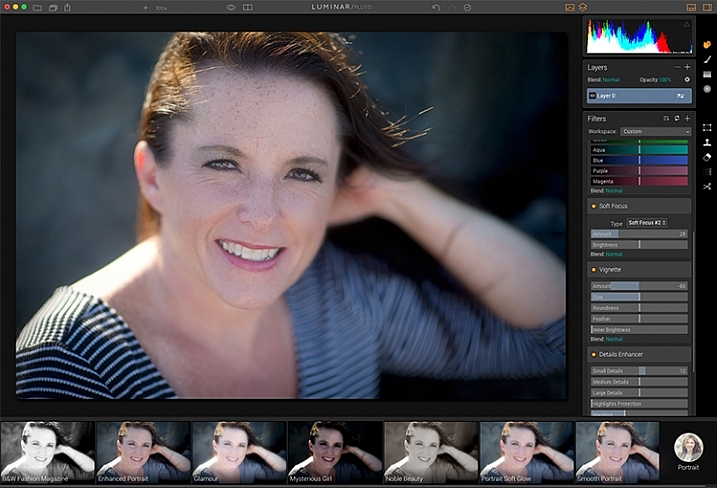
A portrait edited using the Black and White Fashion Magazine preset under the Portrait presets in Luminar.

Pros of Luminar

Macphun’s Luminar, as a standalone application, offers an excellent option for those who don’t want to get involved in a subscription service. Luminar is currently available from Macphun for $ 69, making it an easy way to get started editing RAW photos with a powerful image editor. For those already using Photoshop or Lightroom for their editing, Luminar works as a plugin that provides all of the powerful editing options of the standalone.

Luminar is easy to use, with a multitude of sliders that are pretty self-explanatory and provide for fine control over image effects. In a very short amount of time, you can be editing your RAW files and exporting finished images in a variety of formats, including TIFF, JPEG, PNG, GIF and PSD. If you’re familiar with MacPhun’s interface in the Creative Kit, Luminar will be easy to figure out.

I found the quality of the images edited in Luminar to be excellent, but as in Creative Kit, I thought some of the presets needed to be dialed back a bit for the best results. The variety of effects and options available really lets you customize the look of your images as well. I found some presets to be excellent starting points, but then by adding another filter or two, I was able to get exactly the style I wanted for my image.

Macphun Luminar

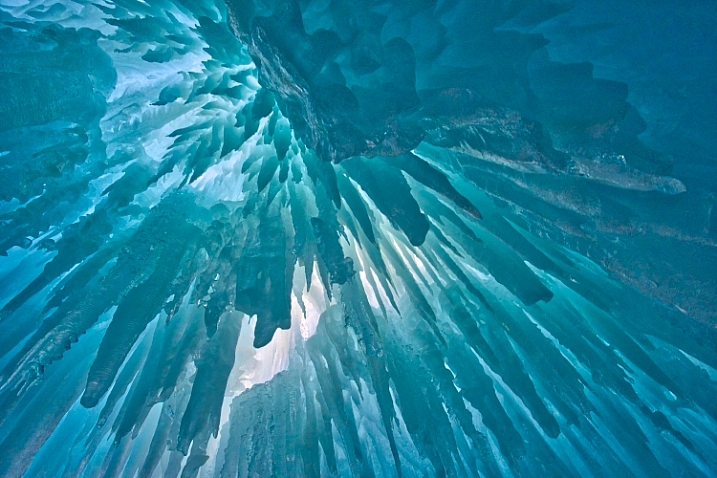
An image edited using MacPhun Luminar.
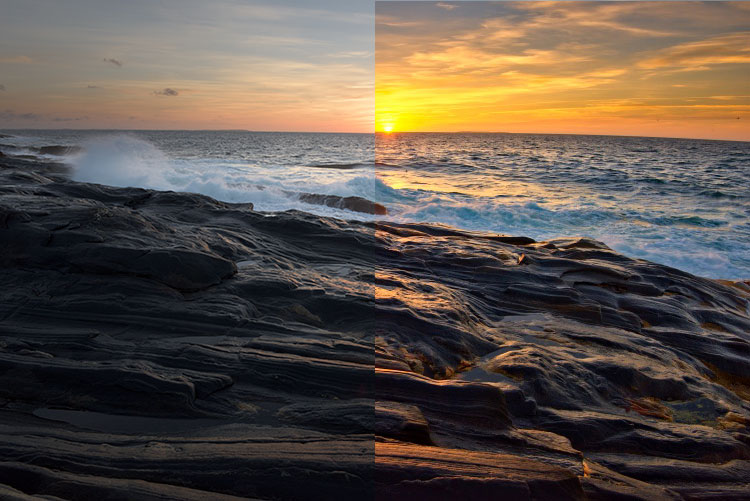
Before/after

Layered files

As of a recent update to the program, there is now the ability to save images as .lmnr files, which will save the layers and work done on an image, so you can come back to it later. A nice feature similar to saving as a layered PSD file. 

Cons of Luminar

As someone who’s used Photoshop for years, I found that some of the tools, such as the clone stamp, worked differently than I expected. This is easily overcome as familiarity with Luminar grows, but it took a little while before I got results I liked.

One other puzzling question is, why isn’t there native support for Macphun’s Creative Kit? MacPhun indicates in their product FAQ that there will be support for plugins eventually, but it would seem to make sense to have that powerful suite of plugins available from Day 1. Once support for plugins is available, Luminar becomes an even better value, in my opinion.

Macphun Luminar

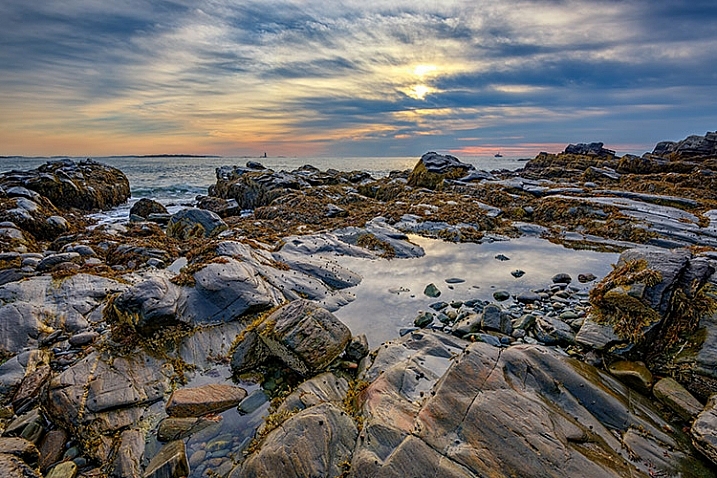
Landscape image edited using Macphun Luminar.

Luminar, while an excellent photo editor and RAW processor, lacks certain tools available in Photoshop, such as the ability to output to CMYK, have multiple print layout options, or add text to an image. While many will never have a need to do any of that, it is a distinction that should be made, especially for those who like to add a watermark to their images being shared online.

Finally, Luminar lacks an asset management component like Lightroom, so for those who like to create catalogs, collections, and add keywords and descriptions to images, you’ll still need to use Lightroom while using Luminar as a plugin.

Macphun Luminar

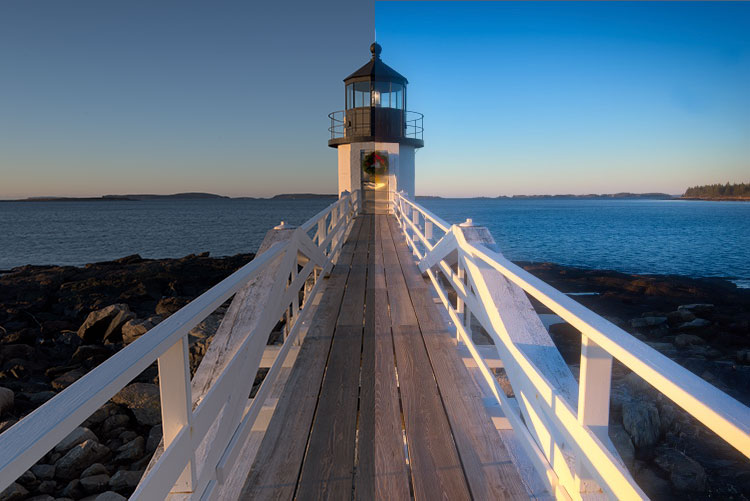
Edited and exported using Macphun Luminar.

Final Verdict

Macphun Luminar has a simple to understand interface and a lot of great features that make it an excellent RAW processing application. Its flexibility to work as either a standalone application or a plugin for Photoshop, Lightroom, and other photo applications means that Luminar will be easy to integrate into your current workflow. My first thought, however, is that its primary market is people who want a powerful photo editor that is simpler to use than Photoshop, without paying a subscription fee every month.

Luminar offers some excellent editing tools, and with over 50 presets, it’s easy to get started towards the look you want. The interface is easy to understand, with self-explanatory sliders clearly marked to allow you to adjust the effect to your liking. If you’re just getting started with processing RAW files and photo editing in general, Luminar is a great choice.

Luminar is available from Macphun’s website for $ 69, for Apple computers only (currently, supposedly a PC version is coming in the future tbd). Here are a couple more before and after images of what you can do with Luminar. Have you tried it? What are your thoughts?

googletag.cmd.push(function() {
tablet_slots.push( googletag.defineSlot( “/1005424/_dPSv4_tab-all-article-bottom_(300×250)”, [300, 250], “pb-ad-78623” ).addService( googletag.pubads() ) ); } );

googletag.cmd.push(function() {
mobile_slots.push( googletag.defineSlot( “/1005424/_dPSv4_mob-all-article-bottom_(300×250)”, [300, 250], “pb-ad-78158” ).addService( googletag.pubads() ) ); } );

The post Overview and Impressions of the new Macphun Luminar Software by Rick Berk appeared first on Digital Photography School.


Digital Photography School

 
Comments Off on Overview and Impressions of the new Macphun Luminar Software

Posted in Photography


CamFi launches Matrix software for multiple camera control

10 Jan

The maker of remote camera controller and image transmitter device CamFi has announced a new software package that allows CamFi users to control and trigger multiple cameras at the same time.

CamFi Matrix is an application for Windows PCs that communicates via a Wi-Fi or cabled network with certain Canon and Nikon DLR cameras and which can be used to preview a shot via Live View. A control panel allows camera settings to be adjusted and focus points to be selected, and once the shutter is tripped remotely the images can be downloaded and viewed. The system allows an unspecified number of cameras to be controlled at the same time, though the company recommends a high-performance router for simultaneously controlling more than ten, and a cabled connection for more than 20. The company suggests that using multiple-camera set-ups will be useful for creating virtual reality images, 3D product shots and panoramas.

To operate with the Matrix software each camera in the system needs its own CamFi unit, and connection is made via a router or cabled Ethernet rather than directly between the PC and the camera – so an existing network is required.

The CamFi units have existed for some time and have previously been used to link cameras to phones and tablets as well as PCs, but only one camera at a time. The software is free for owners of CamFi units.

For more information and to see a list of compatible cameras visit the CamFi website.

Articles: Digital Photography Review (dpreview.com)

 
Comments Off on CamFi launches Matrix software for multiple camera control

Posted in Uncategorized


Scan to CAD: Software Turns Volumetric Snapshots into Usable 3D Models

17 Nov

[ By WebUrbanist in Gaming & Computing & Technology. ]

scan

Bringing a critical gap between 3D scanning technology and functional outputs for architects, designers and homeowners, Canvas can scan a room in minutes then generate useful CAD software files.

Raw scans of spaces can be helpful in terms of generating rough measurements and usable as a baseline for a more rigorous three-dimensional model, but it takes time and energy to translate between the two. So while they are great for point-to-point measurements and as-built drawings, such scans are limited in terms of letting someone rework or envision changes to a structure.

3d-sensor-technology

Occipital, the startup behind Structure Sensor, wants to make that transition smooth, painless and effectively automatic. After a users scans a room (or a whole house) with their iPad, they can send away for CAD files that will be returned in two business days. They can then plug those files into software of choice, like Sketchup, and begin remodeling their space.

3d-design-capture

The company calls their vision “augmented home” and pictures their software and hardware getting increasingly refined over time to the point where on-the-spot shots can be immediately transformed into precise and full-color 3D files.

3d-space-model

“I think we’ll probably look back at today as a time, just like the 1830s, when we just started to have photographs,” says Adam Rodnitzky, the company’s VP of marketing. “We’re now entering the era when we’re going to start having a 3D record of the world around us.”

Share on Facebook


[ By WebUrbanist in Gaming & Computing & Technology. ]

[ WebUrbanist | Archives | Galleries | Privacy | TOS ]


WebUrbanist

 
Comments Off on Scan to CAD: Software Turns Volumetric Snapshots into Usable 3D Models

Posted in Creativity


Review: Neat Image 8 Noise Reduction Software

07 Nov

In the early days of digital cameras, noise was a much bigger problem than it is these days. DSLRs routinely top out at high ISO ratings that film shooters and early DSLR users could only dream of. In those early days (the early 2000s), when ISO 800 was typically the upper usable limit of high ISO, noise reduction software became a must-have for those of us who were post-processing our files and wanted them to look less like sandpaper and more like something we’d be willing to display. Neat Image was one of the first noise reduction applications I used at that time.

Neat Image 8 Review

While it did a nice job, at that time, all noise reduction software was problematic in that it tended to give images an overly smooth, almost plastic or painted look that did a lot of damage in the fine details of an image. Neat Image was no exception in this regard, so I used it sparingly. Over the years, I found myself gravitating to other noise reduction plugins and applications, such as Nik DFine, Topaz DeNoise, and more recently, Macphun’s Noiseless. When I saw that Neat Image had recently been updated to version 8, I was excited to give it a try and see how it stacked up against the others. While Neat Image 8 is available as a standalone app or a Photoshop and Lightroom plugin, I will be focusing on the plugin version, as that suits my workflow better.

Overview of Neat Image 8

Neat Image Profile Screen

Upon opening Neat Image 8, the Device Noise Profile screen is the first thing you see.

Neat Image 8 is a fairly simple software to use, although upon first opening the plugin it can appear a bit confusing. You will be presented with multiple views of the image you are working on; a full-color preview, and the R, G, and B components of the image. There are four buttons at the top left of the screen; Auto Profile, Load Profile, Auto Match, and Auto Fine Tune. In the center are two tabs, Device Noise Profile, which is the tab the plugin starts in, and Noise Filter Settings.

Analyze image

Once the plugin is open, you’ll see the four different versions of your image. The easiest way to get started is to simply click “Auto Profile” and let Neat Image analyze the image. Once complete, a box will highlight the area that Neat Image has selected to use for noise analysis. Neat Image looks for an area with minimal detail for best results. If you select your own area to analyze, make sure it’s an area that contains minimal detail.

Neat Image 8 Adjustment Sliders

These sliders allow you to tweak the noise reduction to your liking after Neat Image has applied the noise profile to the image.

Filter settings in Neat Image

Now that you’ve analyzed the noise levels in the image, you’ll want to click on the Noise Filter Settings Tab. The preview will switch to the full-color image in the center and the R, G, and B channels will disappear. At the bottom left is a zoom toggle to zoom in or out of the image as desired. You’ll also have the ability to change the preview to various other options, including the RGB preview, a Luminance and Chrominance preview, as well as individual channels. Neat Image will then apply the noise filter settings based on the analysis as done above.

You can tweak the settings using the sliders at the right side of the app window. You’ll have the ability to adjust quality, the noise reduction amount, recover detail, smooth edges, sharpen, and fine tune the filter itself. In addition to the sliders, Neat Image comes with some presets, such as Recover Fine Details, Apply Less Noise Reduction, Apply More Noise Reduction, Reduce Noise and Sharpen, and more. You can also create your own presets for future use. These settings put Neat Image among the most customizable noise reduction applications I’ve used.

oaks-neat-image

Pros

For me, noise reduction has always been a love-hate relationship, always battling with a balance between preserving detail and reducing unsightly noise. One of my favorite things about Neat Image is the software’s auto profiling ability, customizing the noise reduction to each image as needed. While Nik Collection’s Dfine 2 also does its own image analysis, it doesn’t offer the customizability that Neat Image does. And Neither Topaz’s Denoise 5, nor Macphun’s Noiseless offer any kind of image profiling, with both requiring you to simply select a preset on your own and go from there.

Neat Image 8 does an excellent job of maintaining detail while reducing noise in an area with little or no fine detail, such as skies.

night-sky-neat-image

Cons

With all the customizability, of course, comes a bit of a learning curve in terms of use. Neat Image does offer tutorial videos on their website to help get you started, but for those of us who are less patient and just want to dive in, it can be frustrating. I had one or two false starts when I first downloaded Neat Image 8, before finally going to their video tutorial to give me a jumpstart.

Neat Image 8 side-by-side comparison.

Side by side comparison of an image shot at ISO 2500, before and after Neat Image 8.

Conclusion

Ultimately, the ability to auto profile an image, adjust settings to personal taste, and use presets for repeatability of noise reduction, makes Neat Image an excellent choice for photographers who battle noisy images for any reason, including shooting long exposures, low light photography, or high iso photography such as indoor sports, events, or weddings. Neat Image is available starting at $ 39.90 per license.

lighthouse-neat-image-v8

neat-image-comparison

leaf-neat-image

leaf-neat-image-comparison

googletag.cmd.push(function() {
tablet_slots.push( googletag.defineSlot( “/1005424/_dPSv4_tab-all-article-bottom_(300×250)”, [300, 250], “pb-ad-78623” ).addService( googletag.pubads() ) ); } );

googletag.cmd.push(function() {
mobile_slots.push( googletag.defineSlot( “/1005424/_dPSv4_mob-all-article-bottom_(300×250)”, [300, 250], “pb-ad-78158” ).addService( googletag.pubads() ) ); } );

The post Review: Neat Image 8 Noise Reduction Software by Rick Berk appeared first on Digital Photography School.


Digital Photography School

 
Comments Off on Review: Neat Image 8 Noise Reduction Software

Posted in Photography