RSS
 

Posts Tagged ‘Single’

Science photography award goes to image of a single trapped atom

14 Feb
Single Atom in an Ion Trap | Photo by David Nadlinger/University of Oxford/EPSRC/PA

A photo of a single trapped atom has won the Engineering and Physical Sciences Research Council’s (EPSRC) science photography contest. The image, which is titled “Single Atom in an Ion Trap,” was taken by David Nadlinger of the University of Oxford. Showcased in the image is single positively-charged strontium atom trapped by electric fields produced by metal electrodes.

You have to zoom in to really see it, but even that is incredible when you really wrap your mind around what you’re looking at. Here’s a closer crop:

This closer crop better shows the glowing strontium atom, trapped by electric fields produced by electrodes in the vacuum chamber.

According to the EPSRC, the image is a long exposure that was taken through an ultra-high vacuum chamber’s window. A blue-violet laser was used to illuminate the atom, which absorbed light particles and then re-emitted them. That process produces enough light that a regular camera can photograph the atom if a long exposure is used.

Photographer and overall EPSRC contest winner David Nadlinger discussed the idea behind the image:

The idea of being able to see a single atom with the naked eye had struck me as a wonderfully direct and visceral bridge between the minuscule quantum world and our macroscopic reality. A back-of-the-envelope calculation showed the numbers to be on my side, and when I set off to the lab with camera and tripods one quiet Sunday afternoon, I was rewarded with this particular picture of a small, pale blue dot.

Articles: Digital Photography Review (dpreview.com)

 
Comments Off on Science photography award goes to image of a single trapped atom

Posted in Uncategorized


How to do Single Image HDR Effects with Aurora HDR 2018

08 Feb

When creating an HDR or High Dynamic Range photo, you typically need three or more images taken at different exposures (bracketed) to create one stunning image. But given the high dynamic range of today’s digital cameras, do you still need to shoot bracketed images to achieve the HDR look? In this article, I’ll show you how you can achieve HDR effects from a single image using Aurora HDR 2018.

Results will also be compared with an image made the “real” HDR way. Which is best? You be the judge.

What is HDR?

First off, let’s break down what HDR is exactly. As mentioned earlier, HDR combines a series of images, each taken with a different exposure. The result is a dramatic photo with brightened shadows and darkened highlights. Thus, shadows and highlights are the two main features that will play the biggest role in creating an HDR photo from a single image.

Using this insight, you could take a single shot and apply HDR effects by playing with just a few features that affect the overall dynamic range of your image. To start, here’s a single image of a landscape scene, shot in RAW.

Note: the images used in this article are courtesy of dPS editor Darlene Hildebrandt. 

How to do Single Image HDR Effects with Aurora HDR 2018

1. Shoot in RAW

The very first thing you want to do with your single-image HDR image is to make sure it was taken in RAW format, not JPG. RAW files are larger in size than JPGs because they store much more image information.

This means that you can push lots of post-processing effects and even salvage parts of an image that would otherwise be unrecoverable. You could feasibly apply HDR effects to a JPG image, but the results won’t be as dramatic as they will be with a RAW file.

2. Adjust the Highlights and Shadows sliders

Since highlights and shadows tend to affect the overall brightness of an image, you’ll want to play with these sliders first. Pulling down the highlights can restore bright areas that appear washed out in an image while pulling up the shadows brighten up dark spots.

For example, the sample image above was opened in Aurora HDR 2018 and the highlights and shadows were pulled to their extremes, just for demonstration purposes. Check out the dramatic change that happens just by altering the highlights and shadows.

The sky now looks overly dramatic, and the foreground is really bright and practically free of shadows. Since HDR is largely done to taste, some might like this style as-is, while others might deem it too extreme. If you want a slightly less dramatic and more realistic photo, move the highlights and shadows sliders around to taste.

How to do Single Image HDR Effects with Aurora HDR 2018

3. Adjust the Blacks and Whites sliders

To sharpen up your image and make it less flat, play around with the image blacks and whites. In general, adjusting whites is preferable to bumping up the exposure since the latter will affect highlights more than shadows and mid-tones.

If needed, you can even brighten your shadows more by using the Dodge tool and darken highlights with the Burn tool (built-into Aurora HDR). While dialing in the blacks of the image, be sure not to clip (lose detail) your shadows too much by going too far with the Black slider.

HINT: you want them to clip a little, otherwise there will be no black in the image and it will be flat.

4. Finish off with HDR Enhance and Smart Tone

Finally, top it off by adjusting two of Aurora HDR’s most unique and impactful features: HDR Enhance and Smart Tone.

The first feature, HDR Enhance, adds details, clarity, and color adjustment to an image without creating typical HDR problems such as a halo effect. Meanwhile, Smart Tone is a mapping algorithm that automatically brightens your image while also reducing noise.

These two features can be tweaked individually to achieve your HDR style of choice.

How to do Single Image HDR Effects with Aurora HDR 2018

The Result

At this point, it’s worth noting that although Aurora HDR 2018 has many filters that you can apply to images, I didn’t use them all for demonstration purposes. Instead, I stuck to the main editing window on the right-hand panel (HDR Basic).

After tinkering around in Aurora HDR, these are my two resulting images. The first is a single shot with balanced exposure and HDR editing effects applied. Next is a regular 3-bracket HDR image. Which image do you prefer?

Aurora HDR single Image

Here is the original unedited RAW file for comparison.

single image Darlene

Single-Image HDR Effects

How to do Single Image HDR Effects with Aurora HDR 2018

Full HDR from 3 bracketed exposures. Notice how much more tonal range is in this image than the one above.

Single Image HDR Photo – Example #2

This second example shows the single image HDR effect in an urban environment. Below is the starting RAW image before any post-processing was applied.

How to do Single Image HDR Effects with Aurora HDR 2018

Original raw image.

The above image was opened in Aurora HDR and the Highlight and Shadow sliders were pulled to their extremes. Again, you don’t (and shouldn’t) keep the highlights and shadows sliders at their extremes, but this is just a visual demonstration of how dramatic of an effect they can have. It’s also a good idea to see how far you can go, then scale it back a bit in each direction.

Notice how the image has brightened up considerably and you can now see lots of detail in the buildings, especially the “Meet the Producer” sign.

How to do Single Image HDR Effects with Aurora HDR 2018

Notice in the image above that there is a halo effect around much of the building. To fix that, simply adjust those highlight and shadow sliders to your liking. Also play around with the HDR Enhance slider, which will preserve image contrast and clarity without exacerbating the halo effect.

Next, the Whites and Smart Tone sliders were adjusted brighten the image further.

How to do Single Image HDR Effects with Aurora HDR 2018

Below is the resulting single image with light Aurora HDR effects applied. For comparison, a 4-image bracketed HDR is also included below.

Aurora HDR single Image

Original again for comparison.

Aurora HDR single Image

HDR from a single image.

HDR from 4 bracketed images. The biggest difference here is a more seamless continuation of tones. You will get less haloing and less noise from this method than using a single image.

In Conclusion

There you have it – a quick tutorial on how you can create an HDR effect from a single image in Aurora HDR.

Have you experimented with making a single image look like an HDR shot? Please share your techniques and sample images in the comments below.

The post How to do Single Image HDR Effects with Aurora HDR 2018 by Suzi Pratt appeared first on Digital Photography School.


Digital Photography School

 
Comments Off on How to do Single Image HDR Effects with Aurora HDR 2018

Posted in Photography


How to capture a classic perfume product shot with a single speedlight

27 Jan

Dustin Dolby, the photographer behind the workphlo YouTube channel, is great at breaking down product photography into the simplest possible bits. By using Photoshop to mask together multiple exposures, he’s able to capture professional looking product photos using extremely minimal gear.

In his latest episode, he shows how a single speedlight and some reflecting material can be used to capture a professional-looking photograph of perfume. What’s more, the exercise of capturing these exposures helps explain some basic lighting tenets when shooting products:

Lighting a perfume bottle in a studio setting, requires the photographer to understand the angles the light is coming from. The substance of a few key lighting techniques can be boiled down into a few tips. Backlighting is a great way to show the volume of a translucent object, which couples nicely with frontal lighting.

Here’s a look at the high-res final render, composited from a few different exposures you see him capture in the video above:

Photo by Dustin Dolby/workphlo, used with permission.

As Dustin explains in the video, you can do a lot more here—both compositionally and with different lighting techniques if you really want to have some fun—but this tutorial is more about explaining the basics and capturing a “classic” perfume shot with very little gear.

Check out the full tutorial up top, and if you want to see more of Dustin’s ‘workphlo,’ head over to his YouTube channel or follow him on Instagram and Facebook.

Articles: Digital Photography Review (dpreview.com)

 
Comments Off on How to capture a classic perfume product shot with a single speedlight

Posted in Uncategorized


This crazy fire-and-water wedding portrait was shot in a single exposure

06 Aug

Photographer Markus Hofstaetter doesn’t shy away from challenging projects. Inspired by a previous fire-background hot-rod photo shoot he did, Hofstaetter had the idea to try this same technique with a portrait. There would just be one key difference: this one would be a single exposure.

A photo shoot like this is all about safety, and Hofstaetter did everything he could to ensure his subjects, assistants, and the backyard stayed nice and unburnt.

He got himself a heat-proof suit from the Muckendorf-Wipfing fire department, moistened the entire backyard, cut away stray branches to ensure he had enough room, had damp sheets at the ready, and actually built a little pond in his backyard. That last part did keep the couple a bit safer, but it was actually all about getting a killer reflection in the final photograph.

You can see how the photo shoot came together in the behind the scenes photos and video below:

$ (document).ready(function() { SampleGalleryV2({“containerId”:”embeddedSampleGallery_3170715563″,”galleryId”:”3170715563″,”isEmbeddedWidget”:true,”standalone”:false,”selectedImageIndex”:0,”startInCommentsView”:false,”isMobile”:false}) });

Once it came time to shoot the actual photo, he used a Canon 5D Mark IV and 35mm lens set to F22. The full exposure was 4.4 seconds long. The fire background was made by dipping a 6-foot-long Kevlar wick into one liter of lamp oil, hanging it on an aluminum stick, and setting it ablaze.

The exposure lasted as long as it took for the fire to cross the frame, with a nice burst from two Hensel strobes to light the couple.

The final photograph took 4 or 5 tries, as you can see from the BTS video above, but in the end Hofstaetter managed to capture the memorable portrait he was after:

The photo has made its way around the Internet over the past week, but something people don’t know is that Hofstaetter’s initial plan was to capture the shot on both digital and large format film (his specialty).

“You see there also a large format camera (Linhof Master Technika) in one photo,” he tells DPReview. “I wanted to shoot film too, but it was too stressful to handle both cameras, because I had to light the fire too. Plus, I couldn’t get the analog camera in a good position with the lenses I had available… next time I’ll try to shoot it on film too, and maybe get a wider angle lens for the Linhof.”

To see more of Hofstaetter’s work, head over to his website, follow him on Instagram, or follow along on his blog as he continues to experiment with all sorts of crazy ideas.


All photos © Markus Hofstaetter and used with permission.

Articles: Digital Photography Review (dpreview.com)

 
Comments Off on This crazy fire-and-water wedding portrait was shot in a single exposure

Posted in Uncategorized


Rim Light – A Simple Way to Create Powerful Images with a Single Flash

22 Mar

In this article, I will introduce you to creating a rim light using a single flash. While not so common, it is extremely easy to put in place and will allow you to get very interesting and powerful images. To do this kind of photography you just need a flash with the ability to place it off camera. A welcome accessory, the only one you may need, is a light stand or tripod to easily keep the flash in place.

Rim Light - A Simple Way to Create Powerful Images with a Single Flash

Learning flash doesn’t have to be hard

If you are just getting started in portraiture, chances are you have been faced with the “flash versus natural light” dilemma, and you probably went with natural light. I find many amateur and beginning photographers are intimidated by lighting equipment because they think that in order to get something good, they have to use complicated setups where many pieces of equipment are required.

In my opinion, the problem with learning to use flash is that the easiest possible setup, i.e., a single flash used off-camera, is often presented only as a way to create a basic image that needs to be improved by adding more gear and by creating more complicated lighting setups. As if nobody would seriously use just one light. So, I can see why flash photography is intimidating.

If you are a beginner, you probably want to know how to use your single, entry level, flash and how to create images that will stand out from the gazillion of portraits out there.

googletag.cmd.push(function() {var gpt_slot = googletag.defineSlot( “/1005424/_dPSv5in-post-mobile(300×250)”, [300, 250], “pb-ruleset-mobile-ad-0” ).addService( googletag.pubads() );ruleset_mobile_slots.push( gpt_slot );});

googletag.cmd.push(function() {var gpt_slot = googletag.defineSlot( “/1005424/_dPSv5in-post-mobile(300×250)”, [300, 250], “pb-ruleset-desktop-ad-4” ).addService( googletag.pubads() );ruleset_desktop_slots.push( gpt_slot );});

Keep it simple

My solution was to forget about the magazine and fashion style portraits. I wanted to take advantage of the limitations of my single light setup to create strong and moody portraits by combining the hard light from the bare flash with a low-key style. Note; this style will better suit male models.

Rim lighting 01

Self-portrait using a single flash on my right, without any light modifiers.

By changing the output power and the zoom setting of the flash, you can get a more gentle and intimate portrait, like the one below.

Rim lighting 02

A single light setup can produce less punchy and contrasty images by changing the flash output power and the zoom settings.

Creating a rim light

This is all nice and good, but you can get a very different look by using a rim light. This kind of light highlights only the contours of the subject, and I love it.

Rim lighting 03

Rim light and low-key style; a powerful combination.

The setup is extremely simple. Just hide the flash right behind the model or the object, and point it back directly at the subject.

In practice, we could see the rim light as the opposite of a silhouette, where the subject is seen as a black shape against a brighter, often white, background. In the studio, the light setup for a silhouette is, in fact, the same of as that used to create a rim light, except that the flash is pointing at the background instead of at the subject.

Rim lighting 04

Self-portrait in silhouette.

Ideally, you want to have only the rim light in the scene and not record any ambient light. But this does not mean you have to work in a dark room. The only thing you need to be careful about with rim light setup is to ensure that the flash output power is such that the light does not spill over and around the subject edges. You want to have only the light running along the subject contour.

googletag.cmd.push(function() {var gpt_slot = googletag.defineSlot( “/1005424/_dPSv5in-post-mobile(300×250)”, [300, 250], “pb-ruleset-mobile-ad-1” ).addService( googletag.pubads() );ruleset_mobile_slots.push( gpt_slot );});

googletag.cmd.push(function() {var gpt_slot = googletag.defineSlot( “/1005424/_dPSv5in-post-mobile(300×250)”, [300, 250], “pb-ruleset-desktop-ad-5” ).addService( googletag.pubads() );ruleset_desktop_slots.push( gpt_slot );});

Rim Light - A Simple Way to Create Powerful Images with a Single Flash

It is all about that thin light running along the subject’s edges.

Refine it a little

If possible, the editing is even easier. Make sure that the blacks in your image are deep and the highlights are bright. Do this and you have pretty much done with the editing.

What I like about this technique is that the resulting photo has a mysterious look that captures the viewer’s imagination. I guess it has all to do with the “see/not see”.

If you like props, you can also use them with a rim light to better convey a message, like in the photo below.

Rim Light - A Simple Way to Create Powerful Images with a Single Flash

Addiction. Here I have allowed the light to spill a bit more, so as to light my hands and the mobile screen.

We all live, most of the time, with our noses inside a smartphone screen, somewhat unaware of the reality around us. That and a feeling of addiction is the message I tried to attach to the photo.

Adding emotion

Emotions can also be easily conveyed in an interesting way by using rim light. We had a new baby girl a few months ago, and a few weeks before the due date, I experimented with a rim light in the living room when my pregnant partner passed by. I decided to take the usual very cliché photo of the father kissing the belly of the mother. While kissing her baby bump, I had the vision of the sun rising from behind the Earth, seen from space and thought, “Use a rim light!”. This is the result:

Rim Light - A Simple Way to Create Powerful Images with a Single Flash

Rim light can change a cliché image into a very moody and interesting one.

googletag.cmd.push(function() {var gpt_slot = googletag.defineSlot( “/1005424/_dPSv5in-post-mobile(300×250)”, [300, 250], “pb-ruleset-mobile-ad-2” ).addService( googletag.pubads() );ruleset_mobile_slots.push( gpt_slot );});

googletag.cmd.push(function() {var gpt_slot = googletag.defineSlot( “/1005424/_dPSv5in-post-mobile(300×250)”, [300, 250], “pb-ruleset-desktop-ad-6” ).addService( googletag.pubads() );ruleset_desktop_slots.push( gpt_slot );});

I think this simple light setup transformed the same old same old photographic cliché into a much more powerful and interesting image.

Special effects

Finally, because the scene is backlit, an easy way to add interest is to include in the shot smoke or aerosols. Both will capture and scatter the light around, creating some interesting effects.

Rim Light - A Simple Way to Create Powerful Images with a Single FlashSince I do not smoke, I sprayed water around to make this self-portrait shot more interesting.

Finally, try to turn the model towards the light and allow the flash to light them a bit more for some interesting variations.

Rim Light - A Simple Way to Create Powerful Images with a Single FlashTurning the model to face the light can be an interesting variation on the theme.

To conclude, I hope I have given you some ideas to start playing with a single off-camera flash in a simple and non-intimidating way using a rim light. The bonus is creating some particular and interesting photos in the process.

googletag.cmd.push(function() {var gpt_slot = googletag.defineSlot( “/1005424/_dPSv5in-post-mobile(300×250)”, [300, 250], “pb-ruleset-mobile-ad-3” ).addService( googletag.pubads() );ruleset_mobile_slots.push( gpt_slot );});

googletag.cmd.push(function() {var gpt_slot = googletag.defineSlot( “/1005424/_dPSv5in-post-mobile(300×250)”, [300, 250], “pb-ruleset-desktop-ad-7” ).addService( googletag.pubads() );ruleset_desktop_slots.push( gpt_slot );});

The post Rim Light – A Simple Way to Create Powerful Images with a Single Flash by Andrea Minoia appeared first on Digital Photography School.


Digital Photography School

 
Comments Off on Rim Light – A Simple Way to Create Powerful Images with a Single Flash

Posted in Photography


Urban Planet: How the Whole World Would Fit into a Single City or Structure

08 Mar

[ By WebUrbanist in Architecture & Cities & Urbanism. ]

life in one city

Cities often feel like dense and crowded places, and it is hard to imagine everyone on Earth living in urban environments let alone a single city or even (yes, it’s possible) one gigantic megastructure. In a series of videos, filmmaker Joseph Pisenti asks: what if everyone lived in one city? Then he takes it further with: what if everyone lived in just one building?

It sounds like an absurd proposition, but our planet’s population of billions could, in fact, but contained in a relatively small amount of space if needed (perhaps in case of a worldwide evacuation to space?). Images of single cities in the videos show places that already have populations in a single frame larger than countries like, say, Australia have spread across an entire continent.

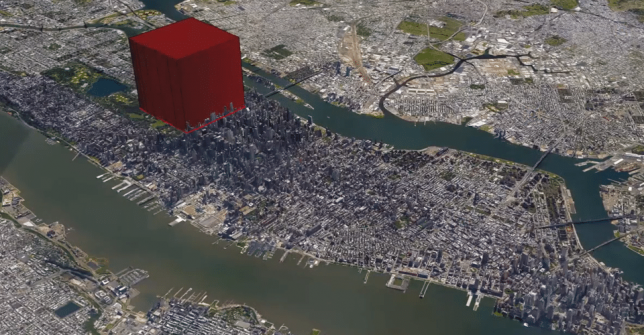
A few billion cubic meters in a structure set on, say, Manhattan, could uncomfortably house the human race. It would be twice the height on the world’s largest building, but we would fit if we had to.

As the video series unfolds, its creator gets increasingly realistic with respect to actual needs for people beyond simply space to exist, imagining a world where we all could actually live on a small part of South America. Hopefully, of course, it will never come to this, but as sea levels rise it’s good to know we have options (and fun to engage in these thought experiments, regardless). By the time you finish watching this series, however, you may find you would rather simply escape it all:

Share on Facebook


[ By WebUrbanist in Architecture & Cities & Urbanism. ]

[ WebUrbanist | Archives | Galleries | Privacy | TOS ]


WebUrbanist

 
Comments Off on Urban Planet: How the Whole World Would Fit into a Single City or Structure

Posted in Creativity


How to Take Your Portrait Photos From Good to Great with a Single Click

12 Oct

Do you enjoy portrait photography? Are you a Lightroom user? You’re going to love what we’ve just released today!

It’s our all new Adobe Lightroom® presets bundle: 101 Lightroom Portrait Presets.

NewImage
With our new presets pack, transforming your portrait shots is a breeze.

And for a limited time, the pack can be yours for the special introductory price of just USD $ 20 (that’s 60% off).

Check it out here.

In this comprehensive Portrait Presets pack you’ll get the following collections:

  • Art Series (7 presets): Get the look from the early 1900’s through to the 90’s.
  • Black and White (10 presets): A variety of black and white presets to give you that b&w portrait look.
  • Film Series (8 presets): Nothing beats the authenticity of film. These presets will re-create that professional film feeling.
  • Fix (20 presets): Fix a range of of issues including contrast, grain, highlights and sharpness.
  • Tone (14 presets): Change an array of tonal qualities.
  • Traditional Series (8 presets): Tweaks to give your portraits that classic look. Including Beach,
  • Outdoors, and Worn, amongst others.
  • Touch Up Kit: 37 brushes to help you touch up eyes, hair, lips and skin.

Created by professional photographer and author Rachel Devine, she’s done all the hard work for you so you can get the perfect edit for every portrait, without the fuss.

Here’s a short video of Rachel showing how easy it is to use these presets:

Simply apply the effect and adjust as desired… it’s fast and easy!

You’ll save a whole heap of processing time, while giving your portraits an instant “pop”. See Rachel demonstrate in the video on our product page.

Transform your photos in just one click. Pick up our 101 Lightroom Portrait Presets today – while we’re still offering it at the introductory price.

Please note: a copy of Adobe Lightroom is required to use these presets.

Also: Haven’t used presets before? No worries. Full instructions are included in the pack.

Lastly: like all our products this one has a 60 day satisfaction guarantee. If you buy it and find for whatever reason that it doesn’t suit your needs simply contact our support team and we’ll arrange a refund – no questions asked.

googletag.cmd.push(function() {
tablet_slots.push( googletag.defineSlot( “/1005424/_dPSv4_tab-all-article-bottom_(300×250)”, [300, 250], “pb-ad-78623” ).addService( googletag.pubads() ) ); } );

googletag.cmd.push(function() {
mobile_slots.push( googletag.defineSlot( “/1005424/_dPSv4_mob-all-article-bottom_(300×250)”, [300, 250], “pb-ad-78158” ).addService( googletag.pubads() ) ); } );

The post How to Take Your Portrait Photos From Good to Great with a Single Click by Darren Rowse appeared first on Digital Photography School.


Digital Photography School

 
Comments Off on How to Take Your Portrait Photos From Good to Great with a Single Click

Posted in Photography


Special Effect – How to Create Multiple Flash Exposures in a Single Frame

18 Mar

Many photographic techniques, rightfully, tend to focus on polished images. They vary anywhere on the spectrum from getting sharper images to capturing accurate skin tones. These techniques are important. However, sometimes they’re not very much fun. Sometimes, that’s precisely what you need to have, and exactly what photography should be – fun.

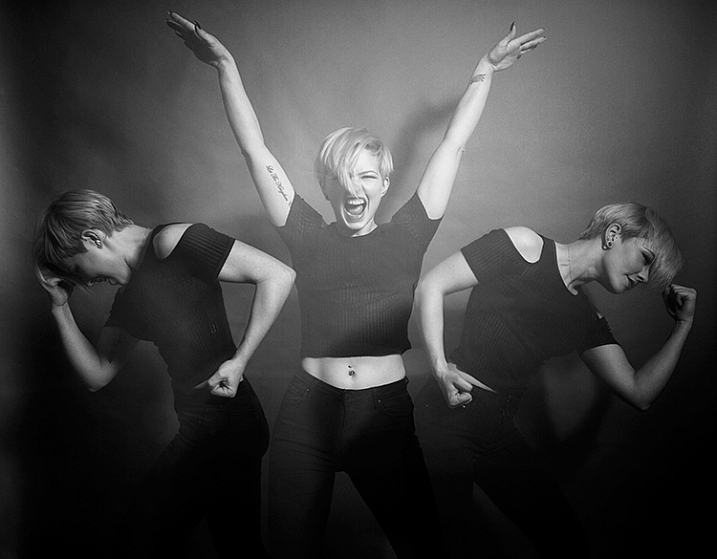
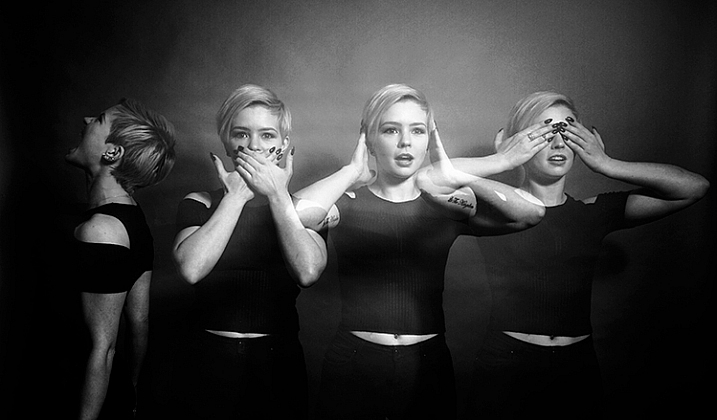
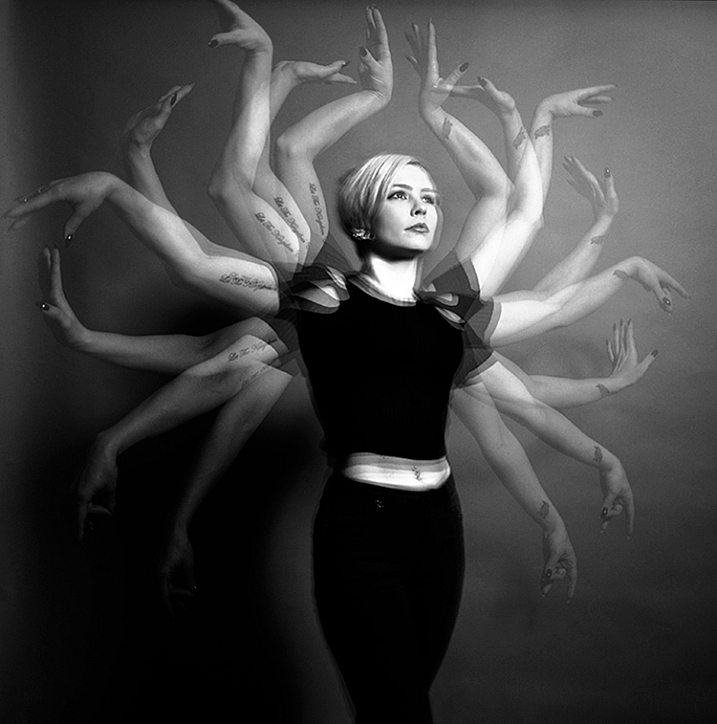
This article will guide you through a fun special effect technique that will allow you to capture multiple exposures in a single frame, using the test button on your strobes or flashguns. Using this method, you will gain a new tool to add movement, and a sense of action in your studio photography.

how-to-multiple-flash-exposures-2793

What you need

  • A dSLR on manual settings (set from 2-10″ or bulb exposure)
  • A very dark room (or nighttime outdoors)
  • A tripod
  • A human subject
  • A strobe or flashgun (speedlight) with a test button (to manually fire the flash)
  • Someone to serve as an extra pair of hands (not required but it helps a lot)

Setting it up

how-to-multiple-flash-exposures-2795

Aperture

Because you’re using flash, the aperture setting is the most important in this technique. As long as your shutter speed is slower than your camera’s flash sync-speed, aperture is what controls how the flash exposure is recorded, and it also dictates what power output to set on your flash. I suggest using an aperture somewhere between f/8 and f/16, to get the best results. A smaller aperture will also help to minimize the effect of any ambient light in your images.

Camera settings

With your camera on a tripod, set the dial to manual mode, the ISO to 100, and your shutter speed to between two and six seconds. To test if your shutter speed is suitable, take a test shot without any flash. As long as the image is completely black at the end of the exposure, it will work for this technique.

This time can be changed and extended later, depending on how many movements you want to capture.

Lighting

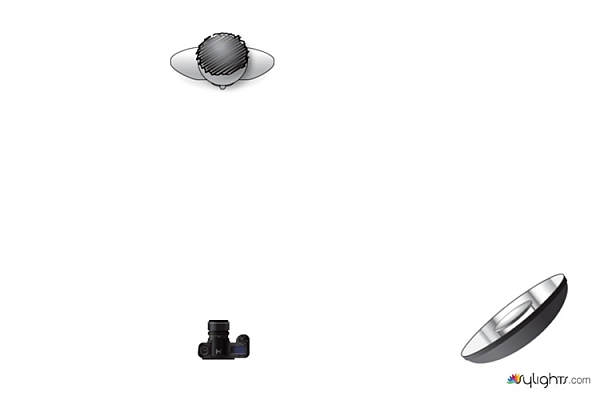
To start with, try to keep your lighting simple. A single light source will give you unlimited potential. This technique will work with multiple lights, but it is best to build up to that over time, as you get used to how the technique works.

As for lighting placement, the choice is yours. The lighting will, and should, depend on the final intent of the image you are trying to create. However, if you’re unsure, try starting with your light high above, and in front of, your subject. That will provide a good starting point to make adjustments from there.

Use a light meter, or manually calculate the exposure, to set your flash output, so it matches your chosen aperture.

how-to-multiple-flash-exposures-diagram

Simple lighting set-ups, like this one used in these images, can be the most effective.

Direction

With everything set up, you need to explain to your subject how to move. The easiest way to explain this is, “Pose, wait for the flash, pose, wait for the flash, and pose again”.

In more detail – you want to wait for your subject to adopt the first pose, set the focal point, and start the exposure. Press the test button on your strobe to fire the flash. After this first flash, your subject should move to their second position as quickly as possible, where you will press the test button again. Repeat as many times as required.

Keep trying

The hardest part of this technique is that it is incredibly hit and miss. Getting your subject to move into positions that create pleasing compositions, without be able to evaluate while it’s happening, is tricky. It takes time and patience. You will need to shoot a lot of frames, and most of them will be unsuitable. Just keeping making as many attempts as you can, until you think you have something, then take some more.

how-to-multiple-flash-exposures-2781

Tips

Here are a few things to keep in mind that will make your attempts easier.

Start small

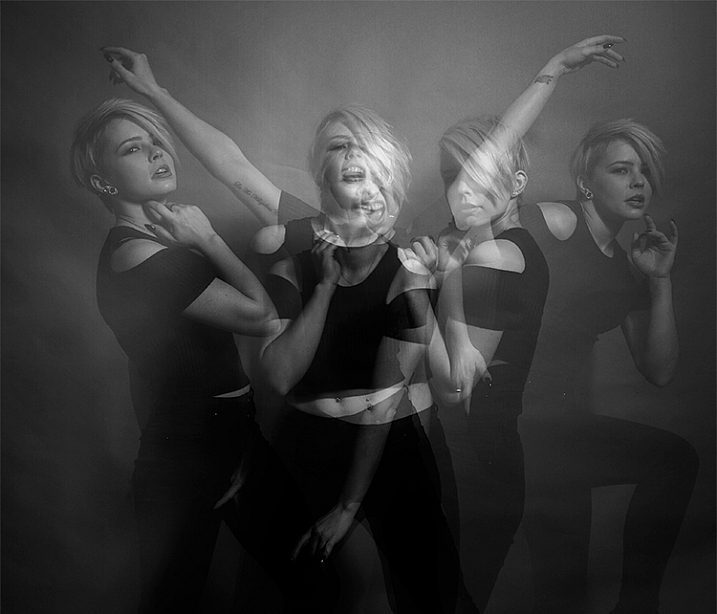
Sometimes it’s hard judge how movements will appear in the final image. By trying to squeeze too much in, you might end up with a cluttered mess in your images. Start with two or three movements to gauge where things are and build it up from there.

how-to-multiple-flash-exposures-2787

Trying to include too many movements may result in a cluttered mess like this image.

Remote triggers

If you have a remote trigger for your strobes with a manual button on it, you can hold it in your hand and fire the flash. This is much more preferable than having to move between the camera and your light source during each frame.

Recycle rate

If you want to squeeze more than two or three movements into a six second exposure, try to ensure that your flash isn’t set to full power. By reducing the power output, you’re also decreasing the amount of time it takes your flash to refresh. This will allow you to fire the strobe more times in the short timeframe.

Clarity

There is no one way to process images from this technique, and all of that is up to you. However, if you want crisper, more pronounced outlines of your subject, the clarity slider in Lightroom or Adobe Camera RAW will help a lot.

Neutral backdrops

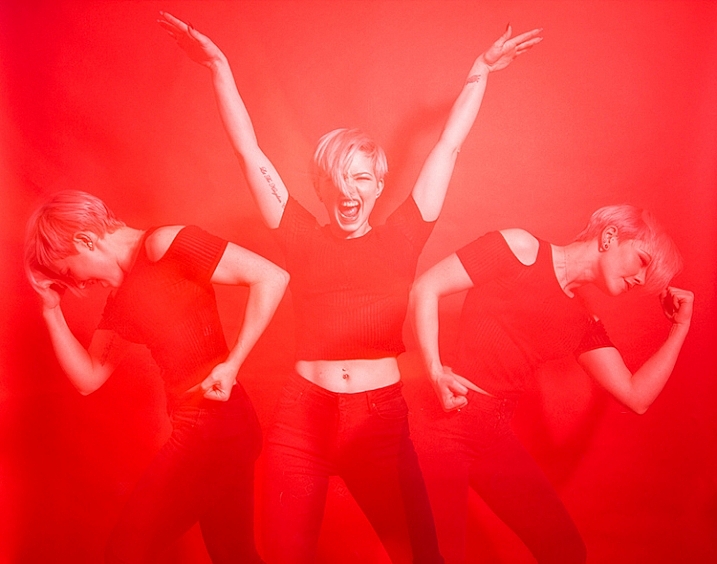
how-to-multiple-flash-exposures-2793-2

Colored backdrops will overpower images using this technique.

For color images, try and stick to a black or grey background. Because your subject is moving to different positions, the background continues to expose once your subject has moved. If you use a colored background, as I did with these images, that color will dominate your exposures. Of course, this can be used judiciously as a feature of the image should you choose.

Two second timer

If you can’t rope someone into being your assistant for the day, set your camera to use the two second timer, to give you time to move between the camera and the strobe.

Keep going

Once you’ve had a go at this technique with people, feel free to try and think of ways to use it with other subjects. For example you could use it to capture a hammer at different points in its swing, or perhaps a basketball at different parts of its arc. The choices are endless. Be creative with it, have fun, and if you give it a go please share your images below, as well as any questions you may have.

This is the third of a series of articles we will be featuring this week on dPS all about special effects. Check out the others here:

  • How to Photograph the Full Band of the Milky Way
  • Fire Spinning with Steel Wool – A Special Effects Tutorial

googletag.cmd.push(function() {
tablet_slots.push( googletag.defineSlot( “/1005424/_dPSv4_tab-all-article-bottom_(300×250)”, [300, 250], “pb-ad-78623” ).addService( googletag.pubads() ) ); } );

googletag.cmd.push(function() {
mobile_slots.push( googletag.defineSlot( “/1005424/_dPSv4_mob-all-article-bottom_(300×250)”, [300, 250], “pb-ad-78158” ).addService( googletag.pubads() ) ); } );

The post Special Effect – How to Create Multiple Flash Exposures in a Single Frame by John McIntire appeared first on Digital Photography School.


Digital Photography School

 
Comments Off on Special Effect – How to Create Multiple Flash Exposures in a Single Frame

Posted in Photography


Light L16 packs 16 cameras into a single portable body

09 Oct

US-based startup Light has officially introduced its L16, a portable device packed with 16 individual cameras, ten of which capture an image at the same time at different fixed focal lengths. The resulting photograph is a composite of all the individual images combined, with a final resolution of up to 52 megapixels. An earlier prototype of this camera was shown off this past April. Read more

Articles: Digital Photography Review (dpreview.com)

 
Comments Off on Light L16 packs 16 cameras into a single portable body

Posted in Uncategorized


PIX 2015 re:FRAME single day passes on sale, speaker schedule posted

11 Sep

The days are ticking down to PIX 2015, our interactive photo expo on October 6 & 7. We’re excited to announce some new speakers have been added to our re:FRAME lineup and that single day passes are now on sale. Now’s the time to make your PIX plans! Join us online or in Seattle for two days of hands-on photography activities, inspirational talks and practical demonstrations. Read more

Articles: Digital Photography Review (dpreview.com)

 
Comments Off on PIX 2015 re:FRAME single day passes on sale, speaker schedule posted

Posted in Uncategorized