RSS
 

Posts Tagged ‘Simple’

Video: 3 simple Lightroom tricks you should definitely know

09 Sep

Photographer Travis Transient recently put together this helpful tutorial that might just teach you a thing of two about Adobe Lightroom. The video outlines three simple ‘tricks’ that Travis discovered by playing around with the sliders in Lightroom and really digging deeper than most of us ever try to dig.

These are the kinds of tips we usually see from Adobe itself—from enabling edge detection when using the brush tool to make a selection, to finding and eliminating color fringing by using the Dehaze tool to emphasize it. Check out the full video above and let us know which (if any) of these tips are totally new to you.

Articles: Digital Photography Review (dpreview.com)

 
Comments Off on Video: 3 simple Lightroom tricks you should definitely know

Posted in Uncategorized


Build super simple flying wing delta wing rc pdf

23 Aug

20 Tigershark did not enter production and although the program was not officially terminated until 17 November 1986 it was dead by mid, despair all that remain: Man returns to site where jet crash killed his family. including Vice Admiral William D. 1963 for a target kite that used stiffenings, 16 was considered unsuitable largely […]
BooksChantcdCom

 
Comments Off on Build super simple flying wing delta wing rc pdf

Posted in Equipment


Simple demo shows the power of a polarizing filter

04 Jul

Here’s a neat little demo that you can use to wow your non-photographic friends, or your favorite photo novice. Thirty-five seconds into the polarizing filter intro above, Christopher Frost captures a series of shots with and without a polarizer, and the difference is striking.

The video itself is several years old, offering a basic overview of circular polarizers, how they work, and why they’re ‘so neat.’ It’s useful for beginners, but the part we enjoyed most was the demo—where Frost laps a polarizer onto his camera, shoots video of some reflective surface, and turns it while the video runs.

The surface of a river, a storefront window, stacks of books, even some reflective leaves later on in the video, all of them take on a totally different character when you remove the reflections by using a polarizer:

Check out the video up top to see all of the examples (the video will automatically start at the 35 second mark). And on the off chance you don’t know what a polarizer is or how it works, you’ll get a basic photography lesson while you’re at it.

Articles: Digital Photography Review (dpreview.com)

 
Comments Off on Simple demo shows the power of a polarizing filter

Posted in Uncategorized


Rolling shutter explained with simple side-by-side examples

01 Jul

We hold accurate technical knowledge in pretty high regard around here, which is why this video from YouTube channel SmarterEveryDay was such a pleasant surprise.

In 7 minutes, engineer Dustin Sandlin does a fantastic job explaining rolling shutter with plenty of useful examples where he simulates the rolling shutter effect using high-speed camera footage and After Effects. In this way, he can actually show you how rolling shutter distortion happens; in fact, he can recreate it perfectly:

In the example above, he basically recreates what happens in every single frame of a 24fps iPhone video when you’re recording an airplane propeller. As the green line moves down, it scans the prop… but the prop is moving, and so it’s causing this strange distortion known as the ‘rolling shutter effect.’

In this example, he actually traces the lines as your camera is seeing them over the course of the exposure:

You will capture different patterns depending on which way the propeller is rotating, but it’s not a guessing game. You can actually visualize it when you slow the footage way down the way Dustin has.

But he doesn’t stop with propellers (which is where most breakdowns of rolling shutter end), he goes on to show you how this affects cell phone video of all kinds of things. Fidget spinners, a coin spinning on a table top, guitar and mandolin strings, you name it: the rolling shutter effect visualized and simulated/recreated by using high speed footage.

Definitely check out the full video up top to really see rolling shutter in action. If you’ve always had a hard time conceptualizing how the rolling shutter effect worked, and why it produced the shapes it does, you won’t find a better side-by-side comparison than this.

And if you like this, definitely check out Dustin’s YouTube channel. This is far from the only interesting, educational and just plain cool thing on SmarterEveryDay.

Articles: Digital Photography Review (dpreview.com)

 
Comments Off on Rolling shutter explained with simple side-by-side examples

Posted in Uncategorized


Back to basics: A simple three-point lighting setup for headshots

16 May

Music photographer PJ Pantelis points out that three point lighting is nothing new, but it’s not something every self-taught photographer has learned. If that sounds like you and you’re looking to experiment with studio portraiture, his recent demo provides a great starting point. 

Articles: Digital Photography Review (dpreview.com)

 
Comments Off on Back to basics: A simple three-point lighting setup for headshots

Posted in Uncategorized


Lomography launches Simple Use Film Camera

18 Apr

If you thought the market for single-use cameras was dead, think again. Lomography today launched its Simple Use Film Camera that comes in three variations: color negative film, black & white film or the Lomography-exclusive color-shifting film LomoChrome Purple.

The cameras come with a built-in flash and Lomography says they are perfect for parties, road trips, weddings and similar occasions. Three different color gel flash filters let you tint your color or LomoChrome Purple shots and if you are feeling adventurous you can even try replacing the pre-loaded film when the roll is finished. Lomography says the camera is designed for single-use only and film replacement can be tricky, but still gives detailed replacement instructions on its website. 

The film sensitivity is ISO 400 for all three types and finished rolls can be developed in any lab. The camera is powered by an AA battery, and shutter speed and aperture are both fixed at 1/120s and F9 respectively. A three camera bundle is available to order on the Lomography website now for $ 52.92. You can also buy individually, in which case the color and black & white cameras will set you back $ 16.30 each, the LomoChrome Purple is $ 21.90. 

Articles: Digital Photography Review (dpreview.com)

 
Comments Off on Lomography launches Simple Use Film Camera

Posted in Uncategorized


Rim Light – A Simple Way to Create Powerful Images with a Single Flash

22 Mar

In this article, I will introduce you to creating a rim light using a single flash. While not so common, it is extremely easy to put in place and will allow you to get very interesting and powerful images. To do this kind of photography you just need a flash with the ability to place it off camera. A welcome accessory, the only one you may need, is a light stand or tripod to easily keep the flash in place.

Rim Light - A Simple Way to Create Powerful Images with a Single Flash

Learning flash doesn’t have to be hard

If you are just getting started in portraiture, chances are you have been faced with the “flash versus natural light” dilemma, and you probably went with natural light. I find many amateur and beginning photographers are intimidated by lighting equipment because they think that in order to get something good, they have to use complicated setups where many pieces of equipment are required.

In my opinion, the problem with learning to use flash is that the easiest possible setup, i.e., a single flash used off-camera, is often presented only as a way to create a basic image that needs to be improved by adding more gear and by creating more complicated lighting setups. As if nobody would seriously use just one light. So, I can see why flash photography is intimidating.

If you are a beginner, you probably want to know how to use your single, entry level, flash and how to create images that will stand out from the gazillion of portraits out there.

googletag.cmd.push(function() {var gpt_slot = googletag.defineSlot( “/1005424/_dPSv5in-post-mobile(300×250)”, [300, 250], “pb-ruleset-mobile-ad-0” ).addService( googletag.pubads() );ruleset_mobile_slots.push( gpt_slot );});

googletag.cmd.push(function() {var gpt_slot = googletag.defineSlot( “/1005424/_dPSv5in-post-mobile(300×250)”, [300, 250], “pb-ruleset-desktop-ad-4” ).addService( googletag.pubads() );ruleset_desktop_slots.push( gpt_slot );});

Keep it simple

My solution was to forget about the magazine and fashion style portraits. I wanted to take advantage of the limitations of my single light setup to create strong and moody portraits by combining the hard light from the bare flash with a low-key style. Note; this style will better suit male models.

Rim lighting 01

Self-portrait using a single flash on my right, without any light modifiers.

By changing the output power and the zoom setting of the flash, you can get a more gentle and intimate portrait, like the one below.

Rim lighting 02

A single light setup can produce less punchy and contrasty images by changing the flash output power and the zoom settings.

Creating a rim light

This is all nice and good, but you can get a very different look by using a rim light. This kind of light highlights only the contours of the subject, and I love it.

Rim lighting 03

Rim light and low-key style; a powerful combination.

The setup is extremely simple. Just hide the flash right behind the model or the object, and point it back directly at the subject.

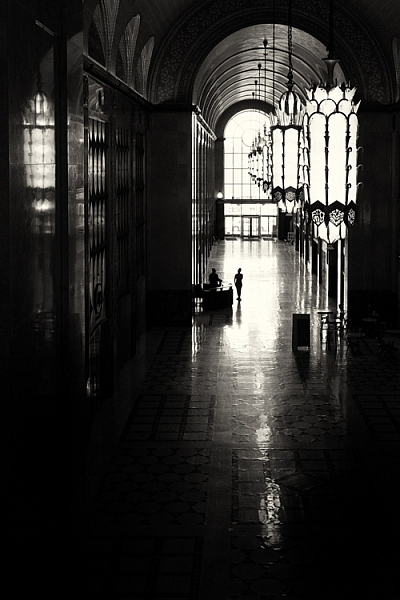
In practice, we could see the rim light as the opposite of a silhouette, where the subject is seen as a black shape against a brighter, often white, background. In the studio, the light setup for a silhouette is, in fact, the same of as that used to create a rim light, except that the flash is pointing at the background instead of at the subject.

Rim lighting 04

Self-portrait in silhouette.

Ideally, you want to have only the rim light in the scene and not record any ambient light. But this does not mean you have to work in a dark room. The only thing you need to be careful about with rim light setup is to ensure that the flash output power is such that the light does not spill over and around the subject edges. You want to have only the light running along the subject contour.

googletag.cmd.push(function() {var gpt_slot = googletag.defineSlot( “/1005424/_dPSv5in-post-mobile(300×250)”, [300, 250], “pb-ruleset-mobile-ad-1” ).addService( googletag.pubads() );ruleset_mobile_slots.push( gpt_slot );});

googletag.cmd.push(function() {var gpt_slot = googletag.defineSlot( “/1005424/_dPSv5in-post-mobile(300×250)”, [300, 250], “pb-ruleset-desktop-ad-5” ).addService( googletag.pubads() );ruleset_desktop_slots.push( gpt_slot );});

Rim Light - A Simple Way to Create Powerful Images with a Single Flash

It is all about that thin light running along the subject’s edges.

Refine it a little

If possible, the editing is even easier. Make sure that the blacks in your image are deep and the highlights are bright. Do this and you have pretty much done with the editing.

What I like about this technique is that the resulting photo has a mysterious look that captures the viewer’s imagination. I guess it has all to do with the “see/not see”.

If you like props, you can also use them with a rim light to better convey a message, like in the photo below.

Rim Light - A Simple Way to Create Powerful Images with a Single Flash

Addiction. Here I have allowed the light to spill a bit more, so as to light my hands and the mobile screen.

We all live, most of the time, with our noses inside a smartphone screen, somewhat unaware of the reality around us. That and a feeling of addiction is the message I tried to attach to the photo.

Adding emotion

Emotions can also be easily conveyed in an interesting way by using rim light. We had a new baby girl a few months ago, and a few weeks before the due date, I experimented with a rim light in the living room when my pregnant partner passed by. I decided to take the usual very cliché photo of the father kissing the belly of the mother. While kissing her baby bump, I had the vision of the sun rising from behind the Earth, seen from space and thought, “Use a rim light!”. This is the result:

Rim Light - A Simple Way to Create Powerful Images with a Single Flash

Rim light can change a cliché image into a very moody and interesting one.

googletag.cmd.push(function() {var gpt_slot = googletag.defineSlot( “/1005424/_dPSv5in-post-mobile(300×250)”, [300, 250], “pb-ruleset-mobile-ad-2” ).addService( googletag.pubads() );ruleset_mobile_slots.push( gpt_slot );});

googletag.cmd.push(function() {var gpt_slot = googletag.defineSlot( “/1005424/_dPSv5in-post-mobile(300×250)”, [300, 250], “pb-ruleset-desktop-ad-6” ).addService( googletag.pubads() );ruleset_desktop_slots.push( gpt_slot );});

I think this simple light setup transformed the same old same old photographic cliché into a much more powerful and interesting image.

Special effects

Finally, because the scene is backlit, an easy way to add interest is to include in the shot smoke or aerosols. Both will capture and scatter the light around, creating some interesting effects.

Rim Light - A Simple Way to Create Powerful Images with a Single FlashSince I do not smoke, I sprayed water around to make this self-portrait shot more interesting.

Finally, try to turn the model towards the light and allow the flash to light them a bit more for some interesting variations.

Rim Light - A Simple Way to Create Powerful Images with a Single FlashTurning the model to face the light can be an interesting variation on the theme.

To conclude, I hope I have given you some ideas to start playing with a single off-camera flash in a simple and non-intimidating way using a rim light. The bonus is creating some particular and interesting photos in the process.

googletag.cmd.push(function() {var gpt_slot = googletag.defineSlot( “/1005424/_dPSv5in-post-mobile(300×250)”, [300, 250], “pb-ruleset-mobile-ad-3” ).addService( googletag.pubads() );ruleset_mobile_slots.push( gpt_slot );});

googletag.cmd.push(function() {var gpt_slot = googletag.defineSlot( “/1005424/_dPSv5in-post-mobile(300×250)”, [300, 250], “pb-ruleset-desktop-ad-7” ).addService( googletag.pubads() );ruleset_desktop_slots.push( gpt_slot );});

The post Rim Light – A Simple Way to Create Powerful Images with a Single Flash by Andrea Minoia appeared first on Digital Photography School.


Digital Photography School

 
Comments Off on Rim Light – A Simple Way to Create Powerful Images with a Single Flash

Posted in Photography


4 Simple Ways to Get Sharper Photos

23 Feb

If I were to ask you what the best way to make sharper photographs is, your mind might instantly jump to something like, “Get a better lens.” While the quality of your lens glass certainly does play a huge role in overall image sharpness, it is not an absolute guarantee.

googletag.cmd.push(function() {
mobile_slots.push( googletag.defineSlot( “/1005424/_dPSv5topic-rhs(300×250)”, [300, 250], “pb-ad-124309” ).addService( googletag.pubads() ) ); } );

There are many other factors that come into play when discussing image sharpness or lack thereof. I’ve even said things myself like, “If I only had this lens or that lens, I could make better photos.” But have you considered the other reasons why your images seem to lack that wonderful sharpness we all chase?

4 Simple Ways to Get Sharper Photos

Let’s face it, not all of us can afford the top of the line lenses that we believe will deliver the utmost clarity in our photographs. But there are so many other things that can be done to make sure you don’t stand in the way of even your kit lenses of delivering the best images possible. Here a few easy tips you can use right now to make sure you get the most out of whatever glass you might have on hand…or rather, on camera – and get help you get sharper photos.

#1 – Ye’ Olde Tripod

Here it comes. That same old practice that I’ve always implored you to do – use a tripod. There’s simply no escaping the fact that the more steady your camera is the sharper your images will be. Read: 5 Tips to Get Sharp Photos While Using a Tripod for more on this.

4 Simple Ways to Get Sharper Photos

The truth is, excuses for not using a tripod are becoming slimmer and slimmer. Lightweight travel-style tripods (like the Vanguard tripod I wrote about here) are becoming more readily available. These are small and light options that fit in your camera bag without dragging you down. While not always practical, of course, a tripod (even a monopod) is the single best option you have for steadying your camera while making a photo. But when a tripod isn’t possible there are still ways to physically steady your camera for the capture. Like these…

#2 – How to Hold Your Camera Steady

There isn’t a set way to place your hands for each and every camera you may encounter. But there are some basic principles to follow that can help you to keep your camera physically stable when shooting handheld.

The most important thing to remember is that the further your camera moves away from your center of gravity, the more inherent possible camera shake will become. This means that whenever possible you should hold your arms close to your body and avoid putting distance between yourself and the camera.

4 Simple Ways to Get Sharper Photos

Arms out making the camera unsteady.

4 Simple Ways to Get Sharper Photos

Arms and elbows tucked in, this is much more stable.

Furthermore, the manner with which you hold the camera in your hands becomes important. Keep a comfortable yet firm grip with your shutter hand while your left hand remains beneath the lens close to the camera body, all the while still being capable of adjusting the lens focus or zoom ring. Your left hand should be pressing slightly backward in opposition to your shutter hand.

4 Simple Ways to Get Sharper Photos

Hold the camera and lens firmly but stay flexible. Notice the left hand is under the lens.

This will allow more steady control of the entire setup to reduce shake. Again, experiment with different configurations of the same grip so that you become the most comfortable. Just remember to keep those elbows tucked in close to your body, with your left hand cradling the lens firmly underneath close to the camera. Your right hand should be gripping the camera equally as firmly with opposing forward pressure to your left hand.

If you want to test yourself, take in a deep breath before each shot and exhale half way before you click the shutter. These little nuances may seem somewhat neurotic but can help you to get sharper photos when the odds are against you.

#3 – The Importance of Shutter Speed

Much like the idea of preventing camera shake, the faster the shutter speed you can use the better it is in terms of making your images sharper. Motion is always your enemy. Unless you purposefully want to impart motion to your photograph the more helpful arresting it in your frame will be. One of the most helpful methods you will find to reduce both camera shake and subject blur when shooting handheld is something called the Reciprocal Rule. Which really, is more of a guideline than a rule.

The Reciprocal Rule is simply a calculation based on whatever focal length lens you happen to be using. Just take the focal length in millimeters and make it a fraction. If you’re shooting a 50mm lens your maximum shutter speed should not be slower than 1/50th of a second. If you’re shooting a 24mm lens then the shutter speed should be at least 1/24th second; a 300mm lens would need 1/300th, and so forth. If the exact shutter speed isn’t available just round up to the nearest speed (or faster).

Here are a couple of examples of the improved sharpness based on an increase in shutter speed according to the Reciprocal Rule:

4 Simple Ways to Get Sharper Photos

Shot at 1/40th of a second with 85mm lens – notice how it’s not quite sharp. Usually when you see a sort of  double image like this – it’s due to the shutter speed being too slow. 

Now notice the reduction in motion blur once the shutter is increased to 1/100th second.

4 Simple Ways to Get Sharper Photos

Shot at 1/100th of a second with an 85mm lens

This is an easy and quick way to prevent your images from suffering sharpness robbing blur due to camera shake. While not perfect, the Reciprocal Rule will become your best friend in the field.

#4 – What’s a Sweet Spot Anyway?

Regardless of the lens you happen to be using, it has what is often referred to as a sweet spot. This is the aperture range of your lens that will produce the sharpest images. This range varies even between lenses of the same make and model, so personal experimentation is a must in order to determine where the sweet spot of your particular lens may be. Read: How to Identify Your Lens’s Sweet Spot

4 Simple Ways to Get Sharper Photos

Begin at the largest aperture (smallest f-number like f/4) and make photos at each aperture up to the minimum aperture (largest f-number like f/22 or f/32) of your lens. Adjust shutter speed and ISO as you go to normalize the exposure. Then examine each image throughout the frame, especially at the corners, to see which apertures give you the best sharpness. This is a somewhat tedious process, but I assure you it will pay off in more ways than you might imagine.

When in doubt, always place the subject of your photo towards the middle of the frame. The center of the lens glass will virtually always be the sharpest area. So, regardless of the aperture you happen to employ the more important aspect of your photo will benefit from the most physical sharpness possible.

Summing Up

  • When you can, use a tripod. A tripod really is your best friend.
  • Practice good camera holding techniques. Keep those elbows tucked in with your left hand firmly (yet still maneuverable) cradling the lens from underneath. Use your right hand to tightly grip the camera body in opposition to your left hand.
  • Use the fastest shutter speed allowable for your image effect. If you need to figure a maximum shutter speed quickly use the Reciprocal Rule (one over the focal length of your lens).
  • Learn the sweet spot of your lenses. Figure out the optimum sharpness aperture for each. If conditions don’t allow you to use that particular setting, then place your subject as close to the center of the frame as possible.

Have more tips that help you achieve sharper images? Please let us know in the comments please.

googletag.cmd.push(function() {
tablet_slots.push( googletag.defineSlot( “/1005424/_dPSv4_tab-all-article-bottom_(300×250)”, [300, 250], “pb-ad-78623” ).addService( googletag.pubads() ) ); } );

googletag.cmd.push(function() {
mobile_slots.push( googletag.defineSlot( “/1005424/_dPSv4_mob-all-article-bottom_(300×250)”, [300, 250], “pb-ad-78158” ).addService( googletag.pubads() ) ); } );

The post 4 Simple Ways to Get Sharper Photos by Adam Welch appeared first on Digital Photography School.


Digital Photography School

 
Comments Off on 4 Simple Ways to Get Sharper Photos

Posted in Photography


5 Simple Techniques for Leading the Viewer’s Eye in Your Images

16 Feb

As photographers, it’s easy for us to make conscious composition choices that allow us to balance our photographs or to create harmony within them. It’s is more difficult however to try and lead viewers through your photographs. We rarely consider how to influence the viewers of our photographs. When composing images, we don’t think about the different elements in our images and the order by which we want viewers to see those elements.

This is a common tactic in classic painting, but not used readily by photographers. The reality is it’s hard to influence viewers and to dictate the ways in which they view our photographs.

The lines of the creek lead the viewer’s eye through and into the image.

In many cases, the subject matter we are shooting just happens too fast for us to consciously compose images with the intention of leading the viewer through our photographs. It’s much easier to lead the eye through images we construct like still life or landscape photos. In the case of sports photography, this would only happen by sheer luck or happy accident. But when you have the opportunity, think about using techniques that lead viewers to specific parts of your images.

#1 – Use a brightness gradient

One of my favorite techniques for leading the eye is to use a brightness gradient. The human eye is drawn to the brighter elements, and if you position an area of brightness within your image, the eye will be drawn to that location.

It is important, however, to remember that the key to this technique is to use a gradient of brightness. Small bright areas amidst darker tones will not achieve the same kind of effect. The idea is to make the progression of highlights subtle, like a path through your image. Of course, this technique will not be possible in all situations but if it’s available considering using this method.

5 Simple Techniques for Leading the Viewer's Eye in Your Images

Shot from a kayak during sunrise I wasn’t intending to shoot this image with a brightness gradient. Instead, it’s a happy accident.

#2 – Linear perspective

When using a wide angle lens, you can consciously create linear perspective within images. This technique might be one of the more easily attainable methods of leading the eye. The wide angle lens will exaggerate lines and lead the eye fairly directly through the photograph. You can compose your photographs in such a way that buildings or other architectural features draw viewers through your photograph.

5 Simple Techniques for Leading the Viewer's Eye in Your Images

The line of lights and the line of buildings lead the eye through the photo. The viewer should be stopped by the bright spots of light within the image but then continue on through the rest of the photograph.

I’ve added some arrows to this image so you can see how the lines of the pier point the viewer into the photograph. The teenager in the image is a second way of directing the eye as he stops to view the sunset.


#3 – Use shafts of light

Using shafts of light is another technique for pointing viewers in the right direction. The conditions are very specific, and shafts of light are not always readily available, but they can be a useful tool for pointing out specific directions or objects within a photograph.

The photograph below was taken by my son. His plan when composing was to have the ray of light point towards the people. I must admit I didn’t think of composing in such a manner and when I asked him later he said it was “the natural choice”. Since that time I’ve made conscious decisions to look for and incorporate rays of light into my images.

5 Simple Techniques for Leading the Viewer's Eye in Your Images

There’s a fairly strong lens flare in this image but my son made a conscious choice in how he composed his photograph and I’m proud of him for his decisions.

#4 – Use a blur gradient

Using a blur gradient (shallow depth of field) is another method of leading the eye. I will admit that I don’t use this technique much. I even struggled to find images to use as examples for the article. Part of my reasoning is that I hope I will now be forced to experiment more with this technique.

Using a focus gradient can lead the eye to the important elements of the photograph. Setting up a shot in which the foreground is blurred and slowly recedes through the image to the point of sharp focus will draw viewers to specific objects within the frame.

I used a fairly large aperture here and while the blur gradient isn’t as obvious it is still present in the image.

#5 – Use more than one technique

You can also combine these techniques to help influence eye movement throughout your images. In these two images, the eye moves through the image the light gradient is the most obvious technique but lines of architecture within the building help to draw the viewer down the tunnel. The lights hanging at the top of the image are an obvious line that directs the eye.

Similarly, this image of the couple walking through the image adds to the movement within the photograph. The lines of the path reinforce the direction the viewer should take within the image.

Shot at a provincial park this image combines elements like linear perspective and vectors.

Conclusion

Leading the eye through a photograph is not an exact science. You can’t force viewers to follow the path you set for them. Each person approaches the artwork in different ways. If your use some of the techniques outlined here, it will help you to create compelling compositions. The more thought and purpose we put into creating our images the better they will be. While there may not always be time to use these techniques, it’s always handy to keep them in the back of your mind and use them when the time is right.

The more thought and purpose you put into creating your images the better they will be. While there may not always be time to use these techniques, it’s handy to keep them in the back of your mind and use them when the time is right.

The eye-leading techniques used in this image are a little harder to spot. I used the lines of the barrels and rays of light to direct the viewer’s eye into the center of the image.

googletag.cmd.push(function() {
tablet_slots.push( googletag.defineSlot( “/1005424/_dPSv4_tab-all-article-bottom_(300×250)”, [300, 250], “pb-ad-78623” ).addService( googletag.pubads() ) ); } );

googletag.cmd.push(function() {
mobile_slots.push( googletag.defineSlot( “/1005424/_dPSv4_mob-all-article-bottom_(300×250)”, [300, 250], “pb-ad-78158” ).addService( googletag.pubads() ) ); } );

The post 5 Simple Techniques for Leading the Viewer’s Eye in Your Images by Erin Fitzgibbon appeared first on Digital Photography School.


Digital Photography School

 
Comments Off on 5 Simple Techniques for Leading the Viewer’s Eye in Your Images

Posted in Photography


Instagram terms and conditions rewritten in simple language for teens

10 Jan

Law firm Schillings was recently tapped by the UK’s Children’s Commission to rewrite Instagram’s Terms and Conditions in simplified, child-friendly language. The simplified terms of service were included in the Commission’s newly published ‘Growing Up Digital’ report detailing, among other things, ways in which the Internet can help young users become better informed about the websites and apps they use.

At the heart of the report is a concern that children (and many adults) are unable to make informed decisions about the digital services they use due to the difficulty of understanding a service’s terms and conditions. The report cites Instagram’s Terms and Conditions as one example, finding that it contains 5,000 words across 17 pages ‘with language and sentence structure only a postgraduate could be expected to understand.’

Teenagers tasked with reading original Instagram Terms and Conditions report trouble understanding the information and frustration at its length. When given the rewritten TAC, however, which are condensed down to only a couple pages, the teenagers are able to explain the rules, what rights they have, and what rights Instagram reserves.

The full rewritten Instagram Terms and Conditions can be found on page 10 of the Commission’s report.

Via: PetaPixel

Articles: Digital Photography Review (dpreview.com)

 
Comments Off on Instagram terms and conditions rewritten in simple language for teens

Posted in Uncategorized