RSS
 

Posts Tagged ‘shot’

Behind the Shot: Flames of the North

11 Aug

Nature photographer Erez Marom had cold feet – literally – when he created this image. Standing (with thermal boots on) in the freezing waters of a glacier lagoon in Iceland, he saw an opportunity to capture a unique ice formation in the foreground, distant snow-capped mountains and the Aurora Borealis above it all. In this article he explains how he used focus stacking to get the look he wanted for his final image, ‘Flames of the North’. Learn more

Articles: Digital Photography Review (dpreview.com)

 
Comments Off on Behind the Shot: Flames of the North

Posted in Uncategorized


And in the end… Beatles ‘Abbey Road’ cover photo was shot 45 years ago today

09 Aug

The photograph on the sleeve of ‘Abbey Road’ by The Beatles is among the most famous images in popular music, and it was taken 45 years ago today. The debate about whether Abbey Road was The Beatles final album continues but for a whole generation of fans, the image of John, Paul, George and Ringo walking across the street outside Abbey Road studios in London signified the end of an era. Click through to see how fans are marking the anniversary.

Articles: Digital Photography Review (dpreview.com)

 
Comments Off on And in the end… Beatles ‘Abbey Road’ cover photo was shot 45 years ago today

Posted in Uncategorized


On-Assignment: Full-Sun Group Shot

18 Jul

If you have never done it before, lighting a group shot outdoors in full sun can be daunting. After all, sun is pretty bright. And your subject is pretty big and thus harder to light at a high level.

But with a leaf-shutter camera and a couple of battery powered monoblocs, you can easily own the sun and just about anything you can put under it.

Read more »
Strobist

 
Comments Off on On-Assignment: Full-Sun Group Shot

Posted in Photography


Three Tips for Being Ready to Shoot Faster so you Never Miss a Shot

11 Jul

We’ve all heard one of the cornerstones of making better photographs is to slow down; be deliberate and take your time. This is very true. In no way am I advocating not being purposeful in your shooting. However, sometimes there are situations when the difference between getting a good image, instead of a blurred and washed out frame, is separated by only a few precious seconds. This is especially true when it comes to working in action filled situations like sports or street photography, but it can also be just as easy to miss moments in nature and landscape photography if you go into situations ill prepared.

Here are three tips that can improve your reaction time and make you more ready to obtain quality images for processing when you find yourself in those “shoot from the hip” scenarios.

Being Ready to Shoot Faster – Never Miss a Shot

Be Self Aware

Knowbeforeyougo

“Know thyself.” No, Socrates wasn’t a photographer (though I’m sure he would have been awesome). In this case, the saying of “know thyself” means becoming aware of your surroundings more so than having a deep introspective understanding of your own self, although that’s a good thing to have, usually. We exercise this on a daily basis, albeit almost unconsciously. You notice a stain on your shirt, or you see the little boy chasing a ball towards the street, or you see a dark alley that’s just a little too dark to walk down alone. You can incorporate this same inherent awareness into your photography to make you a faster shooter.

Here’s an example: Let’s say you find yourself taking an afternoon to work on your street photography. When you first begin your expedition, it’s very bright outside. You are probably still able to shoot at a reasonably fast shutter speed and low ISO. As the evening starts giving way to night, there is of course less available light. So, a good idea would be to begin thinking about bumping up your ISO so that you can maintain the same exposure settings. Or alternatively, slowing down your shutter speed or increasing the size of your aperture (remember, low F-number means a bigger opening and more light into the lens such as f/2.8). Keep in mind however, that a higher ISO will introduce more noise into your final image, but it will have less of an overall impact than changing the shutter and aperture settings.

In photography, your surroundings are in a state of constant flux. So, to be a good photographer, you must be aware of the changes in your surroundings and mould yourself the best you can in order to produce consistent and quality work. This means learning to understand what is happening around you, whether it be: changing lighting conditions, approaching weather, wind, the presence or absence of people and objects, – the list goes on indefinitely. Anticipate what is going to happen next and make adjustments now, to save time later.

Shoot Comfortably

This would seem to go without saying, but you still see many photographers looking down right uncomfortable or awkward while they’re out shooting. Sadly, the majority of the pain is self-inflicted. To shoot faster and to be ready for the shot when the time is right, your camera must be available for use at a moments notice without restricting your movement or causing discomfort. One of the best ways to make this happen is to have your camera suspended from a quality camera strap. Camera straps, like most things, can become a very personal item for new and seasoned photographers alike. Don’t buy a strap because its got pretty flowers embroidered on it or because its made from the latest space age whatever-foam. Do a quick search for “camera strap” here on dPS and you will find a large number of reviews and write-ups of great camera straps. But don’t stop there. Shop around, read reviews, ask your photographer friends and sift camera forums. Being able to comfortably retrieve your camera quickly is key to not missing great images.

Have a budget? Most of us do, even more of us can’t afford to spend thousands on the latest lens or camera body that we dream of owning. Luckily, the majority of the accessory market is crammed with makers competing to sell you their wares. It’s easier than ever to strike a balance between what you need and what you can afford. If you can, have more than one camera strap in your kit so you can choose what fits best for a particular outing.

Badstrap

Prepare Beforehand

This is the big one, yet many people don’t seem to understand that preparation is golden. A close cousin to situational awareness, research and preparation prior to any photo work should become second nature and will pay huge dividends. It will also make you a faster shooter and help to prioritize your workflow, not to mention make you appear more competent as a photographer.

Preparedness

Know what you’re walking into beforehand and prepare accordingly. Are you going on a hike? Find out what wildlife and plants are native to the area and pack your bag with long lenses so you can get close to your subjects from a distance. Travelling abroad? Be sure to read up on the local attitudes towards photography before you start snapping away to avoid any awkward confrontations or worse. Of course, the most unpopular, but useful, aspect of being well prepared is practice, practice, pactice. Practice, and then practice some more. Want faster and more smoother lens changes? Practice at home, so you lose less time in the field and have fewer fumbles. Practice finding your camera adjustment buttons without looking. This will save you loads of time and frustration when you find yourself shooting at night. If you haven’t figured it out by now, the key word here is practice. Practice everything and you will be amazed at how much easier quicker most things suddenly become.

Do you have any other tips for shooting faster and being ready? Please share them in the comments below.

The post Three Tips for Being Ready to Shoot Faster so you Never Miss a Shot by Adam Welch appeared first on Digital Photography School.


Digital Photography School

 
Comments Off on Three Tips for Being Ready to Shoot Faster so you Never Miss a Shot

Posted in Photography


Step By Step How to Do a Head Shot on a White Background

14 May

Today you are going to come ride along with me as I shoot head shots for a client in San Diego, California. I was hired by a company to create simple head shots of their instructors in the San Diego area.

There is a very big market for head shots and quite a few people want them shot on a white infinity backdrop. There are many ways to do this but I’m going to take you along on a shoot with me and show you how I do it:

Step by step how to do a head shot on a white background

Digital-Photography-School-Steven-Head-Shot-Thumbnail

First off, what is a seamless backdrop?

It’s a giant roll of paper – thats it! I used an 8-foot long roll in ‘alpine white’ color. Again, it’s just a big white roll of paper. When properly lit, this roll of paper gets ‘blown out’ or overexposed, so it appears as a perfectly white void on which your subject sits/stands in the middle. This white void makes the viewer focus on your subject rather than a cluttered background.

Setting up the seamless backdrop

As you can see in the animated GIF below, I start by finding an open area at least 8 feet wide. This is easier to set up with two people, but on this corporate shoot it was just me.

To make this easier to set up by yourself just lay the roll of paper on the ground and position the light stands on either side of the end of the roll of paper at their lowest height. Make sure the paper is set to unroll from underneath the back of the roll ,and not over the top and front of the roll.

When you pull from the back of the roll the natural curl of the paper will let the paper roll straight to the floor then curl toward your camera  into the room. This will provide a smooth curved transition from the vertical roll of paper into the floor and toward you so the background and floor will appear seamless. If the paper is pulled from overhand when it hits the floor it will want to curl backwards toward the back of the room. This won’t create seamless transition as you pull the roll into the room.

Run the cross bar through the center of the paper roll – the cross bar will stick out about 2 inches on either side of the roll. The cross bar has 2 slots at each end and the light stands have two vertical screws. Lift up the roll and place these two slots into the two vertical screws and then screw in the included wing nuts to secure the roll onto the light stands.

Raising the seamless backdrop

Now that we have the paper roll secured on the light stands at their lowest height, it’s time to raise it up. The light stands have two sets of clamps and two sets of vertical poles that raise up. With two people you can simply raise the paper roll at the same time to the desired height and lock the clamps down to secure the paper roll at your desired height. With only one person you have to slowly raise one side, then the other, until you get the roll to the desired height. Check out the GIF below and try not to laugh at the CEO jumping in during setup.

Digital-Photography_School

Unrolling the backdrop

Now that we have the bar to the height we want it, we can unroll the backdrop. I always keep little clamps on each end of the roll to keep it from unrolling on its own. Unclamp the little A-clamps on either side of the paper roll and slowly pull the roll down. If you don’t pull slowly the roll can gain momentum, unroll really fast, and go much further than planned! Since we were only doing head shots I just pulled the backdrop down to the floor. Once the roll is at the desired length clip the A-clamps back in place to keep the roll from unrolling further on its own like you see below.

seamless backdrop, studio lights, corporate headshots

Lighting the shoot

The way to make lighting easy is to light in layers, one step at a time. In this case I’m going to light the backdrop first. Once I get that done I’m going put a subject in front of the backdrop and light them separately. Once that is lit correctly we are ready to rock!

Lighting the backdrop

Now that the backdrop is set up properly we want to light it so that it appears solid white. I placed an Alien Bees 1600 studio strobe 3 feet away from the backdrop on the left side and angled it to shoot across the backdrop. The light had a reflector on it to contain the direction of the light. This will make the light rake across the middle of the backdrop to light it up white.

Dialling in the camera settings

I set my camera to f/8 aperture as it’s a good middle ground depth of field to start. The studio lights will give me all the light I need so I set the ISO low at 200. I then set the shutter speed to 1/160 which is the maximum shutter speed sync my camera allows. In this room a 1/160 shutter speed is fast enough that none of the lights on the ceiling would register – essentially I’m killing any ambient light in the room so the only light that shows up in the photo is from the studio strobes.

I take a guess and set the studio strobe light at 1/4 power. I do a quick test at f/8, ISO 200, 1/160 shutter speed and get this:

corporate headshots, white seamless backdrop, studio strobes, lighting setups

Looks pretty good to me! You can see the area closest to the light is perfectly blown out white, but as you move to the right the light is becoming weaker and the white backdrop appears more grey. Because the light is weaker on the right side it’s also showing the wrinkles in the paper. Because I’ll be placing people several feet in front of the light stand and zooming into the middle of the backdrop I’m not concerned with the right side of the backdrop. If I were shooting a wider shot I would add another light on the right side of the backdrop to light up that side, but that isn’t necessary for this shoot.

Lighting the subject

Now that we have the backdrop dialled in it’s time to light the next layer – the subject. I place an Alien Bees 800 studio strobe to the right of the backdrop, about six feet in front of the first light. I put an umbrella on the light which spreads the light out (diffuses it) as it passes through the umbrella and gives it a nice, soft appearance. I set the light at 1/4 power, at a 45 degree angled downward, and raised to about 8 feet high to test it out.

I step in front of the backdrop like the goofball that I am and get this:

studio lighting, seamless backdrop, corporate headshots

The backdrop still looks good, but I (the subject) am overexposed. This means the umbrella light is too strong. I reduce the power from 1/4 power to 1/8th power, have the CEO grab two nearby Nerf guns, step back in for a test, and get this:

seamless backdrop, studio lights, corporate head shots

Looking much better!

The light hitting the white background is bouncing onto the back of the subject and wrapping around his body too much. To correct this I need to move the subject a few feet toward the camera so the light bouncing off the background falls off before it reaches him. When I do this I also need to move the umbrella light the same distance toward the camera to keep the same exposure.

I also want more room to the right to compose my subjects so I move the umbrella light two feet camera-right, and one foot toward the camera. I then have the subject move two feet camera-right and one foot toward the camera so the background light won’t reach the subject as much.  I take another test and get this:

seamless backdrop, corporate headshots, digital photography school, seamless backdrop

This looks great to me. The background layer is blown out white, the subject layer is properly exposed, and as a bonus just enough light is bouncing off the backdrop to give some backlighting to the subject. Here is a closer crop to see what we are working with:

studio lights, seamless backdrop, corporate headshots

The only thing I should do to improve this is have the subject turn his body to face the umbrella so there isn’t so much shadow on the camera-left side.

Positioning the subject

headshot, seamless backdrop

The client wanted simple head shots of their instructors for use on their website profiles. I had the subject stand in the same place, square up their shoulders to face the umbrella light, and smile. You’ll notice that the umbrella placed up above the subject and pointed down at 45 degrees leaves a nice catch light (the white reflection of the light) in the top right corner of the subject’s eyes. When you can place a catch light at the ten or two o’clock position (like on an analog clock) in the subject’s eyes it brings them to life. Here is what we end up with:

 Quick positioning tip

To keep everything consistent, place some tape on the floor where you want people to stand. I didn’t have any tape with me but I did have an extra umbrella. I simply placed the umbrella at a diagonal angle and told the subjects to place their toes against the umbrella. This squared them up with the light so each portrait was consistent.

Wrapping it up

Overall it was a very quick setup, shoot, and breakdown. We shot 45 different instructors in about 45 minutes! Once everything was dialled in we just photographed one instructor after the next. The shoot was fun, the client was happy, and the instructors loved their head shots!

Digital-Photography_School-Portaits

Would you like to see more real shoots?

Did this post help you and did you enjoy seeing some behind-the-scenes info on real client shoots? If so sound leave me a comment below. If it would help I’d love to start sharing more live client shoots to show everyone how they come together!

For more portrait tips using a white background see these articles on dPS:

  • 4 Tips for a Perfect White Background in High Key Photography
  • White Seamless – Studio How-To
  • Awash In Light: High Key Portraiture

The post Step By Step How to Do a Head Shot on a White Background by Mike Newton appeared first on Digital Photography School.


Digital Photography School

 
Comments Off on Step By Step How to Do a Head Shot on a White Background

Posted in Photography


Behind the Shot: Shredded

06 May

900_Kirkjufell_5-2-2013_7.jpg

In the latest of his series of ‘Behind the Shot’ articles, landscape photographer Erez Marom shows us how he captured a dramatic image of Kirkjufell mountain, overlooking a frozen lake in Iceland. Marom talks about his equipment choice and exposure settings, and also gives a step-by-step look at the post-processing required to achieve the final result. Learn more

News: Digital Photography Review (dpreview.com)

 
Comments Off on Behind the Shot: Shredded

Posted in Uncategorized


Behind the shot: ‘Louisville in Motion’

24 Mar

Screen_Shot_2014-03-20_at_12.39.50_PM.png

Making a time-lapse video isn’t trivial, but the end result is compelling. Photographer Eric Stemen explains how he made his tribute to Louisville, Kentucky. He talks about his shooting technique – everything from getting good exposures to using sliders. There’s also a look at all the gear he used and some post-processing tips. Learn more

News: Digital Photography Review (dpreview.com)

 
Comments Off on Behind the shot: ‘Louisville in Motion’

Posted in Uncategorized


How I Got The Shot: Portrait Style

30 Jan

Lynsey Peterson_6howIgottheshot

Whenever I see “How I Got The Shot” articles, they are typically landscape or nature shots, or difficult lighting situations.  Rarely do you see a detailed account of the taking of a portrait image.  Maybe because for portrait shots, it’s often more about the connection between subject and photographer than the technicals, or maybe because it seems fairly straightforward.  That said, when I was first starting out in portrait photography, I spent many hours drooling over beautiful images I admired and wondering how they had been taken, and more importantly, how could I try to take something similar.

This article will not only discuss the technical accepts of the shot and the editing process, but also the interaction I had with the subject, which was key to this, and every shot I’ve ever taken.

Portrait Style

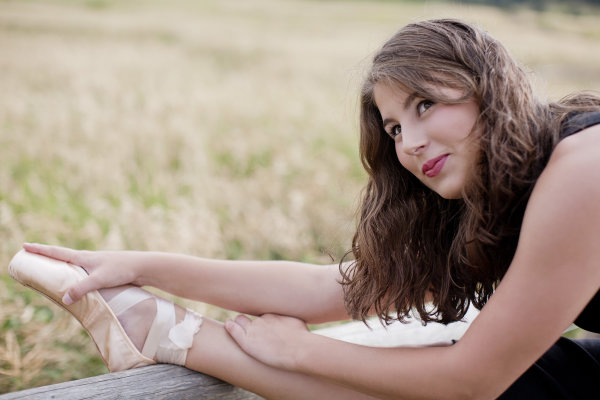
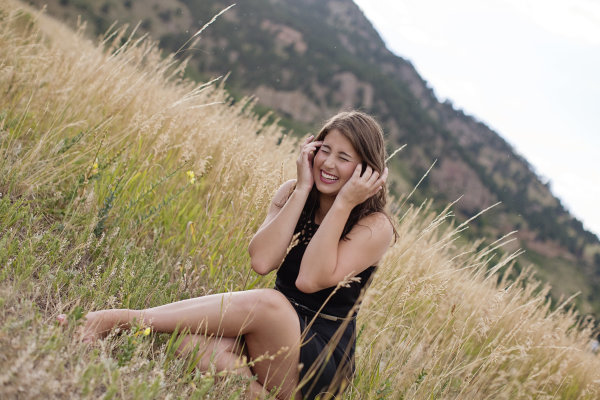
This beauty is Madeleine and these images are from her high school senior photo shoot taken last September.  I don’t often shoot this type of portrait. But, I say the same thing about weddings and dogs and yet I’ve photographed both in the last week, so maybe I should just face the fact that if you are lovely and ask me real nice, I’ll shoot just about anything.  Except food.  Food photography freaks me out.  Life is hard enough without having to make sure sesame seeds are all in the perfect place, or that there is just the right amount of shine on an edge of cheese.

Lynsey Peterson_1howIgottheshot

Madeline has studied dance on and off and had just started pointe dancing prior to this shoot, so incorporating her new pointe shoes into a few shots was something she wanted to try.

Technical stuff – gear

These images were shot at Boulder, Colorado’s Chautauqua Park in the rain, near sunset. I was likely wearing a black t-shirt, jeans, and flip-flops if you want to get the full visual, but I doubt that mattered much because 90% of the time I am wearing a black t-shirt, jeans, and flip-flops. Probably of more interest to you was the gear. I travel light and I’m not into fancy equipment (my money is better spent on quality flip-flops), so this was shot with my faithful Canon 5D and my workhorse/splurge Canon 50mm f/1.2L which rarely leaves my camera body.  I typically don’t use a lens hood, and didn’t here as I like a little flare.

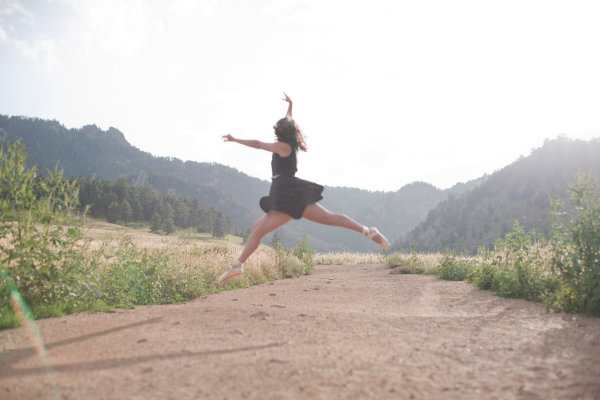
The image below that I will detail was shot in Aperture priority mode (f/2.5). I could possibly wax poetic about my camera, the settings, and lighting and other technical components for a few more paragraphs but it is truly not necessary. Here, as with most portrait photography, the details of how this image came to be were driven by the subject matter: the location choice was her favorite park; the jump was something that she felt she could do and a way to incorporate the dance element that I felt was least awkward and most genuine; and the settings were dictated by the need to shoot towards the mountains.

An argument could be made that this isn’t a true portrait, unlike the image I’ve shown above. An argument could also be made that flip flips aren’t real shoes. But they get me from point A to point B, are extremely comfortable, and allow for me to continue my hatred of anything on my feet. A portrait is a documenting someone’s likeness. This is a picture of a 17 year old girl that does ballet, has a beautiful free spirit, and mountain living in her DNA. I can’t think of a better way to document her likeness.

The Process

Let’s start with the Straight Out Of Camera (SOOC) image

Lynsey Peterson_2howIgottheshot

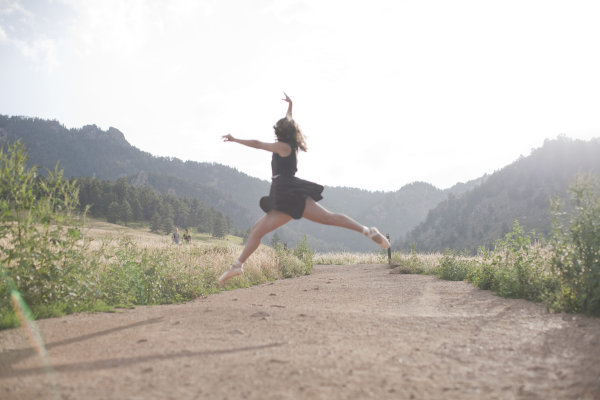
Other than minor editing to her skirt, this is exactly what the world looked like in my camera. I shot this in RAW and converted it to jpg in Photoshop. My settings were not spot on, and there are flaws. The most glaringly obvious flaw, being that focus on the subject is soft at best.  I mean, really soft–clouds and fluffy bunny rabbits soft. There were other images in this sequence where the focus was much sharper. But in those, I didn’t care for arm placement, or light, or a hundred other picky details. I could have taken the sharpest one of the bunch and edited it to perfection, completely changing or correcting things, turning something unreal into reality. Some photographers would may do that, but I am not going to fight for either side of that battle today. This is a picture of a girl jumping in mid-air and if you are looking at that happening in real life, it’s not going to look sharp as a tack. This is an image worthy of being delivered to the client, soft focus or not.

Image clean up

The first thing I always do to an image during the editing process is clean it up if necessary. This park is always crowded, and waiting for random people to be out of the shot isn’t an option I like because the entire mood could change. I also don’t like to use Photoshop to drastically change anything (as mentioned earlier when I refused to do Photoshop Plastic Surgery on a sharper image), but here the lessor of two evils is just to remove the innocent bystanders from the image entirely in post-production. Beyond the hikers, there are a few other elements that are distracting including the trail markers, which only take away from her being in midair.

Lynsey Peterson_3howIgottheshot

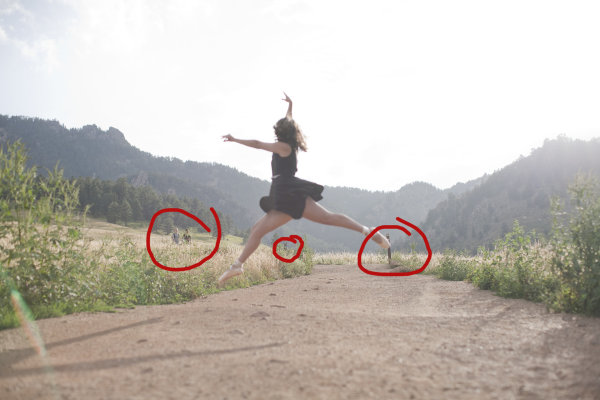
Things to clean up in Photoshop

Warm up!

This was not the first image we shot. People take time to warm up. If I had asked her right off the bat to leap as high as she could, without care as to who was watching or how she would do it, or what it would look – she wouldn’t have been comfortable enough to even try it. We started with some basic face-only shots, worked up to some dance poses in the shoes, and then found a spot where she felt comfortable enough to jump. Because of this, I didn’t have a lot of options for the exact frame. This was the flattest and least rocky area for the jump to be safe and successful.

Whenever I attempt an action portrait shot, I do several things the same when interacting with the subject: 

#1 – I always watch them the first time with my own eyeballs.  

I don’t even touch my camera. Not only do I need to see the entire view without the limits of a viewfinder, I need to earn their trust that I am interested in what they’re doing, with or without the picture. Then after encouragement, I make it clear that we may have to try this several times; she may not nail the jump, but then again I may not nail the shot, successful jump or not. To give you an idea, for the five jumps she did, I have 32 shots taken over the course of about 8 minutes.

#2 – this is typically the only time I break my rule of never letting a client see the image in the back of my camera.

For an action shot like this, I shoot until I have an image I like and then show my subject. It’s their action, their talent, their special trick. I have no idea how to leap in the air like this; I want to know that whatever they are doing is coming out as they envisioned it, or at least that they are happy with how it is likely to turn out. I, like most of the people who will view this, have no idea if this jump is technically correct in the world of pointe dance. That one ballet class I took in the first grade didn’t really cover much beyond how to stand straight in a tutu. However, in the moment I remember questioning even photographing this considering I didn’t know what to look for. In those moments, it’s best to realize that the only thing you should be looking for is a great image—you’re not always qualified to look for much else.

Lynsey Peterson_4howIgottheshot

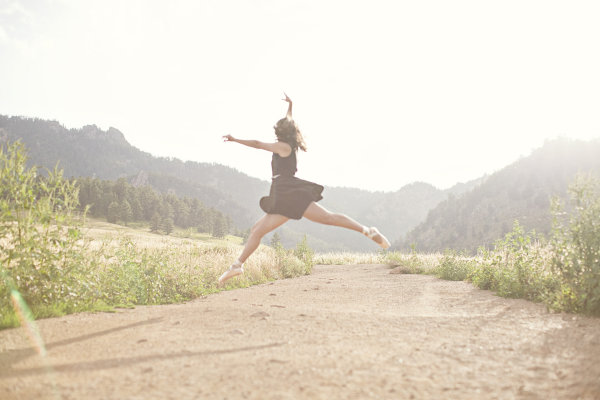
After image clean up

Most important – subject’s comfort level!

Now that I have cleaned up the things that didn’t need to be there and adjusted my exposure a bit, I will tell you the most important technical piece of this image: none of it matters. It really doesn’t. Why? I’m glad you asked. Even if I had the fanciest equipment available, perfect light, sharp eyes, and sturdy flip-flops, there is no way I could have gotten this shot if Madeleine didn’t feel comfortable. Not only is she fairly new to pointe dancing, she is a teenage girl. The most important thing I brought to this shoot was an ability to make her feel comfortable, a ton of patience, and an honest desire for her to love these pictures.

Without those things, this image and every other one I shot that day, don’t happen. For me, portrait photography is 95% people skills and 5% equipment. Maybe even a little luck thrown in for good measure. But we still need to make it sing the tune it was meant to carry. Throw in a little sparkle.  Wave the magic wand a bit. Put a layer of frosting on this cake.  Everyone loves frosting–I don’t know if I could trust someone that doesn’t.

Final touches in Photoshop

I started with a manual adjustment in Photoshop with Levels, a quick sharpener with the oddly named Unsharp Mask (60% and 2.0 pixels is my go-to setting), and then removed a few stray raindrops that were showing on her dress.  I opted to leave the framing the way I shot it—I like the bit of shadow you see of her legs in the bottom left corner, and I like where she is in relationship to the mountains in the background.

Now for the fun part: I use a few actions to kick-up the color and clarity a notch on most of my images. I like Totally Rad and the Pioneer Woman’s actions quite a bit and over the years have managed to customize my favorites to exactly what I like, saving me a great deal of time. Here I have used a few actions to both sharpen the color and also warm it up a bit, to give a nod to the sun flare that was already there. In doing so, I lost a bit of my sky detail, but I don’t miss it. Here is the finished version of the image:

Lynsey Peterson_5_finalhowIgottheshot

And voila! It’s just that easy. Years of ballet lessons, a scheduled photo shoot, waiting out a rainstorm, getting to the perfect jump, and a bit of editing. Oh internet, I kid.

This is an image that I love. This is an image that my client loved. Will it end up in a magazine or be noticed by people beyond those that love Madeleine, and obviously anyone reading this? No. But it’s a shot that I am proud of. It’s a great example of the kind of portrait photography I like to do and a lovely addition to my portfolio. It happily hangs on a wall in my office, where it will stay as a reminder that not all beautiful and loved shots are technically perfect and portrait photography is a lot more than a camera and a pretty girl.

Lynsey Peterson_7howIgottheshot

The post How I Got The Shot: Portrait Style by Lynsey Peterson appeared first on Digital Photography School.


Digital Photography School

 
Comments Off on How I Got The Shot: Portrait Style

Posted in Photography


How the Shot was Done: SNK Police Cosplay

23 Jan

Cosplay-shoot-first-shot

I do a lot of cosplay (short for costume play) photography with friends, and I was asked by some to do a cosplay crossover photo shot (Shingeki no Kyojin / Psycho Pass) with them. They sent me some reference shots from which I decided to create a slightly futuristic, detective movie kind of look. I also thought I’d experiment with shooting to fit a wide movie crop to suit the look of the shoot. In this article I’ll show you how I set up, shot and processed two photos from the shoot, including the one above. If you’d like to see more photos from the shoot, you can do so here.

So on to how the shot was done . . .

The right location

Our location for the shoot was the rear of Federation Square in Melbourne, Australia. It’s a futuristic looking building with lots of metal, glass and interesting angles in its construction. For the shot above I wanted to take advantage of these textures to accentuate the futuristic look, so we first went to the alcove depicted below in this behind the scenes photo.

Cosplay-shoot-first-shot-BTS

Lighting the shot

It was dusk so there was little light getting into the alcove from what became camera left. I wanted to keep that light in the shot as a fill, but my key light was going to be a ring flash – my Orbis ring flash. This kind of light gives a dramatic look with almost no shadow. It’s stark and flat but works well with this kind of scene. In my first test shot I noticed a fantastic unexpected effect of the brushed metal backdrop: anistropic reflection. This created a bright diagonal streak across the back of the shot.

To get the right balance of fill to key, I set the camera to 1/125sec f/2.8 ISO160 and adjusted the power on the flash to get the right brightness for the shot. This ended up being towards the bottom end of the flash power. Following is a lighting diagram and the photo as it came out of camera:

Cosplay-shoot-first-shot-diagram

Cosplay-shoot-first-shot-raw

Processing the image

In post processing the major changes I made were to increase the contrast and clarity, as well as a significant temperature move towards blue, and tint shift to green. With a movie aspect ratio crop and heavy vignette, plus a few small tweaks to the exposure settings, I ended up with this final photo (below).

Cosplay-shoot-first-shot

The second location shoot

I love the self-conscious, melodramatic, slow motion walking scenes in movies, and these guys’ outfits were perfect for a shot like that. I wanted to keep a consistent look with the first shot, but give this one its own twist. To do this I took the group out into an area with more space and a cool geometric glass patterned wall as the backdrop. I added a pair of flashes behind the group for some rim lighting, but I deliberately chose to keep them in view for some dramatic lens flares. I replaced the ring flash with an on-camera flash and balanced that to be under the exposure from the rim lighting. This gave me a low key dramatic look (drama was the theme of the night!). Again I set the camera exposure to just give a hint of the background – 1/40sec f/4.5 ISO500 – and dialed the power of the flash to get the balance I was after.

Rather than try and pose the shot, which would look too forced, I got them into a staggered starting position and simply asked them all to walk toward the camera. To get them in an appropriate mood and make them feel badass, I played this tune (which I consider to be the best slow walking music ever) on my phone and it totally did the trick.

Following is a lighting diagram and the photo straight out of the camera.

Cosplay-shoot-second-shot-diagram

Cosplay-shoot-second-shot-raw

I processed this photo in essentially the same way as the previous shot, to get a consistent look and feel between it and the rest of the photos in the shoot. Please visit this gallery to see all the images at a decent size.

Cosplay-shoot-second-shot

I really love cosplay photography because I get to go crazy and pull out all the creative stops, to make over the top photos, that suit the over the top characters and plot from anime. I’m fortunate to have fun, creative and energetic friends to work with to create these shots. If you’d like to see more of my cosplay and other photo shoots, you should like my Facebook page where I post photos regularly, and occasionally discuss how they were made.

Which of the two shots is your favourite, and why?

Models featured in these photos:

  • Ettelle
  • Jase Lube-Sama
  • KnRai
  • Kobito Cosplay
  • Mei at Play

The post How the Shot was Done: SNK Police Cosplay by Neil Creek appeared first on Digital Photography School.


Digital Photography School

 
Comments Off on How the Shot was Done: SNK Police Cosplay

Posted in Photography


Challenge of Challenges: vote for the best shot of 2013

04 Jan

COC1.jpg

To showcase the talent and imagination shown by our Challenge hosts and entrants, we’re once again running a ‘Challenge of Challenges,’ to find the dpreview.com Picture of the Year for 2013 (yes, it’s a bit late, but we ran out of days before the holidays). We’ve whittled more than 1000 challenge winners down to a more manageable 25 – selected by the dpreview editorial team. We’re also trying out a completely new voting interface for the first time. Click here to jump straight to the voting page.

News: Digital Photography Review (dpreview.com)

 
Comments Off on Challenge of Challenges: vote for the best shot of 2013

Posted in Uncategorized