Test shoot with Philecia, shot at the SLC Photocollective.
Jake Garn Photography
Posts Tagged ‘Shoot’
Test Shoot with Philecia
05
Feb
How I shoot sports as an amature photographer
04
Feb
This video is intended for the beginning photographer to hopefully give you an idea how you might like to shoot sports. I realize this might not be the technically correct way to do sports photography, but its what has been working for me. Thanks, and Enjoy.
Video Rating: 4 / 5
10 Ways to Direct a Portrait Shoot like a Pro
30
Jan
In this post Gina Milicia – author of our brand new eBook “Portraits: Making the Shot” shares 10 tips on directing a portrait shoot like a Pro.

Mallory Janson New York: photo by Gina Milicia
1. Check your Mood
Have you ever been served by a rude shop assistant or waiter that was in a bad mood? How did it make you feel?
Your mood on the day of your shoot is going to have a huge impact on the people around you. If you want the people you photograph to look and feel relaxed then you should look and feel relaxed too.
2. Try to be interested rather than Interesting
A great portrait photographer knows how to speak to their models and make them feel comfortable, confident and relaxed.
A persons name is the sweetest sound to their ears so remember it and use it often.
Most people’s favorite topic of conversation is themselves. Ask questions, be interested and really listen to their answers
3. “Be yourself, everyone else is already taken.” Oscar Wilde
Ditch the boring clichés, saying stuff like “make love to my camera” just sounds really creepy
Work with a language you are totally comfortable with. If you are softly spoken then this is how you should give direction. Trying to be someone else will just make directing awkward for you and your model.

Daniel Macpherson: photo by Gina Milicia
4. “By failing to prepare, you are preparing to fail.” Benjamin Franklin
As the photographer you should always be the first to arrive and the last to leave.
Always have your lighting, poses and location worked out in advance. Your model will already be feeling nervous and vulnerable. Subjecting them to lighting tests and your uncertainty is only going to make them feel worse.
5. YOU need to know how to Pose
Practice posing to learn which positions will flatter a body and which shapes looks good from different angles. Or be a model for another photographer and experience what it’s like to be directed by someone else.
Then explain the pose in different ways.
- Get in there and do the pose for them. Show them what you want.
- Explain it to them at the same time.
- Then get your model to do the pose before you start shooting.
This is not only the quickest and most effective way to get your sitter into the pose, it helps you develop a rapport. Once your model knows how nice the pose looks on you (and realizes they won’t look foolish), they will be much happier to do what you’re asking.

Lachy Hulme: photo by Gina Milicia
6. Use Visual rather than Verbal Cues
“I hear and I forget. I see and I remember. I do and I understand.” – Confucius
The quickest and most effective way to direct a person is by giving them visual rather than verbal cues.
Telling my clients how to stand with verbal cues would sound something like this
“Stand with your feet adjacent to each other, weight on your back foot, hips side on, front toe to camera, right arm on hip, left arm in pocket, chest ¾ to camera , head slightly right…. No sorry my right. Now move your head left… sorry, I mean right. Now step left… sorry I mean right”
Verbal cues become incredibly confusing and can really diminish rapport with your client. You become frustrated because your client keeps moving the wrong way and your client is confused, uptight and lacking in confidence.
I have found that visual cues are by far the best way to pose your clients.
I simply swap places with my client walk onto the set and go into the pose so they can see exactly what I’d like them to do.
Once your client is in the correct position continue to use visual cues to direct them.
Some examples of this would be;
“Turn your face towards that tree” instead of “turn your face to the left”
“Move your face towards the window and move your eyes back to look into my camera” instead of “turn your face to the right and look at me”
7. Praise and Encourage
Give positive feedback when your model is doing the right thing. It’s classic positive reinforcement but it works. Ignore the bad and praise the good.
Talking to your model will keep them relaxed so they don’t worry about what you’re thinking behind the camera (because that’s exactly what they’re worrying about).

Shaun Micaleff: Photo by Gina Milicia
8. One Size does not Fit All
“A photograph is just a tiny slice of a subject. A piece of them in a moment. It seems presumptuous to think you can get more than that.” – Annie Leibovitz
It’s really important to choose poses that fit your model.
Trying to foist a particular style and attitude onto the shoot is a short cut to your model looking and feeling uncomfortable. Most great portrait photographers are masters at letting their model’s personality come through in their shots.?
9. Eye, eye, eye
“You can’t hide your lying eyes” – The Eagles
Everything you think about is mirrored in your eyes. I actually notice this in the eyes of women more than men.
Even if you’ve nailed the pose, the lighting, and the location, an insincere smile or eyes that lack emotion can ruin your shot.
How do you get your sitter to switch off?
While you can’t actually stop your sitter from thinking, you can direct them to a better headspace to reduce any negative thought patterns.
Here are a few visualization techniques I use
- Favorite holiday destination
- Dream job scenario
- Meeting one of their idols
Ask your sitter to look away from the camera, and then back again after each frame. This is especially useful on a long shoot as it distracts your sitter long enough to give them fresh, thoughtful eyes for each shot.
Make small variations on the pose to make it a little more interesting, such as asking your sitter to make their smile bigger or smaller.
Just keep talking
10. The quiet moments in between frames
Some of my best portraits have been captured in those moments between frames when the model thought I wasn’t shooting and relaxed their “pose face” or glanced/laughed off camera. Watch for these moments. They are gold.
Enjoy this post? Check out more of Gina’s advice in her new eBook – Portraits: Making the Shot (and get a bonus one free for the next week only).
Post originally from: Digital Photography Tips.
Check out our more Photography Tips at Photography Tips for Beginners, Portrait Photography Tips and Wedding Photography Tips.
10 Ways to Direct a Portrait Shoot like a Pro
DSLR Tutorial: How to shoot a documentary & what gear to use!
22
Jan
Facebook: facebook.com New tutorials only here: youtube.com Fenchel & Janisch DSLR Tutorial Series: Shooting news and documentary style handheld and with tripod. In this “how to” video we show you how to prepare and film news and other kinds of documentaries. We will explain why you can’t shoot at a demonstration with a tripod and a tele-lens plus we will talk about sound and lenses in this new DSLR filmmaking tutorial by Fenchel & Janisch. Voice Over: Moritz Janisch Copyright 2011 by Fenchel & Janisch Filmproduktion GbR Twitter: twitter.com More DSLR videos on our channel: www.youtube.com Official website: www.fenchel-janisch.com
How to Shoot Really Big Panoramas
21
Jan
The image below is a stitched panorama comprised of 7 separate frames, stitched together in Photoshop CS6, using the Photomerge feature. The full sized finished image weighs in at 85 megapixels. In this article I will share some tips for creating your own stitched panoramas.

Sunset Cliff, San Diego, CA – 1/160, f/5.0, ISO 125, 70mm (Canon 5DmkIII, EF24-70mm f/2.8L USM)
Shooting your Photos
The first step in creating a stitched panorama with Photomerge is to shoot suitable images. Keep these points in mind:
- Overlap the images – according to Adobe, the images should overlap by at least 40%, but no more than 70%. Outside of this range, Photomerge may not be able to align the files correctly.
- Keep your settings constant – you need to keep focal length, focus point, and exposure constant throughout the series of images so that you can combine them later. The easiest way that I’ve found to do this is to take one shot on P, look at the camera settings, and then dial those settings in on manual mode. I also focus on a suitable object about 1/3 of the way into the scene, and then change the camera to manual focus so that the focus will be constant.
- Shoot vertical – this is a little counter-intuitive since we’re making panoramas. It’s usually best to shoot vertical (portrait orientation). Since you’ll merge multiple frames together later to get as wide as you need, shooting vertical will give you a taller overall panorama. Also, you’ll need some of this vertical space for cropping. More on cropping later.
Preparing your Files
The next step in the process is to prepare your files for Photomerge. This is actually optional. If you shoot JPEG and you’re happy with your images straight out of the camera you can go directly to Photomerge in Photoshop. If you shoot RAW, process your RAW images in whatever program you use, and export full size TIFF or PSD files to a temporary location on your computer so you can open them from Photomerge.
Lightroom users: If you process your RAW images in Lightroom, you don’t have to export to disk, because you can send your files straight to Photomerge from Lr.
1. Select the files
2. Right-click and choose “Merge to Panorama in Photoshop…”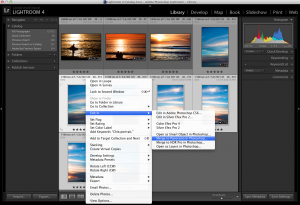
Sending files straight to Photomerge from within Lightroom
Merging your Panorama with Photomerge
The next step is to open your images in Photomerge from within Photoshop, and stitch together your Panorama.
(Lightroom Users: if you jumped to Photomerge straight from Lr, skip to step 4 below)
1. From the file menu, chose Automate > Photomerge

Launching Photomerge within Photoshop CS6
2. Click “Browse” and navigate to the files you exported to a temporary folder in your drive.
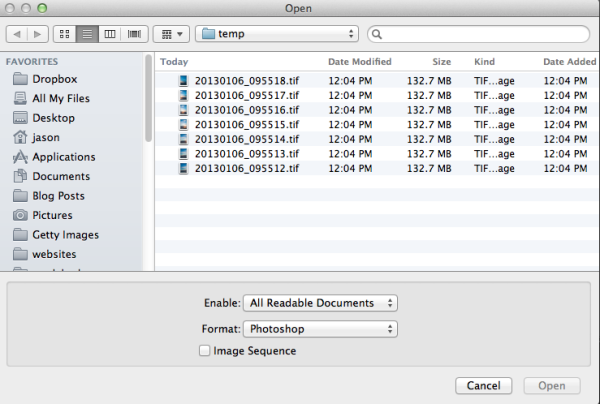
Browse to the location where your files are located
3. Select all of the files and click “Open.”

Select all files
There are several options under “Layout” on the left side of the Photomerge dialogue box, but I’ve had good success with Auto. For a detailed explanation of each of the options, check out the Adobe Help article here.
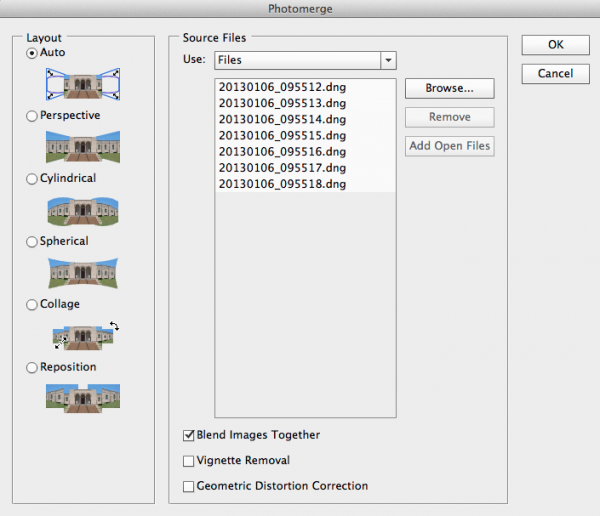
Photomerge dialogue
If you noticed any vignetting or distortion in your source images, select the options to correct that during the Photomerge process. Personally I don’t use these two options, as I’ve noticed they slow down the Photomerge process exponentially. Instead I prepare my images in Lightroom and apply Lens Correction in Lr before sending my images to Photomerge. However these features are there if you need them.

Photomerge options
4. Click OK and wait for Photomerge to complete.
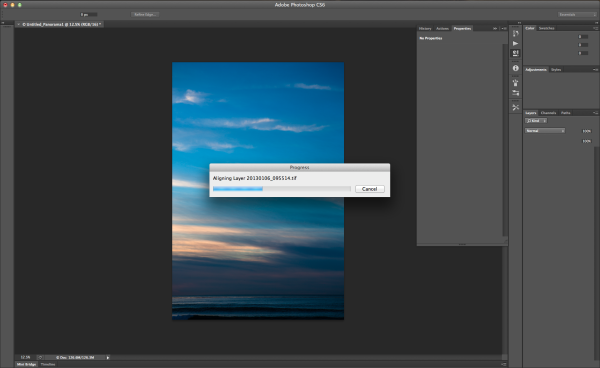
Photomerge working
5. When Photomerge finishes its magic, you will have a single panorama with each image in a separate layer. Zoom to 100% and check the seams between the images. If everything looks OK, flatten by navigating to the Layers menu and selecting “Flatten Image.”

Panorama in separate layers
6. Crop a rectangular composition from the center of your stitched panorama. This is where shooting in portrait mode really helps. There is a more vertical height to the photo and therefore more space available for cropping.
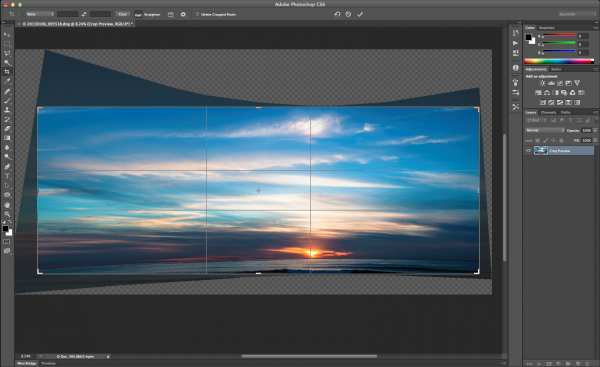
Cropping your Panorama
Conclusion
The Photomerge feature in Photoshop makes stitching Panoramas easy. For me, the hardest part is remembering to take advantage of this feature by shooting images when I’m out an about that I can later stitch together into a panorama. Next time you’re out shooting and the you can’t figure out how to fit the scene into your lens, try shooting multiple frames and stitching together a panorama when you get back to your computer.

7-frame stitched panorama of Matsumoto Castle. Matsumoto City, Nagano Prefecture, Japan – 1/500, f/7.1, ISO 100, 70mm (Canon 5DmkII, EF70-200mm f/2.8L IS USM)
I appreciate feedback, please comment below or feel free to connect with me through Facebook or Google+. I’ll do my best to answer questions and reply to comments.
Post originally from: Digital Photography Tips.
Check out our more Photography Tips at Photography Tips for Beginners, Portrait Photography Tips and Wedding Photography Tips.
How to Shoot Really Big Panoramas
Engagement photo shoot
16
Jan

Engagement photo shoot done with Nikon D300s, Nikon D200, Nikon 24-70mm f2.8, Sigma 70-200mm f2.8, Nikon SB-900, Lastolite softbox.
Realshot TV – Fashion shoot for Made By No One
15
Jan
Made By No One – French Vintage & Jewelry in Malmö needed a fresh new set of shots for an upcoming campaign and trusted Realshot Studios to get the job done. Desirée Dora whipped up the makeup and the styling was created by store owners Tilisha Levin and Caroline Bergqvist. Macs shot the frames and Kimmo assisted and lighted, while Nikko and Elina were the subjects of the day. Check out our work at ?facebook.com
A test shoot with Chase
15
Jan
I shot this series with Chase in late summer of 2012. We simply set off wandering the streets of Hollywood right outside his front door, finding perfect spots along the …
Jake Garn Photography
Pretty Joi Shoot last look with Nawcious
07
Jan
Photoshoot with Nawcious Flik So Sik
Video Rating: 3 / 5
Matt Glass – Spurious Cultist – photo shoot 1
05
Jan

A behind the scenes video of an art project I’m working on. It will consist of photographs, videos and more. www.SpuriousCultist.com filmed by Cynthia Loveland and Matt Glass(me). music by The Bees (Band of Bees) and The Beach Boys.
Video Rating: 5 / 5
You must be logged in to post a comment.