RSS
 

Posts Tagged ‘REVIEW’

Sony a6000 First Impressions Review posted

12 Feb

a6000beauty2.jpg

The a6000 sits in the middle of Sony’s range of mirrorless cameras, just above the a5000 and aging NEX-7. The feature that makes it stand out from the crowd (and not just among Sony cameras) is its Hybrid AF system, which has phase detect points across 92% of the frame. To learn what that means to photographers, and learn more about the a6000 in general, then have a look at our a6000 First Impressions Review.

News: Digital Photography Review (dpreview.com)

 
Comments Off on Sony a6000 First Impressions Review posted

Posted in Uncategorized


Nokia Lumia 1520 camera review

08 Feb

3212278645.jpg

The Nokia Lumia 1520 runs the Windows Phone operating system and offers high-end specs all-around. The device is powered by a Qualcomm Snapdragon 800 quad-core processor and ships with 2GB of RAM but it’s the camera specs that should make the 1520 an appealing option for mobile photographers. The PureView branded camera combines a 1/2.5-inch 20MP BSI CMOS sensor with a F2.4 lens and optical image stabilization. How does it perform as a camera? Read our in-depth review to find out.

News: Digital Photography Review (dpreview.com)

 
Comments Off on Nokia Lumia 1520 camera review

Posted in Uncategorized


2013 Gear in Review

03 Feb

On a whim I decided to look back on my collective work in 2013 and see what gear I used most. Historically I’ve avoided doing this as my gear bag is never very deep. This past year though I took advantage of some perks at BorrowLenses.com where I could experiment with a variety of gear, gear that under normal circumstances would be too costly to buy. So what gear did I fall back on using more and more?

Here are the camera bodies I used through out 2013:

Here are the lenses I used through out 2013:

Here are the hard numbers for both lenses and cameras use in 2013:


What It All Means

I shot a lot of timelapse sequences this year hence the high image count, but I still took the time to take some meaningful still photos. Not to mention I also took the time to enjoy family photography with a waterproof Canon D20 point and shoot.  Clearly I’m a Canon shooter, but I’m not necessarily in love with only Canon lenses. Over the course of the year I’ve come increasingly fond of the Zeiss Distagon f/2.8 15mm lens due to its overall sharpness, minimal distortion in the corners and it’s predictable hard stop for infinite. If I didn’t have access to the lens I’d buy it, but if buying it is not in your budget either then it’s well worth renting the Zeiss 15mm at BorrowLenses.com. The Canon 5D III (which I rent multiple units of per shoot) has become my workhorse camera, but I still own the 5D Mark II. You’ll likely see a trend where I used fast lenses the most (f/1.0 and f/1.4) and this is because I’ve been working on an astrolandscape project where I need to capture a lot of light while minimizing exposure times.  The Canon 24mm f/1.4 has been a great lens to use as it is both fast and well suited to a classical landscape look. My Canon 50mm f/1.0 continues to be my go to fun lens both for family, travel and even an occasional astrolandscape photograph. I tried my hand at some more exotic equipment including the Leica M9 rangefinder and Hasselblad medium format cameras. I was not a fan of the M9 mostly because the sensor is not well suited to low light photography creating super noisy images. The Hasselblad 4HX + IQ280 back was an exotic combination I’d love to revisit using, but will have to wait for a specific project. The combination of broad dynamic range and high resolution opened my eyes to a completely different realm of photographic possibilities.  The brief glimpse into the world of exotic photography equipment was fun, but I’m still most productive and financially solvent in the 35mm DSLR world. We’ll have to see what comes of my gear use in 2014.

Copyright Jim M. Goldstein, All Rights Reserved

2013 Gear in Review

The post 2013 Gear in Review appeared first on JMG-Galleries – Landscape, Nature & Travel Photography.


Related Stories

  • 2013 Gear in Review – Enclosure
  • FLight Pollution
  • FLight Pollution – Enclosure
Feed Ads by FeedBlitz
powered by ad choices


JMG-Galleries

 
Comments Off on 2013 Gear in Review

Posted in Equipment


OM-D on a budget: Olympus E-M10 First Impressions Review

29 Jan

beautyshot.jpg

The Olympus E-M10 wraps much of the E-M5’s feature set into a smaller, more compact body. It retains core OM-D features like twin dials, a built-in EVF and a 16 megapixel Four Thirds sensor, but manages to fit them into a body that’s more Stylus 1 than ILC. It sits below its E-M5 and E-M1 siblings in terms of both price and specifications, but with features borrowed from two very strong predecessors it’s potentially a very impressive camera in its own right. Take a look at our first impressions and sample gallery.

News: Digital Photography Review (dpreview.com)

 
Comments Off on OM-D on a budget: Olympus E-M10 First Impressions Review

Posted in Uncategorized


Fujifilm X-T1 First Impressions Review

28 Jan

decrapped.jpeg

The Fujifilm X-T1 has a lot in common with its X-series siblings – bearing an important distinction: it’s weatherproof. It does in fact offer many of the same inner workings as the X-E2, including its 16MP X-Trans CMOS II sensor with on-chip phase detection. On top of that it adds a revamped EVF, an OLED panel boasting a claimed lag time of 0.005 seconds. Consider also that it shoots 8 fps with subject tracking and it all adds up to a very well specified package. Read our first impressions review

News: Digital Photography Review (dpreview.com)

 
Comments Off on Fujifilm X-T1 First Impressions Review

Posted in Uncategorized


Portrait Plus Retouching Software – A Review

26 Jan
Portrait Plus from ArcSoft packs powerful facial retouching tools into a user-friendly program.

Portrait Plus from ArcSoft packs powerful facial retouching tools into a
user-friendly program

One of the most difficult tasks in Photoshop is also one of the most common. Since we are in the business of making people look good, solid portrait retouching skills are perhaps some of the most important tools in your digital bag of tricks. A couple of months ago, I wrote an article detailing one of my favorite techniques for basic skin smoothing in Photoshop. It’s a pretty straightforward approach to smoothing skin and removing blemishes and I use it all the time. As convenient as it is, though, it can have an impact on editing time, particularly when I’m dealing with a lot of photos at once.

Portrait Plus from ArcSoft is a portrait retouching program that works as a stand-alone application (Windows and Mac) or as a Photoshop plug-in under the filters menu (Currently Windows only). It has a simple, user-friendly interface designed for efficient, seamless integration with your portrait workflow.

How does it work?

Simply put, Portrait Plus automatically detects the faces in your photos, and then identifies 24 key facial features. While this auto-detection is really pretty amazing, it’s not always perfect (and therefore my only real complaint).  Profiles turned too far away from the camera and semi-obscured features (think bangs over the eyes) will throw auto-detection for a loop. I had a couple of images where the auto-detection did not work, requiring me to manually select the facial features and target areas. While a bit frustrating, I don’t view this as that much of a negative, since you are likely to manually adjust the target areas yourself anyway as you become more comfortable with the software.

The overlay on the left shows the facial features automatically detected by the software.

The overlay on the left shows the facial features automatically detected by the software.

Once an image has been imported, you have a choice of using one of the program’s ten presets, or editing the photo manually, with the option of saving the results as a preset for future retouching work. While the manual editing tools are very extensive, and allow users to select specific areas and facial features, many of the test photos I ran through Portrait Plus for this review achieved excellent results with the presets alone. Facial retouching that could take several minutes or longer can be drastically reduced down to just one or two clicks of the mouse. In order to ensure consistency throughout the photo, Portrait Plus also detects all visible skin, giving the editor as much or as little control over the final image as possible.

Powerful editing tools

Here is a breakdown of the manual retouching tools.

Skin

Some skin retouching software simply blurs over the imperfections.  By identifying very specific areas of the face, however, Portrait Plus gives you extensive control over what to repair and to what degree, for a more natural-looking result. By taking this targeted approach, Portrait Plus eliminates deep scars, pimples, scratches, and other imperfections, while restoring or maintaining one of the most important aspects of all–original skin tone.

  • Skin smoothing
  • Skin tone
  • Brighten skin
Original on the left. Skin-smoothed on the right.

Original on the left – skin-smoothed version on the right

Enhancements

If you’ve ever wanted to get in touch with your inner plastic surgeon, here’s your chance. By giving the user control over specific areas like the mouth, cheeks, eyes, and nose, reshaping and fine-tuning facial features has never been easier. Tools included are:

  • Remove eye circles
  • Blemish removal
  • Brighten eyes
  • Deepen smile
  • Lift cheeks
  • Slim face
  • Enlarge eyes
  • Enhance nose
  • Remove shine
  • Whiten teeth

Makeup

Depending on your lighting and camera settings, makeup does not always have the look you were going for in the final image. By having the ability to make these adjustments in post-production, you can either save your original idea, or go in a new direction. You’ve got to be very careful with this set of tools, however–a single mouse click can be the difference between a subtle adjustment and “alien eyes”. Effects included:

  • Blush
  • Lipstick
  • Colored contacts
  • Eye color
  • Eye lashes
  • Eye liner
  • Eye shadow
  • Shape eyebrows

Comparison

The original version of this portrait is straight off the camera, only edited for size. In the Portrait Plus version, you can see how edits like basic skin smoothing, along with a wider smile, slimmer face, whiter teeth, and digital lipstick provide subtle, but significant changes.

portrait-plus-dps-review-007

portrait-plus-dps-review-006

Many of the effects in this software package would take months to learn, and years to perfect if you were to attempt them yourself in Photoshop. While Portrait Plus does have a bit of a learning curve, it is far less steep than what you’d experience by trying to learn all of these edits on your own.

Multiple Faces

Portrait Plus does a great job of detecting multiple faces within the same image.

Portrait Plus does a great job of detecting multiple faces within the same image.

While I’ve not yet tested it on photos with more than two faces, ArcSoft’s website claims that Portrait Plus can detect up to 20 faces in a single image. This can come in particularly handy for event photographers, who often find themselves editing photos of large groups of people. Portrait Plus also allows you to “lock” faces, selecting which faces in a photo are retouched and which are left alone.

Supported file formats

The Windows stand-alone version can import JPEG, TIFF, PNG, and BMP images of 24 bits per pixel, while the Mac stand-alone imports JPEG, TIFF, PNG, and RAW files with 24 bits per pixel. Both Windows and Mac export JPEG and TIFF files. The Photoshop plug-in will import and export all Photoshop-supported file formats.

Wrap-up and recommendations

As a portrait photographer, I strive to get everything as close to perfect in the camera as I possibly can. While even the best portraits can always use a tweak or two, the reality is that some portraits require significant retouching. As important as the editing is, though, so is time with my family. So, whatever I can do to cut down on my editing time is a bonus. As good as I am at retouching, Portrait Plus is a bit of a game-changer. An intuitive, user-friendly Photoshop plug-in, Portrait Plus can seamlessly add a whole new dimension to any photographer’s editing arsenal.

Portrait Plus is available for download on the ArcSoft website.  Enter coupon code Portrait45 at check-out for a 45% discount. Valid through March 31, 2014.

The post Portrait Plus Retouching Software – A Review by Jeff Guyer appeared first on Digital Photography School.


Digital Photography School

 
Comments Off on Portrait Plus Retouching Software – A Review

Posted in Photography


Review: Comparison Canon 5D MarkIII vs the Canon 6D

25 Jan

EOS 5D Mark III and EOS 6D

Now that Canon has two semi-professional full-frame cameras, the EOS 5D Mark III and EOS 6D, naturally photographers wonder which is the best model for them. As a former Technical Editor of EOS Magazine (the best magazine Canon owners could possible buy) I would like to share my insights.

But first, if you’re in the market for a full-frame EOS camera, let’s not forget the top of the range EOS 1D-X. This is a high-end, professional camera with a price tag to match. It’s big and heavy and built for the demands of a professional photographer’s life. Most photographers don’t need this much camera, but it’s interesting to look at because its size and price put Canon’s other full-frame cameras into perspective. Here’s a photo:

EOS 1D-X

EOS 1D-X

Big, right? The body alone weighs 1340 grams (nearly three pounds) and will set you back nearly $ 6800 USD+tax if you buy it from B&H Photo Video. The weight and price alone mean this camera isn’t suitable for most non-professional photographers, leaving Canon’s other full-frame models, the EOS 5D Mark III and EOS 6D, as the available choices.

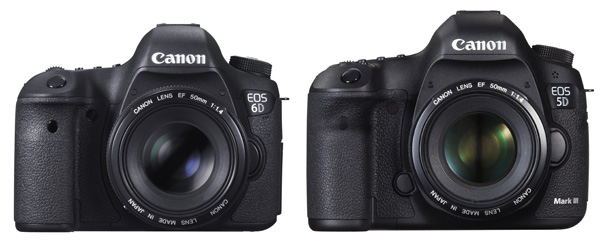
Let’s compare – Canon 5D MarkIII vs the Canon 6D

Key differences

Let’s start by looking at what could be the deciding factor for some people – price. The EOS 5D Mark III costs around $ 3299. The EOS 6D is $ 1500 less expensive at $ 1799 (body only prices). That’s a huge difference, so why would anyone choose the 5D Mark III over the 6D? Let’s take a look.

Size and weight

  • The 5D Mark III weighs around 950g/2.1 lb.
  • The EOS 6D is Canon’s smallest and lightest full-frame digital SLR. It weighs 755g/1.6lb (body only, but including memory card and battery). It is also slightly smaller.

I own an EOS 5D Mark II and I can tell you that it gets heavy when I carry it around all day. If you’re planning to carry a camera on a strap over your shoulder for hours at a time, then it makes sense to buy the lighter model, and use light lenses (such as the EF 50mm f1.4 lens in the photo below).

EOS 6D

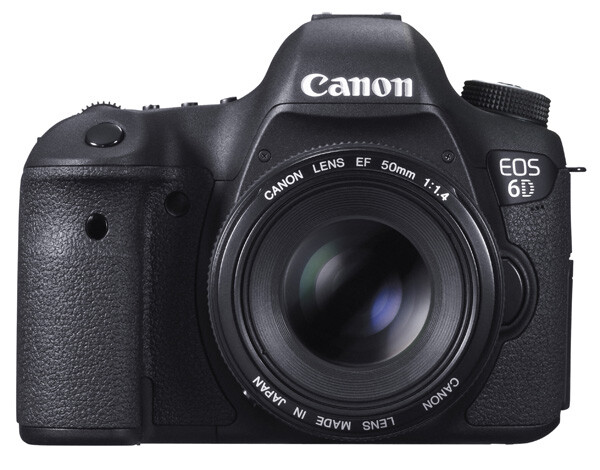
EOS 6D with EF 50mm f1.4 lens

On the other hand, if you are a landscape photographer, keep the camera mainly in the studio, or just take it with you on location and use it for a couple of hours then pack it away again, the weight probably makes no difference.

Bottom line: If size and weight are critical, then go for the EOS 6D. But not before considering autofocus performance!

Autofocus

Autofocus performance is the major difference between the two cameras. It is a big factor if you are into photographing sports, action, portraits or any moving subject.

  • The EOS 5D Mark III has a 61 point AF array with up to 41 cross-type AF sensors (depending on the maximum aperture of the lens mounted on the camera). Along with the EOS 1D-X, it has Canon’s most advanced autofocus system.
  • The EOS 6D has an eleven point autofocus (AF) array with one cross-type AF sensor in the centre.

Cross-type AF points are more sensitive, and therefore focus more accurately, than other AF sensors. This is especially important if you work at wide apertures (i.e. between f1.0 and f2.8) as depth-of-field is so narrow at these settings.

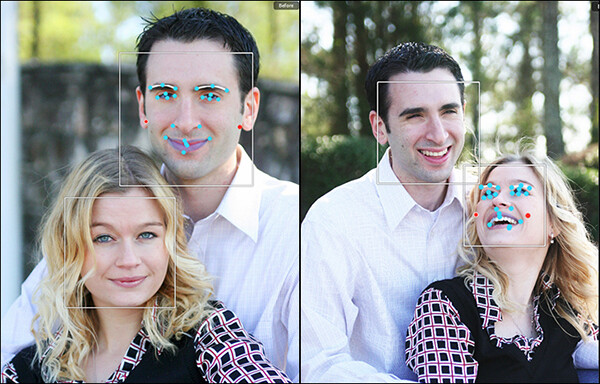
As an example, let’s look at how it works with portrait photography. Imagine that you’re taking a portrait of someone with an 85mm lens set to f1.8. Accurate focus is critical as depth-of-field is very narrow at this setting – you may have less than an inch of sharpness to play with. The normal way to focus in this situation is to use the AF point closest to the model’s eye. The photo below shows how this works by overlaying a diagram of the EOS 6D’s AF array over a portrait. The single cross-type AF point in the centre is shown in green, and the AF point the photographer would have to use is in red:

EOS 6D autofocus array

You can see the problem right away. As the only cross-type AF point is in the centre, you can’t use it to focus unless the model’s eye is also in the centre of the frame. You have to use one of the less sensitive, and therefore less accurate, AF points at the edge of the array.

With the EOS 5D Mark III the story changes. With up 41 cross-type AF points available (shown in red), it is far more likely you will find one to cover the model’s eye. The end result is that you will get more in-focus photos.

EOS 5D Mark III autofocus array

You can learn more about the autofocus of the EOS 5D Mark III in my article Understanding EOS Autofocus: The EOS 5D Mark III and EOS 1D-X

Bottom line: If autofocus performance is critical, then (budget allowing) go for the EOS 5D Mark III.

Wi-fi and GPS

This is another major difference between the two cameras. However this time, and somewhat counter-intuitively, it is the EOS 6D that has the features and the 5D Mark III that does not.

  • The EOS 6D’s built-in GPS lets you geotag your photos with the camera’s location as you take them. You can then use that to see where they were taken on a map, help organize or search your images in Lightroom, or as extra information if you sell your photos to a stock library. If you want to do the same with an EOS 5D Mark III, you have to buy a GPS unit separately.
  • The EOS 6D’s built-in wireless lets you upload your photos via a local wi-fi connection to a computer as you take them (useful in a studio or even on location if you have a laptop with you), upload photos to Facebook, or remotely control your camera using a Smartphone app. Again, you have to buy a separate wireless unit, which comes built-in to a portrait grip, to do the same with an EOS 5D Mark III.

Bottom line: If you need GPS or Wi-fi, then buying the EOS 6D will save you a lot of money.

EOS 5D Mark III

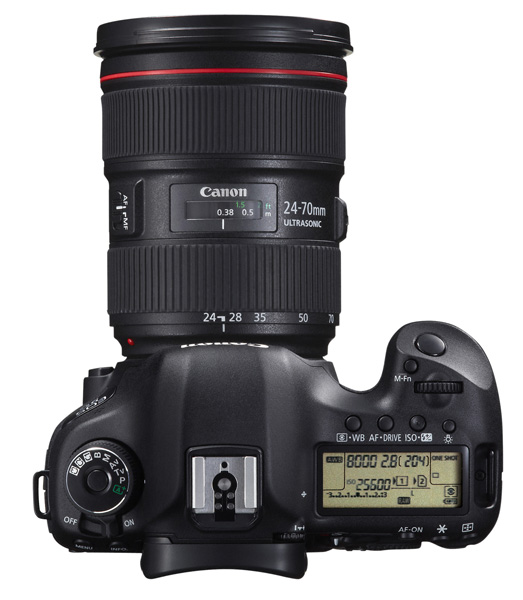
EOS 5D Mark III with EF 24-70mm f4 lens

Dual card slots

  • The EOS 6D has a single card slot for an SD type memory card (it also accepts SDHC and SDXC cards)
  • The EOS 5D Mark III has two card slots. One takes CF cards, and the other SD (plus SDHC/SDXC cards)

One benefit of dual card slots is speed. CF cards are faster, which helps give higher burst speeds and assists with recording movies.

Another is security. You can set the EOS 5D Mark III to save photos to both the CF card and SD card slots at the same time, giving you a back-up in case one fails. Bear in mind it will slow the camera down as it takes longer to write a file to two cards, but it may give you peace of mind on important shoots. I imagine wedding photographers will greatly appreciate this feature.

Having said that, if you look after your memory cards, and buy a reputable brand, they are highly unlikely to fail. Most memory card failures are the result of corruption caused by user error, such as removing a card from a reader while the computer is writing to it.

Bottom line: If dual card slots matter to you, then you need the EOS 5D Mark III.

EOS 5D Mark III dual card slots

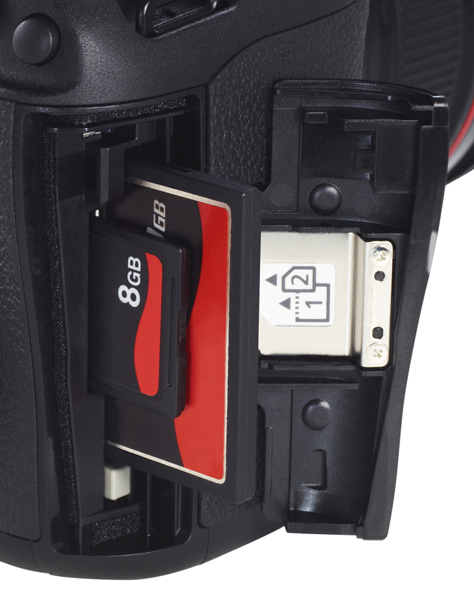
The dual card slots of the EOS 5D Mark III.

Minor differences

There are lots of minor differences between the two cameras, so I’ve provided some links to in-depth reviews so that you can get more information before making a purchasing decision. You’ll also see some photos taken with both models. In the meantime, if you own or have used either of these cameras, why not tell us what you think in the comments. Why did you choose one or the other, and do you think you made the best choice?

EOS 5D Mark III reviews

  • DP Review
  • Photography blog
  • Photography Life

EOS 6D reviews

  • DP Review
  • Photography blog
  • The Phoblographer
  • Graham Clark Photography

Understanding EOS

Understanding EOS ebook cover

My ebook Understanding EOS is written for photographers who want to learn to get the best from their EOS cameras. Click the link to learn more.

The post Review: Comparison Canon 5D MarkIII vs the Canon 6D by Andrew S. Gibson appeared first on Digital Photography School.


Digital Photography School

 
Comments Off on Review: Comparison Canon 5D MarkIII vs the Canon 6D

Posted in Photography


Spider Camera Holster Review

24 Jan
The SpiderPro Holster provides a secure, durable camera-carrying system that takes away the strain caused by traditional camera straps.

The SpiderPro Holster provides a secure, durable camera-carrying system that takes away the strain caused by traditional camera straps.

Many moons ago, someone had the idea to attach a strap to two points on a camera and hang it around their neck. While it may have seemed like a good idea at the time, it’s tough denying that traditional camera straps pose certain problems. Personally, I just don’t like that weight hanging around my neck for several hours at a time, especially if I’m using a longer lens like the 70-200mm. Getting the camera off my neck and over my shoulder isn’t a great alternative, because whether it’s around my neck or over my shoulder, the weight is a strain and at least one hand is always on the camera, making sure it’s not bumping into anything or anyone.

Sling straps were a good step in the right direction,  but they don’t always work well when I’m carrying a camera bag. They also only partially solve the upper-body strain that comes with carrying a pro DSLR (or two) for an extended period of time. All that changed for me, though, when the Spider Camera Holster came along.  Suddenly, I could completely ditch the strap. By providing a secure, balanced carrying solution at my hip, Spider gives me a truly hands-free carrying experience, and takes the strain off my neck and shoulders. Available in two models with various accessories, Spider has a reliable set-up for almost every situation.

SpiderPro Camera Holster Kit

What’s in the Box?

  • Holster
  • Pin
  • Belt/pad combination
  • Accessory plate
The Pro Kit includes the holster, pin, belt, and pad.

The Pro Kit includes the holster, pin, belt, pad, and accessory plate.

How Does it Work?

The holster and pin are at the heart of the Spider system. Made of stainless steel and hardened cast aluminum, the holster provides a durable, safe, and secure place to mount your camera at your hip. A two-position lock gives added peace-of-mind. In its locking position, the camera is locked in place each time the pin slides into the holster. A 15° turn of the lock releases the pin, allowing you to smoothly and easily remove your camera from the holster. In its second position, the locking mechanism is disengaged, allowing for quicker, one-handed removal of the camera from the holster. While I personally don’t recommend disengaging the locking mechanism, some sports or event photographers might prefer this quicker release. Proceed with caution if you do.

The red circle shows the locking mechanism in its locked position. Lifting it until it clicks into the "up" position disengages the lock.

The red circle shows the locking mechanism in its locked position.
Lifting it until it clicks into the “up” position disengages the lock.

The pin attaches either directly to the bottom of the camera, or to the included accessory plate. Once attached to the camera, the pin slides into the holster at a 90° angle and locks in place. The camera then swivels into its proper position–upside down, with the lens pointing behind you. It is the very nature of this swivel joint that keeps the camera securely in place, preventing any accidental bumps from dislodging it from the holster.

The two-inch, reinforced belt is size-adjustable and has a three-way locking buckle to ensure yet another added level of security. The integrated pad helps support the heavier loads of professional size cameras and longer lenses. In the single camera configuration, the holster is actually bolted to the belt. Trust me when I tell you that it’s not going anywhere.

When loaded properly, the camera will hang upside down, with the lens pointing behind you. The holster offers a comfortable balance, regardless of whether you are using a flash or a 70-200mm lens.

When loaded properly, the camera will hang upside down, with the lens pointing behind you. The holster offers a comfortable balance, even if you are using a flash or a 70-200mm lens.

Since cameras are designed with only one accessory hole on the bottom, those of us who have more than one thing to attach are usually forced to sacrifice something. The Spider Holster gets around that by using an accessory plate that allows plenty of room for attaching the pin, as well as additional threaded holes for a tripod quick-release plate. If tripod use is not a concern, you can–as mentioned–attach the pin directly to the camera. During my test-drive, however, I found that using the accessory plate configuration placed the camera in a more comfortable position in the holster.

The accessory and include allen wrench make the system easily adaptable for trip use.

The accessory plate and included allen wrench make the system easily adaptable for tripod use.

Black Widow Camera Holster Kit

What’s in the Box?

  • Holster
  • Pin
  • Belt
  • Pad
The Black Widow Holster is designed for lighter DSLRs and smaller cameas.

The Black Widow Holster is designed for lighter DSLRs and smaller cameras.

How Does it Work?

The Black Widow Holster is designed around lighter weight, entry-level DSLRs, mirrorless systems, and smaller point-and-shoot cameras. It works almost identically to the SpiderPro, with a few key exceptions. For starters, the holster itself is made of tough, durable plastic, with stainless steel where the pin locks into place. The locking mechanism on the Black Widow only has one position, meaning that disengaging the lock is not an option. Additionally, since the Black Widow is designed with an eye towards lighter cameras, it can be used with either the kit belt or your own.

Personalizing the Experience

Fresh out of their respective boxes, both kits are ready to go. Both can also be accessorized, tailoring the experience to your own specific needs. In addition to being able to buy each component separately, the following accessories are available for the SpiderPro and Black Widow.

SpiderPro

  • Large Lens Pouches  – one or more pouches can be attached to the belt, allowing you to carry your camera on one hip and a spare lens on the other
  • Arca-Swiss Adapter – an additional adapter can be attached to the accessory plate, making it compatible with any Arca-Swiss tripod head
  • Pro Pad Adapters Kits – For those photographers who prefer the belts they already own, the SpiderPro Pad can be attached to belts from Think Tank and LowePro.

Black Widow

  • Thin Plate – works in conjunction with the tripod plate you already own, allowing you to attach both the holster pin and your tripod plate at the same time
The locking mechanism on the Black Widow has only one position-- locked-- and cannot be disengaged.

The locking mechanism on the Black Widow has only one position– locked– and cannot be disengaged.

Impressions and Recommendations

The Spider holster systems do what they say they do and they do it really well, providing a balanced, secure, comfortable, and durable camera-carrying experience that takes any possible strain to the upper body completely out of the picture. With what appears to be high-quality materials and workmanship, I’m confident that both of these products are built to last. I’d be remiss, though, if I didn’t offer a few words of caution.

First and foremost, make sure your camera is properly locked in the holster before letting go. This is absolutely vital. A drop of even just a couple of feet can cause very expensive damage. Secondly, be careful when kneeling while you have a camera in the holster–particularly if you have a flash attached. This applies primarily to photographers who may be using two holsters at once, as well as those who may opt to disengage the locking mechanism. You could accidentally damage your camera or slide it from the holster while kneeling if you aren’t careful.

No system is perfect, but the SpiderPro gets me closer than I’ve ever been. I still enjoy my sling strap, but when I’m working long hours in a fast-paced event or teaching situation, I find the relief to my upper body that Spider Holster provides to be just what my neck, back, and shoulders ordered.

The post Spider Camera Holster Review by Jeff Guyer appeared first on Digital Photography School.


Digital Photography School

 
Comments Off on Spider Camera Holster Review

Posted in Photography


Sony Alpha 7 review: Full-frame mirrorless is here

23 Jan

beautyshot-001.jpg

By putting a 24 megapixel full-frame sensor into a body nearly the same size as the Olympus E-M1, the Alpha 7 is arguably the most ambitious camera Sony has ever made. Never before has there been a full-frame camera this small – and one that supports nearly every 35mm lens format ever made, as well as Sony’s own E-mount lenses. Does Sony get enough things right with the Alpha 7 to compete with more conventional full-frame cameras such as the Canon 6D and Nikon D610? Read our full review to find out

News: Digital Photography Review (dpreview.com)

 
Comments Off on Sony Alpha 7 review: Full-frame mirrorless is here

Posted in Uncategorized


Think Tank Modular Components and Pro Speed Belt Review

18 Jan

I’ve said it before and I’ll say it again. There are two kinds of reviews. There are first impressions, “fresh-out-of-the-box” reviews, and there are those (usually more useful) that come later, after the reviewer has had a chance to really put the product through its paces. Considering that I’ve been using the Think Tank Pro Speed Belt and Modular Components for almost ten years, I’d say that this review falls squarely within the second category.

think-tank-modular-components-review-001

The Think Tank Pro Speed Belt, combined with elements of the Modular Component System makes carrying and accessing your gear while on location easier and more convenient.

If you’ve been doing this long enough, you know that the right bag for getting you TO the gig is not always the right bag for getting you THROUGH the gig. You event photographers know what I mean. Whether it’s sports, concerts, weddings, or general location shooting, chances are good that at some point your bag has frustrated the hell out of you. Big and bulky may be great for safe transit, but you need lean and convenient once you’re inside the stadium, arena, or church.

My favorite solution to the problem is the Think Tank Pro Speed Belt with the Modular Component System. If you’ve ever wanted to feel like Batman and have a utility belt of your very own, now’s your chance. Think Tank offers a wide selection of components for the belt, ranging from lens pouches and accessory bags, to a holder for your water bottle. The modular components have more padding and removable inserts than the skin set, but both have their pros and cons (e.g., heavier and more protection vs. lighter and less protection).

Note: I should note that in the almost ten years since I started using this system, Think Tank has introduced Version 2, slightly updating each of the components. The pieces you see in the photos are from Version 1, but all are available in the newer models.

This review covers only the six modular components I actually own. I’ve never used all six at once. Just like I have different camera bags for different types of assignments, I can tailor the belt and its components in the same way. All have the high-quality construction I’ve come to expect from Think Tank, from the water-resistant materials and stitching, to the durable zippers and padded inserts. All components have their own removable rain covers, and are designed to either rotate freely around the bag (perfect for redistributing the weight when necessary), or be “locked” in place via the loops on the belt.

The Belt

Made of nylon webbing, three-ply bonded nylon thread, and high-density closed cell foam, the belt is comfortable, durable, and comes in four sizes.

think-tank-modular-components-review-002

Modular components can either rotate freely around the belt, or be “locked” in place using the loops around the padded section.

Speed Changer

The Speed Changer is an incredibly versatile bag, and is my favorite belt component. It’s a bit deceptive-looking, actually capable of holding quite a bit more than it would seem from a quick glance at the outside. This is where I usually pack extra memory cards and batteries, as well as my cell phone, business cards, notebook, pens, lens cloth, energy bar, and more. Removing the padded insert allows enough space for a pro-sized DSLR body without a lens attached and a few small accessories. This is also a great belt pouch for assistants, who are often in charge of keeping spare batteries and accessories close at hand.

think-tank-modular-components-review-005

The Speed Changer is a multi-use pouch that can hold a wide array of necessary accessories.

Lightning Fast (Strobe Stuff in V2)

The Lightning Fast is a pouch designed to hold a standard speedlight (Nikon SB900, Canon 600EX) with the included diffuser attached.

think-tank-modular-components-review-004

The Lightning Fast (Strobe Stuff) holds a professional speedlight with diffuser attached, and has a pocket for extra batteries.

Lens Changer 50

The Lens Changer 50 is designed around wide-angle lenses like the 16-35mm f/2.8 or 17-40mm f/2.8. It’s a great pouch for carrying the lens with either caps and hood in their closed and reversed positions, or with the lens hood in its shoot-ready position.  As shown in the photo, I also occasionally use the LC50 for my 70-200mm f/2.8. It doesn’t fit completely–especially not with the hood in a shoot-ready position–but it still works well when I’m trying to travel light.

think-tank-modular-components-review-010

The LC50 is designed for wide-angle lenses, but can securely hold a 70-200mm as well.

Lens Changer 35

The LC35 is almost identical to the LC50, and holds my 24-70mm f/2.8 with the lens hood in its shoot-ready position.

Lens Changer 75 Pop Down

The LC75 is the one lens pouch in the line that is expandable. In its shorter size, it holds the 70-200mm f/2.8 with the hood reversed. By unzipping the bottom, the pouch expands to accommodate the lens with the hood in its shoot-ready position.

think-tank-modular-components-review-007

The LC75 Pop Down (worn in the middle in this photo), is expandable, able to hold the 70-200mm lens with the hood in the shoot-ready position. The Lens Drop (to the left of the LC75) is a versatile pouch with many uses.

Lens Drop

Don’t let the name worry you. The Lens Drop is a very secure and versatile pouch. Designed primarily for standard zooms and small primes, I’ve used it for every thing from lenses to small water bottles. Most of the time, though, I keep it empty. It gives me a place to put the lens that just came off the camera until I get the new lens on the camera. Without an empty pouch on the belt, I’d have to stop and find someplace to put the lens down until I had a free pouch for it. Keeping an empty pouch available lets me change lenses while I’m on the move. The Lens Drop is pictured above, directly to the left of the LC75 Pop Down.

Also Available But Not Pictured

  • Lens Changer 15 – Great for small primes, teleconverters, and most kit lenses with hood in shooting position.
  • Lens Changer 25 – Holds a regular zoom like the 24-70mm with hood reversed.
  • R U Hot? – Holds a large water bottle (Not included).
  • Stuff It & Little Stuff It – Perfect for small accessories and personal items.
  • Digital Holsters – Available in five sizes, the holsters carry bodies with lenses attached.

My favorite configuration of the bag is the Speed Changer for accessories and the Lightning Fast (Strobe Stuff in V2.0) for my speedlight. I’ll also add on the appropriate lens pouch for whatever back-up I’m carrying. If a traditional shoulder bag or backpack is giving you fits once you get to the shoot, consider the Think Tank Modular Components and Pro Speed Belt for a more convenient and even distribution of the weight around your waist, and for keeping everything at your fingertips.

Just like Batman.

The post Think Tank Modular Components and Pro Speed Belt Review by Jeff Guyer appeared first on Digital Photography School.


Digital Photography School

 
Comments Off on Think Tank Modular Components and Pro Speed Belt Review

Posted in Photography