RSS
 

Posts Tagged ‘REVIEW’

Panasonic Lumix FZ60 Review

03 Dec

Panasonic Lumix FZ60.jpg

I remember some years ago lusting after a (then) new Kodak (remember them?) digicam that had a 10x zoom. Wow! I thought what photographic horizons it would conquer.

Now, you can put your mitts on a 50x zoom digicam (thanks to Canon) but, as you will quickly find out, it’s not a dream holiday with such a powerful lens, with handholding at extreme tele settings a no-no.

Panasonic Lumix FZ60-front.jpg

IMHO the 24x zoom on the FZ60 is arguably a better length for average shooting in the hands of the average and lesser-skilled photographer.

Panasonic Lumix FZ60-top.jpg

Panasonic quaintly describes the camera as one that ‘caters to the camera buyer who wants that zoom reach, but doesn’t need the bright constant aperture, and the drawbacks it brings. If you’re willing to forgo the extra light capture, it could provide a compelling option.’

Eh?

It seems the company is comparing the FZ60 with another model which had an aperture of f4.5 as opposed to the FZ60′s smaller f5.2 at the tele end. For me, there’s little sense in the comparison.

The big plus is that the 24x zoom ranges from a 35 SLR wide equivalent of 25mm to a tele equivalent of 600mm. As I’ve mentioned many times before, try and get, use and lug a 35 DSLR lens of that focal length!

And it’s a Leica-designed optic.

Panasonic Lumix FZ60 Back.jpg

Panasonic Lumix FZ60 Features

The camera is set in the by now established bridge camera format: looks like an interchangeable DSLR, works like one but doesn’t allow lens switching and cannot take pictures equal in quality to a DSLR. So there!

But for many people, especially those on a foreign (or even domestic!) holiday this is the ideal single camera for the purpose: it’s relatively compact, won’t stow in your pocket but will hang quite happily on from your neck regions on a shoulder strap and few subjects, however distant, will be beyond your reach.

Panasonic Lumix FZ60 Menu_1.jpg

Panasonic Lumix FZ60 Scenes.jpg

The mode dial carries well-identified settings for intelligent Auto, PASM, creative movie, two custom settings, scene modes (soft focus, dynamic monochrome, cross processing etc) and creative control setting.

Creative movie allows you use Program AE, aperture and shutter priority settings plus manual when shooting video.

Creative control lets you select a variety of image effects in stills shooting, along with examples of how they look.

Topside carries a selection of buttons to shoot a burst of shots, a Function button, movie record and the zoom lever.

Move to the rear side and we see the four way jog dial, with the menu button set into its centre, along with another Function button, trash plus AF options.

The 16.1 million pixel CMOS captures a relatively largish maximum image size of 4608×2592 pixels or, in print terms, an output of 39x22cm output.

Movies in Full HD 1920×1080 can be recorded to a Class 4 SD card in the AVCHD format or MPEG4 at a lower resolution. This clip was shot with a stills pan head, which accounts for the jerky panning!

Overall, the camera offers a surprising level of manual and over-riding control as well as the useful ability to capture on RAW and JPEG.

A special note: I had a great time shooting some beach action in movie mode. The zoom’s full tele setting is perfect for such a subject.

Startup Times

I could shoot the first shots about two seconds after powering up, while follow on shots came in at about a second apart, until the buffer memory filled.

Distortion

No sign of any distortion at the wide or tele ends of the zoom.

Panasonic Lumix FZ60 ISO Tests

Panasonic Lumix FZ60 ISO 100.JPG

Panasonic Lumix FZ60 ISO 400.JPG

Panasonic Lumix FZ60 ISO 800.JPG

Panasonic Lumix FZ60 ISO 1600.JPG

Panasonic Lumix FZ60 ISO 3200.JPG

At ISO 1600 some artefacts were beginning to appear and by ISO 3200 these made picture taking a tricky chore.

(insert Full wide 2 and Full tele 2

Panasonic Lumix FZ60 Review Verdict

Panasonic Lumix FZ60  wide.JPG

Panasonic Lumix FZ60  tele.JPG
Quality: excellent.

Why you’d buy the Panasonic Lumix FZ60: above average as a stills camera; perfect for video.

Why you wouldn’t: a vari-angle screen could have made a difference.

Great camera, excellent zoom reach.

Panasonic Lumix FZ60 Specifications

Image Sensor: 16.1 million effective pixels.
Sensor: 11mm CMOS.
Metering: Multi, centre-weighted, spot.
Lens: Leica DC Vario-Elmarit f2.8-5.2/4.5-108mm (25-600mm as 35 SLR equivalent)
Exposure Modes: Auto, Program AE, shutter and aperture priority, manual.
Shutter Speed: 4-1/2000 second.
Memory: SD/SDHC/SDXC plus 70 MB internal.
Image Sizes (pixels): Stills: 4608×2592 to 480×480.
Movies: 1920×1080, 1280×720, 640×480.
Viewfinder: Turret (202,000) and 7.6cm LCD screen (460,000).
File Formats: JPEG, MPO 3D, MPEG4, AVCHD.
Colour Space: sRGB.
ISO Sensitivity: Auto, 100 to 6400.
Interface: USB 2.0, HDMI mini, remote control, DC input.
Power: Rechargeable lithium ion battery.
Dimensions: 120.3×80.8×91.9 WHDmm.
Weight: 493 g (with battery and card).
Price: Get a price on the Panasonic Lumix FZ60 at Amazon.

Post originally from: Digital Photography Tips.

Check out our more Photography Tips at Photography Tips for Beginners, Portrait Photography Tips and Wedding Photography Tips.

Panasonic Lumix FZ60 Review


Digital Photography School

 
Comments Off on Panasonic Lumix FZ60 Review

Posted in Photography


Carl Zeiss Planar T* 50mm f/1.4 Hands-on Review

03 Dec

In this video, we take a look at this manual focus lens from Zeiss. Without autofocus, can the performance of this lens compete with the likes of the Nikkor 50mm f/1.4 G and Canon 50mm f/1.4? Available in: Nikon F-mount: www.digitalrev.com Canon EOS mount: www.digitalrev.com Pentax K mount: www.digitalrev.com
Video Rating: 4 / 5

 
Comments Off on Carl Zeiss Planar T* 50mm f/1.4 Hands-on Review

Posted in Nikon Videos


nikon coolpix L810 review uk

03 Dec

hi this is my review on the nikon coolpix L810 price £150-£200 thanks for watching please like the video
Video Rating: 4 / 5

 
Comments Off on nikon coolpix L810 review uk

Posted in Nikon Videos


Tamron AF 70-300mm F4-5.6 Review

03 Dec

A review of the Tamron 70-300mm lens for Canon and Nikon digital cameras. Covering the build quality and capabilities of the lens. Sample photos and a collection of alternative lenses at the same focal range are also discussed. The full text review,sample photos and price checker can be found at www.slr-lens.co.uk

 
Comments Off on Tamron AF 70-300mm F4-5.6 Review

Posted in Nikon Videos


StickyAlbums Mobile Portfolios [REVIEW]

03 Dec

StickyAlbums is, at its heart, a tool for generating word-of-mouth referrals for professional photographers. As you will see in this review, the system is not set up for the casual photographer, as the free version is more of a means of introduction and trial than it is a full blown service, like gmail or Flickr.

StickyAlbums is a way to create a mobile portfolio of images, either in general or for a specific client. The creation of the portfolio takes place on stickyalbums.com and the viewing is optimized for mobile devices, such a tablets or smartphones. While the portfolios are known to be 100% compatible with iOS devices, not every single version of Android can be tested, although I was informed the app should work on just about any Droid phone or tablet.

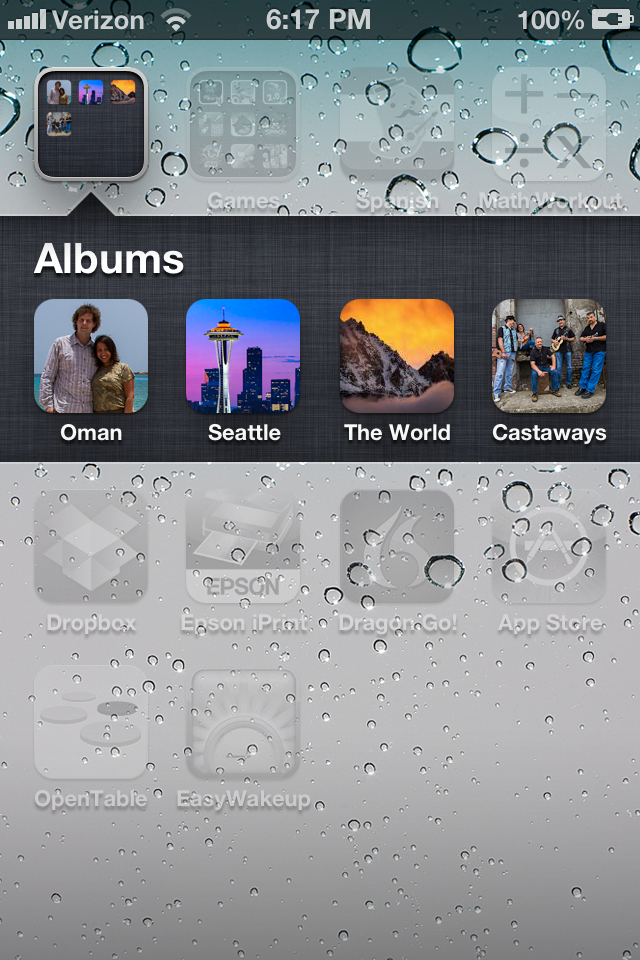
Albums are created by uploading images to stickyalbums.com, creating a couple of splash pages, some simple formats and then delivery to clients. Clients will receive a link which will ask them if they want to download the album, which will show up as an ‘app’ on the desktop of their mobile device. From there, clients can browse, zoom and share albums. The service has basic features, like stats for number of downloads, and is ready for prime time, while still under development and improvement based on customer feedback.

Getting Started

Let me start by pointing out the free version is good for one album of 12 images as a trial.  If you want to skip this review and give it a try yourself, go to http://www.stickyalbums.com/pricing/. The next level up is a monthly subscription ($ 21/mo) which allows for use of youtube videos as well as images and lifetime hosting. The highest level offers everything the monthly subscription offers plus the option to use your own branding on albums, unlimited uploads, password protected albums and lifetime hosting of albums. It is appropriately called the “Professional” version and runs $ 189/year.

The basic process is this:

  • Pick a number of images for the album you want to create. The album shouldn’t be much more than 10-40 images because there is a 50MB download limit for most devices.
  • Resize the images to be 1600px on the long edge.
  • Now gather some special images. These will be a logo (rectangular), desktop icon and two splash screen, or ‘loading’ images. The loading images can be of anything and created using Photoshop to include your logo as well.
  • Start stepping through the album creation process where it will ask for your images, desktop icon, logo, email address, phone number, web address and loading pages.
  • Create the album and share!

I found the process to be easy once I ran through it a couple of times. It helps that logos and other info (my website, email, etc…) can be stored on the site for easy entry when creating an album.

I’m not going to give a step-by-step tutorial here because they already have a well organized page that describes how to arrange files and use the service to create an album. That can be found here http://www.stickyalbums.com/create-your-branding-files/

In The Real World

What it is like using StickyAlbums? With a recent upgrade to the site, it is easy and useful. Not that it wasn’t useful before, but some small issues with organizing images have been fixed and the ability to see basic stats (how many downloads) was added. The Professional version also allows for password protected albums.

How can you use StickyAlbums? If you are a pro, there are a number of ways. I have used it as a basic means to share images with clients, such as wedding clients, before and after delivery of final images. Brides with smartphones are an excellent market for this app as it place their wedding images in an easy to carry package to show friends. No need for your clients to save all the images and page through them inside their phone’s ‘Photos’ album. This product stands by itself as a desktop icon.

It can be used as a basic portfolio to send to connected clients. It can also be used as a promotional tool. For instance, let’s say you perform a studio shoot with a client, such as a high school senior. Inside the album you send to the senior and their parents you include 20 images from the shoot. Also included is an image you create in Photoshop that is a 20% off coupon for another shoot, complete with your phone number and email address, either for them or for a friend. Referrals are the lifeblood of many studio photographers and this app helps put your name and contact info right into the hands of your client when they are showing their friends how great they look during your studio shoot.

There is some downside to the app. It can become large, the downloads I mean. A lot of devices demand use of wifi if a download is more than 10MB and these albums can quickly become large with 20 images, even at 1600px and 72PPI. Clients will often need to accept an exception request on their phone allowing them to download the larger package and that’s an extra step for users not always familiar with the process.

On the plus side, there is no need to use the iTune Store or Google Play as the service uses HTML5 to deploy. This means no need to learn coding nor application to either service. Also, as the service will download images the first time a client clicks on their desktop icon and then caches it, opening after the first time is fairly quick for users. Even better, the albums can be updated by you on the website backend and the next time your client opens that album, it will grab the new images.

If you are a kids sports photographer, this can be a great tool. Imagine creating a ‘living’ album that starts off with an image of the teams season schedule. The next pictures are highlights from the latest game which can change each time you shoot the team. Or a “highlights reel” where you simply add new images of great catches or game wining shots and build the album as the season goes on. Even more so, you can create an album for each player on a basketball team, for instance, and then add photos of them in action each week simply by sorting by jersey number.

I have already used the service to deliver albums to previous wedding clients as a thank you and a friendly reminder that I still shoot weddings. It can also be used as an add-on for wedding photographers who want to charge for the download as an additional service. Many wedding photographers like to send a thank you on the one year anniversary of their clients’ weddings and this plays perfectly into that idea for connected clients.

Conclusion

With the Professional version of the site allowing for complete branding based with your company’s logo and contact info, StickyAlbums is an easy, out-of-the-box solution for photographers looking to get their images into the hands of their clients in a way clients will utilize over and over. The concept is simple; make it easy for your clients to show their friends how great of a photographer you are.

The app allows clients to share links via text message, email, Pinterest, Facebook or Twitter. It will also sense orientation and rotate images accordingly (tip: group your horizontal images together and your portrait images together so your clients don’t have to keep rotating their phone).

I like what I’ve found so far and plan on continue to use the service to help generate more referrals. I like that the images can not be copied directly (although any device allows screen shots).

If you would like to see a sample album, I have one of 30 images from my current ‘Best Of…” folder. Click on this link from your mobile device http://moblalbum.com/vlQw7rfYBo/gallery/30843 You can click on that link in a web browser from any machine and get a web-based version as well.

Post originally from: Digital Photography Tips.

Check out our more Photography Tips at Photography Tips for Beginners, Portrait Photography Tips and Wedding Photography Tips.

StickyAlbums Mobile Portfolios [REVIEW]


Digital Photography School

 
Comments Off on StickyAlbums Mobile Portfolios [REVIEW]

Posted in Photography


Nikon D3S Review

02 Dec

A sample of what the Nikon D3S can do – full review at www.stuckincustoms.com

 
Comments Off on Nikon D3S Review

Posted in Nikon Videos


Sigma 85mm f/1.4 EX DG HSM Hands-on Review

01 Dec

Sigma has released their latest fast-apertured prime in the form of an 85mm f/1.4, a popular focal length for portrait photographers. With Nikon and Canon’s offerings costing a considerable amount more, does the Sigma offer up enough quality to be a good enough alternative to the big brands’ lenses? Is it sharp? What’s the bokeh like? Find out in this video. Full size sample shots at Flickr: www.flickr.com Twitter: twitter.com Facebook: www.facebook.com For the latest updates, visit our Blog: blog.digitalrev.com For more reviews, opinions, helps and tips visit: www.digitalrev.com In this Video: Sigma 85mm F1.4 EX DG HSM – www.digitalrev.com Canon EOS-1D Mark IV – www.digitalrev.com Visit our online store: www.digitalrev.com
Video Rating: 4 / 5

Adorama Photography TV presents How’d They Do That with David Bergman. David is a concert, sports and action photographer based in New York. David has photographed everything from major sporting events like the World Series to the high intensity world of rock concert tours. He has photographed six US Presidents and his Obama inauguration GigaPan has been viewed over 12 million times. For info about the gear David uses, and to learn more about concert photography as well as his work with Bon Jovi, go here: www.adorama.com See more of David’s work at www.davidbergman.net and at www.tourphotographer.com. Products David uses: Nikon D3S Body Only www.adorama.com Nikon 70-200mm f/2.8G AF-S VR II Zoom-Nikkor ED-IF Lens www.adorama.com Nikon 24-70mm f/2.8G ED-IF AF-S Wide Angle-Telephoto Zoom Nikkor Lens www.adorama.com Nikon 14mm – 24mm f/2.8G ED-IF AF-S Wide-Angle Zoom-Nikkor Lens www.adorama.com Apple Aperture 3 Photo Editing Software for Mac. www.adorama.com Visit www.adorama.com for more photography videos! Send your questions to: AskMark@Adorama.com
Video Rating: 4 / 5

 
Comments Off on Sigma 85mm f/1.4 EX DG HSM Hands-on Review

Posted in Nikon Videos


Review: Lilliput 668-GL Monitor / Display for DSLR and Camcorder

30 Nov

www.mrthaibox123.com

 
Comments Off on Review: Lilliput 668-GL Monitor / Display for DSLR and Camcorder

Posted in Nikon Videos


Fujifilm XE-1 Review

29 Nov

Fujifilm XE-1-front.jpg

When the X-Pro1 was announced to a surprised market earlier in 2012 I then remarked on my scepticism at the release of a magnesium alloy bodied, mirrorless interchangeable lens camera.

Then it sunk in and I added that other companies had performed ‘major rethinks about the future of upper level digital cameras: like Olympus with its retro OM-D and Nikon with its bare bones N1.’

It was obvious that Fujifilm had done ‘a mighty rethink about gaps in the pro market and come up with a camera that has some pretty clever answers to some profound questions.’

Since then there have been other models in the X-mount line and the XE-1 is the latest.

Fujifilm XE-1-back.jpg

Fujifilm XE-1-top.jpg

Fujifilm XE-1 Features

Make no mistake, this is a finely-engineered camera. To begin with the review camera looked right with touches of matte chrome set into a black metal body. Although I found the rubber speed grip to be a little small, the general feel of the camera is good, despite a body weight of over 600 grams with the f2.8/18-55m lens fitted — the first zoom designed for X-mount cameras.

Fujifilm XE-1 Bicycle.JPG

The external controls are easily discovered, with the die-cast magnesium top deck layout consisting of black text on chrome, while the rear surface has largish white text in black. Overall, it’s very film camera-ish!

Fujifilm XE-1 Shutter speeds.jpg

The nice touches in this department are a direct-select dial for the shutter speed, accompanied by a +/- two f stops exposure correction dial and power button. Frequently-used actions can also be assigned to the Function button, sited right next to the power button.

Fujifilm XE-1-Menu.jpg

Just over the lip of the top deck is a viewfinder select button that switches your view from turret to rear screen or you can auto select and let the approach of your eye trigger the former’s view.

Not only is there a pop up flash set into the top deck but the nearby hot shoe also accepts external flash units. Immediately ahead of it (and pointing uselessly skywards!) is the L+R stereo microphone; my advice is to use a plug in external mic!

Fujifilm XE-1 Sculpture 1.JPG

The rear has buttons for selection of single frame or continuous shooting, AE and AF options, menu, macro shooting, display options, a quick access button to take you to direct selection of such functions as ISO, white balance, image size etc.

Tucked away on the front, just beneath the lens is a three way switch for manual focus, single frame or continuous focus.

External connections allow hook up for an external stereo mic, mini HDMI output plus USB and AV output.

The 16.3 megapixel CMOS accounts for a large 4896×3264 maximum image capture, both in RAW and JPEG. This can deliver a 41×28 cm print.

Movies in Full HD 1920×1080 can be shot. While the AF seems to function quite well in movie mode you can’t shoot stills mid video.

An unexpected joy (for this film born and bred feller) is the aperture ring set into the lens: as you roll it around, it’s a joy (with the 18-55mm zoom anyway) to see the lens aperture shrink down to f22! How many digicams will allow you that pleasure!

As with some other models, the XE-1 can shoot high quality motion panorama stills, sized up to 5120×1440 pixels. It’s an eery sensation to shoot one, as the camera chug-chugs along, snatching individual frames, then stitching them in camera. If you want to get into panos, I would only suggest that you practice, practice, practice! ‘Tis fun but t’ain’t easy!

Fujifilm XE-1 ISO Tests

Fujifilm XE-1 ISO 100.JPG

Fujifilm XE-1 ISO 400.JPG

Fujifilm XE-1 ISO 800.JPG

Fujifilm XE-1 ISO 1600.JPG

Fujifilm XE-1 ISO 3200.JPG

Fujifilm XE-1 ISO 6400.JPG

Fujifilm XE-1 ISO 12800.JPG

Fujifilm XE-1 ISO 25600.JPG

Right up to ISO 6400 the camera performed brilliantly. At ISO 12800 noise was evident and even more so at ISO 25600 but even this setting could be used!

Fujifilm XE-1-Melons.JPG

Fujifilm XE-1 Review Verdict

Quality: well above average.

Why you’d buy the Fujifilm XE-1: you have the skills to exploit it.

Why you wouldn’t: the LCD screen does not tilt.

The X-mount series of cameras goes from strength to strength. This sits easily into the lineup.

A fine successor to the X-Pro1.

Fujifilm XE-1 Specifications

Image Sensor: 16.3 million effective pixels.
Sensor: 23.6×15.6mm CMOS.
Metering: Multi segment, centre-weighted, spot.
Lens Mount: Fujifilm X.
Lens Factor: 1.5x.
Exposure Modes: Auto, Program AE, shutter and aperture priority, manual.
Shutter Speed: 60 mins (Bulb); 30 sec to 1/4000 second.
Memory: SD/SDHC/SDXC.
Continuous Shooting: Approx 6 or 3fps.
Image Sizes (pixels): Stills: 4896×3264 to 1664×1664.
Movies: 1920×1080, 1280×720.
Viewfinders: 12.5mm turret (2,360,000) and 7.1cm LCD screen (460,000).
File Formats: JPEG, RAW, JPEG+RAW, MPEG4.
Colour Space: sRGB, Adobe RGB.
ISO Sensitivity: Auto, 100 to 25600.
Interface: USB 2.0, HDMI mini, stereo mic.
Power: Rechargeable lithium ion battery.
Dimensions: 129×74.9×38.3 WHDmm.
Weight: 350 g (inc battery, card).
Price: get a price on the Fujifilm XE-1 (Body Only) or the Fujifilm XE-1 with 18-55mm Lens .

Post originally from: Digital Photography Tips.

Check out our more Photography Tips at Photography Tips for Beginners, Portrait Photography Tips and Wedding Photography Tips.

Fujifilm XE-1 Review


Digital Photography School

 
Comments Off on Fujifilm XE-1 Review

Posted in Photography


Nikon 70-200 f2.8 VRII Review w/ Sample Pictures – Focus – VR ii – Sharpness – Bokeh – Accuracy Test

28 Nov

photographyequipment.yolasite.com (Budget Equipment) razzi.me www.facebook.com twitter.com In this video I am doing hands on review of Nikkor 70-200 f/2.8G ED VRii lens. I tested the focus, sharpness at wide open aperture and at 200mm, bokeh, focus accuracy and VRII. It’s an exceptional lens with great sharpness and works great in low light situation when you cannot hand hold at slower shutter speed. Equipment Used in the Video DSLR: Nikon D3s Lenes: 70-200 f/2.8 VRii Speed light: Nikon SB700
Video Rating: 4 / 5

 
Comments Off on Nikon 70-200 f2.8 VRII Review w/ Sample Pictures – Focus – VR ii – Sharpness – Bokeh – Accuracy Test

Posted in Nikon Videos