RSS
 

Posts Tagged ‘reveal’

Technical readouts reveal faster shutter speeds, improved ISO and more in iPhone 11 Pro

20 Sep

Like he did last year for the iPhone XS, Sebastiaan de With, co-founder of the iOS camera app Halide, has again made use his app’s technical readout feature to obtain additional camera specifications above and beyond what can be found in the official spec sheet. He’s broken down the data and compared the new iPhone 11 Pro to last year’s XS model. Let’s have a closer look at his findings:

The 11 Pro main camera comes with a 6-element lens that offers a 26mm equivalent focal length and F1.8 aperture. The chart below details the changes between the XS and the new model. As you can see the base ISO on all of the camera modules has increased by half a stop, the maximum shutter speed has been increased from 1/22,000 sec to a whopping 1/125,000 sec and the maximum ISO has been expanded to ISO 3072 vs the previous ISO 2304 limit, coinciding with the increased base ISO level.

It’s not quite clear at this point what the blisteringly fast shutter speeds could be used for. The increased maximum ISO doesn’t necessarily mean that the new iPhone will produce lower levels of image noise at a given ISO setting but it should be able to achieve better exposures in very dark settings.

Apple iPhone XS versus 11 Pro main camera comparison, source: Halide

As before, the telephoto cameras features a 52mm equivalent focal length but now comes with a faster F2.0 aperture. This should improve low light tele photos and should also produce a more visible ‘natural’ bokeh than on the iPhone XS.

Apple iPhone XS versus 11 Pro tele camera comparison, source: Halide

The iPhone XS did not come with an ultra-wide camera, so we can’t compare but the new camera offers a 13mm equivalent field-of-view, an F2.4 aperture lens and phase detection AF.

Apple iPhone 11 Pro ultra-wide camera specifications, source: Halide

The front camera has been updated, too. It now features faster shutter speeds, a higher maximum ISO, larger image output size and a wider field-of-view.

Apple iPhone XS versus 11 Pro front camera comparison, source: Halide

Overall the hardware changes don’t look too impressive on paper, but they are of course only a (small) part of the whole story as Sebastiaan points out in the blog post:

‘It’s kind of unbelievable that even with the glowing reviews out today, Apple has said that there’s more software processing yet to come. We’re told Deep Fusion is a very big leap in post-processing quality, but with the changes to Smart HDR, Semantic Mapping in the imaging pipeline and discrete situational processing like Night Mode, these specs are the furthest from the whole story on the new iPhone cameras yet.’

The Halide app is available from the iOS App Store for iPhone and Apple Watch and will set you back $ 6.


Image credits: Charts used with permission from Sebastiaan de With, developer of Halide.

Updated (September 19, 2019): Edited to clarify the increased ISO ratings and base ISO levels.

Articles: Digital Photography Review (dpreview.com)

 
Comments Off on Technical readouts reveal faster shutter speeds, improved ISO and more in iPhone 11 Pro

Posted in Uncategorized


Leaked photos, specs allegedly reveal Leica’s upcoming SL2 mirrorless camera

09 Sep

Nokishita has shared images and specifications for a new Leica camera it claims is the SL2.

According to the report, the new camera (codenamed Vader) will feature a 47-megapixel CMOS sensor and feature 4K video recording with a new ‘Cine Mode.’ The report also notes the camera will have both Wi-Fi and Bluetooth connectivity and be compatible with Leica’s mobile app, FOTOS.

Based on the images, the front of the camera remains largely unchanged from the original Leica SL (Typ 601) with the exception of the viewfinder bump and edges around the grip, both of which have been rounded off compared to the sharper design of the original SL. The rear of the camera stays the same up top, but swaps the unlabeled buttons on both sides of the camera for a row of three buttons on the left-hand side of the rear display: a play, function and menu button.

There’s no additional information on pricing, but Nokishita points at a September release with a note that the camera could be pushed back to later in the year pending other factors.

Articles: Digital Photography Review (dpreview.com)

 
Comments Off on Leaked photos, specs allegedly reveal Leica’s upcoming SL2 mirrorless camera

Posted in Uncategorized


Don’t Create Detail, Just Reveal It – How to Reveal the Hidden Details in Your Photos

24 May

The post Don’t Create Detail, Just Reveal It – How to Reveal the Hidden Details in Your Photos appeared first on Digital Photography School. It was authored by Herb Paynter.

Just as cleaning the lenses of your eyeglasses clarifies what you see, cleansing your pictures of dull lighting will put the sparkle in your photos.

Have you noticed how many individual tools are available in your favorite editing software for changing the values of pixels? The array is dazzling, and most of this editing involves “localized” procedures (dodging, burning, painting, cloning, masking, etc.) affecting specific areas.

But here’s something to consider.

Unless the image you are working on is either damaged (either completely blown-out highlights, plugged-up shadows) or just contains too much unwanted clutter, you rarely need to create specific detail with these tools. The detail is usually right there just below the surface waiting for discovery. You need only make global adjustments to the tones within the darker and lighter ends of the range to achieve pretty amazing results.

When I took this shot of my wife Barbara fifteen years ago, I put it in the reject file because it was so dark. But carefully adjusting and lightening the shadow and middle tones in the picture separated the deep shadow tones from the middle tones. Now both she and the picture are definite keepers. No local editing was necessary, and there is no tell-tale evidence of a touchup. The image contained all the necessary lighter tones – they simply had to be uncovered.

Push tones instead of pixels

Post-processing digital images is usually a process of subtraction; removing the visual obstacles that are covering the underlying detail in a photographic image. This detail will reveal itself if you merely nudge the tonal ranges instead of the pixels.

The fact is…all the detail in every subject has been duly captured and is hiding in either the shadows or the highlights, waiting to be discovered.

The digital camera’s image sensor sees and records the entire range of tones from black to white within every image it captures. What is hiding within this massive range of tones is the detail. Unfortunately, the camera sensor has no way of knowing the detail that may be under (or over) exposed within that range. It simply captures everything it sees inside the bookends of dark and light.

Camera image sensors can capture a range of tones up to 16,000 levels between solid color and no color. This doesn’t mean that all 16,000-pixel values are actually present in the picture; it just means that the darkest to the lightest tones are stretched out over the significant detail that is hiding in the middle.

Adjustments made to the image in Alien Skin’s Exposure X4.5 revealed detail in the sunlit walkway and darkened archway that appeared lost in the original capture. No painting or cloning tools were necessary.

The purpose of this article is not to get geeky about the science, but to assure you that there is an amazing amount of detail that you can recover from seemingly poor images.

A basic JPEG image can display more than 250 tones in each color. While that doesn’t sound like much, you should know that the human eye can only perceive a little over 100 distinct levels of each color. No kidding! Technically, 256 tones are too many.

The balancing act

Here’s a sobering truth. Your camera can capture more detail than your eye can detect and more tones than your monitor can display. As a matter of fact, it can capture up to 16,000 levels of tones and colors. That’s more than any publishing resource (computer monitor, inkjet printer, Internet, or even any printed publication) can reveal. Each of these other outlets is limited to reproducing just 8-bits (256 levels) of each color. The camera’s light-capture range is even beyond the scope of human vision. The range (light to dark) of your camera is immense compared to any reproduction process. What this means is that the editing part of the photography process needs MUCH more attention than the image capture process.

This introduces a complex but interesting phenomenon. Your post-production challenge is to emphasize the most important details recorded inside the tones captured by your camera and then distinguish them sufficiently for the printer, your monitor, or the Internet to reveal.

Your camera captures an incredible amount of detail in each scene that isn’t initially visible. However, with the right software, this detail can be uncovered just as an electron microscope can reveal detail buried deep inside things that the naked eye cannot perceive.

Image editing is all about discovering and revealing what is hiding in plain sight.

Image clarity

Bringing a picture to life doesn’t always require additional touchup procedures. Sometimes, just massaging the existing detail does the trick. The Highlights, Shadows, and Clarity sliders were all that were required to transpose this shot from average to special.

Clarity is the process of accentuating detail. The dictionary defines clarity as “the quality of being easy to see or hear; sharpness of image or sound.” When we clarify something, we clear it up. We understand it better. We view an issue from a different perspective.

Many image editing software packages have a slider called “clarity.” The function of this slider is to accentuate minor distinctions between lighter and darker areas within the image. Each of the other tone sliders (Exposure, Contrast, Highlights, Shadows, Whites, Blacks, Clarity, and Dehaze) all perform a clarifying process on specific tone ranges.

The real beauty of shooting with a 12/14-bit camera is the level of access you receive to the detail captured in each image. If you want to think “deep,” you can start with the editing process of your digital images. You’ll be amazed at what you will find when you learn to peel away the microlayers of distracting information in well-exposed photos.

Just as cleaning the lenses of your eyeglasses clarifies what you see, cleansing your pictures of dull lighting will put the sparkle in your photos.

Adobe Camera Raw controls reveal significant detail in the darker portions of the image by simply adjusting the Basic slider controls.

Learning to expose images correctly

The information you learn from excellent teaching resources like Digital Photography School teach you how to correctly set your equipment to capture a variety of subjects and scenes. Study the articles in this amazing collection and learn to shoot pictures understanding the basic tenets of good exposure. Poorly-captured images will hinder your discovery of detail. However, correctly exposed images will reward you with, not only beautiful color but, access to an amazing amount of detail.

Learn to harness the power of light correctly for the challenge that each scene presents by balancing the camera controls of ISO, Aperture, and Shutter Speed. The more balanced your original exposure, the less post-processing will be necessary.

Conclusion

Every scene presents a unique lighting situation and requires a solid understanding of your camera’s light-control processes to capture all possible detail. Any camera can capture events and document happenings, but it takes a serious student of photography to faithfully capture each scene in a way that allows all that information to be skillfully sculpted into a detailed image.


The post Don’t Create Detail, Just Reveal It – How to Reveal the Hidden Details in Your Photos appeared first on Digital Photography School. It was authored by Herb Paynter.


Digital Photography School

 
Comments Off on Don’t Create Detail, Just Reveal It – How to Reveal the Hidden Details in Your Photos

Posted in Photography


Photo Finishing – Challenge Yourself to Reveal the Personality in Every Image You Capture

21 Feb

The post Photo Finishing – Challenge Yourself to Reveal the Personality in Every Image You Capture appeared first on Digital Photography School. It was authored by Herb Paynter.

Many folks think that photography takes place in the camera, but that’s not the whole truth. Photography is a two-part process that involves 1) capturing the light from a scene, and 2) shaping that captured light into a form that matches what your mind saw when you took the picture. The capture process does happen inside the camera, but the shaping part happens on your computer.

The Capture, or Photo Process

We give the camera credit for things that it doesn’t actually do. Don’t get me wrong, capturing all the light in a scene is a monumental undertaking. Keeping track of millions of points of light is a very critical and specialized responsibility. However, the camera is not so much an artistic tool as it is a capture device with a single purpose – to accurately record the light from the surfaces of objects in a scene. While that purpose can get complicated with lighting challenges, the camera is still just box with a round glass eye and a single function: to record light.

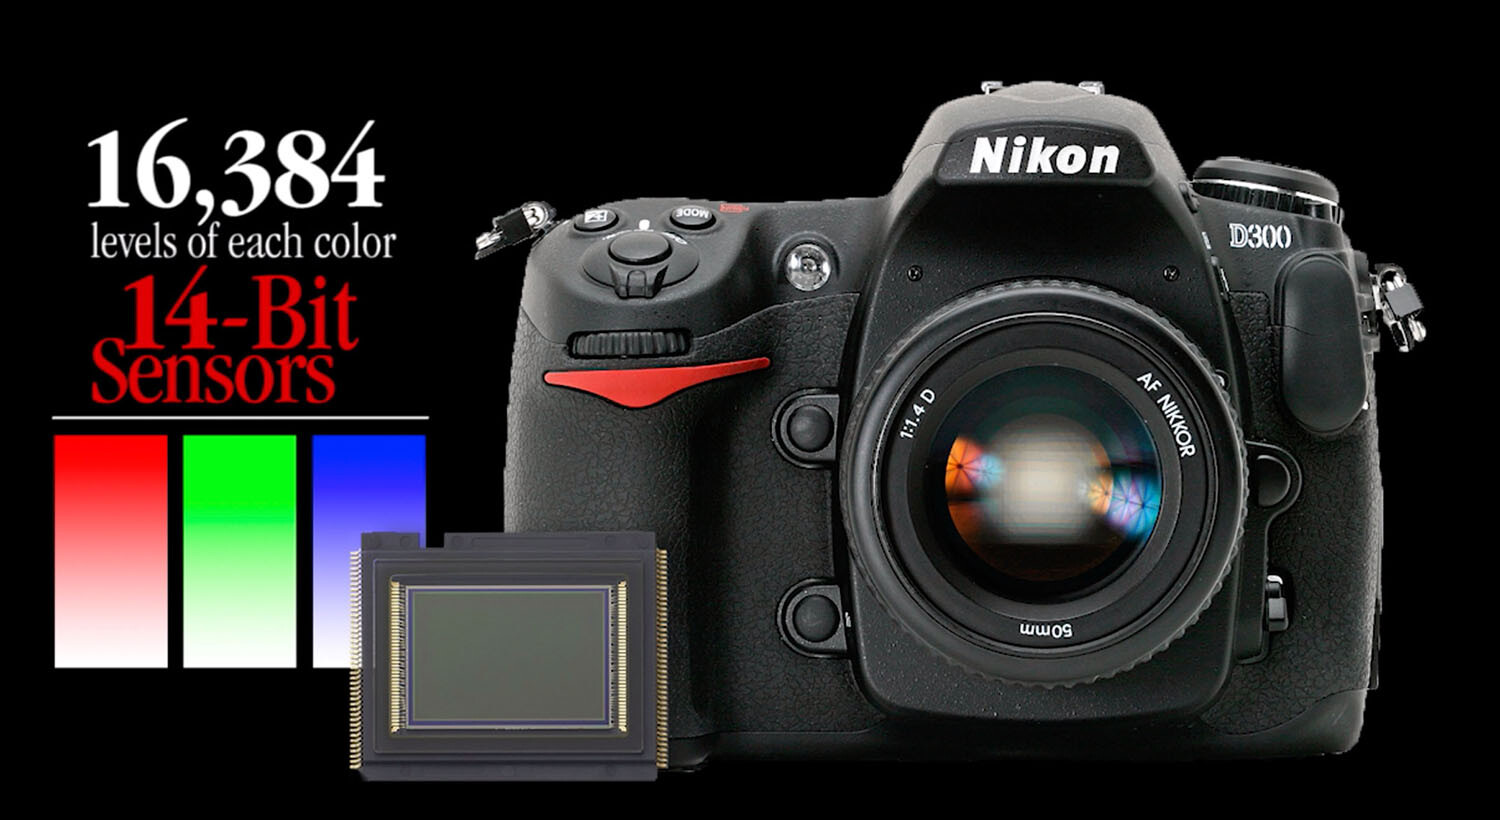
When the light of a scene enters the camera lens, it gets dispersed over the surface of the camera’s image sensor, a postage-size electrical circuit containing millions of individual light receptors. Each receptor measures the strength of the light striking it in a metric called “lumens.” Each receptor on this sensor records its light value as a color pixel.

The camera’s image processor reads the color and intensity of the light striking each photoreceptor and maps each image from those initial values, producing a reasonable facsimile of the original scene. When this bitmap of pixels gets viewed from a distance, the eye perceives the composite as a digital image.

The real magic happens after the storing of light on the memory card. The image that first appears when you open the file is the image processor’s initial attempt at interpreting the data recorded by the camera’s image processor. Most times, the initial (JPEG) image interpretation of this data is an acceptable record of the original scene, though not always.

Presets

Your camera provides several pre-set programs that adjust the three settings in the camera that affect exposure: aperture, shutter speed, and ISO.

Three main controls determine your exposure: the shutter speed, the aperture, and the ISO. The camera presets (A, S, and M) allow you to determine the depth of field and/or speed with which the camera captures the light.

The A (aperture priority) mode allows you to set the size of the lens opening (f-stop) while the camera automatically sets the shutter speed. The S (shutter priority) mode lets you set the duration of the lens opening (shutter speed) while the camera adjusts the size of the lens opening. The letter P (program mode) allows you to determine the best mix of aperture and shutter speed while your camera retains the correct balance of light for the exposure. The letter M (manual mode) gives you complete control over all settings but requires to balance the overall exposure.

Your camera’s variable ISO (International Standards Organization) setting adjusts the light sensitivity of the camera’s image sensor, allowing you to capture scenes in dim or bright light; the higher the number, the more sensitive the light receptors become, allowing you to capture images in lower levels of light.

The Histogram

Your camera provides a small graph that roughly indicates how well the camera is set to correctly capture the light in the current scene.

This graph displays the range of light coming through the lens and approximates the current light distribution that captured under the current settings. By adjusting the three settings mentioned above, you can shift and somewhat distribute this range of light to best record the full range of light.

Color balancing the light

Every scene’s color cast is influenced by the temperature of the light illuminating that scene. When the scene is captured outside, the Sun’s position in the sky and the influence of cloud cover alters the color of the light. Your camera offers at least two ways to compensate for the differences in color temperature (Auto White Balance and Pre-set Color Balance).

Auto White Balance

The Auto White Balance (AWB) sensor in your camera seeks any prominent white or neutral subject in the scene and shifts the entire color balance of the scene in an effort to neutralize that element. But there is an assumption with AWB that you desire the current lighting to be perfectly neutral in color.

Any clouds interfering with the sunlight will have a slight influence on the neutrality of 6500° (natural sunlight) lighting. AWB takes that slight shift out of the equation. Most of the time, this is a great idea. However, to record early morning or late afternoon (golden hour) lighting accurately, AWB will neutralize those warm colors and completely lose that “warm” mood.

Pre-Set White Balance Settings

Your camera offers several pre-sets to offset any known color casts caused by specific lighting situations. These settings appear in every digital camera “Settings” display and may appear in a slightly different order or wording. Daylight sets the camera to record scenes under typical mid-day outdoor lighting. Cloudy/Overcast shifts the colors toward orange to compensate for the bluish cast caused by light filtering through nominal cloud cover.

Shade offers a stronger orange shift to compensate for completely overcast (stormy) skies. Flash provides a very similar color temperature lighting as Daylight and is intended to prepare the image sensor for artificial daylight or “Speed light” type flash devices.

Tungsten/Incandescent shifts the colors toward the blue end of the color range to compensate for the warmer shift of incandescent lights. Fluorescent attempts to compensate for the greenish cast of gas-charged fluorescent lights.

Kelvin/Custom permits the user to set a custom color balance setting, essentially teaching the camera what “neutral” gray color looks like. All of these pre-sets attempt to correct non-neutral lighting conditions.

The Sculpting, or Finishing Process

While the camera does capture the full range of reflected light in a scene, it has no way of knowing the best tonal curve to apply to each image. Many times the five tonal ranges (highlight, quarter, middle, three-quarter, and shadow) need to be reshaped to best interpret the light captured at the scene. This tonal contouring process is the magic of sculpting the light into a meaningful visual image.

This little fella perched outside my front door and caught me off guard. I didn’t have time to fiddle with the controls to optimize the lighting situation. My first click got his attention and the second got this expression. Fortunately, I capture my images in both jpg and RAW formats simultaneously. Doing so allowed me to post-process the tones and display to you what I actually saw that morning.

I use the term “sculpting” when talking about image editing because it best describes the rearranging of tones in a digital image. Only ideal lighting balance looks great when rendered as a “stock” JPEG camera image.

This sculpting or finishing process amounts to the clarification of tones and colors in a digital image; making the image appear in final form the way the human mind perceived it in the original scene. While the color balancing aspect of this process is a bit more obvious, the tonal recovery is actually more critical to the final presentation.

The digital camera cannot capture all of the dynamics of the visible spectrum on a sunny day, nor can it determine the best balance of those tones. The camera’s image sensor simply captures all the light possible and presents the data to the camera’s image processor to sort out. Under perfectly balanced lighting, this works out just fine, but occasionally detail hides in the shadows and gets lost in the highlights, requiring help from the photographer/editor to balance out the tones.

This is where the individual tone-zones come into play, and the sliders available in RAW processing software (Camera Raw, Lightroom, On1 Camera Raw, Exposure X4) are invaluable. The internal contrast of every image (Whites, Highlights, Middle tones, Shadows, Blacks) can be pushed around and adjusted in a very non-linear manner (in no particular order) to reveal detail that otherwise remains hidden.

Conclusion

Photo finishing isn’t complete until both color and tones are correctly adjusted for maximum effect, matching the emotion of the original scene. Only then is your image ready for viewing. Challenge yourself to squeeze the detail and reveal the potential personality out of every image you capture. It’s well worth the extra effort.

The post Photo Finishing – Challenge Yourself to Reveal the Personality in Every Image You Capture appeared first on Digital Photography School. It was authored by Herb Paynter.


Digital Photography School

 
Comments Off on Photo Finishing – Challenge Yourself to Reveal the Personality in Every Image You Capture

Posted in Photography


Lensrentals tears down Canon’s 50mm F1.2 RF lens to reveal new optics, tech and surprises

13 Dec
Photo kindly provided by Lensrentals

For the latest edition of LensRentals gets down and dirty with camera equipment, Lensrentals founder Roger Cicala tore down Canon’s new 50mm F1.2L RF lens to reveal what tech and construction is lurking inside.

‘Usually, I start tear down posts with a joke about “those of you who are following along by disassembling your own lens at home”,’ reads one of the introductory paragraphs of Cicala’s teardown blog post. ‘Well, no joke today; this is not a home disassembly project. I’m not really sure it’s even a Lensrentals disassembly project. But we got out tools out and boldly went where we probably shouldn’t have gone.’

The unusual screw arrangement is seen tucked inside the front barrel assembly of the Canon 50mm F1.2L RF lens — photo kindly provided by Lensrentals

Right off the bat, Cicala came across something he had never seen in a lens before — a unique screw arrangement on the front part of the lens barrel. Figuring the unique arrangement ‘was some kind of binary code for “Do Not Enter”,’ Cicala instead flipped the lens over and started to disassemble it from the rear.

With each new layer peeled back, new surprises awaited Cicala. There was wiring, rather than simple ribbon cables (which Canon has almost always preferred), a denser PCB, and a little extra electrical shielding.

Cicala noted the denser PCB and wiring (visible bottom-right) inside the Canon 50mm F1.2L RF lens — photo kindly provided by Lensrentals

The teardown also confirmed Canon is using the same USM motor for the 50mm F1.2L RF as it is for its much, much larger 400mm F2.8L IS III lens, which Cicala teases as Lensrentals’ next teardown. Near the USM motor, Cicala noticed an interesting tensioning spring, but it remains unknown what purpose it serves.

Photo provided kindly by Lensrentals

Eventually, Cicala turned the lens back over and removed the front lens barrel. After a little work, what he ended up with was the stripped down optical core of Canon’s 50mm F1.2L RF lens. ‘Like a shaved cat, it’s always kind of shocking how small the core of the thing is,’ says Cicala.

The stripped-down optical core of the Canon 50mm F1.2L RF lens — photo kindly provided by Lensrentals

Other details revealed in the teardown include a piece of electrical discharge tape that seemingly leads to nowhere, additional sealing felt and a collection of springs that serve an unknown purpose.

Photo kindly provided by Lensrentals

All in all, Cicala was impressed with the lens, going so far as to say that this lens, and this lens alone, makes him lust for Canon’s EOS R system. Cicala concludes his assessment saying ‘One thing that is very clear […] Canon has invested very heavily into developing the lenses of the R system. This level of engineering didn’t all happen in the last year, they’ve been working on this for quite a while.’

To read and see the entire teardown, head over to the Lensrental blog and set aside a good ten minutes or so.

Articles: Digital Photography Review (dpreview.com)

 
Comments Off on Lensrentals tears down Canon’s 50mm F1.2 RF lens to reveal new optics, tech and surprises

Posted in Uncategorized


1000-year long exposure due to reveal effects of climate change for exhibition in 3018

26 Oct
The view from Eagle Rock – a digital pinhole image by Ryland West, showing the view from one of Keat’s camera sites

A series of pinhole cameras have been positioned around Lake Tahoe to record in a single exposure the effects of climate change over the course of the next 1000 years. Conceptual artist Jonathon Keats has booked space at the nearby Sierra Nevada College to hold an exhibition of the results in the year 3018.

The idea of the project is to show the long-term effects of climate change on the environment, by recording how the scenes the four cameras are pointed at alter over the course of a 1000-year exposure. Though technical details are scant regarding the size of the aperture, the basic premise of the cameras is a pinhole construction with a rose-colored pigment to record the image. The pinholes have been made in 24-karat gold sheets (though the reason isn’t clear why gold was used) and the pigment records the image by fading in areas where it is exposed to most light. As it is the areas that are exposed to light that fade the final image will be positive.

According to an interview on the Vice’s Motherboard website Keats has ‘borrowed a technique from Renaissance painters who worked with copper. This involved rubbing the copper with pumice stone, then rubbing it with garlic and finally applying a layer of pigment. After studying different pigments, Keats chose rose madder, a red pigment that is derived from the root of a madder plant.’

The tiny cameras have a copper body and measure 2.75in long by 2.25in in diameter, and have been placed in strategic positions to monitor the condition of the lake and its shoreline. Whether the cameras can remain still for 1000 years, and whether the exposure will be right in 3018, remains to be seen – but not by any of us. Keats himself says in the Motherboard interview “The [environmental] changes that happen may wipe out the camera or wipe out the institution that’s in charge of it. I just signed a contract with Sierra Nevada College that is for an exhibition of these four photographs in the year 3018. We’re certainly taking chances with this, but that’s also part of the picture in a way.”
I’ll wait closer; to the time before buying a ticket for the opening night.

Press release

TAHOE TIMESCAPE VISUALIZE LAKE TAHOE IN 3018

Experimental Philosopher Jonathon Keats Explores 1,000 Years of Environmental Change in the Lake Tahoe Basin

TAHOE PUBLIC ART INSTALLATION | 2018 – 3018
ART EXHIBITION | OCT 18 – NOV 16, 2018
TAHOE GALLERY, SNC, Incline Village, NV

Tahoe Timescape is a public art project conceptualized by experimental philosopher and artist Jonathon Keats that photographically documents the next thousand years of environmental change in the Lake Tahoe Basin. The project enlists a new approach to photography based on the traditional pinhole camera. Pierced through a plate of 24-karat gold, a minuscule pinhole focuses light onto a rose colored pigment, such that the color fades most where the light is brightest, very slowly imprinting a unique positive image. The Millennium Camera’s thousand-year-long photographic exposure, taken between 2018 – 3018, not only shows the view in front of the camera, but also records how it develops over time, revealing dynamics ranging from urban development to climate change.

Digital Pinhole Photograph from Eagle Rock | Site Photography by Ryland West
While one goal of Tahoe Timescape is to provide documentation of human and environmental dynamics for study by future generations, the Millennium Camera, custom made from copper for durability, is equally intended as a mechanism for people today to envision their long-term impact on the environment – and potentially to change the picture by altering their behavior.

Tahoe Timescape features four Millennium Cameras that will be deployed around all four shores of Lake Tahoe, with fixed vantage points positioned to provide an expansive view of the Lake Tahoe Basin, presenting multiple opportunities for the public to engage in deep-time thinking as they explore the region. The copper brackets that secure each camera in their location, as well as informative plaques mounted next to the cameras, are fabricated locally by Mountain Forge. The four locations, pinpointed on a topographic map and identified by geographic coordinates, are as follows:

  • South Shore: Heavenly Mountain Resort, South Lake Tahoe, NV / CA
  • West Shore: Eagle Rock, Homewood, CA
  • North Shore: Lake Tahoe Dam, Tahoe City, CA
  • East Shore: Sand Harbor, NV

Jonathon Keats and Tahoe Public Art’s Executive Director, Mia Hanak, conducted site surveys to identify the vantage points and Millennium Camera locations. Local landscape photographer Ryland West explored each site to shoot a set of landscape photographs paired with digital pinhole photographs focused on the actual vantage point from the Millennium Cameras to help us imagine the photographic composition that will be recorded by each between now and 3018.

“Tahoe Public Art is truly excited to be presenting the conceptual art of Jonathon Keats to the Lake Tahoe Basin. With the ongoing stewardship of Sierra Nevada College, we hope this encourages tourists and residents alike to contemplate the future of the basin and how they can become active in its preservation.” – Steve Miller, Chairman, Tahoe Public Art.

Further outreach will be facilitated by an exhibition about deep time photography at Sierra Nevada College’s Tahoe Gallery. Opening on October 18th and running through November 16 in 2018, the exhibition will feature four sets of landscape photographs, digital medium format pinhole photographs, and photo documentation of the cameras secured at each location. Samplings of pinhole cameras, and a topographic map showing the camera sites and geographic coordinates will also be showcased. On September 5th, Keats led a pinhole camera workshop for SNC students. The exhibition will also showcase original artwork by SNC students — including 2-D, 3-D, digital arts, and interdisciplinary art — encapsulating how they envision Lake Tahoe in one thousand years.

Articles: Digital Photography Review (dpreview.com)

 
Comments Off on 1000-year long exposure due to reveal effects of climate change for exhibition in 3018

Posted in Uncategorized


Leaked: GoPro to reveal entry-level ‘HERO’ action cam this week, will cost $200

27 Mar

A major leak earlier today confirmed what rumors have been claiming for over a week: GoPro is preparing to release an entry-level version of its HERO action cam. The new camera—ostensibly just called the GoPro HERO—will feature the same styling as its high-end HERO6 sibling but, thanks to some pared down specs, is allegedly priced between $ 180-$ 200.

According to this leaked PDF courtesy of Nokishita, the GoPro HERO will shoot 1080/60p and 1440/60p video as well as 10MP stills at up to 10fps, can capture timelapse video at 0.5 second intervals, is waterproof to 10m (~33 feet) out of the box, and features a 2-inch touchscreen on the back.

The PDF (which is in French) also specifies that the camera features WiFi and Bluetooth connectivity, voice control, and compatibility with GoPro’s one-touch Quik Stories highlight video creation in the GoPro app.

The leak does not cover price or release date; however, Photo Rumors is reporting that the new HERO camera—also seen in the leaked images above—will cost between $ 180 and $ 200, and Nokishita writes that the HERO will be announced on March 30th. If that turns out to be the case, be sure to check in with DPReview this Friday for the official details.

Articles: Digital Photography Review (dpreview.com)

 
Comments Off on Leaked: GoPro to reveal entry-level ‘HERO’ action cam this week, will cost $200

Posted in Uncategorized


GoPro Q3 2017 financial results reveal return to profitability

04 Nov

GoPro has reported its Q3 2017 financial results, detailing revenue that highlights a return to profitability. The company has undergone extensive business restructuring over past months in an effort to reverse its fortunes while decreasing non-GAAP expenses. According to its latest quarterly results, GoPro saw a 37% year-on-year revenue increase, raking in $ 47 million in cash with a 40% gross margin.

GoPro achieved both GAAP and non-GAAP profitability during its third fiscal quarter, with company CEO Nicholas Woodman saying, “GoPro has turned a corner, restoring growth and profitability to our business.” In addition to growing revenue, GoPro saw “dramatically reduced operating costs,” though the lower costs won’t affect its product roadmap, according to Woodman.

In its third quarter last year, GoPro saw a GAAP net loss of $ 104 million. Compare that to this year’s Q3 GAAP net income of about $ 15 million, and you’ll get a sense of the drastic improvement the company just posted. The turnaround has been largely driven by GoPro’s average sales price (up 22% year-on-year) and the cat that its quarterly operating expenses were the lowest they’ve been in 3 years.

Articles: Digital Photography Review (dpreview.com)

 
Comments Off on GoPro Q3 2017 financial results reveal return to profitability

Posted in Uncategorized


Unboxing Buildings: Dull Modern Facades Removed to Reveal Historic Decor

24 Oct

[ By WebUrbanist in Architecture & Offices & Commercial. ]

Modernist architects rejected brick, stone and iron ornament in favor of clean metal and brutalist concrete, and in some extreme cases went so far as to cover up old facades with more contemporary cladding. But what was originally an act of erasure can also turn into an unintentional act of preservation, as in the case of this structure built in the 1920s but clad over in the 1960s.

This drab building in San Antonio, Texas was at best unremarkable and at worst a bit of an eyesore. White stripes and vertical strips of red worked with rows of glass to create something simple, Modern and a bit dull. It was also somewhat misleading: many of those apparent windows were covering up walls, not openings. All of this became clear as the surface started to be stripped away and old structure restored.

Echoing a similar trend in recent decades of stripping back paint to reveal wooden details in homes, developers and cities have started to realize the potential value in hidden landmark architecture. The Schoenfield Building in Cleveland, for instance (depicted above), was a beautiful structure built of brick but for a time covered in a less glamorous coat. Its underlying facade has since been uncovered.

In the case of the Odean theater, it is hard to imagine what ever possessed someone to cover the elaborate facade of the original (upper left) with its decorative details and beautiful windows with an array of vertical metal strips (upper right). Fortunately, though the name has changed, the architecture has since been restored (bottom).

The decision is not always so clear-cut, however. Architectural Observer followed the restoration of a structure in Hays, Kansas where “there was a push to ‘restore’ and ‘revitalize’ the immediate downtown area. The master plan called for the removal of this particular facade.”

“Much history was lost in the redevelopment process; should this facade be counted among the losses?  Or do you feel that the two early 20th-century facades (both needing restoration) which were revealed are the stronger asset?” It is a question that often faces preservationists, especially in places like Europe where long histories can result in many iterative additions and changes over time. In this case, the facade was removed but saved. To see more examples like these and discussion about historic preservation, check out this thread on reddit.

Share on Facebook


[ By WebUrbanist in Architecture & Offices & Commercial. ]

[ WebUrbanist | Archives | Galleries | Privacy | TOS ]


WebUrbanist

 
Comments Off on Unboxing Buildings: Dull Modern Facades Removed to Reveal Historic Decor

Posted in Creativity


Sigma to reveal new lens at PDN PhotoPlus Expo 2017

05 Oct

Lens maker Sigma will showcase its full range of Sigma Global Vision lenses, Cine high-speed primes and zooms as well as the Foveon sensor-based sd Quattro and Quattro H cameras at the upcoming PDN PhotoPlus Expo 2017 Expo trade show in New York City later this month, but that’s not all they’re doing.

The company has also announced it will reveal one completely new lens at the show, teasing us with this little detail without revealing anything else about the upcoming glass.

Additionally, a number of photographers and other imaging professionals will take the stage at the Sigma booth and talk about how they use Sigma products in the areas of aviation, editorial, glamour, landscape, travel and wedding photography.

As if those weren’t enough reasons to pay a visit, PPE 2017 attendees who visit Sigma’s booth (#837) will also have a chance to enter and win a Sigma 24-70mm F2.8 Art lens. Something to think about if you happen to be in New York at the end of October…

Sigma Reveals its PDN PhotoPlus Expo 2017 Line Up and a Brand New Lens

The breakthrough year for Sigma Global Vision Art, Contemporary and Sport lenses on display; brand new lens addition to be unveiled; Sigma Pros light up stage with new presentations

Ronkonkoma, NY – October 4, 2017 Sigma Corporation of America, a leading still photo and cinema lens, camera, flash and accessory manufacturer, will showcase its full line up of Sigma Global Vision lenses, including a brand-new addition to the line, at the upcoming PDN PhotoPlus Expo 2017 Expo held at the Jacob Javits Convention Center in New York City from October 26-28, 2017 (booth 837).

The company will also have on hand its breakthrough optics for the cinema market – the Sigma Cine high-speed Primes and Zooms – as well as the Foveon sensor-based sd Quattro and Quattro H cameras.

“Sigma has had a landmark year with the introduction of seven new lenses across our Global Vision and Cine product lines,” states Mark Amir-Hamzeh, president of Sigma Corporation of America. “Our research and development team is dedicated to creating superior optics that meet the ever-growing requirements of today’s high resolution cameras, taking advantage of every possible design and element to capture the greatest picture detail for both still and moving images. We look forward to showcasing the culmination of what has been a remarkable year in optical advancements for Sigma at this year’s PPE event.”

Sigma 2017 introductions include the award-winning 14mm F1.4 DG HSM Art, 24-70mm F2.8 DG OS HSM Art, 135mm F1.8 DG HSM Art, 100-400mm F5-6.3 DG OS HSM Contemporary Sigma Global Vision lenses and the new Sigma Cine FF High Speed 14mm T2 and 135mm T2 prime lenses.

Sigma Special PPE Presentation – Sigma Pro Phenom Jen Rozenbaum
Sigma Pro Jen Rozenbaum will take the PPE stage on Wednesday, October 25, 11:00 AM – 12:30 PM to deliver a PPE Master Class on “How to make every woman look amazing.”Jen will share with attendees her vast experience in boudoir photography, providing top tips and secret tricks – from wardrobe to posing – that flatter all women. Jen’s presentation will help attendees understand how to best dress and pose any woman of any size and shape as well as gain confidence behind the camera whether they are shooting boudoir, wedding or seniors!

Master Photographers Take the Sigma Stage
Showcasing the very best in photography craft, the expanded Sigma Pro family will headline the Sigma stage and offer attendees a behind the lens look at the techniques and technology that captured some of the year’s most outstanding photographs in the areas of aviation, editorial, glamour, landscapes, travel and weddings.

This year’s prestigious Sigma Pro PPE stage line-up includes outdoor sports and adventure travel photographer Liam Doran, aviation photo expert Jim Koepnick, renowned bird and travel photographer Roman Kurywczak, fearless woman photographer Jen Rozenbaum, and glamour and wedding photographer Jim Schmelzer.

The exciting topics include (listed by Sigma Pro) and showcase lenses from Sigma Global Vision Art, Contemporary and Sport lines:

  • Liam Doran – Adventure Sports Photography: Get a behind the scenes look at the fast-paced world of editorial adventure sports photography with Liam Doran clients Powder, Bike, Ski, Mountain, Outside, Aka Skidor and many more. Showcasing Art and Sport lenses.
  • Liam Doran – Signature Images – A Visual Journey: From skiing in Switzerland to mountain biking in Colorado, Liam shares the backstory on how some of his favorite images were shot and which Sigma lenses helped him capture some of his best work. Showcasing Art and Sport lenses. Liam shoots extensively with the 12-24mm F4 DG HSM Art, 24-70mm F2.8 Art, 100-400mm F5-6.3 Contemporary and the 150-600mm F5-6.3 DG OS Contemporary and the 70-200mm F2.8 EX DG OS HSM lenses among others.
  • Jim Koepnick – Documentary Photography…A Single Lens Solution: While there is a mystique about street photography with an old rangefinder camera and one lens, the bottom line is the photo that is captured, and the story that photo tells the viewer. Jim shares what a pro can do with a Sigma 18-300mm F3.5-6.3 DC Macro OS HSM Contemporary lens.
  • Jim Koepnick – Air Show Photography – Sigma Has It Covered: Air shows are one of the most popular spectator events in the country, and the wide variety of Sigma lenses make it easy to photograph every aspect of exotic aircraft in the air and on the ground. Learn the best techniques for capturing fast moving planes in flight and making creative images of planes and personalities on the ramp using the Sigma 12-24mm F4 Art, 24-70mm F2.8 Art, 100-400mm F5-6.3 Contemporary and the 150-600mm F5-6.3 Contemporary lenses.
  • Roman Kurywczak – For the Love of Landscapes: Roman will take attendees on an inspirational journey showcasing the magic of landscape photography through useful tips, suggested camera settings, instruction on innovative techniques and recommendations for the optimal Sigma brand lenses and gear for capturing stunning images of your very own. Showcasing the Sigma 12-24mm F4 Art, 14mm F1.4 Art, 100-400mm F5-6.3 Contemporary and the 150-600mm F5-6.3 Contemporary lenses.
  • Roman Kurywczak – Getting Close for Impact: This educational lecture will show you the technical tips and tricks needed to take your close-up photography to the next level. Attendees will learn how to consistently capture sharp images, front to back, handheld, and all in a single frame with a variety of Sigma lens options including the Sigma 105mm F2.8 EX DG OS HSM, 150mm F2.8 EX DG HSM, APO Macro 180mm F2.8 EX DG HSM, 18-300mm F3.5-6.3 Contemporary, 100-400mm F5-6.3 Contemporary and the EM-140 DG Macro Flash.
  • Roman Kurywczak – Photographing Wildlife – from Portraits to Action: This exciting photographic journey will give attendees the important information they need to know about photographing wildlife out in the field – from camera settings to Sigma lens and accessory choices. Roman will share striking examples illustrating how the right lens choice positively impacts the image without breaking your budget. Showcasing the Sigma100-400mm F5-6.3 Contemporary, 150-600mm F5-6.3 Contemporary, 300-800mm F5.6 EX DF APO HSM and the 500mm F4 DG OS HSM Sport lenses.
  • Roman Kurywczak – Photography After Dark: This informative how-to program is designed to open up your eyes to the possibilities of photographing landscapes after dark, whether a natural landscape with the star filled sky as a backdrop, or dazzling city lights photographed from a helicopter using a variety of Sigma lenses including the Sigma12-24mm F4 Art, 14mm F1.4 Art and the 24mm F1.4 DG HSM Art lenses.
  • Jen Rozenbaum – Bulletproof Posing for All Women: Confidence is just as important behind the lens as it is in front of it! Posing women is a creative challenge for all photographers. Join Jen as she shows her bulletproof tips and tricks for posing women to make them look simply amazing, and give the photographer and subject the confidence that generates an incredible shoot. Showcasing the Sigma 50mm F1.4 DG HSM Art,85mm F1.4 DG HSM Art, and the 24-105mm F4 DG OS HSM Art lenses.
  • Jim Schmelzer – Glamour Photography Using Exotic Lenses for Impact: Jim will showcase a variety of glamour images shot with Sigma Art and Sport lenses. He will deconstruct shots –sharing tips, including those that he used to capture the stunning images of world-class models from his latest commercial glamour shoot in Cancun Mexico. Showcasing the Sigma 85mm F1.4 DG HSM Art, 120-300mm F2.8 DG OS HSM Sport and the 135mm F1.8 Art lenses.
  • Jim Schmelzer – Choosing the Right Lens for Your Wedding Day Assignment:Wedding day photographers must wear a variety of hats. They need to be an architectural photographer, photojournalist, portrait artist and most importantly, they need to be fast and accurate. Look over Jim’s shoulder as he demonstrates how he captures the versatility in images required of today’s modern wedding photographer. Showcasing the Sigma 12-24mm F4 Art, 24-105mm F4 Art, 35mm F1.4 DG HSM Art and the 85mm F1.4 Art lenses.

For the Sigma Pro presentation schedule days and times, please visit:https://blog.sigmaphoto.com/event/photoplus-2017/ ?

Sigma Super Giveaways at PPE 2017
PPE 2017 attendees who visit Sigma at booth 837 will have a chance to enter and win a Sigma grand giveaway – a 24-70mm F2.8 Art – an MSRP value of $ 1299.00 USD!

Re-engineered and introduced in 2017, the newly updated 24-70mm F2.8 Art lens is Sigma’s workhorse zoom lens. It touts a brand new Optical Stabilizer (OS), Hypersonic Motor (HSM) for highly efficient and fast autofocus, as well as a dust- and splash-proof mount with rubber sealing.

The 24-70mm F2.8 Art lens embodies all the technical qualities and finesse that define the high-performance Sigma Global Vision Art series. A popular industry focal range covering a wide array of shooting scenarios, the 24-70mm’s optical design also includes three SLD (Special Low Dispersion) glass elements and four aspherical elements to ensure image accuracy and sharpness. The 24-70mm F2.8 Art aspherical elements use Sigma’s thicker center glass design and highly precise polishing process, delivering stunning images and bokeh effects. The lens’ purpose-built structure boasts a new metal barrel for optimal durability with TSC composite internal moving components designed to resist thermal contraction and expansion. Available for Canon, Nikon and Sigma camera mounts.

Articles: Digital Photography Review (dpreview.com)

 
Comments Off on Sigma to reveal new lens at PDN PhotoPlus Expo 2017

Posted in Uncategorized