RSS
 

Posts Tagged ‘quick’

7 Quick Tips To Help You Capture Better Portraits

24 May

Taking great portraits is a great genre of photography to master. Some of the most famous photographs in the world and even paintings are simple head and shoulder portraits. They can tell us so much about the person being photographed. Think of arguably the most famous painting of all time and most people would probably say the Mona Lisa. But taking portraits also seems to be a difficult thing for newbie photographers to do. Fear not, here are 7 quick tips to help you capture better portraits.

7 Quick Tips To Help You Capture better Portraits - portrait of a chef

1. Start with a conversation

It might seem daunting taking someone’s portrait, even in a studio. But it will get so much easier if you build a rapport with the person first. Whether it’s in the studio or in the street, start the shoot with a conversation and get to know who they are. Find out what they do, what they like, and even what their personality is like.

If you can, make them laugh with a joke. Not only will all of this help build a picture of who they are which can influence the photo, but it will also mean that they are much more comfortable working with you.

This, in turn, will mean that they will be more relaxed and also more be accommodating to you taking their photo. Clearly, sometimes that will be difficult in travel photography, for example, when you might not speak the same language. But even then it’s amazing what a few hand gestures, a few local phrases, and a smile can achieve.

portrait of a lady smiling - 7 Quick Tips To Help You Capture better Portraits

2. Frame carefully

While it might seem obvious, it’s amazing how often I’ve seen a portrait taken where it hasn’t been framed properly. When you are taking an environmental portrait, you need to capture some of the person’s surroundings to be able to tell a story. But when you’re doing a normal head and shoulders portrait, the sole focus should be the person standing in front of you. Their face is where the focus should be, so if there are distracting elements near them or in the background try to crop those out.

Often the reason that photographers end up with too many distractions in the photo is that they are too far away from their subject. So, if you find that you are not able to focus primarily on the subject’s face when taking a portrait, get closer.
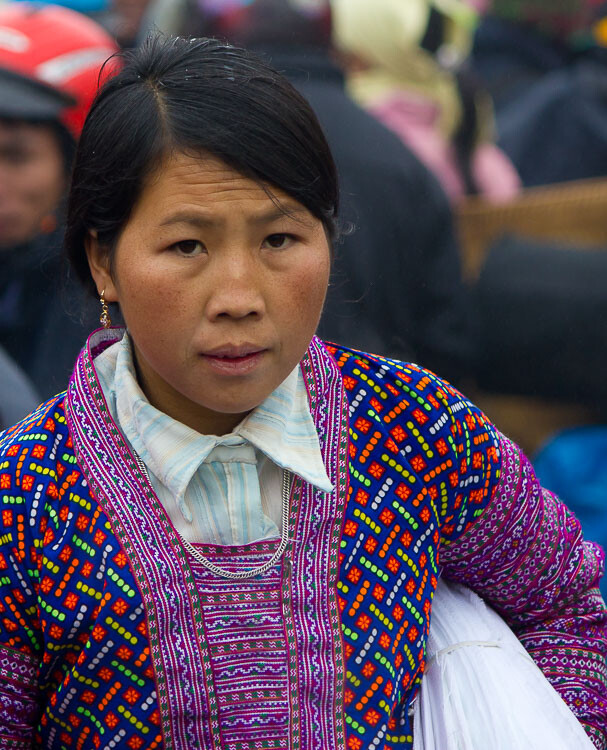
portrait of an Asia lady - 7 Quick Tips To Help You Capture better Portraits

3. Think about the background

Another key element of framing your portrait properly is to ensure that the background isn’t too overpowering. Ideally, a muted or plain surface such as a wall works best as the viewer isn’t distracted by anything else. They can focus solely on the person’s face. If you find that your subject is standing somewhere that doesn’t work best for the portrait, ask them if you can move them and position them somewhere better. Even if you don’t speak their language, usually pointing to where you want them to go does the trick.

If you find that you have to take the photo with too much stuff happening in the background, set a wide aperture so that you will get the background blurred. This will help make your subject stand out from the busy background and not get lost in the photo.

portrait of a person in costume in Italy - 7 Quick Tips To Help You Capture better Portraits

4. Experiment

Most of the time the advice that you are given is to try and light your portrait using natural light, photograph your model from the front, and get close enough to eliminate any distractions. Sound familiar? For example, being outside on an overcast day is ideal for taking portraits as the soft even light means you don’t get harsh shadows on the person’s face.

But while these are great bits of advice that you should follow, it is also worth sometimes pushing the boundaries. So experiment with harsh lighting or even a more creative shots such as in the example below. I took a step back to let people pass and was immediately struck with the dynamism that having someone walk across the image brought to it. It’s still a portrait, but it’s a little more interesting than if there was no one else in the shot.

The key is to not be afraid to go against convention and try something different, you might be surprised by the results.

7 Quick Tips To Help You Capture better Portraits - portrait of person in costume in Venice

The passer-by added a sense of mystery to this portrait.

5. Keep the eyes sharp

If there is just one rule that you need to follow when it comes to taking better portraits, it is to ensure that the subject’s eyes are sharp and in focus. If the eyes are not in sharp focus, the whole image looks soft and unappealing. So, take extra care that you are focusing correctly and that you are keeping the eyes sharp.

When taking portraits outside, the majority of the time you can get away with using a fairly wide aperture. So as long as there is decent light your shutter speed should remain fast enough to avoid camera shake. If you are unable to keep a fast enough shutter speed, raise your ISO accordingly.

portrait of a young Asian child crying - 7 Quick Tips To Help You Capture better Portraits

6. Take multiple shots

You often have a relatively short window when taking portraits as your subject will usually want to get on with their day. But that should still give you plenty of time to take multiple photos. Try taking photos in burst mode so that you can capture the exact moment when your model has their eyes open or has an expression on their face that works for the photo.

You can also try a few different compositions and even angles to give your photos variety. The great thing about digital photography is that it won’t cost you anything to take multiple photos as long as you have enough memory space.

man taking a photo in Venice -7 Quick Tips To Help You Capture better portraits

7. Just relax

Sometimes the real key to taking any great photo is just relaxing and letting it happen naturally. So rather than rushing around and clicking away frantically, just slow down and take your time.

Start talking to people without the burden of knowing that you want to photograph them and if the situation lends itself to a photo just enjoy the process and have fun. Show the person the photos you’ve taken, keep everything casual and you will find that your photos become much better and more intimate.

young girl's portrait - 7 Quick Tips To Help You Capture Fantastic Portraits

Taking a great portrait takes great skill, but when done well it can have incredible results. You will find that not only will you have amazing photos that will look great anywhere, but also memories that you will cherish. Just follow these 7 quick tips to help you capture better portraits and you’ll be on your way to capturing great photos of people.

Please show us your portraits and share your tips advice below.

The post 7 Quick Tips To Help You Capture Better Portraits appeared first on Digital Photography School.


Digital Photography School

 
Comments Off on 7 Quick Tips To Help You Capture Better Portraits

Posted in Photography


Quick Video Review – What is the Best Camera Bag or Way to Carry Your Gear?

07 Apr

There are many ways to carry around your precious camera gear – so which is the best? Well, that is a very subjective question, that only you can answer. In this video from the Camera Store, Jordan demonstrates some of the pros and cons of the most popular options.

?

Here is a list of all the camera carrying bags, straps and other options mentioned in the video and a few extras.

List of camera straps mentioned:

  • Op/Tech Pro Loop Neoprene neck strap
  • BlackRapid Curve Strap Ultra Padded
  • Cotton Carrier Camera System
  • Lowepro S&F Technical vest system
  • Lowepro S&F Technical Belt
Video Quick Review - What is the Best Camera Bag or Way to Carry Your Gear?

Holdfast Moneymaker dual camera strap system

Photography backpacks:

  • Pro Trekker 650 AW Camera Backpack
  • Manfrotto Pro Light camera backpack RedBee-210
  • Lowepro Tahoe BP 150 backpack
  • Lowepro Slingshot Edge 250 AW
Video Quick Review - What is the Best Camera Bag or Way to Carry Your Gear?

Agua Versa 90 backpack

Other kinds of bags:

  • Domke Journalist Chronicle Shoulder Bag
  • Kelly Moore Luna fashion bag
  • Ona makes stylish designer leather bags
  • Jill-e Designs also make fashionable bags
  • Filson makes stylish unisex bags

OR read this to avoid having a bag collection in your closets like I do – 5 Camera Bag Hacks to Help You Curb the Temptation of Buying More.

Others options not mentioned:

  • Wrist straps
  • Holster systems (like the Cotton Carrier G3 Strapshot Holster)

What do you use?

So of all those options, which do you use to carry your gear? Are their other options we’ve missed? Please tell us in the comments below.

The post Quick Video Review – What is the Best Camera Bag or Way to Carry Your Gear? appeared first on Digital Photography School.


Digital Photography School

 
Comments Off on Quick Video Review – What is the Best Camera Bag or Way to Carry Your Gear?

Posted in Photography


Tips for Quick Photo Editing in the Field

04 Apr

In today’s world of fast and super fast consumption of everything, perhaps photography and photographers are an anomaly in that we obsess over editing and over-editing our photos until the cows come home (figuratively speaking of course)! But there are some situations where quick photo editing and speed are our friends.

For example, say you are traveling on an adventure of a lifetime but still want to keep your followers and/or your community engaged and up to date on all your adventures by way of images. Or if you have just come back from a client photoshoot and want to send some sneak peek images so that your clients get excited about what is to come in the next few weeks.

Albert Hall Jaipur India at Sunset with pigeons - Tips for Quick Photo Editing in the Field

A quick edit of an image as I was traveling around India for 10 days.

In situations like these, having a process to edit your photos quickly yet efficiently and on-point with your photographic aesthetics is key. Luckily there are a few elements that can be adjusted to achieve a clean edited look. These sliders are universal in that they are available with almost any editing software available be it Lightroom (as seen below), Photoshop, or even smartphone editing software like Snapseed and VSCO.

Follow along with this video

In the following video, I share some quick and easy editing tips for times when you are in a crunch.

?

One quick tip for a fast edit in the field is to start with an image that has good bones, to begin with. Essentially what this means is that you try to get the images as close to your vision for the final outcome, straight out of the camera.

So slow down and really think through elements like exposure, composition, tonality, etc., right as you are taking the image. This will definitely help speed up your editing even more.

Golden Gate Bridge with a pink hue at sunrise before editing straight out of camera -

A clean straight out of camera shot that was almost what I wanted to achieve.

Karthika Gupta Golden Gate Bridge with a pink hue at sunrise after a quick edit

A few minor adjustments to amplify the pink/orange hues for a quick edit.

Conclusion

I hope these editing tips were useful. Keep in mind, the whole point of this exercise is to make editing in the field easy and quick.

You can always come back and re-edit those images to perfection when you have the time to spend hours on a single image (we have likely all been guilty of doing that at some point or the other – it is called the photographer’s dilemma!!).

Do you have any other quick photo editing tips you’d like to share? Please do so in the comments below.

The post Tips for Quick Photo Editing in the Field appeared first on Digital Photography School.


Digital Photography School

 
Comments Off on Tips for Quick Photo Editing in the Field

Posted in Photography


Quick look: Canon’s new compressed Raw format

03 Apr
Canon’s new entry-level EOS M50 is also the first Canon camera to come with the new Digic 8 processor, allowing it to capture smaller C-Raw files in the new CR3 format.

The EOS M50 may be aimed at beginning photographers, but its all-new Digic 8 processor makes it Canon’s first camera to use the CR3 Raw file format. Older Canons that used the CR2 file format could capture either losslessly compressed Raw files or ‘medium’ and ‘small’ equivalents, both saving you disk space, the latter at the expense of reducing resolution.

However, if you enable the compact ‘C-Raw’ option on the M50, the files will be 30-40% smaller than their losslessly compressed equivalents without any reduction in resolution. But are there any other image quality penalties to pay? Let’s take a look.

Click here to download the original Raw files for all of the below comparisons.

Base ISO

Uncompressed Raw Compressed Raw
Click through for full size
ISO 100 | 1/40 sec | F5.6 | Canon EF 50mm F1.4

The above images were shot and processed using our standard studio testing procedure. Do you see any differences? We couldn’t find any – but we decided to see if boosting the ISO value and using our low-light scene would turn anything else up, particularly in terms of shadow noise.

High ISO

Uncompressed Raw Compressed Raw
Click through for full size
ISO 12800 | 1/40 sec | F5.6 | Canon EF 50mm F1.4

Now that we’ve switched to our low light setup and boosted the ISO by seven stops, the images still appear all but identical, even in terms of noise levels. So far, it looks like it’s best for you to go ahead and switch into C-Raw and save yourself some disk space.

But when we put the EOS M50 through our standard exposure latitude test, we did find some evidence of what sort of processing is happening in Canon’s C-Raw files.

Pushed shadows

Uncompressed Raw Compressed Raw
Image pushed four stops in Adobe Camera Raw

Our exposure latitude test involves exposing our studio scene with increasingly lower exposures, and then pushing them back to the correct brightness in Adobe Camera Raw. With many older sensors, you would see an abundance of noise being added by the camera, but today’s sensors output files that are much more tolerant to this sort of manipulation.

Basically, after pushing the files, we look into the shadow regions to assess the exposure latitude (essentially the dynamic range) of the Raw files. And it’s after underexposing the EOS M50 by four stops and then re-brightening, we start to see some clearer differences between the regular Raw files and their C-Raw equivalents.

The resulting pattern can be more difficult to remove or reduce than normal noise patterns, and is reminiscent of artifacts left behind from noise reduction algorithms that we’ve seen in the past.

At this time, we’re optimistic that users of Canon’s new Raw format can shoot in C-Raw without a noticeable impact on image quality.

But after all, this is a four-stop push. Depending on your shooting, this may indicate a slight dynamic range disadvantage to using C-Raw, but it’s likely to remain an edge case for most users. And so we’ve decided to finish off with a more informal test in a more common situation. We wanted to see if processing out the two different Raw files would turn up different results for the gradient in a blue sky.

Blue skies and takeaways

Uncompressed Raw Compressed Raw
Click through for full size
ISO 100 | 1/640 sec | F8 | Canon EF-M 15-45mm F3.5-5.6

Smooth gradients can often trip up compression algorithms, particularly in many cameras’ JPEG engines, so we wanted to see if there was any noticeable difference when the EOS M50 compresses its Raw files. As with our un-pushed studio images, it’s again impossible to tell which is the normal Raw file, and which is the C-Raw file. So what does this all mean?

Of course, we still have plenty of tests to run on the EOS M50, but at this time we’re optimistic that users of Canon’s new Raw format can safely shoot in C-Raw and save themselves valuable memory card and disk space without noticeable impact on image quality.

Note that all of the above images of our studio scene were processed in an identical manner to images in our studio scene widget, meaning there was no sharpening nor noise reduction added. Adjustments for the blue sky scene were limited to highlights, shadows, whites and blacks in Adobe Camera Raw, and sharpening and noise reduction were left to default levels.

Click here to download the original Raw files for all of the below comparisons, and to see how the EOS M50’s uncompressed Raw files compare to its peers, check it out in our studio test scene.

Articles: Digital Photography Review (dpreview.com)

 
Comments Off on Quick look: Canon’s new compressed Raw format

Posted in Uncategorized


5 Quick Portrait Posing Tips to Flatter Your Subject

15 Mar

Being in front of the camera is daunting, to say the least, not to mention staring at a big black lens in front of you. I understand how my subjects feel because I totally hate being photographed. In this article, I’ll give you five portrait posing tips to help flatter your subjects.

1. Relaxed posture

5 Quick Portrait Posing Tips to Flatter Your Subject

Getting your subject into a relaxed posture is easier said than done! But relaxing for portraits is definitely not synonymous to slouching. I tell my subject to close their eyes and take some deep breaths, give their arms and hands a good shake, breathe out, and then open their eyes.

It’s easier for men. I tell them to relax into their normal stance and give them instructions from there. For men, it is generally a slouching issue. I tell them to straighten their spine and not to slouch. This makes them look taller and leaner and gives them square shoulders rather than droopy. However, this posture can look a bit stiff too so I ask them to gently breathe out as this releases the tension on the shoulders.

Relaxing for women is a little bit trickier but the above is a good start. Sometimes it helps them to imagine that a string is attached to their spine and I am pulling it gently upwards. The key word here is gently!

2. Weigh distribution

5 Quick Portrait Posing Tips to Flatter Your Subject

I get women to stand with one leg slightly behind the other and to put their weight on the back leg. With the weight distributed more on the back hip and leg, I get them to lean their upper body forward toward me to balance the weight distribution and slightly twist their body to either the left or right.

It’s a very subtle chest-forward-booty-back pose and you really want it to be subtle. It is important to make sure that you are not looking up at your subjects but that your camera is ever so slightly looking down at them. This pose and your camera angle combined gives your subject a more flattering and leaner look. Don’t overdo the looking down angle, a slight camera tilt will do. This is not the bird’s eye view pose.

Men don’t need to redistribute their weight backward and forwards like women. I find that an even central distribution of weight works better for them. Getting them to put their thumbs in their pockets helps achieve this. If I feel they need to slightly loosen up, I just tell them to gently breathe out.

3. Leaning

5 Quick Portrait Posing Tips to Flatter Your Subject

With their spines straight, find a wall or structure your subjects can lean on. I usually start with having them lean with their backs flat against the structure and I instruct them to pull away from one side until I feel the right angle is achieved.

Sometimes, this pose ends up as just one shoulder leaning. The important thing is that the resulting image does not look like your subject is missing a limb or shoulder as can happen sometimes if you are not careful with the angles.

4. Chin forward

5 Quick Portrait Posing Tips to Flatter Your Subject

Women are extremely conscious about double chins and their faces not looking as lean as they’d like in their images. A bad habit that many women do instinctively when they are photographed is to tilt their chins upwards thinking this removes any double chins.

This looks very unnatural and awkward and gives them a longer neck and a shorter face. When you speak to people, you don’t stick your chin up at them, do you? Instead of chinning up, I get them to push their chins forward and down a touch. This gives them a slight stretchy pain on the back of the neck and feels unnatural, but looks really flattering.

The forward action eliminates the double chin and tipping the chin slightly downwards makes the face look leaner.

You can modify this pose slightly by asking them to point their chins towards one shoulder and if the shoulder is droopy, they can lift the shoulder bone up a touch. This not only gives them a taller and leaner posture but adds angles as well to improve the composition of the image.

5 Quick Portrait Posing Tips to Flatter Your Subject - chin out

5. Connection

On any of the above and at any point during the session, breathing out helps your subject be more at ease so just remind them to do so. You also want them to always have a connection, just like the direction of the chin connecting to the direction of the shoulder for some angles.

Their gaze also needs to connect to either their body or their environment. You don’t want your images to look like the subject is in a vacuum. Looking straight at the camera connect them to the viewer. If you are shooting outdoors, you could instruct your subject to look at the horizon in the far distance or a tree nearby.

If they are holding something like flowers or a coffee mug, you could ask them to look down at what they have in their hands. Check that they don’t look asleep though so adjust your position and take a few images.

5 Quick Portrait Posing Tips to Flatter Your Subject

Conclusion

I hope these 5 quick portrait posing tips are helpful for you when you do your next photo session. If you have any other posing tips please share them in the comments below.

The post 5 Quick Portrait Posing Tips to Flatter Your Subject by Lily Sawyer appeared first on Digital Photography School.


Digital Photography School

 
Comments Off on 5 Quick Portrait Posing Tips to Flatter Your Subject

Posted in Photography


A Quick Guide to Using Bounce Flash for More Natural-Looking Photos

09 Mar

Creating a portrait using flash is a whole lot more than just pointing your flash at your subject and taking the shot. Learning how to use flash creatively opens up a variety of new lighting options – which you can use to make the picture you envision in your head show up on your camera’s LCD screen. In this article, we’re going to look at using bounce flash.

Bounce flash is a handy trick you can use in a pinch to improve both the quality and amount of light in your finished picture using a flash unit right on top of your camera.

A photo taken using bounce flash to light the subject

The soft lighting for this image was created using a single flash, positioned on the camera and pointed directly up at the ceiling.

What is bounce flash?

Bounce flash is exactly what it sounds like. You aim the flash unit on your camera at a ceiling or nearby wall so that the light reflects off it and then back towards your subject.

This may seem like a really roundabout way of providing illumination, but there are a number of excellent reasons why you would want to bounce your flash, such as:

  • It quickly creates soft light.
  • It can be used to create directional light.
  • Helps you avoid the drawbacks of direct flash.

Let’s go through each of these points in more detail to get a better sense of how to use bounce flash to improve your photography.

Left: On-camera flash rotated to bounce off a wall to the side. Right: Built-in flash that cannot be rotated or bounced.

1. How does bounce flash create soft light?

One of the most important factors in determining how soft the light in your image will be is the apparent size of the light source. Notice I said “apparent size” – not “actual size”.

Your pop-up flash or attached speedlight are small light sources – so if you aim them directly at your subject you get harsh lighting. This is why photographers often use softboxes, umbrellas or other modifiers to create a larger source of light – which makes the light softer.

You can use this same concept to quickly create a larger apparent light source by bouncing your flash off a roof or wall and spreading out the light.

Direct flash is that which is aimed right at the subject.

Direct flash – not flattering to the subject and creates a harsh shadow on the wall behind.

Flash aimed at the ceiling to bounce the light and soften it.

Flash bounced off the ceiling – much more even and softer lighting.

2. How can bounce flash create directional light?

Understanding the direction from which the light is coming – and using that to your advantage – can have a huge impact on the quality of your photos.

Without flash, you’re at the mercy of whatever ambient lighting is available. When you are indoors in a dimly lit room, that ambient light is often rather unpleasant as the light usually comes from the ceiling overhead. This casts deep and dark shadows under people’s eyes – not at all a flattering look for a portrait.

By setting up near a wall, you can bounce your flash off it and effectively create a new light source that sweeps in from the side. Think of it as creating a new window to add more light to the scene. This new light will fill in those ugly shadows for a much more pleasing look.


The result of the flash being bounced off the wall to camera left is more directional light as seen here.

3. How does bounce flash improve on direct flash?

Sometimes a direct flash can significantly improve an image. Sometimes it results in redeye, awkward shadows, and a deer-in-headlights look.

Using bounce flash solves the red-eye problem since that is caused by light reflected directly back at the camera from the back of the eyeball. When your main light is bouncing in from overhead or from the side, you can also say goodbye to large shadows cast by your subject onto the background.

Lastly, direct flash creates boring lighting that flattens facial features and textures. Bounce flash results in more sculpted light that can be used to accentuate features and show depth.

Example of a photo taken using direct flash as the key light

This portrait was taken with direct flash, causing a harsh shadow on the back wall and a bad case of red-eye (Settings: 1/80th, f/3.2, ISO 500)

Example of photo taken without using any flash, high ISO

Without using flash, I had to bump the ISO up to 6400 in order to keep the right exposure. The colors are dull and there is a lot of noise in the shot (Settings: 1/80th, f/3.2, ISO 6400)

Example of a photo taken with bounce flash

With bounce flash, the light on the model is soft and even. There is a glimmer of catch-light in the subject’s eyes and no shadow on the back wall. (Settings: 1/80th, f/3.2, ISO 500)

What do you need to get started with bounce flash?

In order to shoot bounce flash, the bare minimum you will need is an external flash unit with a head that can swivel and tilt.

If you are planning on buying a new flash, make sure to research how it can be maneuvered. Some cheaper models will provide more flash power than your standard in-camera pop-up flash, but if they can’t be adjusted to tilt and swivel then you won’t be able to use them for bounce flash lighting.

Get a flash that can both rotate (swivel) and tilt (up and down) in order to do bounce flash.

Balancing the light

When shooting with flash in a bright room, you need to perform a balancing act in order to keep the light looking natural. This is the case with bounce flash as well.

A flash picture essentially has two exposures:

  1. The ambient, or available light, which is all the light from windows, light bulbs, candles, chandeliers, etc.
  2. The light from your flash.

As the photographer, you need to balance these two exposures to create the image you want. Fortunately, this doesn’t mean that you need to go around flicking light switches until you get the exact amount of brightness needed for each shot – your camera settings can control how much light will be in the final shot.

In this image, the flash is too strong and the exposure is not well-balanced with the ambient light in the room. Exposure here was: 1/125th, f/4, ISO 250, flash was ETTL with +2 Flash Exposure Compensation.

Aperture:

Opening up the aperture will allow more light in, effectively increasing the flash power and also making the camera pick up more of the ambient light

ISO:

Increasing your ISO means the sensor “collects” more light. Again, this effectively increases the power from your flash as well as the influence of the ambient light.

Shutter Speed:

Here’s where a lot of control comes in. As long as you stay within your camera’s maximum sync-speed, your flash will influence the final shot regardless of the shutter speed. On the other hand, a long shutter speed will collect a lot of ambient light, and a short shutter speed will collect less, often drastically affecting the final image.

It may take some time to get used to this balancing act with aperture, ISO, and shutter speed so that your bounce flash shots give you well-lit subjects with natural-looking lighting.

The inside of a car, lit by bounce flash

Firing a flash into the roof of the car creates soft, bounced light that really makes all the surface details shine.

Other details to keep in mind

Flash Power

Since the light from your flash has to travel the extra distance to bounce off a wall or ceiling before reaching the subject, you can’t use your camera’s ETTL metering as is to determine the amount of power needed. Your camera assumes that you are using direct flash, so if you don’t make any adjustments, the flash power will always be a bit too low.

Increase your camera’s flash exposure compensation depending on the distance to the surface you are using to bounce the light. For a typical ceiling in a home, this might be an adjustment of +1/3 or +2/3. If you are photographing in a hall with high ceilings, you may need to boost your flash by +1 or even more.

A young man photographed using bounce flash

A seamless background and soft light from bouncing the flash off a slanted ceiling gives this picture the type of quality you might expect from multiple flashes and a studio setup.

Color

Important question: What color is going to be reflected back at you if you shoot a flash into a pink wall?

Yup, you guessed it – it’s gonna be pink. The light from your flash is going to take on whatever color it bounces off. So unless you’re going for that funky, unnatural pink look, you’ll want to make sure you bounce your flash off neutral-color surfaces like whites, grays or blacks. (Alternatively, you can shoot or convert to black and white.)

Don’t blind people!

As you start to discover how fun it is to swivel your flash around and create dramatic and interesting light, it can be easy to forget where your flash is pointed. If an unfortunate passerby steps between the wall and your flash just as you fire off a shot, they might get an unwelcome blast of light. It’s a good idea to check and make sure the coast is clear before snapping each shot.

Give it a shot!

Bounce flash is a handy trick in your arsenal to help you land that perfect shot when the situation allows for it. So tilt your flash up and give it a try!

The post A Quick Guide to Using Bounce Flash for More Natural-Looking Photos by Frank Myrland appeared first on Digital Photography School.


Digital Photography School

 
Comments Off on A Quick Guide to Using Bounce Flash for More Natural-Looking Photos

Posted in Photography


A quick tour of Fujifilm’s camera and lens factory in Sendai, Japan

11 Feb

Documentary cameraman Johnnie Behiri of Cinema5D was in Japan recently, when he was invited to visit one of Fujifilm’s camera and lens factories in Sendai, Japan. Having been on a few factory tours ourselves, we suggest you do exactly what Behiri did: say yes, and bring a camera to document your journey.

The factory Behiri visited is responsible for putting together Fujifilm’s Fujinon MK lenses, the X-T2 ILC, and the GFX 50S medium format camera and lenses. The tour is short and sweet, but you get to see how careful Fuji must be about cleanliness in a factory like this, and watch as the technicians assemble each Fujinon MK lens by hand.

This isn’t the first time someone has been invited inside the Sendai Factory. In fact, we went there ourselves in 2016. And one year before that, The Fuji Guys took their own tour of the factory, which you can watch below (even if it is a bit dated now):

Fuji fans can watch both tours above. And if this inspires you to go behind the scenes with a few other manufacturers, check out our visit to the Hasselblad factory in Sweden, the Leica factory in Germany, Canon’s L lens factory in Japan, and more.

Articles: Digital Photography Review (dpreview.com)

 
Comments Off on A quick tour of Fujifilm’s camera and lens factory in Sendai, Japan

Posted in Uncategorized


Quick Video Tutorial – 8 DIY Photography Hacks for the Kitchen

09 Dec

Here is another fun video from the team over at COOPH. This time they’re playing with ordinary household items found in your kitchen.

Here are 8 DIY photography hacks you can do at home

Watch as they play with some eggs, kitchen utensils, have fun with a cheese grater, make a DIY softbox for a flash, play with reflective surfaces, flour, and some fruit!

Get cracking (pun intended) and see what you can come up with trying these tips out.

The post Quick Video Tutorial – 8 DIY Photography Hacks for the Kitchen by Darlene Hildebrandt appeared first on Digital Photography School.


Digital Photography School

 
Comments Off on Quick Video Tutorial – 8 DIY Photography Hacks for the Kitchen

Posted in Photography


11 Quick Tips to Improve Your Drone Photography

30 Sep

In this short video from the people over at COOPH, they bring you 11 tips to help improve your drone photography,

If you enjoy drone photography check out these dPS articles as well:

  • Tips for Getting Started Doing Photography with Drones
  • How to Use Drones to do Stunning Aerial Photography
  • Side by Side Drone Comparison – DJI Mavic Pro Versus the Phantom Pro 4
  • Review of the Epson Moverio BT-300FPV Smart Glasses for Drones
  • Overview of the ThinkTank Airport Helipak V2.0: More Than Just a Drone Case

Drone photography?

So we’re curious here at dPS, how many of you are using drones now or getting one soon? Tell us in this quick poll.

Note: There is a poll embedded within this post, please visit the site to participate in this post’s poll.

The post 11 Quick Tips to Improve Your Drone Photography by Darlene Hildebrandt appeared first on Digital Photography School.


Digital Photography School

 
Comments Off on 11 Quick Tips to Improve Your Drone Photography

Posted in Photography


10 Quick Tips for Travel Photography

27 Aug

Here is a really quick video for you from the gang over at COOPH (Cooperative of Photography) with 10 tips for travel photography.

Enjoy, and check out the links to stuff mentioned in the video below it.

Links to things mentioned in the video

For more a more detailed tutorial on how to remove tourists check out: How to Remove People from Your Photos Using Photoshop

For sharing prints with people when you travel you might want to consider a Fuji Instax printer. Portable enough to take with you, prints photos from your Smartphone or tablet.

For backing up your images on the road, read the following:

  • How to Backup and Manage Your Photos When Traveling Without a Computer
  • Step by Step Plan for Backing Up Your Images While Traveling

Then grab one of the G-Technology drives shown in the video (the tough black and blue ones)

Shoot at sunrise: 4 Reasons Shooting at Sunrise and Sunset Will Help You Take Better Photos

Lastly, more on using framing in your compositions: Tips for Using Natural Framing to Improve Your Composition

Your turn

Do you have any other good quick tips for travel photography you want to share with us? Please do so in the comments below.

The post 10 Quick Tips for Travel Photography by Darlene Hildebrandt appeared first on Digital Photography School.


Digital Photography School

 
Comments Off on 10 Quick Tips for Travel Photography

Posted in Photography