Almost every DSLR or Mirrorless camera has a mode dial with a variety of letters and icons on it, some of which might seem cryptic or confusing. Usually you’ll find a green icon for Full Auto mode (usually a green A or rectangle), Full Manual mode (M), as well as Aperture Priority (A or Av) and Shutter Priority (S or Tv). Your camera might also feature scene modes such as portrait, night, or macro, and even some user-configurable modes indicated with a U1 or U2 (or C1/C2, etc.).
Somewhere on that dial is a letter that’s often left neglected, and unused by many people, even though it can be quite powerful – Program Auto (P). In my experience most people don’t use it because they don’t understand it. Is it Auto? Is it Manual? What can it do that the other modes can’t? The answer is a bit strange at first, but once you wrap your head around what the humble little P mode can do, you might find yourself using it much more than you thought.

The camera mode dial operates on somewhat of a continuum. On one end you have Full Manual mode, which gives you complete control over the three elements of exposure: shutter speed, lens aperture, and ISO sensitivity. On the other end you have Full Auto mode which gives you almost no control over exposure except whether the flash turns on or not (and on some cameras, not even that much). On most cameras Full Auto will not even let you choose basic parameters like white balance and focus mode, which is fine if you just want to shoot some pictures and not worry about all the technical aspects of photography.
The other modes exist in the middle of the spectrum and give you some degree of control, while your camera handles the rest. For instance, in Aperture Priority you control the aperture and ISO, and let your camera figure out what shutter speed to use for a good overall exposure. In Shutter Priority things are reversed; you control the shutter speed and ISO, while your camera figures out what aperture to use.
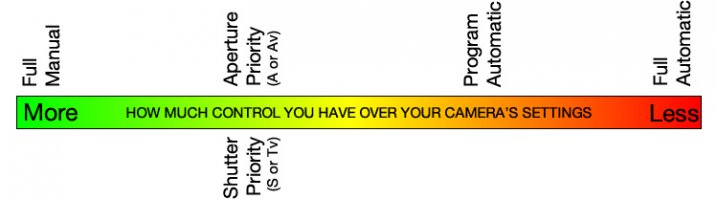
Program mode exists on the same continuum somewhere between Aperture/Shutter Priority and Full Automatic. When you initially put your camera in P mode you might notice that things look similar to Full Auto; your camera sets the aperture and shutter speed in order to get a proper exposure. One benefit you might not immediately realize is that you can set the ISO which will then remain unchanged by the camera. This is quite useful in situations where you want to intentionally use a lower ISO, such as outdoors or in bright light, or a high ISO when things are a bit darker and you prefer to not activate the flash. If nothing else, think of the Program Auto mode as an ISO Priority mode; you set the ISO and your camera figures out the shutter speed and the aperture. If that’s all you want to do, you’re set. Change the ISO (or not) and worry only about composing and framing your shots, then let your camera figure out the rest.
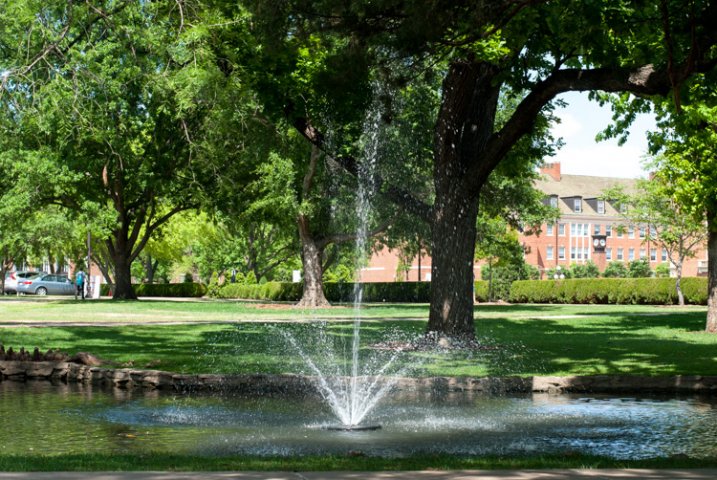
Program Auto gave me a well-exposed picture but the result was not what I was hoping for. I wanted a smoother look for the fountain…
…so I quickly adjusted my shutter speed to 1/20 using the dial on my camera. Program mode kept a nice exposure while giving me the motion blur I was looking for.
If you’re willing to dig a little deeper you will find many more useful features to unlock in Program mode – far more than just giving you the ability to control the ISO. It’s kind of like the familiar Auto mode on steroids. There are many options available to you in Program that you won’t get in Full Auto, and many of these can help you get the shot you want, instead of the shot your camera thinks you want. However, as you start changing settings your camera will do its best to maintain a proper exposure. In this way Program is like the late-night infomercial version of Auto; it handles all the nitty-gritty complicated stuff for you…but wait, there’s more!
For example: if you are using Program mode while taking pictures at an indoor birthday party you can set a high ISO so you don’t need to use the flash, and your camera will choose a combination of aperture and shutter speed to get a properly-exposed photo. You can then rotate the command dial (on some cameras it might be pressing a button) to change these values if you decide you want a wider aperture or slower shutter. Essentially your camera says “Here’s what I think will be good,” and then you take over and say “Thanks bro, I’ll take it from here” as you shift the values of your shutter and aperture using the dial on your camera.

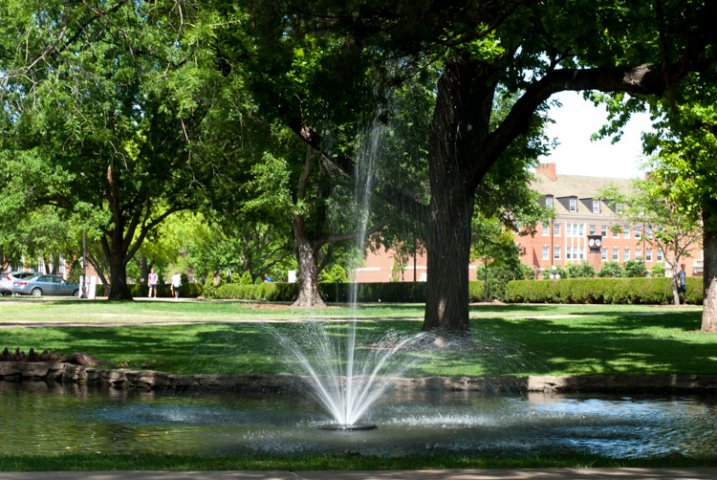
I shot this using Program Auto mode which was a great way to tweak my exposure settings on the fly with very little time to waste.
Or you might be outdoors doing some nature photography but aren’t quite sure what settings to use. So, you put your camera in Program and set the ISO to 100 in order to get as little noise as possible. Soon you might notice that your camera has selected a small aperture, and you’d like to get a bit of background blur so you quickly rotate the dial on your camera until your aperture is much wider. Your camera then automatically adjusts the shutter speed accordingly, in order to maintain a good exposure.
You can also set parameters within Program like white balance, metering mode (full/center/spot), select which focus point to use, and even tell your camera to use the flash or not. Contrast this to the Full Auto mode and you start to see the usefulness of the humble little P marker on your camera’s mode dial. At this point you might be wondering why you would want to use Program Auto instead of Aperture or Shutter Priority because those will also allow you to set the ISO, aperture, and shutter speed. Program Auto sort of functions like the best of all worlds: you can change various options if you want to, or you can just leave everything alone and let your camera figure it all out.
Shooting in Program mode gave me a good overall exposure but I was not happy with the results…
…so I switched to spot metering, re-took the shot, and got what I wanted. Program allows for this flexibility, whereas Full Auto does not.
I must admit that even though Program mode can be quite useful I spend most of my time in Shutter or Aperture Priority along with Manual. For me Program is great to have in a pinch, but I generally prefer to make more of the decisions when shooting, instead of having my camera do the heavy lifting.
Still, it’s good to be aware of what it is, and what it can do, in case you find yourself in a situation where you don’t want to give up all control to your camera but also don’t want to do everything yourself. What’s your preferred method of shooting, and what do you like (or dislike) about using the Program Auto mode? Leave your thoughts in the comment section below.
googletag.cmd.push(function() {
tablet_slots.push( googletag.defineSlot( “/1005424/_dPSv4_tab-all-article-bottom_(300×250)”, [300, 250], “pb-ad-78623” ).addService( googletag.pubads() ) ); } );
googletag.cmd.push(function() {
mobile_slots.push( googletag.defineSlot( “/1005424/_dPSv4_mob-all-article-bottom_(300×250)”, [300, 250], “pb-ad-78158” ).addService( googletag.pubads() ) ); } );
The post Your Guide to Understanding Program Mode on Your Camera by Simon Ringsmuth appeared first on Digital Photography School.


 An unnamed student at the Digital Photography program at Ravensbourne (UK) asks, via Twitter:
You must be logged in to post a comment.