RSS
 

Posts Tagged ‘product’

Post-Processing: The Final Phase of Studio Product Photography

22 Apr

For the final installation of this series we will be exploring the third and final cog to the product photography studio. We will discuss the system that will allow you to catalog and edit your images to get them web ready in a hurry. For this we are going to deploy Lightroom. I am sure that there are other programs that can be inserted here since we are only doing some minor adjustments and renaming. If you have Lightroom fire it up and follow along.

SHOOTING TETHERED

I like to shoot tethered whenever I work in studio for a few reasons. The first being that I can see the image I just shot on a large monitor. I can zoom in and see details that are difficult to get to on the back of a camera screen. The second reason is that I have all the shots automatically sorted into the correct folders.

SETUP THE TETHER

To get started with tethering in Lightroom go to File > Tethered Capture > Start Tether Capture.

Studio product photography processing 01

From there you will enter the tethered settings. I always put the product name as the session name, in this case “Stan Lee” since I am shooting action figures. Next is the naming, I let the filename remain the part number (or product name) but add a number sequence to the end. You can do whatever works for you to differentiate the shots.

Next choose the location where you want Lightroom to store your images. In this case I am going to have all of the shots go into the folder for my client “XYZ” so I make a folder called “XYZ Product Images”. Lastly add the metadata information, in this case my contact and copyright information. Then hit OK.

Studio product photography processing 02

Next you will get a little display that you can position anywhere on your Lightroom screen, I like to put it up at the top. It shows that the camera is connected.

*TIP* If nothing is showing up check that you camera is turned on and that the cable is connected. If that fails, reboot your camera, reboot Lightroom and remove and reconnect the cable. This usually clears up 99% of tether issues. Below the camera make is the part number and the rest of your camera settings.

Studio product photography processing 03

(You can read all about my camera setting on my other DPS article here; Tips for Fast and Effective Studio Product Photography. Now that you have your tether capture all setup you can begin taking photos.

Studio product photography processing 04

THE PHOTO SHOOT

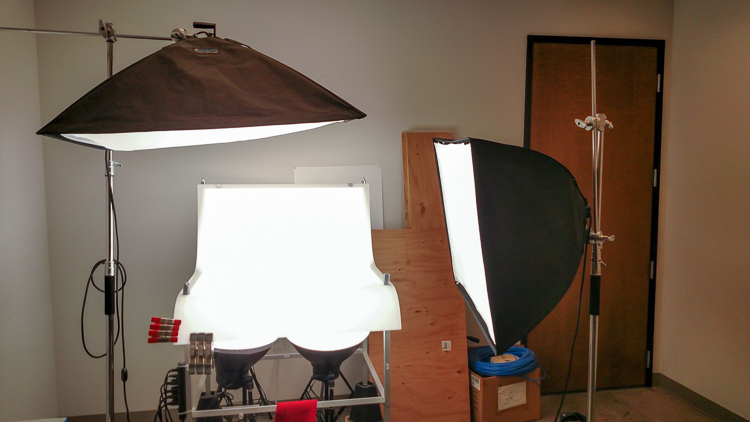
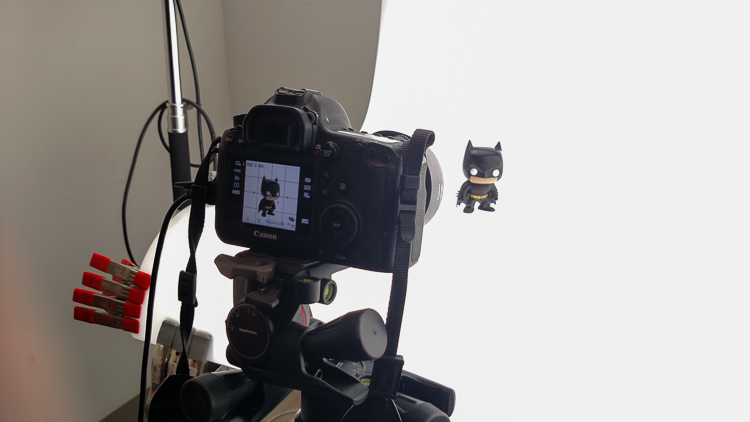
For this shoot my client wants two angles of this Stan Lee action figure. So I use our basic lighting setup (discussed in this article; Equipment Tips for Quick and Efficient Studio Product Photography) and take the first shot.

Let’s take a look at this shot in Lightroom Develop module. Hit the D key to enter the develop module, or click Develop at the top of Lightroom. Make sure your clipping detection is turned on by hitting the J key.

Studio product photography processing 05

What I am trying to accomplish here is to blow out the background. If it were blown out we would be showing red (clipped) in Lightroom. We aren’t seeing that, which means I need to decrease the shutter speed to let in more light. Let’s try 1/3 of a stop for a bit more additional light and shoot again.

Studio product photography processing 06

Set the exposure

Now we are cooking with fire. All of our subsequent shots will be dialled in making less work. It is not necessary to have the entire background clipping. In fact, for some subjects it will likely mean you have lost a ton of contrast in the image. This amount of red is okay for this subject.

Keep in mind white and reflective products will become overexposed must sooner than darker ones, so set your exposure accordingly. Even if you have zero red on the background it is okay, there Lightroom tools that will make quick work of the background. But remember that every bit of extra work you do later in Lightroom costs time so try to get it right in camera.

*TIP* With this product photography studio setup it is so easy to get many product angles in such a short amount of time. It’s always wiser to shoot extra angles now rather than have a client ask for others later. Now that we have four angles of Stan Lee let’s switch to the next product.

Change the product

Studio product photography processing 07

Click the little gear icon on the tether tool which will bring up the Tether Capture Settings and you can change your session name to the new product number, in this case, “Wookiee”. Hit the tab key twice, because, as you can see the sequence number is retained from the last shot and it reads shot number 5. Hit the number 1 key and then hit OK or Enter.

You are now setup to take the next shot and all of these new images will go into the “Wookie” folder but stay in the main project for XYZ Products.

Studio product photography processing 08

Just as before, we will take four angles for the client to make sure we have enough.

Studio product photography processing 09

If we expand the navigator pane you can see that we have two product folders, “Stan Lee” and “Wookie” and there are four images in each. We can view all the images by selecting the “XYZ Product Images” folder. We are now done with the tether tool so you can close it.

Studio product photography processing 10

THE EDIT

Typically this is where I will grab all the images from the shoot and export them as small files for client proofs. The client chooses the images they want and then we edit those. Let’s pretend they’ve already given us their list and begin the edits.

Make the background white

Hit the D key to enter the develop module, or click Develop at the top of Lightroom. The first thing I like to do is make sure that the background is blown out (pure white with no detail). To do this, make sure your clipping highlight feature is turned on, (hit J on the keyboard if it’s not).

Since our shot could use a little help at the bottom we will increase the whites with an adjustment brush. Hit the K key and with a new brush enter +1.00 on exposure and +40 on whites (I have saved this preset as its own brush called “blowout”). Turn on Auto Mask, it does a good job of keeping these settings from inadvertently bleeding onto the subject if you get a little too close. Now simply paint the white background and it will clip the whites. If it doesn’t, finish painting, then add a new brush and paint again.

Studio product photograph processing 11

Global adjustments

Hit your K key once more to return to image adjustments. Turn off clipping highlights by hitting the J key. This helps you to focus on the subject during the adjustments. For this image I added +20 contrast, -30 blacks, +30 clarity and +20 saturation.

You can easily sync these settings to the rest of the product image by bringing up the filmstrip at the bottom of Lightroom. If you don’t see your filmstrip, click the little up arrow at the bottom of the develop module. Now select your first image, hold you Shift key and click the last image. Click the Sync button in Lightroom to apply the settings to all the selected images.

Studio product processing 12

We will select Basic Tone, Clarity and Color to sync just those effects to the rest of the images.

Studio product processing 13

Click Synchronize and the rest of the products will get the same adjustments. Keep in mind you still need to go back to each image and ensure their backgrounds are properly clipped as well. You can use the Adjustment Brush feature as before. Our Stan Lee products are now on completely white backgrounds and they look great.

Alternate method

For the Wookie products I will show you a slightly faster albeit sometimes not as accurate method. Enter the Develop module, and instead of using an Adjustment Brush let’s see if the Whites slider will clip the background. For this image I added +93 to the Whites slider.

Studio product processing 14

Worked like a charm. Now let’s finish giving this little guy some additional love. I added +20 contrast, -30 blacks, and +20 clarity. Additionally I added some sharpness found in the Detail pane. This time, when we select all of our Wookie products and synchronize I will click the Check All button.

Studio product processing 15

When I do a quick look at the rest of my Wookie products they all look great. These are ready to export and it took me less than two minutes to edit all four images.

Studio product processing 16

Studio product processing 17

Studio product processing 18

Conclusion

Assuming you already have a calibrated monitor, the only other thing you might want to do is add a custom color profile for you camera to Lightroom. This will ensure that your product colors remain true, which is very important. You can see how to do that with this dPS article; How to Use the X-Rite ColorChecker Passport to Obtain Perfect Color.

This concludes my three part series for studio photography and how to inject some speed into it. I hope you enjoyed it. Thank you for reading.

The post Post-Processing: The Final Phase of Studio Product Photography by Jacob Macias appeared first on Digital Photography School.


Digital Photography School

 
Comments Off on Post-Processing: The Final Phase of Studio Product Photography

Posted in Photography


Just added: New product overview videos and getting started guides

01 Apr

Are you shopping for a new camera? Or just looking for some advice about how to use your current favorite model? We’ve been working on a series of product overview videos for a couple of years, and we’ve just added a new series of informational videos to our YouTube channel.

Called ‘Getting Started Guides’, these videos are intended to give you a quick breakdown of the key features of several recent releases, and some quick tips on how to get the most out of them. You can find all of our recent overview and getting started guide videos from the links below, and subscribe to our YouTube channel to ensure you never miss a new video!

Watch our series of product overview videos

Watch our new ‘Getting Started Guides’

Articles: Digital Photography Review (dpreview.com)

 
Comments Off on Just added: New product overview videos and getting started guides

Posted in Uncategorized


GoPro Karma Grip gimbal now available as stand-alone product

06 Dec

GoPro’s Karma Grip motorized gimbal mount was first released as part of the Karma drone kit.  Unfortunately, GoPro had to recall the Karma drone due to problems with its power supply, but now the company has made the Karma Grip available as a stand-alone product.

The Karma grip is compatible directly with the GoPro Hero 5 Black and needs an adapter for Hero 4 Black and Silver models and the Hero Session 5. The motorized gimbal is used to stabilize video while walking or during other outdoor activities, when smoother footage is required than the cameras’ built-in electronic stabilization can produce. The camera can be charged and transfer data to a computer while mounted on the grip. 

The grip can be handheld or attached to GoPro’s chest harness, Seeker backpack, helmet mounts and other camera supports. It’s available now for $ 300.

Articles: Digital Photography Review (dpreview.com)

 
Comments Off on GoPro Karma Grip gimbal now available as stand-alone product

Posted in Uncategorized


Product Review: Polaroid Carbon-Fiber Travel Tripod and Varipod

02 Dec

First a little background: I’m a wilderness photographer. I spend time, a lot of time, every year on multi-day river, backpacking, and winter trips in Alaska. This past summer, between June and mid-September, I spent more than 60 days in the backcountry. On every one of these trips, to one degree or another, weight was an issue, and I’m always on the lookout for good, light equipment that might suit my travels. With that in mind, on to the review of two new support products from Polaroid, the Polaroid Pro Series Carbon Fiber Travel Tripod, and the Varipod.

ak-homer-109256-sunset-48

Image made using the Polaroid Pro Series Carbon Fiber Travel Tripod (ISO100, 1/5th sec @ f22)

Polaroid Pro Series 55″ Carbon Fiber Travel Tripod With Removable Ball head

polaroid-tripod-review

I was excited to open up the box containing Polaroid’s new carbon travel tripod. Upon first inspection, I was impressed. There are five leg segments, each about eight inches in length making the tripod very compact. Additionally, it is designed so the legs fold back over the center post and included ball head, making the fully collapsed tripod very small indeed.

Build

The leg segments are of the twist-lock variety, ergonomic, and very effectively hold the sections in or out with a simple, quick twist. The numerous legs section means that the lowest sections are thin, giving the impression of flimsiness. However, after several days of use, they did not strike me as fragile.

img_3264

The legs of the tripod, even when fully extended are not very long. Polaroid has made up for this shortcoming by having a fixed center post that extends up another foot or so from the top of the tripod, adding substantially to the height. The post itself is expandable, allowing the very compact tripod to stretch almost to my eye level (I’m six foot). Though using this extendable system reduces stability.

polaroid-tripod-review-01

The included ball head is the highlight of this tripod. Made of machined aluminum, it’s designed much like the large Kirk Industries head on my full-size tripod. Polaroid’s version uses three knobs, one to lock the quick release (similar to Arca-style plates), one to control the rotation, and one to lock and unlock the ball itself. One side cut allows for vertical compositions. Simply, it’s a great little ball head that held my big Canon SLR easily. In fact, it was so good, I wish I could purchase it separately to replace the flimsy head atop my current compact tripod. As the head is the point where many light and entry-level tripods fall short, I was impressed and surprised by this one.
img_3248

Usability of the tripod

I put this tripod to use a number of times over a couple of weeks, including a couple of sunset photo shoots on a beach, and two evenings photographing the aurora borealis. In bright conditions and relatively fast shutter speeds, the tripod worked well. The height adjusts easily and quickly, though the center post system does limit how low the camera can go. (At its lowest, the camera is still 12-15 inches off the ground, see photo below.)

img_3255

During my sunset photo shoots, the system worked fine at a variety of heights, and I was able to use shutter speeds down to about 1/5th of a second, and still maintain sharp images (see top image in this article).

pltric-90-final

Image showing the design of the non-retractable center post on the Polaroid Carbon Travel Tripod.

It was when I tried to shoot the northern lights that the tripod showed its one flaw – instability with a heavy camera. The non-retractable, non-removable center post, make the tripod a bit jiggly when used with a full-size DSLR. A point and shoot, or mirrorless system would not likely have the same trouble. However, even with the heavy camera, I was able to attain sharp images when I used a remote shutter release and the mirror lock-up function of the camera.

To maintain sharpness, I was forced to use the camera's timer and mirror lock-up functions.

To maintain sharpness at extended shutter speeds, I used the camera’s timer and mirror lock-up functions.

Conclusion

If it weren’t for that wobbly center post, I would give this small, light tripod, with an awesome ball-head, a glowing review. I’d like to see Polaroid include a system to retract the center post to add stability when I drag the shutter. If the next version of this tripod includes such a feature, I’ll strongly consider adding it to my quiver. In the mean time, I can easily recommend this tripod to anyone shooting with a light-weight camera system. If you are working with a point and shoot, or mirrorless, the simplicity, flexibility, and the particularly impressive ball head make the Polaroid Pro Series Carbon Fiber Travel Tripod a contender.

Rating 3.5 out of 5 stars.

Polaroid 65″ VariPod

2-in-1 Telescoping Camera Monopod with Removable Tripod Balance Stand Base

varipod-polaroid

Out of the box, Polaroid’s rendition of this classic long-lens tool, the monopod, looked more or less like a standard version of the product, with one exception. The foot of the monopod incorporates a removable, articulated, three-legged base. At first, I didn’t understand the purpose of this feature, but later, as I used the Varipod outdoors, I figured it out (more on that in a moment). The expandable leg, like the tripod reviewed above, uses a twist-lock system that holds the aluminum tubes firmly extended. I had no issues with segments collapsing, even with a heavy lens and SLR.

In the field, the monopod worked well. The removable foot is articulated so it doesn’t interfere when you tip the monopod forward or back. Though at first confused by this seemingly unnecessary add-on, as I shot with a 500mm f/4 on a sandy beach, the usefulness of the stand was obvious; the monopod foot didn’t sink into the muck. This could be useful to anyone shooting in soft terrain, whether the sidelines of a sports field or a muddy wetland.plmonstand-66-final

The foot system did seem overly complex. It is made of aluminum with various hinges and springs. Though effective at providing support in soft terrain, it also got dirty and was very difficult to clean. The foot had to be blown out, rinsed, and shaken before I eventually managed to remove all the grains of sand.

The support provided by the monopod allowed me to achieve sharp images with my 500mm f/4 at shutter speeds as low as 1/30th, opening up creative composition possibilities with moving subjects. The monopod is also far lighter and maneuverable, though of course less stable, than a full-size tripod.

Conclusion

The Polaroid Varipod works. The articulated foot provides support in soft terrain, and the legs are sturdy and easy to adjust. My main complaint is the complexity of the foot and difficulty in cleaning. I’d like to see this made simpler, with fewer parts that can jam with sand and dirt. Otherwise, it’s a solid contribution to the market.

Rating 4.5 out of 5 stars.

googletag.cmd.push(function() {
tablet_slots.push( googletag.defineSlot( “/1005424/_dPSv4_tab-all-article-bottom_(300×250)”, [300, 250], “pb-ad-78623” ).addService( googletag.pubads() ) ); } );

googletag.cmd.push(function() {
mobile_slots.push( googletag.defineSlot( “/1005424/_dPSv4_mob-all-article-bottom_(300×250)”, [300, 250], “pb-ad-78158” ).addService( googletag.pubads() ) ); } );

The post Product Review: Polaroid Carbon-Fiber Travel Tripod and Varipod by David Shaw appeared first on Digital Photography School.


Digital Photography School

 
Comments Off on Product Review: Polaroid Carbon-Fiber Travel Tripod and Varipod

Posted in Photography


Tips for Fast and Effective Studio Product Photography

23 Sep

This is the second part of a series that will explore a studio setup aimed at product photography. You can see the first here: Equipment Tips for Quick and Efficient Studio Product Photography.

Although this is built primarily for product photography you can use it for a few other genres. In this second part I will be going hands on with an actual shoot. I will show you how to set up a shoot based on the equipment from part one and go over some tips that I have gathered over the years of using it. If you haven’t read part one yet, head over there and give it a quick look so that you are up to speed with how we are about to implement that system.

PICTURE 1

Getting set up

Now that you are caught up let’s dive in. For almost every shoot I start by turning on my table lights. Those include the lights behind and beneath my table to allow the surface to glow from within (see photo above).

I have one of my Spiderlite TD6 heads above the table aimed straight down. This really helps fill in the top of the product and knock down the shadows caused by the table that underlights the product. My second TD6 light is the one that moves around my set. This is my main light as it is set brighter than the others and it is responsible for the main direction of light.

Settings for my lights will differ slightly from what you will need but this is a good starting point. The overhead TD6 is set for 30% power. The two Flashpoint lights under the table are set to 50% power. I have two small fluorescent softboxes behind the table at full power. My main TD6 is usually at 66% power (two switches turned on).

PICTURE 2 PICTURE 3

These are the settings I run on my lights, and they work for almost all of my clients that need photos shot for their Amazon, Ebay, Etsy stores or their online company catalog. You need to realize that all bulbs are not created equal and that if you are mixing different daylight balanced fluorescents that colors can come out altered in your shots.

Set the color balance

To counter this problem, invest in the Xrite color checker. Make a custom profile for your camera using your lights and this will ensure that colors are accurate. To find more information on incorporating the Xrite into your workflow check out this article by Andrew Gibson: How to Use the X-Rite ColorChecker Passport to Obtain Perfect Color.

PICTURE 4

Set the exposure

As for my camera, I have one of my custom buttons pre-programmed and ready to go, I simply switch to C2 and I am shooting in seconds. My C2 settings are fixed for Manual Mode at f/16 and 1/6th of a second, highlight detection on, and a square crop. This will get me very close with my studio setup. If I need a little more blowout on my white table I slow my shutter speed, or alternatively if any clipped whites creep into my product I can increase the shutter speed.

PICTURE 5

I also find that manual focus is much faster in this situation. Focus hunt happens a lot during shoots and it eats time quickly when you are shooting 20+ products with 4+ angles per part. With a quick flick of a button on the back of my camera, I can enter Live View mode, zoom in, and get the exact focus that I would like. I shoot with highlight detection on so that when the image comes up for review anything that is clipped will flash black.

PICTURE 7

From there I am able to determine if I obtained a proper exposure. The histogram doesn’t help very much here as it is always going to be spiked to the right because I am purposely blowing out the background. I have also set my camera to crop the image to a square as this tends to be the only format my customers want for this style of photography.

Make a raised platform

A big tip that I can share with you is to use a raised platform. The reason you need a raised platform is because when an object gets placed directly on the table surface it tends to add a glaring highlight to the bottom of the product. The tabletop and the highlight are so close in terms of power it becomes difficult to blow out your table and keep the highlight on the bottom of your product from clipping. I have a super easy solution to get around this dilemma. What I did was take two boxes, stack them on top of each other, and then wrapped both in regular old white printer paper.

PICTURE 8

PICTURE 9

If you leave them unwrapped then you will have black strips reflecting in your product. The next thing I did was get a sheet of clear acrylic from Lowes. It is a quarter inch thick, and is 18×24″. It cost me around $ 20. I place this acrylic on top of the wrapped boxes which raises the shooting surface by seven inches.

PICTURE 10

What this does is allow the table to blow out, but because of light falloff it prohibits the product from being overly lit on the bottom and clipping the highlight. While I was at it I wrapped two smaller boxes of different sizes in white paper as well. I use these quite often to bounce light back into the shadows.

PICTURE 11

Ready to place the subject

Now that we have gone over power settings for the lights, the configuration of my camera, and some tips on knocking down blown highlights by raising the surface, let’s set up an actual shoot. We will ease into it and start with something that doesn’t give you a whole lot to think about. Let’s do a regular coffee mug.

I placed the mug directly in the middle of the acrylic. The overhead light is directly over the mug aimed down. The other TD6 is at 90 degrees, hitting the mug from camera right.

PICTURE 12

Picture-13b

The resulting image is 95% ready to go online almost straight out of the camera. There are a few things you might want to obsess over, like adding more white reflection and narrowing the dark gap. But honestly, it’s ready to go as is. I did say this was an easy subject so let’s move onto something a bit harder, shall we?

Let’s try a harder subject

The next thing we will attempt is something that gives plenty of photographers fits; a white subject on a white background. Well, because we have a blown out table top and we are controlling the amount of light that the tabletop is introducing to our subject, it actually isn’t difficult to get great results.

Let’s start with the same lighting. Light from directly above, and one more light at 90 degrees to camera right. Straight out of camera we can see we did a pretty good job.

Picture-14b

There is no major clipping going on the subject yet the background is completely white. There is not a lot of shape and dimension to the item, however. So let’s move the right light so that instead of 90 degrees it is 45 degrees. Now the light will hit the product on the front of this USB hub. Bingo.

Picture-15

We now have highlights on the leading edges which helps give it shape and dimension. It’s very close, but we can still do a little better. Let’s add one of those white wrapped boxes we made earlier to the shadow side and bounce some of our key light back into the product.

PICTURE 16

Picture-17b

Now what we get is just a subtle fill in the shadow and that just about does it for this product. Yes, we could obsess further over some other details and finesse it some more, but remember this is a speed table. We are trying to get products on and off the table quickly. This image would pass for all of my clients.

Shooting reflective surfaces

For our final demonstration let’s do a reflective surface. Leaving the lights exactly the same as the previous shot (again because this is about speed) I will remove the white box that is acting as a fill and shoot this RCA adapter.

PICTURE-18b

Again right out of camera it is pretty good. You can see some red reflecting on the shadow side in the lower left which is coming from a red bag out of frame, and there is a really dark strip running down the left/center side. Let’s clean those two things up and try again. I will remove the red bag from out of the frame and put the smaller white box fairly close to the adapter.

PICTURE 19

picture-20b

With just those two changes it has made a large difference in the shot. Let’s try and clean this up a tad more. The reason there is a black line is because it is reflecting the much darker room behind the camera. Using the angle of incidence I will use my large white box just below my lens and throw light back into the subject.

PICTURE 21

picture-22b

There we go! A perfectly acceptable image for an online catalog. The RCA adapter is cleanly lit, no harsh black lines, a fully white background and it is already squared because of our camera settings. This image is ready to go.

Read more info about shooting reflective surfaces here.

Summary

The reason I built this system is for speed. If you are trying to knock out 100 products a day, with this system you could absolutely do it. I know because I have done it.

Of course, there is the third and final part of the process and that is editing using your favorite software.

I use Lightroom, and it will really going up your product photography game. You need it to catalog all of your client’s images, keep track of the part numbers, export to their specification and clean up shoot errors using very little time.

Please share your questions and comments in the space below.

googletag.cmd.push(function() {
tablet_slots.push( googletag.defineSlot( “/1005424/_dPSv4_tab-all-article-bottom_(300×250)”, [300, 250], “pb-ad-78623” ).addService( googletag.pubads() ) ); } );

googletag.cmd.push(function() {
mobile_slots.push( googletag.defineSlot( “/1005424/_dPSv4_mob-all-article-bottom_(300×250)”, [300, 250], “pb-ad-78158” ).addService( googletag.pubads() ) ); } );

The post Tips for Fast and Effective Studio Product Photography by Jacob Macias appeared first on Digital Photography School.


Digital Photography School

 
Comments Off on Tips for Fast and Effective Studio Product Photography

Posted in Photography


Equipment Tips for Quick and Efficient Studio Product Photography

05 Jul

In this article I’m going to discuss the equipment you will need to create great product photography. I built my setup to provide great versatile lighting, speed, and the ability to cut out the product in post production very quickly and accurately. This setup can be used for still life, food, fine art and even some macro work.

Article Example_03

When I first started doing product photography I was hired by a company to reshoot their entire 3200 piece inventory. Needless to say that was a HUGE job, and speed and efficiency was paramount. I had previously not done more than a few dozen parts at one time for a client, so I really was not set up to undertake a job of this scale. I was going to have to rethink a lot of things, and I knew I was going to need additional studio equipment. The words, “Not going to happen” were not going to come out of my mouth, as I wanted the challenge and the learning experience. Many of the things I implemented for that specific job are still in use for my product photography today. This tips in this article are a good base to start if you are an aspiring product photographer.

Requirements of a product setup

Article Example_04

Here is what I felt were the most important things to plan for to make this job happen.

  1. Speed – to be able to quickly move through multiple angles of a single product, and to adapt quickly to the next product.
  2. Versatile light – lighting that can stay constant for similar groups of products, but remain flexible enough to quickly shift to get proper exposure.
  3. Cut-out ease – the ability to knock out a product from the background quickly in post-production, and place a product on pure white without having to open the image in Photoshop.

With this list in mind you find yourself smack dab in the crosshairs of a shooting table. There really is no other way around it. This is why a shooting table works so well for this type of setup.

1. Speed

Article-Example_01b

A platform is needed when you want to quickly move products in front of your camera and then off the set. Why not make it a platform that is specifically made for photography? The seamless background of a shooting table means less fussing around with intersecting lines that is typical with most background setups, and you won’t have to spend much time with product placement within the scene. That alone will speed up your shoots.

2. Versatile light

You can bounce light off the white shooting table, or better yet light the table from below, causing it to glow. Another great thing about a shooting table is that it’s white. White is a great way to control the shadows of a product. If I had it my way I would have the product completely enshrouded in white light or reflectors, then introduce shadows that add shape and dimension via black cards for the ultimate control. That unfortunately isn’t going to happen, but a white table is a great start.

ShootList4

Table with light coming from below.

ShootList5

Table with light from above.

3. Remove background quickly in post-production

Article Example_05

Article-Example_02b

Nice clean light, easy to cut-out product shot.

No one wants to sit around using the Quick Selection tool in Photoshop, refining the edge, seeing the horrible job that tool does, and then finally having to use the much more labor intensive Pen tool to mask out the background. It’s far easier to get this done in camera, or at least give yourself a huge head start. The time you will save with this method will add up very quickly, and will give you a more natural look.

A shooting table

A shooting table is the first place to spend your money. There are many different tables out there but after all my research I found the Foba DIMIU shooting table to be the perfect solution for me.

ShootList3

It is a large shooting area, a long sweeping seamless Plexiglas surface that allows you to light from above or below it, the table frame features 4 – æ inch studs at each corner that can be used for various attachments such as arms and brackets to hold cards, product or lights.

ShootList1

The table is lightweight, can be moved around the studio with ease, and is easy to assemble. I raised the height of my table by using 6×4 lumber cut into blocks, and some bed risers.

ShootList2

At $ 1,544 I realize that the price might keep it out of a lot of hands. But, don’t fret, a more affordable option can be found, like the Manfrotto large still life table for $ 811. If you’re planning on shooting only small products, the Manfrotto mini table at $ 480 is an option as well. Keep in mind, if you think you might have large products in the future, spend the money now and get the largest table you can afford.

Lighting

Lighting is the next thing to consider. The type of system you choose is going to make a pretty big difference when it comes to shooting your actual products. You will ultimately be choosing between two main types of light; a constant (continuous) light system or a studio strobe (flash) system.

A constant light setup is going to be much easier if you’re just starting out with product photography. With a constant light system the learning curve is exponentially smaller. The benefits of What You See Is What You Get (WYSIWYG) light cannot be overstated. I am going to go out on a limb to make a broad statement and say that if you are reading this article for help with your product photography, then you likely do not have the experience needed to employ studio strobes as your light source.

Article Example_03

Even if you have some experience with strobes, unless you have two to three years or more of shooting strobes in a product environment, do yourself a huge favor and get continuous lights. You will be amazed at how much, and how quickly you will learn when you use constant light. Plus there are some added benefits of using a constant light:

  • No tether equipment. You do not have to control the lights with a radio transmitter, by placing the light in optical slave mode, or by a cable like you do with studio strobes. They will always be on, ready to make pictures.
  • You can use them as video lights if you want to get into motion for product shots.
  • They are a far superior light learning tool, even for more advanced photographers. In my opinion this reason alone is why you want go with constant light.

ShootList9

Okay great, you are going to take my advice and get some constant light. My recommendation would be the Westcott Spiderlite TD6 system for the following reasons:

  • They are bright.
  • The fluorescent bulbs stay cool. A huge deal when you are stuffed in a studio with no windows.
  • The included bulbs are daylight balanced and can be mixed with light from a window.
  • Option to use tungsten halogens (not sure why you would because those bulbs run so hot).
  • Westcott has plenty of light modifiers for shaping your light.
  • Light output is controllable in 33% increments with three switches.
  • Solid build, with all metal heads and quality light modifiers.

When I bought the kit from Westcott it came with the Spiderlite TD6 head, six 50w fluorescent bulbs, a tilter bracket, and the 36×48 softbox. I paid $ 700 per light, and bought two of those kits for a grand total of $ 1400.

ShootList10

There is some good news though. At the time of writing this article, there is a Westcott promo kit that comes with two of everything, two heads, two brackets, two sets of bulbs, and two softboxes, one is the 36×48 the other is a strip 12×36. The kit is going for $ 799. A fantastic buy for this lighting system.

If that is still a little more than you want to spend, then there are some other options for lighting. Impact has a kit that has light heads, stands, bulbs, and modifiers for about $ 265. But as my grandfather always said, you can’t afford to buy something twice. If product photography is something you are going to do, pay for the quality of Westcott. It will last, day in and day out.

My TD6 lights are used primarily as my key (main) and fill lights. I still need to be able to light my shooting table. For that I turned to some reflectors.

ShootList6

I went with two 16″ reflectors from Flashpoint, for $ 70 a piece. These sit under my raised shooting table and shine straight up through the bottom to blow out my table top.

ShootList7

Light stands

Now is a good time to talk about support. Supporting your lights should be carefully considered, and you need to ensure you don’t skimp here. I have a story to help illustrate this point. While doing a product shot for a client I was moving about the studio, and I brushed past my lights on my way back to my camera. Before I could turn around and look at the scene I heard a crash. My light had toppled over, hit the table, knocked the product off balance, and it hit the floor and broke. It was a bottle of wine. I was left with a huge mess to clean up, a broken bottle that needed to be replaced, and a bill from the client for the unreturned product. It could have been worse, but not by much. Invest in your light stands. Get good ones and weigh them down properly with sandbags.

You are going to want to use some sort of a C-Stand. Whether it be a turtle base (removable legs from the center column) a rocky mountain C-stand (a stand with one leg that can go up and down the center column) or a super C-stand (extra heavy duty) invest in a C stand for your large lights. Also, always have sandbags handy to weigh the C-stands down once you bring them onto your set.

ShootList8

For the price of $ 129 per stand from Adorama, for their Flashpoint C-stand with turtle base is pretty great, I couldn’t be more pleased. It has been a fantastic solid stand for my large TD6 lights.

The other stand that I bought was a lot less mission critical, it was for my reflectors. I bought a few Manfrotto Nanopole stands which bottom out at 20″, and can go as high as six feet. They are not meant for anything too heavy, but they do the small stand job perfectly.

So, we touched on all the main equipment needed to make a successful product photography set. Do you have any other tips to add? What do you use for product photography? If you have any questions please ask in the comments below.

googletag.cmd.push(function() {
tablet_slots.push( googletag.defineSlot( “/1005424/_dPSv4_tab-all-article-bottom_(300×250)”, [300, 250], “pb-ad-78623” ).addService( googletag.pubads() ) ); } );

googletag.cmd.push(function() {
mobile_slots.push( googletag.defineSlot( “/1005424/_dPSv4_mob-all-article-bottom_(300×250)”, [300, 250], “pb-ad-78158” ).addService( googletag.pubads() ) ); } );

The post Equipment Tips for Quick and Efficient Studio Product Photography by Jacob Macias appeared first on Digital Photography School.


Digital Photography School

 
Comments Off on Equipment Tips for Quick and Efficient Studio Product Photography

Posted in Photography


Mirrorless is ‘probably’ the future: an interview with Hasselblad Product Manager Ove Bengtson

27 Jun

It is quite extraordinary for Hasselblad to produce a mirrorless camera like the X1D for a number of reasons. Firstly is the obvious: it has predominantly produced cameras with very large mirrors since its first consumer camera in 1948 – the 1600F. Second, mirrorless cameras with touch screens and electronic view finders are very modern, and we may not all think of Hasselblad as a manufacturer of entirely up-to-date electronic products.

In the X1D we are looking at a medium-format sensor in a body that can hide behind a standard high-enthusiast 35mm-style DSLR. Okay, so plenty of people will point out that it isn’t ‘full frame’ 645 (the smallest of the 120 film formats), but it’s very similar to 127 film which was considered medium format by the ISO organization. More to the point, it’s much bigger than the ‘full frame’ 35mm format and is essentially the same size as the sensors used in Leica’s S series, the Pentax 645Z, Phase One IQ3 50MP and Hasselblad’s own H6D-50c.

I guess this kind of breakthrough is one we’d expect to come from what we might consider a high-tech company, not a business that has traditionally created a relatively low volume of very high-priced and principally mechanical professional tools.

Of course Hasselblad marked a technological turn around when it introduced the H6D with its new electronic platform, but this new X series camera takes what the H6D did a few steps further. Shortly after the announcement of the X1D in Gothenburg I got some time with Hasselblad product manager Ove Bengtson to discuss some of the technical challenges that had to be overcome to create the X1D and to find out some more detail about how the product will work when it comes to market.

‘…designing a mirrorless system is relatively easy compared to our usual H cameras’

‘The X1D took only between 18 and 20 months to develop from the final concept to where we are today,’ says Ove Bengtson. ‘As it uses the same 50-million-pixel Sony IMX161 sensor, the same electronic platform and same processor as the H6D-50c most of the work was already done – designing a mirrorless system is relatively easy compared to our usual H cameras as there are no moving parts. We started discussing the idea in November 2013 but were still talking about it a year later before we decided to go ahead. The work that we had already done in the development of the H6D saved us a lot of time in research for the X1D.’

As mirrorless cameras are so much easier to make and offer so much more flexibility I wonder if mirrorless is the future for Hasselblad. ‘Yes, it probably is, but not for a while. Mirrorless systems can be smaller and lighter, and because they have no internal movement they are more durable and they create less vibration so there is less to disturb image quality. Electronic viewfinders will need to get better though and the AF systems will need to improve to catch up with phase detection systems.’ 

‘We really do want phase detection but we’ll have to wait for the sensor manufacturer.’

‘It is a great benefit to be able to have AF points all over the screen, as in our H system we are really restricted to the centre of the frame, but phase detection wasn’t even an option for the X1D. We discussed having phase detection AF points built into the sensor, but Sony was already too far down the road with the sensor development at that stage. We really do want phase detection but we’ll have to wait for the sensor manufacturer.

So, while mirrorless has many advantages over mirrored systems there are still just as many reasons to use the H system. The H system has better AF in low light, and a lot of photographers prefer an optical viewfinder. The H system is also modular so you can change the backs and use a waistlevel viewfinder – not to mention a choice of 12 lenses including technical lenses – so it is still a very different experience.’

To allow X1D users access to the existing range of H system lenses Hasselblad will introduce what it describes as a ‘simple adapter’, but in the announcement there wasn’t much more detail than that. ‘Yes, this adapter will allow autofocus to operate with most of the H lenses, but they weren’t designed to work with contrast detection systems. Consequently users will need to update the firmware in their lenses to allow them to work properly. Not all lenses have firmware that can be upgraded as early H lenses in 2002 were fixed, but all more recent lenses will be able to be used.’

‘It is still early days for this camera but when it comes to market it will have touch AF…’

The cameras on display at the announcement event had touch screen controls for working the menus and for making feature selections, but they didn’t allow touch AF controls. ‘It is still early days for this camera but when it comes to market it will have touch AF and the AF points will be spread across the screen. You will press the AF/MF button and an AF point display will appear on the screen and then you can select the point you want to use.’

The X1D’s touch-driven interface. The menu screens and displays are controlled via a series of swiping motions, much as we are used to in smartphones.

Ove said that the company hadn’t directly considered allowing the rear screen to be used as a touch pad while the EVF is in use, but that it would probably be a question of firmware and that they would consider it. ‘The touch experience for the user has been a major consideration for us, and we want the touch sensitivity to be the best there is. Users will all have smart phones and we couldn’t allow the screen of the X1D to present an experience that isn’t as good as people will be used to.’

We also talked about the company’s integration of the Nikon flash system and what the reasons were for not developing a system of their own. ‘We don’t want to have to develop our own flash system, as we’d prefer to concentrate our resources on making cameras and lenses. Any system needs a range of flash units as customers want a choice, so it makes much more sense to work with an existing system that already has that range and choice. When we only had the V system we partnered with Sunpak, and in more recent years we worked with Metz, but Metz discontinued the gun as they didn’t sell enough. Nikon agreed to work with us and we are very happy that they offer excellent flash units that will work well with our X1D.’

‘We have to produce the best that we can and allowing reduced quality just isn’t an option’

The XCD lenses that Hasselblad has developed to go with the X1D use leaf shutters and offer a top shutter speed of 1/2000sec. Leaf shutter systems allow much faster flash synchronization than focal plane shutter systems and, as is the case with the H6D, the X1D can work with full power flash at that shortest shutter opening. ‘In this camera and in the H6D we use a dual shutter system to achieve the top 1/2000sec flash sync speed,’ explains Ove.

‘The new XCD lenses are designed and built to the same specification standards that we use for the H series lenses. We have to produce the best that we can and allowing reduced quality just isn’t an option. In fact these have a short back focus which makes it easier to design them to really excellent standards. The lenses are designed by us and manufactured by Nittoh who have made many great lenses in the past, including the lenses for the X-Pan. These XCD lenses have no crosstalk and the angle of the light as it approaches the sensor is well within the limits. You’ll notice that the exit pupil of the wide angle particularly is set well inside the barrel.’

‘Right now… we have no zooms on the roadmap’

‘To start with we will concentrate on fixed focal length lenses as we can make these small in line with the compact concept of the camera. I expect there will be some demand for zooms but we will wait and see what that demand is and then respond to it. Right now though, we have no zooms on the roadmap. Personally I think they will have to be too big, and I want us to concentrate on the best performance and the highest resolution possible.’

Speaking to Ove and other technicians at the event it is obvious that Hasselblad has built this system around the specific physical dimensions of the 43.8×32.9mm sensor. If there will be a 100MP version of the X camera it will not be one using the current Sony offering that measures 53.4x40mm. ‘The camera isn’t designed to take a larger sensor,’ I was told, ‘and the XCD lenses don’t have the covering circle to work with it. We designed the camera to be small and portable, and a part of that equation is the size of the sensor. If we work with a larger sensor it means we need a bigger body and bigger lenses, and that would defeat the principles of what the X1D is about.’

No one would be drawn on how many lenses the company expects to have in the XDC range in five years’ time, but it is clear there will be more and that they will start coming shortly. The 30mm will be formally announced at Photokina and I think it reasonable to assume there will be hints of other focal lengths at the time, even if the announcements aren’t formal.

The X1D really does mark quite a departure for Hasselblad and a step towards a larger market (though still some way from the mass market) that will allow the company to broaden its user base. The step too though is as much about demonstrating it is a modern company now that can make modern products. It has also drawn an unmistakable line under that period of its life when it rebadged and allowed other brands to have too much of a hand in its manufacturing.

Things are looking up; Hasselblad seems to be back on track, innovating once more and in many ways getting ahead of the game. The X1D is certainly the coolest, most flexible, portable and accessible digital medium format almost on the market.

Articles: Digital Photography Review (dpreview.com)

 
Comments Off on Mirrorless is ‘probably’ the future: an interview with Hasselblad Product Manager Ove Bengtson

Posted in Uncategorized


ISO, Aperture, Shutter Speed Guide for Product Photography

24 Feb

Who said you have to be a professional photographer to take a good picture—but wait, a great product image requires more than just lights, aim and shoot! When you are shooting products to sell on your ecommerce store, you want to achieve the best results possible. A remarkable product image can give your online store a professional look that tells Continue Reading

The post ISO, Aperture, Shutter Speed Guide for Product Photography appeared first on Photodoto.


Photodoto

 
Comments Off on ISO, Aperture, Shutter Speed Guide for Product Photography

Posted in Photography


A closer look: Iconasys Product Photography Turntable

18 Feb

You may have noticed a new feature in our camera reviews lately – an interactive, 360-degree view. With selectable hot spots, the 360-view gives our readers a closer look at a camera’s notable body features. We’ve been excited to roll them out in reviews like the Sony Cyber-shot RX1R II, and now you can take a look at how we put them together using the Iconasys 360 Product Photography Turntable. Peek behind the scenes and see how it works, and give us your feedback on the new feature in the comments.

Articles: Digital Photography Review (dpreview.com)

 
Comments Off on A closer look: Iconasys Product Photography Turntable

Posted in Uncategorized


Vote now for Best Product of 2015!

05 Jan

Vote now for Best Product of 2015!

Late last year we asked you to vote on the outstanding products of 2015. We created four polls, covering lenses and cameras, including more than 50 products in total. With thousands of votes cast, and plenty of ‘discussion’ in the comments, we’re ready to announce the winners! Click through this slideshow to see the results, and read a little about the products that you voted for. 

And the fun isn’t over just yet – now is your chance to vote on the winners and runners-up from each of the four categories, to determine the readers’ choice award for best overall product of 2015.

Runner-up – Best High-end Compact: Sony Cyber-shot RX1R II

The Sony RX1R II features the same high resolution 42.4 MP sensor and BIONZ X processor from the a7R II along with a large aperture, fixed focal length ZEISS Sonnar T* 35mm F2 lens, which have been fine-tuned to optimize performance together. The camera’s sensor features 399 phase-detection AF points that cover about 45% of the image area, and a retractable high-resolution electronic viewfinder.

We’ve really enjoyed using the RX1R II, and obviously it’s impressed you too, taking runner-up spot in our poll for best high-end compact.

Winner – Best High-end Compact: Sony Cyber-shot RX100 IV

The RX1R II just missed out on the top spot to another Sony high-achiever, the Cyber-shot RX100 IV. The DSC-RX100 IV is the fourth generation of a popular and critically-acclaimed series of enthusiast compacts. This iteration brings with it a new 1″ type 20MP stacked CMOS Exmor RS sensor. Its stacked design frees up more space for high speed circuitry allowing for more sophisticated functions, and is a next generation of the familiar backside illuminated (BSI) design.

The RX100 IV is capable of 4K video recording (with clips limited to a 5 minute maximum), slow motion 40x video recording with 960 fps capture and up to 16 fps continuous shooting. Like its predecessor the RX100 IV offers a 24-70mm equivalent F1.8-2.8 lens and continues the tradition of a pop-up electronic viewfinder, upgrading the OLED panel to a 2.35 million dot resolution.

Runner-up – Best Consumer ILC: Nikon D7200

Taking the runner-up spot in our poll for best consumer ILC was the Nikon D7200. This poll covered a pretty broad range of products but you were obviously impressed by the D7200, which proved itself very capable in our testing. An updated version of the venerable D7100 the D7200’s design and build quality remains the same but it gains a faster processor, much larger buffer for continuous shooting, improved low light autofocus performance, and Wi-Fi with NFC.

The D7200 is built around a 24.2MP CMOS sensor with no optical low-pass filter, which maximizes resolution. It has an ISO range of 100-25600 that expands up to 102400 in black & white only. The autofocus system remains 51-points with 15 cross-type sensors but all of those points can focus down to -3EV. 

Winner – Best Consumer ILC: Olympus OM-D E-M5 II

Your vote for the best consumer ILC of 2015 went to Olympus’s very capable OM-D E-M5 II. Compared to the original E-M5, the control points of the Mark II have been reworked allowing for quick, direct access to exposure settings and the construction made impressively solid. 

One stand-out feature on the Olympus is a 40 megapixel option for stills shooters, which uses the sensor-shift stabilization system to combine multiple exposures into one higher-resolution image. The camera can also capture up to 1080/60p and 5-axis IS makes it a pleasure to use hand-held. We greatly enjoyed using the OM-D E-M5 II in 2015 and we’re glad that clearly you did too.

Runner-up – Best High-end ILC: Canon EOS 5DS/R

Your choice for runner-up in our Best High-end ILC category was Canon’s enthusiast flagship the EOS 5DS / R. We bundled both the 5DS and 5DSR in together since they’re so similar, and we enjoyed shooting with both in 2015. The Canon EOS 5DS and 5DS R are the highest resolution DSLRs currently on the market, boasting 50MP stills. With more than double the resolution of the 5D Mark III, the 5DS has an optical low pass filter, while the 5DS R has a self-canceling filter.

The autofocus system has a total of 61 points (in a ‘high density reticular array’), 41 of which are cross-type. It uses the same 150,000 pixel RGB+IR metering system as the EOS 7D II with a scene detection system. The metering system also has an anti-flicker function for shooting under sodium vapor lights. The ISO range on the camera is 100-6400, expandable to 12800.

Winner – Best High-end ILC: Sony a7R II

Sony was on a winning streak throughout 2015 it seemed, and this is reflected in your votes across all of our end-of-year polls. The clear winner in our poll to find your favorite high-end ILC of last year was the a7R II – also one of our all-time standout cameras. We’re not going to lie – the a7R II was a huge pain to review, but that’s because of the sheer amount of technology that Sony packed into it, all of which required careful testing. 

The Sony a7R II is the world’s first camera to use a full-frame Backside Illuminated (BSI) sensor (which is stabilized) boasting 399 phase detect AF points. Electronic first curtain and fully electronic (silent) shutter modes ensure wonderfully detailed files with no risk of the shutter shock issues that plagued the original a7R, while internal 4K/30p recording is newly available in both full sensor and APS-C (Super35) modes. Impressive stuff indeed, and it obviously impressed you too.

Runner-up – Best Lens: Canon EF 11-24mm F4 L

Easy to dismiss as an expensive ‘stunt’ lens at first sight, Canon’s ambitious 11-24mm F4 L turned out to be an exceptionally capable piece of glass, and quickly became one of our favorite lenses last year on both Canon and Sony A-mount bodies. The 11-24mm offers the widest angle of view of any rectilinear full-frame Digital SLR lens, and has a close-focus distance of just 11 inches. An absolute pleasure to use for shooting landscapes, weddings, concerts and photojournalism, this lens is sharp across the entire frame and well-constructed.

Winner – Best Lens: Zeiss Batis 85mm F1.8

The clear winner in our poll to find your favorite lens of 2015 was the very lovely Zeiss Batis 85mm F1.8. Zeiss is well-known for making some excellent glass and the Zeiss Batis 85mm F1.8 is no exception. Available in Sony E-mount, this lens is weather and dust sealed, image stabilized and coated in Zeiss’ T* anti-reflective coating. It features a digital OLED focus depth display, making it incredibly easy to manually focus.

Linear motors ensure fast and silent AF, while pairing with an a7R II’s AF system guarantees the most accurate focus you’ll ever experience from any 85mm prime, period. If that’s not enough, a floating element design helps to reduce chromatic aberration and ghosting. It took the winning spot by a considerable margin – thanks to everyone that voted!

So there you have it. Four category winners, and four runners-up. But which of these winning products is the overall best product of last year? Vote now in our final readers’ poll and remember that as before, you can rank up to three choices. Voting will run through the end of this month and winners will be announced in the first week of February. 

.


Have your say
$ (document).ready(function() { Poll({“pollId”:”0391113666″,”openForVoting”:true,”mainElementId”:”poll0″,”slot”:null,”isSingleChoicePoll”:false,”minNumberOfChoices”:1,”maxNumberOfChoices”:3}); })

Have Your Say: Best Product of 2015
Your answers
1. Required
2. Optional
3. Optional
You need to login to vote

Sony Cyber-shot RX1R II

Sony Cyber-shot RX100 IV

Nikon D7200

Olympus OM-D E-M5 II

Canon EOS 5DS / R

Sony a7R II

Canon EF 11-24mm F4 L

Zeiss Batis 85mm F1.8

Articles: Digital Photography Review (dpreview.com)

 
Comments Off on Vote now for Best Product of 2015!

Posted in Uncategorized