RSS
 

Posts Tagged ‘Power’

Camouflaged Solar Panels: Tesla Roof Tiles Power Home Batteries & Electric Cars

21 Nov

[ By WebUrbanist in Gadgets & Geekery & Technology. ]

tesla-solar-roof

Elon Musk is attacking the question of energy storage and consumption at home, first with electric cars, then with home batteries and now the final piece of the puzzle: solar panels people will actually want to show off.

tesla-material-types

Developed in collaboration with 3D, their semi-translucent Solar Roof tiles cost less than ordinary roofs, insulate better and best of all they generate energy to charge your electric batteries (Powerwall) and automobiles (Model X). This is effectively the final missing piece from the ultimate sustainable-power smart house.

teslatiles

The three-layered design features a normal solar panel at the bottom with a film on top that renders it invisible from below but operational under the sun’s rays coming from above. At the top is a tempered glass that is shatter-resistant, making it more durable than conventional clay (with a lifespan well beyond the typical 20-year roof).

telsa-powerwall-batteries

Aside from these benefits, perhaps the single biggest selling point is the array of material styles: Textured Glass, Slate Glass, Tuscan Glass and Smooth Glass. It may sound superficial but looks matter — neighbors complain and residents shy away from too-overt solar tech attached to their house.

tesla-demo-house

And people trust Tesla to do more than make better technology: they expect a high level of visual design as part of the package. Also, since they are all coming from the same collection of companies, one can expect superior installation and integration options tying Tesla cars, Powerwalls and Solar Tiles together. Between the tech and its brand backing, this development promises to boost solar adoption to new heights.

Share on Facebook


[ By WebUrbanist in Gadgets & Geekery & Technology. ]

[ WebUrbanist | Archives | Galleries | Privacy | TOS ]


WebUrbanist

 
Comments Off on Camouflaged Solar Panels: Tesla Roof Tiles Power Home Batteries & Electric Cars

Posted in Creativity


Power struggle: Hauntingly beautiful images of abandoned cooling towers

05 Nov

A look inside active and abandoned cooling towers

Belgian photographer Reginald Van de Velde has made a project of exploring the inner workings and mechanisms of some of Europe’s awe-inspiring, dormant giants: cooling towers. His images document both active and decommissioned cooling towers, as well as towers slated for demolition.

The interiors of the towers yield astonishing vistas, and as they’re abandoned he’s able to enter explore them, document and admire them. In his imagery he searches for patterns, a sense of scale, repetition, and disruption, rendering landscapes within the massive structures.

‘One thing that fascinates me extremely is the fact that not a single cooling tower is the same,’ Van de Velde says. ‘Each and every one of them has a unique interior design and build! They all look the same from the exterior, but with each visit to a new cooling tower I’m always surprised by a different interior, time and time again.’

To see more of Reginald’s work, visit his website or follow him on Facebook and Instagram.

A look inside active and abandoned cooling towers

Vegetation is slowly taking over the bottom area of this cooling tower slated for demolition, Belgium. Photo by Reginald Van de Velde

A look inside active and abandoned cooling towers

Inside the belly of an active cooling tower: billions of water drops fall down while releasing heat to the environment. Belgium. Photo by Reginald Van de Velde

A look inside active and abandoned cooling towers

The impressive interior view of a giant cooling tower scheduled for maintenance, France. Photo by Reginald Van de Velde

A look inside active and abandoned cooling towers

The spectacular view inside a decommissioned gasometer in Germany, looking upwards. The air vents at the top dome create natural ambient light. Gasometers can reach heights of 150 meters. Photo by Reginald Van de Velde

Inside Active and Abandoned Cooling Towers

Unreal scenery resembling the set of a sci-fi movie. This is the view inside a defunct cooling tower in Belgium. Photo by Reginald Van de Velde

A look inside active and abandoned cooling towers

Warm moist air rises from a central outlet inside an active cooling tower, Belgium. Photo by Reginald Van de Velde

Inside Active and Abandoned Cooling Towers

Snow particles cover the interior mechanism of an abandoned cooling tower in Belgium. Photo by Reginald Van de Velde

A look inside active and abandoned cooling towers

Covered in moss and algae, these beams support the inner structure of a defunct cooling tower, UK. Photo by Reginald Van de Velde

A look inside active and abandoned cooling towers

A structure that resembles the look and feel of a cooling tower: this is the view inside a gasometer, an industrial recipient used for the storage of natural gas. Belgium. Photo by Reginald Van de Velde

To see more of Reginald’s work, visit his website or follow him on Facebook and Instagram.

Articles: Digital Photography Review (dpreview.com)

 
Comments Off on Power struggle: Hauntingly beautiful images of abandoned cooling towers

Posted in Uncategorized


Drone footage captures the raw power of Iceland

18 Oct

Bjarke Hvorslev and Kristian Kettner shot the above film entirely with a Sony a7r ii camera mounted to a DJI Phantom 4 drone during a 6 day trip to Iceland. The film really does an amazing job depicting the raw beauty and power that Iceland has become so famous for. Turn down the lights, crank up the sound and be sure to watch this in HD.

Articles: Digital Photography Review (dpreview.com)

 
Comments Off on Drone footage captures the raw power of Iceland

Posted in Uncategorized


Monsoon III: Time-lapse captures the raw power of a monsoon

14 Oct
 
You may remember Mike Olbinski’s storm chasing thriller Vorticity from July and, unsurprisingly, he’s back at it again. This time around he chased storms over the course of 36 days during the 2016 monsoon season in the Southwest. Though he says it was somewhat of a slower season in terms of activity, you wouldn’t know it from the time-lapse video that he put together. This is definitely worth a watch in full-screen HD with the lights turned off. Hope you enjoy it as much as we did!

Articles: Digital Photography Review (dpreview.com)

 
Comments Off on Monsoon III: Time-lapse captures the raw power of a monsoon

Posted in Uncategorized


The Power to Change: 12 Brilliantly Reclaimed Energy Stations

11 Oct

[ By SA Rogers in Architecture & Public & Institutional. ]

reclaimed-power-plants-gasholder-park-1

As cities grow and their power needs change, the historic and often surprisingly beautiful structures holding turbines, generators, coal and gas are decommissioned, becoming prime candidates for redevelopment. A recent wave of power stations built at the turn of the 20th century, packed full of period details, have been transformed into cultural centers, hotels, apartments and more, including London’s stunning Battersea Station.

Power Plant to Cultural Art Space by Renzo Piano, Moscow

reclaimed-power-plant-renzo-piano

reclaimed-power-plant-renzo-piano-2

A historic power plant on the banks of the Moskva River in Moscow will become a new cultural center, transformed as part of a larger contemporary art site by architecture firm Renzo Piano Building Workshop. The main building was built between 1904 and 1907 and will be extensively renovated to add lots of glass, while the original towers remain intact to provide natural ventilation.

Battersea Power Station to Residential Tower, London

reclaimed-power-plant-renzo-piano-4

reclaimed-power-station-battersea-1

reclaimed-power-station-battersea-2

reclaimed-power-plant-battersea-3

battersea-foster

A pair of twin coal-fired power station buildings set on the edge of the Thames River in London were decommissioned way back in 1983, but are considered such an important landmark in London, they’ve been preserved, awaiting the perfect redevelopment plan that takes advantage of their beautiful Art Deco interior fittings and decor. One of the largest brick buildings in the world, Battersea Power Station has been the subject of many proposals, including turning it into an eco-dome or an amusement park, all of which have ultimately fallen through. The latest places the original building at the center of a mixed-use complex by architects Norman Foster and Frank Gehry, which includes both luxury residences and affordable homes, a hotel, a gym, and a series of shops, cafes and restaurants.

Brick Power Station to 5 Star Hotel, South Africa

reclaimed-power-station-south-africa-1

reclaimed-power-station-south-africa-2

reclaimed-power-station-south-africa-3

reclaimed-power-station-south-africa-4

Decommissioned since 2001, this old power station on Thesen Islands in South Africa once used waste timber to power huge turbines, which supplied electricity to nearby Knysna and Plettenberg Bay. Now, it’s part of the 5-star, 24-room boutique Turbine Hotel by CMAI Architects, redesigned to keep as much of the original structures and equipment intact as possible. Mechanical equipment, operating panels, piping and the original turbines are all incorporated into the new complex, and things like gauges and dials were worked into various parts of the hotel. The entire development scheme is considered a ‘living museum,’ where guests can clearly see what it used to be while experiencing it in a new way.

Coal-Burning Power Plant to College Learning Center

reclaimed-power-plant-beloit

reclaimed-power-plant-beloit-2

A coal-burning power plant in a small Wisconsin town will become part of Liberal Arts institution Beloit College as a leaning and wellness center. With Chicago-based Studio Gang Architects at the helm, the project will preserve the industrial feel of the site while offering a coffee shop, conference hall, lounges, lecture hall and theater as well as a competition swimming pool, 3-lane track, 10,000-square-foot fitness center and 17,000 square-foot gymnasium. It’s set to be finished in 2018.

Next Page – Click Below to Read More:
The Power To Change 12 Brilliantly Reclaimed Energy Stations

Share on Facebook


[ By SA Rogers in Architecture & Public & Institutional. ]

[ WebUrbanist | Archives | Galleries | Privacy | TOS ]


WebUrbanist

 
Comments Off on The Power to Change: 12 Brilliantly Reclaimed Energy Stations

Posted in Creativity


Sony a6500 adds 5-axis stabilization, touchscreen and processing power

07 Oct

$ (document).ready(function() { SampleGalleryV2({“containerId”:”embeddedSampleGallery_2453034851″,”galleryId”:”2453034851″,”isEmbeddedWidget”:true,”standalone”:false,”selectedImageIndex”:0,”startInCommentsView”:false,”isMobile”:false}) });

Sony has taken the wraps off of its 24MP a6500 mirrorless camera. The flagship APS-C camera gains five-axis image stabilization and touchscreen operation. A larger buffer and more processing power also help set it apart from the existing a6300. It will cost around $ 1400.

The a6500 is now the company’s top-end APS-C camera, sitting above the a6300. It makes use of the same copper-wired 24MP sensor with 425 on-sensor PDAF points but gains a faster (LSI) processor to allow high speed operation. Sony also promises improved processing at high ISO settings, thanks to this new LSI.

The camera gains 5-axis image stabilization which continues to work in both stills and video. The system is rated as offering 5 stops of stabilization, by CIPA standard testing.

When used in conjunction with stabilized ‘OSS’ lenses, the in-lens stabilization takes over correction of the axes that is can stabilize, though Sony makes no claims for this adding to the degree of stabilization offered.

It also gains a touchscreen for faster operation, particularly in terms of AF point positioning. The rear screen works as a touchpad if you’re holding the camera to your eye.

The buffer has been significantly increased, allowing the camera to shoot at 11 frames per second for around 300 JPEGs or 100 Raw+JPEG frames. Sony says this (presumably in combination with the additional processing power) also helps it offer a faster image review when you’ve been shooting large bursts.

It can shoot 4K video much like the a6300 but with the touchscreen allowing touch-to-pull-focus. The AF drive speed during video shooting can be controlled for smooth focus transitions. This autofocus ability is maintained across all the camera’s video modes, including 1080/120p capture.

Beyond that, the camera’s video capabilities are very similar to those of the a6300: UHD 4K  at up to 100Mbps from 6K readout, meaning roughly 1.54x oversampling in each dimension (2.4x overall). The camera can also capture Full HD (1080) at up to 120p which is now offered as part of a feature that allows the camera to offer anything from 1fps to 120fps capture, for playing back as anything from 60x high speed to 1/5th speed slow motion.

Sadly, Sony is making no promises of improved rolling shutter, compared with the a6300 (suggesting it’s a sensor read-out limitation, rather than one of processing).

Like the a6300, the a6500 has a mic input but no headphone socket.

The camera’s menu has also been updated, which the company says will make it easier to search and navigate. At present, it does not appear that the camera can shoot uncompressed Raw.

Battery life is rated at 350 shots per charge when using the rear screen and 310 shots per charge when using the EVF.

The a6500 will be available for $ 1400/€1700 in the end of November and December for the US and EU, respectively.


 Press release:

Sony Introduces New ?6500 Camera with Exceptional All-Around Performance

New Flagship APS-C Sensor Camera Combines World’s Fastest AF speed1and Highest Number of AF points2 with In-camera 5-axis optical image stabilization, Touchscreen AF Operation, 24.2 MP Exmor® CMOS sensor and more

NEW YORK, Oct. 6, 2016 – Sony Electronics, a worldwide leader in digital imaging and the world’s largest image sensor manufacturer, has today introduced their new flagship APS-C sensor camera, the ?6500 (model ILCE-6500).

As the latest addition to Sony’s lineup of award winning mirrorless cameras, the new ?6500 shares the same unrivaled 4D FOCUS™ system as the ?6300 camera, which can lock focus on a subject in as little as 0.05 seconds, the world’s fastest1 AF acquisition time. Also shared with the ?6300, the new ?6500 features 425 phase detection AF points that are densely positioned over nearly the entire image area – the world’s highest2 number of AF points on any interchangeable lens camera. The new model can shoot images at up to 11 frames per second with continuous autofocus and exposure tracking and up to 8 frames per second in a live-view shooting mode that makes it easy to track fast moving subjects, as it combines all of the benefits of an electronic viewfinder with the immediacy of an optical viewfinder.

The camera can shoot at these high speeds for up to 307 frames3 thanks to its expanded buffer, which, along with the fast response speeds described above, are all achieved with the support of a new front-end LSI chip that has been added to the camera. This new front-end LSI also serves to enhance both still and video image quality.

Additionally, the new ?6500 features Sony’s acclaimed in-camera 5-axis optical image stabilization, making it the first Sony APS-C sensor camera to offer all of the benefits of advanced in-body stabilization, which include a shutter speed advantage of approximately 5 steps4. It also offers touchscreen AF capabilities for focus point selection and adjustment.

“We are continuing to push the boundaries of modern innovation in digital imaging, in particular within the mirrorless space,” said Neal Manowitz, Vice President of Digital Imaging at Sony Electronics. “By equipping the ?6500 with 5-axis image stabilization and touchscreen AF, we’re offering photographers and videographers more control than ever before and a seemingly endless amount of creative possibilities. As our flagship APS-C camera, it far exceeds the performance threshold of any camera in its class, and many above its class as well.”

Unmatched AF Capability

Sony’s new ?6500 camera utilizes the same 4D FOCUS system as the ?6300 – a Fast Hybrid AF system that combines high-speed phase detection AF with extremely accurate contrast AF and allows it to capture and lock on to moving subjects in as little as 0.05 seconds1. It also features 425 phase detection AF points and High-density Tracking AF Technology, which significantly improves subject detection and tracking performance.

New for the ?6500, thanks to faster internal processing capabilities enabled by the front-end LSI, the maximum buffer for high-speed continuous shooting is an impressive 307 frames3, greatly increasing the chances to catch that decisive moment.

The camera’s 425 phase detection AF points, focusing tracking and accuracy are also available when using non-native A-mount lenses5 with Sony’s LA-EA3 mount adaptor. Additionally, it includes silent shooting, Eye AF in AF-C mode, AF in focus magnifier modes, Expand Flexible Spot AF and more.

5-axis Image Stabilization Provides 5 Steps Shutter Speed Advantage

One of the most exciting developments in the new ?6500 is the implementation of 5-axis image stabilization for the first time in a Sony APS-C sensor camera. Additionally, through a total revision of the internal design of the camera, this newly developed stabilization system fits entirely within a body that is nearly the same size as the ?6300 model6. This innovative 5- axis system provides a shutter speed advantage of 5 steps4, ensuring the full resolving power of the sensor can be realized, even in challenging lighting.

The shake compensation provided by the system works with a variety of lenses, including E-mount lenses without OSS (Optical SteadyShot) stabilization and A-mount lenses7 when used with a compatible mount adapter. When an E-mount lens with OSS is mounted, pitch and yaw are compensated in the lens and horizontal, vertical and roll axes are compensated in the camera body, resulting in optimal 5-axis stabilization7.

Also, with a simple half press of the shutter button, the effect of the image stabilization can be monitored in the viewfinder or on the LCD screen, allowing framing and focus to be accurately checked and continually monitored. This is available even when a lens is attached that does not have built-in shake compensation.

New Touch Screen Focusing

The new ?6500 comes equipped with touch screen functionality, allowing users to lock focus on a subject simply by touching it on the screen. This is a powerful compliment to its advanced AF system and video shooting capabilities.

Additionally, in a first for Sony cameras, the ?6500 features touchpad functionality. When utilizing the viewfinder for framing and shooting, the LCD screen can be used as a touch pad. Simply drag a finger across the screen to shift the focus point from one area to another.

Powerful 24.2 MP8 Exmor CMOS Sensor, BIONZ X® Processor and New Front-End LSI

The new ?6500 features an APS-C sized 24.2 MP8 Exmor CMOS sensor that works together with a BIONZ X image processor and the newly developed front-end LSI to maximize processing power and achieve an impressive sensitivity range of ISO 100-512009.

The image sensor employs a thin wiring layer and large photodiode substrate that maximizes light collection efficiency, plus copper wiring in its structure for outstanding read-out speed. The BIONZ X image processor and newly developed front-end LSI ensure superior image and video quality with low noise even when using higher ISO settings, in particular those at high sensitivity values where other cameras typically struggle. The LSI is also responsible for the expanded buffer depth for continuous shooting.

Professional Video Capabilities

The new ?6500 becomes the latest Sony interchangeable lens camera to offer internal 4K movie recording, as it can shoot 4K (3840x2160p) video in the popular Super 35mm format on the full width of the image sensor. When shooting in this format, the camera uses full pixel readout without pixel binning to collect 6K of information – approximately 2.4x10 (20 MP equivalent) as many pixels as 4K UHD and then oversamples the information to produce high quality 4K footage with exceptional detail and depth.

Additionally, the ?6500 will focus exceptionally fast during movie shooting thanks to its Fast Hybrid AF system, offers touch focusing for professionally smooth focus shifts, while also offering adjustable AF transition speed and AF tracking sensitivity. The camera supports the XAVC S codec11 during video shooting, which records at a high bit rate of up to 100 Mbps during 4K recording and 50 Mbps during Full HD shooting, ensuring maximum detail and clarity in both video formats.

Other professional caliber video features include the ability to record Full HD at 120 fps at up to 100 Mbps, which allows footage to be reviewed and eventually edited into 4x or 5x slow motion video files in Full HD (24p) resolution with AF tracking.

New on the ?6500 is the incorporation of a ‘Slow and Quick’ (S&Q) mode that supports both slow motion and quick motion. In this mode, frame rates from 1 fps to 120 fps can be selected in 8 steps for up to 60x quick motion and 5x slow motion recording12. Footage shot in this mode can be previewed after shooting without the need for PC-based post processing.

The camera also offers S-Log gamma recording13 for wide dynamic range shooting – approximately 14-stop latitude in S-Log3 gamma setting – and supports S-Gamut for a wider color space. Both options allow for greater creativity for processing video post-production.

Shooters also now have the ability to select, extract and save still images from movie footage directly on the camera. Approximately 8 MP images and 2 MP images can be pulled from 4K modes and Full HD modes, respectively.

Enhanced Operability and Reliability

The new ?6500 has a refined design, maintaining the mobility of the ?6000 series while adapting much of the usability of Sony’s acclaimed ?7 II series. The new model features the same high contrast, high-resolution 2.4 million dot XGA OLED Tru-Finder as the ?6300 that offers exceptional corner-to-corner visibility.

New hardware features on the ?6500 include a magnesium alloy body and a high-durability shutter with a tested life span of approximately 200,000 release cycles14. It also has several design features that are borrowed from the ?7 II series of full-frame cameras, which include a robust lens mount, a recessed grip to improve handling, a larger release button and ten total custom buttons including ‘C1’, ‘C2’ and ‘C3’. It also has an improved operation feel for its mode and control dials and rear face buttons, as well as a softer eyepiece cup for more comfortable usage.

On the software front, there is a new overall user interface, which allows for a much smoother process for searching and adjusting menu settings, as well two new metering modes – Highlight, where exposure metering is focused on the brightest area of the frame, and Entire Screen Avg, which maintains an average metering for the entire image.

The camera is Wi-Fi®, QR and NFC compatible and fully compatible with Sony’s PlayMemories Mobile™ applications15 available for Android™ and iOS platforms, as well as Sony’s growing range of PlayMemories Camera Apps™. The ?6500 also offers location data acquisition via a Bluetooth16 connection to a compatible mobile device and an updated menu structure to deliver a smoother navigational experience.

Pricing and Availability

The Sony ?6500 interchangeable lens camera will ship this November for about $ 1,400 US and $ 1,750 CA. It will be sold at a variety of Sony authorized dealers throughout North America.

There is also a new genuine leather body case (model LCS-EBG) that will ship in November and a new eyepiece cup (model FDA-EP17) that will be launched at a later date.

Notes:

  1. Among interchangeable-lens digital cameras equipped with an APS-C image sensor as of October 2016, based on Sony research, measured using CIPA-compliant guidelines, and internal measurement method with an E PZ 16-50mm F3.5-5.6 OSS lens mounted, Pre-AF off and viewfinder in use.
  2. Among digital cameras as of October 2016, based on Sony research.
  3. With “Hi” continuous shooting mode and “Fine” image quality.
  4. Based on CIPA standard. Pitch/yaw shake only. With Sonnar T* FE 55mm F1.8 ZA lens mounted. Long exposure NR off.
  5. A-mount lenses with SSM or SAM only. Users can choose phase-detection AF or contrast-detection AF in AF System menu. “Phase-detection AF” is not available during movie shooting. AF-C in AF System menu is available only with “Contrast-detection AF” selected, but no motion tracking is performed during continuous shooting (Hi+, Hi, Mid).
  6. Excluding grip, frontal-view size and main body thickness are the same as for the ?6300
  7. All 5-axis stabilization is performed in-camera when SEL90M28G is mounted
  8. Approximate effective MP
  9. Standard ISO range: 100-25600 for stills and movies. Expandable up to ISO 51200 for stills only.
  10. In 24p recording. Approx. 1.6 times in 30p recording.
  11. SDHC/SDXC memory card of Class 10 or higher is required for movie recording in XAVC S format. UHS-I (U3) SDHC/SDXC card is required for 100Mbps recording.
  12. Sound cannot be recorded. SDHC/SDXC memory card of Class 10 or higher is required.
  13. S-Log2 and S-Log3 are premised on processing pictures.
  14. With the electronic front curtain shutter, under internal test conditions of Sony.
  15. Use the latest version of PlayMemories Mobile
  16. Can be connected via Bluetooth with smartphones featuring (as of the date of release)

Sony Alpha a6500 specifications

Price
MSRP $ 1400 (body only)
Body type
Body type Rangefinder-style mirrorless
Body material Magnesium alloy
Sensor
Max resolution 6000 x 4000
Image ratio w:h 3:2, 16:9
Effective pixels 24 megapixels
Sensor photo detectors 25 megapixels
Sensor size APS-C (23.5 x 15.6 mm)
Sensor type CMOS
Processor Bionz X
Color space sRGB, Adobe RGB
Color filter array Primary color filter
Image
ISO Auto, 100-25600 (expandable to 51200)
Boosted ISO (maximum) 51200
White balance presets 8
Image stabilization Sensor-shift
Image stabilization notes 5-axis
Uncompressed format RAW
JPEG quality levels Extra fine, fine, standard
File format
  • JPEG (Exif v2.3)
  • Raw (14-bit Sony ARW)
Optics & Focus
Autofocus
  • Contrast Detect (sensor)
  • Phase Detect
  • Multi-area
  • Center
  • Selective single-point
  • Tracking
  • Single
  • Continuous
  • Touch
  • Face Detection
  • Live View
Autofocus assist lamp Yes
Manual focus Yes
Number of focus points 425
Lens mount Sony E
Focal length multiplier 1.5×
Screen / viewfinder
Articulated LCD Tilting
Screen size 3
Screen dots 921,600
Touch screen Yes
Screen type TFT LCD
Live view Yes
Viewfinder type Electronic
Viewfinder coverage 100%
Viewfinder magnification 0.7×
Viewfinder resolution 2,359,296
Photography features
Minimum shutter speed 30 sec
Maximum shutter speed 1/4000 sec
Maximum shutter speed (electronic) 1/32000 sec
Exposure modes
  • iAuto
  • Program
  • Aperture priority
  • Shutter priority
  • Manual
Built-in flash Yes
Flash range 6.00 m (at ISO 100)
External flash Yes (via hot shoe)
Flash modes Flash off, Autoflash, Fill-flash, Rear Sync., Slow Sync., Red-eye reduction (On/Off selectable), Hi-speed sync, Wireless
Flash X sync speed 1/160 sec
Drive modes
  • Single
  • Continuous (Hi+/Hi/Mid/Lo)
  • Self-timer
  • Bracketing
Continuous drive 11.0 fps
Self-timer Yes
Metering modes
  • Multi
  • Center-weighted
  • Highlight-weighted
  • Spot
Exposure compensation ±5 (at 1/3 EV, 1/2 EV steps)
AE Bracketing ±5 (3, 5 frames at 1/3 EV, 1/2 EV, 2/3 EV, 1 EV, 2 EV steps)
WB Bracketing Yes (3 frames, H/L selectable)
Videography features
Format MPEG-4, AVCHD, XAVC S
Modes
  • 3840 x 2160 @ 30p / 100 Mbps, XAVC S, MP4, H.264, Linear PCM
  • 3840 x 2160 @ 30p / 60 Mbps, XAVC S, MP4, H.264, Linear PCM
  • 3840 x 2160 @ 25p / 100 Mbps, XAVC S, MP4, H.264, Linear PCM
  • 3840 x 2160 @ 25p / 60 Mbps, XAVC S, MP4, H.264, Linear PCM
  • 3840 x 2160 @ 24p / 100 Mbps, XAVC S, MP4, H.264, Linear PCM
  • 3840 x 2160 @ 24p / 60 Mbps, XAVC S, MP4, H.264, Linear PCM
  • 1920 x 1080 @ 120p / 100 Mbps, XAVC S, MP4, H.264, Linear PCM
  • 1920 x 1080 @ 120p / 60 Mbps, XAVC S, MP4, H.264, Linear PCM
  • 1920 x 1080 @ 100p / 100 Mbps, XAVC S, MP4, H.264, Linear PCM
  • 1920 x 1080 @ 100p / 60 Mbps, XAVC S, MP4, H.264, Linear PCM
  • 1920 x 1080 @ 60p / 50 Mbps, XAVC S, MP4, H.264, Linear PCM
  • 1920 x 1080 @ 60p / 28 Mbps, AVCHD, MTS, H.264, Dolby Digital
  • 1920 x 1080 @ 60p / 28 Mbps, MP4, H.264, AAC
  • 1920 x 1080 @ 60i / 24 Mbps, AVCHD, MTS, H.264, Dolby Digital
  • 1920 x 1080 @ 60i / 17 Mbps, AVCHD, MTS, H.264, Dolby Digital
  • 1920 x 1080 @ 50p / 50 Mbps, XAVC S, MP4, H.264, Linear PCM
  • 1920 x 1080 @ 50p / 28 Mbps, AVCHD, MTS, H.264, Dolby Digital
  • 1920 x 1080 @ 50p / 28 Mbps, MP4, H.264, AAC
  • 1920 x 1080 @ 50i / 24 Mbps, AVCHD, MTS, H.264, Dolby Digital
  • 1920 x 1080 @ 50i / 17 Mbps, AVCHD, MTS, H.264, Dolby Digital
  • 1920 x 1080 @ 30p / 50 Mbps, XAVC S, MP4, H.264, Linear PCM
  • 1920 x 1080 @ 30p / 16 Mbps, MP4, H.264, AAC
  • 1920 x 1080 @ 30p / 6 Mbps, MP4, H.264, AAC
  • 1920 x 1080 @ 25p / 24 Mbps, AVCHD, MTS, H.264, Dolby Digital
  • 1920 x 1080 @ 25p / 17 Mbps, AVCHD, MTS, H.264, Dolby Digital
  • 1920 x 1080 @ 25p / 16 Mbps, MP4, H.264, AAC
  • 1920 x 1080 @ 24p / 50 Mbps, XAVC S, MP4, H.264, Linear PCM
  • 1920 x 1080 @ 24p / 24 Mbps, AVCHD, MTS, H.264, Dolby Digital
  • 1920 x 1080 @ 24p / 17 Mbps, AVCHD, MTS, H.264, Dolby Digital
  • 1280 x 720 @ 25p / 6 Mbps, MP4, H.264, AAC
Microphone Stereo
Speaker Mono
Storage
Storage types SD/SDHC/SDXC + Memory Stick Pro Duo
Connectivity
USB USB 2.0 (480 Mbit/sec)
HDMI Yes (micro-HDMI)
Microphone port Yes
Headphone port No
Wireless Built-In
Wireless notes 802.11b/g/n + NFC
Remote control Yes (via smartphone)
Physical
Environmentally sealed Yes
Battery Battery Pack
Battery description NP-FW50
Battery Life (CIPA) 350
Weight (inc. batteries) 453 g (1.00 lb / 15.98 oz)
Dimensions 120 x 67 x 53 mm (4.72 x 2.64 x 2.09)
Other features
Orientation sensor Yes
GPS None

Articles: Digital Photography Review (dpreview.com)

 
Comments Off on Sony a6500 adds 5-axis stabilization, touchscreen and processing power

Posted in Uncategorized


Lumulabs Lumu Power adds a light and color meter to your iPhone

22 Sep

Lumulabs is showing off its new Lumu Power light and color temperature meter add-on for smartphones that was successfully funded through a Kickstarter campaign earlier this year. Attached to an iPhone, the Lumu Power can measure ambient light and flash output, as well as color temperature. It uses two sensors, one on each side of the half-dome design. A photodiode with CIE spectral luminous efficiency measures the light levels and a True Color sensor, which is compliant with the CIE 1931/DIN 5033 color standard, analyzes the color temperature. 

The electronics are protected by a stainless steel housing and the device attaches to your Apple device via the Lighting connector. An Android version that uses a USB Type-C port is planned for next year.

The diffusers are made from polycarbonate lexan, and like the original Lumu, the Lumu Power is controlled via a dedicated app. The latter is still in development but Lumulabs says new functions are added almost on a daily basis. Color temperature, illuminance flash output curve, flash duration and flash versus ambient light ratio are some of the functions that have already been implemented. You can pre-order now on the Lumu website for $ 229. Shipping is planned to start by the end of the month.

Articles: Digital Photography Review (dpreview.com)

 
Comments Off on Lumulabs Lumu Power adds a light and color meter to your iPhone

Posted in Uncategorized


Lightroom Mastery: The Power of the Adjustment Brush

10 Aug

If there is one thing I wish I would have spent more time learning early on in my time with Lightroom, it’s the adjustment brush.

Lightroom is an incredible editing tool, arguably the easiest one to use, and the quickest to learn. The one thing that took me a while to wrap my head around when starting out, was how to use the Adjustment Brush. In this article I’d like to share a quick excerpt from the new Lightroom Mastery course I created for Digital Photography School. I hope you find it helpful.

Why the Adjustment Brush is Great

Lightroom excels at making changes to the entire image (global adjustments) super simple and effective. It really becomes a joy to use Lightroom once you get the hang of it. Need to pull up the shadows in an overly-contrasty image?  No problem; just pull up the shadow slider.  Need to correct for overexposure?  Easy – just drop the exposure slider.

But what do you do when you need to make a change to a very specific area (local adjustments), and you don’t want that to affect the rest of the image? This is exactly when you want to call upon the power of the Adjustment Brush.

Look at the difference an adjustment brush made in the sign, as well as brightening up the lower right corner.

Look at the difference an adjustment brush made in the sign, as well as brightening up the lower right corner of this image.

How the Adjustment Brush Works

Instead of making a global change to the entire canvas, the Adjustment Brush enables you to get very specific and just paint over where you would like to make changes.

This sounds simple, but is incredibly powerful – you now have the ability to affect big change in many different areas of your image, without resorting to bouncing the image over to Photoshop. Hey, I’m all about simplicity, and if I can get all my edits done in one program versus two, I’m all in!

A Perfect Example – Corvettes and Chrome

A good friend had just come to visit me from China, we decided to walk around the neighborhood and managed to catch a parade. It may not look like it, but this was in November in San Diego, one of the benefits of fair weather every day. I caught this image of this beautiful car driving by:

Lightroom adjustment brush, lightroom mastery course, lightroom mastery, dps, corvette, chrome, parade

I darkened the sky a bit and applied some more contrast to the ground and ended up with this:

Lightroom adjustment brush, lightroom mastery course, lightroom mastery, dps, corvette, chrome, parade

That looks good, but the photo really wasn’t capturing how bright the chrome wheels and bumper accents were. In short, I needed to do some local editing on just those pieces. Adjustment brush to the rescue!

Time to Shine – Creating a Chrome Adjustment Brush

Deciding where to start when creating your custom brush

I knew the key to making this photo pop was getting that chrome to come back to life. I first clicked into my Adjustment Brush window (hit K on your keyboard or select the Brush tool from the top of the right hand panel in the Develop Module) and reset all the sliders back to zero. Since the wheels were not facing the sun, they were underexposed and caught in shadow.

Creating the brush itself

Lightroom adjustment brush, lightroom mastery course, lightroom mastery, dps, corvette, chrome, parade
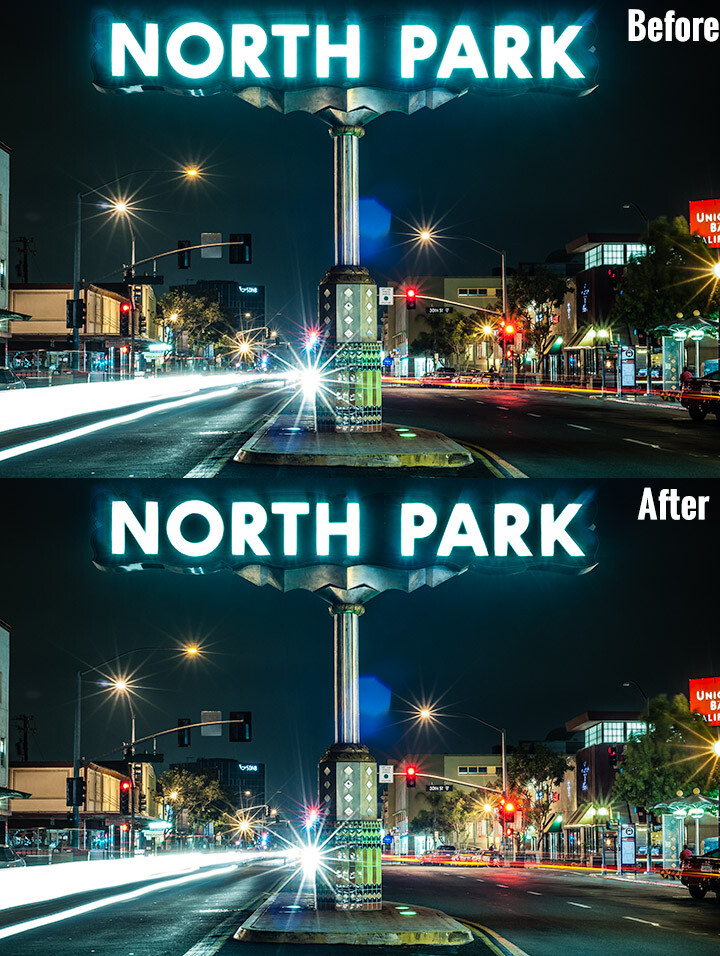
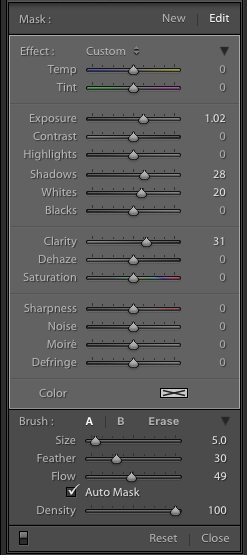
I decided to increase the exposure +1 stop, bump the shadows up to +28 to correct the darkness, and increase the whites to +20 to make the highlights in the chrome pop.

For good measure I increased the clarity to +30 to make sure the edges in that chrome highlights were nice and snappy. Here is what the adjustment window looked like before I started painting (see right)

This was an educated guess as to what I thought would work. If this worked well, I could leave it. If it didn’t, I could always move the sliders after painting, to change it as necessary.

Painting with the Adjustment Brush – best practices

There are a few guidelines I like to follow when painting with the Adjustment Brush. Here a few helpful tips to make this easy:

  • Use a brush size that is a bit smaller than the area you are trying to paint.  It helps if you don’t “color outside the lines”, although that is an easy fix if you do. A quick tip here: if you use a mouse with a scroll wheel you can change the size of your brush by scrolling up and down. It works the same with my Apple magic mouse.
  • Check the box for Auto Mask if you are painting something with fine edges you don’t want to go over. Auto Mask does a good job of keeping your brush inside the lines even if you go outside, which saves time.
  • I like to see the mask I’m painting versus the effects of the mask I’m painting. To have the mask show up in red either click Show selected mask overlay or simply click the O key on the keyboard to toggle the mask on and off.

Let’s get painting!

I quickly painted over the wheels, front bumper, headlights, and any other chrome I could find. It’s a bit difficult to see, since the mask is nearly the same color as the car (you can change the mask color by clicking Shift+O repeated times until you find a better color) but here is what the mask looked like after my initial run:

Lightroom adjustment brush, lightroom mastery course, lightroom mastery, dps, corvette, chrome, parade

Using the eraser tool to clean up mistakes

Wow, I’m apparently terrible at coloring inside the lines! In all reality, going outside the lines on this image didn’t make a noticeable difference, but we might as well do this right.

To clean up areas where you’ve overpainted all you have to do is click Erase in your Adjustment Brush window. This will pull up a brush that will erase the mask area when you paint over it. This is important: make sure to click click the A or B brush after using the eraser so you don’t forget and start painting over areas with the eraser versus the brush by accident!

After a quick clean-up I ended up with this, which is much better:

Lightroom adjustment brush, lightroom mastery course, lightroom mastery, dps, corvette, chrome, parade

Let’s turn off the mask and see how it looks

Remember, to turn off the mask you can simply click the O key on your keyboard. Here you see my image after the adjustment brush has been applied:

Lightroom adjustment brush, lightroom mastery course, lightroom mastery, dps, corvette, chrome, parade

Much better!  The chrome wheels and bumper are much brighter now, and look a lot better.  The only thing I don’t like now, is how dark the drivers-side door is.

It’s a pretty easy fix to create a new brush to bring up the shadows, so I’ll do that.

Starting a new mask in the same image

It’s important to think of masks like layers. The wheels and bumpers are painted with one mask, that has one group of settings.

If I want to make a new adjustment brush with different settings for the door, I need to create a new mask, as opposed to just moving the sliders around. If I move the sliders around without creating a new mask, that will make changes to the current active mask (my wheels and bumpers).

To make a new mask just click New at the top of the mask menu. I only increased the exposure setting to +1 to add a full stop of light to the side, painted over the door and rear of the car, and got this:

Lightroom adjustment brush, lightroom mastery course, lightroom mastery, dps, corvette, chrome, parade

Let’s compare that to the second edit before I used any adjustment brushes:

Lightroom adjustment brush, lightroom mastery course, lightroom mastery, dps, corvette, chrome, parade

Before Adjustment Brushes were applied.

Much better!

This is just one simple example, the sky’s the limit!

There are endless possibilities with the adjustment brush. I could have changed the color of this entire car if I wanted to as well.

You can lighten up dark areas of images and vice versa. You can apply sharpening or clarify to individual areas. You can do a whole host of beauty editing like whitening teeth, giving eyes more color,  and more.

If you found this helpful, you will LOVE the new DPS Lightroom Mastery course!

lightroom-mastery.jpg

There are far too many excellent tips to learning how to master Lightroom to include in a blog post, so Digital Photography tasked me with creating the best and most comprehensive Lightroom video course on the web!

In Lightroom Mastery I break down everything in Lightroom and teach you more in three hours, than most photographers learn in years. I cover every module, tool, tip, and trick from my 10 years using Lightroom.

During the initial launch, dPS is doing a huge 50% discount on the course!  The price will regularly be $ 99, but during this special launch it’s only $ 49!

Go grab the course before the sale is over

You can click this link to learn more about what is included in the course, watch a preview video, and purchase the course!

googletag.cmd.push(function() {
tablet_slots.push( googletag.defineSlot( “/1005424/_dPSv4_tab-all-article-bottom_(300×250)”, [300, 250], “pb-ad-78623” ).addService( googletag.pubads() ) ); } );

googletag.cmd.push(function() {
mobile_slots.push( googletag.defineSlot( “/1005424/_dPSv4_mob-all-article-bottom_(300×250)”, [300, 250], “pb-ad-78158” ).addService( googletag.pubads() ) ); } );

The post Lightroom Mastery: The Power of the Adjustment Brush by Mike Newton appeared first on Digital Photography School.


Digital Photography School

 
Comments Off on Lightroom Mastery: The Power of the Adjustment Brush

Posted in Photography


Power Zoom: Panasonic Lumix DMC-ZS100/TZ100 Review

05 Apr

Key Features

  • 20.1MP 1″-type BSI CMOS sensor
  • F2.8-5.9, 25-250mm equiv. lens
  • Depth from Defocus AF
  • 4K/UHD video capture
  • 3″ touchscreen LCD
  • 1.2M-dot equiv. EVF
  • Post Focus / 4K Photo functions
  • Wi-Fi

As the 1″-type enthusiast compact market has grown over the last 2 years, there has been a noticeable gap in the market. There were small, standard zoom (24-70mm) models and long zooms (24-600mm), but nothing in-between for those who want a longer lens without sacrificing body size.

Enter Panasonic, a company with a long history of making travel zoom cameras. In fact, the company made what many would consider the first one: the DMC-TZ1, way back in 2006. Panasonic entered the 1″-type market in 2014 with its DMC-FZ1000, a camera we liked enough to give it a Gold award.

At this year’s Consumer Electronics Show in Las Vegas, the company announced the DMC-ZS100 (TZ100 outside of North America), which took the guts of the FZ1000 and shrank the body down to the roughly the size of a Sony RX100 IV. Naturally, you can’t stuff a fast 25-400mm lens into a compact body, but the ZS100’s 25-250mm equiv. F2.8-5.9 lens is nothing to sneeze at, either. The camera uses the same 20.1MP sensor as the FZ1000 which is more than likely the same as the one in the Sony RX100 II and III.

The ZS100 is chock full of features, most notably its Depth from Defocus autofocus system, 4K video capture and electronic viewfinder. It also has a 3″, touch-sensitive LCD, Wi-Fi (but, unlike most Panasonic products, no NFC) and useful 4K Photo and Post Focus features.

Why Pay More?

Imagine you’re shopping for a compact travel zoom camera, and you’re viewing the selection at a Big Box retailer. You reach the Panasonic section and see the DMC-ZS60, which offers a 30X zoom and costs $ 450, next to the ZS100 which ‘only’ has a 10X zoom but costs $ 250 more. It’s not a stretch to imagine a camera buyer asking themselves why they should pay more for what seems like less.

While the ZS60 does indeed have a longer lens than the ZS100, there is a trade-off:

Above is a graph showing equivalent aperture vs equivalent focal length, which is described in detail here. The yellow line at the top is the ZS60 (1/2.3″ sensor), while the ZS100 (1″ sensor) is in blue below it. In terms of equivalent aperture (which takes into account sensor size), the ZS60 is effectively around 2 stops ‘slower’ than the ZS100.

This means several things. For one, the ZS100 can capture roughly four times the total light at every focal length, if you keep the aperture open and use the same shutter speed. Since the sensor is gathering more light, you get a better signal-to-noise ratio, which in turn leads to higher image quality. This will be especially noticeable in low light, when the ISO needs to go up.

There’s another benefit to having a 1″ sensor rather than the 1/2.3″ one. The lenses used on larger sensors tend to offer more control over depth-of-field, allowing you for blurrier backgrounds in portraits.

The one area in which the ZS60 bests the ZS100 is in terms of zoom, as you can see by how much further the yellow line extends.

Understanding the math behind all of this is a bit confusing, but the end result is the same: the ZS100 will produce better quality images and can produce more background blur than the ZS60, though you’ll have to sacrifice both zoom power and money in order to get it.

Compared to its peers

Using what we’ve learned from above, let’s take a look at how the ZS100 fits among its 1″ sensor peers:

In this group, which includes cameras from Sony, Canon and Panasonic, you’ll notice that the benefit of shorter, faster lenses: their equivalent apertures start low, and stay low. For example, Canon’s G7 X I and II, which have focal ranges of 24-100mm equiv., are  2 stops faster than the ZS100.

The Sony RX10 I/II reaches out to 200mm (not far from the 250mm on the ZS100), but since it has a fixed F2.8 lens, its equivalent aperture is over 2 stop faster than the ZS100 at full zoom. That said, the RX10 I and II are also much larger and heavier cameras. The FZ1000 isn’t quite as large as the RX10s and even with its F2.8-4 aperture range, it still has a 1+ stop advantage over the ZS100 for much of its zoom range.

So what can you conclude from this chart?

  • Smaller cameras sacrifice focal range to keep size down but can offer fast apertures
  • Long zoom cameras sacrifice size for focal range. This is especially the case with the RX10s. Canon’s G3 X strays from the group, with its slower F2.8-5.6 lens.
  • In order to have a 25-250mm equiv. lens in a body that fits in your jacket pocket, Panasonic had to make some compromises. Its lens isn’t as long as the large-zoom cameras or as fast as those of the small cameras – instead it’s a blend of the two. If the ZS100 had a faster lens like, say, the FZ1000, you’d be looking at a camera nearly as large, which would make the ZS a lot less desirable.

Articles: Digital Photography Review (dpreview.com)

 
Comments Off on Power Zoom: Panasonic Lumix DMC-ZS100/TZ100 Review

Posted in Uncategorized


Power of Plywood: 15 Beautiful & Affordable Interior Applications

23 Mar

[ By Steph in Design & Fixtures & Interiors. ]

plywood student flat 2

Long considered a sub-material that should always be covered with something else, plywood has come into its own as a visually striking surface option for interior applications. An affordable alternative to solid wood, plywood is easy to shape, readily available and comes in textures ranging from the smoothest birch panels to mottled pressboard, and it’s getting a starring role in everything from micro apartments to cafes and modern offices.

Artist’s Studio in Tel Aviv

plywood artist studio

plywood artist studio 2

plywood artist studio 3

plywood artist studio 4

Thin sheets of beautiful birch plywood make up a clever floor-to-ceiling arrangement of drawers, doors, cupboards and niches in this multifunctional artist studio by Ranaan Stern. The drawers are custom-sized to fit a collection of two-dimensional art pieces. The sliding door hides a folding bed, and features peg holes for displaying smaller works of art and hanging tools.

All-Plywood Tiny Student Apartment
plywood student flat 1

plywood student flat 2

plywood student flat 3

plywood student flat 4

Created in response to a need for affordable student housing, this environmentally friendly ‘smart student unit’ is made from cross-laminated plywood and packs a surprising amount of comfort and function into under 100 square feet, including a kitchen, fold-down table, hammock, stairs leading to a sleeping loft, and even a private bathroom.

Modern Cabin Interior
plywood modern cabin

plywood modern cabin 2

plywood modern cabin 3

plywood modern cabin 4

A striking, matte-black geometric cabin in the woods of Poland by Tomek Michalski looks dark and monolithic from the outside, but bright and cheerful inside. The designer used plywood for nearly all interior surfaces and built-ins, including the couch and bed platform.

Transformer Apartment
plywood transformer 1

plywood transformer 2

plywood transformer 4

plywood transformer 5

This faceted geometric wall pushes out into the space within a 645-square-foot apartment by Vlad Mishin. Behind those plywood panels are books, a television, a kitchen and doors to the bathroom and bedroom.

Wall-to-Wall Shelving at Triangle House
plywood wall to wall

plywood wall to wall 2

plywood wall to wall 3

Raw plywood pressboard covers nearly all of the interior surfaces in Norway’s ‘Triangle House,’ from the stair treads to entire walls of floor-to-ceiling shelves.

Next Page – Click Below to Read More:
Power Of Plywood 15 Beautiful Affordable Interior Applications

Share on Facebook


[ By Steph in Design & Fixtures & Interiors. ]

[ WebUrbanist | Archives | Galleries | Privacy | TOS ]


WebUrbanist

 
Comments Off on Power of Plywood: 15 Beautiful & Affordable Interior Applications

Posted in Creativity