RSS
 

Posts Tagged ‘portraits’

Annemarie Busschers: 11 Clearer Than Life Portraits

11 Jan

[ By Marc in Art & Drawing & Digital. ]

Annemarie-Busschers-Montage

Annemarie Busschers is a contemporary artist from the Netherlands who creates portraits that beautifully captures the raw emotion of her subjects, often photorealistically.

Annemarie-Busschers-3

Annemarie Busschers works, most of which can be found on her site here, follow similar themes of “saying goodbye to the self” (in the artist’s own words). Even when she’s setting out to to capture her subject’s emotion, the realism of her depiction gives it a photo realistic aspect. These examples show several self portraits (top right photo, and bottom).

Annemarie-Busschers-2

This painting, via PulpFactor, is one of Annemarie Busscher’s earlier works, and an excellent example of the emotional realism that continues through her most recent portraits. The second image comes via Booooooom and gives a good perspective on the size of her canvases.

Annemarie-Busschers-4

These Annemarie Busschers paintings are excellent examples of the amount of texture she attains with her artistry. The size of the canvas gives her room to create a landscape out of skin and facial features, creating an image that’s an incredibly clear treatment of her subject.

Annemarie-Busschers-5

Found on entremundos and galeriebrandt, these pieces reveal the contrast between Annemarie’s treatments of different subjects. Each subject requires a different approach to capture their personality.

Annemarie-Busschers

Annemarie Busschers has incredible talent that’s constantly evolving, but always sticks to one essence: that the subject will have their essence captured in whatever way serves them best.

Share on Facebook


[ By Marc in Art & Drawing & Digital. ]

[ WebUrbanist | Archives | Galleries | Privacy | TOS ]


WebUrbanist

 
Comments Off on Annemarie Busschers: 11 Clearer Than Life Portraits

Posted in Creativity


Aussies: Do You Want to Attend a dPS Portraits Workshop?

20 Dec

Do you live in or near Melbourne Australia (or are able to get there)? If so – we’re thinking of holding our first dPS photography workshop in 2013. The topic will be ‘Taking Great Portraits’ and the in structure is a leading Aussie portrait photographer.

We’re still finalising the details but to help us plan we’re looking to see what level of interest there would be in such an event.

If you’re interested in attending workshops and live in or can get to Melbourne please leave your email address below.

It will help us get an idea of the level of interest but will also enable us to shoot you an email in the new year with information on what we’re planning.

If you’re not in Melbourne – stay tuned – we’d love to take these workshops on the road at a later time.

Post originally from: Digital Photography Tips.

Check out our more Photography Tips at Photography Tips for Beginners, Portrait Photography Tips and Wedding Photography Tips.

Aussies: Do You Want to Attend a dPS Portraits Workshop?


Digital Photography School

 
Comments Off on Aussies: Do You Want to Attend a dPS Portraits Workshop?

Posted in Photography


Christmas Portraits: How I Took It

19 Dec

A Guest post by Judd Green

Every Christmas I like to get the boys together and do a couple of quick snaps as their Christmas portrait.

IMG 6719a

It’s good to look back on and see how much they grow and change every year. When I say quick, I mean quick as they have been my test subjects for so long they get over photos very quickly, keeping kids attention during a portrait session is a whole different post all together!

This year I knew exactly what I wanted, but it was going to be a little challenging then normal. When I think of Christmas I think of decorations, but mainly Christmas lights, and what are Christmas lights good for? Bokeh! My 50mm 1.4 rarely comes off my camera these days, perfect for what I wanted to achieve in capturing some good bokeh.

IMG 6746a

So I found some old Christmas lights we weren’t using and set them up in the back yard, I had some colored lights hanging over our fence for the background of the shoot and also had some plain white lights in a circle on the ground for the boys to sit in for the shoot. Now as I wanted the lights to be the feature in the shoot, I had to expose for them first and foremost and for that to happen I had to wait for it to get darker if I wanted to shoot wide open.

IMG 6738a

But also in order to have the boys correctly exposed I needed my flash. Now when a flash is involved you are then limited in how fast you can set your shutter speed, any faster then 1/250th you will generally miss getting the flash as the shutter closes up again before the flash has any effect. When working with flashes and strobes I like to play it safe and set my shutter to 1/160th and set everything else accordingly. So with my shutter at 1/160th and aperture at 1.4, then the only other setting to adjust is ISO, which I was happy with the result I got setting it to 800.

IMG 6749a

Now everything is set, where to put the flash? I wanted a good silhouette around the boys as I like that look. So the flash needed to come from behind, so it sat on the ground behind the boys. And with the settings I had, it was easy for the flash to over power everything, so I had to set it to it’s lowest power setting possible. But with the flash giving the nice silhouette from behind I needed some sort of light source to light the boy’s faces, that’s when the wife comes in and holds my white reflector bouncing the light from the flash onto the boys faces, which I am very happy with the results.

So that’s the story behind a Christmassy shoot lit up by only Christmas lights, one speed lite and my boy’s smiles.

There is so many different ways to get creative with photography and you don’t need the latest and most fancy equipment, just learn the limits of what you have and maybe even push them.
Merry Christmas all!

Judd Green is a Photographer from Brisbane Australia. See more of his work at www.juddricphotography.com

Post originally from: Digital Photography Tips.

Check out our more Photography Tips at Photography Tips for Beginners, Portrait Photography Tips and Wedding Photography Tips.

Christmas Portraits: How I Took It


Digital Photography School

 
Comments Off on Christmas Portraits: How I Took It

Posted in Photography


Environmental Portraits: Weekly Photography Challenge

15 Dec

This week your photographic challenge is to take an ‘Environmental Portrait’ (or a portrait that is as much about the surrounds of your subject as it is the subject themselves).

Untitled

The idea came from my post last week – ‘How to Create Portraits that Captivate and Intrigue‘ where I explored the idea of portraits often becoming more interesting when you pay a lot of attention to the background (and foreground) of your portraits and place your subject within an environment that adds to the image.

The cask merchant

You might also like to take a look at my previous Introduction to Environmental Portraits tutorial.

"I Am..." An Engineer

The key is to take a great portrait – but instead of going for a background that is not distracting or blurred it out or zooming in to remove it – put that subject in a setting which tells something about your subject.

Perhaps you’d like to photograph someone at work, or a child in their bedroom, or someone in a sporting dressing room preparing for a game…. really it is totally up to you!

Proud X in his bedroom

Once you’ve taken and selected the ‘Environmental Portrait’ image/s that you’d like to share – upload them to your favourite photo sharing site or blog and either share a link to it or – embed them in the comments using our embed tool to do so.

Ricky's world

If you tag your photos on Flickr, Instagram, Twitter or other sites with Tagging tag them as #DPSENVIRONMENTALPORTRAIT to help others find them. Linking back to this page might also help others know what you’re doing so that they can share in the fun.

Also – don’t forget to check out some of the great shots posted in last weeks challenge – 1 Subject 3 Shots challenge where there were some great shots submitted.

Post originally from: Digital Photography Tips.

Check out our more Photography Tips at Photography Tips for Beginners, Portrait Photography Tips and Wedding Photography Tips.

Environmental Portraits: Weekly Photography Challenge


Digital Photography School

 
Comments Off on Environmental Portraits: Weekly Photography Challenge

Posted in Photography


How to Create Portraits that Captivate and Intrigue

08 Dec

Yesterday as I wrote about an old professional photographer friend taught me about using a zoom lens as a compositional tool I was reminded of another influence that he had upon me – that of always considering the background and surrounds of your portrait subject.

Image by Blazej Mrozinski

I remember looking through one of his portfolios one afternoon and marveling at the way he was able to create shots that were just so…. interesting.

He was the type of photographer who produced portrait images that you just couldn’t glance at – you were captivated by them, really drawn into the image.

I remember trying to pick his brain as to how he did it and after a few moment of thinking he replied:

“I spend more time thinking about the background in my shots than thinking about the main subject.”

With that in mind I worked back through some of the images in his portrait portfolio again and realised that he was right – image after image featured subjects surrounded by well considered and interesting backgrounds.

Image by orangeacid

  • The backgrounds gave context to and told the stories of the subject.
  • They didn’t overwhelm or distract from the subject – but gave meaning to it and brought them alive.
  • Sometimes the surrounds of the person communicated who they were and sometimes they left you intrigued – wanting to know more

Image by an untrained eye

I came away from that experience challenge to consider the backgrounds and surrounds of the people I photographed and found myself thinking less about how to pose people but thinking more about what scene to put them into.

Image by mharvey.nyc

PS: I’m not suggesting this is the only or even best way to take portraits. There’s certainly a place for minimalistic portraits too which isolate the subject – but I think many photographers could learn a lot from considering their backgrounds more.

Post originally from: Digital Photography Tips.

Check out our more Photography Tips at Photography Tips for Beginners, Portrait Photography Tips and Wedding Photography Tips.

How to Create Portraits that Captivate and Intrigue


Digital Photography School

 
Comments Off on How to Create Portraits that Captivate and Intrigue

Posted in Photography


Karl Taylor Takes 840 Portraits in One Day!!

30 Nov

The Annual Guernsey Festival of Photography is set to become one of the world’s most respected festivals of the art. As part of it, Karl Taylor endeavoured to photograph as many people in one day as he could or were willing. This year’s festival theme was war photography with contributions from some world famous photojournalists. Karl’s project for the festival focused on a celebration of life of the people of Guernsey 65 years after their liberation from occupation during the Second World War. His revealing final image is a fitting reminder of the freedom we all now enjoy as a result of the sacrifices of so many in our recent history.
Video Rating: 4 / 5

Mrs. Ramany commits to her office that she would give her house for shooting. She somehow manages to convince Mr. Ramany for the same. The director and the photographer come to inspect the house. Their comments and Mr. Ramany’s helpless reactions are captured in a very hilarious manner.
Video Rating: 5 / 5

 
Comments Off on Karl Taylor Takes 840 Portraits in One Day!!

Posted in Photography Videos


Newlywed Portraits by Wayne Murphy

27 Nov
jmk-photography-1

© Wayne Murphy

What do you say when a beautiful bride with a killer dress and a groom with Superman like rugged good looks ask you to drive an hour and a half to one of their favorite and most significant spots on the planet, take a “short” hike to some water falls and give you complete creative freedom to take their photo when they get back from their honeymoon in Mexico? You scream YES, of course, I’d love to and what time! Ema and Trevin originally wanted to have their ceremony at Morell Falls in Seeley Lake Montana but decided against it in favor of the much more family friendly and accessable Conrad Mansion in Kalispell.

jmk-photography-5991

© Wayne Murphy

When we arrived at the falls the first thing I did was thank God that I wasnt too much of an old man to keep up with the youngsters on the “short” three-mile hike. Then with light meter in hand I got down and prayed that I would’nt royally screw this up, it was kind of a one shot deal. I took quite a bit of time to meter the light in the area that Ema had picked out months before, and then meter it again. I never thought I would love my light meter so much, thank you CPP for forcing me to get one and learn to use it! I had packed in a battery pack, flash, light stand, a parabolic and small assortment of lenses, mostly primes to save on pack space and weight, not really sure what would work since I had only seen photos while researching the area on Google. I ended up settling on the last lens I ever thought I would use, a 16-35 f/4 wide-angle. Not exactly a portrait lens by any stretch of the imagination and if you’re not careful you can easily make people look pretty uh… strange with it. In this case I was sure it would work.

jmk-photography-1049

© Wayne Murphy

A fairly large crowd had gathered while Ema and Trevin were off in the woods changing curious what was going on with the fancy camera, light stand and they seemed really curious as to what the heck the parabolic umbrella was used for (massive light source with huge output to fight back the sun). When the newlyweds emerged from the woods all dressed up we got started right away, had a blast and laughed a bunch. I would do this kind of portrait session again in a heartbeat and so a new category was born! Newlywed Portraits.

Wayne Murphy is a portrait and wedding photographer from Kalispell Montana with a passion for flash and a love for natural light.

Website: http://www.jmkphotography.net


dslrBlog

 
Comments Off on Newlywed Portraits by Wayne Murphy

Posted in Photography


One Light Portraits Part 2: The Diagrams

21 Nov

A lot of you have asked for lighting diagrams from my last post on One Light Portraits, so here they are- the finished shot, as well as the arrangement of lights, reflectors, and camera position.  Enjoy!

For this shot, the flash is on-camera, and bounced into a reflector at camera left.

This is a variation on the previous shot. This time, the reflector is placed at the model's waist, facing up. The flash is bounced at the ceiling, and teh reflector then reflects that light up into the model's face.

For this shot, a speedlite in a softbox was used. We are outdoors, and our subject is positioned under a tree for shade. The softbox then becomes the main light on our subject, and the daylight fills the background.

In this shot, a softbox is set up behind the subject, while a reflector is set up directly opposite to bounce light into the face. In this case, the silver side of the reflector was used.

A household bulb can make a perfectly acceptable light source when nothing else is available. In this case, a household lamp was used, with the shade removed. To soften the light, a white sheet was used as a scrim to allow light to pass through. A higher ISO- ISO 2500 – was used. Keep in mind your white balance must be adjusted for the yellowish cast a household bulb creates.

This shot uses one large soft box- 50 inches- to create a soft light.

Post originally from: Digital Photography Tips.

Check out our more Photography Tips at Photography Tips for Beginners, Portrait Photography Tips and Wedding Photography Tips.

One Light Portraits Part 2: The Diagrams


Digital Photography School

 
Comments Off on One Light Portraits Part 2: The Diagrams

Posted in Photography


Portraits with Props: Weekly Photography Challenge

17 Nov

Szúrópróba

As a followup to our recent post on Adding Interest to your Portraits with Props we thought it might be fun to do one of our weekly challenges on the topic.

So this week your challenge is to take and share a portrait photo that has some kind of ‘prop’. Really it can be any kind of prop (subtle or not) that you like whether it be some element of clothing (a hat, scarf etc), an accessory (sunglasses), having your subject hold something (flowers, balloons, an umbrella) or do something (type on a computer, blow a bubble with gum, ride a bike) or anything else.

Have some fun with it!

Once you’ve taken and selected the ‘Portrait with Props’ image that you’d like to share – upload it to your favourite photo sharing site or blog and either share a link to it or – embed them in the comments using our embed tool to do so.

If you tag your photos on Flickr, Instagram, Twitter or other sites with Tagging tag them as #DPSPROP to help others find them. Linking back to this page might also help others know what you’re doing so that they can share in the fun.

Also – don’t forget to check out some of the great shots posted in last weeks challenge – Backyard challenge where there were some great shots submitted.

Post originally from: Digital Photography Tips.

Check out our more Photography Tips at Photography Tips for Beginners, Portrait Photography Tips and Wedding Photography Tips.

Portraits with Props: Weekly Photography Challenge


Digital Photography School

 
Comments Off on Portraits with Props: Weekly Photography Challenge

Posted in Photography


One Light Portraits: Simple Elegance

13 Nov

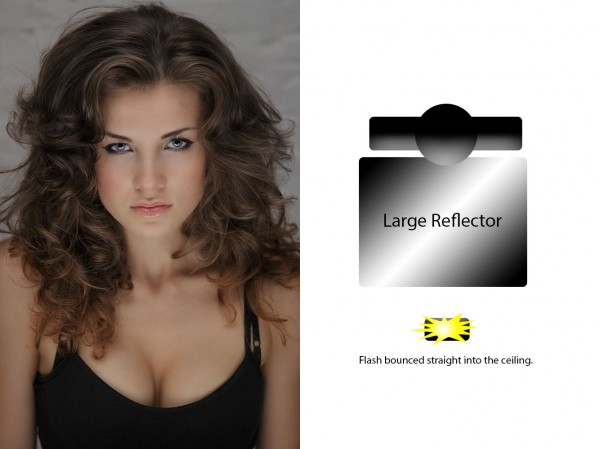
In this case, a reflector was used at camera left, but a neutral colored wall would work just as well. The flash bounces off the reflector, the rear wall picks up some light, and the ceiling picks up some more, illuminating the top of the hair.

Everyone who ever picks up a camera at one point or another finds themselves pointing it at another person.  But unless you walk around with a lighting kit in your back pocket, you have to make do with what you have.  If you’re lucky that means you have a speedlite in your bag.  If not, there are other ways to light your subjects and get a pleasing portrait.

Let’s start with the best case scenario- you have a speedlite on your camera with a swivel head. This gives you the flexibility of TTL exposure, as well as the ability to bounce the flash and avoid the ugliness of direct flash.  Bouncing flash simply means that the flash head is aimed at a surface and the light is reflected back onto your subject.  This softens the light coming from the flash head, and makes it a much more pleasing light source.  The ability to bounce the flash is huge, because a variety of looks can be achieved simply by repositioning the flash head and the surface the light is bouncing off of.  Walls and ceilings are generally pretty easy to bounce off of, but something smaller, such as a reflector, or a piece of white oak tag will work equally well.  The important thing about the surface being used for bouncing is that the color be neutral, such as white or gray.

Positioning the subject in a corner of the room will allow you to use one light to create multiple light sources.  The flash can be aimed at the wall to the side, and angled up to the ceiling to provide a hair light. In addition, the wall being used as the background will provide some back lighting. This will create soft shadows on the unlit side of your subject. It’s important to be sure your subject’s face is turned towards the bouncing surface so they are properly illuminated by the light.

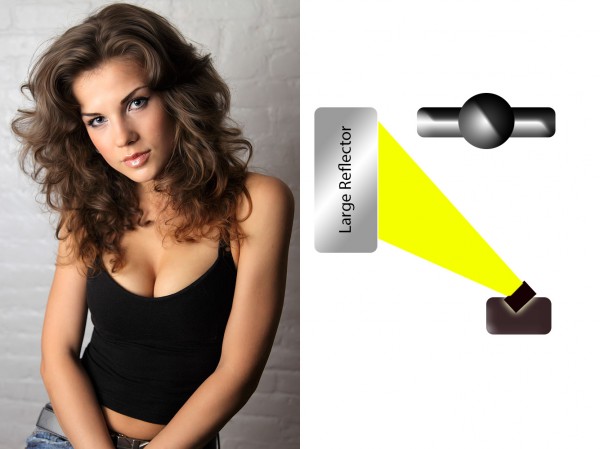
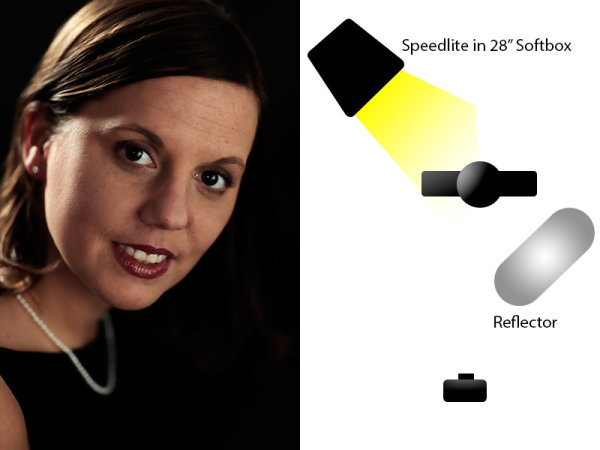
Placing a reflector at waist level and bouncing the flash into the ceiling creates a soft glamor lighting effect. It’s actually a double bounce: once off the ceiling, and then off the reflector.

Another variation on this setup that works well for women and creates a glamor lighting look, is to place a reflector at your subject’s waist.  Bounce the flash directly off the ceiling and have the reflector kick light back up into the subject’s face.

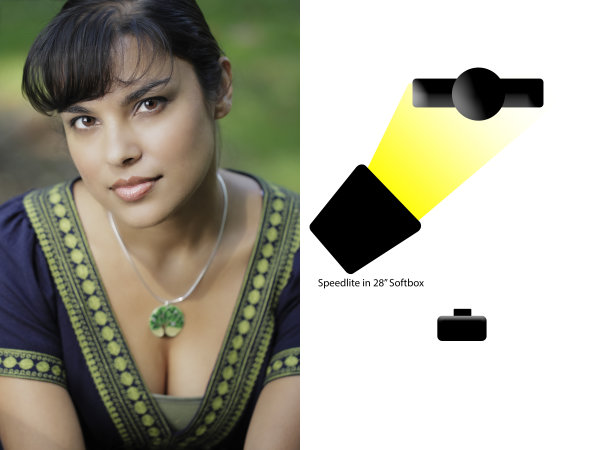
Postioning the softbox to camera left created a soft light that flattered Mary’s facial structure. I positioned her in the shade of a tree, so the flash was sure to be the main light on her, while the background was lit by sunlight.

The next step with a flash is to get it off camera.  All of the major SLR makers offer some sort of wireless flash control. Again, a bare flash tends to not be the best light source. Flash in general is a harsh, unflattering light source.  To soften the light, a modifier is needed.

There are all kinds of modifiers available on the market.  Softboxes are great for portraits because the light is softened, directional, and there is no spill. Umbrellas are great for softening and directing the light, but you get more spill, meaning it’s harder to control what the light does and does not hit.  The basic rule of thumb is, the larger the light source, the softer the light.  So a larger soft box will nicely soften the light and wrap it around your subject, creating soft shadows as well.

The important thing when lighting with a softbox is that the light must hit the mask of the face, either from the softbox or via a reflector. If the face is in shadow, or if features of the face cast unflattering shadows, the portrait is going to be unsuccessful. Generally, positioning the light slightly above and off to the side of the subject will produce the best light.

A softbox positioned behind and to the side of the subject, while a reflector is positioned directly opposite to create a two-light effect.

If you happen to be outdoors, the available daylight works wonders for filling the background as you mix available light with flash.  Position your subject in shade, and light them with a flash and modifier of choice, such as a softbox.  Allow the available light to fill the background, and even create a hairlight.  Indoors, you can create dramatic low-key lighting using one light in a softbox.  Add a reflector, and now you have a two light setup.  The softbox as the main light can be used as a rim light or hair light, and position the reflector so that it bounces light back into your subject’s face.  You’re simply playing angles here, so watch where the light hits and bounce it back to your subject’s face.

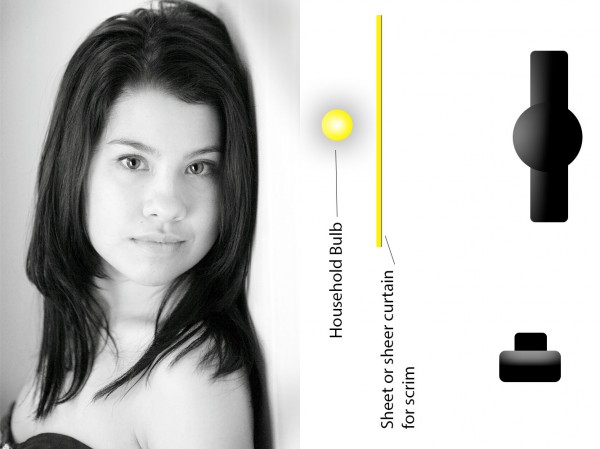
This portrait was made using a household lamp with a 75 watt bulb, with a sheer curtain to soften the light. It’s important when using a household lamp to adjust your white balance properly, as the bulbs can range in color from more greenish to yellow.

Now, what if you’re caught without a flash? Simple. Any light source will do.  With today’s DSLRs, higher ISO’s mean greater flexibility in terms of light.  A simple household lamp with a shade can even be a good portrait light.  The important thing again is to watch how the light is falling on your subject.  You may need to manipulate the lamp’s position, or the subject’s position in relation to the lamp.  If the shade dims the light too much, remove the shade, and find another way to modify the light.  It could be as simple as rigging a sheer curtain in front of the lamp to create a scrim.

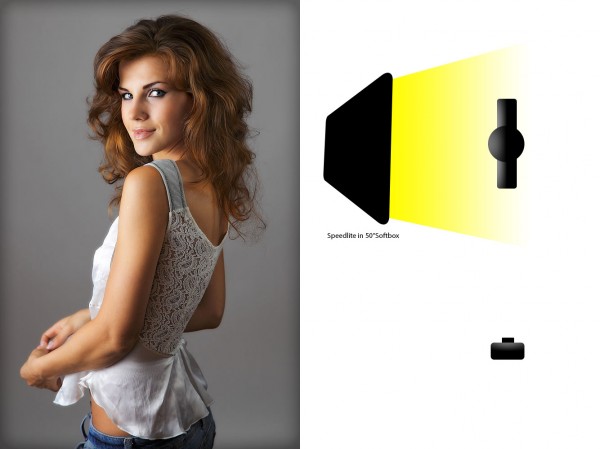
A single softbox will create more dramatic lighting. In this case, a large, 50 inch softbox was used creating a soft, dramatic light.

The bottom line is, no matter what, as long as you have light, you have the ability to make a great photo.  The key is simply being able to see the light, play the angles, and think outside the box when necessary.


Post originally from: Digital Photography Tips.

Check out our more Photography Tips at Photography Tips for Beginners, Portrait Photography Tips and Wedding Photography Tips.

One Light Portraits: Simple Elegance


Digital Photography School

 
Comments Off on One Light Portraits: Simple Elegance

Posted in Photography