RSS
 

Posts Tagged ‘Portrait’

How to Make a Low Key Portrait Step by Step

22 Jan

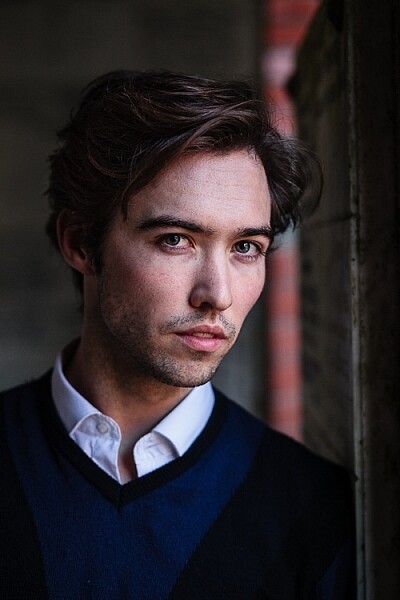
What does low key mean?

In a world where the crisp, clean, high key shot dominates, it’s great to see a return to the low key portrait. In comparison to the high key image, where most of the tones are above (lighter than) 50% grey, the low key portrait has tones that are mostly under (darker than) 50%.

You’re replacing the light, airy feel with a more moody, dramatic look. Looking at your histogram, most of the information is bunched on the left-hand side. That’s not to say that you’re underexposing the subject to get this look. You still need correct exposure on the face. A lot of action movies or thrillers have posters with a low key feel. Think drama and you’re in the ballpark for how a low key portrait will look.

Low key portrait examples 01

The background and lighting

Your background needs to be dark, usually dark grey or black, and the tone of the clothing will be of a darker tone. They don’t need to be black strictly speaking.

You should set your lighting to create drama. Take your cues from film noir. The photos don’t need to be in black and white, though. However, you may find that the absence of color in low key images can lend itself to this look. As well as choosing dark clothes, avoid ones with patterns, as this will draw attention away from the face.

Low key portrait examples 02

Lighting a low key portrait

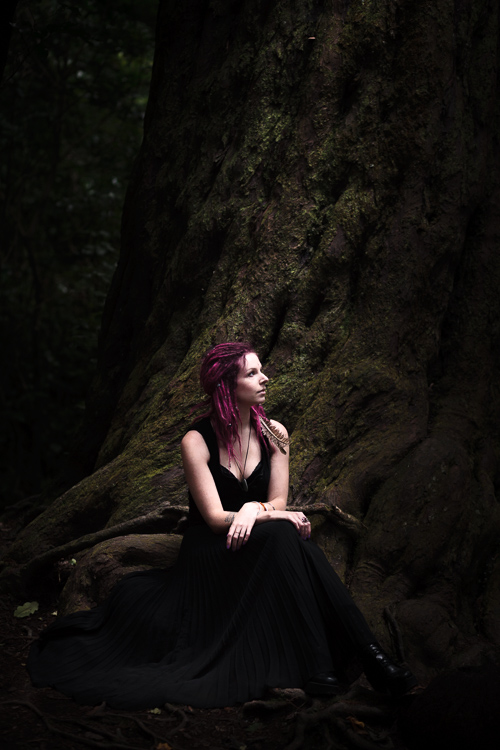
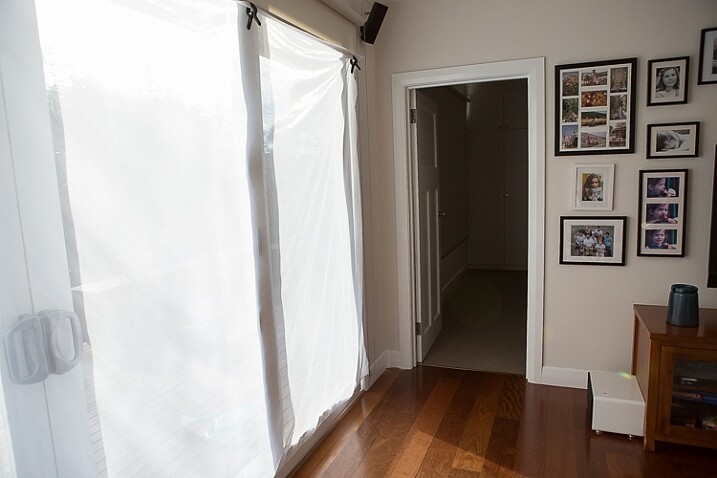
You don’t need to use artificial lighting to get a low key portrait. You could use natural light through a window. To get control, you need to close the curtains down to a tiny slit of light. Then, with the room lights off, place your subject in the light and expose for their face.

The rest of the room will go dark for a naturally lit low key portrait. If you’re in a corner room with a window on each side, you could even do this trick where the second window acts as a backlight. Just narrow the slit in the curtains to control the light for this effect (see below).

Low key portrait examples 03

You can also have this control in the studio, so let’s set up and refine a studio portrait.

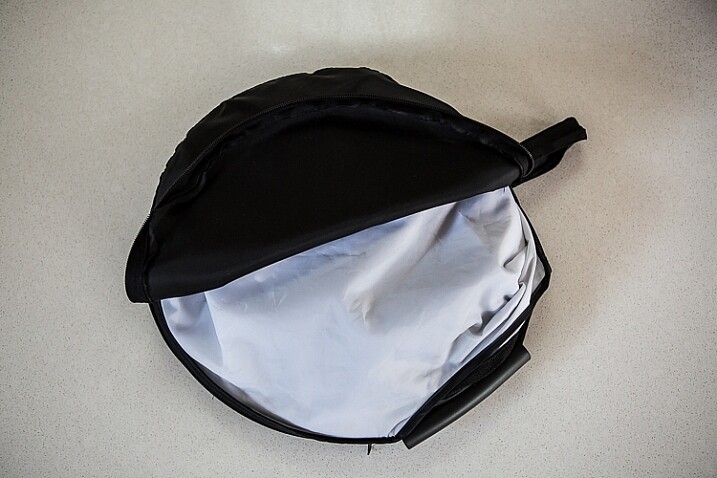
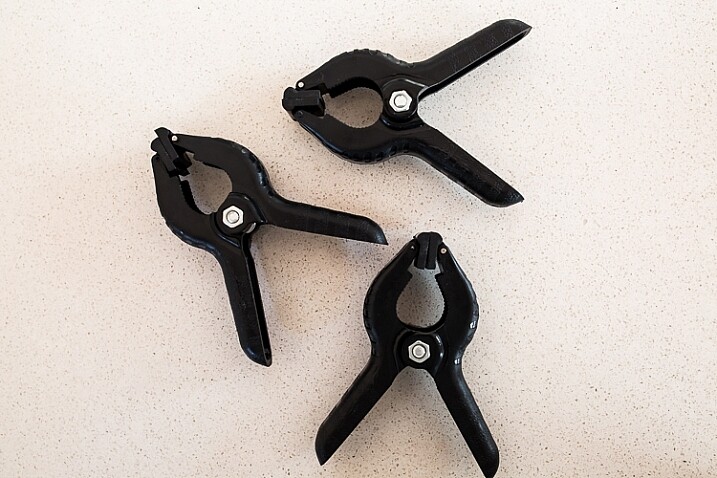
You’ll need a lighting setup that is flattering and controllable. A strip softbox lets you control the light more, as would a beauty dish. If you don’t have either, you can add some material over the softbox you do have to create a strip light. If you have a grid, even better. As long as you can control where the light goes, you’ll be able to get this down. You can even block your light from the background using a black card (things that block light are referred to as flags).

Creating a low key portrait from scratch

For the examples here, I used an Elinchrom BRX500 with a 44cm White Beauty Dish and a white deflector. Like I’ve mentioned, you don’t need to have exactly this gear to get these shots. Gear is only small part of the equation, it’s using the gear that counts.

Making the background darker

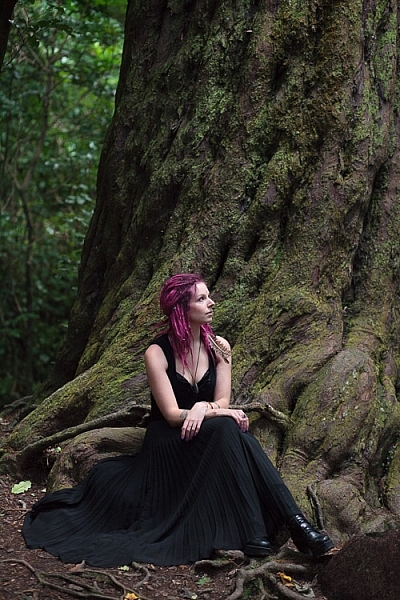
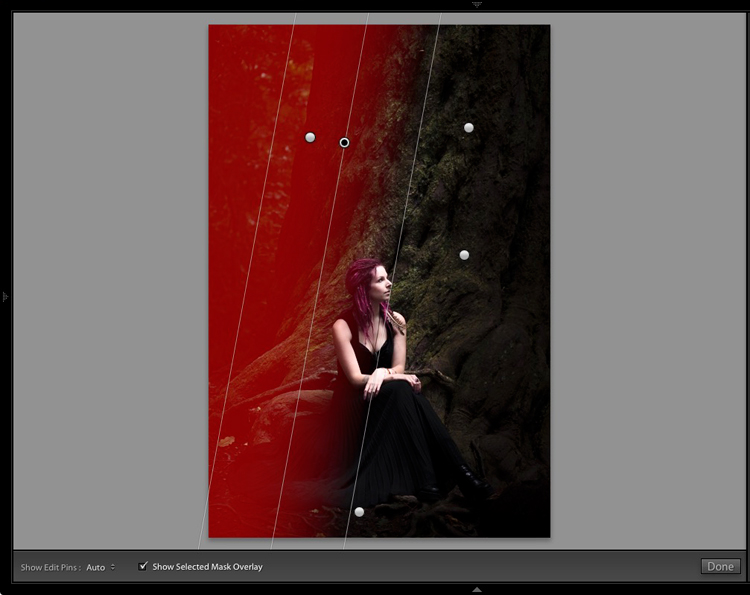
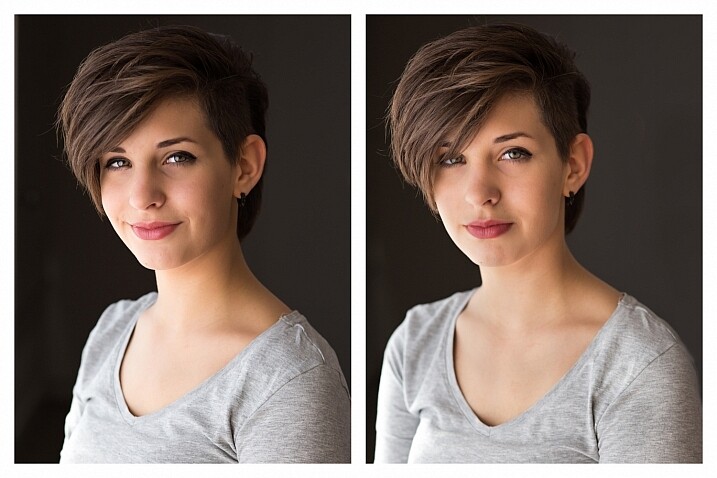
In this first shot, you’ll see the model against the wall, photographed with a butterfly lighting pattern. Even though the tones are dark, the image itself is too bright for a low key portrait.

Low key portrait example 02

Close to the grey wall.

The Setup

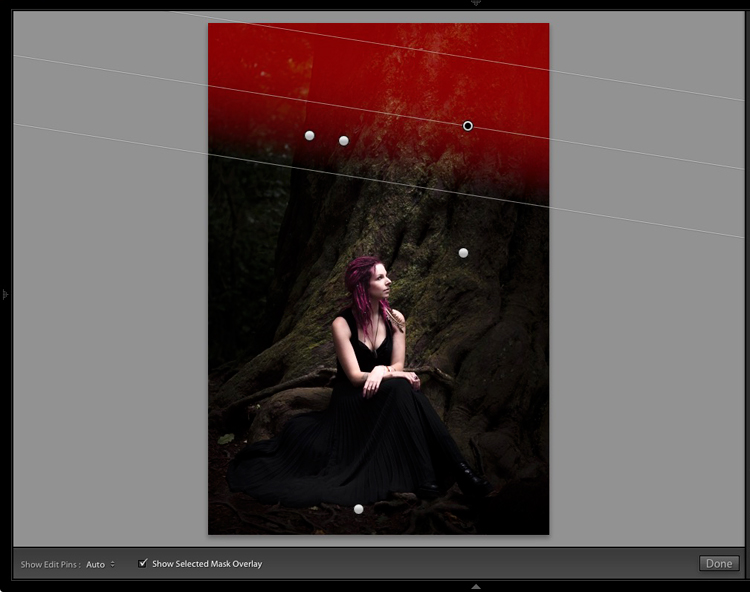
By moving the model and the light evenly away from the wall, you’ll notice the light on the subject stays the same, but the background gets darker.

Low key portrait example 03

Moving the model away from the wall means the light falls off and the background gets darker.

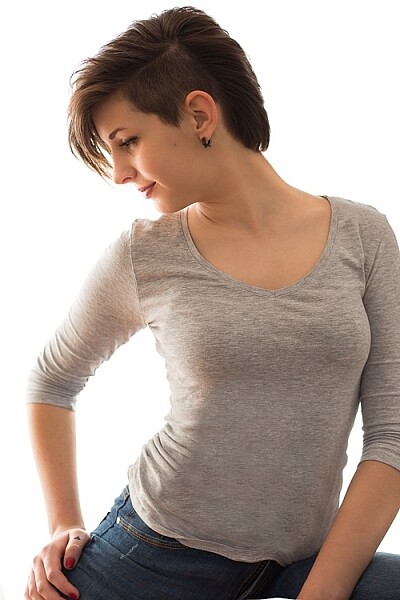
Move the light to the side

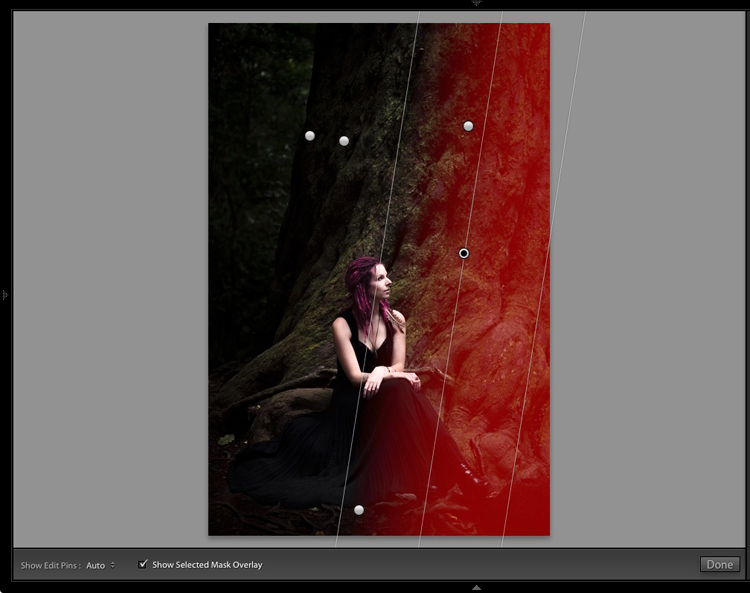
If you move the light around to the side, into a short lighting position, you’ll see the background darkens even more, and there is an increase in the drama of the shot. We still have light spilling on to our background, though.

Low key portrait example 05

Moving the light to the side means even less light falls on the background, darkening it even more.

Low key portrait example 04

Add a grid to the light

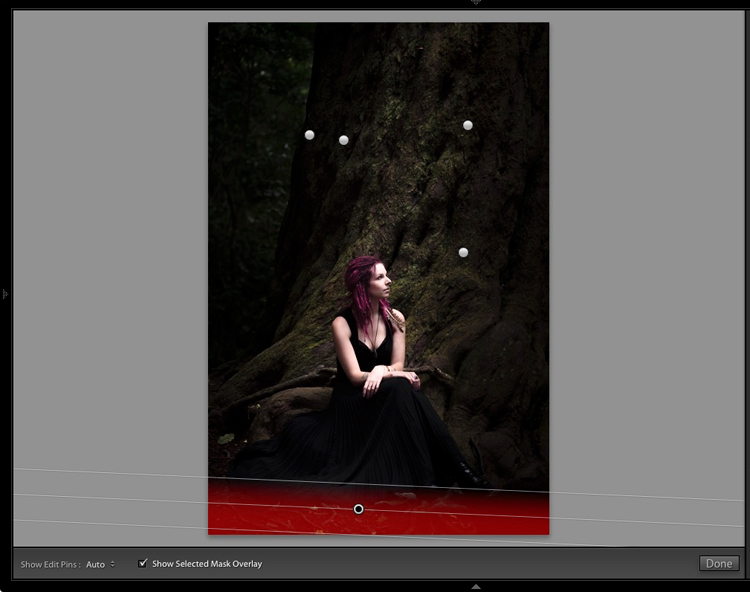
By adding a grid to the light, you can control the light even more. The grid restricts the light to whatever is in front of the light only, none bounces around or spills out the sides.

Low key portrait example 07

With a grid added to the light.

Low key portrait example 06

Light with grid added.

Add light onto the hair

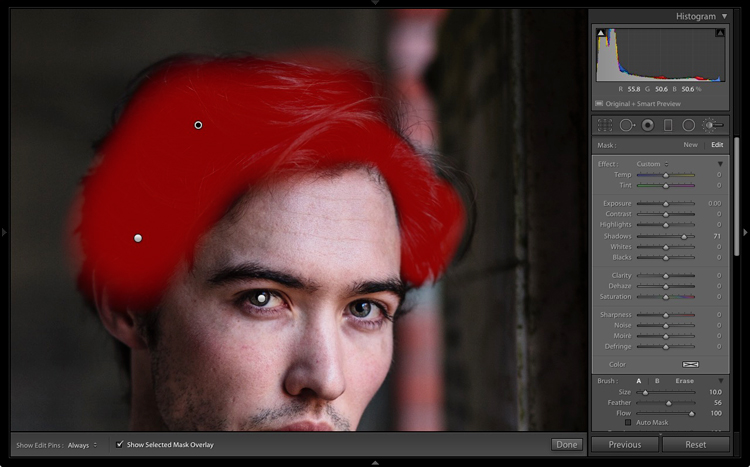
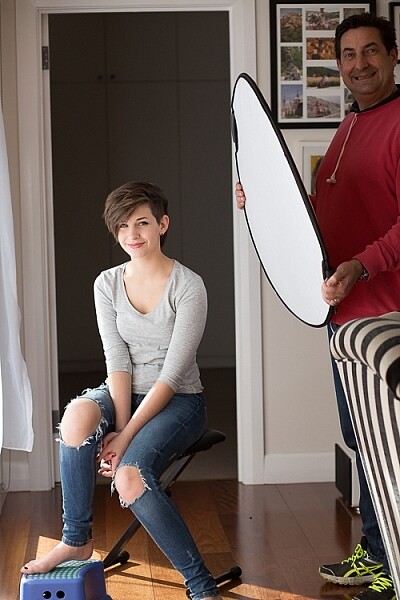
You’ll see that the hair is starting to blend in with the background now. This can be a great effect sometimes, but if you want separation between the hair and the background, you need to add fill light in there somehow.

You could choose a reflector, but a second light offers more control. I’ve added a strip light on the other side of the subject opposite the main light. Make sure that light doesn’t hit your lens or you will get flare. Use a grid or a flag to block it if necessary.

Low key portrait example 09

Second light added for her hair.

Low key portrait example 08

Light position with main light (with a grid) and hair light (also with a grid) opposite and behind the subject.

Practice it!

These examples should get you going towards making your own low key portrait. The trick is to control the light so you darken the environment. Try the curtain trick if you don’t have any lights. You can even use that trick with an off-camera speed light by putting the flash outside the window to replace the natural light for more control.

Have you done any low key portraits? Have any questions? Please share in the comments below.

googletag.cmd.push(function() {
tablet_slots.push( googletag.defineSlot( “/1005424/_dPSv4_tab-all-article-bottom_(300×250)”, [300, 250], “pb-ad-78623” ).addService( googletag.pubads() ) ); } );

googletag.cmd.push(function() {
mobile_slots.push( googletag.defineSlot( “/1005424/_dPSv4_mob-all-article-bottom_(300×250)”, [300, 250], “pb-ad-78158” ).addService( googletag.pubads() ) ); } );

The post How to Make a Low Key Portrait Step by Step by Sean McCormack appeared first on Digital Photography School.


Digital Photography School

 
Comments Off on How to Make a Low Key Portrait Step by Step

Posted in Photography


18 of the Most Popular Portrait Articles on dPS in 2016

04 Jan

Earlier this week we shared some other popular articles from 2016. Check those out here:

  • Top Gear Related Articles of 2016
  • 15 of the Most Popular Landscape Photography Articles of 2016

To continue on with the best of, let’s take a look at portrait articles. Here are some of the most-read to help you with your portrait photography.

18 of the Most Popular Portrait Articles on dPS in 2016

  1. 11 Steps for Basic Portrait Editing in Lightroom; A Beginner’s Guide
  2. How to Avoid Fake Smiles in Your People Photography
  3. Good Crop Bad Crop; How to Crop Portraits
  4. How to Make Colors Pop in Your Portraits; Without Using Photoshop
  5. 24 Portrait Lighting Setups [Cheat Sheet]
  6. How to Pose and Angle the Body for Better Portraits
  7. How to Create Awesome Portrait Lighting with a Paper Bag an Elastic Band and a Chocolate Donut
  8. 5 Tips for Taking Better Portraits in Nature
  9. How to Use Portrait Angles More Creatively: A Visual Guide
  10. How to Find Great Backgrounds for Outdoor Portraits
  11. 5 Secrets for Finding Great Indoor Portrait Locations
  12. 10 Tips for Doing Your First Family Portrait Session
  13. How to Do a One Light Portrait Setup and Use it as Your Back-up Plan
  14. Tips for Taking Candid Portraits of People
  15. Comparing a 24mm Versus 50mm Lens for Photographing People
  16. 8 Tips to Help Make People Comfortable for Their Portrait Session
  17. Photographing People: To do Styled Portraits or Not?
  18. 10 Tips to Help You Create Unique Storytelling People Photos
portraits_makingtheshot_1200x628px

You can also look at our ebook by dPS author Gina Milicia – Portraits Making the Shot. Or grab the entire portrait collection by Gina including hours of video training for 76% off(until 31st Dec only!). Click here for the ebook or here for the bundle.


googletag.cmd.push(function() {
tablet_slots.push( googletag.defineSlot( “/1005424/_dPSv4_tab-all-article-bottom_(300×250)”, [300, 250], “pb-ad-78623” ).addService( googletag.pubads() ) ); } );

googletag.cmd.push(function() {
mobile_slots.push( googletag.defineSlot( “/1005424/_dPSv4_mob-all-article-bottom_(300×250)”, [300, 250], “pb-ad-78158” ).addService( googletag.pubads() ) ); } );

The post 18 of the Most Popular Portrait Articles on dPS in 2016 by Darlene Hildebrandt appeared first on Digital Photography School.


Digital Photography School

 
Comments Off on 18 of the Most Popular Portrait Articles on dPS in 2016

Posted in Photography


How to Create a Dark and Moody Rembrandt-Style Portrait In Lightroom

03 Jan

Dutch artist Rembrandt Harmenszoon van Rijn is known for his dark and moody portraits, characterized by a single lighting source falling across a subject placed in front of a dark background. It’s an interesting, evocative style that is easy enough to replicate in modern photography.

There are two steps to creating a Rembrandt-style portrait. The first is to get the lighting and composition right. The second is to use Lightroom to emphasize the dark and moody feel created by the lighting.

Rembrandt inspired lighting is easily achieved using natural light. The important thing is that the light is directional. Take a look at these portraits to see how it works.

Portrait #1Rembrandt style dark and moody portrait

This portrait was taken with the model standing under an archway that was part of a local building. We took the photo on a cloudy day, so the light was quite soft and even, perfect for portraiture.

The light comes from the model’s left, through the archway, casting a shadow across his face. The right side of his face is dark because no light is coming from that side. The background is also dark because less light is falling on it.

The photo looks like it could have been taken in a studio – but the light was shaped by the archway rather than a softbox.

Rembrandt style dark and moody portraitPortrait #2

I made this portrait in a forest. The light was coming through the trees from above. It was a cloudy day, but the narrow gaps between trees meant the light was very directional. I asked my model to lift her face up towards the light so that it didn’t cast shadows under her eyes.

I selected these portraits because they are interesting from a post-processing point of view. One of them was very easy to process, and the other took a lot more work. Can you guess which one was which?

Processing Portrait #1

The first portrait was the easiest to process. Here’s the Raw file as it came out of the camera.

Rembrandt style dark and moody portrait

Virtually all the work for this portrait was done in the Basic panel in Lightroom. These are the main adjustments.

Rembrandt style dark and moody portrait

  • Exposure +0.20. A slight tweak to brighten the photo.
  • Shadows -27. This makes the darkest tones in the photo darker without affecting the lightest tones.
  • Clarity + 41. A global adjustment to enhance texture and details and add a gritty feel to the male portrait (a much lighter touch is required with portraits of women).

You’ll note that I didn’t use the Contrast slider to make the background darker. The reason is that the Contrast slider affects both dark tones and light tones equally. It is better to use the Highlights and Shadows sliders to control highlights and shadows separately.

Taking control of dark tones with the Shadows slider gives you a lot of choice when it comes to setting the tonal values of the image. You can also move the Blacks slider left, although you may block up some shadow areas when you do so.

Remember, your aim is to create a dark and moody Rembrandt style portrait, so it’s up to you how dark you want to make the shadows. Here’s a comparison that shows what happens with this portrait when I push Shadows to -100 and Blacks to -22.

Rembrandt style dark and moody portrait

Local adjustments

Pushing Shadows and Highlights sliders left may also darken parts of the photo that you would prefer to remain as they are. In this portrait, the model’s hair became too dark, so I used the Adjustment Brush to lighten it. This screenshot shows the mask created by the Adjustment Brush in red. I set Shadows to +71 to make his hair lighter.

Rembrandt style dark and moody portrait

Processing Portrait #2

The next portrait required more work in Lightroom. You can see why when you look at the original image as it came out of the camera, below.

Rembrandt style dark and moody portrait

While the light is coming from above, it wasn’t as directional as the processed image suggests. An image like this needs a little more work in Lightroom in order to obtain the dark background that a Rembrandt style portrait requires.

Rembrandt style dark and moody portrait
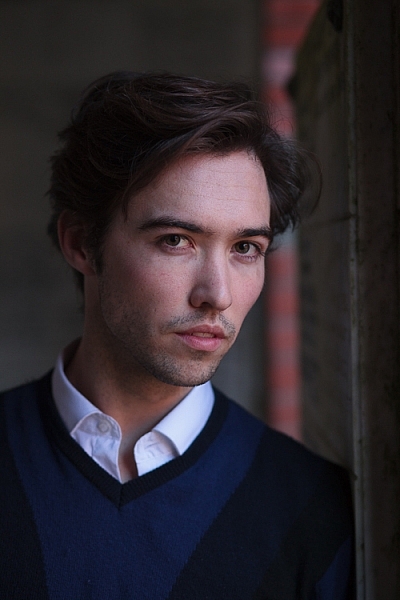
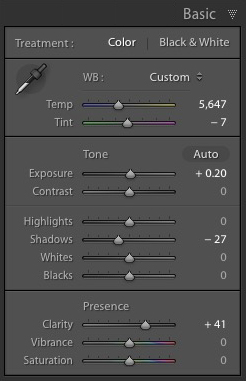
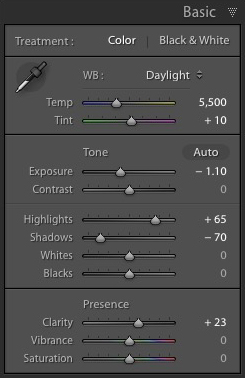
I made some subtle changes by setting the following:
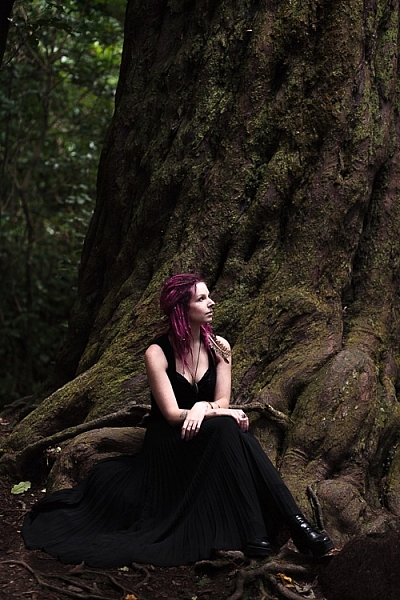
  • Exposure to -1.10
  • Shadows to -70
  • Highlights to +65
  • Clarity to +23

Moving the Shadows and Exposure sliders left made the entire image darker, making the background look more how I wanted. Moving Highlights to +65 then made the highlights (in other words, the model’s skin) brighter. Once again this has increased contrast, but in a way that is much more controlled than using the Contrast slider.

Here’s the result so far.

Rembrandt style dark and moody portrait

Local adjustments

Once you have achieved all you can with global adjustments, it is time to work with local adjustments. Lightroom has three local adjustment tools – the Graduated filter, Radial filter and the Adjustment Brush. It is up to you to select the tool (or combination of tools) best suited to the task in hand.

For this portrait, I applied five Graduated filters, and moved the Exposure slider left (to darken) for each one. These screenshots show where the Graduated filters I applied to the image fall.

Rembrandt style dark and moody portrait

Rembrandt style dark and moody portrait

Rembrandt style dark and moody portrait

Rembrandt style dark and moody portrait

Rembrandt style dark and moody portrait

The best way when making local adjustments is to play it by eye. Don’t be afraid to jump around between your local adjustments and tweak the settings until you get the photo looking as you wish.

These comparisons show the difference that the Graduated filters made to the image.

Rembrandt style dark and moody portrait

Finally

The key to re-creating the style of a painter like Rembrandt in Lightroom is to analyze the type of lighting used in his portraits and think about how you can replicate that using the tools inside Lightroom. Bear in mind that the lighting is just as important as Lightroom technique. Get the lighting right and the rest should follow easily.

Do you have any questions about the Lightroom techniques used in this article? Let me know in the comments!


If you’d like to learn more about processing your photos in Lightroom then please check out my ebook Mastering Lightroom: Book Two – The Develop Module.

googletag.cmd.push(function() {
tablet_slots.push( googletag.defineSlot( “/1005424/_dPSv4_tab-all-article-bottom_(300×250)”, [300, 250], “pb-ad-78623” ).addService( googletag.pubads() ) ); } );

googletag.cmd.push(function() {
mobile_slots.push( googletag.defineSlot( “/1005424/_dPSv4_mob-all-article-bottom_(300×250)”, [300, 250], “pb-ad-78158” ).addService( googletag.pubads() ) ); } );

The post How to Create a Dark and Moody Rembrandt-Style Portrait In Lightroom by Andrew S. Gibson appeared first on Digital Photography School.


Digital Photography School

 
Comments Off on How to Create a Dark and Moody Rembrandt-Style Portrait In Lightroom

Posted in Photography


3 Video Tutorials – Portrait Retouching Tips Using Lightroom

06 Dec

Many of our readers use Photoshop to edits portraits, but what if all you have is Lightroom? Or you don’t know Photoshop as well? You can certainly do most of your portrait retouching using Lightroom.

Here are some video tutorials that walk you through a complete edit of one portrait from start to finish, using only Lightroom. I have also included one that I myself did too.  Every photographer has their own style, so take what works for you from each and apply that to your own editing style.

#1 Extended Lightroom Portrait Edit by Adam Lerner

Photographer Adam Lerner walks you through his portrait editing process from start to finish. He will give you some tips and tricks and great hidden gems inside Lightroom that you can use.

#2 Full Lightroom Portrait Editing by Photos in Color

Ed Gregory from Photos in Color processes a portrait using Lightroom from end to end. He makes a very different looking end result so if you’re looking for some style ideas and tips this might be a good one for you. See what he does the same and differently than Adam above, and myself below.

#3 Portrait retouching in 10 minutes using Lightroom

This is my version. Having taught Lightroom in the classroom and done portraits for over 20 years, I may have some good tips for you that you didn’t already know. I’ve been using Lightroom since the beta version 0.9 or so, and it’s my go-to image editor.

I almost never pull an image over to Photoshop unless I need to do layers for something. For portraits, that may be a head swap or something where I have to blend images. But otherwise, I pretty much use Lightroom for everything, even skin, eye and lip retouching.

Your turn

How do you use Lightroom to process and do your portrait retouching? Do you have any other tips the three of us missed? Please share in the comments below.

googletag.cmd.push(function() {
tablet_slots.push( googletag.defineSlot( “/1005424/_dPSv4_tab-all-article-bottom_(300×250)”, [300, 250], “pb-ad-78623” ).addService( googletag.pubads() ) ); } );

googletag.cmd.push(function() {
mobile_slots.push( googletag.defineSlot( “/1005424/_dPSv4_mob-all-article-bottom_(300×250)”, [300, 250], “pb-ad-78158” ).addService( googletag.pubads() ) ); } );

The post 3 Video Tutorials – Portrait Retouching Tips Using Lightroom by Darlene Hildebrandt appeared first on Digital Photography School.


Digital Photography School

 
Comments Off on 3 Video Tutorials – Portrait Retouching Tips Using Lightroom

Posted in Photography


DPReview Asks: Who would you want to shoot your portrait?

16 Nov

We sat down with ten well-known photographers and asked a simple question: “Who would you want to shoot your portrait?” Some of the answers may surprise you.

So what do you think – if you had your pick, who would shoot your portrait? Tell us in the comments!

Articles: Digital Photography Review (dpreview.com)

 
Comments Off on DPReview Asks: Who would you want to shoot your portrait?

Posted in Uncategorized


10 Tips for Doing Your First Family Portrait Session

15 Nov

Photographs from a good family portrait session will be treasured for many years to come. It’s an incredibly rewarding area of photography, but it can also be a little daunting for new photographers. You need to build a rapport with the family fast, keep the children on board, and meet the parents’ expectations with gorgeous photographs.

Family portrait FAMILY GROUP

So where do you start? Which camera settings should you choose?

Here are some important pointers to make your first session go smoothly, and to help you take great family portraits.

1. Get down to their level

Get down to a child’s eye level. This will lead to far more engaging photographs, as well as helping you to interact better with the child.

Family portrait INDIV GIRL flowers

2. Use Centre point focus

Different focus settings suit different photographers, but center point focusing tends to be the most useful for family portraits. As you take more and more family portraits, you’ll get a feeling for whether this suits you, But it’s a great starting point for your first session.

3. Choose an appropriate aperture

Your aperture settings will be influenced by the style you prefer. As a starting point, many lifestyle family photographers choose to shoot wide open for individual portraits (f/2.2 works really well), and around f/5.6 for group shots to ensure everyone is in focus.

Family portrait DAD AND SON opt

This was taken at f/5.6.

Family portrait INDIV GIRL park

This was shot at f/2.2.

4. Starting shutter speed

You will probably find yourself needing a slightly faster shutter speed for family portraits than you’d need for many other kinds of portraits. Children move fast, and sometimes unpredictably! A good setting to start with is 1/250th, which will give you flexibility for children rolling over or waving. If you have a situation where someone is moving very fast, such as a child jumping or racing off into the distance, choose a much faster shutter speed like 1/800th.

Family portrait BABY opt

This was taken at 1/800th]

5. Use Auto ISO

While you’re familiarizing yourself with the apertures and shutter speeds that work for you on family portrait sessions, consider setting your ISO to auto. The results are usually satisfactory, and it’s one less thing to think about on the day. As you gain experience and confidence, you can start to select the ISO as you go along.

6. Metering mode

Certain metering options seem to suit some photographers better than others. As you take more family portraits, you’ll soon see which works best for you. To start with, try using spot metering for individual portraits, and evaluative metering for a group shot.

Family portrait MUM AND BABY

This was taken with the evaluative metering mode.

7. Shoot in RAW format

The editing options open significantly in Lightroom, and you’ll have a far greater range of colors and detail recorded if you shoot in the RAW format.

8. Auto White Balance

Set your white balance to auto if you’re doing a location shoot. You’ll be working in a variety of locations with different lighting, and you won’t have much time for setting white balance as you go. Correcting white balance is an easy edit in Lightroom, so you’d be better off spending the time engaging with the family you’re photographing.

9. Choose your lenses

Consider which lenses to take with you to the family portrait session. If your budget doesn’t stretch to having several lenses, consider renting some. It can be surprisingly economical, and it gives you the opportunity to try out different focal lengths to see which suit you best.


Family portrait BABY

This was taken with an 85mm lens.

Using several lenses throughout a family portrait session will give you lots of variety in the images, as well as meaning you can cope with most locations. A zoom lens like a 24-70mm will give you lots of flexibility, or a popular prime lens for family portraits is an 85mm lens, which is very flattering for portraits. A wide lens like a 35mm will help you to set the scene.

As you gain experience photographing families, you’ll develop a sense for which lenses suit you best. That’s a good time to invest in the best quality lenses you can afford.

Family portrait SIBLINGS INSIDE

This was taken with a 35mm lens.

10. Set limits

Limit yourself to taking five versions of each scene. This will train your eye to look for the details and expressions you want to capture and to make sure you ultimately combine them all in one photograph.

Conclusion

So there you have it – family portraits in a nutshell. Practice makes perfect, though, so be prepared to work hard and hone your camera skills. Above all, a friendly and professional attitude combined with careful preparation for each family portrait shoot should make for happy clients and repeat business.

Please share your family portrait tips and photos in the comments section below.

googletag.cmd.push(function() {
tablet_slots.push( googletag.defineSlot( “/1005424/_dPSv4_tab-all-article-bottom_(300×250)”, [300, 250], “pb-ad-78623” ).addService( googletag.pubads() ) ); } );

googletag.cmd.push(function() {
mobile_slots.push( googletag.defineSlot( “/1005424/_dPSv4_mob-all-article-bottom_(300×250)”, [300, 250], “pb-ad-78158” ).addService( googletag.pubads() ) ); } );

The post 10 Tips for Doing Your First Family Portrait Session by Louise Downham appeared first on Digital Photography School.


Digital Photography School

 
Comments Off on 10 Tips for Doing Your First Family Portrait Session

Posted in Photography


iOS 10.1 adds ‘beta’ support for Portrait mode to iPhone 7 Plus

26 Oct

Apple has released an update to iOS 10, which alongside various bug fixes and refinements, adds beta support for ‘Portrait’ mode in the iPhone 7 Plus.

The Portrait mode feature is only supported by the dual-lens iPhone 7 Plus model running iOS 10.1, and is designed to replicate the look of shooting at a shallow depth of field – an effect traditionally limited to larger imaging formats. Although anyone with an Apple developer account has been able to shoot with the new mode for a while (we posted a gallery including some samples last month), iOS 10.1 represents the first truly public ‘beta’ test of the new feature.

Are you curious? Have you downloaded it? Did you jump straight to the comments section before you finished reading this paragraph? Let us know. 

Articles: Digital Photography Review (dpreview.com)

 
Comments Off on iOS 10.1 adds ‘beta’ support for Portrait mode to iPhone 7 Plus

Posted in Uncategorized


How to Take Your Portrait Photos From Good to Great with a Single Click

12 Oct

Do you enjoy portrait photography? Are you a Lightroom user? You’re going to love what we’ve just released today!

It’s our all new Adobe Lightroom® presets bundle: 101 Lightroom Portrait Presets.

NewImage
With our new presets pack, transforming your portrait shots is a breeze.

And for a limited time, the pack can be yours for the special introductory price of just USD $ 20 (that’s 60% off).

Check it out here.

In this comprehensive Portrait Presets pack you’ll get the following collections:

  • Art Series (7 presets): Get the look from the early 1900’s through to the 90’s.
  • Black and White (10 presets): A variety of black and white presets to give you that b&w portrait look.
  • Film Series (8 presets): Nothing beats the authenticity of film. These presets will re-create that professional film feeling.
  • Fix (20 presets): Fix a range of of issues including contrast, grain, highlights and sharpness.
  • Tone (14 presets): Change an array of tonal qualities.
  • Traditional Series (8 presets): Tweaks to give your portraits that classic look. Including Beach,
  • Outdoors, and Worn, amongst others.
  • Touch Up Kit: 37 brushes to help you touch up eyes, hair, lips and skin.

Created by professional photographer and author Rachel Devine, she’s done all the hard work for you so you can get the perfect edit for every portrait, without the fuss.

Here’s a short video of Rachel showing how easy it is to use these presets:

Simply apply the effect and adjust as desired… it’s fast and easy!

You’ll save a whole heap of processing time, while giving your portraits an instant “pop”. See Rachel demonstrate in the video on our product page.

Transform your photos in just one click. Pick up our 101 Lightroom Portrait Presets today – while we’re still offering it at the introductory price.

Please note: a copy of Adobe Lightroom is required to use these presets.

Also: Haven’t used presets before? No worries. Full instructions are included in the pack.

Lastly: like all our products this one has a 60 day satisfaction guarantee. If you buy it and find for whatever reason that it doesn’t suit your needs simply contact our support team and we’ll arrange a refund – no questions asked.

googletag.cmd.push(function() {
tablet_slots.push( googletag.defineSlot( “/1005424/_dPSv4_tab-all-article-bottom_(300×250)”, [300, 250], “pb-ad-78623” ).addService( googletag.pubads() ) ); } );

googletag.cmd.push(function() {
mobile_slots.push( googletag.defineSlot( “/1005424/_dPSv4_mob-all-article-bottom_(300×250)”, [300, 250], “pb-ad-78158” ).addService( googletag.pubads() ) ); } );

The post How to Take Your Portrait Photos From Good to Great with a Single Click by Darren Rowse appeared first on Digital Photography School.


Digital Photography School

 
Comments Off on How to Take Your Portrait Photos From Good to Great with a Single Click

Posted in Photography


Tips for Taking the Torture out of Extended Family Portrait Sessions

04 Oct

I have yet to meet someone who loves getting their picture taken with the whole extended family. The thought of getting all the dramatic aunts, crazy uncles, wild kids, and tired grandparents together and smiling all at the same time seems nearly impossible, and not at all fun. I know of many photographers who refuse to do big family portraits because they can be so unpleasant. I have grown to love big extended family portrait sessions throughout the years. You can too, whether you’re the photographer, or one of the silly cousins getting her photo taken.

Extended Family Portrait Session

Think of big groups as your own family

The first thing that helped me love extended family sessions was the way that I thought of them. Instead of a difficult crazy session, I try to think of them as my own family, and take the photos with love. Let me share a story that may change your mind about extended family sessions too.

A while ago I was asked to add a missing brother to an extended family photo. The entire family had been there when they had the photo taken, except for this one brother who couldn’t get off work. Months later, one of the other brothers tragically passed away. Their most recent family portrait wasn’t complete, and they’d never be able to get a new one.

So, I took this working brother to the same location, took a photo of him, worked him into the photo through the magic of Photoshop. I matched everything the best that I could, so they could have the last most complete family portrait. It made me realize how fragile life is, and how fragile families are. If I have an opportunity to capture a family right now, today, as they are, I’m happy to do it. You never know when or why that portrait may become priceless to them.

Not only are these photos precious and invaluable, but they can be a lot of fun, and not too difficult to pull off. Let me give you some tips to help.

Extended Family Portrait Session

Take charge, be bold, move fast

When you’re working with a big group of people, someone has to be in charge. That person is you, the photographer. This is not a time to be timid and quiet, hoping things will fall into place. As soon as you’re ready to start, get everyone’s attention. Taking charge right away will let them know that you are confident, that you know what you are doing, and that they can trust you. Smile a lot, and if it works for you, throw in some humor. Tell your group that if they will listen to you closely, and do everything you say, that it will be quick, painless, and even fun. Everyone there likes to hear “quick, painless, and fun”, so you’ll have their attention right away.

Don’t take a long time getting everything situated. Have everything scoped out beforehand, and have a firm idea of where and how you will place everyone. Know what order you will be photographing each group, and if you have any stragglers, kindly, but firmly move them toward the picture location. If there are a lot of small children, this is especially imperative. You will lose their interest and patience so quickly, so you need to take advantage of any time when they are even remotely cooperative. You won’t get any good photos when everyone is exhausted and sick of you, so you have to be done before that happens.

Extended Family Portrait Session

Add some personality

With a big group, it seems like you might only have one option – get everyone to look at you, and hope they are smiling. Many clients do want a more traditional family photo, very posed, with everyone looking and smiling. But try giving them a few photos with a little bit of their family’s personality. When you are working with so many people it’s really hard to get a perfect traditional photo anyway. Most of my clients know that isn’t really my style, so they are happy with the more fun, casual photos.

My favorite thing is to ask everyone to hug in to Grandpa and Grandma, or hug someone next to them. Set everyone up for the more formal photo, and once you’ve captured that, just ask them all to hug. Usually it feels silly enough that they start to laugh, and you get genuine laughs and connection.

Extended Family Portrait Session

Try different poses and positions

It can be a challenge to know how to arrange a really big family group. You could easily have four generations in one photo, which can add even more challenges with arrangements. Some families like family photos where they are all squished in together, in one big family group. I’ve had some that want them completely mixed up, where nobody is grouped into separate families. This is okay, but I find that most families like to at least be able to tell which small families within the group belong together. You can do this by just having each family stand next to each other, or you can even put gaps in between each family. I usually do both, so they have options to choose from later.

I usually place Grandpa and Grandma in the center then evenly distribute their children’s families on either side.

Extended Family Portrait Session

My style doesn’t involve a lot of props, so you won’t notice a lot of chairs and stools in my family photos. They are an option if you’d like to create different levels, but it usually takes a lot of time to get that set up, and your subjects lose patience fast. I prefer a more casual, natural look to something that looks very precise and contrived. Sometimes worrying about those extra things can cause a lot of stress for you, and for your families, and make the whole process more of a chore. But feel free to use them if it’s your style and preference.

Extended Family Portrait Session

Find suitable locations

If you want to have some seated photos, look for locations that have places to sit built in. I love rocks, logs, or even park benches. You can also have some people sit on the ground, some kneel, some stand, but again, be careful not to take so long over-posing that you lose their patience.

It can be difficult to find a place that will work for such a large group. Try to find locations with simple backgrounds that don’t detract from the faces. If possible, schedule the session during the early morning or evening, to take advantage of better lighting. Look for places that have large trees or buildings to filter the light. It’s much harder to make difficult lighting situations work with 30 people than it is when you’re just photographing one.

Don’t move around a lot with a large family once you’ve found a good spot. Find one or two good backgrounds, three if they’re really close to each other, and stick with them. This will keep their photo groupings more consistent with each other, and will make the session go much faster and smoother. Try getting 30 people to move quickly over to a different rock, and you’ll see what I mean.

Extended Family Portrait Session

Get all the break-off groupings

Once you’ve photographed the big huge family, it’s time to get all of the little groups. Keep this moving quickly, and be efficient moving from one group to the next. Here’s a list of the different groupings that I do:

  • Entire extended family
  • Grandpa and Grandma (Dad and Mom) alone
  • Dad and Mom with their children (siblings)
  • Dad and Mom with their children and children’s spouses
  • All the siblings
  • The siblings and their spouses
  • Grandpa and Grandma with the grandchildren
  • All the grandchildren
  • The sisters together
  • The brothers together
  • Each separate family

I don’t do every one of these every time. It depends on what the family wants. Also, I know every family is different, and there may not be Mom and Dad, or any grandchildren, etc. This is just to give an idea of how you might break the groupings up.

I try to do the whole family first, and then the smaller groupings. Because it’s hardest to get everyone paying attention and happy for the whole group, you want to get that in when everyone’s fresh. However, sometimes some of the families arrive before others. It’s a great use of time to take the photos of those families while you’re waiting for the entire group to get there. They’ll be happy that they’re finished early, and that they don’t have to sit around doing nothing while they’re waiting for the latecomers.

Extended Family Portrait Session

A few more tips

Remember when you’re working with big families, that letting go of perfection can save you, and them, from a miserable experience. Kids often don’t cooperate, and sometimes some of the family is really grumpy about being there for photos. Do the best you can, and let the rest go. If there are little ones not looking at the camera, or even crying, you are still capturing that family at this moment in time, and giving them a gift. They may end up treasuring the silly faces, and loving the memories of when one grandchild was going through his never-sit-still phase.

Direct the adults

Tell the parents and grandparents to do their best to continue looking at you and smiling, even if you are trying to get their kids’ attention. Many a good photo is ruined by a parent looking down and lecturing their child right at the moment when the child finally does look up and smile. If the adults are picture-ready at all times, then you will have a chance at catching the split second that their kid smiles, and they’ll be smiling too.

Extended Family Portrait Session

Shoot lots of the big group

Take LOTS of photos in a row with the big group. You may think that you have what you need, but then later when you look at the photos full size, you’ll realize that Uncle Bob blinked in every single one. If you take a lot of photos, one right after the other, you can do head swaps later if you need to open some eyes. If they’re taken at approximately the same time, it will be really easy to change the faces, because they’ll be in the same place in every photo.

Love your families

Lastly, remember to love the families you are photographing. They love each other, even through their faults and imperfections, enough to want to preserve a moment in their lives. This photo is so important to at least one person there. Important enough to go through all the hassle of gathering their entire family together in one place at one time. They are trusting you to give them this cherished gift. Consider yourself one of the family for that hour or so, and let your lens capture the love.

googletag.cmd.push(function() {
tablet_slots.push( googletag.defineSlot( “/1005424/_dPSv4_tab-all-article-bottom_(300×250)”, [300, 250], “pb-ad-78623” ).addService( googletag.pubads() ) ); } );

googletag.cmd.push(function() {
mobile_slots.push( googletag.defineSlot( “/1005424/_dPSv4_mob-all-article-bottom_(300×250)”, [300, 250], “pb-ad-78158” ).addService( googletag.pubads() ) ); } );

The post Tips for Taking the Torture out of Extended Family Portrait Sessions by Melinda Smith appeared first on Digital Photography School.


Digital Photography School

 
Comments Off on Tips for Taking the Torture out of Extended Family Portrait Sessions

Posted in Photography


How to Use 1 Natural Light Setup to Create 3 Different Portrait Looks

22 Sep

As a portrait photographer, the majority of my work is shot on location. This can be outdoors or in my clients’ homes or places of business. I mostly shoot using natural light and have become adept at finding the best light source in any location as well as creating backgrounds that won’t interfere with the subjects. In this tutorial, I want to show you an easy, natural light portrait setup you can recreate in your own home. Simply by repositioning yourself and your model, you can create three distinctly different portraits from this one setup.

one natural light setup - 3 looks

No special lighting or fancy equipment is needed, and the techniques are straightforward and easy to master. Experiment to create different looks using various backdrops such as plain walls or sheets, or different outfits for your subject. You can also get different effects by changing your lens, distance to the subject, and experimenting with different apertures.

Equipment

Below is a list of the items I have used for this setup and suggested substitutes:

  • SHEER CURTAIN or FABRIC: You can buy a sheer curtain or length of fabric from any fabric or haberdashery store. I picked this one up from the clearance table at my local Spotlight store (Australia) for under $ 20.
Image showing basic natural light portrait setup using a white cloth

A white sheer curtain or large sheet of sheer fabric will filter the window light.

  • REFLECTOR: I have a circular, five-way reflector that follows me everywhere. Each side has a different colour; white, silver, gold, and black, plus a diffuser. It folds into a neat little disc, is lightweight, and can be thrown into the back of my car. You will get endless use out of a portable reflector, and at around $ 30 from Amazon, it’s a worthwhile investment. However, if you don’t want to rush out and buy a reflector (or wait for your order to arrive before you start shooting) a large piece of white card, polystyrene, or foam board, will work equally well.
Image showing basic natural light portrait set-up with a reflector

This reflector was a great investment at around $ 30. It is lightweight and folds up compact to the size of a dinner plate.

  • BACKDROP CLAMPS: another Ebay or Amazon purchase, my backdrop clamps come in packs of 12 for under $ 20. These are infinitely useful for creating makeshift studios. In this instance, I used them to attach the sheer curtain to the rolled-up window blind. You can also use masking tape to stick the curtain directly onto the window, or use heavy-duty stationery clips.
clamps can be helpful for a natural light portrait setup

Backdrop clamps can be purchased inexpensively from Ebay or Amazon and similar.

Lens

My favourite portraiture lens is the Canon EF 85mm f/1.8, but you can use a 50mm, a 100mm – whatever works in the space you have. A tighter space will require a shorter focal length.

Basic portrait setup

Look for a window or glass door with a good strong light source coming through, so that you can shoot at the lowest possible ISO. If the window has a sheer curtain, pull it across to filter the light. If there is no curtain, you can attach a piece of sheer fabric to the window using the backdrop clamps or masking tape.

As you can see, the setup couldn’t be simpler. This is the corner of my living room, with sliding glass doors to the left of the shot. The strong afternoon light is filtered with a sheer curtain clipped to the bottom of the roller blinds. I have closed the curtains in the adjoining room to create a dark background for my subject. If your room layout doesn’t allow this, you can hang a sheet or large piece of coloured fabric behind your subject, or just use a plain wall.

natural light portrait setup background

The setup couldn’t be simpler.

As you can see in the setup below, I brought my model forward (away from the open door behind her). This is to ensure she has good light on her face, and that there is sufficient distance between her and the room behind her to make sure it is completely out of focus. In this pull-back shot, you can see some detail in the room behind her. However, in the first pair of portraits, further along, you can see no background detail. The room behind looks like a studio backdrop.

Add a reflector

If you are going to use a reflector, you’ll need someone to hold it for you. If there is no-one to help, try propping it on a chair. Let your creative photographer’s brain get to work and figure out a creative solution.

natural light portrait setup reflector and assistant

You’ll need an extra person to hold the reflector – in this case, my husband!

Portrait #1: side lighting and a reflector

This is my most-used natural light setup. Side lighting contours and shapes the face, and is flattering for most subjects. If your subject is male, or if you want to create a moodier portrait, you can try moving the reflector further away from your model or removing it altogether. This creates more contrast by increasing shadow on one side of the face.

Your model can sit, stand, or even lie on the floor if the window is low enough. How you position your model’s face and body is up to you. To recreate the look below, your model’s face needs to be at a 90° angle to the main light source (the window). Her body turns 45º away from you. The door behind my model is opened and I darkened the background room to minimize distracting elements. Position the reflector on the shadowed side of her face, to bounce the light back and fill in the shadows

In the photos below, the image on the left is shot without a reflector. The one on the right is shot with a reflector. The effect in this example is subtle because the light in this room is already balanced somewhat by small, high windows on the opposite wall to the main window. In the photo on the right, you can see how the reflector brightens the face and fills in the shadows, particularly the under-eye shadow of her left eye. It also brings out more detail and highlights in her hair and improves separation from the background.

natural light portrait setup with and without reflector

Left (no reflector): ISO 320, f/4, 1/200th. Right (with reflector): ISO 320, f/4, 1/320th.

Portrait #2: shooting into the backlight

I love this technique for photographing women and girls. It creates soft, non-directional  lighting on the face, so is flattering to every age group. And the backlighting creates a gorgeous halo around the hair. This works especially well if the model wears her hair out, or wears a dress with some sheer elements – think darling little girls in fairy costumes and tutus!

Technique for backlighting

Using the same window setup as before, your model sits or stands with her back to the window. Position the reflector in front of her, bouncing the light back into her face. Your light meter will try to read the light coming from the window, and will underexpose your model’s face. You can obtain the correct exposure by getting in close to her face to set your exposure. You might also bracket your exposures and check the back of the camera until you’re happy with the result (review the histogram but note that the background area may show clipping – that’s okay). To get the exposure right on the face, you will lose detail in the background, which is the idea!

natural light portrait setup backlighting

ISO 320, f/4, 1/160th

The photo below is a yoga instructor posing in front of a window on the floor of her studio. The backlighting is beautiful through her hair, and the warm tones of the timber floor reflect back on her skin to give her a golden hue. The lighting technique is identical to the previous photo. But in this photo, I have allowed the curtain and window to be visible as I think it adds something to the scene.

natural light portrait setup backlighting

ISO 500, f/5, 1/80th.

Portrait #3: shooting with front-on light

For this set-up, the sheer curtain remains in place. Your model faces the window, and you position yourself between your model and the window. If you are taking a wider shot than the example below, you may be able to bounce light into the back of her hair with a reflector.

Frontal lighting removes virtually every shadow on the face. It brings out detail and colour in the eyes, and can be quite striking with the right subject. However, this technique is not for everyone. It can give the face a flat, two-dimensional appearance, and if the light source is too strong, your subject will squint. This lighting tends to highlight every imperfection, which is fine if your subject happens to be young and gorgeous. But, it can be too harsh for a mature model, or someone with a lot of blemishes.

Examples of front lighting

The photo below of a young girl snuggled into a faux-fur hood has been enduringly popular on my social media sites. It was shot using this lighting technique in warm, late-afternoon light.

natural light portrait setup front lighting

ISO 400, f/4.5, 1/200th.

The photo below of my daughter, sun-kissed after a day at the beach, was photographed with front-on lighting. As we were  on vacation and I didn’t have my usual bag of tricks at hand, I didn’t use a sheer curtain to filter the light. As you can see, the highlights are more pronounced than those in the first photo, but the effect is similar.

natural light portrait setup front lighting

ISO 250, f/3.5, 1/125th.

Now it’s your turn

I’d love to hear how you get on trying this setup at home. Please post any questions, comments or examples of your portraits in the comments section below.

Don’t forget, there is also our dPS Facebook Group, which you can join to share your photos and get a critique from other dPS readers.

googletag.cmd.push(function() {
tablet_slots.push( googletag.defineSlot( “/1005424/_dPSv4_tab-all-article-bottom_(300×250)”, [300, 250], “pb-ad-78623” ).addService( googletag.pubads() ) ); } );

googletag.cmd.push(function() {
mobile_slots.push( googletag.defineSlot( “/1005424/_dPSv4_mob-all-article-bottom_(300×250)”, [300, 250], “pb-ad-78158” ).addService( googletag.pubads() ) ); } );

The post How to Use 1 Natural Light Setup to Create 3 Different Portrait Looks by Karen Quist appeared first on Digital Photography School.


Digital Photography School

 
Comments Off on How to Use 1 Natural Light Setup to Create 3 Different Portrait Looks

Posted in Photography