RSS
 

Posts Tagged ‘Plan’

How to Do a One Light Portrait Setup and Use it as Your Back-up Plan

21 Apr

one-light-beauty-setup-3320

When photographing people, every session is different and every subject is different. This leads to a lot of scope when it comes to lighting choices and experimentation. This variety is fantastic, and it’s a large part of why portraiture is such a rewarding pursuit.

Unfortunately, with too much experimentation, it is all too possible to end a session with a collection of sub-standard images. Yes, this exactly how to grow and develop as a photographer, but where does that leave your subject? Often enough, this situation means that you’ve gotten what you need from the session, chiefly experience, but the subject is left with less than stellar photos for their time. This isn’t much of a problem if you’ve wrangled your kids to sit for you, or if you have paid someone else to pose for you. If you’ve been paid for this portrait session, however, this becomes problematic and can be devastating to your future efforts.

A good way to alleviate this is to always include a technique that you’ve practiced thoroughly. Doing this may not ignite your creative spark, but once it’s done, you can experiment until your heart’s content, while safe in the knowledge that you will still have something usable at the end of the day.

one-light-beauty-setup-3251

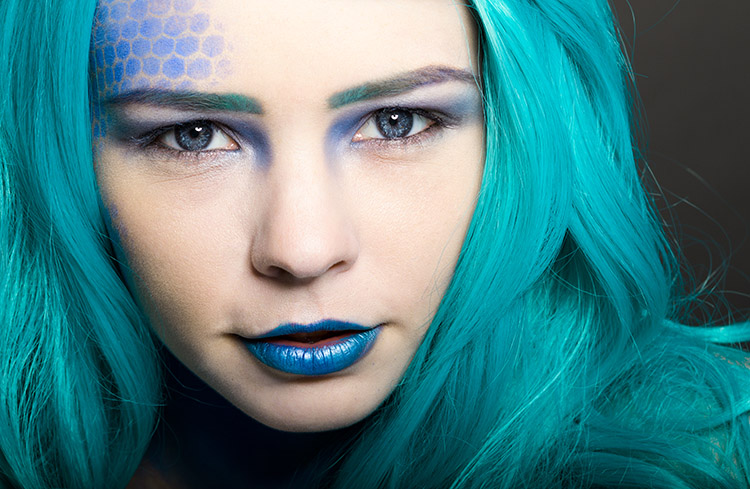
This article will give you a simple, yet solid, one light technique that works with strobes, flashguns (speedlights) and even window light. It will work with just about any modifier and suits men, women, children, and other subjects just fine.

Equipment

Here’s a list of what you need:

  • A light source: Either flash or window light will work. In terms of modifiers, beauty dishes and softboxes are a great starting point.
  • A white reflector: Don’t have a dedicated reflector? A sheet of white poster board or foam core is a perfect and cheap substitute.

Set up

First, have your subject stand or sit where you need them. If possible, keep them at least five feet from the background. Place your light source directly in front of them, between two and four feet away (60-120cm). Angle the light source (if using flash) so it’s pointing directly at your subject. Watch the shadows falling under their nose and mouth. For this technique, you’re looking to minimize the contrast on your subject’s skin. If the shadows are too long, lower your light source until they are minimized (also make sure you can see the light in their eyes as a catch-light).

Place your reflector directly against your subject, and parallel to the ground at waist level. For ease, you can place it on a stool or a card table. If your subject is sitting, just have them hold it across their knees.

one-light-beauty-setup-diagram

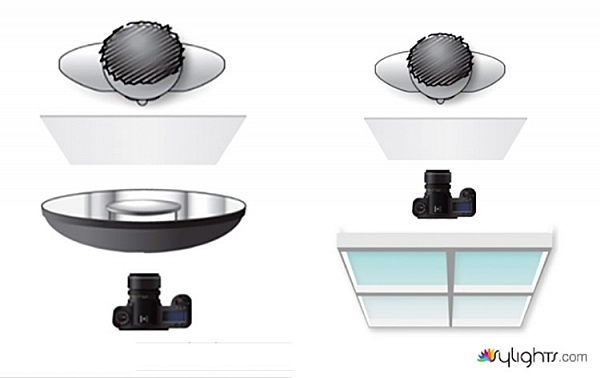
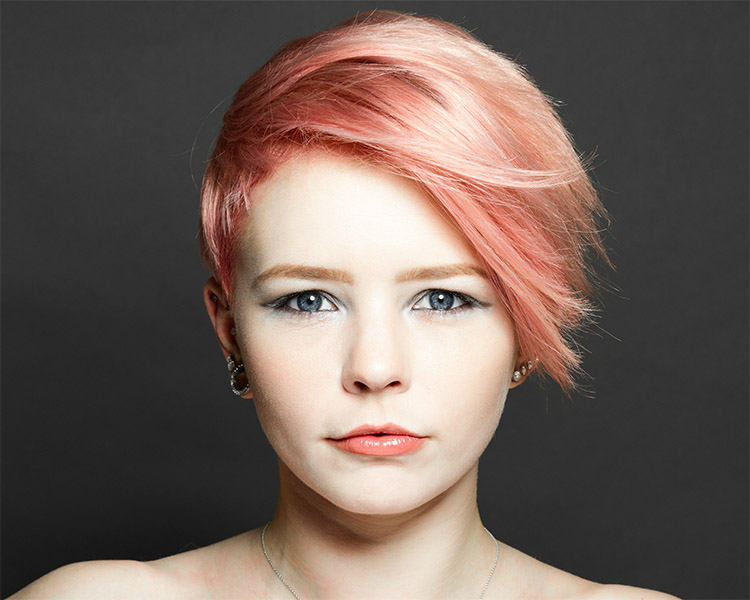
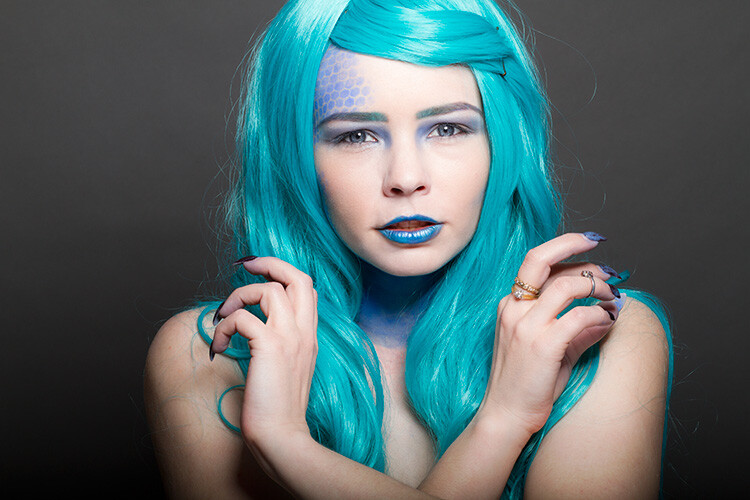
Because the light source will be so close to your subject, you will need to shoot from directly underneath it. Calculate or meter your exposure and take a test shot. If all is well, you should have a good, clean portrait with soft light.

one-light-beauty-setup-3205

Backgrounds

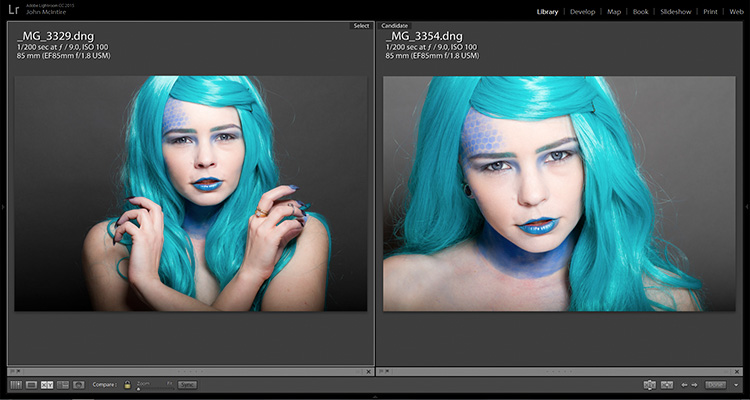
You can change the way your background appears in the image by moving your light source if you’re using flash, or by moving your subject if you’re using window light.

With flash, to get a darker background, you simply move your light source closer to your subject. To get a lighter background, move your light source away from your subject. Moving your light source will require you to change your exposure. You can do this with your aperture settings or on the flashes themselves (turn the power up or down accordingly); it’s your choice.

With window light, you’re forced to move your subject instead. For a darker background move your subject closer to the window. For a lighter background, move them farther away. As with flash, this will also result in changes to your exposure. This time you can choose between shutter speed and aperture.

one-light-beauty-setup-3354-2

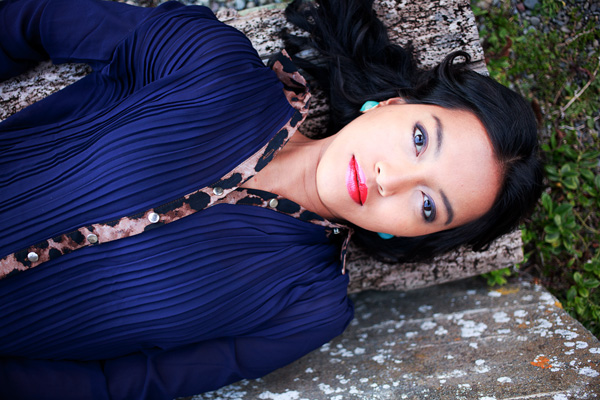
Farther from the window

one-light-beauty-setup-3329

Closer to the window

one-light-beauty-setup-comp

You should also be aware that the softness of the light is changed when you adjust the distance between your subject and the light source. If the distance between your light source and your subject decreases, the light will be softer. If that distance increases, the light will be harder.

Tip: If there are shadows falling on the background in your frame, your subject is too close to the background. Try moving your whole setup away from the background a few feet.

Angle of light

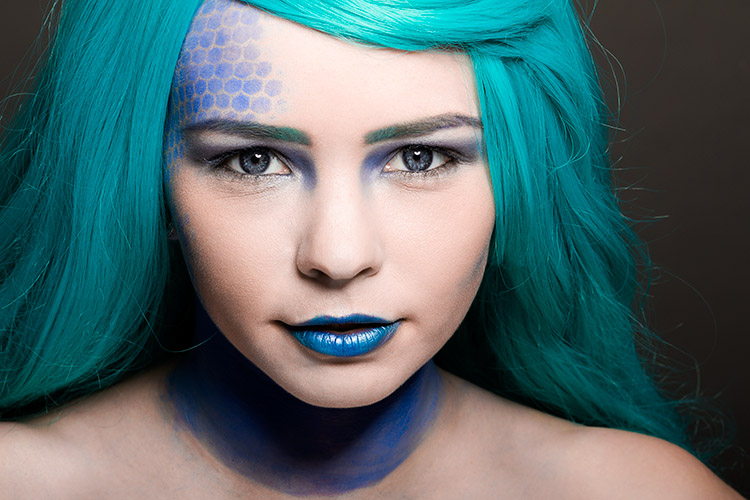
You can place your light as high as you want and still get good results; however, for really soft, bright skin you will want to minimize the contrast in blemishes and skin texture. To do this, make sure your light is only slightly higher than your subject, and pointing directly at them. As above, watch for the shadows under the mouth and nose. If they’re long and pronounced, try lowering your light until they disappear.

Window light

If you’re using window light for this technique, the biggest thing to watch out for is you. Because you are lighting your subject from the front, it is all too easy to find yourself blocking your light source. With extremely large windows, this isn’t much of a problem, but with a window in an average home, it can be a pain. One way to sort this is to have your subject sit. That way you can sit, squat or kneel and avoid blocking any light.

In the end

one-light-beauty-setup-3318

This technique may seem simplistic in writing, but it is effective and it yields good results. It also takes only a few attempts to nail down. By adding this technique to your toolkit, you’ll be giving yourself something solid to fall back on, should things not go to plan in other ways.

If you decide to give it a go, please feel free to share your results or ask any questions you may have.

People photography week

This week on dPS we’re featuring articles all about different kinds of people photography including portrait, event and travel photography. See all the previous ones below, and watch for more people photography articles over the next few days.

  • How to Take Low Key Head-shots

googletag.cmd.push(function() {
tablet_slots.push( googletag.defineSlot( “/1005424/_dPSv4_tab-all-article-bottom_(300×250)”, [300, 250], “pb-ad-78623” ).addService( googletag.pubads() ) ); } );

googletag.cmd.push(function() {
mobile_slots.push( googletag.defineSlot( “/1005424/_dPSv4_mob-all-article-bottom_(300×250)”, [300, 250], “pb-ad-78158” ).addService( googletag.pubads() ) ); } );

The post How to Do a One Light Portrait Setup and Use it as Your Back-up Plan by John McIntire appeared first on Digital Photography School.


Digital Photography School

 
Comments Off on How to Do a One Light Portrait Setup and Use it as Your Back-up Plan

Posted in Photography


Macphun offers Aurora HDR Pro 3-month payment plan

27 Feb

Macphun has announced a new 3-month payment plan for Aurora HDR Pro, the image editing application for Mac OS X it launched in November. Rather than requiring the full $ 99 USD price at the time of purchase, the payment plan allows users to pay $ 33 per month for three months, while still gaining immediate access to the software license.

According to Macphun, Aurora HDR has been downloaded more than 150,000 times since its launch. The payment plan doesn’t involve a subscription and does not charge interest. The company’s ‘bonus of the month’ gift to customers is also provided to users who opt for the 3-month installment.

The payment plan is now available through the Aurora HDR website.

Articles: Digital Photography Review (dpreview.com)

 
Comments Off on Macphun offers Aurora HDR Pro 3-month payment plan

Posted in Uncategorized


Ricoh announces new service and support plan for Pentax 645Z

28 Oct

Ricoh Imaging US has announced the Medium Format by PENTAX Advantage Program, a new support and service offering for the Pentax 645Z camera. Under this program, camera owners are given three years of extended service and support from the date of purchase, as well as loaner lenses and camera bodies and a toll-free support number. Read more

Articles: Digital Photography Review (dpreview.com)

 
Comments Off on Ricoh announces new service and support plan for Pentax 645Z

Posted in Uncategorized


Western Digital announces plan to acquire SanDisk

24 Oct

Yesterday, Western Digital announced plans to acquire SanDisk Corporation, a company that specializes in memory chips and SD cards. According to a statement released on Wednesday, WD will purchase all of SanDisk’s shares in a deal totaling about $ 19 billion; a combination of cash and stock will be paid. Read more

Articles: Digital Photography Review (dpreview.com)

 
Comments Off on Western Digital announces plan to acquire SanDisk

Posted in Uncategorized


Floating Blue: Bold Plan to Expand Dense Cities into Open Seas

23 Sep

[ By WebUrbanist in Conceptual & Futuristic & Technology. ]

floating ocean city ecosystem

Ocean cities are a longstanding Utopian dream, but many such schemes fail to address the immediate need of cramped urban centers, many of which around the world are bordered and constrained by large bodies of water.

floating city design strategy

Blue 21, a Dutch architecture and design group, aims to sustainably extend such cities into adjacent lakes and oceans, alleviating the stress on existing metropolitan areas and providing vital resources (like space to grow food) in close proximity to urban cores. The team has experience building floating homes in the Netherlands but wants to take their experience global and work at a larger scale.

floating city on the water

These modular buoyant extensions can be added to over time and used to grow algae, veggies, crops and seafood, producing food and biofuels to support existing populations on land.

floating city blue revolution

At the same time, they can serve to productively process and recycle city wastes and absorb emissions, becoming a productive rather than consumptive part of the regional ecosystem. “As an integrated concept it proposes floating development that can be ‘plugged in’ to existing cities and help them recycling waste nutrients and CO2 that often end up in the environment, polluting it.”

While Blue 21 may not be a solution on the immediate horizon as yet, it represents an approach that bridges the gap between fantastical floating cities and more realistic solutions that engage accessible stretches of ocean. “We are Blue21, starting a Blue Revolution. This is how: by building world’s first floating city with a positive impact on nature. Because we believe our future is on the water for seven reasons: 1. We are running out of land, 2. Cities on land are vulnerable, 3. Water will save us from our addiction to fossil fuels, 4. Water is the new oil, 5. Water is an innovation playground, 6. We can actually have a positive impact, 7. We can do this, now.”

Share on Facebook


[ By WebUrbanist in Conceptual & Futuristic & Technology. ]

[ WebUrbanist | Archives | Galleries | Privacy | TOS ]


WebUrbanist

 
Comments Off on Floating Blue: Bold Plan to Expand Dense Cities into Open Seas

Posted in Creativity


7 Major Elements of Photography Business Plan

06 Jul

Did you know that entrepreneurs who create a proper business plan are usually two times more successful in developing and growing their business than those who have no business plan? This is according to a study conducted by Palo Alto Software. Just as you wouldn’t typically begin a photo shoot without proper lighting and gear setup, starting your own business Continue Reading

The post 7 Major Elements of Photography Business Plan appeared first on Photodoto.


Photodoto

 
Comments Off on 7 Major Elements of Photography Business Plan

Posted in Photography


The Dryline: BIG Plan Fights NYC Floods with Waterfront Park

24 Mar

[ By WebUrbanist in Architecture & Cities & Urbanism. ]

dryline manhattan park view

A huge infrastructure project designed to prevent future Hurricane Sandy-style devastation, the Dryline is a perfectly-named solution for a city already sporting a successful High Line and an underground Low Line currently under construction. In the wake of that devastating super-storm, over 300,000 homes were left damaged or destroyed and nearly 20 billion dollars of destruction was caused in total – the first section of the Dryline is slated to cost a few hundred million, which in contrast does not seem like so much money.

berm

coastline

Developed by Bjarke Ingels Group (BIG), the scheme continuous to evolve with each iteration. This latest video illustrates many of the mechanisms of action through easy-to-understand sketches and diagrams. It also features interviews with New Yorkers about their vision for a greener southern tip for Manhattan.

active

Designed to be deployed incrementally, the grand plan involves many discrete steps, each intended to shore up the lower portion of the city – the place that takes the brunt of incoming tides. The individual interventions vary, from berms that double as parks to sliding barriers that move into position during unusually high tides. Ultimately, “the Dryline imagines a landscaped buffer stretching all the way from West 57th Street, looping down to the Battery and back up to East 42nd Street, bestowing Manhattan with a protective green cushion.”

community active space

community bike space

At the same time, the design follows classic principles of urban landscape pioneers like Robert Moses and Jane Jacobs, taking this environmental challenge as an opportunity to create more park and civic space. Per The Guardian, “With a sprinkling of fairy-dust, the shoreline becomes furnished with undulating berms and protective planting, flip-down baffles and defensive kiosks, promenades and bike paths, bringing pedestrian life worthy of Lisbon or Barcelona to the gritty banks of Manhattan.”

dryline berm section

dryline green space fall

BIG is a firm known for thinking large and this project is no exception. Then again, lessons learned from the other ambitious urban projects (like NYC’s High Line) can be applied here: built it piece by piece to reduce one-time costs and provide room for adjustment, and take citizen input into account. In the end, anyone who has walked the south edge of Manhattan knows it is a disjointed and, in many places, unwelcoming space – there is a huge opportunity for a new kind of part to provide connectivity and green space from this disparate set of urban landscapes.

dryline coastal glass sections

nyc manhattan dry line

green park plan

“The Dryline consists of multiple but linked design opportunities; each on different scales of time, size and investment; each local neighborhood tailoring its own set of programs, functions, and opportunities. Small, relatively simple projects maintain the resiliency investment momentum post-Sandy, while setting in motion the longer-term solutions that will be necessary in the future.”

Share on Facebook


[ By WebUrbanist in Architecture & Cities & Urbanism. ]

[ WebUrbanist | Archives | Galleries | Privacy | TOS ]


WebUrbanist

 
Comments Off on The Dryline: BIG Plan Fights NYC Floods with Waterfront Park

Posted in Creativity


NPPA and World Press plan ethics symposium following contest disqualifications

26 Feb

The National Press Photographers Association and World Press Photo plan to hold a symposium later in 2015 to talk about ethics in photography, following news that 20% of the photos entered in the World Press Photo contest were disqualified after reaching the penultimate round, due to digital manipulations of some sort being discovered. Meanwhile, the NPPA has called on the photographers disqualified from the contest to release their photos to the public. Read more

Articles: Digital Photography Review (dpreview.com)

 
Comments Off on NPPA and World Press plan ethics symposium following contest disqualifications

Posted in Uncategorized


How to Plan the Perfect Portrait Shoot

22 Apr

Natural lIght portrait

In my last article I gave you five reasons to use natural light for portraiture. The next step in creating the perfect portrait shoot is planning. The more details you figure out in advance, the more likely you are to come away from the shoot with some beautiful portraits to make you proud.

Generating ideas

The creative side of portrait photography is something that some photographers seem to find easy, and others really challenging. One approach to generating ideas is to look at the work of others and let their portraits inspire you.

You’re probably familiar with the main photo sharing sites already (Flickr, 500px and 1x) and there’s no doubt that you will find plenty of inspiration if you take the time to search them. To help you out I’m going to give you a short list of portrait photographers and websites to look at. The work you will see here will open your eyes to the possibilities within the world of portrait photography.

For high quality black and white portraits take a look at the work of Betina la Plante, Eduardo Izq and Phil Sharpe (Phil has a lot of colour portraits in his portfolio too).

For beautiful colour portraits view the portfolios of Cristina Hoch, Alex Benetel, Alessio Albi, Emily Soto, Ling Li, Anna Karnutsch and Sarah Ann Wright. You can gain greater insight into how some of these photographers work by checking out my interviews with portrait photographers.

Other websites where you can see more work by portrait photographers are Faded & Blurred (leans towards the fine art and documentary side) and The D Photo (leans towards the creative side).

Creating mood boards

If you’ve had a good look through some of those links you’re probably feeling a little confused. That’s no surprise, I selected the photographers because they represent a wide variety of styles and techniques. So, how do you make sense of it all?

My favourite technique is to create a mood board with Pinterest. A mood board is a place where you gather photos that you like in order to communicate the feel or mood that you want to create. You’re not copying the photos you’ve added to your mood board, but using them for inspiration and to communicate to potential models what you’d like to achieve.

Creating mood boards is easy with Pinterest. You can make as many as you like, pin photos and move photos between different boards. Here is one of mine as an example, containing black and white portraits of men or this one on the dPS board – Portrait Inspiration.

Mood boards are also a good way to get a handle on what sort of portraiture appeals to you. When I look at my mood board of black and white portraits of men, it tells me that I like dark, moody portraits taken with natural light. As you look at your own mood boards you will see patterns emerge as to what style of portrait appeals to you. Use this feedback to inspire your portrait shoots.

Finding locations

Finding locations depends on where you live and the style of portrait photography you’d like to pursue. You may shoot in a studio and that makes the decision easy. Others may prefer to shoot outside, utilizing local beauty spots and other interesting locations. Here are some things to consider:

Are you looking for an urban environment or a rural one? If your mood boards contain photos taken in natural environments like forests or fields, then that is the sort of location you should look for. Going back to my mood board of black and white portraits, I can see that I have mostly chosen ones taken in gritty urban environments. I need a similar location to create portraits consistent with the feel of the images in this mood board.

Natural lIght portrait

The background in this photo was a bush, giving it a rural feel. Can you imagine how different this portrait would be if it had something like a concrete wall as a background? The atmosphere would be completely different.

How public or private is the location? You may prefer quiet places without many people around where you can concentrate on your portrait shoot.

Choose a lens

What lens will you be using? This is important when choosing a location. If you use a wide-angle lens, you will be including a great deal of the location in the photo. If you use a telephoto lens, you may only utilize a small part of the location, and that may be out of focus if you shoot at a wide aperture. Telephoto lenses give you more freedom when selecting locations because they can transform a small area such as a fence or wall into a beautiful background.

Natural lIght portrait

The portrait on the left was taken with a wide-angle zoom (focal length 26mm) and the one on the right with a short telephoto lens (85mm). Can you see how the focal length affects the background? Wide-angle lenses include more of the background, therefore you need a location suitable to this approach. Telephoto lenses include much less, and can turn mundane locations into interesting backgrounds.

Read my article How to Choose the Perfect Portrait Lens for more information on this topic.

What will the light be like at your location when you are there? Think about what time of day you will be shooting, and where the light will be coming from. The weather is a major factor, the nature of a location and its suitability for portrait photographer depends on both the weather conditions and time of day.

Natural lIght portrait

This portrait was taken at the end of the day as the sun was setting, casting a beautiful soft light with a red glow over the scene.

Build a dossier of locations

With these things in mind build up a mental dossier of locations close to where you live that you can use for portrait shoots. Keep your eyes open when you are out and about and you will find yourself seeing the potential of locations in a new way.

Natural lIght portrait

I took this portrait in a children’s playground. Every day places like this can become interesting locations. Take note whenever you find somewhere new that could one day be used for a portrait shoot.

Finding models

The final step is finding models to work with. By now you should have a fairly good idea of what type of portraits you’d like to create, and where you’d like to take them. Now you need a model to make that happen.

You may be lucky enough to have friends or family members who would make good models. If have to search a little harder, a good place to start is Model Mayhem. There are other websites where models and photographers can connect, but Model Mayhem is my favourite because it lets you search by location. You can centre the search around the city or town you live in, and save time wading through profiles of models from other parts of the country.

The good thing about websites like Model Mayhem is that its members are people genuinely interested in modelling. You will find that the models who come up in your search range from inexperienced to professional. You may feel most comfortable looking for somebody whose experience matches yours. For example, if you are new to portrait photography then you may feel a little intimidated by an experienced model, and prefer to approach somebody who is also starting out.

Bear in mind that if you have the budget, one advantage of using professional models is that you will benefit from their experience and expertise with posing. Inexperienced models will expect you to direct them. Depending on the style you are pursuing, you may learn quicker and create better portraits with a professional.

There are downsides to websites like Model Mayhem. Some of the models you approach won’t respond and others won’t like your style of photography. Some might let you down at the last minute. But on the whole, my experience has been positive, and I’ve found some of my best models here.

Here are a couple of other ideas that photographers I know have used successfully for finding models. One put up a sign at her local university (where she was also a student) and found models that way. Another friend of mine had some business cards made and approached people in the street to ask them if they would like to model for him. Not all responded, but he found a few good models that way.

By the way, if you’re a model based near Wellington in New Zealand, then feel free to get in touch. Contact details on my website (link below).

Perhaps the readers can share some of their experiences about searching for models. I would like to hear your stories, both the positive experiences and the negative.

Putting it all together

Hopefully these ideas have given you a head start in planning the perfect model shoot. What are your experiences with creating portraits? What advice would you give other photographers? Let us know in the comments.


The Natural Portrait photography ebookThe Natural Portrait

My ebook The Natural Portrait teaches you how to take beautiful portraits in natural light. This 240 page ebook, published by Craft & Vision, takes you through the entire process of natural light portrait photography through from finding a model, deciding where to shoot, working with natural light and post-processing your images. Click the link to learn more or buy.

The post How to Plan the Perfect Portrait Shoot by Andrew S. Gibson appeared first on Digital Photography School.


Digital Photography School

 
Comments Off on How to Plan the Perfect Portrait Shoot

Posted in Photography


Car-Free City: Hamburg Announces Audacious 20-Year Plan

14 Jan

[ By WebUrbanist in Architecture & Cities & Urbanism. ]

car free green city

Germany may be known for its green political party and sustainable energy focus, but this daring plan to eliminate the need for automobiles entirely across the country’s second-largest metropolis is fresh and bold by any standard.

car free signs colors

Hamburg’s Green Network Plan (Gruenes Netz) is a two-decade strategy to connect the whole urban center and its outskirts via bicycles and pedestrian routes, rendering vehicles redundant and bringing green space effectively right to the doorstep of every city dweller.

car free urban layout

Major parks, playgrounds, gardens already make up 40% of the city and many form contiguous axes accessible without motorized transit, so this direction is in many ways an extension of their existing approach. At the same time, this proposal goes beyond green rings or environmental zones toward a new type of environment-first urban planning.

car city context paths

Hamburg is well aware of the dangers of climate change, having experienced a nearly 10-degree Celsius rise in temperatures in just over half a century, as well as water levels that have gone up by close to 20 centimeters (expected to increase another 30 by 2100).

car free connections images

Beyond climate change-combating benefits, however, its architects note “It will offer people opportunities to hike, swim, do water sports, enjoy picnics and restaurants, experience calm and watch nature and wildlife right in the city, [reducing] the need to take the car for weekend outings outside the city.” Effectively, the vision is of a city that serves all needs and makes traveling to escape its cramped urban confines a problem of the past.

Share on Facebook


[ By WebUrbanist in Architecture & Cities & Urbanism. ]

[ WebUrbanist | Archives | Galleries | Privacy | TOS ]


WebUrbanist

 
Comments Off on Car-Free City: Hamburg Announces Audacious 20-Year Plan

Posted in Creativity