RSS
 

Posts Tagged ‘Photoshop’

How to Use Photoshop to Create Milestone Photos of Babies

22 Jan

Buried deep in my parents’ basement are boxes of slides with pictures of my siblings and I, when we were kids, all taken with my dad’s Minolta DSLR that has long since been lost to the ages. I have a few scans of those early photos but most of them won’t see the light of day anytime soon. Thus the images that marked the passage of time for me, my sister, and my three brothers are few and far between.

Baby milestones Photoshop background

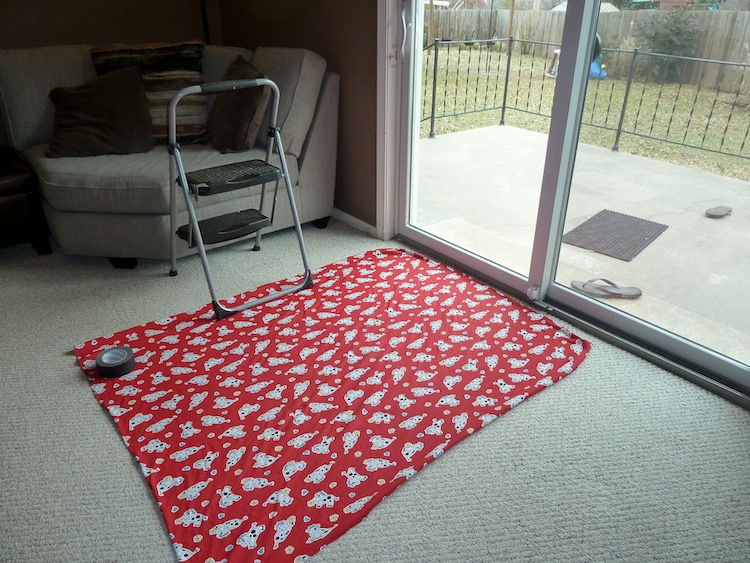
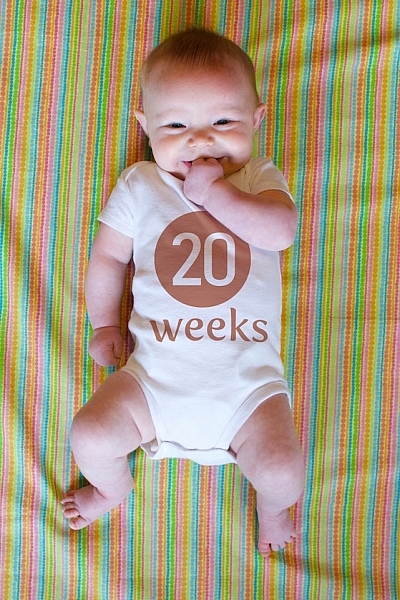
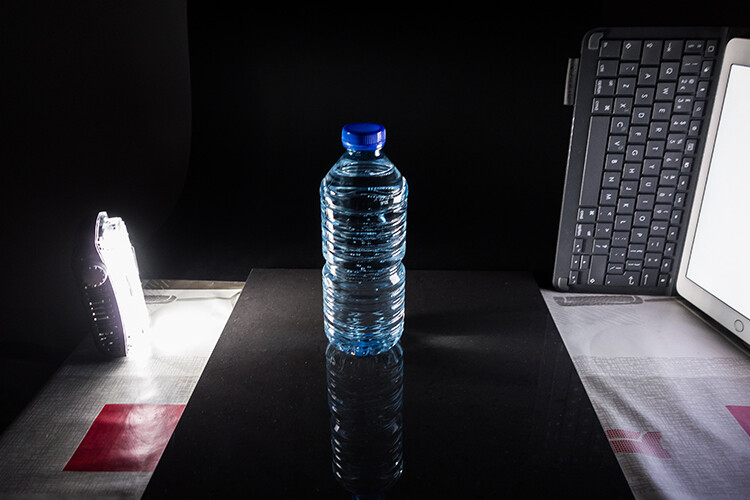
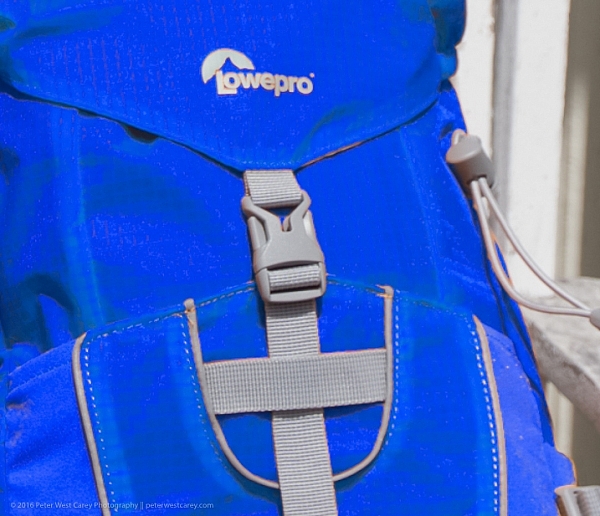
This picture taken with a pocket camera and the fabric was purchased at a thrift store.

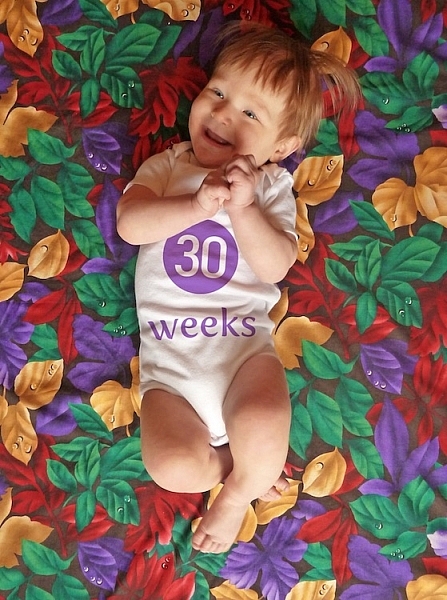
Thankfully modern technology and the prevalence of digital cameras means babies born today will likely have no shortage of images to mark their early years. One of the most common methods of documenting milestones is to take pictures at weekly or monthly intervals. Often these are augmented with some type of decoration or adornment to indicate the passage of time (e.g. a small chalkboard, a giant sticker on the kid’s tummy, or a number stamped in the corner of the picture).

There is an incredibly easy, fun, and highly effective way to do this in Photoshop. It only takes a few minutes and produces great results, even if you have never used this program before you should be able to figure it out.

Preparing for the photo shoot

My wife and I got this idea after reading a post on the popular do-it-yourself blog Young House Love but have tweaked it to fit our style. To get started you will need a few things, many of which you probably already own:

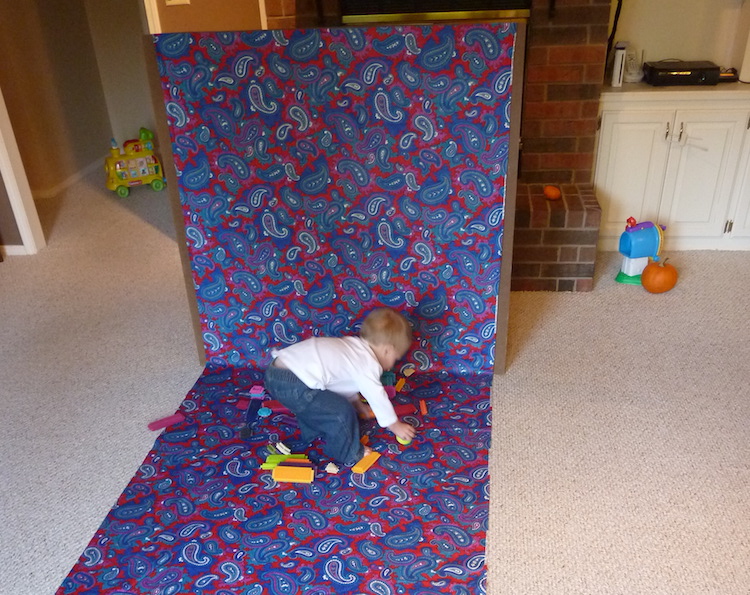
  • Fabric with big colorful prints; Finer-detailed prints are okay, but the bigger and more prominent the pattern, the better it will look when paired with your baby. Don’t spend much money on these since you’ll need a lot if you do a different fabric each week. Pro tip, let the grandparents know you’re in need of fabric. Ours were thrilled to go shopping at thrift stores and send us what they found.
  • White onesies; A t-shirt works better after the first year, but until that time onesies are best because they stretch nice and even across the baby’s body leaving you with fewer wrinkles to contend with in the post-processing phase.
  • Blue painter’s tape;  Used to hold the fabric down to the ground.
  • A big window; Or a glass door, or another similar surface to let in a lot of light.
  • A step stool; so you can get a higher angle.
  • Tape to hold the fabric in place; Blue painter’s tape will work but I like to use Gaffer’s tape (I recommend this brand which is stronger and leaves no residue on the carpet when you pull it off.)
  • A reflector;  We didn’t buy one of these until well into our second child and it’s amazing how much a reflector helps get nice even lighting.
How to Use Photoshop to Create Milestone Photos of Babies - setup

It doesn’t take much to prepare for this type of photo shoot.

The session

The process works best with two people; one to take pictures and someone else to do multiple jobs like hold the reflector, smooth the blanket, and soothe the baby. Position your child with his or her feet near the light source (i.e. giant window or glass door) and have your helper hold the reflector by the baby’s head to bounce light back. Then get up on the stepstool and start taking pictures! Babies wriggle and squirm around a lot so don’t worry about quantity. It’s better to have too many good ones than to have to redo everything because you only took three shots and the baby was frowning in all of them.

Photoshop time

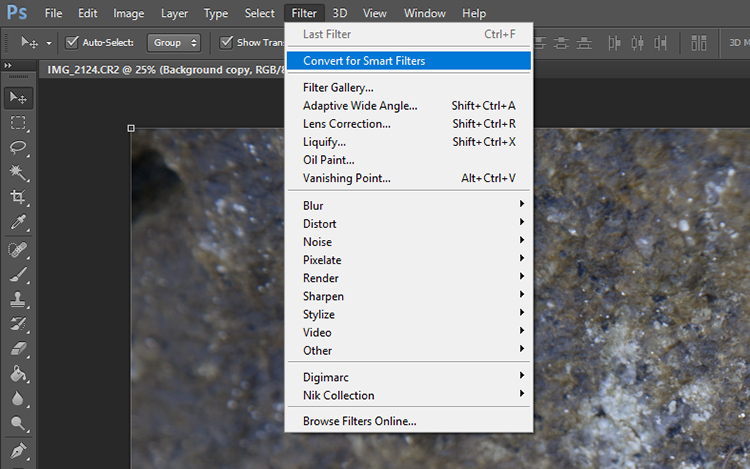
After your pictures are done it’s time to head to Photoshop where the real fun begins. You will need two fonts: Fyra for the numbers and one that you want to use for the letters. I like Fertigo Pro, but almost anything will work, it’s largely a matter of personal taste here.

Open your photo in Photoshop and it will appear as the background layer. You can leave it as is unless you plan to do any editing such as color adjustments or retouching, though my advice is to keep it simple and avoid all that if possible. You’ve got a newborn and you can’t spend hours editing your photos every single week when there are diapers to change and clothes to wash!

Add the text

photoshop-baby-milestones-fyra

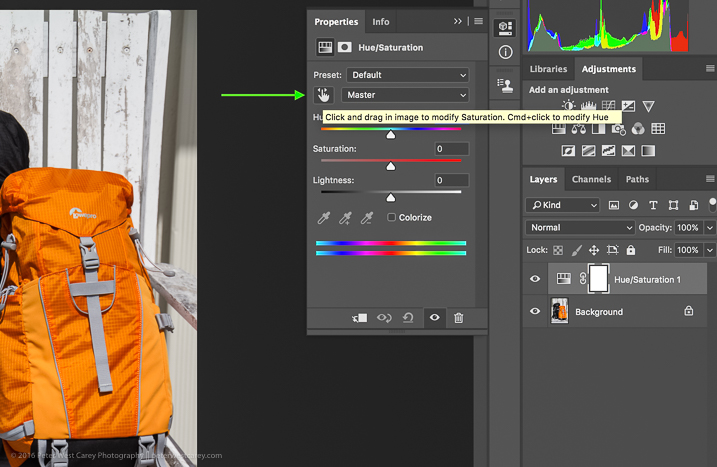
Click the “T” button in the tool palette to activate the Text Tool, then click anywhere in the picture to create a new text layer. Use the Fyra font and type a letter which will show up as a big circular number – perfect for marking the weeks or months of time that have passed.

Use the toolbar at the top of your screen to adjust the size of the number, and if you don’t get it perfect you can always change it later using the Transform Tool. Press [enter] to lock in the number, then repeat most of the process for “weeks” by clicking the Text tool, selecting a font, clicking on your baby, and typing the label (weeks, months, etc.) you want.

How to Use Photoshop to Create Milestone Photos of Babies adding the text

At this point your picture might look like something the neighbor kid made in Microsoft Paint, but you’re just getting started. The finished version will look much better thanks to the magic of Photoshop.

Resize and warp the text

The next step is to customize the size and position of each of the elements. Using the Layers palette select the layer with a single letter, which is actually the number in the picture, and choose “Edit > Transform”. You can now reposition the number where you want it, and resize it by clicking and dragging on one of the corners. Hold down the [shift] key while doing this to maintain the proportions (shape) of the number or else your finished product will look all stretched out. You can even rotate the number by hovering your cursor near one corner until it turns into a cornered arrow and then click and drag.

How to Use Photoshop to Create Milestone Photos of Babies transform the text

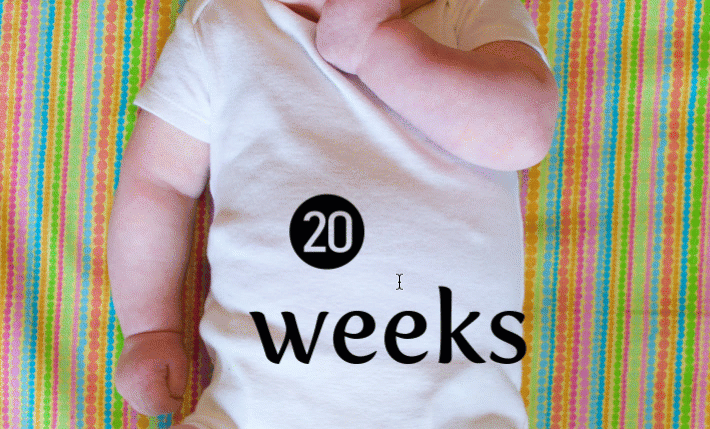
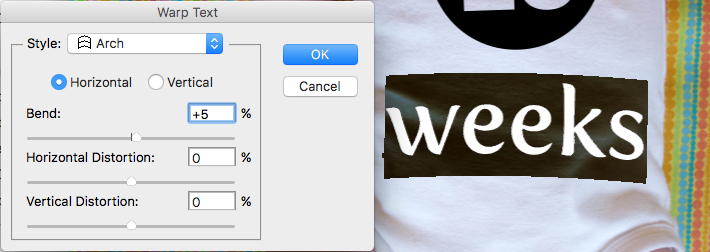
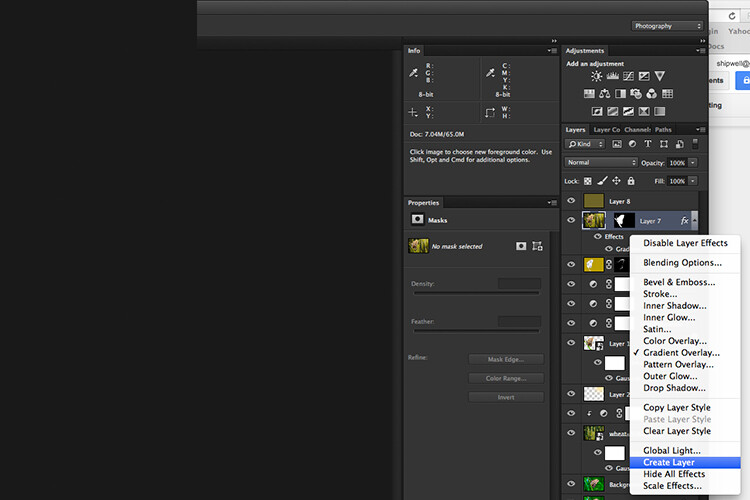
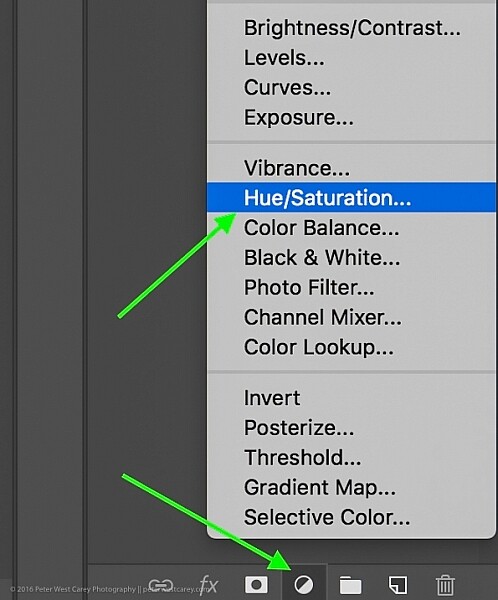
Repeat the same process for the word you’ve used then with that layer still selected, click the Text tool in your toolbar and manually select the word (in this case “weeks”) itself. Then choose; Layer > Type > Warp Text… and add an Arch style. (You can also click the “Warp Text” toolbar button to do the same thing, see red arrow below.)

How to Use Photoshop to Create Milestone Photos of Babies warp text

I like to use just a couple of degrees here, which helps the text simulate a more natural curve that you might see if it were printed across the white onesie directly. Usually, +5 gets the job done just fine.

How to Use Photoshop to Create Milestone Photos of Babies warp text tool

Text color

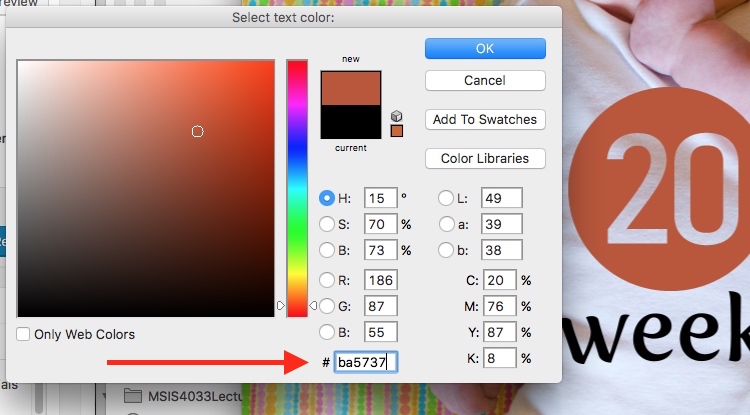
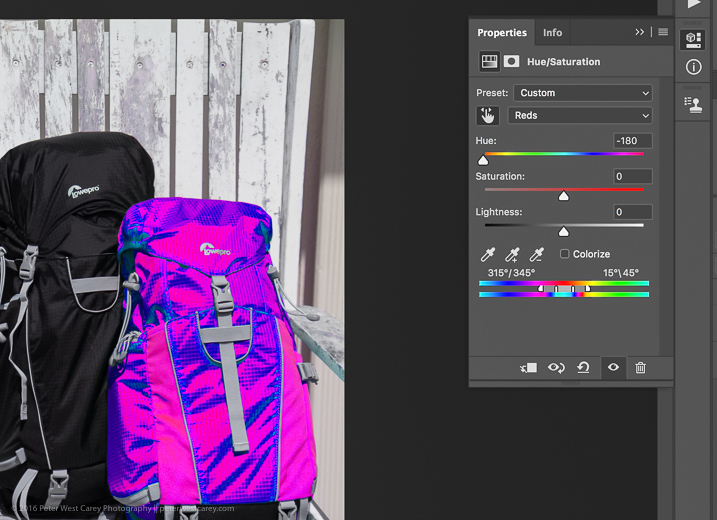
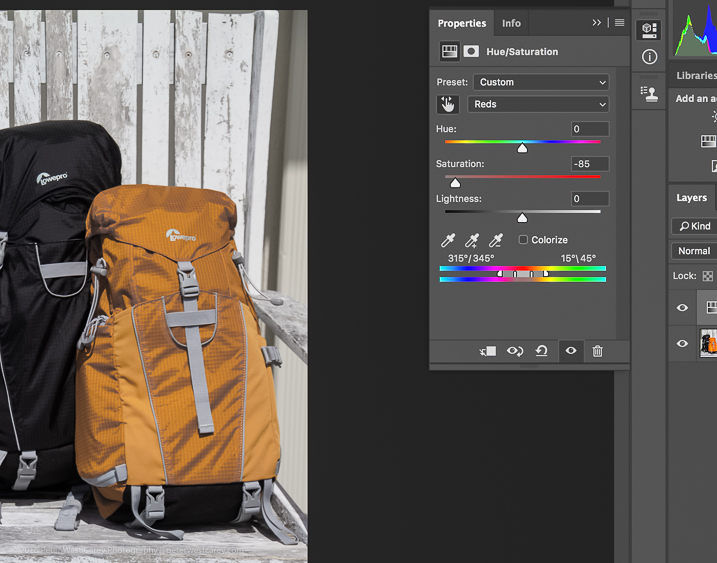
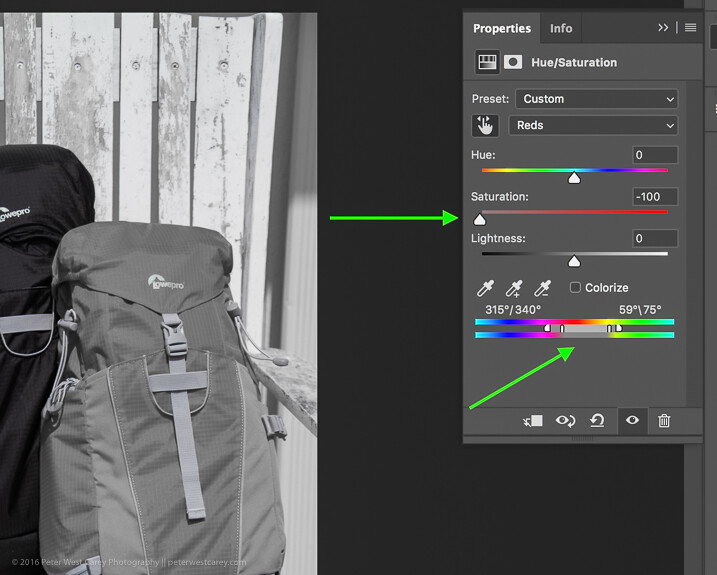
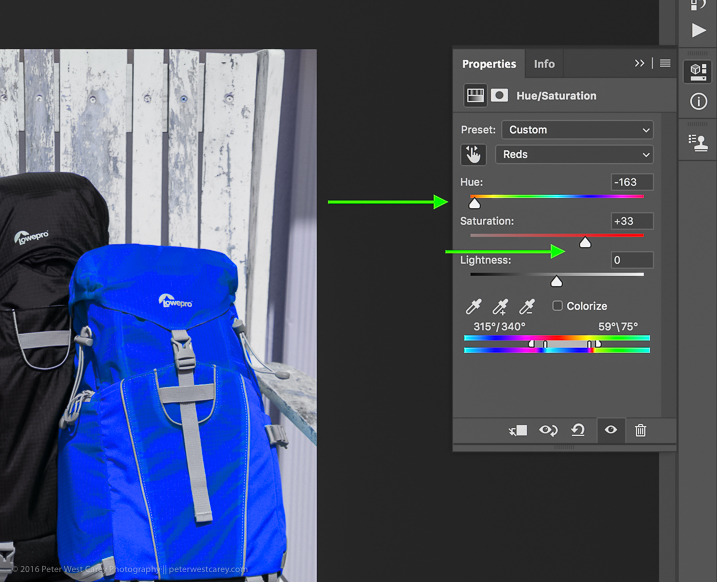
After that, the next step is to change the color of the text so it complements the fabric on which your baby is laying. Use the Text tool to select either the number or the word (weeks) then click the black box next to the Warp Text button to change the color of the text.

How to Use Photoshop to Create Milestone Photos of Babies text color

Use the eyedropper to select a color from the fabric and tweak as necessary. you will also see the color of your text or number, whichever is selected, change as you try out different options. When you find one you like you can click the “OK” button to lock it in place.

But, before you do that select the six letters and numbers in the # box at the bottom and press [ctrl+c] to copy it. This is the hex code that tells your computer what color is in use, and you will use it again in the next step.

How to Use Photoshop to Create Milestone Photos of Babies text color

Repeat the same process for the other layer of text. To get the same color you can either hover the eyedropper over the newly-colored text on the picture or paste the color code (6-digits you copied) into the box at the bottom. When you are finished you will have an image that is close to the final product, but you’re not quite done yet.

How to Use Photoshop to Create Milestone Photos of Babies

Blend mode

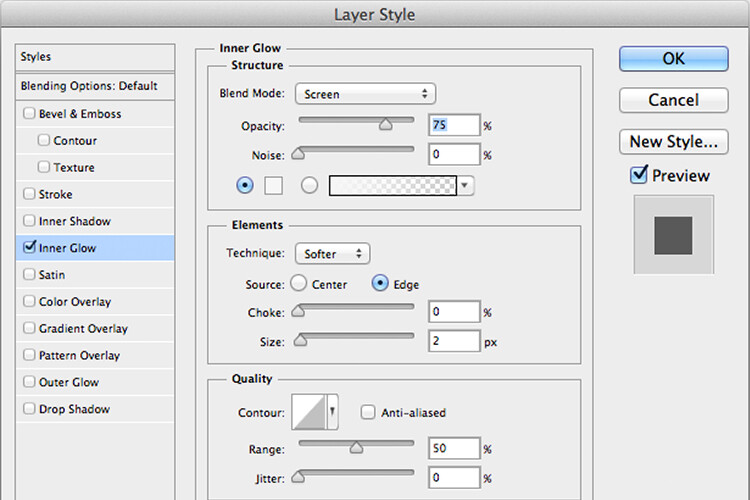
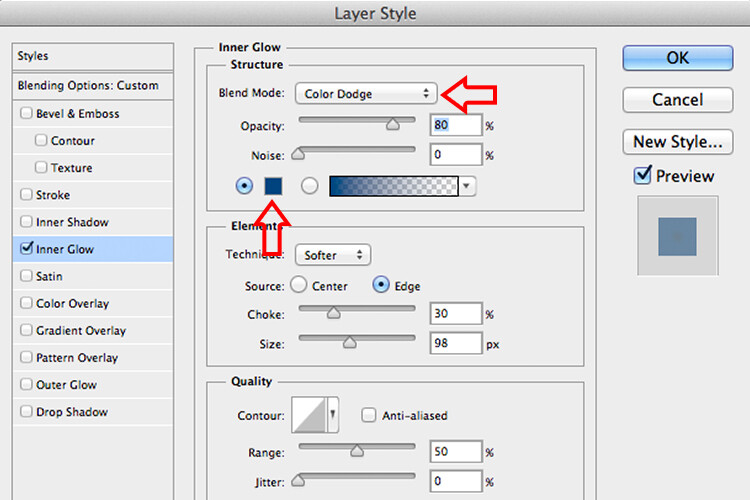
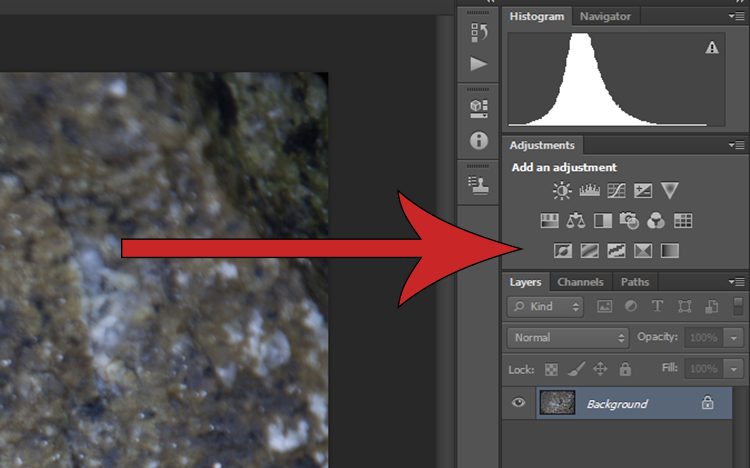
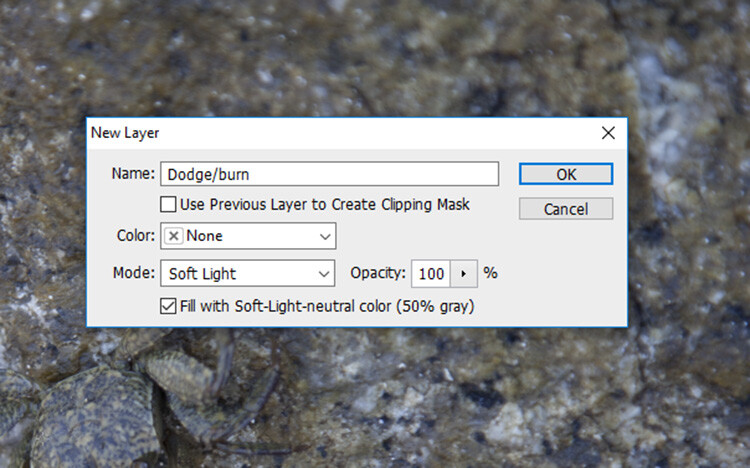
Two final editing steps remain before your image is done, the first involves blend modes. These have to do with the way in which layers work together and how one layer’s color can be altered based on how it is combined with the layer below.

Use the Layers palette to highlight a text layer and change its blend mode to “multiply” with an opacity of 75%. This will allow some of the texture of the white onesie to show through, and make the text seem like it naturally printed on the fabric instead of just pasted on afterward in a computer program.

How to Use Photoshop to Create Milestone Photos of Babies blend mode

Masking

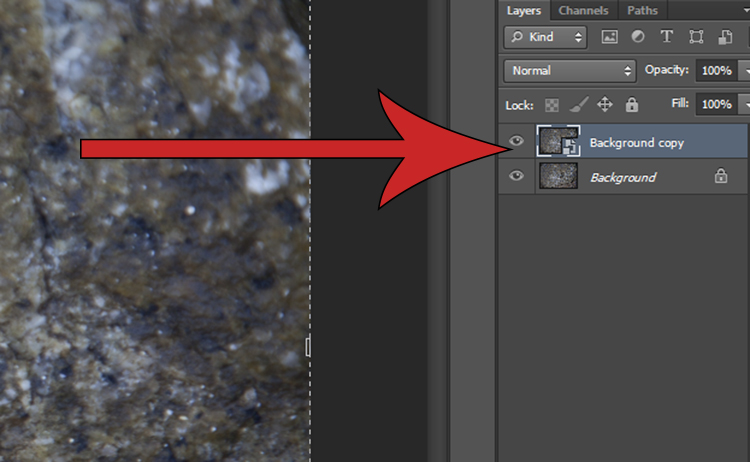
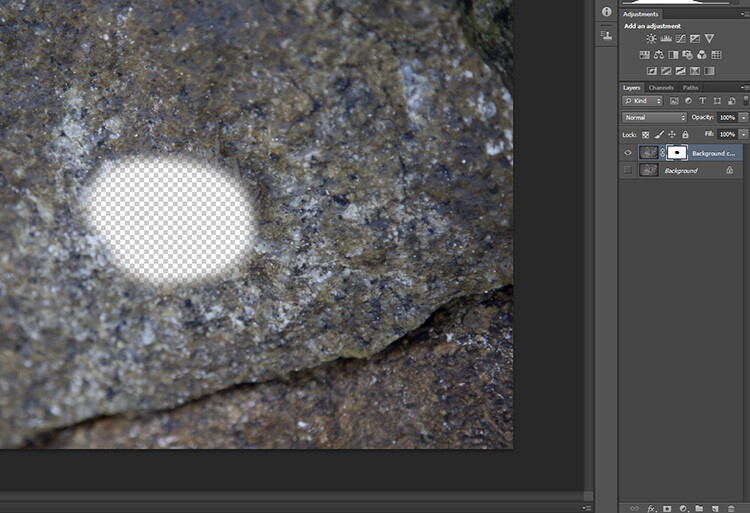
At this point, you may be thinking about using the eraser tool to fix parts of your image where the baby’s hands obscure the number or text. But trust me, this is not what you want to do!

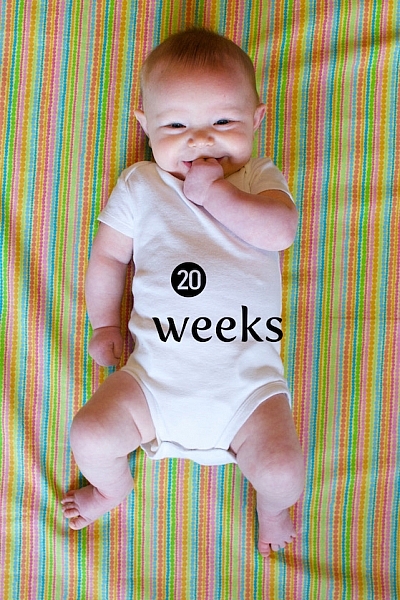
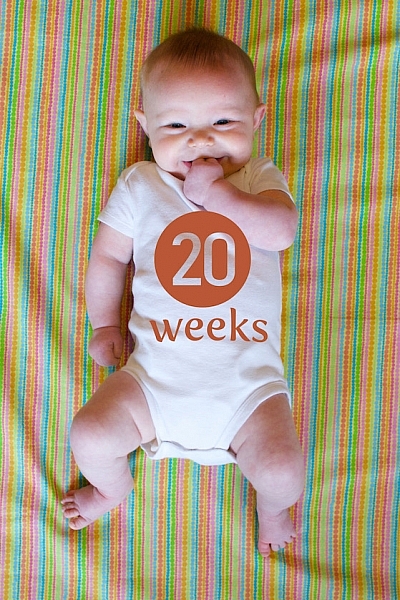
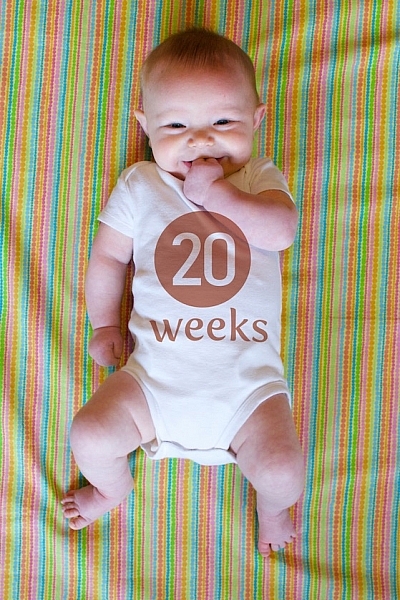
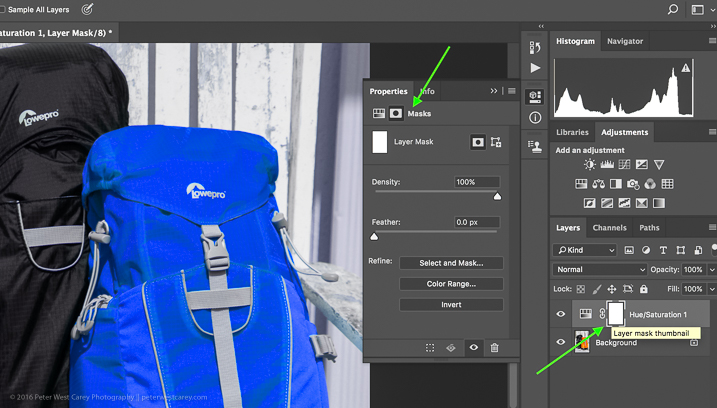
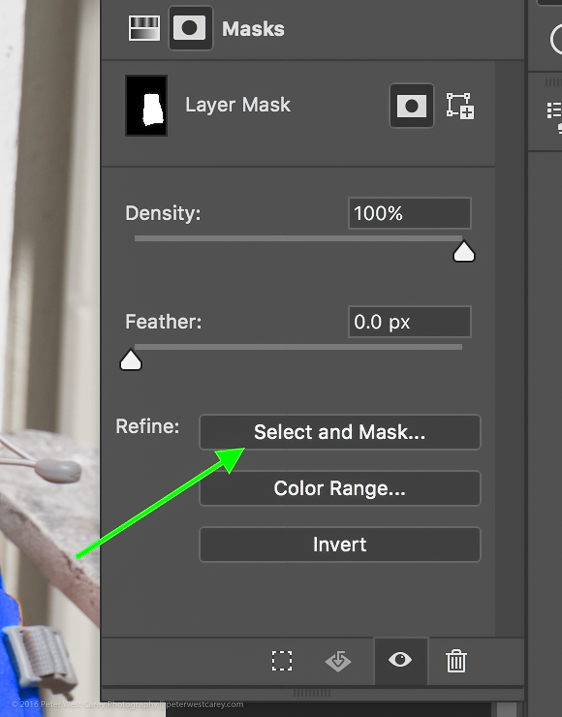
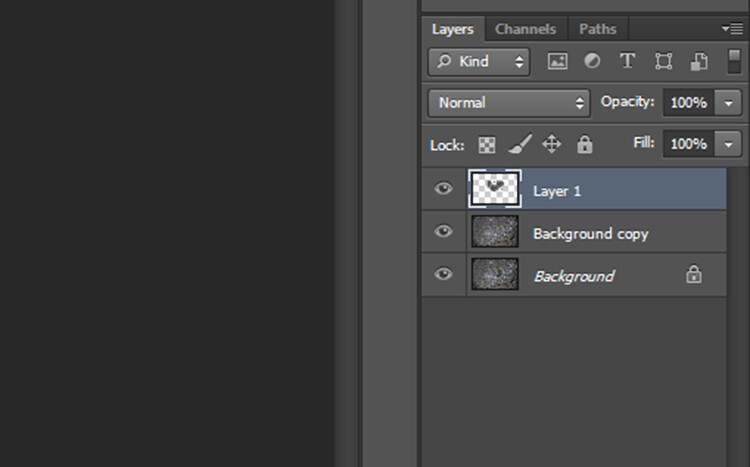
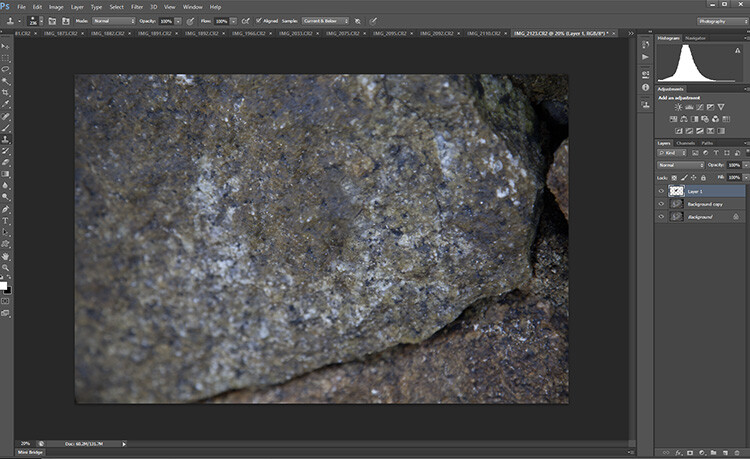
Photoshop has a fantastic feature called layer masks that let you hide (erase) parts of a layer and even recover (show) them again later if you erase too much. In the example above, you will note that the baby’s arm should be covering up the 20, so the solution is to use a layer mask to remove (hide) that portion of the 20. How to Use Photoshop to Create Milestone Photos of Babies masking

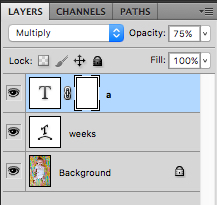
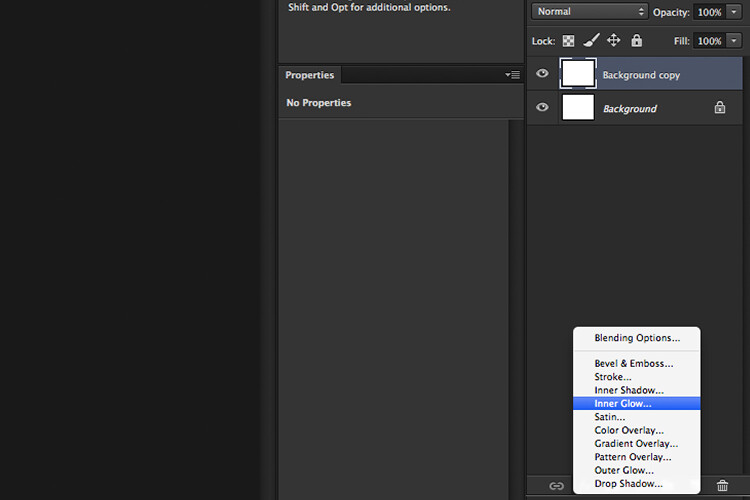
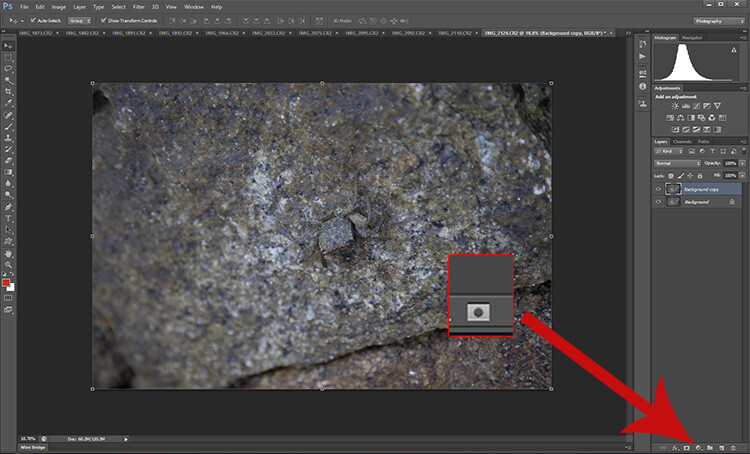
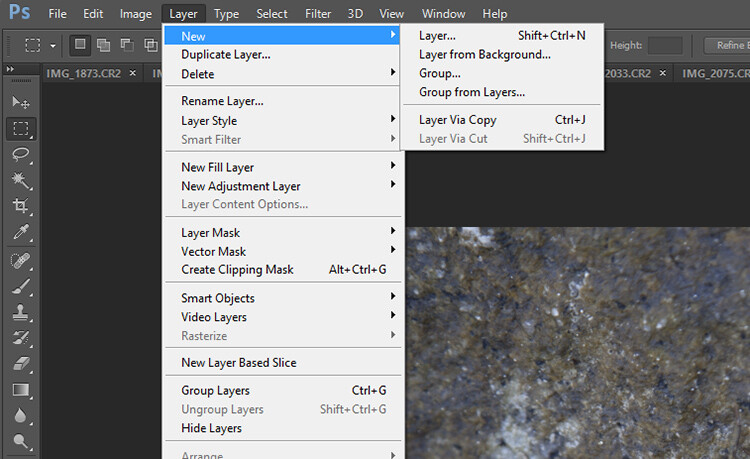
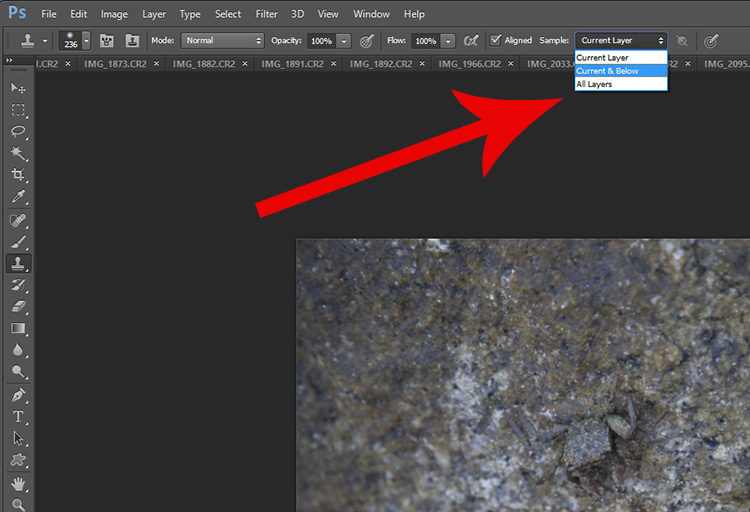
Click the text layer that you want to edit then choose “Layer > Layer Mask > Reveal All”. Now you will see a white box next to the layer that you can use to show and hide different parts of the layer itself. When you add anything dark to this layer mask it will erase (hide) that part of the layer, and when you add anything white to the mask it will show that part of the layer. This is an incredibly useful feature in Photoshop that you can use in all sorts of ways to edit your images, not just snapshots of your baby with milestone stickers.

Click the brush tool and start painting over the portion of the layer mask you want to erase, but keep one finger on the “x” key of your keyboard to switch between erasing mode and adding mode. If you accidentally brush over something that you want to keep, press “x” and add it back by painting it back in white! Then press “x” again to go back to deleting (painting with black).

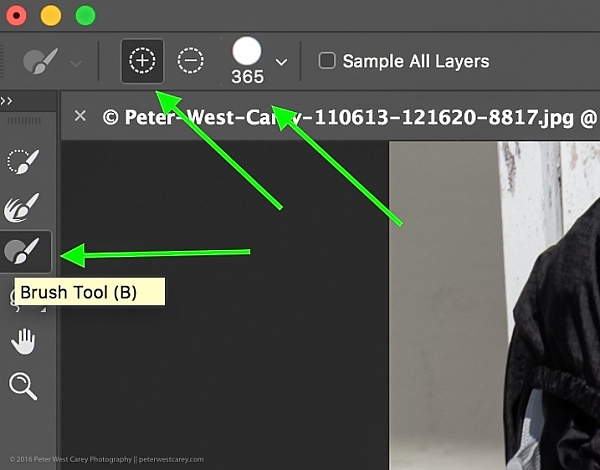
Press the “z” key to zoom in on your image (and option-z to zoom out) and then “b” to go back to the brush tool. After a few strokes of your brush, your image is ready to share with family and friends!

How to Use Photoshop to Create Milestone Photos of Babies

When to stop

Right here is where I like to stop because the image is, as I like to say, good enough. There are some imperfections that could be cleaned up like using a displacement map to alter “weeks” so it follows all the contours and folds of the fabric, but I have found that these are just not worth my time. To be honest, most people won’t even notice.

You can easily spend hours using warp transforms, color tweaking, and spot removal to get each picture looking pixel-perfect and ready to print in Baby Cosmopolitan. But parents of newborns have to find a balance between time spent on the computer and time spent with their families.

How to Use Photoshop to Create Milestone Photos of Babies

After 52 weeks of doing pictures we used a slightly different setup and reduced our images to once a month with our child standing or sitting instead of lying down.

Conclusion

If you have an infant or are expecting one, pictures like this are a fantastic way to mark the passage of time. My wife and I did shots like these with our two boys every week for the first year of their lives, and then every month until they turned two.

At the time it seemed like a huge hassle to get out the fabric, put a white onesie on, and try to soothe a fussy infant long enough to snap a few pictures every single week. Looking back through them we are so glad we did. When shown in an album side by side these images provide a priceless way of seeing how our kids both grew so much during those early times of their lives.

If you have a small baby and give this a try, please share your images and/or questions in the comments area below.

googletag.cmd.push(function() {
tablet_slots.push( googletag.defineSlot( “/1005424/_dPSv4_tab-all-article-bottom_(300×250)”, [300, 250], “pb-ad-78623” ).addService( googletag.pubads() ) ); } );

googletag.cmd.push(function() {
mobile_slots.push( googletag.defineSlot( “/1005424/_dPSv4_mob-all-article-bottom_(300×250)”, [300, 250], “pb-ad-78158” ).addService( googletag.pubads() ) ); } );

The post How to Use Photoshop to Create Milestone Photos of Babies by Simon Ringsmuth appeared first on Digital Photography School.


Digital Photography School

 
Comments Off on How to Use Photoshop to Create Milestone Photos of Babies

Posted in Photography


How to Create a Rim Light Effect Using Photoshop

20 Jan

Lighting is a huge integral part of a movie’s success. The same applies to photography. It’s all about the light or lack of it to create the drama in an image. Rim lighting, as the term suggests, is also called edge or back lighting. In this article I will show you how to create this dramatic style of lighting.

how to create a rim light effect in Photoshop

A rim light effect created in-camera and an Inner Glow effect added in Photoshop.

Rim lighting adds drama

There’s a particular scene in the movie Alien (1979) in which the character played by Harry Dean Stanton goes to find Jones the cat. That scene had me glued to my chair with both hands up to my mouth and fingers lodged between my teeth. You just knew something bad was going to happen but it was drawn out with unbelievable tension.

How to Create a Rim Light Effect Using Photoshop Alien

Alien Courtesy of 20th Century Fox

The lighting throughout the movie was low key to give that moody atmospheric feel.

A good example of rim lighting is using two side lights or one light from behind the subject, as in the image below.

How to Create a Rim Light Effect Using Photoshop

In this photo the light is behind the subject creating an edge or rim light around the subject’s head. This is also called a hair light.

Before I demonstrate how to create a rim light effect in Photoshop. I want to show you just how easy it is to get a rim light effect in-camera, so you can try it out in the comfort of your own home.

Create a rim light effect in-camera at home

I used the following setup to create my rim light:

  • One bottle of water
  • One glossy black tile
  • Two lights
  • A camera mounted on a tripod

I picked up a sample black glossy tile from a local tile shop, where I was able to purchase just the one. As for the lighting, strip softboxes are ideal for this type of rim lighting. You place a strip softbox on each side, and slightly behind (closer to the background), the subject.

Unlike standard softboxes, strip softboxes are narrow and rectangular in shape. But, for the purpose of this article so that you can easily do a similar setup in your own home, use whatever light sources that you already have at your disposal.

Using my iPad placed vertically to one side of the bottle, I opened the Soft Box app which is free to download and set it to white. I placed an LED light on the other side of the bottle. My kitchen table was used for the setup.

As you can see in the photo below, I was able to angle the lights so that I could control the rim light hitting the bottle. My camera settings were: ISO 2000, 1/60th of a second, at an aperture of f/5.6.

How to Create a Rim Light Effect Using Photoshop

A simple setup that you can do at home to create a rim light effect in-camera using a black glossy tile, a prop, and two lights.

NOTE:

If you don’t want to use two lights and you have a regular softbox, try placing it directly behind the object and cover the center of the softbox with a strip of black card (that will become your background). You will need to experiment to get the rim lighting around the object.

how to create a rim light effect in Photoshop

This is the bottle of Water straight out of the camera.

Let’s dive into Photoshop.

Creating a rim light effect in Photoshop

The key to adding the rim light effect in Photoshop is Layer Styles and having the subject isolated from the background. Before any layer style can be applied, it is necessary that the image that you are applying the style to has been carefully cut out. Use whatever selection tool you want but I would recommend using the pen tool.

Layer style

Let’s take a look at Layer Styles. With Photoshop open, go over to the Layers Panel. Scroll down to the bottom and you will see a group of icons. You will see this icon, fx second to the right. Click on that and a pop-up dialog box will appear with different preset style options.

How to Create a Rim Light Effect Using Photoshop layer styles

The Layer Styles presets are accessed by clicking on the fx icon located at the bottom of the Layers Panel.

How to Create a Rim Light Effect Using Photoshop - The Inner Glow preset

The Inner Glow preset

Alternatively, you can access the Layer Styles by going back to the top right corner of the Layers Panel and clicking on the downward arrow icon with horizontal lines beside it. Scroll down to where it says Blending Options. The same Layer Style option box appears and just click on Inner Glow.

How to Create a Rim Light Effect Using Photoshop

When you click on any of the Layer Style options, the settings are all preset options, but they can be easily edited. In this example, leave some of the settings as they are and only adjust the following three:

  1. Choke – similar to feathering
  2. Size
  3. Opacity

Experiment until you get the desired effect, then click the OK button.

How to Create a Rim Light Effect Using Photoshop

The Layer Style pop-up dialog box with the default settings.

adding a rim light effect in Photoshop

A rim light effect is added in Photoshop using Inner Glow from the presets in the Layer Styles.

Using Color Dodge Blend Mode instead of Screen

My preference when using this Layer Style technique is to change the Blend Mode from Screen to Color Dodge. I used this on the bottle of water in the title shot. To illustrate the subtle differences between the two Blend Modes, see the two photos below. The first image is the Inner Glow with Screen as the

The first image is the Inner Glow with Screen as the default setting. For the second image, I changed the Blend Mode to Color Dodge.

alt=

Changing the Blend Mode to Color Dodge

How to Create a Rim Light Effect Using Photoshop inner glow

Rim light effect created in Photoshop using Inner Glow from the presets in Layer Styles.

How to Create a Rim Light Effect Using Photoshop

This rim light effect is created using Inner Glow from the Layer Style presets but I changed the Blend Mode to Color Dodge.

Creating a rim light from scratch using Photoshop

However, this technique really does shine when you have to create the rim light effect totally in Photoshop. For example, take this Owl Butterfly image that I got from www.pixabay.com. It has no rim light effect on it at all.

How to Create a Rim Light Effect Using Photoshop owl

Owl Butterfly from Pixabay 1668956 – dowload the image if you want to follow along.

I isolated the Owl Butterfly from the background using the Pen Tool and placed it against a different background shot to which I added a Gaussian Blur.

How to Create a Rim Light Effect Using Photoshop owl

Wheat from Pixabay 8244_1920

As I had the Butterfly on its own separate layer, I added an Inner Glow from the Layer Styles and changed the Blend Mode to Color Dodge and chose a darkish yellow. I wanted a backlight to appear on the wings of the Butterfly caused by the setting sun in the background.

How to Create a Rim Light Effect Using Photoshop owl before

The Owl Butterfly was cut out using the Pen Tool in Photoshop and placed it against another background image. I blurred the background using Gaussian Blur.

I put this Layer Style effect on its own separate layer. Then I applied a layer mask and brushed in the yellow glow on the wings to give it a more realistic look. I did a bit more retouching by adding a gradient Overlay and then applied the Filter>Blur>Average to blend the colors from the two images.

How to Create a Rim Light Effect Using Photoshop layer style

By placing the Layer Style effect on its own separate layer. I was able to apply a layer mask and brush the Glow effect onto to the wings of the Butterfly.

How to Create a Rim Light Effect Using Photoshop owl after

An Inner Glow was added using the blend Mode set to Color Dodge. I then added a Gradient Overlay to darken the bottom part of the Butterfly and I applied an Average Blur to blend the color of the two images.

Your turn

I hope I have been able to show you how effective creating a rim light in Photoshop can enhance your images. Do you use this effect on your images? Feel free to give it a try and post your results below, I will try to answer any questions and would love to see your images.

googletag.cmd.push(function() {
tablet_slots.push( googletag.defineSlot( “/1005424/_dPSv4_tab-all-article-bottom_(300×250)”, [300, 250], “pb-ad-78623” ).addService( googletag.pubads() ) ); } );

googletag.cmd.push(function() {
mobile_slots.push( googletag.defineSlot( “/1005424/_dPSv4_mob-all-article-bottom_(300×250)”, [300, 250], “pb-ad-78158” ).addService( googletag.pubads() ) ); } );

The post How to Create a Rim Light Effect Using Photoshop by Sarah Hipwell appeared first on Digital Photography School.


Digital Photography School

 
Comments Off on How to Create a Rim Light Effect Using Photoshop

Posted in Photography


How to Swap Colors in Photoshop – Two Methods Explained

12 Jan

Color swapping in Photoshop is both a fun thing to do and a very handy tool for product photographers with clients in need of options. It’s not a hard technique and it only takes a try or two to get it right. This article outlines two methods for how to swap colors in Photoshop.

final-side-by-side-color-swap


The first is a quick method and the second tends to do a better job. I’ll be using this the image below from my review of the Lowe Pro Photo Sport 100/200 AW bag. This demonstration was created with Photoshop CC 2017.

The Quick Method

This method is a quick color swap that may or may not cover your needs. If your subject has nice, solid colors without very much tonal difference, you can likely use this method by itself. Go ahead and open your file in Photoshop and let’s get started!

How to Swap Colors in Photoshop - Two Methods Explained

Sample Image

Step #1 Create a Hue/Saturation Adjustment Layer

Click on the “Create New Adjustment Layer” button on the bottom of the Layers panel and choose “Hue/Saturation”.

How to Swap Colors in Photoshop - Two Methods Explained

Choose Hue-Saturation

In the Properties window that pops up, there is a little hand with a pointer finger in the upper left side of the box. Click that.

How to Swap Colors in Photoshop - Two Methods Explained

This is where my method deviates from some others. As you can see in the image above, there is an option to hold Cmd/Ctrl as you drag the mouse, and change the Hue straight away.

This is a tempting method, for sure. But it won’t always get you as close to your desired results as if you follow the rest of these instructions. For instance, I used that method to try to change the orange pack to blue and this was the result.

How to Swap Colors in Photoshop - Two Methods Explained

Not what I wanted. So….

Step #2 – Select a color range

After you click that little finger and hover over your source color (the orange bag), click there to select the color. Your screen will change depending on which color you pick, but more or less it will look a little like this.

How to Swap Colors in Photoshop - Two Methods Explained

I chose a dark spot so my saturation for all orange dropped and now there is a little slider in the color bands at the bottom of the properties box. You will be using those bands and the saturation slider to refine your selection.

Step #3 – Adjust to get all the color

To know you have the right colors you want to work with, move the Saturation slider all the way down, essentially turning off the source color. If that doesn’t get all the color you want, move the little white bands on the color slider on the bottom until it captures all your source color.

How to Swap Colors in Photoshop - Two Methods Explained4

Move Saturation to -100, and adjust the bands (bottom green arrow) left or right, or apart, until there is no more of the selected color showing.

Can you see how that lighter gray box on the sliders at the bottom is larger (they were moved farther apart) in this image compared to the one above? That is to make sure I gobbled up all the orange, including some reds and yellows. Fiddle with this option to capture all your source color.

Step #4 – swap the color for a new one

Now that you know you have the right source color, jack up the Saturation slider then move the Hue slider until you get a color you like.

How to Swap Colors in Photoshop - Two Methods Explained

If you’re looking for quick and easy, you are essentially done! Save the file with a new name and you’re good to go.

But wait! Things aren’t as good as they could be with this method. For one thing, there is now a slight tint to the entire image as the mask was applied to the entire image. Let’s clean that up a little.

Method #2 for swapping colors

Method #2 picks up where Method #1 left off and continues:

Step #5 – Apply a layer mask

In this step, you want to apply a mask to the Hue/Saturation adjustment layer (seen on the right side of the layer) just to the backpack so it doesn’t tint the whole image. Click on the layer mask and the information panel will change to show mask options.

How to Swap Colors in Photoshop - Two Methods Explained

Choose “Color Range…” from the “Refine” options at the bottom.

How to Swap Colors in Photoshop - Two Methods Explained

This should bring up a mask with the color range you have already selected and changed in the steps above. Your mask should show the area of color you are swapping as white, like so:

How to Swap Colors in Photoshop - Two Methods Explained

Click OK to apply the layer mask.

Step #6 – Refine the layer mask

Now you need to refine the layer mask just a little as Photoshop is not always perfect. Take a look close in my example and you can see some orange peeking through.

How to Swap Colors in Photoshop - Two Methods Explained

To eliminate this effect, click on “Select and Mask”, once again in the “Refine” options area.

How to Swap Colors in Photoshop - Two Methods Explained

Choose to use the “Marching Ants” View to make it easy to find the missing areas.

How to Swap Colors in Photoshop - Two Methods Explained

Then in the upper left corner, choose the Brush Tool and make sure the “add” feature (+) is selected. Lastly, choose a radius size to make the selecting easy. In this case, I used 365.

How to Swap Colors in Photoshop - Two Methods Explained

Now paint all over the area you want to change to the new color. It’s okay to go slightly over the edges to ensure all of the color is changed. If you are making drastic changes or if your background color will interfere, you may need to be more careful with your painting.

How to Swap Colors in Photoshop - Two Methods Explained

Zooming in, you can see that I missed some edges here and there and overlapped a little too much. Take your time and make it look good.

How to Swap Colors in Photoshop - Two Methods Explained

You can also see in the image above that there is still an orange cast on the armrest of the chair. To make the scene complete, I’ll swap that color as well.

Click OK when you are finished painting in the area to swap. You’re just about done!

Step #7 – Layer blend mode

Depending on what you’re swapping and the textures and colors involved, you may be able to get a slightly better result by choosing a different blend mode option for this layer. Click the word “Normal” above your layer and play around with the different layer blend mode choices.

How to Swap Colors in Photoshop - Two Methods Explained

You’re done!

From here, you can fiddle until your heart is content. Try new blending modes and opacities. Refine your masks. Then sit back and enjoy your handy work!

final-side-by-side-color-swap


Cautions

  1. Watch out for white objects when there is a lot of white in the scene. These can be tricky.
  2. For that matter, watch out for the color you want to swap appearing anywhere else in the image. You’ll need to remove the mask from those areas manually (Step #6 but use the “minus” option).

googletag.cmd.push(function() {
tablet_slots.push( googletag.defineSlot( “/1005424/_dPSv4_tab-all-article-bottom_(300×250)”, [300, 250], “pb-ad-78623” ).addService( googletag.pubads() ) ); } );

googletag.cmd.push(function() {
mobile_slots.push( googletag.defineSlot( “/1005424/_dPSv4_mob-all-article-bottom_(300×250)”, [300, 250], “pb-ad-78158” ).addService( googletag.pubads() ) ); } );

The post How to Swap Colors in Photoshop – Two Methods Explained by Peter West Carey appeared first on Digital Photography School.


Digital Photography School

 
Comments Off on How to Swap Colors in Photoshop – Two Methods Explained

Posted in Photography


Voice-controlled photo editing: coming soon to Photoshop?

12 Jan

Adobe Research is experimenting with a voice-controlled photo editing virtual assistant. A demo video uploaded to Adobe’s YouTube account shows how the tool might function, performing and undoing basic edits to an image, and exporting the final product to Facebook – all achieved through spoken commands. 

The demo shows this feature being used for extremely basic editing functions (cropping, flipping an image), which Adobe calls ‘a first step towards a robust multimodal voice-based interface’ for its mobile applications. 

Given that voice control is popping up in just about every gadget you can think of, it seems logical for Adobe to be considering adding voice control to its apps. The Internet of Things is rapidly turning out to be the Internet of Shouting at Things, so voice-controlled photo editing seems inevitable. 

Do you think Adobe could make voice control sophisticated enough for the complex needs of serious photo editing? Let us know in the comments.

Articles: Digital Photography Review (dpreview.com)

 
Comments Off on Voice-controlled photo editing: coming soon to Photoshop?

Posted in Uncategorized


Save 60% off with these Professional Photoshop Actions & Lightroom Presets

21 Dec

It’s Day 5 of our 12 Days of Christmas sale and today our friends over at Shutter PulseShutterPlus are offering an exclusive 60% off to dPS subscribers.

Shutter pulse

Today you can save 60% on their Professional Photoshop Actions and Lightroom Presets.

Quality Photoshop Actions and Lightroom Presets allow you to save a massive amount of time during post processing, and they can also help you to achieve impressive looks and effects with ease.

Today you have the option to pick up the following ShutterPlus Packs:

  • 300+ Photoshop Actions Bundle – Just $ 29, normally $ 39
  • 330+ Lightroom Presets Bundle – Just $ 29, normally $ 59
  • OR… get Both Bundles for an even bigger saving of just $ 39, normally $ 98!

These Bundles Include 100’s of effects including:

  • Stunning HDR Effects
  • Vintage Effects
  • Cinema-Inspired Effects
  • Film-Inspired Effects
  • Matte and Haze Effects

Pick up your bundle before it’s gone!

P.S. You’ll need a copy of Adobe Lightroom and/or Photoshop to use Presets or Actions.

P.P.S These presets are completely different to the dPS presets on sale yesterday, so here’s your chance to build up your preset collection so you have the right look for every occasion!

googletag.cmd.push(function() {
tablet_slots.push( googletag.defineSlot( “/1005424/_dPSv4_tab-all-article-bottom_(300×250)”, [300, 250], “pb-ad-78623” ).addService( googletag.pubads() ) ); } );

googletag.cmd.push(function() {
mobile_slots.push( googletag.defineSlot( “/1005424/_dPSv4_mob-all-article-bottom_(300×250)”, [300, 250], “pb-ad-78158” ).addService( googletag.pubads() ) ); } );

The post Save 60% off with these Professional Photoshop Actions & Lightroom Presets by Darren Rowse appeared first on Digital Photography School.


Digital Photography School

 
Comments Off on Save 60% off with these Professional Photoshop Actions & Lightroom Presets

Posted in Photography


3 Photoshop Elements Tutorials to Help You Correct and Enhance Your Images

14 Dec

We’ve noticed on our current reader survey (if you haven’t filled it out already, please do so here) that many of you are using Photoshop Elements. So I rounded up some video tutorials to help you use Elements (15 or any older version) to help you make corrections and enhancements to your images.

#1 How to brighten and improve a dull photo

George Peirson from How To Gurus walks you through several steps you can apply to make a dull photo more exciting. He covers things like working with adjustment layers so you can work non-destructively, adding more color in certain areas, layer blending modes, and more.

#2 How to remove people using the clone stamp tool

Sometimes you can get unwanted people in your shots. In this video you can learn how to remove them using just the clone stamp tool in Photoshop Elements.

#3 How to create a motion blur effect using Elements

In this final video learn the steps to add motion to an image using different blur effects in Photoshop Elements. The example used is a race car that was frozen with a fast shutter speed.

If you use Photoshop Elements I hope these videos have helped you out, and you have learned a couple new things. Many things that you can do in Photoshop, can also be done in Elements. Some of the tools and menus are a bit different but many of the features are similar. Elements also offers a “guided” user experience to help you walk through doing some common things.

If you want to learn more try the Adobe website where they have more tutorials and articles on Elements.

For more Photoshop help try these dPS articles:

  • How to Add a Sun Flare to Your Images Using Photoshop
  • How to do Non-Destructive Editing in Photoshop
  • An Introduction to Photoshop Layers Possibilities and Properties
  • Tips for Using the Blur Filters in Photoshop
  • 2 Simple Methods for Adding Color to Your Images Using Photoshop
  • A Guide to Black and White Conversion in Photoshop

googletag.cmd.push(function() {
tablet_slots.push( googletag.defineSlot( “/1005424/_dPSv4_tab-all-article-bottom_(300×250)”, [300, 250], “pb-ad-78623” ).addService( googletag.pubads() ) ); } );

googletag.cmd.push(function() {
mobile_slots.push( googletag.defineSlot( “/1005424/_dPSv4_mob-all-article-bottom_(300×250)”, [300, 250], “pb-ad-78158” ).addService( googletag.pubads() ) ); } );

The post 3 Photoshop Elements Tutorials to Help You Correct and Enhance Your Images by Darlene Hildebrandt appeared first on Digital Photography School.


Digital Photography School

 
Comments Off on 3 Photoshop Elements Tutorials to Help You Correct and Enhance Your Images

Posted in Photography


Adobe Photoshop CC gains new MacBook Pro Touch Bar support

14 Dec

Adobe has announced that Photoshop CC now supports the Touch Bar found on certain models of the new Apple MacBook Pro. Three categories of Touch Bar functions are currently supported, including brush selection, customized favorite actions and layer properties. The update that brings this new support is available to download now. 

When using the Layer Properties section with the Touch Bar, Photoshop CC users can access various tools and options related to layers, including Select & Mask, switching between blend modes, placing a Smart Object, clipping layers and scrolling through the layer history. The Brushes section is similar, lending access to brush settings like opacity and flow, size, color, and hardness.

Finally, the Touch Bar also provides access to Favorites, of which users can create their own favorite actions. Says Adobe, users can gain quick access to, for example, Flip Horizontal/Vertical, Full screen mode and the macOS share menu. Additionally, users can set up actions involving the Brushes and Layer Properties categories.

Via: Adobe Blogs

Articles: Digital Photography Review (dpreview.com)

 
Comments Off on Adobe Photoshop CC gains new MacBook Pro Touch Bar support

Posted in Uncategorized


Adobe updates Lightroom for Android and web, Photoshop Express for iOS

12 Nov

Adobe today dropped a fresh round of updates to its mobile and web photo app offerings.

A new version of Lightroom for Android features a Raw Technology Preview for the mobile app — like the one introduced for iOS in July — that lets you import Raw images directly from the camera into your device. With this update, you can now capture, edit, share and access full resolution Raw photos with your Android app, now at version 2.2. In addition to Raw image-processing advantages, the Android app also syncs files with Lightroom on your other devices, including the desktop app and web, complete with edits, ratings and flags.

As explained in a new Adobe blog post to pull this off, you’ll need a special USB adapter — an on-the-go or OTG cable — to connect your camera to your mobile device, and transfer images via PTP mode. OTG cables are inexpensive and come in different configurations, so you’ll want to search for one that matches the ports built into both your camera and your device.

As with the iOS app, Lightroom for Android supports the same Raw files as the desktop app and Adobe Camera Raw. Check to see whether your camera is supported.

Lightroom for web updates include enhancements to the app’s share feature, now letting you add a header graphic, sections and text to promote better engagement and storytelling. That hooks into updates to Adobe Portfolio, the company’s utility that lets you create professional online portfolios: You can now send images from Lightroom on the web to Portfolio. Just create a new project in Portfolio from within Lightroom’s Web app and copy photos into the project. You can also now download original images (if they are available in the cloud) from within Lightroom on the web.

In separate news, Adobe has also announced a major update to Photoshop Express app for iOS. New features include Adobe Photoshop Express Collages, which create high-quality collages with intelligent layout and style transfer automation choices. The update also features Google photo integration, letting you select and import images from a Google Photos account, edit them in Photoshop Express, and share or export them.

All new Lightroom and Photoshop Express features are available now.

Articles: Digital Photography Review (dpreview.com)

 
Comments Off on Adobe updates Lightroom for Android and web, Photoshop Express for iOS

Posted in Uncategorized


How to Add a Sun Flare to Your Images Using Photoshop

29 Oct

If you read my previous article where I give you some tips for doing more spectacular sunset photography, you’ll understand that I love taking photos during the magic hour. For my portraits, I also book my sessions during that time because the light is very soft and flattering. There is one thing I particularly like to do when I process my images and that’s adding a sun flare to my portraits and landscapes. I love to use Photoshop to recreating a scene that would have ideally been there in real life.

How to Create a Sun Flare in Photoshop

I added sun flares to this portrait to add depth.

It’s difficult to not underestimate the effect of a sun flare but it really does make a big difference, especially if you like cinematic results to your images. They’re a great way to add color and depth to your images.

Analyze your image first

The process of adding sun flares is actually quite easy, it only takes two steps and a few minutes. The most difficult thing however is to get a realistic result. You need to analyze your image before doing anything. Start by looking at the position of the sun, how the shadows and highlights are wrapping around your subject.

In the image below, I added a sun flare on the left, but before doing that I noticed that the highlights were hitting the Taj Mahal from the left and the shadows were in the right side of the monument. If I were to position the sun flare on the right side of the image, the results wouldn’t be realistic because the highlights and the shadows wouldn’t correspond to the direction of the light of my sun flare. Try to consider the position, direction and intensity of the light.

How to Create a Sun Flare in Photoshop - Taj Mahal

This is another example of a GoPro image I took. I added a sun flare on the right side of the image because the sun was positioned there in real life. We’re not trying to create another sun, we’re just enhancing it with more colors and more intensity.

How to Create a Sun Flare in Photoshop

In this portrait, I added a sun flare to the left of the model. The result looks realistic because you can see the orange flair spreading and lightning the hair of the model but her face isn’t affected.

How to Create a Sun Flare in Photoshop

How to create and add a sun flare in Photoshop

It’s actually quite easy to add a sun flare in Photoshop. Start by opening your file in Photoshop and creating a new empty layer. The next step is to analyze where you want to place your sun flare and how strong do you want the effect to be. In this case, I want to place my sun flare in the top right of the image and make it pretty big. The sun was actually setting in that position but I am not completely satisfied with how it looks. I want to make the flare more vivid and more intense.

How to Create a Sun Flare in Photoshop

Select the Brush Tool and pick a color

The next step is to select the Brush Tool with an opacity and flow of 100%. Make sure to select a soft brush with a hardness of 0%. I usually like to pick my own color of the sun flare, the color code I use is #fd9424, but there are different ways to pick a color for the sun flare.

You can use the Eye Dropper Tool and select a color from the image by pressing I on your keyboard or by selecting it in the tool box on the left (the chosen color will automatically be set in your palette). Or after you have created the flare, you can create a hue/saturation adjustment layer only affecting that layer and just playing around until you find a color you like.

How to Create a Sun Flare in Photoshop

Adding your flare

To create the sun flare, the first step is to simply create one brush stroke (you just have to press once). Make sure your brush is quite big. So far your image should look something like this:

How to Create a Sun Flare in Photoshop

The next step is to go to blending modes for your current layer (the layer with the brush stroke). The default blending mode is normal, you need to change it to Screen. The screen blending mode by definition will invert both layers, multiply them, and invert the result. Your sun flare is going to get brighter and blend in with the sky after you do that.

How to Create a Sun Flare in Photoshop

Transform

The next step is to select your layer with the sun flare and press CTRL/CMD+T to transform (resize) it. A little box will appear, you want to drag the corners to make it bigger. How big you want to make it depends on your image and your desired effect. The sun flare will affect the whole image if you make it too big and will brighten up the shadows.

Using a brush tool on a new layer is really helpful because you have full control. You can change the position, color, brightness, or saturation of your flare whenever you want by creating new adjustment layers that only affect that layer.

If you think that your effect if too strong, you can reduce the opacity of the layer, if it is not strong enough, you can duplicate the layer. Always remember that the effect should be subtle otherwise if will look quite unrealistic. We are just trying to create a scene taking in consideration how light works.

How to Create a Sun Flare in Photoshop

 whenever you want

Your turn

Now you try you hand at adding a sun flare to one of your images using Photoshop. Please share your images and any questions in the comments below.

googletag.cmd.push(function() {
tablet_slots.push( googletag.defineSlot( “/1005424/_dPSv4_tab-all-article-bottom_(300×250)”, [300, 250], “pb-ad-78623” ).addService( googletag.pubads() ) ); } );

googletag.cmd.push(function() {
mobile_slots.push( googletag.defineSlot( “/1005424/_dPSv4_mob-all-article-bottom_(300×250)”, [300, 250], “pb-ad-78158” ).addService( googletag.pubads() ) ); } );

The post How to Add a Sun Flare to Your Images Using Photoshop by Yacine Bessekhouad appeared first on Digital Photography School.


Digital Photography School

 
Comments Off on How to Add a Sun Flare to Your Images Using Photoshop

Posted in Photography


How to do Non-Destructive Editing in Photoshop

26 Oct

Picture this, you are about halfway through editing a beautiful urban landscape in Photoshop. You’ve already put hours into the image when suddenly you notice that a particular area of the image doesn’t add up. A wall you were working on has accidentally been Clone Stamped to look as if it were hanging at an unnatural angle. It just looks wrong. After repeatedly hitting the undo button you discover that Photoshop can only remember so much, and you are stuck with this disastrous looking edit. All you can do now is waste more precious time trying to fix the problem or close the program and start from square one. If only there was some other way – enter non-destructive editing in Photoshop.

Non-Destructive Editing in Photoshop

Now you see me…now you don’t! Editing with a non-destructive workflow means that you can edit your photos without leaving a trace on the original file.

What is non-destructive editing?

Fortunately, there is a better way! Non-destructive editing (sometimes called NDE for short) is a method of editing in Photoshop that allows you to make changes to an image without overwriting the original image data. This means that you will always be able to backtrack on adjustments made to an image as needed, retaining flexibility and keeping the resolution of the original image intact.

You may have already encountered non-destructive editing while following online tutorials that instruct you to use a particular adjustment layer to make modifications rather than editing the actual image.

Non-destructive editing is not one single technique. You can perform it in numerous ways in Photoshop depending on the desired outcome of an image. For this article, we will have a look at some of the most basic methods used by photographers for doing non-destructive editing .

Duplicating the background layer

No matter what image you have opened in Photoshop, the first step is always to duplicate the background layer. If you do happen to make an adjustment directly onto the image the background layer will remain untouched. Then you can start afresh with all your adjustment layers intact.

To do this, open an image in Photoshop. Move the curser to the thumbnail image in the Layers panel and right click on the shaded area that says Background. Now select the Duplicate Layer option and select OK at the screen prompt. A new layer will appear above the Background layer in the layers panel titled Background Copy.

non-destructive editing duplicate layer

nondestructive editing Photoshop

non-destructive editing

Working with adjustment layers

Simply put, adjustment layers apply colour and tonal adjustments to an image without permanently changing any pixel values. To activate the adjustment layers panel click Window on the top menu bar and select Adjustments. It will bring up a panel with lots of adjustment options such as levels, hue/saturation, brightness/contrast, gradient overlays and black/white.  This is the go-to panel for digital editing and in most cases, it will provide all the editing tools you will need.

Non-Destructive Editing in Photoshop

Select one of the adjustment layers by clicking on an icon. The name of the icon will appear if you rest your mouse on it for a moment. In this example, I have chosen Curves to adjust the contrast in my photograph. Clicking that icon will cause the Curves panel to pop up with the available settings within that adjustment.

non-destructive editing curves

Non-Destructive Editing in Photoshop

Notice that there is now a new layer in the layers panel which is sitting above the one called Background. This means that any layers below the Curves layer will be affected by this adjustment. To limit the effect of an adjustment to a single layer only, right click on the adjustment layer and select Create Clipping Mask. A small arrow pointing down indicates that the adjustment layer will only affect the one that is sitting directly underneath it.

Non-Destructive Editing in Photoshop

Using Smart Filters

Adding a filter to an image can be done non-destructively and will allow you to undo the effects of it later if you change your mind. Click on the layer you would like to apply a filter to and click on the Filter drop-down menu located on the top main toolbar. Select Convert for Smart Filters and a pop-up will appear saying that you must turn the selected layer into a Smart Object. Hit OK and a tiny document shaped icon will appear in the bottom left-hand corner of the selected layer thumbnail image.

non-destructive editing convert smart filters

non-destructive editing smart object

After you select a filter from the Filter Gallery (via Filter > Filter Gallery) and apply it to the image, you will see two new items beneath the selected layer. Clicking on the eye icon next to the Filter Gallery layer will toggle the filter on and off, and double clicking near the Filter Gallery text will open the Filter Gallery adjustments. Right clicking on the Filter Gallery Layer will bring up a menu. If you want to remove a filter altogether, select delete and the filter mask will disappear without degrading your image.

non-destructive editing

Use Layer Masks instead of the Eraser Tool

Masking is one of the more common tools in the Photoshop master’s kit. Using a layer mask allows you to you hide or mmask off parts of an image rather than using the eraser tool to permanently remove parts of an image. To apply a layer mask, open an image, select the layer you want to edit and click on the small icon at the bottom of the layers panel.

non-destructive editing mask

Non-Destructive Editing in Photoshop

A close-up of the Layer Mask button.

A mask will appear next to the layer you have selected, with a small chain icon between the thumbnail and the mask. When you have the image icon selected any effects applied to the image will occur as normal. However, if you select the mask, you will find that painting onto it (with black) will hide parts of that layer.

Close up of the selected mask layer - note the white lines around the corners of the layer.

Close-up of the selected layer mask – note the white lines around the corners indicating which part is active.

Non-Destructive Editing in Photoshop

With the background layer turned off (not visible) you can see that part of this layer is missing, or hidden by the layer mask where it is black. Black conceals or hides, white reveals.

Now, if any hidden portion of the image is painted over in white on the layer, it will be visible again. If you then delete the mask all the hidden areas will reappear.

Dodging and burning non-destructively

The Dodge and Burn tools are used to lighten and darken areas of an image, but applying these effects directly to an image is destructive, preventing you from being able to edit the changes later.

To dodge and burn non-destructively, start by opening up your photo. Duplicate the background layer, then select Layer > New > Layer from the top menu bar. A dialogue box will pop-up, make sure your settings are the same as those shown below and hit OK. A new layer will be created.

Non-Destructive Editing in Photoshop

Create a new layer

Use the settings you see below. That will fill the layer with gray and change the blend mode to make it effective for dodging and burning.

non-destructive editing

Use these settings for your dodge and burn layer.

You can give this layer a nickname to help you remember what it is doing. You can always do it later if you forget, by double-clicking on the layer name. I usually call this layer “dodge/burn”.

Now simply select either the Dodge or Burn tool and apply any adjustments to this new layer. Though you are now editing one layer above the actual image, you have adjusted the blend mode so that the opacity of the grey Dodge/Burn layer is completely transparent, and any changes you make to this layer now appear to only adjust the image, without impacting the quality of the original pixels.

non-destructive editing dodge burn layer

Result of the dodge and burn layer

Result of the dodge and burn layer

Using the Clone Stamp non-destructively

The Clone Stamp is another great tool used to remove bits and pieces you may not want in an image. Normally it works by moving pixels in the original image around but, you guessed it, that is a very destructive technique!

To use the Clone Stamp Tool non-destructively simply create a new layer as before. Next, select the Clone Stamp Tool and in the Sample drop-down menu select the Current & Below option. Now the Clone Stamp Tool will sample everything in the image but only apply any changes to the top most layer.

clone tool

non-destructive editing

The clone layer looks like this.

clone tool non-destructive

The result of the clone layer being applied looks like this.

Conclusion

There are plenty of other methods to edit non-destructively. But as the basics show, non-destructive editing is mostly about using new layers that are placed above the original image rather than adjusting the original image itself. It may seem clunky at first, but it will soon become an automatic part of your workflow. The next time you find yourself with an awkward edit you’ll be glad you can simply turn a layer off rather than starting all over again.

How do you use edit non-destructively in Photoshop?

googletag.cmd.push(function() {
tablet_slots.push( googletag.defineSlot( “/1005424/_dPSv4_tab-all-article-bottom_(300×250)”, [300, 250], “pb-ad-78623” ).addService( googletag.pubads() ) ); } );

googletag.cmd.push(function() {
mobile_slots.push( googletag.defineSlot( “/1005424/_dPSv4_mob-all-article-bottom_(300×250)”, [300, 250], “pb-ad-78158” ).addService( googletag.pubads() ) ); } );

The post How to do Non-Destructive Editing in Photoshop by Megan Kennedy appeared first on Digital Photography School.


Digital Photography School

 
Comments Off on How to do Non-Destructive Editing in Photoshop

Posted in Photography