RSS
 

Posts Tagged ‘Photos’

In photos: Flowing fins of Siamese fighting fish

25 Dec

fish-2.jpg

Thai photographer Visarute Angkatavanich has created a stunning series of close-up portraits of Siamese fighting fish. With simple backgrounds and dramatic lighting, the images show off the species’ vivid colors and graceful fins. Siamese fighting fish, also known as Betta, now days are a popular aquarium fish. See gallery

News: Digital Photography Review (dpreview.com)

 
Comments Off on In photos: Flowing fins of Siamese fighting fish

Posted in Uncategorized


Blog Project: Your Best Photos From 2013

18 Dec

The post Blog Project: Your Best Photos From 2013 appeared first on JMG-Galleries – Landscape, Nature & Travel Photography.


Related Stories

  • The Old Guard – Bristlecone Pine Forest, California
  • The Old Guard – Bristlecone Pine Forest, California – Enclosure
  • Save 25% on my eBook and Star Trail Webinar Now Through Dec. 2nd
Feed Ads by FeedBlitz
powered by ad choices


JMG-Galleries

 
Comments Off on Blog Project: Your Best Photos From 2013

Posted in Equipment


15 December, 2013 – Finding Photos In Your Garden, etc.

15 Dec

It has been a cold week in the US.  Here in Indianapolis it got down to 5 degree (F) a day ago.  For you Celsius people that is -15.  We have published a lot of Antarctica images and ice and it is all too much a reminder of winter.  So, today we switch gears and give you a glimpse of warmer times to come.  Frank Sauer shares his article on Garden Variety.  This is an essay on photographing in your own backyard.  However it is a lot more.  It reminds us that we can find a lot of things to photograph near our homes without having to travel great distances.  Take your camera off the shelf and get out and find something close by that you have seen many times and try to see it differently.  Take some images and if you are bold enough share them on the forum.  

There was great response to Adam Woodworth’s recent article on Landscape Astrophotography.  Adam has made a 30 minute video illustrating how he works the image to come up with the final image.  It’s a great Photoshop tutorial on blending and layers.  Check it out HERE.

My good friend and fellow workshop leader Josh Holko from Australia recently completed a beautiful video about the Arctic.  There is some excellent photography in the video and it is well done.  Enjoy Arctic Expedition

Speaking of Arctic Expeditions, stay tuned this week as LuLa launches 2 back to back Arctic trips this July.  These will be most unique so look for our announcement very soon.


You can win an all-expenses paid photographic expedition to Antarctica, along with air fare from anywhere in the world. The value of this prize is $ 15,000.

The Luminous Landscape wants you to try any of our more than 60 training or travel videos and our new free video player. Each purchase is an entry, and an annual subscription that includes all previous as well as new videos counts as six entries. The winner of a free lifetime subscription is also chosen from each month’s entries.

FIND OUT MORE


The Luminous Landscape – What’s New

 
Comments Off on 15 December, 2013 – Finding Photos In Your Garden, etc.

Posted in News


How to Upload Photos to Flickr and 500px using Lightroom 5

14 Dec

Lightroom 5 Publish Services

The main benefit of Lightroom’s Library module is that it saves you time. It is much quicker, and ultimately simpler, to organize your photos using Lightroom Collections, than it is to search through the folders on your hard drive containing those photos when you need something.

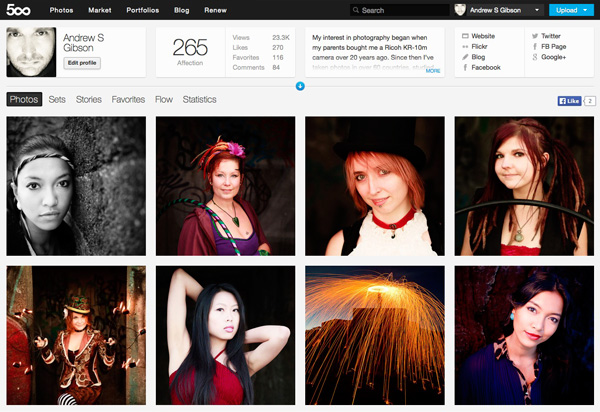
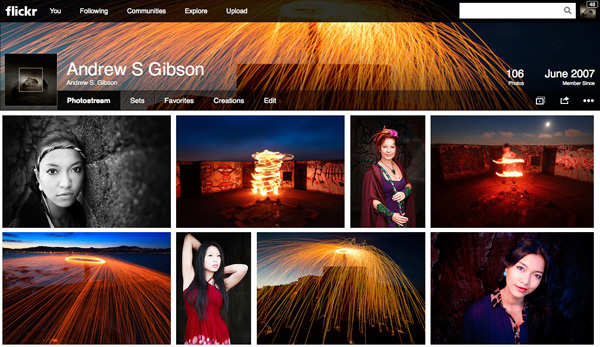
The skills you’ve learned so far in this series (yes, there is a series – I’ll provide links to the relevant articles at the appropriate points) all come together with Lightroom’s Publish Services. You can use these to publish photos to photo sharing websites like Facebook, Behance, Flickr, 500px and more. Today I’ll concentrate on the two you are most likely to use for your best images: Flickr and 500px.

How to Upload Photos to Flickr and 500px using Lightroom 5

Publishing Collections

Lightroom 5 Publish Services

Lightroom’s Publish Services use a special type of Collection called Published Collections (there are also Published Collection Sets and Published Smart Collections). These are the same as regular Collections (which you can learn more about in my article Use Lightroom Collections to Improve Your Workflow) except for these key differences:

  • Published Collections have one purpose only:  to publish your images to either a hard drive location or a photo sharing website such as those listed above.
  • Published Collections are dynamic. They tell you if a photo has changed after you have published it, so you can re-publish it.

Here’s how it works. You create a Published Collection containing the photos that you would like to upload to a website (for example, Flickr). Lightroom tells you which photos have already been uploaded, and which ones haven’t. But wait, there’s more: if you publish a photo to Flickr, then make changes to that photo in Lightroom’s Develop module, Lightroom’s Publish Service marks it and gives you the option of uploading it again.

That’s clever, and very, very useful, as it enables you to see at a glance whether you have uploaded the most recent version.

Setting up a new Flickr Publish Collection

That’s the theory, let’s see how to put it into action:

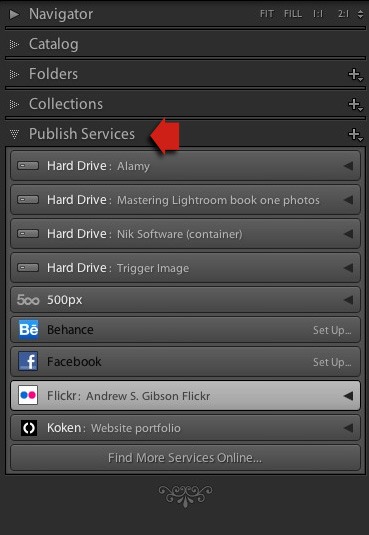
Step 1. Go to the Publish Services panel. It’s at the bottom of the left-hand panels in the Library module (see below)

Lightroom 5 Publish Services

Step 2. Click the New Published Collection icon and select the Go to Publishing Manager option.

Lightroom 5 Publish Services

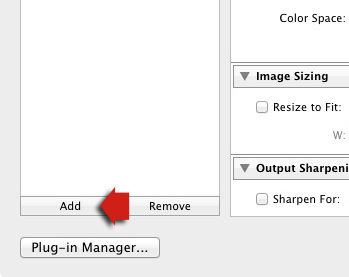
Step 3. Click the Add button in the bottom left of the Publishing Manager window.

Lightroom 5 Publish Services

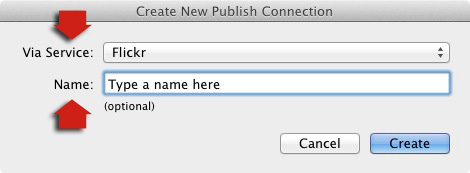
Step 4. In the next window, select Flickr from the Via Service drop-down menu. Type a name for your service underneath.

06

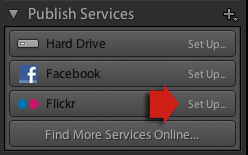
Alternatively, if this is the first time you’ve done it, you’ll see something like the screenshot below. Click the words Set Up next to the Flickr icon to get started.

05a

Step 5. Start by clicking the Authorize button and entering your Flickr log-in details. This authorizes Lightroom to access your Flickr account.

07

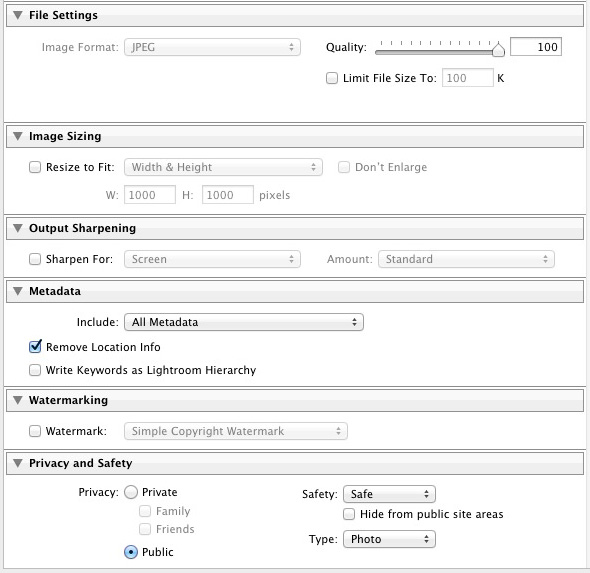
Step 6. Now it’s just a simple matter of adjusting the settings to what you want. The most important ones are near the bottom of the Publishing Manager window. You can set things like image quality, image size and sharpening, add a watermark, set which metadata (if any) to include and select the appropriate privacy setting. Press the Save button at the bottom-right of the window when you’re done. The Flickr Publish Service is now set up.

08

Using the Flickr Publish Service

You’ll see that there is a Published Collection called Photostream in the Flickr Publish Service. Any photos you add to this Published Collection will be uploaded to your Flickr account using the size and quality settings you selected earlier.

Lightroom 5 Publish Services

Click on the Photostream Publish Collection and you’ll see something like the image below if you’re in Grid View – press ‘G’ on your keyboard if you aren’t. If you’re not familiar with how Grid View works, then see my article Making Sense of Lightroom’s Grid View.

09

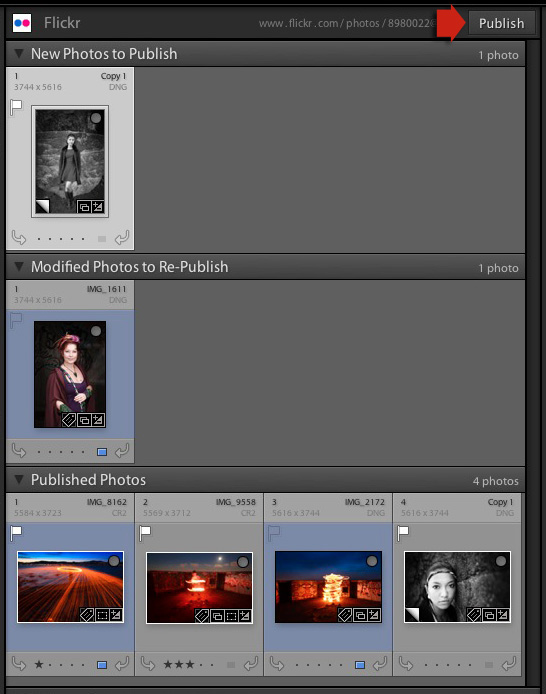
There are three sections:

New Photos to Publish: photos added to the Published Collection but not yet uploaded to Flickr. Click the Publish button at the top right to publish them.

Modified Photos to Re-Publish: these are photos already uploaded to Flickr that have changed since being published. Note that any change, however minor, will result in a photo appearing in this section. That includes things like adding keywords, or any tweaks you make in the Develop module. Modified photos are uploaded again when you press the Publish button. If you don’t want to upload the modified photo, right-click on the thumbnail and select the Mark as Up-to-Date option.

Published Photos: Photos already published to Flickr.

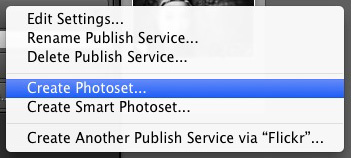
You can also manage Flickr Photosets from within Lightroom. Right-click the Flickr Published Collection heading and select Create Photoset from the menu. This lets you add photos to Sets as well as your photostream.

10

Finally, another benefit of using Lightroom’s Publish Services is that you can add keywords and a description to your images in Lightroom and these are populated automatically when you upload your photos to a photo sharing website. That means you only have to type in those details once, instead of multiple times. You can learn more about keywords in my article Creative Ways to Use Keywords in Lightroom 5.

Publishing to 500px

The 500px Publish Service works in a similar way to the Flickr Publish Service except that it is not built-in to Lightroom. You need to download the plug-in from the 500px website, which you can do here.

Unzip the file and move it to your Programs folder (PC) or Applications folder (Mac). Go to the Lightroom Plug-in Manager (File > Plug-in Manager) and click the Add button to install the plug-in. Once installed, it works virtually the same way as the Flickr Publish Service. The main difference is that the 500px plug-in downloads any photos you have already uploaded to 500px and adds them to your Lightroom Catalog.

Mastering Lightroom Book One: The Library Module

Mastering Lightroom ebook

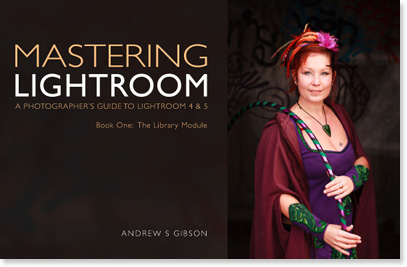
My latest ebook Mastering Lightroom Book One: The Library Module is a complete guide to using Lightroom’s Library module to import, organize and search your photo files. You’ll learn how to tame your growing photo collection using Collections and Collection Sets, and how to save time so you can spend more time in the Develop module processing your photos.

The post How to Upload Photos to Flickr and 500px using Lightroom 5 by Andrew Gibson appeared first on Digital Photography School.


Digital Photography School

 
Comments Off on How to Upload Photos to Flickr and 500px using Lightroom 5

Posted in Photography


TIME’s top photos of the year

07 Dec

lb_lopez.jpg

Each year TIME picks 10 images from 10 photographers to represent some of top news stories of the year. From the massacre at the Westgate Mall in Kenya, the Boston Marathon bombings, to the recent typhoon in the Philippines, the collection highlights the work of seasoned photojournalists. Learn more

News: Digital Photography Review (dpreview.com)

 
Comments Off on TIME’s top photos of the year

Posted in Uncategorized


5 Tips for Successful HDR Photos

05 Dec

How do you create successful HDR photos? It’s a question that I’ve gotten from time to time, and before we get started with this post I do want to make clear that there’s no question that HDR photography is one of those never ending battle grounds in the photography world. Much like the Windows vs Apple battle of the PC world, HDR vs non-HDR is a battle that continues to stir the pot.

Five tips for successful HDR photos – for those that wish to do it!

While it’s always fun to add fuel to the fire from time to time, let’s put the argument of whether or not it’s a valid form of photography aside for a minute, and simply focus on trying to get those who wish to learn a new technique on the right track from the start.

Tip #1 – use a tripod

HDR Photography Tip - Use a Tripod

Using a tripod to photograph HDR brackets helps keep the frames from shifting between shots. (This image was taken with my iPhone using an Olloclip fisheye lens and processed using Snapseed)

This should be a no brainer and I really didn’t even want to put it into this article, but alas, here it is.

A tripod will not only allow you to stabilize each individual image (some of which may be fairly long shutter speeds), but in order to capture the full dynamic range of the scene you will need to take multiple exposures with your camera and it’s vital that these frames line up perfectly. A tripod will ensure that each frame you capture is identical to the previous one, with the only exception being the exposure times.

Tip #2 – don’t tone map a single exposure and call it HDR

I see this all the time, and while I understand it’s a great way to get more out of a single exposure, it’s not really an HDR image. Yes you can create an underexposed, neutral, and over exposed image in Lightroom from the same RAW file, and then merge those three images into one HDR photo, but it’s really not the same as capturing individual images.

Why you ask? Simple. When you capture one exposure at a given set of settings (Exposure Values) on the exposure triangle you are recording data within that given range. No matter what you do to that file in post production the data captured by the camera doesn’t change – you’re only changing the way in which that data is output into an image.

When you capture three or more images at different exposures (EV), then those three images are all going to have different levels of data from which you can pull; allowing for a truly high dynamic range photograph. The more images you capture the more data you’ll have at your disposal. That being said there’s the law of diminishing returns, which basically means that there comes a point when adding more data to the pile doesn’t help improve the photograph.

Tip #3 – know when you need it and when you don’t

hdr-photography-tips-01

Use HDR only when you need it (IE: when the light range of your scene is too large to capture in a single exposure)

Some people use HDR for every photograph they take. In fact it’s step two on this list of 10 Steps Every HDR Photographer Goes Through. You do not have to do this.

HDR stands for ‘high dynamic range’ so if you’re photographing a scene where the lighting is fairly even from shadows to highlights (the scene fits nicely on the histogram, with nothing clipped at either end of the scale) you don’t need to do HDR. Your camera is capable of pulling out enough detail from the highlights and shadows to cover the scene in its entirety with one exposure. It’s also probably not worth it to try capturing moving objects or people in HDR as they typically don’t look right when they get tonemapped.

So when should you use HDR?

Use it during sunrise or sunset, especially when you are photographing into the sun. Use it to photograph during the middle of the day. Use it to photograph architecture or man-made objects, as HDR has a way of really bringing out the detail of craftsmanship.

Tip #4 – invest in a good tone mapping program

Once you capture your bracketed set of photos you’re going to want to put them together in the best way possible. There are a ton of great programs out there to do this, but I recommend using either HDR Soft’s Photomatix Pro or Nik Software’s HDR Efex Pro. There are free alternatives out there, but I find that they don’t do as good of a job at tone mapping. Remember the tone mapping process is done algorithmically so the more powerful the software’s algorithms, the better the end results.

Tip #5 – control the urge to go big

HDR Tip - Avoid Going Too Big

Avoid the urge to create surrealistic photos (unless this is truly the style you wish to go in).

This is where HDR really becomes a touchy subject. Some people say that it’s their style to create over the top, surrealistic style, HDR photography and other’s say that they are destroying the world of photography by creating these highly saturated and oddly lit photographs.

It’s easy to get carried away with tone mapping your images, but if your goal is to recreate what you saw, the best way to do this is to remember to tone it down a bit before you press that process button. It’s also a good idea to watch out for haloing which takes place typically along tree lines (as you see in the photo above above the dark trees on the left side of the image).

hdr-photography-tips-02

Final word

While this is not an exhaustive list of HDR tips, it is a good start to get you on the right track to capture your first high dynamic range photos. That said, if you’re a bit more experienced with HDR and are looking to take your HDR photography to the next level, check out this post Creating HDR Panoramic Photographs written by one of my buddies on his HDR workflow process for creating massive HDR Panoramic images.

Do you have some tips to add to the list? Leave one in the comments below!

Post originally from: Digital Photography Tips.

Check out our more Photography Tips at Photography Tips for Beginners, Portrait Photography Tips and Wedding Photography Tips.

5 Tips for Successful HDR Photos

The post 5 Tips for Successful HDR Photos by John Davenport appeared first on Digital Photography School.


Digital Photography School

 
Comments Off on 5 Tips for Successful HDR Photos

Posted in Photography


Anamorphic adapter lens makes for widescreen iPhone photos

04 Dec

lens.jpg

A new Kickstarter project from Moondog Labs hopes to bring a wider view when shooting with the iPhone 5 and 5s. With Moondog Labs’ 1.33x Anamorphic Adapter lens, a video shot on the iPhone in the standard 16:9 aspect ratio gains about 33% more width. Still images shot in 4:3 are expanded to 16:9. Learn more at connect.dpreview.com.

News: Digital Photography Review (dpreview.com)

 
Comments Off on Anamorphic adapter lens makes for widescreen iPhone photos

Posted in Uncategorized


30 Foul Weather Photos for Inspiration

24 Nov

By John

This week I want to give you a little push to get out of your comfort zone. Turn of the television and get outside and shoot – no matter what the weather. As a matter a fact, in spite of the weather is even better!

Take your photography up a level

Many photographers pack up their gear and head home at the slightest sight of inclement weather. But some of the very best and most dramatic images are to be had if you are willing to brave the elements. Just make sure you are prepared and stay safe. Take the follow precautions:

  • a rain cover for your bag
  • a rain cover for your camera, it’s not water proof!
  • rain gear and boots for yourself, there’s nothing more uncomfortable than being wet or cold or both
  • stay a safe distance away of lighting – you are after all carrying with you a lighting rod (tripod)

Having said that, I hope these images inspire you to do what most others do not as this will almost certainly take your photography up a notch. Being willing to do what’s hard or unpopular is the key to standing apart and making some “wow” images to amaze your friends.

Here are 30 foul weather photos by photographers who did just that, enjoy!

By QtrFlash

By Evan Bornholtz

By Marcus T Ward

By arbyreed

By Marcus Böckmann

By Masashi Mochida

By Gabriel Anast

By Mark Dumont

By Boston Public Library

By Robyn Jay

By Mark A Coleman

By Navaneeth Ashok

By Jean Piere Candelier

By DaveTBear

By hinderik

By Marilylle Soveran

By ap.

By M Gleason

By phani_astronomy®

By Viola & Cats =^..^=

By jimmedia

By Pam Link

By Joe Vahling

By Simon

By Rehman Chughtai

By Roy

By Hartwig HKD

By Héctor García

By David Yu

Added – extra photo just for our commenters that wanted “fowl weather”

By Kevan Davis

Post originally from: Digital Photography Tips.

Check out our more Photography Tips at Photography Tips for Beginners, Portrait Photography Tips and Wedding Photography Tips.

30 Foul Weather Photos for Inspiration

The post 30 Foul Weather Photos for Inspiration by Darlene Hildebrandt appeared first on Digital Photography School.


Digital Photography School

 
Comments Off on 30 Foul Weather Photos for Inspiration

Posted in Photography


French newspaper publishes issue with no photos

18 Nov

liberation-01.jpg

At a time when the journalism industry is struggling to stay in business, photojournalists have been hit especially hard. Earlier this year, the Chicago Sun-Times laid-off its entire staff in favor of giving reporters iPhones. The French newspaper Libération showed its support for photographers by publishing its November 14th issue with all the images removed. See the spread

News: Digital Photography Review (dpreview.com)

 
Comments Off on French newspaper publishes issue with no photos

Posted in Uncategorized


In Photos: Family business documented shipwrecks

18 Nov

Minnehaha_sailing__courtesy_of_Sotheby_s.jpg

The National Maritime Museum in London recently acquired a dramatic shipwreck photo collection from the nineteenth and twentieth centuries. John Gibson started a family photography business in the 1860s and took his first photograph of a shipwreck in 1869. His family has created some of the most evocative images of misadventure at sea over the last 125 years. See gallery

News: Digital Photography Review (dpreview.com)

 
Comments Off on In Photos: Family business documented shipwrecks

Posted in Uncategorized