RSS
 

Posts Tagged ‘Photos’

10 Photography Hacks that will Dramatically Improve Your Photos

18 Mar

Mike is the author of the eBook Hacking Photography: A Plain-English Guide to Taking Impressive Photos – Fast, on sale now for 60% off at SnapnDeals.

There is a widely accepted rule called The Pareto Principle also known as the 80:20 rule. In short, it states that 80% of the results come from 20% of the efforts. I find that in learning photography, this can even skew much higher. This means that potentially improving 5% of your photographic knowledge in the right places, could improve your photography by 95%!

10 photography hacks that will dramatically improve your photos

Hack 1 – Turn the flash off of automatic!

Camera manufacturers are often too eager to make the flash pop up even when it gets slightly dark. This is actually a retention tool for them. If the flash pops, the photo won’t look as good but people won’t be blurry because the flash freezes them in place. If enough new photographers see blurry photos (even though they are caused by improper photographer technique) they will assume something is wrong with the camera and take it back for a refund.

Instead, keep the flash closed and increase the ISO. In all the camera modes except manual mode, increasing your ISO will cause the camera to increase your shutter speed to have a better chance of freezing people in motion. Now shoot the photo. It will use the ambient (available) light, which typically has more color and character instead of a bright face and black background.

Hacking photography music

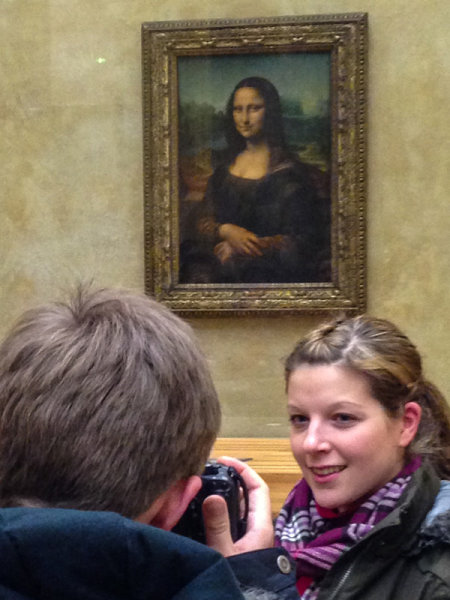
Hack 2 – Get in close to your subject…then get closer

Most people think that they have to step way back and get a lot of space around the subject to get the whole scene. Your subject is not a mime that is stuck in an invisible box, it’s okay to cut off their foreheads, legs, or lower half every now and then! Try getting a close-up of someone’s face from the eyebrows to the mouth. Here is a quick example:

Hacking photography get closer

The problem with zooming way out for every photo is that it doesn’t make it plainly obvious to the viewer what is the point or subject of the photo. I’m a huge fan of subtraction – the less there is in your photo the better. The best images are simple and very clear to the viewer what “story” you are telling with your images.

Hack 3: Eliminate the clutter

This is huge! The best images are ones that are simple and have breathing room for the subject. Try to find the simplest background possible. It’s no different than walking into a super cluttered house versus walking into a clean minimalistic space with very few items to distract you.

If you are taking a photo of a person, take the extra second to look around and find a minimal background that doesn’t distract the viewer.

Hack 4: Look for repeating patterns

Ever hear someone say that a photographer “just has the eye for it?” I disagree. This is a learned skill, not something that you are born with.

As you walk around, take notice of buildings, windows, patterns in brickwork, etc. I was walking by a building I walk by all the time and something suddenly ‘clicked’ and I realized there was a really cool pattern in the brickwork I had never noticed before. I ran home and grabbed my camera to shoot it before I forgot again.

Hacking photography repeating patterns

Hack 5: Shoot from interesting perspectives

I would argue that 99% of photos most viewers ever see are shot from eye-level where the photographer was standing – the same viewpoint we see 99% of our lives from. It’s no surprise when you go to the top of a huge building and look down at a city that it’s visually stunning because we don’t see that perspective very often. You see this birds-eye-view used a lot in food photography.

Hacking photography birds eye view

The same goes for getting down on your stomach and shooting straight up to the sky. Anytime you are afforded a unique viewpoint it’s always interesting to the viewer.

Hack 6: Look for symmetry

Your viewer will do backflips if you can find an image that perfectly reflects the same thing top to bottom, or right to left! How many times have we seen something every day then see a photographer create an image that is an entirely different view of that item?

I took a photo trip to Italy and consciously tried to capture as much symmetry as I could. Here is a quick symmetrical shot:

Hacking photography florence moon

Always keep an eye out for perfect symmetry!

Hack 7: Straighten your lines

Instead of just clicking away when you see something interesting, take the extra second to make sure horizontal lines are horizontal, and vertical lines are vertical. We all have the habit nowadays of just pointing our cameras in the general vicinity of what we are shooting. I propose you take a moment and line yourself up perfectly with that building or person.

Hack 8: Max out the aperture

What most people perceive as “artistic” photographs (AKA better than most) are ones that use a big aperture (small f-number) to blur the background or foreground, to call more attention to a subject. If you are using a kit lens your aperture will likely only go down to f/3.5, which isn’t a very big aperture.

The biggest impact item, and cheapest investment in gear that can make your photos go from okay to awesome is a lens with a huge aperture. I recommend purchasing a 50mm f/1.8 new on Amazon for $ 130-200 (Canon 50mm f/1.8 or Nikon version) or you can usually find them in perfect condition, used, for between $ 80-150.

Hacking photography aperture

Hack 9: Know where the light is coming from, and the quality

It’s funny how easy it is to take great photographs if you are just simply aware of these two things. Think about this: if you are shooting a photograph of someone outside and the sun is directly behind him or her, they will show up as a dark silhouette. If all you did was switch positions with this person so they are facing the sun, they will be nicely lit.

Being aware of the direction and quality of light can also ties into step 4 above. I walked outside of a building, looked down an outside walkway and noticed the shadows formed a really cool pattern because the sun was very bright and coming in from the left. This made an interesting arch pattern that almost looked like an MC Escher sketch.

Hacking photography maze patterns

Hack 10: Use the Rule of Thirds

The rule of thirds is the simplest and most under-utilized tip in the book. Are you ready for the quickest and easiest lesson yet? Here we go: go into your camera and turn on the “Grid” function which will show a grid in your viewfinder with horizontal and vertical lines when you look through it. 99% of new photographers put their subject smack in the middle of the frame when they compose the photo. The viewer also sees 99% of photos with the subject right in the middle of the frame because they look directly at a person, item, etc. This gets really boring really quickly, as we discussed earlier.

The tic-tac-toe rule

Imagine a tic-tac-toe board when you look through your viewfinder. Some cameras have a ‘grid’ function you can turn on to see this through the viewfinder. You always want to line up the point of interest where the lines meet each other. When you compose your photo, line up the point of interest at either 1/3 to the right or left of the frame, and/or the top or bottom 1/3. You want to give your subject room to breathe in the frame.

I caught this at a huge Halloween party Miller-Coors sponsored. You can see who got the attention at the intersection of the top and left 1/3 marks. Note the people on bottom all line up with the bottom horizontal 1/3 line.

Hacking photography rule of thirds

Wrapping up

If you follow these 10 hacks, your photography will take a giant leap forward. I recommend experimenting with one of these hacks per day for 10 days. After you get used to thinking about each one, you will eventually internalize the lesson so it will just happen instinctually. That’s when photography really gets fun. I can’t wait to see what you come up with.

Please share any additional tips in the comments section below.

For more on these hacks grab Mike’s eBook Hacking Photography: A Plain-English Guide to Taking Impressive Photos – Fast, on sale now for 60% off at SnapnDeals.

The post 10 Photography Hacks that will Dramatically Improve Your Photos by Mike Newton appeared first on Digital Photography School.


Digital Photography School

 
Comments Off on 10 Photography Hacks that will Dramatically Improve Your Photos

Posted in Photography


5 Steps to Help you Take Better Landscape Photos

10 Mar

When photographing landscapes, it can sometimes be difficult to produce a an image that is focused in its content, that leads the viewer’s eye exactly where you as the artist want it to go.   Sometimes, even though you may be presented with a beautiful vista, an image may not present itself and you have to work to find it.  Here are five basic steps to help you take better landscape photos. I follow these any time I’m looking to create a landscape image.

#1 Find your subject

Sometimes it’s easy. You choose a building, or a rock formation, or a tree, and it all just comes together.  Other times, it becomes more difficult.   Sometimes nothing in particular stands out.  Look around the scene, find something that draws your eye. Look through your viewfinder, and see how things frame up through your camera’s eye.  Once you have found your subject, you have more decisions to make.

Haystack Rock is a fairly obvious subject. But there are myriad options when it comes to photographing it.  For this image, I decided to use a tidal pool and some rocks in the foreground, but also wanted to include plenty of sky since there was so much interest in the clouds.

Haystack Rock is a fairly obvious subject. But there are a myriad options when it comes to photographing it. For this image, I decided to use a tidal pool and some rocks in the foreground, but also wanted to include plenty of sky since there was so much interest in the clouds.  The rocks and water create some nice lines leading right to Haystack Rock.  EOS 5D Mark III with EF 14mm f/2.8L II, at f/16, ISO 100.

#2 Where is your subject in the composition?

There was no real foreground to speak of here. Just a lot of sand and some uninteresting brush.  What I did see was the way the moon was rising between the arms of the saguaro, and the soft gradation from orange to blue as the sun set behind me.  Taken with EOS 5D Mark III, EF 70-200 f/2.8L IS II, 1/20 @ f/22, ISO 1000.

There was no real foreground to speak of here. Just a lot of sand and some uninteresting brush. What I did see was the way the moon was rising between the arms of the saguaro (cacti), and the soft gradation from orange to blue as the sun set behind me. Taken with EOS 5D Mark III, EF 70-200 f/2.8L IS II, 1/20 @ f/22, ISO 1000.

This will partly be dictated by its location in relation to you, but also by what else is in your scene. Look for interest in relation to what you’ve chosen as the subject. Is there an interesting object or pattern in the foreground, which could lead the viewer’s eye to the subject? Is there something in the foreground that frames your subject or otherwise adds interest without being distracting?  I will often use water or rocks in the foreground if I can.  If it’s water, can you get a reflection of your subject in it?  Sometimes it’s leaves, sometimes trees or a fence.

If there is nothing in the foreground, try minimizing it by putting the subject as the foreground, and looking for background interest.  Interesting clouds or sky, buildings, or trees, can all create a backdrop for the landscape. Sometimes, you’re lucky enough to get both an interesting background AND foreground. These are the times to play with your composition and vary the amounts of foreground and background to see what works best, or what doesn’t work at all.   Generally speaking, if the sky is flat and lacks interest, I will place it in the top third of the frame, using the rule of thirds.  If the foreground lacks interest, I place that in the bottom third.

#3 Tie it together

Once you decide where your subject goes in the frame, what’s in the foreground and what your background will be, it’s time to find a way to tie it all together. Are there leading lines that will lead your viewer from foreground to background?  Leading lines are an easy way to tie your composition together.  Framing is another way, which I included in my discussion of choosing your foreground.  Without tying your composition together, it can often seem like you have two separate images in one.  Creating a composition that pulls the viewer through it and leads them where you want them to look is the best way to create an effective landscape image.

For this image of Kaaterskill Creek, I knew the small cascade was my main subject.  There were some rocks to create interest in the foreground, and the water creates a nice leading line back to the cascade in the middle ground, and then to the foliage in the background.  EOS 5D Mark III with EF 16-35mm f/2.8L II. I was zoomed into 35mm on this one. Exposure was 1.6" at f/20, ISO 100.

EOS 5D Mark III with EF 16-35mm f/2.8L II. I was zoomed into 35mm on this one. Exposure was 1.6″ at f/20, ISO 100.

For this image of Kaaterskill Creek (above), I knew the small cascade was my main subject. There were some rocks to create interest in the foreground, and the water creates a nice leading line back to the cascade in the middle ground, and then to the foliage in the background.

#4 Read the light

Are you at your location at an optimal time? Some locations are better in the early morning, some in late afternoon.  Some are good no matter what time you are there. The difference in the light at these times can mean the difference between a dramatic landscape image, or a snapshot of a pretty place. To find out where the sun will be in a given location at a given time, use an app such as The Photographer’s Ephemerus, or Sunseeker Pro, which will show you the sun’s exact location.  This will enable you to plan when to be a location for optimal light.

Side lighting will create dramatic shadows and show off textures. Backlighting will help create silhouettes, which can be very effective for dramatic images with prominent features breaking the horizon. Front lighting will reveal detail everywhere. Often, I will photograph the same location at different times, as different light will create a variety of images from the same location.

Montauk Point is a great location with lots of photo opportunities, but it's a much better location at sunrise than later in the afternoon or at sunset, due to the shadows created by high cliffs. At sunrise, it can be magical. EOS 5D Mark II, EF 17-40 f/4L. Exposure was 15 seconds, f/11, ISO 800.

EOS 5D Mark II, EF 17-40 f/4L. Exposure was 15 seconds, f/11, ISO 800.

Montauk Point (above) is a great location with lots of photo opportunities, but it’s a much better location at sunrise, than later in the afternoon or at sunset, due to the shadows created by high cliffs. At sunrise, it can be magical.

#5 Choose your shutter speed

Finally, think about what your shutter speed will do to the image.  If you’re shooting water, shutter speed has a lot to do with the water’s appearance in your image. If there are trees, and it’s a breezy day, a faster shutter speed will be necessary to freeze the leaves and avoid motion blur. These are things to be aware of when composing your image.  Learning to visualize these effects in your mind before pressing the shutter button will go a long way toward making you a better photographer.

The Minneapolis skyline was an obvious choice for subject here. But the sky was flat for a background, so I pushed the skyline to the top of the frame.  Thankfully, I caught the Mississippi River on an uncharacteristically calm day and was able to get a nice reflection for foreground interest.  EOS 5D Mark II with EF 24-105 f/4L IS. Exposure was 10 seconds at f/11, ISO 400.

EOS 5D Mark II with EF 24-105 f/4L IS. Exposure was 10 seconds at f/11, ISO 400.

The Minneapolis skyline was an obvious choice for subject here. But the sky was flat for a background, so I pushed the skyline to the top of the frame. Thankfully, I caught the Mississippi River on an uncharacteristically calm day and was able to get a nice reflection for foreground interest. I used a slow shutter speed  (or long exposure) to smooth the waters even more.

Do you have some great landscape tips you’d add to this list? Please share in the comments below.

The post 5 Steps to Help you Take Better Landscape Photos by Rick Berk appeared first on Digital Photography School.


Digital Photography School

 
Comments Off on 5 Steps to Help you Take Better Landscape Photos

Posted in Photography


10 Ways to Improve your Vacation Photos

09 Mar

dPS-Detail

This has probably happened to all of us. We’ve just come back from an exciting trip and want to share all the wonderful moments with our friends and family. But after a brief moment we seem to be the only ones still enjoying the picture-show. Everyone else has quickly lost interest.

So what can we do to stop putting people to sleep with our vacation photos?

Here are some tips to help you take vacation photos that everybody will love. It’s easier than you might think, and it definitely doesn’t require expensive equipment. Keeping in mind some basic rules, you can take stunning images even with your mobile phone.

Let me take you to Paris and show you how with these 10 ways to improve your vacation photos:

#1 – Don’t rush – take your time

It often happens that you get to a beautiful place and start photographing right away. But wait. Unless it’s a sunset or fast moving group of people, nothing is going to run away from you. Instead take your time to wander around a little bit sucking up the atmosphere.

Here’s an example. Last month I went to Paris. When I got off the metro and the Eiffel Tower appeared, I was immediately tempted to take a picture. Actually everybody around me started shooting right away.

I decided to stroll around first. In my mind I was framing, but I left my camera in the bag. This slow approach helped me to get a feeling for the place and to figure out what it was that I wanted to capture.

#2 – Reflections

Avoid the obvious. When everybody is looking in one direction, look the other way. You may be surprised what you’ll find: impressive reflections, for example.

This is a great way to show a familiar sight in a new light – such as the Eiffel Tower. The giant monument can be seen from almost every point in downtown Paris. It is reflected in car windows or in water puddles at night.

The distortions add a sense of humour or even mysteriousness. Those viewing the image can quickly identify what’s in the photo, yet the unfamiliar perspective puzzles them.

DPS Reflection 2

#3 – Tilt your camera

When taking a picture of a sunset, the horizon should be straight. But when it comes to buildings, it’s perfectly all right to tilt your camera to create a new angle. Don’t be afraid, not everything has to be placed perfectly aligned in the center of the frame.

Just don’t do it part way. If you opt for an uncommon perspective, do it all the way. That is to say let the observer understand that you tilted the camera on purpose, and that the building is not accidentally inclined either to the left or right.

dPS-Tilted-Camera

#4 – Incorporate the surroundings

dPS-Surroundings

When sightseeing we are never alone. There will always be other tourists around. Thus getting a clear shot with no one in the picture is often impossible. What you can do instead is to incorporate other people into your composition.

It’s actually quite a lot of fun to photograph other people taking pictures. You add another story and layer to your images: a picture within a picture.

#5 – Frame within a frame

Holes, doorways or windows are perfect elements to use as other frames within the frame of your camera. This way you can add another dimension and more depth to your images making them appear almost three-dimensional.

But, that’s not all. Light shining through a window with its reflections and shadows is visually pleasant. And peaking through a window subconsciously suggests some mystery and being able to witness something from a hidden point of view that maybe wasn’t meant for our eyes to see.

DPS Frame 1

#6 – Geometry

Look out for lines and patterns that can be used to lead the eye of the observer and make your picture more dynamic, like this winding staircase (below), for example. The eye gets hooked on the left top corner and follows the stair railing as it curls towards the center on the right.

DPS Geometry

Lines are a simple, yet very powerful tool, of photographic composition that make images more interesting and engaging.

#7 – Light

Photography is painting with light. So the quality of light is very important. Bright sunlight at noon, with its harsh shadows, is different from the soft tones of a sunset. Be aware of the different emotions that can be evoked by light and use it as a tool to create strong effects.

With backlighting you can create interesting silhouettes, for example, as can be observed in this image of a monument (below). The foreground is heavily underexposed. There are no details in the monument or the tree. Everything is stripped down to its basic shape and form, yet still allowing you to identify at first glimpse what kind of scenery is documented in the image.

DPS Light

#8 – Clean frames

One common mistake is to incorporate too many elements in one frame. A panoramic shot is great to give an overview of a place. But in general it’s more effective to clean up your photos. Keep it simple.

Simplicity of the frame helps the human mind to better process the information – faster and more efficient than if the observer is confronted with an overloaded image.

Ask yourself: What do I want to say with this picture? Then throw out all the elements that are not important to the statement you wish to express.

dPS-Clean-Framing-2

#9 – Details

Zoom in. Sometimes it’s difficult to capture everything that’s unfolding in front of you. When I was standing in front of the castle of Versailles I was overwhelmed by its pure magnitude. The big courtyard leading up to the main entrance, and the impressive long stretched building in the back. What to make of a situation like that photographically?

A good way to resolve a panorama like that is to focus on details. As hard as I tried I couldn’t get a clean shot of the golden gate and the castle. There were either some other tourists taking picture or all the elements were overlapping each other.

DPS Detail

#10 – Be playful

How many pictures do you have standing rigid in front of an important building, or beautiful landscape? There’s nothing wrong with the typical “I-have-been-there” shot. But it’s more fun to spice it up a little bit.

Interact with your surroundings, create unusual perspectives and use your imagination. Not just you, but your friends and family back home will also enjoy looking at your next vacation pictures.

DPS Playful

Do you have other tips for better vacation photos? If so please share in the comments below.

Want more travel photography tips? Look here:

  • How to Capture the Essence of a Place – Travel Photography Tips
  • Transcending Travel a dPS ebook
  • 6 Tips for Photographing People When Travelling

The post 10 Ways to Improve your Vacation Photos by Kai Behrmann appeared first on Digital Photography School.


Digital Photography School

 
Comments Off on 10 Ways to Improve your Vacation Photos

Posted in Photography


Live Pics io – a Way to Live Share your Photos

02 Mar

LivePicsio ScreenIt happens all the time. You came from a shoot, moved everything from memory cards and… your phone rings. It’s your friend and he wants to see what you’ve got. Right now.

That’s not always so easy, especially if you are shooting RAW. You need to export images to JPEG, upload somewhere, send your friend a link and occasionally explain what to do with this link in a series of emails. Things get even harder if it’s a client and you want to get directions before starting the post-processing step.

I have a good news. Just recently appeared a new web-service that leverages HTML5 and WebRTC technologies to deal with situation in a new way.

Live Pics io is a service for live photo sharing.

The sweetest part – it integrates seamlessly into your existing workflow. Here’s what you need to do to show someone a photo-shoot from within Lightroom:

Step 1. Run Lightroom and select a number of images from your recent shoot.

Step 2. Open Chrome or Firefox and type https://live.pics.io into the address bar. Allow the app to use your microphone and check that it’s connected to a computer (in case you use an external one).

Step 3. Drag and drop the images from Lightroom to the browser window.

LivePicsio Lightroom

Live.pics.io supports CR2 and NEF formats, so if you’re Canon and Nikon owner it should work perfectly (Editor’s note, I tested it with a DNG and that worked also)

Step 4. Copy share album link to your clipboard.

Copy link

Step 5. Send it to your friend/client via IM, Skype or something else. Note, that they have to enable their microphone too and use the same browser (and not the mobile version).

Facebook message

Step 6. Navigate to the next image using arrow keys or simply clicking on a thumbnail. The image will change on your friend or client’s screen keeping you in the same context.

Note that images aren’t compressed. They are always displayed as is. But without the possibility to save an image (right-click protection).

Step 7. You can start another session simply reloading the page.

Important! Don’t close the window or the session will be closed and they won’t see anything. This is for real-time communication, nothing’s getting saved on servers.

P.S.: if you want to show images to more than one person, it’s totally ok. Send the same link to others.

The post Live Pics io – a Way to Live Share your Photos by Konstantin Shtondenko appeared first on Digital Photography School.


Digital Photography School

 
Comments Off on Live Pics io – a Way to Live Share your Photos

Posted in Photography


39 Stunning Photos of Boats

01 Mar

So in a shift of gears this week after 3 weeks of portrait oriented challenges and inspiring images, this week I’m featuring 35 stunning photos of boats.

The ocean is a place of peace and turmoil. Boats can be on the water or dry docked. Big boats like cruise ships, and small ones like toy boats. They’re all here.

Enjoy!

By Riccardo Cuppini

By MorBCN

By zev

By Nick Kenrick

By John Ryan

By Mike Baird

By Jason Mrachina

By Evan Leeson

By Christopher Chan

By MorBCN

By Let Ideas Compete

By Jesper Hauge

By hendra nugraha

By Greg McMullin

By Trey Ratcliff

By marcovdz

By Jeff S. PhotoArt

By Steve James

By Scott Smith

By Scott Smith

By marcovdz

By Wendell

By Casete

By drwhimsy

By Geee Kay

By Vinoth Chandar

By Michael Holden

By Jon Martin

By Cinzia A. Rizzo

By Erich Ferdinand

By Michael Donovan

By Ian Usher

By josullivan.59

By Oliphant

By Send me adrift.

By John Morgan

By Tomasz Huczek

By matt

By Hans Kylberg

The post 39 Stunning Photos of Boats by Darlene Hildebrandt appeared first on Digital Photography School.


Digital Photography School

 
Comments Off on 39 Stunning Photos of Boats

Posted in Photography


A Tale of Two Londons: Classic Paintings x Modern Photos

27 Feb

[ By Steph in Art & Photography & Video. ]

Classic Paintings Modern London 1

London may have changed just a tiny bit since the 17th century, but you’d hardly know it looking at some of these mash-ups of classic paintings superimposed against modern scenery snapped by Google. London-based Redditor ‘Shystone‘ created a series of images matching up famous paintings of locations around the city with Google Street View images, with various elements of the two occasionally blending together.

Classic Paintings Modern London 2

Classic Paintings Modern London 3

The paintings often appear to be actual three-dimensional objects in the photos – oversized canvases blocking the roads or propped against light poles. Vans seem to come precariously close to smashing through the canvas in some shots. Modern tourists look out onto the Thames River as it was in 1746.

Classic Paintings Modern London 4

In one case, a long-demolished building is temporarily resurrected; a three-story townhouse stood on the South end of Trafalgar Square from 1605 through 1874.

Classic Paintings Modern London 5

As a Londoner, Shystone offers up some interesting tidbits about the city’s history, including how the locations shown tie into classic literature like Vanity Fair or Charles Dickens’ Little Dorrit. Check out the full series.

Share on Facebook


[ By Steph in Art & Photography & Video. ]

[ WebUrbanist | Archives | Galleries | Privacy | TOS ]


WebUrbanist

 
Comments Off on A Tale of Two Londons: Classic Paintings x Modern Photos

Posted in Creativity


Invisible Cities: Tweets and Photos as Terrain on a Map

20 Feb

[ By Steph in Gadgets & Geekery & Technology. ]

Invisible Cities Data Visualization 1

What would it look like if you could actually see all of the tweets and Instagram photos from a Beyonce concert in New York City hovering above the skyline in physical form? A project called ‘Invisible Cities’ answers that question with an interactive map that displays geocoded activity from various online services in real time with individual nodes appearing anytime a message or image is posted.

Invisible Cities Data Visualization 2

Using a Leap Motion controller and various hand gestures, the user navigates a three-dimensional data landscape, with all of that information literally at their fingertips. As data is aggregated, the landscape of the city changes, with new hills and valleys representing areas where social networking is the most and least active.

Invisible Cities Data Visualization 3

Invisible Cities Data Visualization 4

The individual nodes seen on the maps are connected by narrative threads based on themes emerging from the information as it comes streaming in. So, those tweets from the Beyonce concert look a bit like a stream of smoke rising out of Barclays Center in Brooklyn as users exclaim, “Jay Z and Beyonce on stage together right now OMG!”

Invisible Cities Data Visualization 5

Take a look through Central Park and you’ll see Instagram posts of people running, walking their dogs or having a picnic. Version 1.0 is now available for the Leap Motion Controller and can be downloaded for free on Airspace. The creators, Christian Marc Schmidt and Liangjie Xia, say “Through an immersive, three-dimensional information landscape, the piece creates a parallel experience to the physical environment, one of intersections, discovery, and memory.”


Share on Facebook


[ By Steph in Gadgets & Geekery & Technology. ]

[ WebUrbanist | Archives | Galleries | Privacy | TOS ]


WebUrbanist

 
Comments Off on Invisible Cities: Tweets and Photos as Terrain on a Map

Posted in Creativity


How to Create Great Photos without Leaving Home

17 Feb

Photos home easy 01

So you want to take pictures; or do you want to be a photographer? I deal with a strikingly similar question every time I swing a golf club; I want to be a golfer, but with life events and time constraints the reality is I merely play golf. Fortunately, making a great photo doesn’t consume the amount of time 18 holes does and since you’re here reading this, it’s safe to say you want to be a photographer.

WHAT TO PHOTOGRAPH?

Portraits, landscapes, sports, oh my! As a new photographer it is incredibly tempting to photograph everything, and that’s a good thing as it will help you understand where your true passion lies. However, I am a firm believer that early success leads to more success.

Let me say that again – early success leads to more success.

As a new photographer there is no better feeling than capturing a truly excellent photo; and if you’re anything like me, time is very limited. Luckily with a simple understanding of light, your home is a great place to create stunning photos.

All of the photos in this article were shot in my home. I do not have a home studio, and as I mentioned earlier, I also have little spare time; but that’s ok because you don’t need either to make great photos. The photos of the tulip and baseball were shot with a cheap piece of white poster board and available light from a window.

USING WINDOW LIGHT

While there are no “essentials” to creating great photos with available light from a widow, I always use a tripod and would highly recommend one. However, if you do not have a tripod, you’ll need to raise the ISO to increase your shutter speed if you plan to hand-hold your camera. A generic rule of thumb is you’ll need a shutter speed of 1 divided by the focal length of your lens. For example, I used a 100mm lens for the tulip, and shot it at f/16 and an 8 second exposure. If I did not have a tripod, I would have had to increase the ISO (and realistically open the aperture as well) until I had a shutter speed of 1/100 (because I was using a 100mm lens) to keep the image sharp; but since I was making use of a tripod, an 8 second exposure was no problem.

There are endless opportunities for photography with available window light. Again, you could certainly hold your camera if you raised the ISO, but I would suggest the following as rough guidelines for photographing next to a window:

Photos home easy 02

  • Use a tripod, or raise your ISO until the shutter speed is 1 / the focal length of your lens
  • If using a tripod, set your ISO as low as possible
  • Set your camera to manual mode and the aperture to around f/11, then adjust the exposure via shutter speed from there

For a clean seamless background, such as the baseball photo here, grab a cheap piece or poster board from the school or office supply aisle at your favourite box store.

What do you do once you’re bored shooting next to the window, or want to learn something more? Stay at home of course!

WHAT’S NEXT? LEARN ABOUT LIGHT

There’s plenty of room to grow with your photography in the house. After all, what’s the underlying foundation of photography? Light! Even if you don’t have a flash you can still learn about lighting at home. Don’t have an off camera flash? No problem, I bet you have a flashlight! I created the photo of the kiwi fruit in a bathroom with the lights off and a flashlight lighting the fruit from behind.

Photos home easy 03

I would take a photo, look at it on the camera’s LCD, and then adjust the angle of light from there. So what if I spent an abnormal amount of time in a dark bathroom by myself, and got strange looks from my wife. I learned a lot about how the position of the light effects the look of the photo, and made a cool photo!

Bottom line, you don’t need a flash to learn lighting and take a great photo, all you need is a dark room (very dark, as in no light at all) and a flashlight.

Photos home easy 04

USING FLASH

So what about flash? I think using flash in photos is the key to creating photos that stand out from the rest. If you have a speedlite or other hot shoe flash, the best thing you can do to take your photography to the next level is learn to use it. After that, the next best thing you can do is take it off the camera when you use it. The photo of the little yellow guy smiling and the red silhouette of the golfer were both shot using off camera flash, and aside from a few tweaks in post processing, they look very close to what was produced in the camera with help from the flash. Once you understand about positioning and light fall off, you’ll be able to manipulate the light in such a way that creates great photos right in the camera.

Photos home easy 05

The point being here, and something you’ll learn either in due time, or right now as I tell you, all great photos have one thing in common: great light. Whether you use light from a window, a flash, or light from something as simple as a flashlight – there are numerous ways you can get great light right in the comfort of your own home.

To recap, here’s what I used in the photos:

  • Flower and baseball- window light, white poster board, and a tripod
  • Kiwi fruit- tripod and a flashlight
  • Golfer – single off camera speedlite with a red gel fired into a seamless paper
  • Little yellow smiling guy – white seamless paper, and a single off camera flash handheld above and to the left of the camera

Once you create one photo with great light at home, I guarantee you will be hooked! Best of luck to you, now go shoot!

The post How to Create Great Photos without Leaving Home by Brian Barthel appeared first on Digital Photography School.


Digital Photography School

 
Comments Off on How to Create Great Photos without Leaving Home

Posted in Photography


Younity lets smartphones access photos stored on your computer

16 Feb

2014-02-10_15.23.51.png

While other phone-to-computer services require syncing a select set of files to ‘the cloud’, a service called Younity offers mobile access to all your photos and other files via direct access. The company’s new iOS app allows users to connect to and browse the contents of computers and connected hard drives over the airwaves. Click to learn more.

News: Digital Photography Review (dpreview.com)

 
Comments Off on Younity lets smartphones access photos stored on your computer

Posted in Uncategorized


Back Up Your Photos Four Ways!(Or Choose One And Go With It)

13 Feb

If your phone takes a plunge into a puddle, you’re going to wish you’d backed up your irreplaceable photos…

The video from the time you met Oprah. Photos from the top of Mt. Everest. A timelapse of your first place win at the donut eating contest.

Don’t wait until you wish you would have backed up your photos.

We’ve compiled our four favorite backup solutions, their pros, their cons and their how-to’s. Turns out it’s easy and it doesn’t have to be expensive.

Do not wait until your computer is actually on fire. That is entirely too late.

Find A Way That Suits You, Back Up Your Photos Today

(…)
Read the rest of Back Up Your Photos Four Ways!
(Or Choose One And Go With It) (589 words)


© laurel for Photojojo, 2014. |
Permalink |
No comment |
Add to
(Or Choose One And Go With It)”>del.icio.us

Post tags:


Photojojo

 
Comments Off on Back Up Your Photos Four Ways!(Or Choose One And Go With It)

Posted in Equipment