RSS
 

Posts Tagged ‘Photos’

Upload Your Photos to Multiple Social Media Websites with Expojure

19 Feb

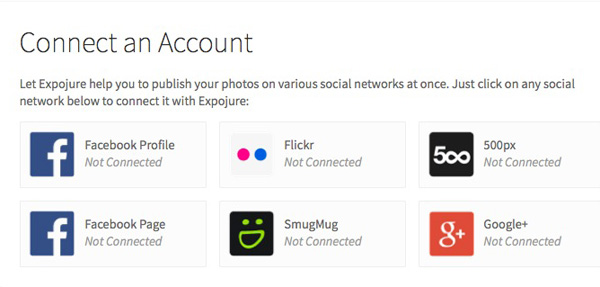
How many social media websites do you upload photos to regularly? I have five – a Facebook page, my personal Facebook profile, Google+, Flickr and 500px. Some people have more. For photographers who want to get their work out there, this seems like a must. Yet it’s time consuming and, truth be told, an inefficient way of working.

If this is you, then you’ll be interested in new photo sharing website, Expojure. A startup based in Mumbai, it lets you upload the photos you want to share to a central Expojure account, arrange them in Collections, add keywords, titles, tags and descriptions, then upload them to as many as six photo sharing websites (the five listed above plus SmugMug).

Expojure review

I’ve been using Expojure for a few weeks now and I’m very impressed with the setup. The website is well-designed and easy to use. The layout is simple, doing exactly what most people will need it to, without adding unnecessary extras.

There’s also a plug-in for uploading photos to your Expojure account directly from Lightroom.

How Expojure works

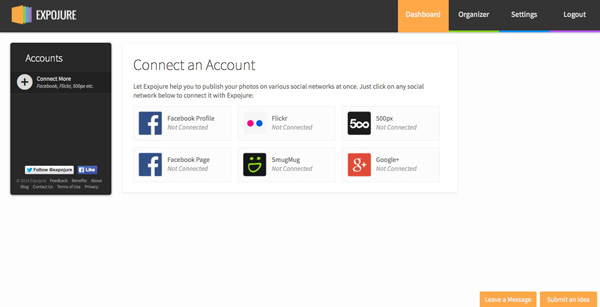
When you sign in to Expojure you’ll see a page that looks something like this – it is your Dashboard. If you’ve uploaded any photos to Expojure already, you will see them here. If not, you’re presented with the option to sign into the photo sharing accounts you wish to use. Just click the buttons to do so. Connected accounts are shown afterwards on the left.

Expojure review

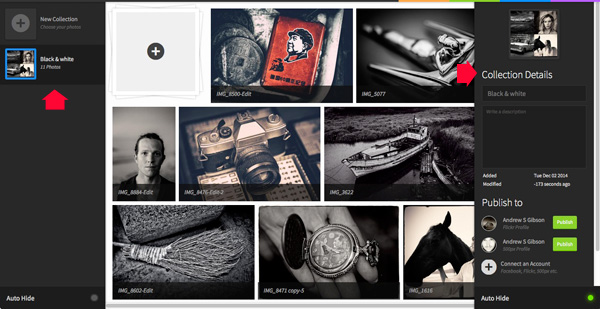
Once you’ve connected to some photo sharing websites, it’s time to go to the Organizer and add photos. Uploaded photos are automatically placed in a new Collection. You can rename the Collection and add a description using the panel on the right. You can also move photos around between Collections.

Expojure review

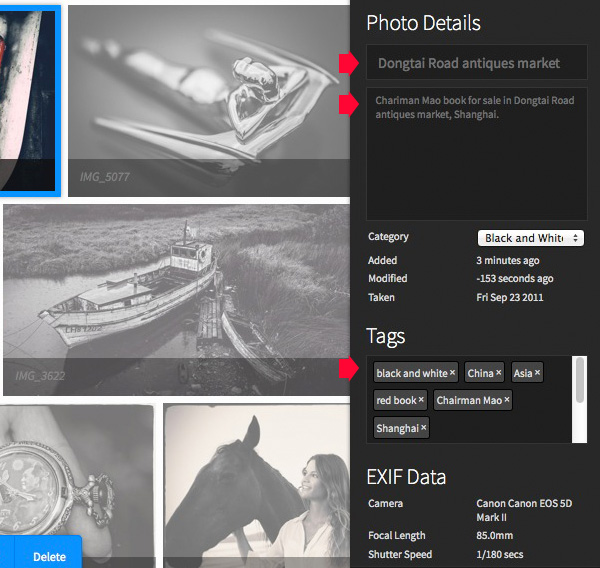
You can add or amend details of individual photos by clicking on them and entering the new information on the right. If you haven’t already added a title, description, or tags now is your chance to do so.

Expojure review

Click the green Publish buttons in the bottom right corner to upload the photos. Expojure places all the photos in the Collection into a new Set on your selected website.

Expojure review

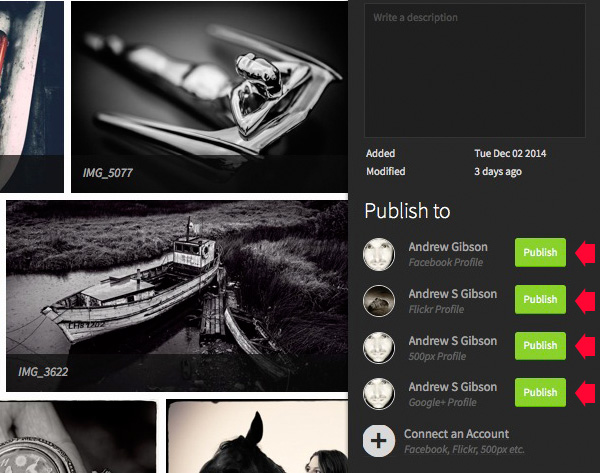
Every photo in the Collection is sent to the chosen website. If you want to upload a single image, you need to create a new Collection and add the chosen photo to that first.

Here’s a photo that I uploaded to Flickr. The title, description, EXIF data and tags have been successfully added. The only thing left to do is add the photo to any Groups or mark the location on the map.

Expojure review

Expojure Lightroom plug-in

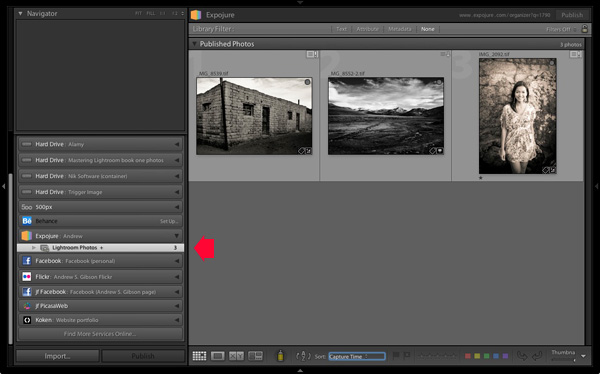
If you click on the Settings tab at the top of the Expojure website page you can download a free plug-in for Lightroom. Use Plug-in manager to add it. It shows up in Lightroom’s Publish Services.

Once installed, you can create new Publish Collections containing photos to upload to your Expojure account. Lightroom uploads them when you press the Publish button. The images are held there until you log in and distribute them to your photo sharing websites.

Expojure review

Notes about Expojure

At the time of writing Expojure is free to use, and has been since the service went live. However, at some point (most likely after this article has been written, but before it is published) Expojure is switching to a subscription model. There will still be a free account, which limits you to uploading 20 photos a week and connection to two social media accounts. Paid accounts retain unlimited photo uploads and unlimited social media accounts.

If you have a free 500px account, you will receive an error message when you upload photos to it. This is because free accounts don’t support Sets. However, your photos are still successfully uploaded to 500px, despite the error message.

Expojure will add more features, and more services to its supported photo sharing websites over the next few weeks. Some of these may be active by the time you read this article.

Alternatives to Expojure

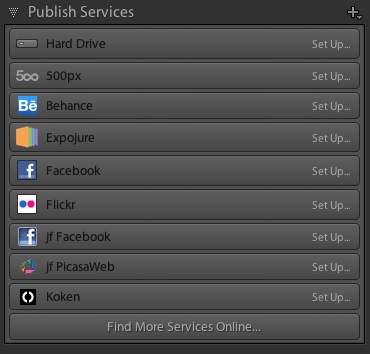
The only alternative to Expojure that I’m aware of is Lightroom’s Publish Services (please let us know in the comments if you know of any others). The benefit of Lightroom’s Publish Services is that it is free (once you own Lightroom). However it’s not as efficient or easy to use as Expojure and doesn’t support websites like Google+ out of the box (plug-ins are available for many photo sharing websites).

Expojure review

Conclusion

Expojure is a well thought out service that greatly simplifies the task of uploading photos to social media websites. If you find the process of adding images to multiple websites frustrating, then please take a look at Expojure’s website, you’ll be glad you did. The video posted at the top of the article gives you a good overview of how it works.

Which photo sharing accounts do you use and how do you manage them? Please let us know in the comments.


The Mastering Lightroom Collection

Mastering Lightroom ebooksMy Mastering Lightroom ebooks will help you get the most out of Lightroom 4 and Lightroom 5. They cover every aspect of the software from the Library module through to creating beautiful images in the Develop module. Click the link to learn more or buy.

googletag.cmd.push(function() {
tablet_slots.push( googletag.defineSlot( “/1005424/_dPSv4_tab-all-article-bottom_(300×250)”, [300, 250], “pb-ad-78623” ).addService( googletag.pubads() ) ); } );

googletag.cmd.push(function() {
mobile_slots.push( googletag.defineSlot( “/1005424/_dPSv4_mob-all-article-bottom_(300×250)”, [300, 250], “pb-ad-78158” ).addService( googletag.pubads() ) ); } );

The post Upload Your Photos to Multiple Social Media Websites with Expojure by Andrew S. Gibson appeared first on Digital Photography School.


Digital Photography School

 
Comments Off on Upload Your Photos to Multiple Social Media Websites with Expojure

Posted in Photography


6 Eye-Catching Photos and How They Can Help You Improve Your Photography

17 Feb

Each photographer has their own way of approaching a scene, choosing which settings on their camera will best reflect their vision, and then crafting the final image. You get to make this series of decisions each time you take a photo, and it’s a highly personal experience.

But you can still learn a lot by going behind the scenes of a photo, and hearing how the photographer made their own decisions. Whether you pick up a new tip for creating an interesting effect, a new way of looking at a scene, or simply the inspiration to go and shoot, it’s both informative, and a lot of fun too.

So here are six of my favourite photos, and details about how they were taken. Get out your notebook, have your camera handy, and let’s go.

1. Waterfall in the Woods

Extremely essential camera skills 1

Vancouver Island, Canada – Settings: 14mm, f/10, 1.6 seconds, ISO 80

This shot is a great example of what happens when you pick a slow shutter speed. Moving water takes on this flowing look and adds a softer feel to the image.

If you want to get this effect, first set your shutter speed to a long value. Here the setting was 1.6 seconds – a value around there is a good place to start. Then you’ll need to adjust the rest of your settings to get a good exposure. This can be tricky sometimes, especially if it’s a really bright scene. A high (small) aperture, and low ISO can really help. But if that’s not enough, you may need to use a neutral density filter.

Then make sure you can keep your camera steady for the entire shot. The ideal would be to use a tripod, but it doesn’t even need to be a big, heavy one. This shot was taken with a point and shoot camera (the Sony RX100III) and the tripod was just a tiny tabletop tripod set up on the rocks.

Finally take the photo, and enjoy a beautiful waterfall image that really grabs your viewers’ attention.

2. The Bee and the Flower

Extremely essential camera skills 2

Edmonton, Canada – Settings: 85mm, f/4.0, 1/3000th, ISO 200

This photo has two elements to pay attention to, the first being the composition. The bee is very small, but you can still easily make it out. That’s thanks to negative space. All of the blue, empty sky is negative space that draws your eye towards the subject. One of the keys to finding negative space in a scene is to move your feet. Walk around, looking to see if you can find an angle that helps simplify your frame by incorporating negative space. Don’t stop there, though. Change your position even further by climbing up high, or, as in this case, lying on the ground. Yep, this photo was taken lying flat on the grass. Don’t be afraid to get messy in the pursuit of a great shot.

The second thing to note about this shot is the shutter speed. There’s a very fast setting chosen here (1/3000th of a second) and that allowed the bee to be in sharp focus, even when it was moving very fast. A slower shutter speed could have led to motion blur of the subject, losing that crisp, sharp detail. When shooting fast moving objects, make sure your shutter speed is set appropriately.

3. The Internet Man

Extremely essential camera skills 3

Jodhpur, India – Settings: 50mm, f/1.6, 1/320th, ISO 400

There’s a great story behind this image. On a trip through India we found ourselves in Jodhpur, known as the Blue City. The walls of many of the houses are painted a vibrant blue, and it made for some incredible images. But this portrait was not taken on a photo walk, but rather after we made our daily visit to the internet shop.

After we finished up on the computer, we got to chatting with the man who owned the shop. He was a wonderful guy, with a great face, so we asked for a portrait. He was happy to oblige, and by standing in the doorway of his shop we got both a beautiful blue background, and catchlights in his eyes from the light coming in the door (catchlights, those white specks in the eyes, are a great way to add life and sparkle to your subjects’ eyes).

One final note on the settings: using a low aperture value can help your subject stand out from the background, especially if you can’t bring them very far forward from the background. In this image f/1.6 was used, which is definitely very low, but it really helped create some background separation.

The best part of the story? After we took his photo (and gave him a copy of the file) he thanked us, and told us that he’d pray that we’d have a son before returning to India. Well, we did have a son. Now we just have to go back, don’t we?

4. Cows in the Field

Extremely essential camera skills 4

The Sacred Valley, Peru – Settings: 200mm, f/7.1, 1/1600th, ISO 800

Learning how to use lens compression to your advantage can make for some really impressive shots. This image is a great example of this technique.

Very simply, when you use a longer focal length (like the 200mm used in this photo) it makes the distance between objects in the frame appear to be less. It makes the background appear closer to the foreground, and in this example it makes the hills appear very close to cows. Essentially, it compresses the space in the image.

Here you can see how it makes the hills really fill the frame and create a strong, patterned background that contrasts nicely with the organic shapes of the cows.

In your own photography you can use a long lens to make clouds appear much larger and closer to your subject, or make your friends look like they’re stepping on top of a building, Godzilla-style. There’s no limit to the creative effects you can achieve when you use compression.

5. Down the Stairs

Extremely essential camera skills 5

Krabi, Thailand – Settings: 17mm, f/5.0, 1/400th, ISO 400

If long lenses make objects appear closer to each other in your frame, what about wide angle lenses?

Here’s a great example. This shot, taken while looking down a few of the 1,272 treacherously steep steps of the Tiger Cave Temple, makes you feel like you may just fall down them, along with the photographer.

The wide angle lens (17mm) helps to create that feeling. The wide angle exaggerates the distance between objects, especially at the edges. Take a look at those hand rails at the edge of the frame. They look very far apart, especially compared to the distance between the hand rails further down the stairs. But this exaggeration at the edges helps to turn the rails into leading lines, drawing your eye down the stairs, and creating that falling feeling.

So if you want to add some drama to an image, or exaggerate perspective, grab a wide angle lens. Place objects near the edges and make use of the stretching it causes.

6. Camel at Sunset

Extremely essential camera skills 6

Jaisalmer, India – Settings: 70mm, f/7.1, 1/400th, ISO 125

Doesn’t a great silhouette image just grab your attention? It’s so different from how we normally see the world that it can add a big impact to your work.

But a silhouette is a prime example of how your camera can easily be fooled by light, and how you, the photographer, need to know how to control it.

In this example your camera might very well try to expose for the camel, or somewhere in between the camel and the sunset, and you’ll wind up with something really bright, or sort of dark, but it probably won’t look like a nice, crisp silhouette.

So what to do? Take control. When aiming for a silhouette you’ll want to expose for the sky, not the subject. Then you can either use exposure compensation to dial in the exposure you’re looking for, or better yet, jump into full manual control and choose your settings to get exactly the exposure and depth of field you want.

Hopefully this peek behind the decisions and settings of these photos gives you a few tips to take some great shots of your own. The more you learn about how all the settings on your camera affect the look and feel of your images, the better decisions you’ll be able to make. Best of all, this stuff doesn’t have to be hard to learn, and you’ll get to use the knowledge to create better images for the rest of your life.

googletag.cmd.push(function() {
tablet_slots.push( googletag.defineSlot( “/1005424/_dPSv4_tab-all-article-bottom_(300×250)”, [300, 250], “pb-ad-78623” ).addService( googletag.pubads() ) ); } );

googletag.cmd.push(function() {
mobile_slots.push( googletag.defineSlot( “/1005424/_dPSv4_mob-all-article-bottom_(300×250)”, [300, 250], “pb-ad-78158” ).addService( googletag.pubads() ) ); } );

The post 6 Eye-Catching Photos and How They Can Help You Improve Your Photography by Lauren Lim appeared first on Digital Photography School.


Digital Photography School

 
Comments Off on 6 Eye-Catching Photos and How They Can Help You Improve Your Photography

Posted in Photography


How to Take Photos of Super Cute Couples

13 Feb

Store shelves are lined with teddy bears, hearts, and a lot of pink stuff. Valentine’s Day is right around the corner!

And with V-Day comes many happy couples whose adorableness is just begging to be captured on camera for all to see and “squee!” over.

Photographing all those pretty pairs of people can be a tad awkward though, so we’ve put together our very best tips to help make the process fun and pain free!

Read on and you’ll be capturing memories sweeter than a heart-shaped box of chocolate.

4 Tips for Photographing Couples

(…)
Read the rest of How to Take Photos of Super Cute Couples (547 words)


© Taylor for Photojojo, 2015. |
Permalink |
No comment |
Add to
del.icio.us

Post tags:


Photojojo

 
Comments Off on How to Take Photos of Super Cute Couples

Posted in Equipment


Apple reveals Photos beta for developers

08 Feb

Last year Apple announced that it would replace both its desktop image management and editing applications, iPhoto and Aperture with one single app called Photos. Now the company has released a preview of the new software with a beta version of OS X 10.10.3 which has been made available to developers. As expected, Photos is much more consumer-geared than pro, and emphasizes iCloud Photo integration. Read more

Articles: Digital Photography Review (dpreview.com)

 
Comments Off on Apple reveals Photos beta for developers

Posted in Uncategorized


3 Simple Ways to Take Better Photos on Your Next Trip

04 Feb

I love to travel. To me, nothing compares to living on the road and waking up to new places every day. All the different photographs I’ve made during my journeys are the most rewarding part of it all.

Making photos while traveling or on vacation has a special quality because you’re seeing your subjects often for the first time. Travel also presents unique challenges, though – unfamiliar landscape, climate, and culture can easily throw you off. However, it is those very things that can also make beautiful, one-of-a-kind photographs!

Bay of Fundy, New Brunswick

Bay of Fundy, New Brunswick

When travelling to new places, you want to create photos that express the way you feel about the place. You also want to make unique images that are unlike anyone else’s. The sense of wonder you feel when seeing beautiful places for the first time can easily translate into the images that you make with these three simple tips to help you take better photos.

1. Plan, plan, plan

Once you decide where you’re going, read up on the area and educate yourself about the place and what kind of conditions you can expect. What will the weather be like? Are there any special events taking place? Will the flowers be blooming? If you’re traveling internationally, is there a language barrier? If so, try to learn a few key words and carry a phrase book with you. No matter where in the world you go, locals are always more helpful when you make an effort to speak to them in their own language – even if it’s just a few words.

Find out what else is around that you might be able to see during your visit. If you’re photographing nature, you can find great locations by studying maps. Photography websites and forums are full of advice and examples of interesting places to shoot. Learning about the location’s history and culture will also help direct you to unique and interesting subjects.

Sanibel Island, Florida

Sanibel Island, Florida

Find out as much as you can about the places and subjects you’ll be photographing, so you can prepare for them. For instance, if you’re going to be shooting in the desert, near the ocean, or in very cold, wet, or humid environments, you’ll know to bring protective gear to shield your camera from damage caused by moisture, salt, and sand. If you expect temperatures lower than -10c or higher than 40c, extra batteries will be needed as they drain quickly at extreme temperatures. You might consider renting a particular type of lens that is perfect for your subject like a super-telephoto or a tilt-shift. You’ll also need to know what sort of clothes to wear for the weather.

Big Bend National Park, Texas

Big Bend National Park, Texas

2. Don’t let your gear drag you down

No matter where you’re headed, there are some things you’ll need no matter what. When packing your gear, make a checklist to ensure you don’t forget anything important. It should include:

  1. Your main camera
  2. A backup camera
  3. A normal focal length lens (around ~50mm)
  4. A long focal length lens (~100mm or more)
  5. A wide-angle lens (~35mm or less)
  6. Your favourite, most-used lens
  7. A polarizing filter
  8. A battery charger
  9. Spare batteries and memory cards, and a place to backup images (computer, external drive, the cloud)
  10. A lens cloth and/or air blower to keep your equipment clean
  11. A comfortable camera bag – preferably one that doesn’t stand out as a camera bag to avoid making yourself a target for thieves.
  12. A good, sturdy, but lightweight tripod. Many manufacturers such as Manfrotto, Giottos, and Benro (among others) make special travel tripods that are made of strong, light carbon fibre and fold up into a small carrying case.
Strathcona Provincial Park, British Columbia

Strathcona Provincial Park, British Columbia

Be selective with your packing. Don’t bring things you probably won’t use because camera bags can get very heavy, very fast. Use lightweight luggage and never check your camera bag, since checked luggage can be mishandled or lost. If you are flying, check the size and weight restrictions of carry-on luggage so you don’t get an unwelcome surprise at the airport. If you leave your home country, purchase travel insurance that will cover your precious equipment from loss, damage, or theft while abroad.

3. Seek the unique

When traveling, try to avoid the mass-marketed tours and biggest attractions. Not only are they full of people that get in the way of your shot, but they’re also full of people getting almost the exact same photos that you are. Instead, search for places that are beautiful but overlooked. You may be able to find this information online, but the best way is to be open and talk directly to the people who live there – start with your hotel staff, be friendly, and ask locals where the most beautiful places are that most people don’t see.

Goblin Valley State Park, Utah

Goblin Valley State Park, Utah

This can even start when booking your accommodations – instead of staying in a generic chain hotel, look for places with more character such as cabins, villas, or bed and breakfasts. Or, if you’re like me, you can find an RV site right in the midst of the beauty to call home base. This way, the place you spend the most time can present its own photographic opportunities.

Remember to give yourself time to experience the place before you start photographing. Give yourself a chance to find out what is special about the place first, and then try to convey that in your images. If you are photographing something common like a famous monument or national park, try to find a new perspective.

Joshua Tree National Park, California

Joshua Tree National Park, California

It’s easy to become overwhelmed by the exotic nature of new places. But always remember that good light is a photographer’s best friend. A new place may look fascinating to you in the middle of the day, but it will look magical during good light.

googletag.cmd.push(function() {
tablet_slots.push( googletag.defineSlot( “/1005424/_dPSv4_tab-all-article-bottom_(300×250)”, [300, 250], “pb-ad-78623” ).addService( googletag.pubads() ) ); } );

googletag.cmd.push(function() {
mobile_slots.push( googletag.defineSlot( “/1005424/_dPSv4_mob-all-article-bottom_(300×250)”, [300, 250], “pb-ad-78158” ).addService( googletag.pubads() ) ); } );

The post 3 Simple Ways to Take Better Photos on Your Next Trip by Anne McKinnell appeared first on Digital Photography School.


Digital Photography School

 
Comments Off on 3 Simple Ways to Take Better Photos on Your Next Trip

Posted in Photography


Geotagging Photos in Lightroom in 4 Easy Steps

04 Feb

For travel photography, geotagging your photos has become fundamental. By geotagging your images, you’ll not only be able to remember the locations once you are back home, but also it will help on searches. If you intend to sell your photos at any time, adding the metadata pertaining to the location into the file is going to improve searches and make your photograph easier to find on the web.

Geotagging is a rather simple process and there are a couple different ways to do it. At the simplest level, you simply attach a GPS data-logger to your camera and the location will be recorded into the EXIF of the photo at the time you take it. That’s it. Now if you own multiple bodies, then you’ll need a different GPS device for each of them.

Bad_ElF_Geo_Tracker

The other option you have is to get an independent GPS tracker to record the data and then pair it with the photos. As I always carry at least two camera bodies, this is option I utilize. I have tried a couple of loggers and ended up with the Bad Elf 2200 GPS Pro. It is small, convenient and pro-rated, and it can be paired with up to five devices at the same time via Bluetooth. Of course there are other options on the market; all you need is to be sure that you’ll be able to obtain and export the recorded tracks from the device.

Working with Lightroom

Something that’s important before you start: to avoid headaches, is to always wise to check your camera clock. It should be set to the actual local time zone in which you are shooting, as once you import the data, Lightroom will try to synchronize the time of the EXIF data from the camera with the time of the recorded data from the GPS logger. If you forget to do this, there is a way to correct it later, but it will be much more seamless if you do it beforehand.

Once you do that, the process is fairly simple and can be done with the following steps.

1) Obtain your GPS file

Export the GPS data from your logger in the format .gpx. This is the standard for these type of files; save them as they can be useful for other applications as well in the future. As an example, in this recent post I have included a detailed map of my trek to illustrate a day in the field.

2) Import your files into Lightroom

Import your files into Lightroom as you normally do and then go to the Map Module.

Import_Photos

Go_to_Map_Module

3) Load your tracklog file

Select all the photos you want to add the GPS information to. This one is a bit tricky – you need to click on a menu down at the bottom close to the icon with the lock. From there, select “Load Tracklog” and navigate to the menu where you saved the file previously.

Load_Tracklog

Select_your_Track

4) Tag the photos with the GPS information

As soon as you import the file, you’ll see the track loaded into the map. Go to the same menu and select “Auto-Tag XXX Selected Photos.” That’s it – that should do it, and now you’ll also see a bubble over the track that indicates where the photos were taken. At this point the GPS coordinates have already been recorded in Lightroom.

Track_Loaded

Auto_Tag_Photos

GPS_Icon_Added

If for any reason you forgot to put the correct time on the camera, you can now adjust it by going to  “Set Time Zone Offset” from the same menu you were working.

Set_Time_Offset

You can take a look at the photos’ meta data and you’ll find the exact GPS coordinates along with location information. As you can see, this process takes only a minute or two to complete and it is fairly easy.

GPS_Data_LR

If you are not already tagging your photos, I hope you can incorporate the process into your workflow soon. I believe it will be important in the long run and you’ll never forget again where that photo was taken, especially in unfamiliar places.

googletag.cmd.push(function() {
tablet_slots.push( googletag.defineSlot( “/1005424/_dPSv4_tab-all-article-bottom_(300×250)”, [300, 250], “pb-ad-78623” ).addService( googletag.pubads() ) ); } );

googletag.cmd.push(function() {
mobile_slots.push( googletag.defineSlot( “/1005424/_dPSv4_mob-all-article-bottom_(300×250)”, [300, 250], “pb-ad-78158” ).addService( googletag.pubads() ) ); } );

The post Geotagging Photos in Lightroom in 4 Easy Steps by Daniel Korzeniewski appeared first on Digital Photography School.


Digital Photography School

 
Comments Off on Geotagging Photos in Lightroom in 4 Easy Steps

Posted in Photography


Natural Style Newborn Photos: The Way I Like to Remember Them

03 Feb

246

Why natural lifestyle newborn photography?

There are lots of different styles of photography when it comes to capturing a newborn baby. Some people love to use lots of props, and introduce many fun things into every photo. Some are experts at posing the baby in unique and whimsical positions.

Although I can appreciate all the different styles, I prefer to capture a newborn baby the way that I remember my three newborns. My kids are almost all grown up now, and it’s hard to remember exactly what they were like when they were brand new. Every once in awhile, I have sweet memories of how they were once upon a time. The sweet smell of a newborn’s head. The skinny knees stretching out. The reflex grasp of those tiny fingers. The perfect little toes and wrinkly feet. The million different expressions that could keep me entertained for hours. The soft cheek, and even the peeling skin that inevitably showed up for a little while.

These are the things I remember. These are the memories I cherish. These are the moments I try to preserve with my camera with natural newborn photos.

187

Keep it real

One of the wonderful things about photographing babies more naturally, is that you can let so many ideas of perfection go. If your baby loves a pacifier, photograph him with a pacifier. If she’s having a fussy day, grab a few crying photos. It’s okay, because it’s life. Real life. We’re not trying to create an illusion that the baby is something other than who he is, that very moment.

Be patient and flexible when photographing newborns, and leave lots of time to stop for feeding, burping, or changing a diaper. If your goal is to just capture baby as she is, you don’t have to be as worried about getting a whole session in within the two week old time period. It’s okay if baby isn’t quite as moldable if you aren’t trying to mold them into anything in particular. Since we’re just keeping it real, you can be more relaxed. Shoot another day if the first day you try just doesn’t work out. Also, you don’t have to stress out about keeping the baby sleepy the whole time. If he’s asleep, photograph him that way. If she’s wide awake, capture those eyes. It doesn’t matter.

167

Get the details

I love to photograph little details. I can’t hold a newborn without pulling her socks off to have a peek at her feet. That means that I can’t photograph a newborn without getting a few shots of those perfect little baby feet, either. Find the little details you love, and capture them. Feet, hands, ears, knees, hair; everything is cuter in miniature. It’s a good idea to capture hands and feet with mom or dad’s hands holding them too, because it will help the parents remember exactly how small they were.

Don’t wait for a perfect expression. Those wrinkly foreheads, big yawns, hungry mouths, pouty lips, and even those sad cries can be perfect photo opportunities. Baby faces are fascinating!

171

Shoot wide open

I like to use a pretty wide aperture when I photograph these details. If you can shoot at around f/2, give or take, those details will be the star of the photo. You won’t be distracted by other things, and the part you want to highlight will look especially sharp. Shooting wide open is a good idea when you are capturing other newborn moments, like baby’s bath, putting socks or a hat on, swaddling, or anything that you want the focus to be on or a particular action.

Be careful when you are shooting with a depth of field this shallow that your focus is EXACTLY where you want it, and that you don’t move after you lock in your focus. A slight movement from you or the baby could put your photo completely out of focus, and ruin what you are trying to achieve.

For more help shooting indoors with a wide aperture, you can read my article on Indoor Portraits Using Natural Light.

180bw

Capture baby’s world

You might want to get some photos of your sweet newborn in her carefully decorated crib or nursery. If there’s a rocking chair that he loves to be held in, photograph mom or dad rocking the baby. One of my favorite memories with my babies was getting them out of their crib in the morning, or after nap time. They always seemed so happy to see me, and they looked so sweet and small in those big cribs. I wish I had photos to help me remember those times in better detail. Think of baby’s little world, and photograph him in the places he spends a lot of time in.

You could also take photos of the little things that are part of life with a baby, without the baby in the photo. Stacks of diapers, rubber ducks, teeny shoes, bottles, pacifiers, etc. can be photographed to remember what life was like when your house was overtaken by baby things.

169

Show the love

Don’t forget to capture how the rest of the family feels about the new baby. Photograph sister’s look of adoration. Photograph brother’s fascination with baby’s little toes. Photograph mom’s absolute love for her tiny new being. Photograph dad’s proud protectiveness, and contrasting rough, big hands.

177

Sometimes the relationships the family has with the new baby are my very favorite thing to photograph. The love and bonding that happens so quickly with a new baby in the house is an amazing thing, and those special moments are so important to preserve.

Be careful with young siblings that you keep the newborn safe as you are photographing them. You can capture their natural reactions to the baby while still keeping the baby safe. Let them sit near their little brother or sister if they’re too young to hold the baby. They can pat him, or lightly kiss him on the head. If you have a young child hold the baby, make sure someone is standing right outside the frame to take the baby as soon as little sister is “done”, because sometimes that can happen very suddenly.

188bw

If you’ve always thought that baby photos had to be perfectly posed and creatively propped, give lifestyle newborn photography a chance. Try photographing a new baby swaddled in a blanket. See if you can capture a bunch of funny expressions, or capture “a day in the life” of the newborn. You may decide that these natural, real life photos are your favorite after all.

googletag.cmd.push(function() {
tablet_slots.push( googletag.defineSlot( “/1005424/_dPSv4_tab-all-article-bottom_(300×250)”, [300, 250], “pb-ad-78623” ).addService( googletag.pubads() ) ); } );

googletag.cmd.push(function() {
mobile_slots.push( googletag.defineSlot( “/1005424/_dPSv4_mob-all-article-bottom_(300×250)”, [300, 250], “pb-ad-78158” ).addService( googletag.pubads() ) ); } );

The post Natural Style Newborn Photos: The Way I Like to Remember Them by Melinda Smith appeared first on Digital Photography School.


Digital Photography School

 
Comments Off on Natural Style Newborn Photos: The Way I Like to Remember Them

Posted in Photography


Let It Snow! 4 Tips For Super Snow Photos

29 Jan

Oh, the weather outside is frightful. But photographing snow is so delightful!

It’s especially delightful when you know how to make the most of that sparkling, snow-covered landscape.

Check out our four tips for taking brrr-eautiful snow photos, and in no time you’ll be running around and enjoying the cold stuff as much as the sledders and snow-angel-makers.

We guarantee that the gorgeous winter shots you’re going to get are worth leaving the comfort of your heated blanket. (And hey, that blanket will still be waiting for you when you get home!)

Catch Snowflakes On Your Tongue and in Photos

(…)
Read the rest of Let It Snow! 4 Tips For Super Snow Photos (696 words)


© Taylor for Photojojo, 2015. |
Permalink |
No comment |
Add to
del.icio.us

Post tags:


Photojojo

 
Comments Off on Let It Snow! 4 Tips For Super Snow Photos

Posted in Equipment


Print tattoos of your Instagram photos with INK361’s Picattoo service

29 Jan

Instagram Web interface provider INK361 has introduced a new service for Instagram photographers that allows them to create temporary tattoos from their pictures. Once logged in to Instagram via the Picattoo website, users can select up to 12 of their own images to have made into 3x3cm square format prints on sheets of transfer material. Read more

Articles: Digital Photography Review (dpreview.com)

 
Comments Off on Print tattoos of your Instagram photos with INK361’s Picattoo service

Posted in Uncategorized


How to Capture Fantastic Photos in Low Light

21 Jan

It is a simple, unavoidable fact that light is necessary for photography. Life, however, doesn’t restrict itself to times when the sun is bright and plentiful. Unless you only shoot in a controlled environment, chances are you’re going to want to takes photos when the lighting is less than ideal. You are not powerless, though. It is possible to make Continue Reading

The post How to Capture Fantastic Photos in Low Light appeared first on Photodoto.


Photodoto

 
Comments Off on How to Capture Fantastic Photos in Low Light

Posted in Photography