RSS
 

Posts Tagged ‘Photos’

7 Landscape Photography Mistakes That Could be Ruining Your Photos

06 May

If your photos aren’t turning out the way you expect them to, new gear is not necessarily the answer. In fact, chances are you are making one of these seven common mistakes. Don’t be discouraged though; just as a musician needs time to refine their skills, so does a photographer. Once you recognize where the problem lies, it’s easy to make adjustments and achieve better results the next time out.

1) Shooting at the Wrong Time of Day

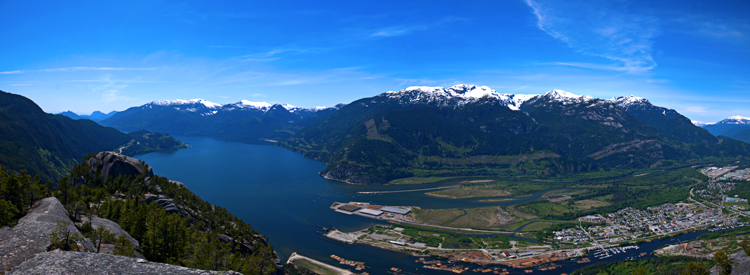
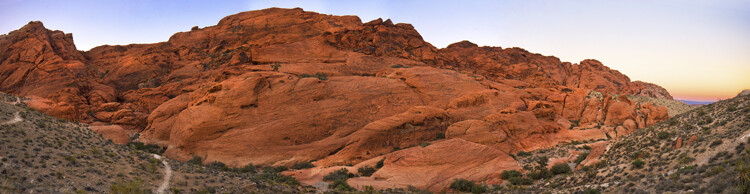
Harsh afternoon sunlight can wreak havoc on a landscape photo. With bright highlights and dark shadows, the contrast makes for especially difficult exposures. For truly dramatic scenic opportunities, dedicate the hours around sunrise and sunset to photography. You’ll be amazed at how few people are there to clutter your composition. With the soft light and colorful skies, your photos will take on a new level of natural beauty.

1_moonrise_red_rocks

2) Your Images Lack a Clear Subject

When you experience something grand, it’s tempting to try and include it all into one frame. The expansive landscape is undeniably beautiful but it’s lacking in any one point of importance. Before pressing the shutter, ask yourself “What is my subject?” If you’re able to provide an answer, you can learn to see like a camera. The human eye interprets a scene differently, heavily influenced by our peripheral vision and ability to scan from left to right. The camera however sees in a much simpler way, only able to record a small portion onto the sensor. By determining what the subject is, you can take the necessary steps to make an effective photo.
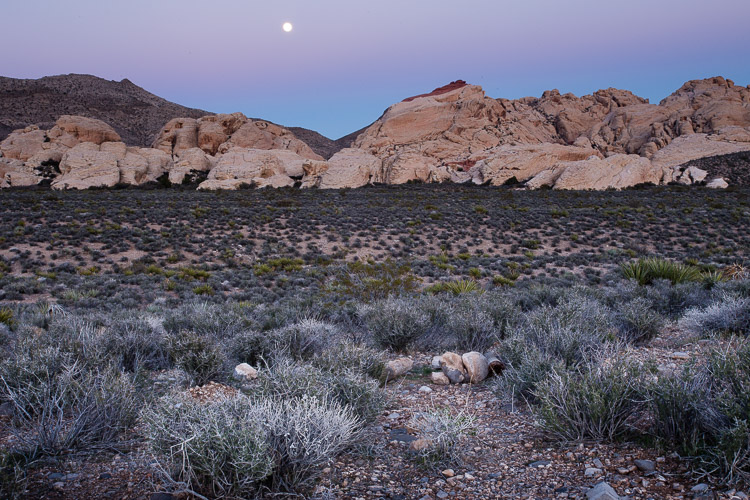
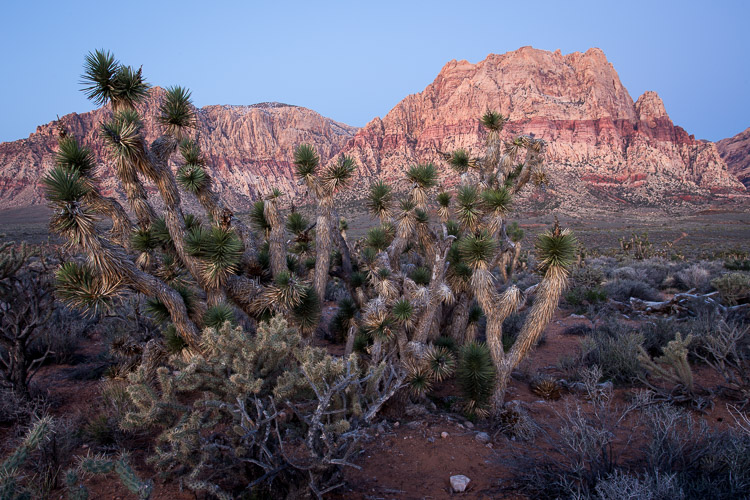
2_fire_wave

3) No Foreground

The gentle hues of dawn are worth getting out of bed for, but color alone won’t hold the viewer’s interest. To make a dramatic impact on your scenic and travel images, find a strong foreground element. This can be a field of flowers, a boulder, tree, or even a man-made object. The idea is to add visual interest all the way through the frame. As you explore various options, try several perspectives including ground level. By having this location worked out in advance, you’ll be ready to capture the fleeting light.

3_cactus

4) Lazy Composition

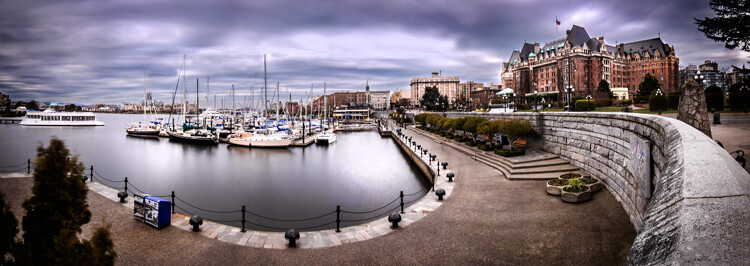
At nearly every scenic vista or photographic landmark, you’ll notice a definitive dirt spot where grass once grew. This well-worn spot is the final destination for scores of tourists who shoot the same photo year after year. Rather than following the crowd, take a quick loop around the area and search for unique perspectives. To more effectively communicate your vision, check all four corners of your viewfinder, and either zoom or physically move to make a stronger image. Do you need the fence in the bottom corner, or the tree that seems to enter the frame from nowhere? This type of attention to detail will help strengthen the composition in-the-camera which saves you time at home trying to clone out unwanted objects.

4_lake_louise

5) It’s Been Done Before

Automatic modes were designed to provide average results under a variety of conditions. While this can be effective on occasion, it’s fundamentally opposite of what you’re trying to achieve with your art. Do you really want your images to be just average? In order to go beyond the safe shot, creative photographers will push the boundaries to explore their own vision. Rather than trying to recreate what’s already been done, find your own twist on it. This may not always be in line with current trends, but who’s to say you’re attempts won’t cause their own stir.

5_brooklyn_bridge

6) There’s Too Much Contrast

One of the most common issues with scenic photos is the huge contrast difference between the foreground and the sky. The solution is not a new camera or complicated software. Actually, a simple tool known as the graduated neutral density filter is all you need. These commonly come in strengths of two (0.6), three (0.9), and four (1.2) stops. While HDR is another effective method, these filters allow you to achieve your vision in the camera at the time of exposure.

Start by manually spot metering the foreground. The goal is to expose in such a way that the foreground is not black, leaving some detail in the shadow areas. This could be at “-1″ on your meter, or “0”, or even “+1″. Of course if you are not sure which foreground looks best, bracket. Take a quick test shot and notice how the foreground looks well exposed but the sky is overexposed. The next step is where the magic happens.

6_without_filter

Get out your graduated neutral density filter and position the dark portion over the top part of the lens. This will darken the bright sky while leaving your foreground properly exposed. You can fine tune the effect by adjusting the filter placement up or down in the mount.

7_with_filter

7) Fear of High ISOs

You may be surprised to learn that a high ISO can be helpful for landscape photography. This is particularly true when shooting without a tripod or including a person in the frame. In these instances, the shutter speed can be no slower than about 1/125 to prevent camera shake and/or subject motion. Then, to achieve great depth of field and keep everything sharp from near to far, your desired aperture would be f/11 or f/16. With these two decisions made, you may take your photo only to find that it’s too dark. This is where the ISO comes into play. Simply double the ISO number and watch as the photo gets brighter.

Many photographers are overly sensitive about high ISO noise and refrain from using anything over 800. Instead they’ll slow down the shutter speed, rely on image stabilizers, or open the aperture wider. The results may look acceptable on the small LCD only to appear soft when viewed or printed larger. Like most aspects of photography, there is always a tradeoff to consider. Would you rather have a blurry, but noise-free photo, or a sharp image with a bit of noise? Considering that most image editing programs now offer terrific noise reduction options, the ISO noise isn’t as harmful as it once was.

8_tunnel

googletag.cmd.push(function() {
tablet_slots.push( googletag.defineSlot( “/1005424/_dPSv4_tab-all-article-bottom_(300×250)”, [300, 250], “pb-ad-78623” ).addService( googletag.pubads() ) ); } );

googletag.cmd.push(function() {
mobile_slots.push( googletag.defineSlot( “/1005424/_dPSv4_mob-all-article-bottom_(300×250)”, [300, 250], “pb-ad-78158” ).addService( googletag.pubads() ) ); } );

The post 7 Landscape Photography Mistakes That Could be Ruining Your Photos by Chris Corradino appeared first on Digital Photography School.


Digital Photography School

 
Comments Off on 7 Landscape Photography Mistakes That Could be Ruining Your Photos

Posted in Photography


Successfully Copy Photos from Your Memory Card to your Computer

02 May

Before you can begin editing your photos you need to get them safely off your camera and onto your computer. Unfortunately this process is often hijacked by (well-meaning if misguided) software which purports to do the work for you but leaves you wondering just where your photos really are! So, to help you understand your options for getting your photos onto your computer, here’s what I recommend.

First of all: Take Charge!

The first thing to understand about getting photos from your camera card or camera onto your computer is that you’re in charge. Any application that opens and tries to grab your photos for you can be closed down. If it is not the application you want to use then do just that – close it.

Now you can take charge and manage the process in a way that makes sense for you.

Choose your application

If you’re using Photoshop then you can use Bridge to import your photos. If you are using Lightroom then you can launch Lightroom and import your photos using it. If you don’t have either program, or if you prefer to manage the process yourself, you can do so using Finder on the Mac or Windows Explorer on a PC. I’ll cover this process first, then look at Bridge and Lightroom.

Importing using Finder or Windows Explorer

import-photos-using-Windows-1
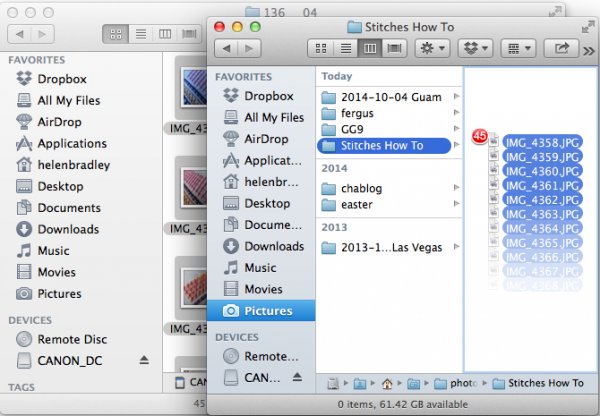
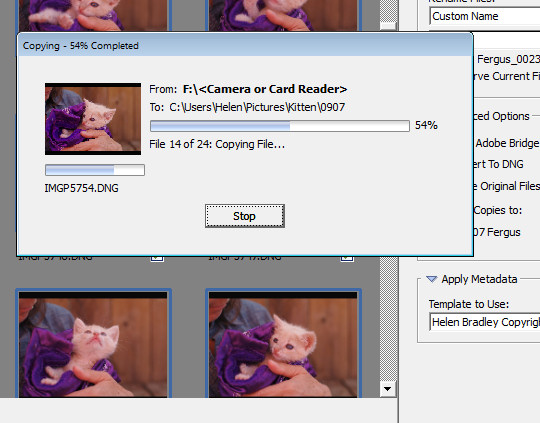
When attached to your computer, a camera or memory card works like any drive, so you can view its contents. You can also copy photos from the memory card onto your computer’s hard drive manually using Explorer or Finder.

On a PC, if the AutoPlay dialog appears when you insert your camera card or attach your camera, choose the Open Folder to View Files option.

If the dialog doesn’t appear, simply launch Windows Explorer and select the drive that represents your camera or memory card.

Navigate to the folder that contains your photos – there may be multiple folders depending on how your camera stores images on the card. You can select the photos, then drag and drop them to the folder of your choice. It’s often easier if you first open the target folder in a second Windows Explorer window so you can drag from one to the other.

import-photos-using-Windows-2

The process is similar using Finder on the Mac. If iPhoto launches – stop it from downloading any photos and close it. Then you can drag photos from your camera card open in one Finder window, to a folder of your choice open in a second window.

import-photos-using-finder-on-the-mac

Importing Photos using Bridge

If you are using Photoshop, launch Adobe Bridge and choose File > Get Photos from Camera. Click the button to open the Advanced Dialog.

import-photos-using-bridge-1

From the “Get Photos from” drop down list select the drive letter that corresponds to your camera or card.

import-photos-using-bridge-2

You can now see and select the photos to import. This is one benefit of using Bridge over Windows Explorer – you will see thumbnail images of your raw files so you can see what you are importing.

On the right of the dialog select the folder in which to place the images. Typically this will be inside your My Pictures folder on your computer but you can choose any location that makes sense to you. However, if you want to find your photos later, on it is essential that you pay attention to the choices you make here.

import-photos-using-bridge-3
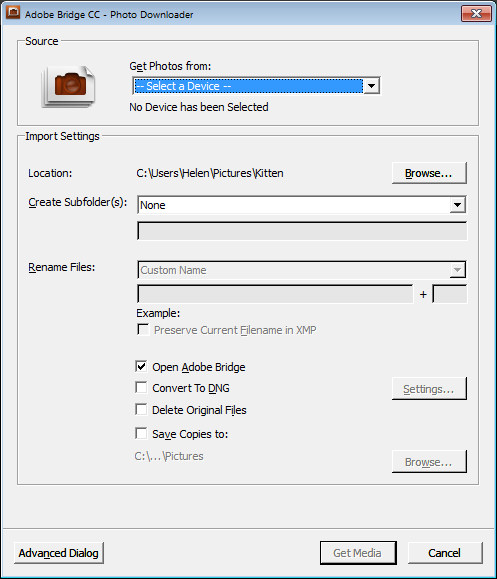
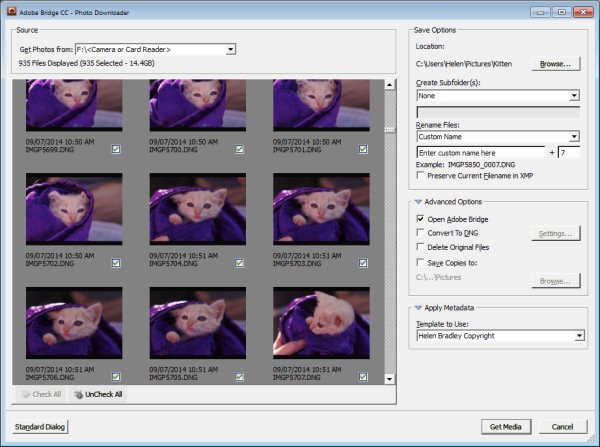
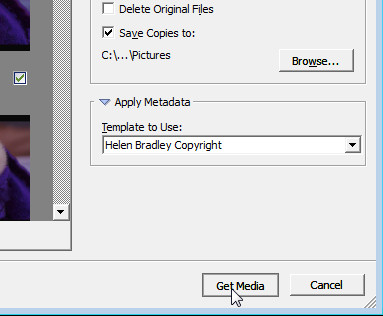
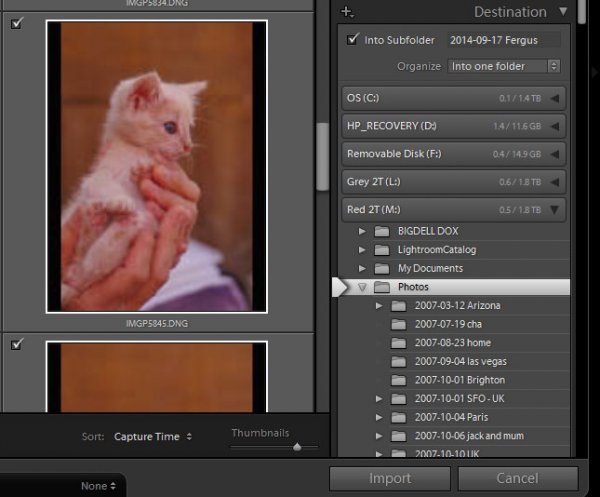
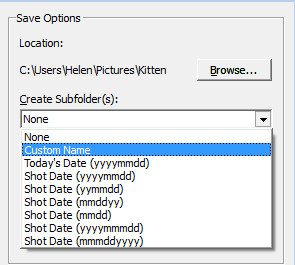
Once you have selected the folder to import the images into, you can, if desired, select a subfolder. In this way you can group photos by shoot, date or something that makes sense to you.  Bridge will create the folder for you if it doesn’t exist, so choose an option from the Create Subfolder(s) list and, if required, type a name for it or choose the date to use – either the capture date or today’s date. If you don’t want to organize photos in a subfolder then click None.

import-photos-using-bridge-4
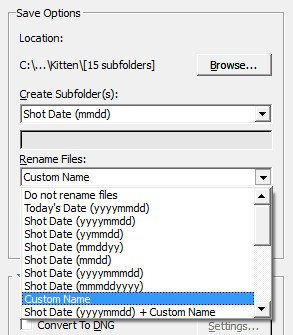
You can also select to rename files on import, or not. Choose Do not rename files if you don’t want them renamed or alternatively select a naming convention from the list.
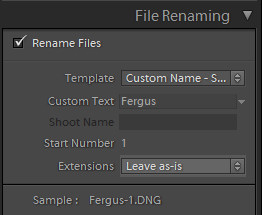
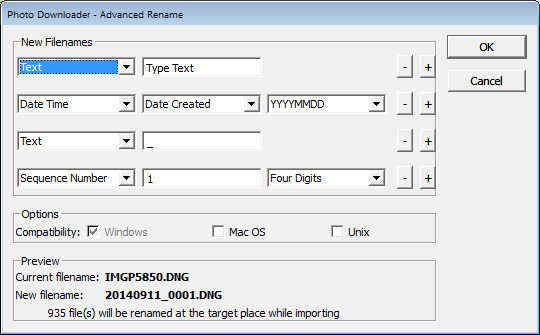
If you have advanced naming requirements for which the dialog does not provide an appropriate choice, scroll to the bottom of the list and click Advanced Rename to open the Advanced Rename dialog where you can create quite complex naming conventions. Whatever choice you make check the entry just below the dialog where Bridge shows you an example of the naming convention in place so you can check to see if it is what you want.

import-photos-using-bridge-5

In the Advanced Options area you can choose other options including Convert to DNG – which is handy if your camera captures in a manufacturer specific format such as CRW, NEF, PEF and so on, but you prefer to work with DNG files. Select this option and Bridge will do the conversion for you.

You can also select Delete Original Files although this is not recommended. It’s best to make sure that the images are correctly copied onto your computer before the originals are deleted so I suggest you leave this option disabled.

Bridge offers a backup option so it will make a copy of your photos on import. To do this, click the “Save Copies To:” checkbox and select an alternate location (such as an external drive) in which to save a copy of your photos.

import-photos-using-bridge-6

If you have a metadata template already created you can select this from the Apply Metadata drop down list.

In future you can create such a metadata template in Bridge by selecting Tools > Create Metadata Template. I suggest that you complete the IPTC Core Data for Creator as well as Copyright Notice, Copyright Status and Rights Usage Terms. Also complete the Type Of Source entry in the IPTC Extension group. When completed this will give you a good all round metadata preset to apply to all your images. For more information on IPTC Copyright Metadata check out this article: Lightroom: Add your IPTC metadata on Import.

import-photos-using-bridge-7

When you have your import settings selected and configured to meet your needs click Get Media to import the images.

import-photos-using-bridge-8

You will see a dialog showing you the progress of the import process.

import-photos-using-bridge-9

Importing Photos using Lightroom

If you’re using Lightroom then it is the obvious choice for managing the process of importing photos from your camera or memory card. From the Library module click Import, then select the source in the top left corner of the Import dialog.

import-photos-using-lightroom-1

Across the top of the screen you will see only two choices, Copy as DNG and Copy. This reflects the fact that you’re importing images from a camera card or camera – the options Move and Add are not available for this process (if you do see Move and Add as available options, it appears that Lightroom isn’t recognizing your camera or camera card correctly and even though they may be available you should not use either of these choices).

import-photos-using-lightroom-2

Next, open the File Handling panel on the right of the screen and select the kind of preview to create – Standard is a good choice. You can choose Build Smart Previews or not (if you’re unsure, check Build Smart Previews).

Checking Don’t Import Suspected Duplicates will ensure that Lightroom doesn’t import images again, that you’ve already previously imported. This is one feature available in Lightroom which is not also available in Bridge.

In Lightroom you can also choose to make a backup by making a second copy of your photos to an alternate location as you import them.

import-photos-using-lightroom-3

File Renaming panel allows you to rename images on import – you can select from a range of naming templates and even create your own. Here I’ve chosen to use the Custom Name – Sequence template so I’ve typed the Custom name and the sequence is set to start at 1:

import-photos-using-lightroom-4

The Apply During Import panel has an option for applying metadata to the image upon import. Unlike Bridge the drop down list for Metadata presets also includes an option New which you can use to create your own metadata preset. I suggest you complete the IPTC Copyright and IPTC Creator details, and in the IPTC Extension Administrative select Original digital capture from a real live scene from the Digital Source Type drop down list. Type a name for the preset and from the Present drop down list click Save current settings as new preset.

import-photos-using-lightroom-5

In the Destination panel you’ll need to select the location into which the images are to be copied. If you’re copying them to your hard drive then typically you’ll select your C drive, then your My Pictures folder which should be in your Users area.

If you save your images to an external drive then select the external drive and the folder into which the images should be imported.

If the folder does not exist you can create a subfolder on import by selecting the Into Subfolder checkbox and type a name for the folder that Lightroom should create to import the images into.

import-photos-using-lightroom-6

From the Organize drop down list you can select to put the images into this folder (Into one Folder) or to organize them by date. Whichever choice you make you can see a preview of what’s going to happen in the folder list, allowing you to check and make sure that everything is going to be imported and arranged to your requirements before you go ahead and complete the import process.

import-photos-using-lightroom-7

When you’re ready to import the images click Import.

Whatever process you choose to use for getting images off your camera card onto your computer the acid test for whether it is a good system or not will be if you can find your images later on. Also be aware that it’s advisable to make a backup copy of your images in case your computer is stolen, damaged or your hard disk crashes. For this reason a backup on a removable external drive is a sensible choice.

Having an import routine that you understand, and can reliably execute, is a necessary first step for any photographer. The worst possible scenario is to have copied your images from your camera card to your computer and erased them from your card, only to discover that you cannot find the images. It’s a scenario that way too many users have encountered – don’t let it happen to you!

Find a video version of this blog post here:

Do you have any other copy and import tips? Please share in the comments below.

googletag.cmd.push(function() {
tablet_slots.push( googletag.defineSlot( “/1005424/_dPSv4_tab-all-article-bottom_(300×250)”, [300, 250], “pb-ad-78623” ).addService( googletag.pubads() ) ); } );

googletag.cmd.push(function() {
mobile_slots.push( googletag.defineSlot( “/1005424/_dPSv4_mob-all-article-bottom_(300×250)”, [300, 250], “pb-ad-78158” ).addService( googletag.pubads() ) ); } );

The post Successfully Copy Photos from Your Memory Card to your Computer by Helen Bradley appeared first on Digital Photography School.


Digital Photography School

 
Comments Off on Successfully Copy Photos from Your Memory Card to your Computer

Posted in Photography


18 Awe-Inspiring Tips to Take Better Photos

27 Apr

Today all of us play the role of photographers – using small electronic cameras, smartphones or tablets, we document each and every moment of our lives. If you’d like to take better photos and memorize moments in your life in a more professional way, have a look at those 18 key tips. 1. Keep it to the eye level Just Continue Reading

The post 18 Awe-Inspiring Tips to Take Better Photos appeared first on Photodoto.


Photodoto

 
Comments Off on 18 Awe-Inspiring Tips to Take Better Photos

Posted in Photography


Shoot Your Own Frozen Flower Photos!

23 Apr

Spring is upon us. And it’s bringing a ton of flowers.

Now the only question is: whatcha gonna do with all those blooming beauties?

Ooh, we know! You should freeze ‘em, photograph ‘em, and then marvel at the gorgeous results.

Seriously, frozen floral photos are so pretty and unique that it’s almost unfair . So let us show you how to make them with this easy peasy (freezy) tutorial.

Freeze Flowers for Stunning Photos

Thanks for the inspiration Mo Devlin!
(…)
Read the rest of Shoot Your Own
Frozen Flower Photos! (508 words)


© Taylor for Photojojo, 2015. |
Permalink |
No comment |
Add to
Frozen Flower Photos!”>del.icio.us

Post tags:


Photojojo

 
Comments Off on Shoot Your Own Frozen Flower Photos!

Posted in Equipment


How to Shoot Panoramic Photos

23 Apr

Image stitching is not new, neither is panoramic photography. Since almost the beginning, photographers have been intrigued with providing a wider view of a given scene. The reason is that panoramic images provide context. In a normal frame of a large expansive scene, we only see a small part of the bigger picture. A panoramic image however, gives us a broader view, and a context for that image. The word panorama is derived from two greek words, “pan” which means everything and “horama” which means that which is seen or the view. So, panorama literally means – a view of everything.

Stitched Panorama

A six image pano of Howe Sound, Squamish BC

Early on, photographers would make panoramics manually, by simply panning across a scene and taking sucessive images. Once the images were printed, they would manually stitch them by overlaying one image on top of the other, or even cutting them into place. This was a new way of viewing and capturing scenes. I saw my first panoramic image as a young boy. It was a huge scene of photographs that had been stuck together and overlaid. It was in a museum in the city where I grew up. I was intrigued, it gave me a view of the city I was living in, that I had never seen before. It gave me a whole new perspective on the place that I called home. I wasted many rolls of film as a youngster trying to do the same shots, but never managed to get it right.

One solution to this challenge was the panoramic camera. These cameras revolutionized panoramic photography. They were able to capture a panoramic scene of 180 degrees in a single shot. No more cutting and sticking photographs together. These rotating cameras captured great images of scenes and did it with ease. There were also wide-angle panoramic cameras that took in much more of a scene in a single image and again, changed the way we viewed images and scenes. These cameras changed the views, and contexts of many famous places. In their day, they were the pinnacle of technology.

Stitched Panorama

Red Rock Canyon, Las Vegas

Once again, the wheel of progress turned and all of this changed when digital panoramics became possible. The photographer only had to pan across the scene and take successive images, as in the past, but now the stitching process in the computer gave a seamless result. The photographer simply dropped these images into a photo stitching tool and voila, an amazing panoramic image magically appeared. Well, that was the idea anyway, in practical terms it was not so easy.

1. How to shoot panoramic photos

Autopano giga is a standalone software tool that stitches your images together. There are a few guidelines to follow when you do a photostitch. By following these guidelines, you will be almost guaranteed that your image will stitch properly the first time.

A. Shoot in Manual mode

Expose for your scene manually and don’t change the exposure between shots. You may have to do a light meter reading for the brightest and darkest parts of your scene. Adjust your settings to make sure that you have good exposure throughout the images and then start shooting.

B. Overlap your shots by at least 30%

Overlap each image by at least 30% if you are shooting in landscape orientation and up to 50% if shooting in portrait. By overlapping you will have duplicates of parts of your scene, this will allow the software to stitch the images together better and adjust for the perspective distortion too.

Stitched Panorama

Five images stitched, Jack Poole Plaza, Vancouver

C. Use a tripod

You can shoot handheld, but using a tripod will ensure that the images will be shot along the same horizontal plane. This can also help with the stitching process too.

D. Keep your aperture between f/8 and f/11

You will want to keep everything in focus, so be sure that your aperture is set to at least f/8. At f/2.8 your focal point may change and this could cause some parts of your image to be out of focus. It may also be a good idea to set your aperture to f/8, focus your camera, then switch to manual focus. That way your camera won’t be focusing on a different part of the scene in each image. At f/8 or f/11 the whole scene should be in focus.

Stitched Panorama

Six image Pano, Victoria Harbour on a snowy, windy day

Now the magic part, digitally stitching the images together. You can do this using Autopano Giga or Photoshop, my preference is Autopano Giga. To learn more about how to do this, take a look at these articles I wrote on image stitching: Walk Through and Review of Autopano Giga – Image Stitching Software and Step By Step How to Make Panoramic HDR Images.

Lets make this fun, upload some of your images that you have stitched, then tell us what software you used. Enjoy, happy shooting and stitching.

googletag.cmd.push(function() {
tablet_slots.push( googletag.defineSlot( “/1005424/_dPSv4_tab-all-article-bottom_(300×250)”, [300, 250], “pb-ad-78623” ).addService( googletag.pubads() ) ); } );

googletag.cmd.push(function() {
mobile_slots.push( googletag.defineSlot( “/1005424/_dPSv4_mob-all-article-bottom_(300×250)”, [300, 250], “pb-ad-78158” ).addService( googletag.pubads() ) ); } );

The post How to Shoot Panoramic Photos by Barry J Brady appeared first on Digital Photography School.


Digital Photography School

 
Comments Off on How to Shoot Panoramic Photos

Posted in Photography


How Your Camera Gets in the Way of Creating Great Photos

21 Apr

I am the kind of person who loves nothing more than to read a new camera manual back to front. When the Canon 5d MK3 came out the manual was over 200 pages, YUM! It was the thickest Canon manual yet, heaven!

Anthonyepesphotography dps2 1

I love my kit and I love finding out how it works, what cool tricks I can do with it and what every single button does plus custom settings, autofocus modes, etc. I still use film (and digital of course), print my own work (which I keep detailed records of) so you can see that I am a solid tech nerd.

Yet, I see all the time how distracting the camera can be when we are taking photos. This statement probably seems like a massive contradiction so let me explain. We expect this piece of kit to take great photos for us – even though the camera is an inert and emotionless device with no brain or heart. Thinking, seeing and feeling are what create great photographs.

Sound technical knowledge is just the springboard – don’t get stuck there. Use it to launch your work to the next level by spending the majority of your time improving your ability to see, and I don’t mean just taking photos.

Anthonyepesphotography dps2 4

Good technique will only improve the quality of your shots – it will not help you create awesome images, it will not help you tell a story, communicate the feelings of a subject, or show the viewer how a place feels to be standing right there. Only you, the photographer can do that. This is where I think many photographers get a bit lost.
Diane Arbus, one of my favourite photographers, and one of the most revered portrait photographers we’ve ever had, had a brilliant relationship with her camera:

“I think the camera is something of a nuisance in a way. It’s recalcitrant….I mean I can work it fine, although I’m not so great actually. Sometimes when I’m winding it it’ll get stuck or something will go wrong and I’ll just start clicking everything then suddenly, very often, it’s alright again.”

For her the camera was just a tool that helped her execute her vision. To create her famous portraits, she spent the most amount of time on finding subjects she was fascinated by, creating a relationship and connecting with them. It’s that connection, and the ease at which her subjects felt with her that created the power of her work. The expressions that she obtained from her subjects are often very moving and they tell the story about what it was like to be them.

Once you’ve learned the fundamentals of how to use your camera, then you are obligated, in my opinion, to focus on seeing, truly looking and truly feeling what’s going on in this world. That is how you will create truly unique and original images.

Anthonyepesphotography dps2 2

Seeing is a state of mind

Learning to really see, is learning to be in a state of mind where you notice everything around you. Not just visually, but with every sense, because all of your senses feed into each other. You’re wandering around one morning and you smell fresh bread baking; it leads you to the back door of a bakery where the door is propped open and the bakers are laughing as they bake trays of bagels. It’s intriguing. It is making you smile.

You are not taking photos. But you are practicing seeing by noticing, by having the intention to notice. All of this is fuel for your photography. It stokes the flames of your creativity, it creates a discipline that you are becoming more and more aware in this world. At first it is a very active practice. It’s like becoming a child again. You have to keep paying attention rather than get lost in your thoughts, your to-do list, your future. But the more you do it the more it comes naturally and you start to see the impact that it has on your photography.

Anthonyepesphotography dps2 3

Chase the light

A great way to develop your eye is to always be chasing the light. Light diffracts, reflects, is filtered, and bounces off of things in a myriad of ways. If you see a shadow, think about where is that light coming from. I’ve spent a lot of my life looking for the sources of reflected light; off building windows, puddles. It’s like a light puzzle and when I’ve found the incident angle, I’ve solved it, and sometimes get a good shot as a prize.

Return to the same places

We miss most of the things that are happening around us because our brain blocks out what it considers to be unnecessary stimuli. So we are essentially fighting our brain and retraining ourselves to notice. I find going back to a place is a good way to see new things. Ask yourself, “What can I see in this place today that I didn’t see yesterday? How can I show something new that I haven’t photographed before? How has this new light changed the scene?”.

Anthonyepesphotography dps2 5

Create seeing projects for yourself

One fantastic way to start training your eye is to create a seeing project for yourself. Pick a subject, then look for that subject wherever you go. I’ve done snail-trails; my friend did red-jack playing cards. It could be tabby cats, purple cars, the colour yellow. Lots of people like shooting doors. You get the idea.

Choose something that is not that rare, but rare enough that you’ll be challenged, and it will help you to develop your eye. It’s like when your mate gets a new car and suddenly you see that car everywhere. The reality is that there aren’t more of those cars but your attention has been focused, honed to it. I’m always taking photos of things embedded in the street, purely for my own satisfaction (looking down is as important as looking up!)

Feel

Our senses all work together, and heightening one sense will heighten the others. Having an emotional reaction to your subject will help your photos because you will imbue those feelings in your photos. I loved what travel photographer Steve McCurry said in an interview:

“A picture of a guy in the street in New Guinea, with a bone through his nose is interesting to look at. But for it to be a really good photograph; it has to communicate something about what it is like to live with a bone through your nose. It is a question of the moment to reveal something interesting and profound about the human condition.” Steve McCurry

Anthonyepesphotography dps2 6

Shoot the third thing

A few years back Victoria Coren wrote about some advice her father, the late writer Alan Coren, had given. I thought this was a brilliant idea that could be applied to taking photos:

“Don’t write the first thought that comes into your head, because that is what everyone will write. And don’t write the second thought that comes into your head, because that is what the clever people will write. When you hit on a third thought, pick up the pen. That one is just yours.”

That first thought is the photo everyone sees and takes (the tourist shot). The second photo is one you thought over and shot. But the third photo is one where you stopped and really examined everything around you. When you start taking that third shot you will see your style come through. This third way of shooting will come quicker as you practice.

Don’t underestimate the power of looking in a different direction

I’ve found that photographers are often drawn to the same places. I have had so many situations like this one – where I’ve stood with banks of photographers on Westminster Bridge and they are all shooting in one direction:

Anthonyepesphotography dps2 7

But then, if you turned around, there was a very different style of photo behind us, which everyone was ignoring:

Anthonyepesphotography dps2 8

Seeing is a lifelong journey that will open up tremendous opportunities for your photography. Commit to improving your ability to see, and it will transform your photos. Push yourself always to see more, experience more and feel more.

googletag.cmd.push(function() {
tablet_slots.push( googletag.defineSlot( “/1005424/_dPSv4_tab-all-article-bottom_(300×250)”, [300, 250], “pb-ad-78623” ).addService( googletag.pubads() ) ); } );

googletag.cmd.push(function() {
mobile_slots.push( googletag.defineSlot( “/1005424/_dPSv4_mob-all-article-bottom_(300×250)”, [300, 250], “pb-ad-78158” ).addService( googletag.pubads() ) ); } );

The post How Your Camera Gets in the Way of Creating Great Photos by Anthony Epes appeared first on Digital Photography School.


Digital Photography School

 
Comments Off on How Your Camera Gets in the Way of Creating Great Photos

Posted in Photography


Opinion: Can an Aperture user be happy with Apple’s new ‘Photos’ software?

18 Apr

One of the most talked about subjects for photographers using Macs to process and archive their photos is the loss of Apple Aperture and its replacement, simply known as Photos. This new software strongly resembles the iOS software of the same name and while it still offers some of the features from the enthusiast-grade Aperture, quite a few things are missing. Learn more about Photos – both what it offers and doesn’t – in this opinion piece from DPR Editor Jeff Keller. Read more

Articles: Digital Photography Review (dpreview.com)

 
Comments Off on Opinion: Can an Aperture user be happy with Apple’s new ‘Photos’ software?

Posted in Uncategorized


With Spring Showers Comes Lightning Photos

14 Apr

Storm season is upon us which means it’s the perfect time to try for some shocking shots.

Lightning photos are hard to perfect but super fun to attempt. Here’s a few tips for getting started.

First and most importantly: Stay safe. Distance is your best friend – use a telephoto lens when possible. Keep your gear dry by setting up under a covered patio or deck.

Second: Long exposures mean you need a tripod, or duct tape and a rock, whatever it takes to get that stability!

Third of all: Every storm is different, so your settings will vary slightly each time. Try these to start with and play around from there –

  • ISO 100
  • f/7 aperture
  • 30 second exposure

For a more in depth tutorial, check out Richard Gottardo’s excellent write-up here covering everything from storm searching to stacking images in post.

And you thought puddle jumping was the best part of a storm…
 

Photo by Richard Gottardo


© Erin for Photojojo, 2015. |
Permalink |
No comment |
Add to
del.icio.us

Post tags:


Photojojo

 
Comments Off on With Spring Showers Comes Lightning Photos

Posted in Equipment


Apple releases OS X Yosemite 10.10.3 update with Photos app

10 Apr

Apple has released the OS X Yosemite 10.10.3 update, and among its features is the new Photos app that has been available to developers since February. Photos replaces Aperture and iPhoto, and is designed to work better with the company’s mobile products. Read more

Articles: Digital Photography Review (dpreview.com)

 
Comments Off on Apple releases OS X Yosemite 10.10.3 update with Photos app

Posted in Uncategorized


25 Fabulous Easter Egg Photos for Your Inspiration

04 Apr

Easter is a few days ahead and it’s a great opportunity for shooting! While you will be taking photos of your family and friends, turn your camera a bit to the treasure you have on your table – Easter eggs! Creative and colorful eggs with all those Easter decorations look just fabulous. See yourself! Here we have put together 20 Continue Reading

The post 25 Fabulous Easter Egg Photos for Your Inspiration appeared first on Photodoto.


Photodoto

 
Comments Off on 25 Fabulous Easter Egg Photos for Your Inspiration

Posted in Photography