RSS
 

Posts Tagged ‘Photos’

Best Photos of 2017 by Jim M. Goldstein

26 Jul

I’m happy to report 2017 was a much better year than 2016 on many fronts. Family was healthy, we avoided experiencing the passing of family members, there was a fair amount of travel, a few great photos were taken and most importantly to me my boys continue to experience nature and ask for repeat camping trips.

In past years yearly recaps I’ve emphasized how much of my focus has shifted from taking nature photos to instilling a sense of wonder about and deep respect for nature in my two young sons. That continues to be the case.   I’ve never delved into it too deeply in past yearly recaps why my prioritization has shifted. In part it’s likely very obvious for some. That said I do want to call it out. I became a photographer because of my love for nature. If I hadn’t been so intrigued by nature I’d never have had a reason to pick up a camera. With the onset of social media and mobile phones with cameras I’m not sure that can be said of many young photographers today. More and more as I view photography online I wonder whether people are truly interested in their subjects (all styles of photography not just nature) or just trying to increase their follower stats because that’s the thing to do in this day and age. Perhaps my cynicism is getting the better of me after working at Borrowlenses where I dealt with photography talking heads & professional and aspiring professional photographers on a daily basis. An element of my becoming a jaded photographer I’m sure (kudos to my friend Richard Wong for writing that post). I’ll avoid going down the path of airing dirt for now as that’s a series of posts unto itself. Anyhow once my boys got old enough it was quite natural for me to want to go back to my roots enjoying nature over photography. I’d like my children to deeply respect and value our natural world. What would I be teaching them, about nature and in general, if I was always taking photos on our trips versus living the moment?

For that reason my yearly recap photos have and will continue to be split between family photos and everything else. While my boys are in their most formative years I’ll continue to put my emphasis behind experiencing nature versus artistically capturing it. The fact that my boys regularly tell me, often out of the blue, they want to go camping again means the world to me. I’m incredibly grateful one aspect of my professional outdoor photographer mind has not lost a beat and that is timing our trips for optimal conditions. This used to torment me as I’d leave my DSLR behind, but the more my boys reminisce and ask for more nature experiences the more I know I’ve made the right call.

Now that that’s out of the way… my favorite photos, in no particular order are below. Enjoy and thanks for taking the time to view this post and my blog in general.  If you happen to have a recap of your best photos of 2017 I invite you to submit it to my blog project, where I list the best photos of photographers who read my blog. It’s a lot of fun and a great way to get inspired at the beginning of the new year.

Best of  Landscape & Nature

_MG_9035-_MG_9089-3

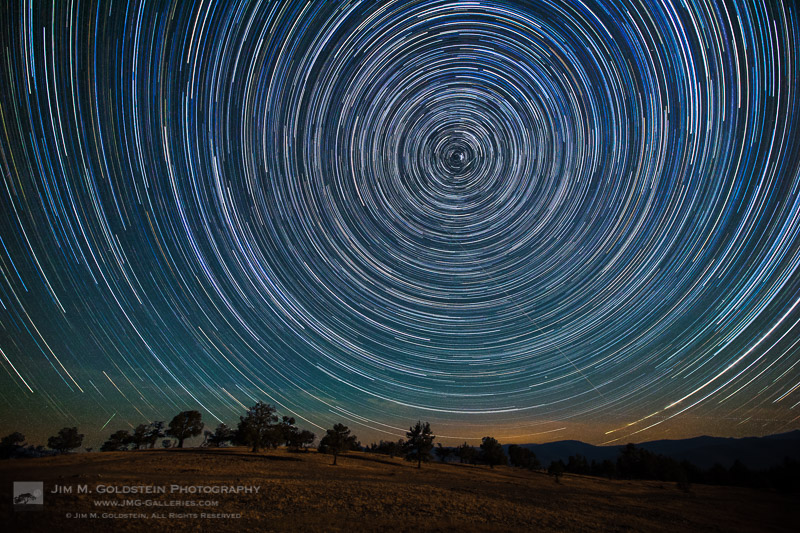
I took my boys to witness the total solar eclipse in August of 2017. We went off road to an isolated mountaintop with 360 degree views in eastern Oregon. My focus for the eclipse itself was on the experience with my boys, but we did star gaze a lot at night before the big day. In trying to explain how the earth moves I set up a quick star trail sequence to show the boys. This was the result.

_A2A1077M-2

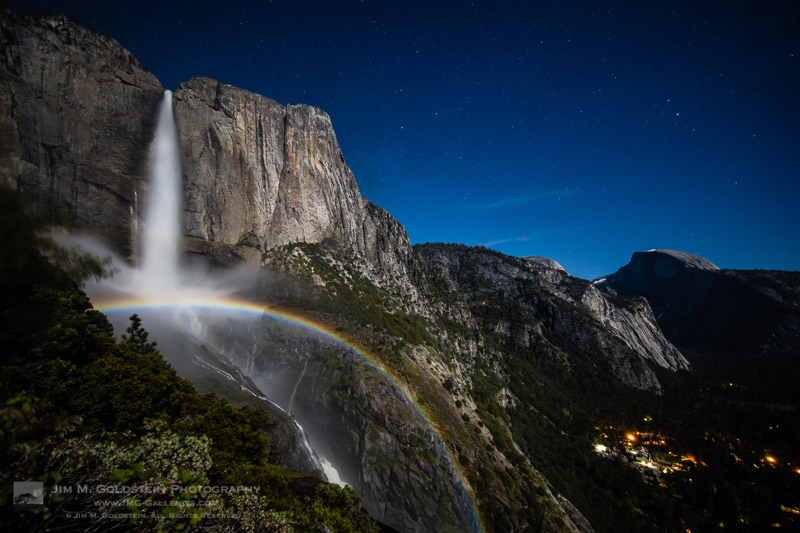
Water levels were near record levels this spring in Yosemite Valley. I made what has become a regular hike to Upper Yosemite Falls to take time-lapses of moonbows with my friend, Brian Hawkins. Like me, he seems to have enough screws loose to think this night hike is a good idea along with huddling in ice cold mist to capture this view.

_MG_7933-edit-3

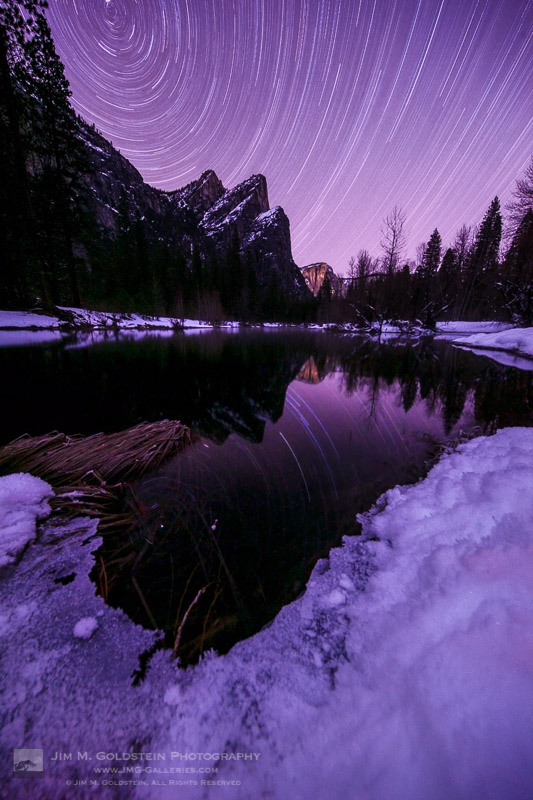
At the beginning of the year I timed a trip to Yosemite Valley to capture some long overdue winter star trail photos. This was a single 2+ hour exposure taken with my Canon 5D Mark II. Pictured is Three Brothers with star trails reflected in the Merced River.

_MG_7906M-4

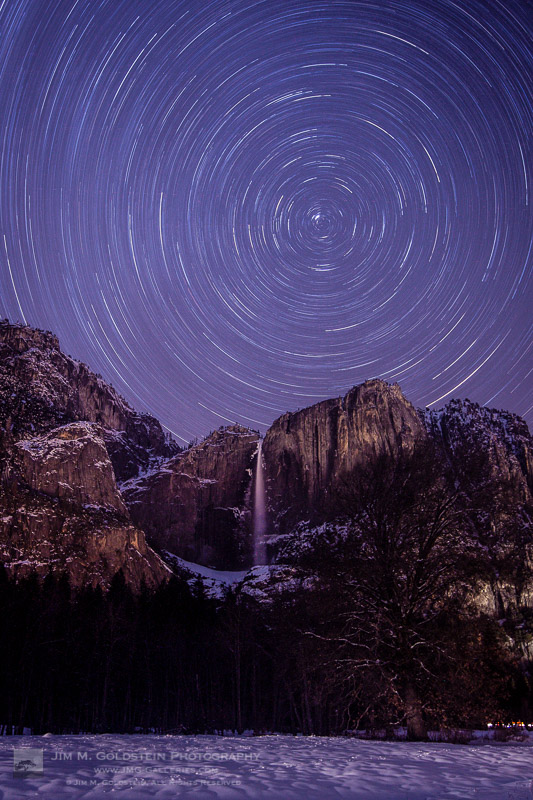
Another single 2+ hour exposure taken with my Canon 5D Mark II. Pictured is Upper Yosemite Falls as seen from the valley floor.

PacificOverlander.com Truck Under the Milkyway

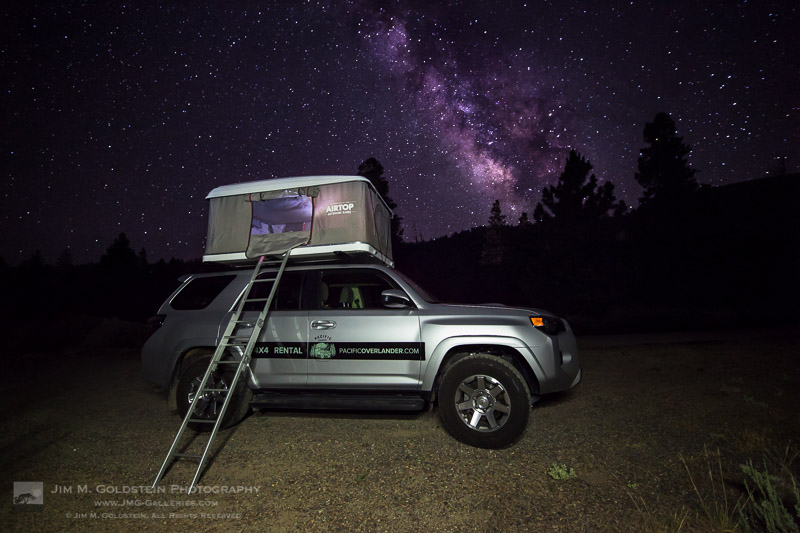
For most of my family trips this year I’ve rented an SUV outfitted with a rooftop tent via PacificOverlander. I took this photo on the first night of one of my trips with the boys as we explored the Owens Valley. While they slept I snuck in this photo of our truck/tent under the Milky Way. If you’re unfamiliar with PacificOverlander it’s well worth investigating. I’ve had several amazing experiences and my boys keep asking me why I keep giving the truck back. They regularly have so much fun on these trips it would seem they’re sold on having a truck/rig like this of their very own.


Best of Family

IMG_4675-2

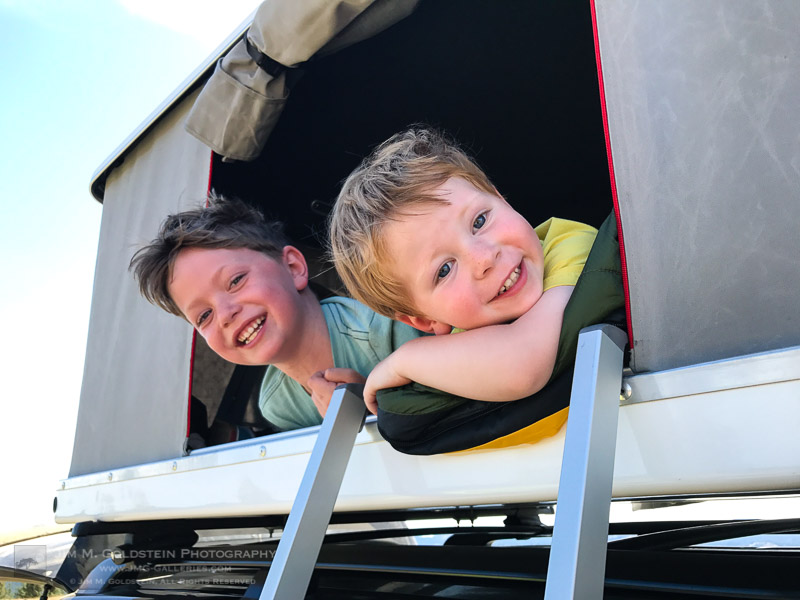
Taken on our trip to see the total solar eclipse, the boys enjoy hanging out in the tent atop our PacificOverlander SUV. This photo sits atop both my home and work desk. It’s probably my favorite photo of the year as it captures the raw joy my boys have on our camping excursions.

_MG_9412-2

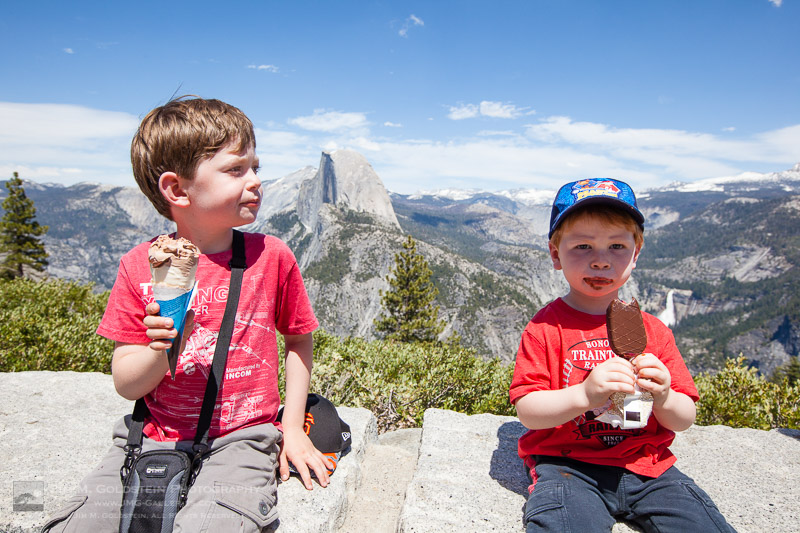
I spoiled my kids with ice cream atop the Glacier Point lookout in Yosemite National Park. A moment I enjoy remembering through this quick snapshot.

_MG_9241-2

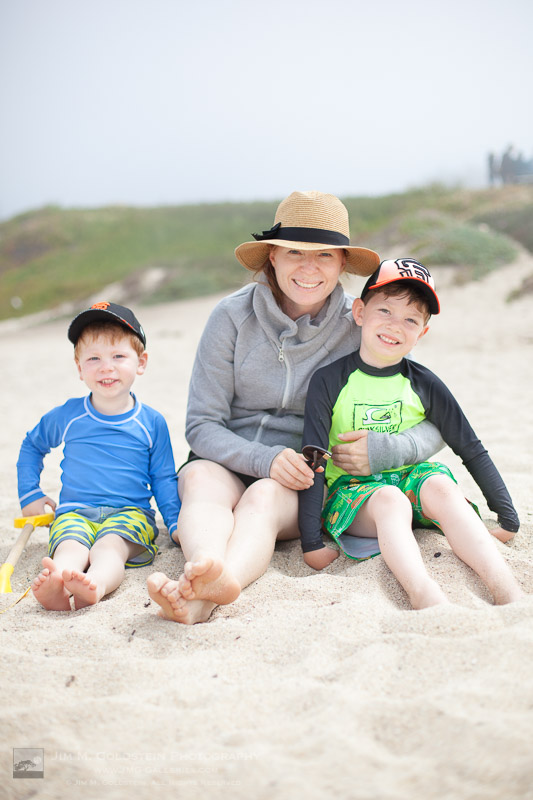
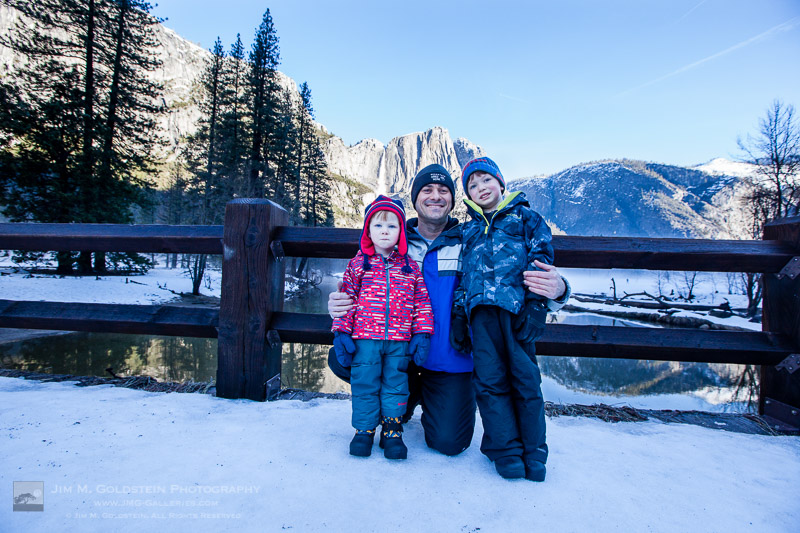
Wrangling family for a group photos is… a challenge. This is especially true when the boys enjoy making faces and test the patience of my wife. Every so often though a photo comes out just right. This was one that I took while we enjoyed a sunny day at a beach near Half Moon Bay.

_MG_9801-4

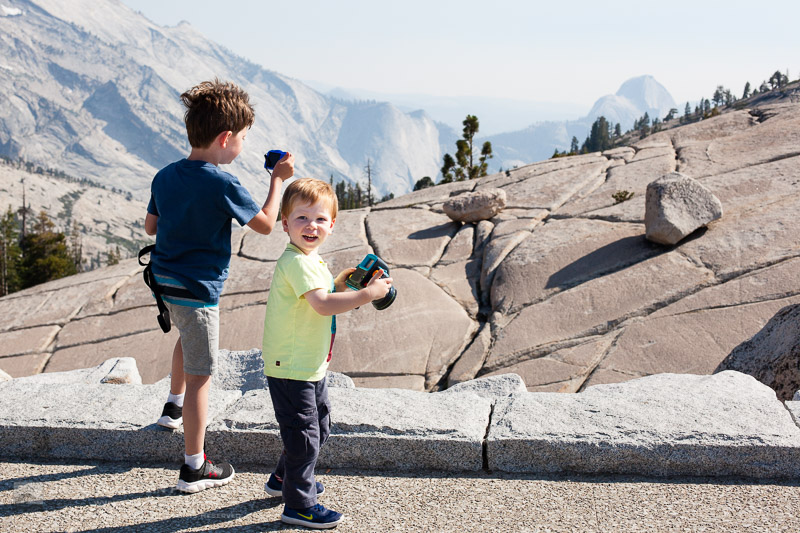
Not a technically great photo, but the fact it captures the raw excitement of my youngest son exploring new places makes it one of my favorite of the year. The had a fun time rock hopping at Olmsted Point in Yosemite National Park.

_MG_8189-3

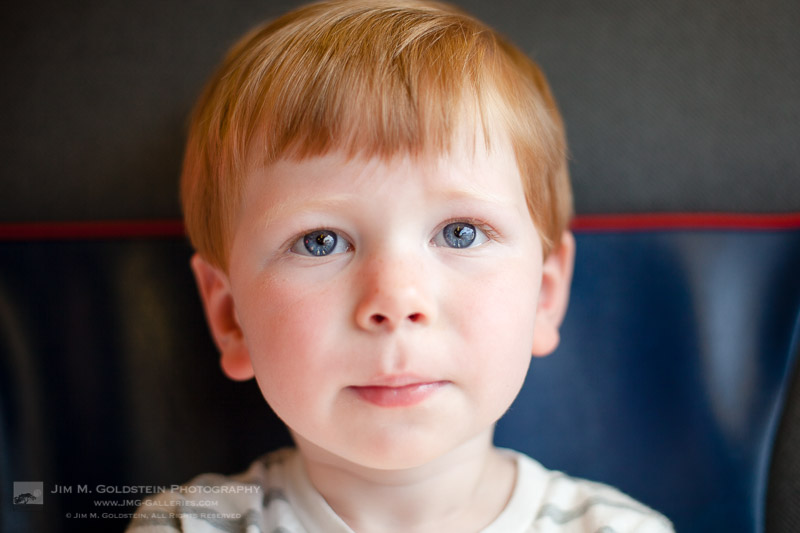
Trains… my boys love trains. Given the opportunity they’ll always jump on a train and lucky for them the commuter train, Caltrain, is very close to where we live. Bright eyed and excited I couldn’t help but take this photo of my son as we started to roll.


Bonus Images / Honorable Mentions

I didn’t take this first image, but it’s impossible to exclude as it’s a great keepsake from a very fun trip. Below that you’ll see a short slideshow of images that might show a glimpse of the future. While I’m not actively taking serious photos in front of the boys they’ve none the less taken to photography on their own. If you’ve seen my past years “Best of” photos you’ll also see that my oldest son continues to enjoy being part of trick photos (forced perspective, rotated images, etc.). His best this year was “rock climbing” at Devils Postpile National Monument. Lastly my oldest also enjoyed getting drenched under a rainbow at Bridal Veil Fall in Yosemite this spring.
_MG_7944-Edit-2

Click to view slideshow.

If you’re curious to see how these compare to my “best of” images selections from years past I invite you to check them out: Best Photos of the Year by Jim M. Goldstein.

Wow! You made it this far. Thanks for taking the time to view all my photos. Keep tabs on my latest posts by subscribe to my blog or (ironically) follow me on social media. I’m not posting as frequently as I used to, but when I do it’s likely something you won’t want to miss. Also I do have a mail list if you’d like to subscribe (at my current rate I send out 1-2 email per year due to a hectic schedule).


The post Best Photos of 2017 by Jim M. Goldstein appeared first on JMG-Galleries – Landscape, Nature & Travel Photography.


JMG-Galleries – Landscape, Nature & Travel Photography

 
Comments Off on Best Photos of 2017 by Jim M. Goldstein

Posted in Equipment


Best Photos of 2017 by JMG-Galleries Blog Readers

26 Jul

_A2A1077M-2

Get ready to start 2018 off on the right foot with some creative inspiration. The results of my 11th annual Best of Photos project hopefully will provide just that by introducing you to photographers and their work from all over the world. Get ready to travel around the world in 100+ links.

For those who are new to my blog project, photographers taking part span the gamut of photo enthusiasts to professionals. The great thing about photography is that no matter what your skill level we all can relate equally in our love for the art of photography and visually exploring. With that in mind I encourage you to reach out to photographers whose work you enjoy to keep sharing & growing as an artist.  I am incredibly thankful that this tradition has been embraced and enjoy seeing how familiar faces have evolved their work & grown over the years.  I hope reviewing your best photos of the year and comparing them to years pasts keeps you inspired and aware of your progress as a photographer.

If you’d like to take part next year and be informed when submissions open for the “Best Photos of 2017? blog project add your name to my mail list. You won’t be spammed. I send out newsletters quite infrequently.

Thank to everyone who took part!  I invite you to visit each link below as I have and introduce yourself to many of the participating photographers.

Best Photos of 2017

  1. Jim M. Goldstein – Best Photos of 2017 by Jim M. Goldstein
  2. Randy Langstraat – My Ten Favorite Photos of 2017
  3. Michael Russell – My Top 10 Photos of 2017
  4. Phil Colla – Best Natural History Photos of 2017
  5. Greg Russell | Alpenglow Images – 2017 year in review
  6. Mike Matenkosky – My Favorite Photos from 2017
  7. Khürt Williams – 2017 Favourites
  8. Carl Donohue – Expeditions Alaska
  9. Kevin Ly – Kevin Ly | Best of 2017
  10. Martin Quinn – Quinn Images – Best of 2017
  11. Robin Mayoff – RHM Images Best of 2017
  12. Craig L. Howe – On the Move
  13. Johann A. Briffa – 2017: A Photographic Retrospective
  14. Harold Davis – Harold Davis—My Best of 2017
  15. Denise Goldberg – top photos :: 2017
  16. William Bean – Bill’s Blog
  17. Greg Clure – Best Images of 2017
  18. Rick Holliday – Best Images of 2017
  19. Peter Carroll – Peter Carroll – Favourites of 2017
  20. Mike Chowla – My 10 Best Photos of 2017
  21. Wendy M. Seagren – wendy seagrens best photography 2017
  22. QT Luong – 2017 in Review, Favorites, and Seasons Greetings
  23. Jenni Brehm – Changing Perspectives
  24. Rachel Cohen – Rachel Cohen Photography
  25. Brian Knott (FMKphoto) – 2017 year in review
  26. Shikha Shrivastava – My favorite photos of 2017
  27. Dave Wilson – Dave Wilson Photography – Best of 2017
  28. Larry Millican – Millican Photography
  29. Alexander S. Kunz – My Favorite Photos from 2017
  30. Mark Duffy – 500px
  31. Stefan Baeurle – Top 10 Favorites of 2017
  32. Adrian Klein – Favorite Photos of 2017
  33. Alan Majchrowicz – Photo Highlights 2017
  34. Russ Bishop – Russ Bishop Photography | 2017 – The Year in Pictures
  35. Todd Henson – Best Photos of 2017: My Favorites of the Year
  36. Peter Tellone – My 2017 Top Ten Best Images
  37. Aaron Hockley – thisGruntled – Best Photos of 2017
  38. Tony Wu – Favorite Photos of 2017
  39. T.M. Schultze – T.M. Schultze Website
  40. Andrew S. Gibson – My Favorite Photos From 2017
  41. John Pemberton – JPSquared – Images of 2017
  42. Scott Thompson – Scott Shots Photography’s Top 10 Tahoe photos of 2017
  43. ElDuro Tuco – ElDuro Tuco
  44. The DarkSlides – The DarkSlides
  45. Jon McCormack – From Ancient Cities to Endangered Animals – 2017 in Photographs
  46. Fred Mertz Photography – Fred Mertz Photography
  47. Richard Valenti – Richard Valenti Photography
  48. Jeff Hubbard – My Favorite Photos of 2017
  49. Andrew Scharlot – 2017 Best Pictures
  50. Deb Snelson – Favorite Photos of 2017
  51. Richard Wong – Favorite Photos From 2017 – Richard Wong
  52. Caleb Weston – Dubland
  53. Gary Crabbe / Enlightened Images – My Favorite Landscape Photos of 2017 – A Year-End Retrospective
  54. Tom Whelan – Nature Diary
  55. Robert Varley – Robert Varley
  56. Kyle Jones – Favorites from 2017
  57. Neil Creek – Neil Creek – Photographer
  58. tim fiddimore – North Devon 2017
  59. Richard Murphy Photography – Best of 2017
  60. Alan Dahl – Favorites of 2017
  61. Gabor Ruff – Natural History Photography – Highlights from 2017
  62. Kevin Ebi – Living Wilderness: Best of 2017
  63. Clint Losee – 10 Best Landscape and Scenic Photos of 2017
  64. Mark Hespenheide – Best of ’17
  65. Ilias Katsouras – Okrivadas
  66. David J Grenier – 2017 Top 12 Photographs
  67. J. J. RAIA – 2017 Jim Goldstein Project
  68. Rob Tilley – Best of 2017 – My Favorite Images of the Year
  69. Björn Göhringer – Top 14 From 2017
  70. Bernt-Inge Madsen – Bernt-Inge.com
  71. USKestrel Photography (Pete Miller) – My favorite images of 2017: A Different Perspective
  72. Milan Hutera – 2017 in Pictures
  73. Fred Murphy – Fred Murphy Photography
  74. Harry Hitzeman – My Top Photographs of 2017
  75. Andrew Thomas – Best of 2017 – Aerials
  76. Dean Foster – 2017: Year in Review
  77. Simon Ng – 2017 A Year of Water
  78. Michael Katz – Michael Katz Photography
  79. Drake Dyck – Top Ten (favourite) Images of 2017
  80. Jose Manuel Santos – The Magnificent Douro Valley
  81. Gary Buzel – Gary Buzel Studios
  82. Bryan William Jones – Top Photos of 2017
  83. Peter Knott – 2017 Favourites
  84. Kamala Venkatesh – Kamala Venkatesh
  85. Jason Frye – My Top 10 of 2017
  86. Jackson Frishman – Favorites of 2017
  87. Thomas Yackley – Top Ten Landscape and Nature Photos of 2017
  88. Mark Graf – 2017 – A Year of Despair and Dragons
  89. Kurt Lawson – 10ish Favorites of 2017
  90. Jorge Ramirez – Selection 2017
  91. William Neill – William Neill’s Light on the Landscape Photoblog
  92. Daniel Leu – Favorites – 2017
  93. Derrald Farnsworth-Livingston – Top 10 Favorite Images from 2017 ~ Journey of Light
  94. Photography
  95. Mike Christoferson – 2017 Has Come and Gone
  96. Carol Schiraldi – Best of 2017 – My Top Images
  97. Robin Black – My 10 best photos (or personal favorites, anyway) of 2017
  98. Bryn Tassell – Favourites of 2017
  99. Steve Luther – SkyVista Photography Best of 2017 Images
  100. George Stark – George Stark Images
  101. Josh Meier – Josh Meier Photography Best of 2017
  102. Werner Priller – My Favorite Images of 2017
  103. Peter Krogh – Best of 2017 Photographs by Peter Krogh
  104. Under Pressure Photography by Scott F McGee – Top 10 Photos of 2017
  105. Joseph Smith – 2017 Favorites – A Year’s Review
  106. Chuq Von Rospach – 2017 BEST PHOTOS OF THE YEAR
  107. Charlotte Gibb – Twelve Months – Twelve Photographs
  108. Holly Davison – Holly Davison Photography
  109. Colleen Miniuk-Sperry/CMS Photography – Favorite Photos From 2017
  110. Anne McKinnell – Top 10 Landscape Photos of 2017
  111. Jim Stamates – My Favs of 2017
  112. Neil Corman Photography – Ten Images from 2017
  113. Eric E Photo – Analog: 2017
  114. Phyllis Whitman Hunter – Phyllis Whitman Hunter Photography
  115. Catalin Marin – My favourite shots of 2017
  116. Catalin Marin – Corporate work – My favourite client shots of 2017
  117. Simon Ponder – Sponderpoints
  118. Greg A. Lato – latoga photography Favorite Photos of 2017
  119. Paul Rosenblum – Best Shots of 2017
  120. Patricia Davidson – My Top 10 Favorite Photos of 2017
  121. Tim Aston – Favorites from 2017
  122. Yosemite and Bay Area Photography by John Harrison – “My Best Nature
  123. Sue Shuey – Best Overall 2017
  124. Ron Niebrugge – My Photo Blog
  125. Michael Frye – My Top Photographs of 2017
  126. Jao van de Lagemaat – Jao van de Lagemaat’s Best images of 2017
  127. David Leland Hyde/Landscape Photography Blogger – Best Photographs of 2017
  128. Mike Cavaroc – Free Roaming Photography
  129. Patrick Endres – 2017 Favorites
  130. Alex Buisse – Best of 2017

Have a great 2018!

The post Best Photos of 2017 by JMG-Galleries Blog Readers appeared first on JMG-Galleries – Landscape, Nature & Travel Photography.


JMG-Galleries – Landscape, Nature & Travel Photography

 
Comments Off on Best Photos of 2017 by JMG-Galleries Blog Readers

Posted in Equipment


How to Use Neutral Tones to Craft Realistic Edits for Landscape Photos

24 Jul

When you look at a white wall, how does it make you feel? Dingy? Cold? Warm and radiant? Modern? Sophisticated? Clean?

White and light gray, sometimes referred to as “neutral tones”, are some of the most powerful colors in the spectrum. We can distinguish many shades of white, and bounced light from a neutral source influences the tint of every other color nearby.

Neutral tones set the mood of an image more than any other colors. You’ve probably transferred a photo to your computer where the white balance was noticeably off: a night shot where everything was too green and cool, or an indoor photo that was orange. White balance is an easy fix in most photo editing software, but neutrals don’t end there: by tweaking them creatively, you can take your photos to the next level.

Sella towers - How to Use Neutral Tones to Craft Realistic Edits for Landscape Photos

What are the sources for neutral tones?

It’s possible to have a photo without white and grays, but most of the time scenes are full of them. These are some of the more common sources in landscape photography.

Clouds

Those water-saturated cotton balls do a great job of reflecting light. On a sunny day they tend to be slightly warm, while storm clouds are a fantastic source for chilly gray tones. However, clouds are not a good source for neutrals when shooting after golden hour or before sunrise.

Overblown sky

When shooting after sunrise and before sunset, the sky will typically be overexposed if you properly expose the rest of the image. It’s not usually desirable, but in a few instances an overblown sky is a good source of white.

Sass de putia - How to Use Neutral Tones to Craft Realistic Edits for Landscape Photos

Water

Lakes and shorelines are my favorite method to introduce strong neutral tones to landscape photos. You can use bodies of water to reflect an overcast sky, and along the coast, you can shoot a long exposure to blur the white foam from the waves.

Both tend to create pure neutrals, so you can completely change the mood of an image with tiny adjustments.

Man o war - How to Use Neutral Tones to Craft Realistic Edits for Landscape Photos

Fog

The most powerful way to introduce mystery and dreariness, fog is often the largest source of gray tones in your image.

Hohenwerfen castle - How to Use Neutral Tones to Craft Realistic Edits for Landscape Photos

Snow

Winter photography enjoys the most magical source for neutral tones. Tinting snow just a bit cooler or warmer profoundly impacts the scene’s mood.

Mount hood - How to Use Neutral Tones to Craft Realistic Edits for Landscape Photos

Moon and stars

When shooting astrophotography, the stars tend to cast a cold white light, and the moon a warmer light.

Gimmelwald - How to Use Neutral Tones to Craft Realistic Edits for Landscape Photos

Haystack rock - How to Use Neutral Tones to Craft Realistic Edits for Landscape Photos

Architecture

Man-made structures that ought to be white or gray such as; lighthouses, white-washed brick houses, winding gravel roads, and expansive castles — are often the subject of an image. Consequently, they make a compelling neutral source.

South stack lighthouse - How to Use Neutral Tones to Craft Realistic Edits for Landscape Photos

Why are neutral tones important?

Out of the camera, even after editing, your neutral tones may not really be neutral. They may be heavily tinted. Introducing off-white into your neutral sources is an important technique for crafting compelling edits.

Keep in mind that the viewer will expect those subjects to look neutral, so if you push the white balance too far or don’t balance the warms and cools, it will begin to look over-edited. A tiny change in neutrals has 10 times the power of changing your colors and blacks.

So, in general, start with subtle adjustments and revisit the photo often under different lighting conditions. Some of the most common ways to pollute neutral tones are:

  • Pushing saturation or vibrance.
  • Over-saturating an image shot at a high ISO.
  • Shifting the white balance too far from pure white to bring out colors in the sky or a dark foreground.

With those caveats in mind, here are four ways your neutral tones can support the rest of the image.

Strumble head lighthouse - How to Use Neutral Tones to Craft Realistic Edits for Landscape Photos

1. Neutral tones root an image’s color palette

With strong neutrals, viewers can believe almost any edits in an image: sunsets that pop, overly blue skies, or glassy teal water. But the moment you introduce color into an element that should obviously be white or light gray, the image’s believability disintegrates.

This is why split toning is rarely a magic pill for making a great photo. Toning the highlights and mid-tones often ends up tinting your neutral sources.

The foam in this shot of Spirit Falls (below) is pure white, but the rest of the image has been significantly warmed and tinted green to bring out the beautiful colors. The contrast between the pure white foam and warm greens creates the impression that the water is refreshingly chilly.

Spirit falls - How to Use Neutral Tones to Craft Realistic Edits for Landscape Photos

2. Neutral tones help you resurrect the colors you remember

After shooting a stunning sunset, it can be disappointing to open the RAW image in your editing software and find that the colors are missing. In most cases, the detail and colors are there, but it’s up to you to revitalize them. Neutral tones will help.

Start by identifying elements in the photo that ought to be white or gray, then adjust white balance and tint accordingly. This will give you a great starting point.

It may still be underwhelming, but now that your neutrals are about right, start selectively bumping the saturation, temperature, and tint on the colorful subjects in your composition. You might add a graduated filter to the sky portion of the image and warm or cool it to help them pop.

Roads end - How to Use Neutral Tones to Craft Realistic Edits for Landscape Photos

Sunsets create a powerful contrast between the warm sky and cool shadows. The image of Road’s End above is primarily cool since the most of the image is in shadow.

However, the sea foam reflects both the warms and cools, so in post-production, I played with the global white balance until both tones came out. Afterward, I introduced a strong magenta cast to bring out the pinks in the sky and foreground.

3. Neutral tones set the overall mood

In reality, neutral tones are rarely neutral. By slightly tinting neutrals, you can communicate aspects of the scene. Here are some examples.

Time of day

Night photography is typically cooled, while sunset or midday photos are warmed. This shot of Mount Bachelor was taken after during civil twilight, so the only source of warm light was the grass in the foreground and hints of alpenglow on the snow. Everything else was left cool.

Mount bachelor - How to Use Neutral Tones to Craft Realistic Edits for Landscape Photos

Temperature

An overly warm image can communicate a hot day, and on chilly days, the overall white balance can be left cool. This is especially powerful if your image has a small, warm light source to draw the viewer’s eye.

Morning fog over this lake in Snowdonia introduced a neutral source and warming the color raises the perceived temperature.

Snowdonia - How to Use Neutral Tones to Craft Realistic Edits for Landscape Photos

Weather

Clear days can be tinted slightly pink to warm the scene, while an incoming storm should incorporate a greener tint.

Oregon is rich with various biomes, and Smith Rock State Park feels like a desert on a clear day. The strong magenta cast brings out colors in the rocks and reinforces the cloudless sky.

Smith rock - How to Use Neutral Tones to Craft Realistic Edits for Landscape Photos

Clarity

When the fog rolls in, it tends to chill the image and evoke mystery. A hazy day adds depth and layers to an image and tends to warm the image at golden hour.

In this shot from Bavaria, the haze on the mountain range adds warmth and communicates just how distant the mountains are.

Geroldsee - How to Use Neutral Tones to Craft Realistic Edits for Landscape Photos

4. Neutral tones help to bring out or tone down a region

Neutrals don’t have to be the same color or white balance! They can help root the mood and color palette of a local section of the image.

For example, snow beneath some trees in the foreground should be cool, and snow on a mountain under sunrise should be warm.

The different white balances communicate the temperature contrast between the foreground and background. Furthermore, since cool colors recede while warm colors pop forward, the warm snow in the background entices the viewer’s eye up from the ice-covered lake in the foreground.

Lost lake -- How to Use Neutral Tones to Craft Realistic Edits for Landscape Photos

What if my image doesn’t have any neutral tones?

It’s not impossible to realistically edit images without strong neutrals. But since your viewer has no neutral reference to root the color palette, you will need a compelling balance of warms and cools to convince the viewer you didn’t artificially crank up the white balance.

This shot from the village of Brunate (below) doesn’t have any substantial neutrals. Although the fog could be considered a neutral source, it strongly reflects the colors in the sky. However, the overpowering warmth in the top left sky is balanced by cooler tones in the rest of the image, which keeps the white balance from being entirely warm and pink.

The contrast also draws the viewer’s eye from the village in the foreground to the beautiful sky in the background.

Brunate - How to Use Neutral Tones to Craft Realistic Edits for Landscape Photos

Conclusion

Crafting realistic edits in landscape photography is a subjective experience. But by carefully preserving your neutrals, you grant yourself almost unlimited creative liberties in the editing process.

So next time you want a fall photograph to feel like a shot from Rivendell, identify the sources of neutral tones in your image and apply these techniques.

The post How to Use Neutral Tones to Craft Realistic Edits for Landscape Photos appeared first on Digital Photography School.


Digital Photography School

 
Comments Off on How to Use Neutral Tones to Craft Realistic Edits for Landscape Photos

Posted in Photography


How to Take Clear and Creative Photos at Aquariums

19 Jul

Aquariums are amazing places to take your family. But it can be really hard to take good photos as aquariums.

Naturally, you want some really cool pictures. But you find out very quickly that aquariums are dark. Really dark! And that your photos turn out blurry. Really blurry!

Low light photography is one of my favorite challenges. So, in this article, I’ll show you how to get clear and creative photos at aquariums and how to apply some simple edits in Lightroom.

A photo of a shark swimming with fish. How to Take Clear and Creative Photos at Aquariums

I’ve always been amazed by people who go diving with sharks. I knew that I wanted my aquarium photos to seem like they were taken from in the water. So as much as possible, I got right up close to the glass, blocking everything out except the creatures in the water.

1. Getting Clear Photos at Aquariums

Turn off your flash

If you set your camera to Automatic Mode, it’ll likely trigger the flash when you take a photo. The flash will make a huge reflection on the glass which will ruin your photo. So before you even enter the aquarium, make sure to disable your flash.

If you turn your flash off you’ve eliminated the biggest problem with glare. But there still might be some ambient light reflecting off the glass. Move right up to the glass so that your camera won’t pick up any of this reflected ambient light. You’ll be standing right up at the glass looking through it, rather than standing back a few feet looking at it.

Photo of ambient light reflecting on glass at the aquarium. How to Take Clear and Creative Photos at Aquariums

Here you can see the white and orange ambient light reflected in the glass on the left side of the photo. This photo is also suffering from a slight bit of motion blur.

Photo of a fish with no ambient light reflecting on the glass. How to Take Clear and Creative Photos at Aquariums

In this second photo, I stepped closer to the glass and angled the camera so as not to see the ambient light reflected in the glass. The main fish is also sharper now. Part of drew me to this photo was the simplicity of the scene. Very little color, good subject and a repetitive pattern of fish in the background. ISO 2500, f/2.8, 1/50th.

Turning off the flash and getting rid of reflections is the first step. Now it’s time to consider freezing the action so that your photos won’t be blurry.

Motion Blur

You may find that your aquarium photos turn out blurry at first. This is because in low light situations your shutter speed can become too slow to freeze the movement.

It’s important for you to set the shutter speed yourself, ensuring that your photos will not be blurry from camera or subject movement. There are two main ways to do this; Shutter Priority or full Manual Mode.

A photo with blurry fish - How to Take Clear and Creative Photos at Aquariums

This is a typical aquarium photo suffering from motion blur. The camera settings were ISO 400, f/4, 1/10th. The shutter speed needs to be much quicker to freeze the movement of the fish. Increasing the ISO to 3200 would have allowed for a much faster shutter speed (1/80th).

Shutter Priority Mode

To use Shutter Priority Mode, start by setting the ISO as high as you are comfortable doing according to your camera. I have no problem going to ISO 3200. This higher ISO will help your camera absorb the dim light.

For photos in aquariums, I suggest setting your shutter speed to 1/125th to begin. Make sure you only set the shutter speed fast enough to freeze the action, but no faster than necessary. If the shutter speed is too quick you’ll end up with dark or underexposed images.

Close-up photo of a shark - How to Take Clear and Creative Photos at Aquariums

I was so excited to get this close to a shark! The settings for this image were ISO 3200, f/2.8, 1/125th.

Manual Mode

If you’re comfortable with it, you should use full manual mode. Set your ISO as high as you are comfortable doing according to your camera. Aim for ISO 3200 which will help your camera absorb the light.

Open your aperture as much as you can, or as much as you are comfortable doing creatively. If your aperture opens to f/2.8 or f/1.8 that will really help to capture the light.

With your ISO as high as you can make it and your aperture open as wide as you like, set your shutter speed to 1/125th or faster (likely somewhere between 1/60th and 1/250th – adjust as needed to get a good exposure based on the amount of light in your scene).

If you have a 50mm lens I recommend you make it your main lens for aquariums. The wider aperture will let in lots more light. It’s a good focal length too.

My typical settings for aquarium photos are as follows:

  • ISO 3200
  • Aperture f/2.8
  • Shutter speed 1/60th

That shutter speed is actually pretty slow. But I have practiced holding the camera really steady and most of the creatures weren’t moving too quickly.

A shark with fish. How to Take Clear and Creative Photos at Aquariums

ISO 3200, f/2.8, 1/125th.

Don’t get discouraged when the first shot doesn’t turn out. Take your time as you explore the aquarium. Try to choose a day to visit when it’s less busy. Give them a call and ask them when those times occur.

2. Getting Creative Photos

Once you’ve figured out how to get clear photos, it’s time to get creative. You might be so overwhelmed by the amazing sea life that you forget to bring your own creativity to the photos, so here are some tips for you.

Angles

To me, varying your camera angle is the quickest way to make your photos more interesting. Rather than capturing everything from the same perspective, try a variety of angles. The same shark can look very different from different angles.

A big lobster with huge claws. How to Take Clear and Creative Photos at Aquariums

I chose an eye to eye camera angle for this lobster. His claws were huge and getting right down to his level made him look like a tough guy. You have to look carefully to see his eyes in the background. This part of the aquarium was actually lit with purple light.

Low angle photo of a shark with its teeth showing. How to Take Clear and Creative Photos at Aquariums

To me, the feature that stands out the most on a shark is its teeth. A low angle is just about the only way to see those teeth in a photo.

Photo of a strange fish (eel). How to Take Clear and Creative Photos at Aquariums

The best way to capture this eel’s beauty was an eye to eye angle.

Photo of a shark chasing a fish. How to Take Clear and Creative Photos at Aquariums

A low angle can add a sense of drama to the photo. When a shark decides that it’s feeding time, that’s a dramatic moment!

Extremely low angle photo of a shark. How to Take Clear and Creative Photos at Aquariums

I would normally refer to this extremely low angle as a “bug’s eye view.” Dramatic angles such as this can really give the feeling of actually being in the water with the sharks. You’ll notice a little glare on the glass on the upper right of the photo.

Silhouettes

Silhouettes are really easy to capture in aquariums. The key to a silhouette is to have a bright background and a dark foreground and subject. If you’re comfortable using Manual Mode, then you only need to adjust your exposure until you get the desired effect.

If you’re in Auto Mode or even Shutter Priority, then your camera may naturally make the photo look like a silhouette. But you could use exposure compensation to adjust the exposure (- if you want it darker, + to lighten it) if you don’t want to shoot in Manual Mode.

A silhouette photo of people watching a manta ray. How to Take Clear and Creative Photos at Aquariums

Children are taken in by the sea creatures and parents are captivated watching their kids. This silhouette photo happened quite naturally because the aquarium is really bright compared to the people in the foreground. You’ll notice some unfortunate ambient light reflecting on the glass near the manta ray’s tail. That could be easily removed in Photoshop – if you have those skills.

Light

Pay attention to the light in the water and you should be able to get some interesting photos. Especially look for backlight or sidelight.

A dramatically lit school of fish. How to Take Clear and Creative Photos at Aquariums

I love backlighting so I positioned myself to get the huge lights in the frame. This gives the photo a dramatic deep sea feel, as though a submarine were coming along.

Close up of a backlit school of fish. How to Take Clear and Creative Photos at Aquariums

Another backlit photo. I was able to get right up to the glass to photograph this school of fish.

Editing Your Photos at Aquariums in Lightroom

When the chaos of the aquarium trip is over you can relax and sift through your photos. Choose the ones that you like the best and forget about the ones that didn’t turn out. Use a program like Lightroom to put the finishing touches on your photos.

My goal is to keep my photos looking as natural as possible. My main concerns are exposure, contrast, and clarity. However, I always want my photos to look the way the moments felt. So I don’t mind exaggerating colors or exposure if need be.

So considering your images, they’re your photos so you get to make the decisions.

Screenshot of adjustments made in Lightroom. How to Take Clear and Creative Photos at Aquariums

The adjustments here, especially clarity, allowed the shark and the fish to pop a little more.

Screenshot of adjustments made in Lightroom.

The most important adjustment made to this photos was the White Balance. I normally use Auto White Balance and the camera gets the color pretty close. But in this case, there is a strong green tint to the photo. There are all sorts of color casts in an aquarium which can make white balance tricky. Make sure you shoot raw so you can adjust it later.

Screenshot of adjustments made in Lightroom. How to Take Clear and Creative Photos at Aquariums

This lobster was impressive for its size and gritty crusty look. I bumped up the clarity significantly in order to portray that in the photo.

Bring it Together

Whether you’re going alone, with a friend, or with your whole family, don’t fight the crowds and choose a quiet time to visit the aquarium. When you get there, take your time and get comfortable with your camera settings.

Once you have figured out how to get clear photos, get creative with angles and interesting light.

Relive the sights as you cull, edit and print your favorite shots. And before you visit an aquarium again review your last photos and plan to make the new batch even better.

The post How to Take Clear and Creative Photos at Aquariums appeared first on Digital Photography School.


Digital Photography School

 
Comments Off on How to Take Clear and Creative Photos at Aquariums

Posted in Photography


Some Cool Tools For Editing Your Photos Inside ACDSee Photo Studio Ultimate 2018

17 Jul

In this third installment of articles on ACDSee Photo Studio Ultimate 2018, we look at some of the Cool Tools – either new features or ones that are particularly useful. Read my first two articles here:

  • ACDSee Photo Studio Ultimate 2018 Guide for Beginners
  • How to do Creative Editing with Layers in ACDSee Ultimate Photo Studio 2018

New Features

1. ACTIONS

Newly implemented in the latest release of the software, Actions are a range of predefined edits that you can apply to your image to achieve a specific look or effect. To assist you with this, there is an Actions Browser that lets you see the effect applied in advance, which is extremely useful.

Some Cool Tools For Editing Your Photos Inside ACDSee Photo Studio Ultimate 2018

Image with the Actions Browser open.

There are 16 different categories covering color, black and white, workflow, editing, special effects, portrait and landscape options, and more. Once you decide on the desired Action, click PLAY and it is applied.

Some Cool Tools For Editing Your Photos Inside ACDSee Photo Studio Ultimate 2018

Example of a Split-tone Action.

Some Cool Tools For Editing Your Photos Inside ACDSee Photo Studio Ultimate 2018

A black and white conversion Action applied.

To apply an Action, you need to open your image in Edit mode. On the top menu bar, look for Tools > Browse Actions.

2. LIQUIFY

Liquify is often used in fashion and portrait editing to change the shape of people or parts of their bodies. It is a new feature in this release of ACDSee Photo Studio Ultimate 2018. This tool needs to be applied with a large soft brush and a delicate touch or it can look overly obvious.

I found the Liquify tool very easy to use. It worked quickly (i.e. there was no lag on processing the change) and had a gentler effect than I was expecting.

Some Cool Tools For Editing Your Photos Inside ACDSee Photo Studio Ultimate 2018 - liquify

This is the before image for comparison.

Some Cool Tools For Editing Your Photos Inside ACDSee Photo Studio Ultimate 2018

Showing where the effect had been applied.

Some Cool Tools For Editing Your Photos Inside ACDSee Photo Studio Ultimate 2018 - liquify

Image after Liquify applied to the arch and bowl of the spoon, and the dark side of the main blueberry.

Using the Liquify Tool

Liquify is a function in Edit mode, so you need to open your image up in there. On the top menu bar, select Filter > Geometry > Liquify.

There are four different Liquify modes:

  1. Shift – This moves pixels from one area to another in the direction you move the brush.
  2. Pinch – This moves the pixels towards the center of the brush (making things smaller).
  3. Brush – This moves pixels away from the center of the brush (making things bigger).
  4. Restore – Undo mode for any of the three options above.

Once Liquify mode is active, check that your brush is the correct size and softness (a larger and softer brush is recommended) and very gently click and nudge the area you want to adjust a tiny amount. It is much easier to do lots of little adjustments as you can undo one if you go too far.

Also be mindful that when you use Liquify it moves all the pixels within the brush, so if you have any lines or other elements, they can be affected too. This can make it obvious that you have used Liquify, so be careful about the backgrounds and surrounding elements in the area you’re using it.

3. FREQUENCY SEPARATION

This is a function used a lot in portrait and fashion photography – anywhere there is a lot of skin visible, especially faces and close-ups. Frequency separation allows you to smooth out blemishes and imperfections, to even out the skin tones, and provide a polished outcome in the image.

While it can be done manually, it is time-consuming to set up. Now with a few clicks, the software does all the layers for you, making it easy to apply the effect where necessary. I don’t photograph people or close up portraits so have never had the need to use this functionality, but for those who want to access this advanced technique, ACDSee has included it.

Using the Tool

Open your image in Edit mode and in the Layers pane, duplicate the layer. Frequency Separation is a destructive edit, so it is recommended that you work on a duplicated layer to maintain image integrity.

Select the top layer (the duplicate), then right-click and select Frequency Separation from the drop-down box. It will then create two layers – one will be grey and have (HF) in the layer description. The other one will be in color, but will be all blurry and have (LF) in the layer description.

On the LF layer, use a brush to work on any skin imperfections. On the HF layer, use the Repair tool to clone clear skin over top of the blemish areas.

4. PIXEL TARGETING

The Pixel Targeting tool allows you to select specific areas in your image based on a combination of tone and color selection. It works in conjunction with an adjustment layer.

In Edit mode, open up your image and select an adjustment layer (any of them seem to be fine). Here I am using a shot of some bright red raspberries and a Vibrance adjustment layer.

Right-click on the top layer and select Pixel Targeting and a panel will open up. The top sliders allow you to select the tones and the bottom sliders allow you to select the colors.

Some Cool Tools For Editing Your Photos Inside ACDSee Photo Studio Ultimate 2018

Adjust the tone and the color sliders to suit. It creates a mask of the subject that you want to adjust.

Save a preset for future use (use the Save option at the top of the screen) and click OK.  The mask you have just created in the Pixel Targeting window is now applied to your adjustment layer, and it will only apply the adjustment to the light areas of the mask.

Here I have turned the raspberries blue simply by adjusting the Hue sliders in the Vibrance layer.

Some Cool Tools For Editing Your Photos Inside ACDSee Photo Studio Ultimate 2018

Useful Features

While learning how to use ACDSee Photo Studio Ultimate 2018, there were several things about it that I found particularly useful. These are either the small things that don’t get used a lot but work really well when you do need to use them, or something that makes it much easier to do a really common task.

These are things I appreciate, especially when something you do a lot is made easier, or offers a clever alternative.

1 – Add a File as a Layer

Some Cool Tools For Editing Your Photos Inside ACDSee Photo Studio Ultimate 2018

At the bottom of the Layers pane are a whole lot of quick access icons for different layer features. The one circled here is the “Add a File as a Layer” option.

I do a couple of specific tasks that require the addition of outside images as extra layers, such as adding texture overlays and compositing.

There are lots of other instances when this could be useful – focus stacking, blending panorama or astrophotography images, time-lapse stacking, and so on.

This is a particularly common function and the way Photoshop does it is really NOT user-friendly. I have always gotten around it by using a second monitor and dragging my image in that way.

But if you are working on a laptop or only have one layer, that isn’t an option, so this feature becomes worth knowing about.

It’s really simple. Click on the Add a File as a Layer icon and a dialog box opens up asking you to select the location of the image you want to add. Even better, you can switch your view to Thumbnail and see examples of the images so you can select the right one.

Click on the desired file and select Open. The file will then open up as a new layer. It will probably need to be resized and the program has that mode already activated for you as well. Drag the yellow handles to the right size, select Commit, and you are done!

Some Cool Tools For Editing Your Photos Inside ACDSee Photo Studio Ultimate 2018

2. Heal Tool

Sometimes you might have a mark, a blemish, or a stray hair or twig in the way on your shot, and you don’t notice until you see it on the big screen when you are editing. Technology has improved so much these days that software can often take care of those issues for you, but it can still be a less than polished outcome.

When editing my blueberry shots, I was dismayed to find that I hadn’t noticed my main berry had a scratch down the front of it. Great chance to give the Heal tool inside ACDSee Photo Studio Ultimate a go.

I was quite impressed with how well it works. Just right-click on a good area and then paint over the blemish area. I find doing lots of small selections gives a more natural effect usually, but ACDSee did a really good job.

Some Cool Tools For Editing Your Photos Inside ACDSee Photo Studio Ultimate 2018

After the Heal tool was applied.

Some Cool Tools For Editing Your Photos Inside ACDSee Photo Studio Ultimate 2018

Before Heal tool applied – you can clearly see the big scratch on the front of the berry.

Conclusion

Before writing these articles, I had never used ACDSee software at all. My background was with PaintShop Pro, Photoshop, and Lightroom. Learning about the full range and capabilities of this ACDSee program has been interesting. There are some really exciting new features and useful tools included, particularly in Edit mode.

Overall I have been impressed at the depth and capability of ACDSee Photo Studio Ultimate. For a beginner wanting a one-stop-shop program at a cost-effective price (and no subscription model), it has a lot of benefits.

For anyone looking to get started in managing their photo files, processing RAW images, and more in-depth editing, this is a good place to start. If you’re looking for a non-subscription option, it is worth considering as well.

Disclaimer: ACDSee is a dPS advertising partner.

The post Some Cool Tools For Editing Your Photos Inside ACDSee Photo Studio Ultimate 2018 appeared first on Digital Photography School.


Digital Photography School

 
Comments Off on Some Cool Tools For Editing Your Photos Inside ACDSee Photo Studio Ultimate 2018

Posted in Photography


Editing Gently: 3 Tips for Processing Realistic Landscape Photos

11 Jul

A well-processed photograph should be just like a good haircut. That’s one of my favorite analogies when it comes to explaining my approach to editing my own photographs. Not only does it confuse people and make them think I’m weird but it is also incredibly accurate when it comes to processing realistic landscape photographs.

What I mean is that when an image is well-processed the viewer will know something has been changed while not being overly apparent and in the end, they like what they see. Just like a good haircut.

sand dunes - Editing Gently: 3 Tips for Processing Realistic Landscape Photos

Before we get further into this, I want to go on record and say that in my opinion there is no “correct” way to process any photograph. So the tips you’re about to learn here come from my own creative tastes and style for landscapes which lean towards an “enhanced” realism but solidly anchored in reality nonetheless.

Now, let’s talk about some ways you can give your landscapes a good haircut and push your processing right up to the boundaries of realism without tipping over the edge.

#1 – Directional Light

Photography is all about light and in landscape photography, 99% of the time the only light source in your compositions will be the sun, or in some cases the moon, which is just reflected sunlight (science).

Sunlight comes from that big ball of fire in the sky and that makes it very directional by nature. Meaning, your main light source for your photographs comes from one spot. When you process your landscape images it’s very important to pay attention to the direction from which the natural light is falling in the image.

The reason for this is because there’s nothing more telling that a photo has been blatantly over-processed than sunlight appearing to miraculously illuminate the frame from different directions. This is especially true when the sunlight is close to the horizon in the early morning or late afternoon. Have a look at the photo below.

zion canyon - Editing Gently: 3 Tips for Processing Realistic Landscape Photos

Notice how the light comes in from the right of the frame and illuminates the tops of mountains? Yet the foreground is in shadow and so are the areas where the sun is blocked by the cliffs.

When processing a photo with such stark lighting as this be mindful that you don’t create overly artificial light where it shouldn’t be. Sure, bring up those dark areas but don’t go too far as I have with this example (below).

zion bad edit - Editing Gently: 3 Tips for Processing Realistic Landscape Photos

See how “off” the lighting is now? Sure, it’s not terrible but there is bright illumination in areas that should be in shadow on the right. There is no longer a natural feeling gradient to the light as it falls on the foreground.

Let’s look at a more harmonious example of the same photo that has been processed to work with the direction of the available light.

zion good edit - Editing Gently: 3 Tips for Processing Realistic Landscape Photos

In this example, the entire photo feels much more comfortable without having bright spots, uneven shadows, or that odd appearance in the first version.

Most of the editing you’ll do to selectively adjust the luminance of landscapes will be done with local adjustment tools like the gradient filters and adjustment brush. We’ll get into using local adjustments in a moment but first, let’s talk about another aspect of landscape processing that can truly ruin any great photo if you’re not careful.

#2 – Match Color Tones in Reflections

Walking hand in hand alongside working with directional light is how you manage reflections in your landscapes. More specifically, matching reflections in water is a little detail that can make or break a convincing landscape photo.

So often I see reflections in water which are either too bright or too dark or perhaps more noticeable, reflections which do not match (or reasonably approximate) the color tone of the light which it is literally reflecting. Have a look at this. I’ve warmed the sky in this image somewhat from its original blue hour cool tone.

yosemite sky - Editing Gently: 3 Tips for Processing Realistic Landscape Photos

Notice how the light reflecting from the river also carries a hint of the orange color from the sky? Not too much but just enough to add some realism. This is because I intentionally warmed the color of the water a wee bit in order to be more harmonious with the warmed sky. If I had not, we would have something of a tonal mutant on our hands…

yosemite cool water - Editing Gently: 3 Tips for Processing Realistic Landscape Photos

Notice how the color tones in the water don’t match the sky and overall scene here?

When it comes to working with your reflections the name of the game is remembering that the light reflecting in the water comes from the sky…usually. So it should also carry some of the same attributes of that light in terms of luminance and color.

Of course, the type of water plays a role in skewing this a bit but just use good judgment and keep in mind that the reflection should almost always carry a hint of whatever color the ambient light brings to the scene.

#3 – Make Realistic Local Adjustments

I’ve talked about how much I love using local adjustments in other dPS articles. I’m admittedly a radial filter junky and the majority of my photos carry some use of either the gradient or radial filter and adjustment brush edits, often times all three. When it comes to making edits using any of these tools it’s important to know how NOT to use them.

My old friend the gradient filter comes into play quite a bit when processing realistic landscape photos to even out bright skies and for illuminating dark foregrounds. What’s more, used with the radial filter and local adjustment brush, it can work wonders.

good adjustments filters yosemite - Editing Gently: 3 Tips for Processing Realistic Landscape Photos

Good adjustments using the filters in Lightroom.

Or it can look absolutely horrifying when used poorly.

Yosemite - Editing Gently: 3 Tips for Processing Realistic Landscape Photos

Bad use of a graduated filter in editing.

The same is true for its circular counterpart, the radial filter. This little gem works beautifully for applying custom vignettes and brightening (or darkening) areas or for adding in a host of other great adjustments to your photos. However, much like the gradient filter, it can be easily blundered.

saguaro cactus bad edit - Editing Gently: 3 Tips for Processing Realistic Landscape Photos

Bad edit with a radial filter in Lightroom.

The local adjustment brush also carries the same caveats. Few things make a picture look worse than the application of a “finger-paint” local adjustment brush. Actually, it gives finger-painting a bad name.

death valley - Editing Gently: 3 Tips for Processing Realistic Landscape Photos

The key to making effective and realistic local adjustments in any photograph comes down to remembering a few important guidelines:

  • Less is usually more. Local adjustments are just that, local. So when applying them remember that they will become more and more apparent when you use them to make drastic edits.
  • Feathering is your friend. Whether it’s the radial or gradient filters or event the adjustment brush, most times you will want to apply your adjustments gradually with very soft borders which blend well with the surrounding pixels. Set your feathering all the way to 100 and then if you need a harder edge for more defined work back it off from there.
  • Don’t be afraid to stack adjustments. When done judiciously, many local adjustments can be applied one over the other. For example, you might use three graduated filters each with a varying color temperature to give the sky a creamy color tone or multiple radial filters to layer out an exposure adjustment.

Final Thoughts

Landscape photography is a long-loved standby in the photography world. It is also one of the most ethereal and easily mismanaged types of photography when post-processing is done unconvincingly.

There are so many aspects of processing realistic landscape photos and most go beyond simply moving a few adjustment sliders around. In fact, I think of my landscapes as more of an exercise in digital painting than as simply editing a picture.

Whatever your persuasion may be in terms of how much you choose to make edit, having a solid basis in reality is a great jumping off point for making a dynamite landscape.

zion - Editing Gently: 3 Tips for Processing Realistic Landscape Photos

Remember, pay close attention to the direction of the light in your frame and make sure that the rest of your edits stay somewhat true to the natural lighting already present.

The same goes for reflections. Make sure the light reflecting from surfaces like water looks like it came from the ambient light source even if that light source has been changed by you. And lastly, don’t mess up the endgame but applying freakishly obvious local adjustments.

Always remember, there are no rules for processing a landscape photograph but there are ways you can make sure your photos stay true not only to your visualized outcome but also to the natural splendor from whence they were born. Yes, I used “whence” in a sentence.

Happy editing!

The post Editing Gently: 3 Tips for Processing Realistic Landscape Photos appeared first on Digital Photography School.


Digital Photography School

 
Comments Off on Editing Gently: 3 Tips for Processing Realistic Landscape Photos

Posted in Photography


PhotoMirage software creates moving photos from a single image

11 Jul

PhotoMirage, a new product from software company Corel, transforms images into “mirages” by adding movement to elements, such as water or clouds. The software works in three steps, the company explains, only requiring the user to select the elements they want animated, isolate them from the rest of the image, then save the final product.

PhotoMirage does not require video footage (the way a cinemagraph does), instead animating a single static image. The software is designed to produce moving images “in minutes,” Corel explains on its product website, enabling the user to choose the rate and direction of the movement using Motion Arrows. Plot Anchor Points are used to isolate images from movement, and a slider is used to manually adjust movement speeds.

The resulting image can be previewed, then either saved or shared directly on platforms like Instagram or through email from within PhotoMirage. The application costs $ 69.95 USD and comes with a free trial, but is only available for Windows 7 and higher.

Via: Digital Trends

Articles: Digital Photography Review (dpreview.com)

 
Comments Off on PhotoMirage software creates moving photos from a single image

Posted in Uncategorized


How to Create Abstract Photos with Colored Paper

04 Jul

Developed in China, paper as we know it has been around for at least 2000 years. Originally made by pressing the wet fibers of plant-derived cellulose together and dried in sheets, paper’s ability to be mass produced resulted in the advancement of the written word as a means to pass information down through time. This accelerated exchange of information triggered a revolution in cultural and technological advancements that have shaped the way we live today.

Artists paint and photographers print on specialized paper. Books, magazines, and newspapers distribute information across the world. Important documents are filed away on paper, ready to be pulled out at a moment’s notice. Even with today’s abundance of computer screens, paper has endured as an indispensable material.

Creating abstract photos is another wonderful use of paper. With a few bulldog clips, some colored paper, and a bit of creativity, you can create beautiful abstract images to enjoy and use as desktop wallpapers or backgrounds.

Creating Abstract Photos with Colored Paper - orange and red abstract image

What you will need

  • Your camera
  • A macro lens or set of extension tubes
  • A selection of different colored paper (I used a packet of variously sized one-color per piece origami paper I found at a dollar shop).
  • Several medium or large bulldog clips.

Selecting a space

First, you’ll need to choose a space to set up in. This is important because your paper needs to be exposed to plenty of natural light. Otherwise, your shadows will be too dark, and your photographs will look flat or awkward.

Set up outside, or near a large window with a decent amount of light flooding into your space. I work on a desk outside, with plenty of room to move and shoot from different perspectives.

Creating Abstract Photos with Colored Paper - orange circle abstract

Setting up

Setting up for this project is can be a little tricky. Once you’ve settled on a space to work in, you’ll need to arrange your colored paper. First, select a piece of colored paper that will serve as the background for the image. You’ll want this background to cover the frame, so choose a size that has adequate coverage. The background color is up to you, so choose whatever catches your eye.

Next, add a second layer of paper to sit on top of the background. This will be your foreground subject. Again, the color is up to you. To make an interesting image, you need to separate the foreground layer from the background. You’ll do this by physically adjusting the orientation of the foreground paper.

Creating Abstract Photos with Colored Paper - bulldog paper clip

Generally, sheets of paper want to stay flat and straight, so shaping your foreground paper can take a little bit of coordination. An easy way to control the orientation of the paper is to add weight to its edges. Attach a bulldog clip to each side of the piece of colored paper and lay it down so that there is a gap between the foreground and background paper.

Photographing your creations

Once you’ve attached your bulldog clips and arranged your paper, it’s time to get busy photographing. There are no hard-and-fast rules here, just photograph what you think looks best.

Try sitting your foreground paper vertically or horizontally in relation to the background paper for different depth effects. You can also try focusing your lens on different areas of the paper, or for a smooth, featureless gradient, unfocus your lens altogether. Focus on a small section of your paper or zoom out to include the whole arrangement.

You can modify the shape of your foreground paper by manipulating the location of the bulldog clips on the paper. Moving them closer together creates a nice S or U bend in the middle of the paper for soft organic lines. For harder lines, move the bulldog clips further away from each other to tighten the paper.

blue and yellow abstract - Creating Abstract Photos with Colored Paper

Paper has a thousand uses, the great thing about this project is that there is no right or wrong way to do things. Just take some time to relax and experiment. If you have kids or grandchildren, get them to help you – they’ll have fun helping to arrange the paper.

Enjoy!

The post How to Create Abstract Photos with Colored Paper appeared first on Digital Photography School.


Digital Photography School

 
Comments Off on How to Create Abstract Photos with Colored Paper

Posted in Photography


What Makes Great Photos? 5 Factors That Can Take Your Images From Good to Great

17 Jun

Have you ever heard the phrase “light is everything” or perhaps “composition is everything”? I know I have many times. But they can’t both be everything, that’s not possible. So what is really going on? Obviously, there is at least a grain of truth to both expressions. But are there other factors that make great photos?

tunnel with art work - What Makes Great Photos? 5 Factors That Can Take Your Images From Good to Great

As it turns out, there are and things are not quite as simple.

A photo with very poor composition will fall apart and it will never be a great photo. But a decent composition capturing the most fantastic light can be a good photo, if not a great one. On the other hand, a great composition in poor light can make a dull photo.

Creating a photo almost always includes some sort of compromise. Either the light is not great, the timing is not perfect, or it is not possible to get to the ideal location, because you can’t walk in thin air or on water. Or maybe the prime elements in the scene are not arranged perfectly.

There are so many factors that have to come together at the exact same time, that it seems impossible to make a perfect photo. And that is part of your life, as a photographer, but knowing what counts, can make your success rate of making great photos higher.

canals in Venice at night - What Makes Great Photos? 5 Factors That Can Take Your Images From Good to Great

What makes great photos?

It is a number of things that make a great photo and composition and light are obviously on that list, but what is the rest?

I find that there a five important factors that combine to make great photos. If you can maximize all five you will have a perfect photo. However, creating such a photo is really rare even for the very best photographers.

Let us have a look at them and then discuss in more detail.

5 factors that help make great photos

What Makes Great Photos? 5 Factors That Can Take Your Images From Good to Great


You don’t have to maximize all five to make a great photo. A decent composition with fantastic light and timing, with fantastic post-processing, can make a great photo. The same goes for an outstanding composition. You will be able to make up for the lack of light to some extent. So you just have to balance the five factors without dropping any completely.

If one of the factors is somewhat lower, it can be compensated by one or more of the others if they score high. You could see it as the sum of the five pillars, that gives an indication of how great a photo is, as long as you don’t have any hitting the bottom.

What Makes Great Photos? 5 Factors That Can Take Your Images From Good to Great

They all work together

A completely failed composition, bad light, completely missed timing, non-existent story and poor image processing will tear a photo into pieces.

The factors are very often interconnected. For instance, the composition is often connected to the timing of capturing a moving object. And the light is connected to the timing, in the case of the natural light. The composition can also be connected to the light, a shadow or some light beam or another light source.

They are all dependent on each other, which increases the complexity. No wonder it is hard to create great photos! And no wonder some types of photographers, like those who do commercial studio and model photography, try to control some of the factors – namely the light – to be able to get a larger success rate on their photos.

Factor #1 – Composition

The composition is something that comes naturally to some people while others have to learn it. It is a fundamental skill to master as a photographer. If it doesn’t come naturally to you, try to copy other compositions you like, in your own way at different locations. That will quickly improve your skills.

What Makes Great Photos? 5 Factors That Can Take Your Images From Good to Great - a city shot at night

Factor #2 – Light

The light can be many different things. There’s hard light, soft light, defused light, warm light, cold light, studio flash, the natural light just to mention some of the most commonly known types. Light is a big topic and it requires some research to get the full understanding. But that is not required to create great photos.

If you are into landscape photography, you will increase the quality of your photos by avoiding a blue sky in the middle of the day. Instead, go for sunrise and sunset times. The time after sunrise and before sunset is called the Golden Hour. Blue Hour also provides excellent light for landscape photography.

What Makes Great Photos? 5 Factors That Can Take Your Images From Good to Great - sunset photo of fog over a mountain pond

If you are into flash photography you would do well by experimenting with an off-camera flash, rather than on-camera. As well try high-speed sync flash which opens doors for creative flash photography.

My advice is to learn about the type of light that is relevant to the kind of photography you enjoy doing.

What Makes Great Photos? 5 Factors That Can Take Your Images From Good to Great - canals in Amsterdam

Factor #3 – Timing

The timing, depending on the type of photography you do, can be a matter of capturing that instant of a second that makes a difference. You have to capture a moment – the magic moment.

The moment of a fleeting kiss, the instant a football player kicks the ball, the moment the wave crash onto a rocky shore with a huge splash. Or as in this case, the instant four people put the same foot on the ground while walking at the same distance.

b/w photo of 4 people walking in a city - What Makes Great Photos? 5 Factors That Can Take Your Images From Good to Great

Other moments are more slow, like a sunrise. Nevertheless, it is still about timing.

You have to get up early, very early sometimes, to get to the location. That is timing. Or as in this case, getting a photo without any people, at the central station at blue hour is about timing too.

What Makes Great Photos? 5 Factors That Can Take Your Images From Good to Great - train station Copenhagen

Empty Central Station in Copenhagen.

Factor #4 – The Story

The story of a photo can be anything ranging from “what delicious crumbles sitting on top of that cupcake”, to “what a fantastic round boulder on that beach” to a “touching relation between people”. A story can be somewhat abstract, yet there has to be a purpose of why you choose to include what you do in the photo.

Sometimes a story is complex and deep, while at other times it is simple “that is a nice boulder sitting in a beautiful landscape“.

You may not be equally good at telling all kind of stories, through your photos. This is perfectly alright and it is fine to stick to what you do best.

I find that story and timing can be very tightly connected as in this case of the image below. Capturing a gondola on a super busy Canal Grande in Venice, and making it seem like a peaceful romantic moment is not as easy as it may sound.

What Makes Great Photos? 5 Factors That Can Take Your Images From Good to Great - canal in Venice with one gondola

If you can get a spot, you can literally stand on the Rialto bridge for hours, while you enjoy the view. The view is full of activity and happy people.

Factor #5 – Image Processing

The last and fifth factor could raise some discussion. One that I do not want to get into here. And if you are a strong believer in Straight Out Of Camera (SOOC) photos, this point will not be relevant to you.

If you believe in photo editing, you may also know that it is often the thing that transforms a photo from flat to an image that pops. In some cases, that is what makes or breaks a photo.

Image editing or post-processing is by no means easy and there are a lot of opinions out there. But even simple things like, adjusting white balance, exposure and contrast can be the difference that makes a photo pop.

If you are into documentary photography, there are certain things you are not allowed to do. You do not meddle with reality. But if you don’t do that kind of photography, it is in the post-processing phase that you can make your artistic interpretation.

What Makes Great Photos? 5 Factors That Can Take Your Images From Good to Great - before and after editing

Before and After. A creative interpretation.

What to look out for

Image editing is a race car without a seatbelt. There are a number of things that can totally ruin your image and if you are not careful. Some of the classic problems from over-processing include halos, too contrasty and over-saturation, but there are many others.

What Makes Great Photos? 5 Factors That Can Take Your Images From Good to Great - example of image processing for creativity

This wedding photo of Alexander and Mia was shot in the worst possible light of midday with a blue sky. In post-processing, I have created a softer and warmer feeling to compensate.

A reason to build up your skills in image processing is that you can compensate to some degree for the other factors. You can enhance the good bits, and hide the less desired parts. Remove unwanted objects to present your photo is the best possible way, from what you captured in your camera.

A great side effect of upping your editing skills and paying some real attention to your photos is that you will get a better understanding of what make great photos. You will find things that degrade your photo (why did I include that dustbin?) and learn to avoid them next time you are on location shooting.

You learn by making mistakes and trying to fix them. The more times you fail, the better photographer you will end up being.

make great photos - Paris at night

Final remarks

In photography, there are no absolutes. Not two people have the same opinion. We do not all like the same, things so what some people would deem a perfect photo, others may not deem perfect. Yet, there are some tendencies and you could do worse, than paying attention to what people like and don’t like if you want to create successful photos.

Any critique is an opportunity to learn something new.

The post What Makes Great Photos? 5 Factors That Can Take Your Images From Good to Great appeared first on Digital Photography School.


Digital Photography School

 
Comments Off on What Makes Great Photos? 5 Factors That Can Take Your Images From Good to Great

Posted in Photography


Video: How to take your photos to the next level with sub-framing

16 Jun

At some point in your photography career, you’ve probably come across the phrase ‘frame within a frame.’ While it might sound like nonsense, what it’s referring to is a composition technique referred to as sub-framing.

In his most recent video, YouTuber George Tomlin breaks down the concept of sub-framing and explains how it can be used to bring an otherwise unlikely scene to life.

As he explains in the seven-minute video, sub-framing is the practice of shooting through objects to frame a subject within the frame of the image—thus the term ‘frame within a frame.’ Rather than simply explaining how it works, Tomlin uses a 3D rendering to show how a particular scene in a made-up cityscape can yield multiple sub-framing opportunities.

In one of the four examples he shares, he shows how shooting through the windows of a vehicle can not only make the image more interesting from a composition standpoint, but also give a bit more context to the scene.

After he gets through the examples of sub-framing opportunities in the 3D scene, he turns to his own work to show off how he’s recently used sub-framing. The examples aren’t shining ones, necessarily, but they do work as solid foundations to build upon in your own work.

Articles: Digital Photography Review (dpreview.com)

 
Comments Off on Video: How to take your photos to the next level with sub-framing

Posted in Uncategorized