RSS
 

Posts Tagged ‘Photography’

A Guide to Using Natural Light for Macro Photography

21 Sep

Working with natural light can seem daunting. Yet as a macro photographer, I love natural light. I’ve spent years studying it, playing with it, observing it, and watching it fall.

I use it in all of my photographs. In fact, the last time I picked up a flash was over five years ago.

natural light macro rose abstract

But how do you take advantage of natural light? Are there some simple principles that can be learned and quickly applied, so that you can take stunning macro photographs in no time?

Actually, yes!

In this short tutorial, you’ll learn all about natural light for macro photography. I’ll explain the types of natural light that I like, the types that I avoid, and how you can best use natural light in your own photographs.

When you’re finished reading, you’ll have the know how to use natural light like a pro!

natural light macro birch leaf in clover

Five Types of Natural Light in Macro Photography

There are five types of natural light that all macro photographers should know:

  • Sunny light
  • Cloudy light
  • Evening frontlight
  • Evening backlight
  • And evening shade

Let’s discuss each in turn.

natural light macro poppy

Sunny Light

By sunny light, I am referring to the light that you find at noon on a clear day.

It’s very bright, very strong, and really contrasty. So, let me just get this out of the way and state it simply.

Do NOT use sunny light for macro photography!

natural light macro clematis

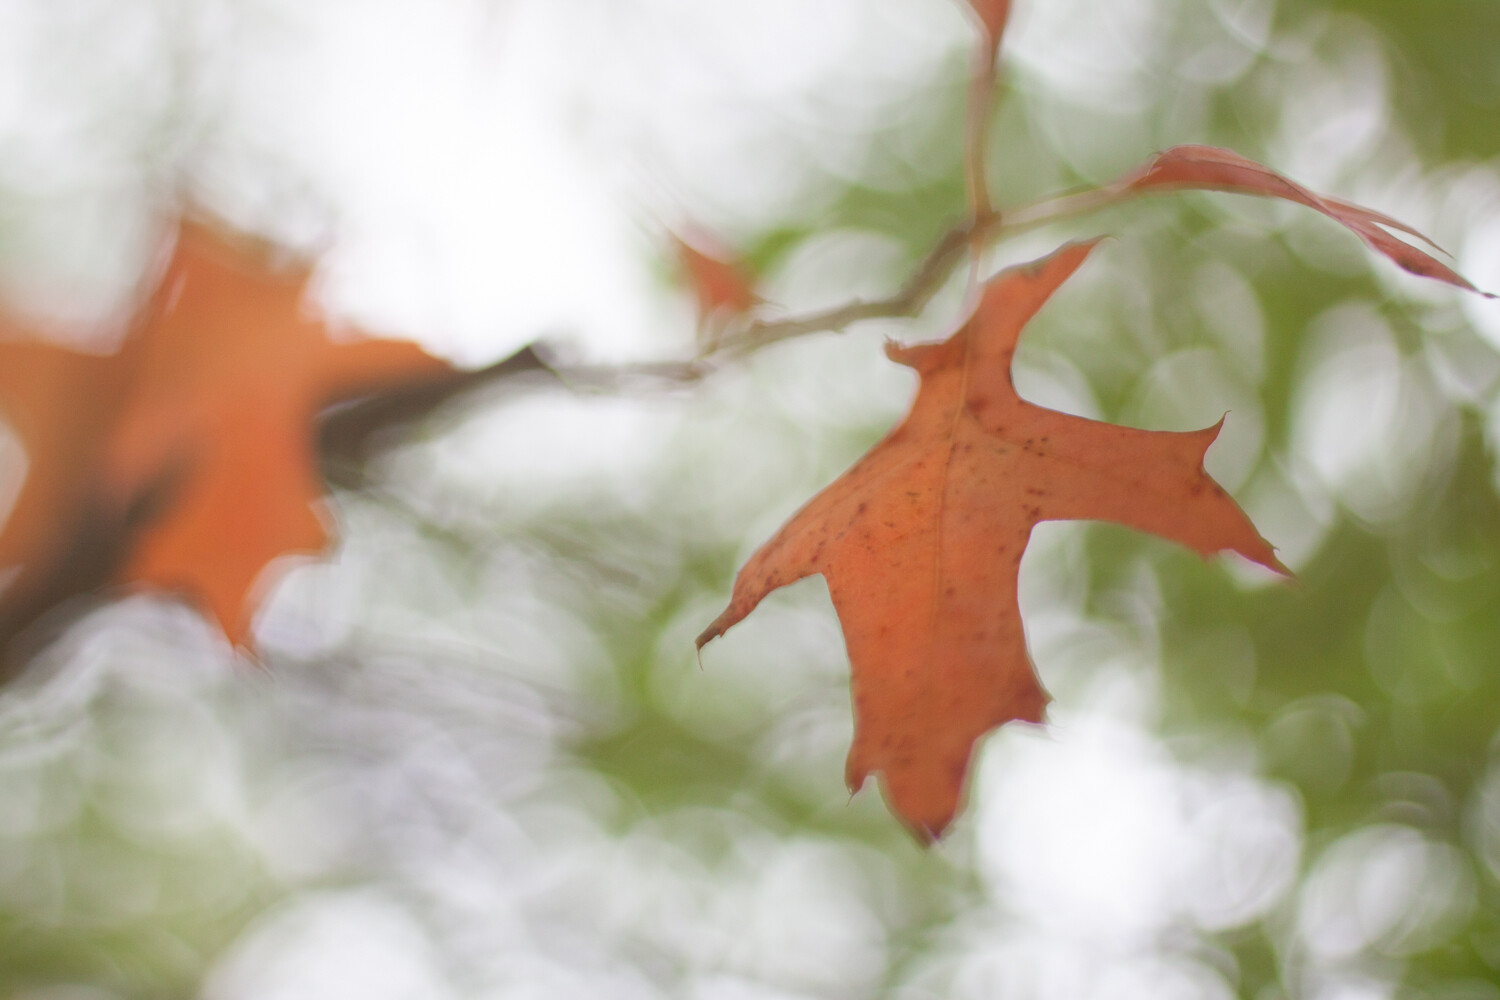
I couldn’t bring myself to take a photograph in direct sunlight. I just dislike it too much! So I photographed this clematis in the evening.

I know that it’s very tempting. After all, bright sunlight is very powerful, and everyone loves to get out on sunny days.

The problem, however, is that direct sunlight is extremely tough for cameras to deal with, resulting in blown out (that is, totally white) highlights and underexposed (very dark) lowlights. It also creates shadows that are unpleasant to look at.

Now, there are some genres of photography that make use of a sunny type of light. Street photography, for instance, relies heavily on the gritty, contrast-heavy look that sunny light provides.

natural light macro aster

Macro photography, however, requires softer light such as the next type of light.

Cloudy Light

Cloudy light is pretty self-explanatory. This is the kind of light when there are clouds, at any time of the day.

natural light macro fall leaves

What does this mean for your photography?

Clouds diffuse the light, causing it to become pleasant and soft. This is an ideal type of light for bringing out colors in your subject. I work a lot with flowers, and I go crazy over cloudy light.

There’s nothing better than a nice cloudy day for flower photography.

natural light macro tulip

I photographed this flower under cloudy skies.

Therefore, if you enjoy doing flower-focused macro photography, cloudy light is for you. Shooting in cloudy light will ensure evenly illuminated subjects, lovely colors, and really pleasing images.

Yet sometimes you might want to create images which are slightly less soft. You might want to work with more striking light, which brings us to . . .

Evening Frontlight

Evening frontlight is found during the golden hours of photography. The golden hours are the first two hours after sunrise, and the final two hours before sunset.

During this time, the sun casts a beautiful golden glow over the world. If you venture outside, and you make sure that the sun is behind you (point your shadow at your subjects), you’ll find that you’re looking at a beautiful landscape.

natural light macro red flower

Is this type of light good for macro photography?

In a word, yes. Such natural light tends to look lovely and soft when rendered by a camera.

I must admit, however, that I am not the biggest fan of evening frontlight. I find that it’s a bit too bright. I also prefer more dramatic lighting. Which brings me to my favorite type of light.

Evening Backlight

Evening backlight is extremely similar to evening frontlight. Except, rather than having the sun behind you, you have it directly in front of you.

I love evening backlight for macro photography. I’m drawn to its dramatic presence and warmth. I suggest that you try it, yourself.

natural light macro aster backlight

I photographed this aster in evening backlight.

To use evening backlight, you simply point your camera into the light. I recommend placing the subject between yourself and the setting sun so that the sun is obscured by the subject. Or put the actual sun slightly outside the image, so that it can be felt rather than seen.

Of course, these images aren’t for everyone. But I personally find them to be stunning!

natural light macro backlight

Yet if you’re looking for something a little less punchy, I do have one final recommendation.

Evening Shade

Evening shade is pretty self-explanatory, as well. Your subject is shaded by some object (a tree, a building, the photographer) in the evening.

What makes evening shade natural light so special? I like the evening shade for one specific reason.

If you can shade your subject while using an unshaded background, your images will really pop. The background will be rendered as liquid gold, while your subject is lit fairly evenly.

natural light macro daisy abstract

I photographed this daisy in some evening shade. The background was lit by the setting sun.

Don’t believe me? Try it!

Conclusion

Natural light may seem difficult to work with, but I hope that after reading these tips, you are feeling far more confident in your abilities.

natural light macro dahlia

Simply remember to avoid sunny light, and you’re halfway there. Use cloudy light if you want soft, evenly illuminated subjects and beautiful colors. Use evening light if you want a bit more drama.

Which type of natural light do you prefer? Share your opinions and images in the comments below.

natural light macro leaves

The post A Guide to Using Natural Light for Macro Photography appeared first on Digital Photography School.


Digital Photography School

 
Comments Off on A Guide to Using Natural Light for Macro Photography

Posted in Photography


7 Tips to Make Travel Photography Interesting Again

20 Sep

It’s difficult to define travel photography these days. I see the same photos on Instagram all the time. Overly processed landscapes and sunset shots, the same pictures of a famous landmark over and over again and thousands of posed selfies on a beach swing. Most of these photos are considered to be travel photography but for me that’s not what it’s about.

How to Make Travel Photography Interesting Again - camel safari

A camel safari in Jaisalmer, India.

Travel photography is about showing a country and its culture, people, and natural wonders. For me, travel photography is National Geographic and Steve McCurry and not the photos intended to lure people to a destination. These photos are often fake and don’t represent the real thing.

Good travel photography, I believe, needs a hint of photojournalism to be honest and real. Here’s my advice and tips to make your travel photography more interesting and stand out from all the rest.

1. Include tourists

Traveling has never been easier and cheaper so it’s hard to avoid bus loads of tourists, especially around landmarks and famous attractions. So why not include them in your shots?

I know an empty Taj Mahal or beach looks amazing, but let’s face it, it’s just not reality anymore and including tourists is a creative way can make your photos more interesting. You can try to create a sense of place or size by adding a person in a photo of a landmark. It will change how your audience looks at the picture dramatically because suddenly they can, for example, feel the real size of a structure compared to that person in the photo.

Include tourists - How to Make Travel Photography Interesting Again

Mount Ijen in Indonesia. The tourists that look like ants on the ridge give the viewer a sense of how majestic this place is in person.

people in a pond by waterfall - How to Make Travel Photography Interesting Again

Kuang Si Waterfalls. The tourists make the place feel real and touchable.

You can also look for interesting or funny scenes. Tourists can act strange or do remarkable things so adding them in the frame together with the subject you want to show creates an extra storyline in your travel photography. Tourists also make interesting subjects by themselves. I always love to observe groups visiting famous landmarks.

tourists taking a photo at Batu Caves Malaysia

Tourists taking a photo at Batu Caves Malaysia.

tourists on a boat in India - 7 Tips to Make Travel Photography Interesting Again

2. Do portraits of real people and get their story

There are lots of portraits around of locals working in tourist destinations dressed in traditional clothing but we’ve all seen those before. Why not try to take a portrait of a real local. Someone who’s working or that you meet on the street.

Do you go to a bar every night and talk to the same guy who serves you a beer? Why not take his portrait and ask about his life. Most people love it if you’re interested in their life and including a story to a photo adds a lot of value.

Portrait of a guy - 7 Tips to Make Travel Photography Interesting Again

I met Lek on a beach in Koh Lanta. He owns a beach bar where I went every night for a drink. He told me about his life and his plans for the future.

Always try to approach people and ask to create their portrait. You can only make a good portrait when there’s some kind of interaction with your subject. Don’t shoot a portrait from far away with a big zoom lens. It shows.

Portrait Indian man - 7 Tips to Make Travel Photography Interesting Again

A guide we hired in Jaisalmer, India.

3. Point your camera in the opposite direction

Famous landmarks and natural wonders make great travel photography but what’s on the other side? People often take the same obvious pictures or try to find a new angle at best. But it’s also really interesting to see what’s on the other side of where everyone’s pointing their camera.

Is there a similar view close by or is there a nice contrast you can shoot? Shooting with a different point of view is great when you want to try and make a photo story or series about a place. Don’t just get different angles of the same location or building. Get a sense of the surroundings too.

volcano at sunset - 7 Tips to Make Travel Photography Interesting Again

The obvious view.

town opposite the volcano - 7 Tips to Make Travel Photography Interesting AgainAn equally interesting view of the town where I stayed on the other side.

4. Make an effort, don’t fix it in post-processing

This is a real issue with photography, in general, these days when it’s so easy to digitally enhance your pictures. I’m not saying you shouldn’t do some post-processing but out there are tons of pictures where people have replaced skies, taken out objects or added sunlight.

This has nothing to do with travel photography because then you’re just showing something that’s not real. Remember the “hint of photojournalism”? Why would you show something that wasn’t there?

Berastagi in Sumatra - 7 Tips to Make Travel Photography Interesting Again

I wanted to show the beautiful colors of the town of Berastagi in Sumatra. I went to the same spot three evenings in a row to capture the perfect light.

Always try to make an effort to get the best shot possible. If you weren’t able to get the shot you had in mind, try again the next day or even a few hours later. Weather and light change fast sometimes and that can work to your advantage.

It’s so much more rewarding when you finally get a great photo of what you actually saw.

5. Go to lesser-known areas or destinations

Especially when you want to shoot portraits, it’s a good idea to get far away from popular tourist areas. The locals will be much nicer to interact with and you’ll more likely be able to ask for a portrait without being asked for money.

Another advantage is that you can discover new and interesting locations that may have never been photographed before. A small temple in a back alley where the locals go to pray or the favorite fishing spot of a local community. Those are the pictures that will stand out and make an interesting story afterward.

many with bags of cotton candy - 7 Tips to Make Travel Photography Interesting Again

I accidentally came across Marina Beach in Chennai, India. There were no other tourists anywhere and it was the perfect place to approach locals and shoot portraits.

6. Street photography is travel photography and vice versa

I don’t like keeping these two genres of photography in different categories because when you’re traveling, you will most likely walk the streets – a lot! The street is where you can find the essence and soul of a country. The real locals with their real jobs and daily life going on around every corner.

I love to explore the streets of cities and towns to find interesting scenes and good stories. A lot of times when I visit a destination I don’t go to the popular locations at all and I try to stay in the quieter neighborhoods where I can see how the locals live.

The best travel photography is shot right on the streets, far away from any tourist destinations. You just have to look for it. Travel photography needs street photography and vice versa.

woman grilling fish on the street - https://digital-photography-school.com/top-street-travel-photography-tips-2017/

Grilling fish on the streets of Hat Yai, Thailand.

family on a motorcycle

7. Don’t be afraid of the dark

I’m not talking about shooting a building using a tripod. Cameras are so good these days that you can easily kick up the ISO to 3200 or even 6400 and shoot handheld. Yes, there will be more noise but I think people are too scared of it.

Good photos will still be good with a reasonable amount of noise. When you go out at night, just leave your tripod behind for once and try to shoot handheld. You’ll get a different and often surprising result. I’ve shot some of my best photos at night, handheld.

Don’t worry if the resulting frame is not tack sharp. This doesn’t make a good photo look bad all of a sudden.

Dark evening scene - 7 Tips to Make Travel Photography Interesting Again

A night scene I encountered while walking around in the streets of Hat Yai, Thailand.

Dark scene - 7 Tips to Make Travel Photography Interesting Again

Conclusion

I hope you found these tips helpful. If you apply them and practice, you can make your travel photography more interesting than the average images. Please share your comments, questions, and images in the section below.

The post 7 Tips to Make Travel Photography Interesting Again appeared first on Digital Photography School.


Digital Photography School

 
Comments Off on 7 Tips to Make Travel Photography Interesting Again

Posted in Photography


7 Tips for Improving Your Wildlife Photography

20 Sep

Creating attention-grabbing wildlife photography that makes a lasting impression is a difficult and demanding challenge. Typically you’re battling a number of uncontrollable and unpredictable elements, not least your subject’s behaviour, the weather, the environment and lighting.

7 Tips for Improving Your Wildlife Photography

But, when it all comes together it’s truly magical! To ensure you maximize every opportunity and extract the most out of your wildlife encounters, there are a number of approaches that you can adopt to help you get ahead.

Here are seven tips to help you take your wildlife photography to the next level.

1 – Know Your Camera

Wildlife’s special moments are often fleeting. Subsequently your camera needs to become an extension of you. Learning to adjust the focus point, shutter speed, aperture and other settings while continuing to look through the viewfinder, for instance, should become second nature. Leaving you to concentrate on being creative with what’s happening in front of you.

Tips for Improving your Wildlife Photography

If you’re not familiar with the ins and outs of your camera, then you may not be exploiting its full potential and therefore limiting yourself. Take some time out to learn as much as you can about your camera’s features and practice, practice, practice.

If reading the user manual is too much like hard work or you’re a visual learner, search for related video resources online.

2 – Shoot at Eye Level

One of the best ways to ensure your audience is able to feel connected with wildlife through your images is to shoot at eye level with your subject. That often means getting low.

Looking down on your subject can feel unnatural and controlling. Shooting at eye level allows you to create images that are much more intimate, and because the viewer is seeing what they expect to see, there is a real sense of familiarity.

7 Tips for Improving Your Wildlife Photography

From a technical perspective, there are also a number of advantages to adopting this approach.

For instance, by positioning yourself, and more importantly your camera, on a parallel focal plane to your subjects’ eyes you will increase the likelihood of your camera’s sensor picking up, and locking focus on, the sharpest part of the image. This is partly dependent on the depth of field of course.

7 Tips for Improving Your Wildlife Photography

Another benefit of interacting with wildlife at their level is the ability to separate your subject from what’s behind the animal to achieve wonderful, unobtrusive backdrops.

So, be prepared to get down, get wet, and get dirty in order to get the best shots!

3 – Keep Backgrounds Simple

Imagine the scene. Your subject is sitting pretty; you’re at eye level and just about to capture the moment. What you haven’t noticed is a tree protruding out of your subject’s head!

The adrenaline rush is part and parcel of wildlife photography and we’ve all been there. We’ve all been caught up in the moment, but it’s important to remember to take a deep breath and look at the bigger picture. Literally!

7 Tips for Improving Your Wildlife Photography

It only takes a moment to run your eye around the edge of the frame to spot unwanted distractions in the scene and then take the appropriate action. Shifting your position by moving to the left, right, up or down, often only as little as a couple of inches may be all that’s required to craft a more pleasant scene.

7 Tips for Improving Your Wildlife Photography

7 Tips for Improving Your Wildlife Photography

4 – Know Your Subject

Research as much as you can about the animals that you’re going to photograph. It really does pay to be able to envisage what your subject is likely to do in given situations.

7 Tips for Improving Your Wildlife Photography

Animals are habitual and most lead relatively straightforward lives with uncomplicated daily routines. Once you’ve tapped into the characteristics of a particular subject such as its preferred habitat, how and when it feeds, mating displays and so on, the more likely you will be able to predict what’s going to happen next and be ready to capture it.

7 Tips for Improving Your Wildlife Photography

By becoming intimately acquainted with your subject species will result in distinctive, evocative images.

7 Tips for Improving Your Wildlife Photography

5 – Be Prepared

Some of the most iconic wildlife photography images have been captured by photographers who were able to make the most of spur-of-the-moment opportunities. By ensuring they had already dialled-in some baseline camera settings before heading out into the field, they were ready when the action occurred.

7 Tips for Improving Your Wildlife Photography

Nature’s flashes of magic are short-lived and second chances are rare. So checking the available light and firing off a couple of test shots before setting out, will ensure that you’ll be ready at a moment’s notice. As well, this will safeguard you against mistakenly using previously loaded settings from the day before.

7 Tips for Improving Your Wildlife Photography

Even the slowest animals can react suddenly. So try and set your shutter speed as high as possible given the available light and your ISO setting.

6 – Break the Rules

Understanding the fundamental rules of wildlife photography with regards to lighting, camera settings, and composition is essential. Regardless of camera brand, manual or aperture priority, back button focusing versus front, you have to do what works for you.

It’s okay to play it safe. But then again your camera is a tool, and like an artist’s brush, it’s what you do with it that will set you apart from your peers. Try experimenting with side lighting, backlighting (or rim lighting), test different viewpoints, close-up versus wide angle, look for patterns, trial alternative lenses, and settings.

Stretch yourself and you’ll grow as a wildlife photographer.

7 Tips for Improving Your Wildlife Photography

7 Tips for Improving Your Wildlife Photography

7 – Take Care

Finally, never forget that for us [photographers] it’s just about obtaining an image. But for wild animals, every day is a fight just to survive. No photograph is ever worth more than your subject’s welfare.

Share your wildlife tips and images in the comment area below. If you have any questions, please ask.

7 Tips for Improving Your Wildlife Photography

The post 7 Tips for Improving Your Wildlife Photography appeared first on Digital Photography School.


Digital Photography School

 
Comments Off on 7 Tips for Improving Your Wildlife Photography

Posted in Photography


Tips for Using Neutral Density Filters for Cityscape Photography at Blue Hour

19 Sep

Neutral density filters (ND filters) are essential tools when it comes to shooting cityscapes at blue hour. Even without an ND filter, you could shoot for a few seconds of exposure (using a small aperture like f/13) when the light falls towards the end of dusk.

But those opaque filters let you take even longer exposure photos (minutes, not just seconds), and create beautiful effects such as light trails, silky smooth water, rushing clouds, etc., by slowing down the shutter speed by a certain number of f-stops.

Singapore - Using Neutral Density Filters for Cityscape Photography at Blue Hour

This Marina Bay (Singapore) photo was shot with a 2-second exposure (at f/13) without using any ND filter. The sky looks good, but the water isn’t smoothed out at all, as that exposure is way too short to create silky smooth water effect that is seen in the photos to follow.

How ND Filters Make Your Exposure Longer

ND filters come in different strengths, some popular ones are 3-stop, 6-stop and 10-stop. The bigger the number, the darker the filter (i.e. the less light that is let through) and the longer the exposure will be.

For example, a base shutter speed of one second (i.e. when no filter is attached) can be extended to as long as 1024 seconds (over 17 minutes) with 10-stop ND filter attached, as each “stop” doubles the exposure time:


1 second > 2 seconds [1 stop] > 4 seconds [2 stops] > 8 seconds [3 stops] > 15 seconds [4 stops] > 30 seconds [5 stops] > 64 seconds [6 stops] > 128 seconds [7 stops] > 256 seconds [8 stops] > 512 seconds [9 stops] > 1024 seconds [10 stops]


It’s easy to calculate when a base shutter speed is a simple number like one second, but what about starting with, say, 1/15th of a second? This is where the Long Exposure Calculator app (for iOS) comes in handy and makes your life easier, as it automatically calculates a required shutter speed for you (look for an Android equivalent here).

ND filter and app - Using Neutral Density Filters for Cityscape Photography at Blue Hour

Neutral density (ND) filter (left) and Long Exposure Calculator app (right).

Using Different Strengths of ND Filters for Your Desired Effect

In this article, we’ll take a little deeper look at when to use which ND filter for your desired effect at blue hour.

3-Stop ND Filter

I don’t use 3-stop ND filter when taking cityscapes at a waterfront, as the strength is too mild to create a silky smooth water effect. Hence, my use of 3-stop ND filter is limited for scenes that have no water to be smoothed out, such as the photo below with light trails of moving cars, which doesn’t require a very long shutter speed.

Shanghai skyline - Using Neutral Density Filters for Cityscape Photography at Blue Hour

Shanghai skyline (China) shot with a 25-second exposure (f/8) using a B+W 3-Stop ND Filter (77mm). The base shutter speed was 3 seconds, ISO 100.

Singapore - Using Neutral Density Filters for Cityscape Photography at Blue Hour

Singapore skyline shot with a 10-second exposure (f/13) using the same 3 -stop ND filter. The base shutter speed was 1.3 seconds, ISO 100.

This mild strength 3-stop ND filter (i.e. not so long exposure) isn’t all bad, though. It allows you to take a number of photos during blue hour, unlike more dense filters like a 6-stop ND filter where you can take no more than a few photos due to a longer exposure time required per photo.

6-Stop ND Filter

I almost exclusively use a 6-stop ND filter when shooting cityscapes at a waterfront. To create silky smooth water effects, slowing down 3 stops isn’t quite enough, but a 10-stop one is way too strong. For example, a base shutter speed of 2 seconds (i.e. with no filter attached) gets extended to 15 seconds (with 3-stop ND filter), 128 seconds (with a 6-stop ND filter) and whopping 34 minutes and 8 seconds (with a 10-stop ND filter) respectively.

Shanghai - Using Neutral Density Filters for Cityscape Photography at Blue Hour

Shanghai skyline (China) shot with a 164-second exposure (f/11) using a B+W 6-Stop ND Filter (77mm) in order to achieve my desired effect of silky smooth water. Had I used a 3-stop ND filter, the water wouldn’t have been smoothed out this much (base shutter speed: 2.5 seconds, ISO 100).

Singapore - Using Neutral Density Filters for Cityscape Photography at Blue Hour

Marina Bay (Singapore) shot with a 163-second exposure (f/13) using the same 6-stop ND filter (base shutter speed: 2.5 seconds, ISO 100).

I typically aim to shoot with a base shutter speed of 2-3 seconds when using a 6-stop ND filter, which extends the exposure to 128 -192 seconds respectively. In order to create a silky smooth water effect, 2-3 minutes of exposure seems just right.

By the way, if you’re planning to buy only one filter for cityscape photography at blue hour, I’d recommend nothing but a 6-stop ND filter. I’ve probably photographed 90% of my cityscapes at blue hour using a 6-stop ND filter. It’s really a game changer if you are interested in doing this kind of photography.

10-Stop ND Filter

A 10-stop ND filter is a kind of special filter that lets you expose extremely long (longer than necessary in most cases!). Personally, I don’t really find 10-stop ND filter useful for shooting cityscapes at blue hour, as the exposure goes too long (even starting at a base shutter speed of 1/2 second gets extended to 8 and a half minutes), and digital noise caused by long exposure becomes too unbearable (even with in-camera long exposure noise reduction turned on).

So, this extreme filter’s use is rather limited to pre-dusk or even earlier in the day, not towards the end of dusk. In fact, one big advantage of a 10-stop ND filter is letting you take long exposure photos while the sky is still bright, which is something 3 and 6-stop ND filters aren’t up to the task of doing.

With a 10-stop ND filter, I usually aim to shoot with a base shutter speed of 1/4 or 1/3 second which is extended to 256 and 341 seconds respectively. I tend to avoid an exposure that exceeds 6-7 minutes, as long exposure noise starts to creep in.

Such a base shutter speed (1/4 or 1/3 second) can normally be achieved around sunset time or before, therefore you don’t really see deep bluish hue that’s typically seen at the prime time of the blue hour. Instead, your photo will have a surreal look that is very unique and distinctive to 10-stop ND filter.

Singapore - Using Neutral Density Filters for Cityscape Photography at Blue Hour

Singapore skyline shot with a 258-second exposure (f/8) using B+W 10 Stop ND Filter (77mm) with a base shutter speed of 1/4 second, ISO 100.

Singapore Using Neutral Density Filters for Cityscape Photography at Blue Hour

Singapore skyline shot with a 259-second exposure (f/7.1) using the same 10-stop ND filter (base shutter speed: 1/4 second, ISO 100).

Conclusion

I hope this post helps you get started with shooting cityscape photos at blue hour using neutral density filters. I’m sure that you’ll be hooked in no time and can no longer shoot cityscapes at blue hour without one!

If you have any questions or tips to share, feel free to do so in the comments below.

The post Tips for Using Neutral Density Filters for Cityscape Photography at Blue Hour appeared first on Digital Photography School.


Digital Photography School

 
Comments Off on Tips for Using Neutral Density Filters for Cityscape Photography at Blue Hour

Posted in Photography


The Six Killers of Night Sky Photography (and how to avoid them)

16 Sep

One of the best things about night photography, in general, is how forgiving it is. That is to say, you generally don’t need special weather conditions to create a really nice picture. The night and urban lights give you all you need to work with. Once it is dark the light isn’t changing so you aren’t chasing the light. Almost any night will do.


But if you are trying to photograph the night sky it is a completely different story. The reality is that night sky photography is very finicky. If you are going to pursue this sort of photography be ready for your opportunities to be very limited. You should also be ready for some failures.

Milky Way - Night Sky Photography

Failure is never any fun, but it is even less so in night sky photography. You have to go to remote areas, so you will often have to drive long distances to get the shot. You will be cutting into valuable sleep time as well.  So let’s try to avoid some of those failures. In that regard, here are the six biggest problems I expect you will run into and how you might deal with them.

Night Sky Photography Killer #1: The Moon

There is nothing that will destroy your opportunities for night sky photography more than the moon. This might surprise you, but it is true. Why is that the case? Because the light coming from even a quarter moon is over 100 times more powerful than starlight. So it simply washes out the scene.

Having the moon in the sky does have its advantages. It can light up your foreground, for example.  But when it comes to photographing the stars, it is a killer.

What’s more, the moon is in the night sky for most of the month. Frankly, I wouldn’t plan a night sky outing more than about 4-5 days on either side of a new moon. Anything near a full moon is out of the question. That takes about 70% of the year out of the picture for night sky photography. As such, it is a huge limitation.

Campsite panorama of the night sky.

So how do you avoid problems with the moon? There are two ways, and for both of them, you need nothing more than a website called TimeAndDate.com. That website will tell you the moon phase, first of all. That way you can plan your night sky outing on or close to the new moon.

If you are totally unfamiliar with the moon and its phases, the new moon is when there is no moon in the sky at night. From the new moon, the moon will transition into a crescent moon, to a quarter, and then a few weeks later to a full moon (and then the process starts reversing itself). The nights around the new moon are critical because not only does that limit the illumination coming from the moon, but during a new moon phase the moon won’t even be in the night sky.

The moon travels across the sky in the daytime during the new moon phase, and across the sky at night during a full moon. The closer you are to a new moon, the less time the moon will be in the sky at all during the night.

That leads to the second way to avoid the moon, which is to take note of the times of moonrise and moonset. Again, you can get these times through TimeAndDate.com. Make sure this lines up with the other conditions you need for success (ie. times of complete darkness, weather conditions, movement of stars, etc.) which we will talk about in a second.

night sky photography - Milky Way over a road

Killer #2: Light Pollution

You may have read that heading and said “duh.” You already know you need to be in a dark place to have any success in capturing the night sky. But you might be surprised by just how dark it needs to be. You cannot just drive outside of a city for half an hour and expect it to be dark enough to really capture a great night sky shot or the Milky Way.

What you need to do is consult the Dark Site Finder. This is the best resource I have found for avoiding light pollution. It is basically Google maps with an overlay of different colors that tell you how much light pollution a given place will have. The darker the color the better (ie the less the light pollution).

dark sky finder map - night sky photography

How dark do you need it to be? Really dark. Take a look at this picture:

church and Milky Way - night sky photography

This picture was taken in a blue area on the Dark Site finder, which is the fifth darkest area out of the 15 different levels. The light pollution you see on the bottom left of the picture was not from a big city, but rather from a small town shaded green on the map that was about 10-15 miles away.

The light pollution was not something you would see as you were shooting – everything looked totally dark to me as I was standing there. But it shows up very clearly in the shot, obviously. Make sure it is very dark where you are planning to shoot.

Killer #3: Star Movement

If you are not familiar with night sky photography, you might think you can just open up the shutter for a minute or two to allow enough light into the camera to achieve a proper exposure. But you can’t, because the stars are moving. And they are moving a lot faster than you might think. (Okay, I know this is actually due to the earth spinning – I’m not a flat-earther – but it appears as though the stars are moving!)

If you shoot the night sky with a long exposure, the stars will move while you have the shutter open. They will show up as small trails. It doesn’t look attractive and just makes the stars look blurry. Of course, you can go with it and create trails that go across the entire frame, but that is a different story entirely. What you are after here are crisp pictures of the stars in the night sky.

How long of a shutter speed can you use? On all but super-wide-angle lenses, you shouldn’t go longer than about 15 seconds. Even on super-wide-angle lenses, you shouldn’t go longer than 30 seconds. You can also use something called the Rule of 500 to determine your longest useable shutter speed. That rule says that the maximum shutter length should be 500 divided by your focal length (eg. with a 24mm lens it would be 500 / 24 or 20.8 seconds).

Because of this, you should use your widest angle, fastest lens for night sky photography. For more information on picking a lens, check out this article.

shooting star night desert photo - night sky photography

Killer #4: Lack of Foreground Element

A starry sky or Milky Way shot will provide a nice background for your picture. It is sort of like having a nice sunset. It is a great thing to have, but on its own, it won’t be enough. You also need a foreground element.

If you just head out to shoot the night sky with no real idea of where you are going, you will likely have problems. You will end up with an uninteresting foreground, and therefore uninteresting photography. The middle of the night is no time to explore and try to come up with something. Remember that where you are going will be very dark. It will be full darkness, with no moon, in a place with no light pollution. You won’t be able to see anything to come up with a foreground.

To fix this problem, you need to scout your area ahead of time. Sometimes that is possible by physically going there, but often it isn’t. When you cannot go ahead of time, you can still virtually scout the location.  Use the Street View feature in Google Maps to get you started.

Killer #5: Unforeseen Conditions Blocking Out the Stars

You probably already know that you cannot head out on a cloudy night and expect to have any chance of success at photographing the night sky. You need a clear sky, or at best partly cloudy conditions. There is no secret as to how you check this. There are a number of weather apps, so just use the one you are comfortable with.

But that isn’t the end of the issue. I have had many outings ruined when there was not a cloud in the sky. They have been ruined by things like dust clouds, smoke, and mist. These conditions aren’t as flukey as you might think. Remember you will usually be doing your night sky shots in remote places.

A desert environment is a pretty commonplace, and moderate winds kick enough dust up into the atmosphere to essentially block out the stars. If you are in a coastal environment, sea mist can do the same thing. Forest fires from hundreds of miles away can also impact your ability to get the shot.

So be sure you take a close look at conditions in your target area. It is no fun to drive for many hours and then not even pull the camera out of the bag.

trees and stars - night sky photography

Killer #6: A Boring Sky

Finally, not just any clear, moonless night will do. If you go out without understanding which stars will be in the sky when you will be shooting, you might be destined for a boring sky. If you have a strong enough foreground element, this might not matter so much. But if the night sky is the predominant subject matter, you need it to look really good.

For most people, this means including the Milky Way in your shot. That means capturing the band of stars that runs across the sky. It is best when you capture a cluster of stars at the heart of it. But the Milky Way isn’t visible all year. It isn’t visible at any time of night during about November through February. Starting in about March it will become visible just before sunrise. In June through about August, it will be visible most of the night. Starting in about September it will only be visible just after sunset. This is true no matter what hemisphere you live in.

To plan for including the most interesting stars and constellations (and, again, usually the Milky Way), just pick up one of the apps that are available for your phone. I use Star Walk 2 and I like it very much, but there are others available such as PhotoPills.

tree at night - night sky photography

Putting It Together

Again, night sky photography is finicky. Taking steps to prepare will pay huge dividends. Because you need to be in remote areas, that means a long drive to get there. Planning will keep you from wasting a whole lot of time and effort.

But don’t wait for perfection – that never happens. Plan for the best conditions you can get, and then give it a shot. It could lead to some stunning pictures.

The post The Six Killers of Night Sky Photography (and how to avoid them) appeared first on Digital Photography School.


Digital Photography School

 
Comments Off on The Six Killers of Night Sky Photography (and how to avoid them)

Posted in Photography


Weekly Photography Challenge – Mellow Yellow

15 Sep

In the last couple of week’s you’ve done blue and red as the photography challenge, so it’s only fitting to complete the triangle of primary colors with yellow this week.

Photo by Boris Smokrovic on Unsplash

Weekly Photography Challenge – Yellow

Simply upload your shot into the comment field (look for the little camera icon in the Disqus comments section) and they’ll get embedded for us all to see or if you’d prefer, upload them to your favorite photo-sharing site and leave the link to them. Show me your best images in this week’s challenge. Sometimes it takes a while for an image to appear so be patient and try not to post the same image twice.

Share in the dPS Facebook Group

You can also share your images in the dPS Facebook group as the challenge is posted there each week as well.

The post Weekly Photography Challenge – Mellow Yellow appeared first on Digital Photography School.


Digital Photography School

 
Comments Off on Weekly Photography Challenge – Mellow Yellow

Posted in Photography


Inspiring Photography of the Waves and Oceans of Tahiti by Ben Thouard

14 Sep

Ben Thouard is an award-winning ocean and surfing photographer living on Tahiti – an island in French Polynesia. His love of surfing and photography took him there at the age of 22, and he hasn’t looked back since.

In this film by Roam, titled SURFACE, Thouard gives us a unique view of waves and surfing. The film documents how he works, and how his shots are captured – it’s a valuable look into the creative process of such an experienced photographer.

Note: Watch it fullscreen, you’ll feel like you’re in the water with him!

?

“Being in the water, moving with the waves and going with the flow… you feel the energy from the ocean,” says Thouard. “You feel very humble in front of all of that power.”

Thouard discovered photography at the age of 15 and spent all of his time underwater trying to capture images of the ocean. Most of Thouard’s days are spent exploring and waiting for the perfect conditions, but when all of that comes together it makes for stunning photography.

Thouard has now created a 184-page book, also titled SURFACE, documenting his work photographing waves and the ocean in beautiful imagery.

Here’s a short trailer on the film above, if you want a more concise insight into his work:
?

To see more of Thouard’s work, head over to his website.

The post Inspiring Photography of the Waves and Oceans of Tahiti by Ben Thouard appeared first on Digital Photography School.


Digital Photography School

 
Comments Off on Inspiring Photography of the Waves and Oceans of Tahiti by Ben Thouard

Posted in Photography


Insect Photography Tips – How to Capture Cool Critters

13 Sep

Do you find creepy crawlies fascinating? Or maybe a bit scary? Insects can be many things, and they are many! From a photographer’s perspective, they offer countless opportunities to learn about photography, your gear, and the critters themselves. In this article, I hope to share some of my love of these critters and some insect photography tips to inspire you to enjoy this buzzing, chirping, stridulating treasure trove.

Mantis in morning light. Insect Photography Tips

Morning mantis.

Why on Earth Should I Photograph Insects?

Insects are the most diverse and numerous animals on the planet. While this may not seem like the most wonderful fact in the world to everyone, it’s a boon for people who like photographing insects.

As I’ll try to demonstrate, it’s not only incorrigible insect chasers who can benefit from this abundance. Anyone who enjoys or wants to learn macro photography, who is looking for inspiration in nature, or who likes to tell a story with their photography is in luck.

Damselfly and ant. Insect Photography Tips

Insects come in many sizes and all colors.

Opportunity is everywhere

Anyone can photograph insects. Not only are they easy subjects to find, they are also amazingly diverse in appearance, behavior, and habitat. You never have to go far to find something interesting to photograph.

Insects offer a great opportunity for different kinds of photography, from scientific documentation to abstract art. So if you’re ever running out of photography ideas, insects are a great way to get back into it.

Photographing them can reveal whole new worlds: you might find unexpected beauty in a grasshopper’s patterns and new perspectives in an ant colony’s activities.

Black and white insect photo of a lacewing - Insect Photography Tips

The delicate lacewing.

On top of being a very varied group of animals, insects also have a lot of variety in their individual lives. Fluffy, colorful caterpillars turn into stunning butterflies; chubby grubs turn into formidable beetles; alien underwater nymphs turn into whirring dragonflies.

The possibilities for the eager photographer are virtually endless. So are you ready to try it out? All you need is your camera, some time, and a big bucket of patience.

Insect development: dragonfly with old nymph skin and mantis ootheca. - Insect Photography Tips

Insect life cycles are fascinating! To the left is a dragonfly next to its old nymphal skin, to the right the ootheca (egg mass) of a mantis.

How to Photograph Insects

I’m going to focus specifically on how to photograph insects. There are a lot of great articles about macro photography in general and other relevant aspects of photography, like natural lighting vs. flash photography, good settings to know about for macro, and nature photography.

Abstract insect photography: dragonfly. - Insect Photography Tips

A close view of a dragonfly’s back.

First, you need to find them

The first step is to find the insects. If you’re happy with just any insect, this is very easy. You just need to go outdoors and wait for a while – some insects will even come to you!

It’s a good idea to spend some time thinking about when and where you want to take photographs. Both location and timing will affect not only the quality of light, but also the kinds of insects you’re likely to find, and their activity levels.

Mantis by swimming pool. Insect Photography Tips

This mantis came to hang out with me next to the swimming pool.

In terms of timing, a good general rule is to aim for a time when it’s cool and the sun isn’t out since the cold will make insects slow. This can be early in the morning or around sunset, in spring or fall, or on an overcast day.

The light conditions may not be optimal at this time, but this is when you want to be out shooting if you don’t want your subject to fly off or run away immediately. Of course, only photographing insects when it’s cold outside means you’ll miss out on normal parts of their life, like flight, mating, feeding, and pollination.

Wasps. Insect Photography Tips

Some insects really are nicer when they’re a bit sluggish, like these wasps.

The location depends a lot on what you want to photograph. You can find a lot of different insects in a garden, field, or forest, but if you’re hoping for something specific you’ll need to learn about that insect and its behavior.

Remember to also think about the background and how it will look in the picture!

Insect photography: locust and mantis. Insect Photography Tips

Locust and mantis.

If you’re really eager about photographing insects, there are many methods you can experiment with.

For instance, the easiest way to photograph nocturnal insects like moths is to set up a light outdoors, next to a white or light-gray wall or sheet. Turn on the light in the evening before you go to bed, and wake up around 2 or 3 am to see all the fun creatures that have appeared. Remember not to do this too often so you don’t disturb them too much.

Larva on net and moth. Insect Photography Tips

The larva on the left found the net before I found it. The moth on the right was photographed in the middle of the night during a biology field course.

You can also catch insects with a net, put them in a glass jar and photograph them there, or even put them in the fridge for a little while to slow them down. I only recommend doing this if you know what you’re doing and you feel it’s worth it.

The insects would probably rather be somewhere else than your fridge. Remember to release them afterward!

Tools of the trade

The camera equipment needed really depends on what kind of photos you’re after. Insect photography can definitely be done with expensive tools in complicated ways, but it doesn’t have to be.

Since insects are generally small, it’s helpful to have a good macro lens or something comparable. But you can also make a great start without any special equipment. Some insects are pretty big and insect photos don’t always have to be close-ups!

Butterfly on cactus. Insect Photography Tips

Here, the insect is not the only subject, but it’s still essential to the photo.

What to focus on

So you’ve chosen the time and location, found your subject, and you have everything you need; all that’s left is to actually make the photo.

No matter what kind of photo you want – a portrait, an action photo, something abstract – there are a few things you should know about insects before photographing them.

Poisonous caterpillar. Insect Photography Tips

This caterpillar is covered in hairs that can cause irritation when they come in contact with skin (or lungs!).

Insects’ behavior and senses are as variable as the insects themselves. Some of them may notice you way before you see them and flee. Some may not notice that you exist, Others may become aggressive if you behave a certain way.

Some insects see much more and more accurately than we do, while some barely see at all. Some smell with their antennae and some of them have ears on their knees.

They are as alien to us as we are to them, which is why you need a lot of patience, some knowledge of what you’re photographing, and an open mind.

Black and white locust. Insect Photography Tips

Locusts have ears on their knees.

It depends on what kind of photo you want, of course, but a few things that are usually good to keep in mind are:

  1. Use a fast shutter speed if you want a sharp photo – insects can be very fast and they move a lot.
  2. Aim for a small aperture (large f-number) if you want to have more than just a tiny part of the insect in focus.
  3. If you’re photographing an insect in flight, try manual focus.
  4. Focus on the eyes, like with any other animal. You might find yourself mesmerized!
Fly with stripey eyes. Insect Photography Tips

Even flies can have beautiful eyes!

Conclusion

Insect photography is such a broad topic that I had to leave many things out of this article, but I hope this basic introduction was able to provide you with some tips.

What do you think about insects? Have you ever photographed them? Feel free to share your best or most interesting insect photos as well as your tips in the comments below.

The post Insect Photography Tips – How to Capture Cool Critters appeared first on Digital Photography School.


Digital Photography School

 
Comments Off on Insect Photography Tips – How to Capture Cool Critters

Posted in Photography


6 Ways to Do Architecture Photography That Stands Out

11 Sep

Architecture offers a great advantage over other fields of photography in that your subject will remain in one place. It is, therefore, easier to locate a subject and it will still be there the next time you visit. But this does not mean that photographing buildings is easy. To capture striking architecture photography requires hard work and lots of practice.

Architecture photography 01

Here are some tips to help you create architecture photos that stand out and catch the eye:

1) Nighttime illuminations

You can create your own interesting images of architecture by shooting a city at night.

Photographing architecture at night as opposed to daytime can transform an image with the variety of light providing a unique perspective. While sunlight can provide shadows and interesting angles of light during the day, you will find nighttime can help to make an image more radiant with bursts of building and street light contrasting a vivid color palette from the sky.

One way to obtain eye-catching images is to start photographing at dusk when the sky retains some light as it begins to be tinged with darkness. At this time of day (blue hour), the rich blue hue nicely balances the lights on the building.

Architecture photography 02

You will find it is best to use a tripod at nightfall because of the low light levels. I recommend that you try different exposures to find the best settings and experiment with your composition.

2) The postcard look

Have you ever wondered how to shoot that wow factor image? To create something fresh and distinct you will need to consider your viewpoint and the building you are photographing.

Often, the best viewpoint is the one that reveals queues of tourists, street signs, or other unsightly elements.

This photogenic prospect of a church on a hilltop was partially obscured by bushes and trees so I found a position that shows off the building while concealing any eyesores. A wider landscape (horizontal) shot suited this subject better over a portrait (vertical) format and creates a picture-postcard look.

Architecture photography 03

It can be very rewarding when you nail a great image that you would be proud to hang on your wall.

Light is another factor to consider when striving to capture your very best architecture images. Consider the interplay of light and any interesting patterns that emerge.

3) Abstract views

Many example photos of modern architecture offer a visual treat with massive forms and flows of energy. But how do you capture the qualities inherent to a building in one image?

Sometimes it is impossible to photograph a building in its entirety either because you cannot stand far back enough without an obstruction or you are at risk by standing in a traffic-heavy street. Instead, move closer to the building and capture some of its details.

You can also shoot at a wide-angle setting to capture abstract views that provide a sense of the space or shoot upwards towards the upper structure of the building.

Architecture photography 04

4) Iconic city landmarks

When photographing important architectural landmarks, we tend to photograph them in a certain way that has been photographed before. There is nothing wrong with capturing this familiar and general view. In fact, I encourage you to shoot an iconic monument in this way as there is often a limited number of uninterrupted views.

It is also good practice to try and find another view of the icon, perhaps by including other buildings or subjects.

Architecture photography 05

5) World landmarks

The world is a huge place with a spectacular abundance of photogenic global landmarks. The Taj Mahal in Agra, India is a magnificent architectural example that is breathtakingly beautiful in any light. When you capture a world landmark such as the Taj Mahal, I suggest you select the largest picture size settings for your camera and the optimal image quality to ensure the finest images are captured.

If you can, photograph the landmark at different times of the day. The changing light can be used to develop interesting compositions. Shoot in broad daylight to capture vibrant colors, strong shadows, and clouds and then create a more atmospheric image by shooting the landmark at sunset.

Architecture photography 06

Architecture photography 07

6) Bridges and bridge life

Bridges throughout the world are the hub of daily life and transport. Whether old or new, suspended or cantilever and of stone or metal construction, bridges are full of photographic potential.

To create images with impact, consider what you want to shoot. Photographing a bridge and the city shows more context and distance while shooting an intrinsic part of the structure such as girders and cable displays defines the bridge’s details.

Architecture photography 08

Another aspect to consider is the life that the bridge conveys such as the flow of pedestrians and vehicles. You could capture foot and car traffic with the bridges to give more of a feel to the construction and location.

Conclusion

Remember these tips when you next do architecture photography and you will soon be capturing images that you can be proud of. Share your tips and photos in the comments below.

The post 6 Ways to Do Architecture Photography That Stands Out appeared first on Digital Photography School.


Digital Photography School

 
Comments Off on 6 Ways to Do Architecture Photography That Stands Out

Posted in Photography


7 Landscape Photography Tips You’ll Wish You Knew Earlier

08 Sep

Landscape photographer Nigel Danson has been reflecting on his time as a professional landscape photographer and has come up with 7 things that he wishes he knew when he first started out on his photographic journey.

Unfortunately for Danson, he’s not able to go back in time and tutor himself. But luckily for us, we’re able to learn from these key moments in his career without spending many years getting to those milestones!

“Recently, looking back at some photos I took over 10 years ago, it made me realize how far I’ve come as a photographer.” says Danson. “It made me think about the things I’ve learned over the last 10 or 15 years.”

Landscape photography can be a tricky art to master, and experience in the field is definitely your friend. But hopefully, these tips and tricks will help you to improve your shots in an instant and give you that boost you need to keep your photography developing.

Summary of the 7 Simple Tips to Improve Your Landscapes

  1. Use Aperture Priority Mode
  2. Master the Histogram
  3. Learn to Focus Properly
  4. Simplify Your Images
  5. Use Different Lenses and Stick with Your Camera
  6. Think About Where You’re Standing
  7. Learn and Use Lighting to Your Advantage

Have you got any landscape images you’ve shot recently? Share them with us in the comments below!

The post 7 Landscape Photography Tips You’ll Wish You Knew Earlier appeared first on Digital Photography School.


Digital Photography School

 
Comments Off on 7 Landscape Photography Tips You’ll Wish You Knew Earlier

Posted in Photography