RSS
 

Posts Tagged ‘Photography’

Smartphone Food Photography For Social Media

11 Dec

The post Smartphone Food Photography For Social Media appeared first on Digital Photography School. It was authored by Darina Kopcok.

Smartphone Food Photography For Social Media-Darina Kopcok-DPS

Search Instagram for #foodphotography today and you’ll find almost 30 million posts.

Blogs and social media have turned what was once a weird little niche in photography into a worldwide phenomenon. From Baltimore to Beijing, there is no doubt that people love to take pictures of food.

However, as appetizing as your filet mignon may look to your eye, it may not to the camera. Throw in some bad restaurant lighting and a wide angle smartphone lens into the mix, and the potential for ugly food photography is high.

Here are my top five tips for great smartphone food photography for social media that will make your Instagram and other social channel images stand out.

Smartphone Food Photography For Social Media-Darina Kopcok-DPS

Use Natural Lighting Whenever Possible

When it comes to food photography lighting is everything. The knowledge of how to use light is what separates the amateurs from the pros.

Although flat lighting has been a trend in food photography lately, food looks best when the light is natural and directional.

The reason a lot of food images taken in restaurants looks so bad is the fluorescent lighting, which is hard and unflattering. It is also often tinged with a green or yellow color cast.

When shooting food indoors on your smartphone, try to get beside a window.

Natural window light is what every professional photographer tries to mimic with complicated and expensive flash systems.

It is very flattering for food.

Just be sure that the sun is not too bright, as it can also cast harsh shadows that are unflattering to your dish.

When shooting food with a smartphone, notice where the light is coming from. It should be from the side or the back of your plate or set-up.

While front light is beautiful in portraiture, it will make food look flat and also can cast unwanted shadows.

Smartphone Food Photography For Social Media-Darina Kopcok-DPS

Choose the Right Angle

Does your plate ever look like it’s sliding off the table whenever you shoot with your smartphone?

This is because the camera has a wide angle lens, so certain angles make your food look distorted.

To achieve the best results, shoot your scene at 90-degrees or straight-on. A 3/4 angle rarely works.

An overhead angle gives a graphic pop to an image because it flattens depth. You can also get a lot more into the frame than you would if you were shooting at 45-degrees.

It’s a perfect angle for tablescapes, but also more minimalistic compositions.

90-degrees is not a good angle for tall foods, like burgers or stacks of pancakes. You want to see those layers, so shoot these kinds of subjects straight-on.

Smartphone Food Photography For Social Media-Darina Kopcok-DPS

Take a Minimalist Approach

Tablescapes are fun and look appealing, but they are oftentimes difficult to do.

It can take a lot of moving the various elements around to make a pleasing composition and by the time you get it right, the food will no longer look appetizing.

A minimalist approach usually works best, especially if you’re a beginner. After all, the focus should be on the food!

Look at it this way: if your food is nicely plated and styled, then you’re already more than halfway there!

All you need is an additional prop or two, like a utensil or a piece of linen tucked under the plate.

How you approach your propping will really depend on the food. In the image of the poke bowls below, the food is already bright, colorful, and full of texture. Adding more than a set of chopsticks would have distracted the viewer’s attention from the dish.

Smartphone Food Photography For Social Media-Darina Kopcok-DPS

Heed the Rules of Good Composition

One problem you often see in food pictures on Instagram is that they look messy. Sometimes the food looks messy but also the environment in which the food is captured in.

The background is cluttered, or there are too many props that are distracting and don’t add anything to the shot.

Some of this can be solved with tighter shots and by taking some unnecessary elements away.

But you should also be aware of some of the basic principles of composition.

Try to have some negative space in the image. That is a clean area where the eye can rest for a brief moment as it moves through the image.

Resist the urge to fill every part of your image.

Smartphone Food Photography For Social Media-Darina Kopcok-DPS

If every area of your surface is covered with ingredients or a prop, it confuses the viewer and gives a claustrophobic feeling. Negative space provides a bit of breathing room and helps us focus on the main subject.

You should also be familiar with the rule-of-thirds. This is a compositional guideline that divides an image into nine equal parts, using two horizontal lines and two vertical lines, like a tic-tac-toe board.

Rule of Thirds

The important elements in your scene should fall along these lines, or at the points where they intersect.

Smartphones already have a grid like this as an overlay when you turn on your camera. Use it to help you place your focal point. That is the area where you want to create emphasis and draw the viewer’s eye.

A focal point can be created with color, an area of contrast, or isolation. A garnish can serve as a focal point.

Tell a Story

Smartphone Food Photography For Social Media-Darina Kopcok-DPS

I have stated that a minimalist approach is often best, however, be mindful that adding a narrative quality to your images can also be very powerful.

Everyone loves a good story. Give your viewer an idea of a wider story taking place beyond the confines of the frame.

For example, you can do this by partially cropping out some of the elements in an overhead table shot, or show someone’s hand serving food or holding a cup of steaming coffee.

This human touch has become wildly popular in food photography, and this lifestyle element has spilled over from Instagram into the world of commercial food photography because it creates a sense of atmosphere and relatability.

Smartphone Food Photography For Social Media-Darina Kopcok-DPS

In Conclusion

Hopefully, this article has given you some tips to improve your smartphone food photography for social media.

Whichever approach you choose, be conscious of consistency and developing your style.

If you look at the most successful accounts on Instagram and other social media, you will find that they have a specific look in terms of color treatment or palette.

Take a good look at your images for the consistencies in your style and work on developing them. This may mean you take a lot of bright and airy images, or maybe you do mostly close-ups of your food.

The more you hone your style, the tighter your feed will look and draw an audience that loves what you do.

I’d love to see some of your smartphone food photography, so please share in the comments below.


The post Smartphone Food Photography For Social Media appeared first on Digital Photography School. It was authored by Darina Kopcok.


Digital Photography School

 
Comments Off on Smartphone Food Photography For Social Media

Posted in Photography


Why You Should Have Photography Heroes

11 Dec

The post Why You Should Have Photography Heroes appeared first on Digital Photography School. It was authored by Kevin Landwer-Johan.

Why You Should Have Photography Heroes Kayan Girls

© Kevin Landwer-Johan

Daily bombardment by images can leave us desensitized to truly inspiring art and cause creative catharsis. Pictures crowd our lives more than ever before. They are on the internet, social media, tv, billboards, pavements and walls. Images are on pretty much every product we purchase. Filling the whole sides of buildings or as miniature graphic icons on our phones.

Anyone interested in growing their photography skills may find this saturation somewhat nauseating.

Narrow your sphere of influence. Purposefully. Feast your eyes on the best and your creative muse will be full and satisfied. Indulging in visual junk food will only make you bloated and unhealthy. Uninspired.

Those Who Have Gone Before Us

Masters of the camera are plentiful. True photography heroes have produced impressive bodies of work in every genre imaginable.

Learn from the best. Find those who have distinguished themselves and whose work stands out and moves you. These days it’s very easy to research and locate portfolios of photographs which inspire you.

How to Find Your Photography Heroes

Why You Should Have Photography Heroes Karen Men

© Kevin Landwer-Johan

Make a list of the styles of photography you are most interested in. Maybe there’s just one. Google your results and include the word ‘photographer’. You might search ‘street photographer’, ‘landscape photographer’ etc. The results will provide you with a starting point you can work with and refine. Also, try searching photography specific sites like 500px. Pinterest is another good option. Searching hashtags on Instagram also produce fruitful results. But on these uncurated websites be careful to find the best, most renowned photographers.

Don’t just read camera manuals and ‘How To’ books. Read blogs and books by photographers whose work you admire. Reading what they write can provide valuable insight into how a photographer thinks. How did they achieve a certain look and feel to a particular photograph? What was the process they worked through in the development of their distinctive style? Which equipment did they use?

There are lots of amazing online documentaries you can watch about famous photographers. Sitting down for an hour or so to see and hear how photographers work is a terrific way to learn.

Go to exhibitions. Viewing curated bodies of work, printed and framed beautifully is a far different experience than looking at photos on a computer monitor or on your phone.

Talk to your photographer friends and find out who they draw inspiration from.

Follow any of these suggestions and your inspiration will increase.

New to Photography? Seek a Wider Sphere of Influence

Why You Should Have Photography Heroes Lahu Smoker

© Kevin Landwer-Johan

If you’re new to photography and not sure where to start, take a broader approach. Look at books on photography where more than one artist and style is discussed. Draw from the ones who move you the most.

I think the very first photography book I owned was called The Camera. It’s part of the classic Time/Life series ‘Life Library of Photography’. The last chapter of the book profiles ten photographers and introduced me to the work of Ansel Adams, W. Eugene Smith, Diane Arbus, amongst others.

Two photographers who caught my attention in this book are Irving Penn and Henri Cartier-Bresson. I have continued to study their styles and methods over the years. Looking back I think it is the connection with the people they were photographing that touched me the most.

Natural Light Portraiture

Why You Should Have Photography Heroes Karen Woman Smoking

© Kevin Landwer-Johan

Some years later I picked up Penn’s book ‘Worlds in a Small Room’. His use of natural light in his portraits had always captivated me. In this book, he writes about developing his outdoor studio and using it in countries like Papua New Guinea and Morocco. He motivated me to emulate this innovation. I designed and built my own version of a natural light studio and use it in the mountain areas of northern Thailand.

From time to time, as the opportunity arises, I enjoy photographing the various ethnic minority peoples who live in this part of the world, (where I also live.) During the past ten years or so, I have had many enjoyable experiences photographing these people in their villages. The studio allows me to photograph them in their space, within their comfort zone. Using the studio, I have more control over lighting and background than I would otherwise have.

Photomontages

Why You Should Have Photography Heroes Saamlor Photo Montage

© Kevin Landwer-Johan

Shortly after purchasing my first camera I was introduced to the photo joiners David Hockney was dabbling with at the time. I saw this video. The idea of making images beyond the conventional photographic boundaries of time and space constraints appealed to me, so I experimented.

Back then we had no internet and information, and examples of Hockney’s photographic montages were hard to come by. I started messing around and chewing through lots and lots of film.

Once I went digital a whole new world opened up. I began to produce video and photos to incorporate into my montages. I am still experimenting more than thirty years after being introduced to this cubist form of image making. The concept still captivates me and draws me to explore wider and deeper.

Be Purposeful in Your Hero Worship

Seek to emulate. Picasso said, “Good artists copy, great artists steal.” Make the most of what you see in other photographers work. Don’t just admire it, mimic it. Build the techniques and methods you see your heroes using into your photography. Then incorporate your ideas, or things you have seen in various other photographer pictures.

The daily bombardment of images into your eye space hopefully presses you to produce better, more exciting and creative photographs. It is too difficult to do on your own. Find your heroes and pay them homage by developing a style of your own, inspired by the images they’ve produced.

The post Why You Should Have Photography Heroes appeared first on Digital Photography School. It was authored by Kevin Landwer-Johan.


Digital Photography School

 
Comments Off on Why You Should Have Photography Heroes

Posted in Photography


Photoshop Focus Stacking for Still Life and Product Photography

09 Dec

The post Photoshop Focus Stacking for Still Life and Product Photography appeared first on Digital Photography School. It was authored by Darina Kopcok.

1 - Photoshop Focus Stacking by Darina Kopcok for DPS

Still life and product photography often require that your entire subject be sharp.

This can be difficult to achieve in-camera because if you’re shooting up-close, you can’t always get a lot of your subject in focus.

Stopping down to a smaller aperture (higher F-stop number) will not necessarily help you get a sharper image.

Enter Photoshop and focus stacking.

Focus stacking is a post-production technique of blending several images with different focus points to create one image that is sharp and in focus throughout the entire subject.

It’s the ultimate way to get the sharpest images, and it’s a crucial technique to know for still life photography.

2 - Photoshop Focus Stacking by Darina Kopcok for DPS

Why you can’t get razor sharp photos

Your aperture, focal length and the distance from your subject all impact the sharpness of your image.

Shooting at a higher F-stop number like f/22 won’t help you get sharper images in still life photography because of lens diffraction.

Lens diffraction in a phenomenon of optical physics that occurs in the lens and camera sensor.

When you shoot at f/2.8 or f/4, a lot of light hits your camera sensor directly. At apertures like f/16, the light hits the subject less precisely and causes a loss of sharpness.

It doesn’t matter how good your lens is – your images will be less sharp at apertures of f/16 and higher due to this law of physics.

The more you stop down, the finer details will blur out further.

Lens diffraction tends to be worse in zoom lenses than prime lenses because zooms have several moving parts.

3 - Photoshop Focus Stacking by Darina Kopcok for DPS

The depth-of-field problem

In still life and product photography, you often need to get pretty close to your subject. This means a shallower depth-of-field.

If you’re shooting small objects like jewelry, or objects that need to fill the frame, you’re usually so close that its entire depth cannot be in focus.

Using a macro lens like a 100mm or 110mm will also give you a shallow depth-of-field.

This is great if you’re doing food photography and want that blurred out background that is sought after in that genre, but for other types of still life, it creates a problem.

4 - Photoshop Focus Stacking by Darina Kopcok for DPS

Shooting for focus stacking

In order to focus stack in Photoshop, you need to shoot in a certain way with certain tools.

First of all, you need a sturdy tripod because your subject must be in exactly the same position from shot to shot in order to be successfully blended later in Photoshop.

If you accidentally bump your tripod, you’ll need to start all over again.

A shutter release is recommended to activate the shutter. Pressing the shutter by hand will introduce a small vibration that can introduce camera shake into the image and cause them to be misaligned in Photoshop.

That being said, Photoshop does a good job with aligning layers that are slightly off.

Personally, I like to tether my camera to Lightroom or Capture One and activate the shutter from within the program.

To shoot for focus stacking, start off by composing your shots and determining your exposure. You should use manual mode so that your exposure is the same from shot to shot.

  • Choose a point on your subject to focus on and take a shot.
  • Focus on a different point on your subject without moving the camera or adjusting any setting
  • Choose the next point and take the final exposure.

Three images will often be enough to cover each area of depth-of-field but it will vary by image

5 - Photoshop Focus Stacking by Darina Kopcok for DPS

Focus stacking in Photoshop

To blend the images together in Photoshop, start off by exporting PSD files into a folder or onto your desktop where you can easily find them.

  • Open Photoshop.
  • Go to File and choose Scripts.
  • Select Load Files into Stack.
  • Click Browse and select all the images from where you saved them initially.
  • Check the Box for Attempt to Automatically Align Source Images.
  • Click OK. Each of the images will open as a new layer in Photoshop.
  • Hold down Shift and click on the top layer in the Layers panel to highlight all the layers.
  • Under Edit, select Auto Blend-Layers.
  • Check the box for Stack Images and also for Seamless Tones and Colors. DO NOT check ‘Content Aware.’ Click OK.
  • Save the final image.

If you have uploaded a lot of images, flatten the final image by selecting Layer -> Flatten Image -> Save.

6 - Photoshop Focus Stacking by Darina Kopcok for DPS

Conclusion

Focus stacking is necessary for product photography but also very useful for other types of still life photography – even food photography.

If you’re fairly new to Photoshop, don’t be intimidated.

Focus stacking is a lot easier than you might think and you will undoubtedly be pleased with your results.

Have you used photoshop focus stacking? If so, share with us your thoughts and images below.


The post Photoshop Focus Stacking for Still Life and Product Photography appeared first on Digital Photography School. It was authored by Darina Kopcok.


Digital Photography School

 
Comments Off on Photoshop Focus Stacking for Still Life and Product Photography

Posted in Photography


7 Top Tips For Running Photography Mini-Sessions

09 Dec

The post 7 Top Tips For Running Photography Mini-Sessions appeared first on Digital Photography School. It was authored by Lily Sawyer.

For many photographers, especially those who photograph families and children, there are certain times of the year which can be great opportunities for photography mini-sessions.

1 - 7 Top Tips For Running Photography Mini-Sessions

If you have done mini-sessions before, you’re probably already a seasoned pro. But if this is your first time doing one, these tips may help. It’s better to start planning months in advance to get the word out before people’s diaries fill up.

Mini-sessions are a quicker photographic session that is captured at lower than your full photographic session rate.

The most obvious opportunity is the Christmas mini when parents book photo shoots for their children or their family for holiday cards or to give to grandparents and family as gift prints. Then there’s Valentine’s day, Mothering Sunday, Easter/Spring, Father’s Day, Summer shoots, Autumn shoots.

Unless mini-sessions are all you do, I suggest deciding on which one to do from the above opportunities instead of offering a mini-session for each month of the year!

2 - 7 Top Tips For Running Photography Mini-Sessions

I thought it would be fun to do this in a DO and DON’T format. DON’T forget these are only my suggestions. Ultimately, DO decide for yourself what is best for your business.

1:

DON’T do more than two in one year.

DO select carefully the ones you want to do and whether you vary them each year or stick to the one or two. Running them more often than this only encourages a client culture of waiting for mini-sessions, much like waiting for a sale. You may lose full-paying clients. Whilst you end up with many new contacts and families, you may be missing the opportunity to market to clients who want to have a longer session with you.

2:

DON’T invite everybody.

DO invite only the clients who don’t usually go for full-price packages in the first instance or those who have a budget. Extend the invitation to their friends if spaces remain. If you don’t fill up, then you may well decide to make the invitation public. You may find that clients have like-minded friends. Knowing their friends do a mini instead of a full shoot, they may tend to follow suit, even if they can afford the full package. You don’t want your normal full-paying clients to suddenly switch to mini-sessions for their annual photoshoots.

3 - 7 Top Tips For Running Photography Mini-Sessions

3.

DON’T do several days or weeks.

DO specify one day (2 if you have more than you can take in one day), one location and short time slots. Make sure your time-slots do not have long breaks in-between. Be clear as to the duration of the mini-session, that is, when their time starts and ends. Make this much shorter than your usual photo shoot. It helps to have a short time in-between slots for a bit of leeway in case a shoot runs over. However, not too long in between so your client knows you have to wrap it up as there is another family waiting after their slot is over.

4.

DON’T overshoot.

DO have a maximum number of images to shoot in mind so you don’t take far too many and end up with more editing hours equivalent to a full shoot. When shooting very young children, we normally have to shoot plenty to make sure we get good ones but don’t labor a pose. Take a few and move on. It helps to have a mental (or physical) list of shots and combinations as well as spots and locations for poses or positioning of subjects to help keep to the session’s time duration.

4 - 7 Top Tips For Running Photography Mini-Sessions

5.

DON’T leave all the outfit planning to your clients.

DO give your clients an idea of the set or backdrop color beforehand so they can plan outfits to suit or you can suggest clothing. I usually ask them to send me photos of their outfits beforehand so we decide together. Having great outfits really make a difference to the final look of your images and may even help strengthen your branding if and when you decide to blog the session.

6.

DON’T allow an unlimited number of props.

DO ask them to bring only one or two props or items from home. For example, special teddies or toys for the kids to use as a prop or to comfort them if necessary. Usually, something that has special meaning works well. It’s a bonus if it goes with the outfits too. Again, you can discuss this with your client beforehand during the planning stage.

5 - 7 Top Tips For Running Photography Mini-Sessions

7.

DON’T send the children off without a little gift after their session.

DO show your appreciation. Applaud their effort and reward their time with one small gift like a small bottle of bubbles, sticker sheets or a little car. They will feel appreciated and that their hard work is recognized and valued. Who knows, this might set you up nicely for the next shoot with them where they warm up to you quicker than the last and be more obliging too. It’ll be a win-win.

I hope these tips are helpful. Do share your thoughts on photography mini-sessions and comments below, or if you have more tips to add.

The post 7 Top Tips For Running Photography Mini-Sessions appeared first on Digital Photography School. It was authored by Lily Sawyer.


Digital Photography School

 
Comments Off on 7 Top Tips For Running Photography Mini-Sessions

Posted in Photography


Weekly Photography Challenge – Shadows

08 Dec

The post Weekly Photography Challenge – Shadows appeared first on Digital Photography School. It was authored by Caz Nowaczyk.

Your weekly photography challenge – SHADOWS!

Still River in black and white by caz-nowaczyk

This week, I challenge you to embrace shadows in your photography. Shadows can be used to tell stories, create drama and mood, as well as mystery.

Your photos can be color, or black and white, and be landscape, portraiture, street photography or any other genre. Either way, I can’t wait to see them!

Check out today’s video on embracing shadows as well as some of the articles below that may give you inspiration for shooting and editing Shadow pictures.

Here are some cool insta pics for inspiration too:


View this post on Instagram


A post shared by Manuel Pena (@manolobrown) on


View this post on Instagram


A post shared by Julia Coddington (@juliacoddington) on


View this post on Instagram


A post shared by Dilerious Dilettante (@loulou_mcphee) on


View this post on Instagram


A post shared by Jeremy Perez-Cruz (@sleepingplanes) on


View this post on Instagram


A post shared by Gregory Urquiaga (@eight_spicey_ducks) on

Add Impact to Your Photos by Including Shadows

5 Tips for Mastering Shadows in Your Photography

How to Use Shadow and Contrast to Create Dramatic Images

24 Dark and Mysterious Shadow Images

25 Shadow Images to Inspire You

Still Waters in black and white by Caz Nowaczyk

Weekly Photography Challenge – Shadows

Simply upload your shot into the comment field (look for the little camera icon in the Disqus comments section) and they’ll be embedded for us all to see. Or if you’d prefer, upload them to your favorite photo-sharing site and leave the link to them. Show me your best images in this week’s challenge!

Share in the dPS Facebook Group

You can also share your images in the dPS Facebook group as the challenge is posted there each week as well.

If you tag your photos on Flickr, Instagram, Twitter or other sites – tag them as #DPSSHADOWS to help others find them. Linking back to this page might also help others know what you’re doing so that they can share in the fun.

The post Weekly Photography Challenge – Shadows appeared first on Digital Photography School. It was authored by Caz Nowaczyk.


Digital Photography School

 
Comments Off on Weekly Photography Challenge – Shadows

Posted in Photography


Embracing Shadows in Photography – A Lesson for Light and Life

07 Dec

The post Embracing Shadows in Photography – A Lesson for Light and Life appeared first on Digital Photography School. It was authored by Caz Nowaczyk.

In this fantastic video by Sean Tucker, he takes a look at the ways shadows can be used in photography to create mystery and depth.


??

Shadows in film

Throughout this process, he examines the work of cinematographer, Roger Deakins, and looks at stills from his films Skyfall, Bladerunner, Jarhead and Unbroken. Using these amazing film stills, he analyses how the Deakins uses color, backlight, selective lighting and loads of deep shadows to create mystery and mood in his images.

According to Sean, many photographers say that using film as a point-of-reference for this type of photography is difficult because the same type of images cannot be captured in stills. As photographers, we simply don’t have access to million-dollar lighting set-ups and set design.

Photographers who tell stories through shadows

So, as part of this perspective, Sean also looks at photographers, Constantine Manos, Ray Metzker, Saul Leiter, and Trent Parke who manage to capture shadows in creative ways. These photographers manage to do this through the use of natural light and in the genres of landscape, portraiture and street photography. Through these images, they sculpt light, create character and tell stories with an interesting narrative. These images draw the viewer in and tell richer stories.

In the video, Sean also discusses the limitations of cameras to see the full dynamic range of the eye. He shows us exactly how this theory works with our camera through a diagrammatic presentation. A helpful tool for those wanting to understand dynamic range.

You may also find the following articles helpful:

Add Impact to Your Photos by Including Shadows

5 Tips for Mastering Shadows in Your Photography

How to Use Shadow and Contrast to Create Dramatic Images

24 Dark and Mysterious Shadow Images

25 Shadow Images to Inspire You

The post Embracing Shadows in Photography – A Lesson for Light and Life appeared first on Digital Photography School. It was authored by Caz Nowaczyk.


Digital Photography School

 
Comments Off on Embracing Shadows in Photography – A Lesson for Light and Life

Posted in Photography


Taking a Measured Approach to Learning Photography

07 Dec

The post Taking a Measured Approach to Learning Photography appeared first on Digital Photography School. It was authored by Kevin Landwer-Johan.

Whether you have just invested in your first camera, or you did so a while back, taking a measured approach to learning to use it will help you improve your photography.

Woman Photographer at the Shopping Mall - Taking a Measured Approach to Learning Photography

© Kevin Landwer-Johan

Beyond camera skills, there’s a whole lot more to making great photos. Composition, lighting, timing, and relationship with your subject are all important aspects of photography. All are largely unrelated to camera tech.

Photography is a journey. You can make it as long or short as you like. You can stick to a well-beaten path, (and create photos much the same as most people do,) or be more ambitious and scale lofty peaks. If you want to do the latter you better have a good idea of where you want to go and be ready to develop the necessary skills for the adventure.

Where do you start and how do you become competent in both the technical and creative aspects of photography?

Start with What’s Essential

Camera manuals are notorious. They are often difficult to understand and the information can appear disjointed. However, these books provide you with valuable insight. To be able to create interesting photographs you need to have a good knowledge and understanding of your camera first.

Taking a Measured Approach to Learning Photography Happy Photographer

© Kevin Landwer-Johan

Start with your camera manual. Read it in the language you most easily understand, (and ignore all other language options.) Don’t try and absorb it all at once. Spread out your reading over the first week with your camera in your hands. Take in a little at a time and practice it.

Google and Youtube will often provide you with information about your camera that’s more straightforward. Search your camera make and model. Find one or two sources that cover it in depth and spend time studying it.

Get a good grasp of the basics of how your camera works. Get to know it’s settings and functions. Learning these things will help you avoid a lot of frustration when you are taking photos.

Concentrate on the Basic Functions

Trying to learn all the intricacies of your camera right at the start can be confusing. Modern cameras are packed with more whistles and bells than you will ever need to use.

Taking a Measured Approach to Learning Photography My First Camera

© Kevin Landwer-Johan

My first camera was a simple tool. I had no option but to learn to use it manually. It had no automatic functions. This was a great way to learn. Thirty years or so later as I was preparing to launch my photography workshops, I had to study how to teach using the auto settings. I had never used them.

It’s a little like driving a car with an automatic transmission after learning in a manual shift car. Easy, because you’ve already mastered the essentials in manual mode.

Personally, I think using manual mode gives you the freedom to become more creative with your camera. I encourage you to do this. If you don’t have the time or commitment, experiment with the auto settings on your camera and find one or two which suit you best. Don’t be distracted by the scene modes or the many other functions your camera has. When you are starting out these will just add confusion.

Taking a Measured Approach to Learning Photography Camera Police

© Kevin Landwer-Johan

Be Regular

Picking up your camera frequently and regularly is the one thing that will advance your photography. Make a habit of taking at least one photo a day. It only needs to take a few minutes.

Once you form a habit you will find it easy to make more time for photography. As you become familiar with your camera you will start to enjoy it more. When this happens you will notice you are beginning to take better photographs. It can become addictive.

Using your camera infrequently will lead to some frustration each time you do pick it up. You will have to think again which dials and buttons do what. You will not be familiar enough with the controls to use your camera with ease. Taking at least one photo a day will help you learn the camera controls and before long you will know them and use them intuitively. You don’t need to make a masterpiece each day, just try to improve a little at a time.

Taking a Measured Approach to Learning Photography Example

© Pansa Landwer-Johan

Learn a Little More

Studying – along with regular camera use – will accelerate your photography learning experience. Find a good book, online course or enroll in some classes.

Look for a teacher or author whose style you like and would like to emulate. Some people who teach photography will have you concentrate heavily on the technical aspects of the craft. Others will encourage you to leave your camera on auto all the time and let the camera do the work. It’s your choice which path you choose to follow. I prefer to teach a mix of the creative and technical aspects of photography.

Taking a Measured Approach to Learning Photography Monk Photographer

© Kevin Landwer-Johan

Building your technical ability is important. You need to understand your camera and how to manage the settings. Receiving some good teaching on the functions of shutter speed, aperture, ISO, focus and other essential controls will lead you to be more creative. Once you have learned these skills your mind will be freer to focus on the creative elements that make good photographs.

Having a good grasp of composition, light, color, and timing is equally important for being able to make good photographs. Much of the creative side of photography is very subjective. You can study it and gain foundational knowledge. This will set you up towards developing your own personal photographic style.

Without a balance between technical and creative study, you can end up unbalanced. This can lead to technically perfect snapshots or terribly exposed, out-of-focus ‘creative’ photographs.

Three Helpful Tips to Help Your Progress

Make a separate folder on your computer, somewhere you can access it easily. At least once a week, go through the photos you have made and choose a few of your favorites. Put them in this new folder. This is your portfolio. You don’t need to share it with anyone else (but it’s a good idea to.) It’s there so you can see your photographs improve over time.

Taking a Measured Approach to Learning Photography Market Photographer

© Kevin Landwer-Johan

Having your work critiqued by a more experienced photographer helps. You may not always see what you have done wrong. You may look at your photos and know they are not great, but not be able to figure out why. This is where an experienced photographer can help you. A good critique will be positive and constructive but not shy away from pointing out changes which need to be made.

Finding someone to mentor you is one sure way that will help your photography progress. Regular contact with a more experienced photographer who’s committed to helping you learn will accelerate the process. The feedback a mentor can provide is invaluable. A good mentor will teach and guide you. They will also set and assess assignments for you.

Conclusion

Taking a Measured Approach to Learning Photography Kevin Teaching

© Pansa Landwer-Johan

Like learning to play a musical instrument or losing weight, the level of your commitment will be reflected in the level of your success. The more committed you are to learning to use your camera well, the more successful you become.

Frequent camera use and study will propel you more quickly to your goal. It’s your choice. Make regular study and camera use a daily habit. Go through and separate out your favorite photos once a week or so. You will be encouraged by the photos you are making. You will never achieve your potential by only occasionally picking up your camera.

The post Taking a Measured Approach to Learning Photography appeared first on Digital Photography School. It was authored by Kevin Landwer-Johan.


Digital Photography School

 
Comments Off on Taking a Measured Approach to Learning Photography

Posted in Photography


Photography Equipment Tips for an Africa Photo Safari

06 Dec

The post Photography Equipment Tips for an Africa Photo Safari appeared first on Digital Photography School. It was authored by Andrew Sproule.

There’s no doubt that booking and planning for an Africa photo safari is an exciting time, especially if it’s your very first venture. As a photo safari tour leader, I’m used to the process. Nevertheless, I still behave very much like a child in anticipation of what Christmas brings. As your departure date draws nearer, your thoughts move to packing for your trip. Although the appropriate clothing is essential, these trips are really about amazing wildlife encounters, shared experiences and capturing memories. It’s time to think about your photography equipment, – your gear.

It’s time to pack your camera bag!

Author’s Note

Before I dive in, I would like to state that this article represents my tips for maximizing your experience while on an Africa photo safari. It’s a guide with a mix of opinion and facts based on my on-location, in-the-field experience. It’s a summary, an introduction and not a laboratory review and therefore should be treated as such.

Secondly, I always recommend photography enthusiasts choose a safari designed explicitly with photographers in mind. General ‘tourist’ safaris have their place, but they’re much more likely to be governed by a species timetable. Lion, check. Move on. Buffalo, check. Move on. You get the picture. On a dedicated Africa photo safari trip, not only will you share a vehicle (often customized for photographers) with liked minded people, you’ll also benefit from being able to spend much more time with an individual animal or group of animals. You’ll be able to witness unusual behaviors and explore different angles and lighting situations. Explicit and invaluable guidance and advice are also on tap.

Thirdly, you’ll notice that I’ve included my camera settings below a number of the images. These settings worked for me in those particular situations, under certain conditions to produce the type of image I was after. I suggest you use these posted settings as a guide only. Instead, think about how these images might look if you were to adjust the shutter speed, aperture or ISO. Then, take that information into the field with you. The relationship between these elements can create widely different outcomes and also help you to define your style.

Leopard, Botswana. Canon 1DX, Canon 70-200mm(at 105mm), f/2.8, ISO 400, 1/125th sec handheld. Image © Andrew Sproule

Cameras for an Africa Photo Safari

Notice I have stated ‘cameras’ in the title and not ‘camera.’ I recommend you take at least two camera bodies with you. On the surface, this may seem like overkill or even a touch extravagant, but there are valid reasons why.

Firstly, it’s peace of mind. Imagine the heart-sinking moment if your camera fails. That emotion is tenfold if it happens on day one of a two-week photo safari! Whether you take two DSLRs, two mirrorless cameras, a combination of both, or an alternative solution, possessing a backup prevents any unnecessary anxiety. Before I purchased a second camera body, I used to hire one for my Africa trips. I still do this on occasion. It’s a great way of testing and trialing gear in the field beforehand and working out what works best for you.

Secondly, Africa is an extraordinarily harsh and dusty environment. Sand and dust particles are the enemies of sensitive camera sensors. Consequently, eliminating the need to swap lenses while on location can be a huge plus.

Furthermore, having two cameras armed with different lenses (for example a telephoto lens and a mid-range zoom), you’ll find it easy to switch between them. Switching between them is useful when wildlife comes too close, or if you are pulling away for a wide shot of wildlife in context of its habitat. Being able to adapt to shifting conditions can mean the difference between capturing, or not capturing the shot.

Not everyone is in a position to take two cameras. It also doesn’t matter whether your camera is full-frame, crop-sensor or another type, as there are pros and cons to all. What is fundamental is that you know your camera intimately. Practice on your dog, your cat or deer in a local park. Whatever you can. The more familiar you are with your camera’s features, the quicker you’ll be able to adjust to conditions that unfold in front of you with confidence.

Lenses for an Africa Photo Safari

Super-telephoto lenses with a focal length of 300mm plus are the staple for most Africa photo safaris. For crop-sensor cameras, 300mm should be ideal. If you intend to photograph birds as well as large game, the longer the focal length, the better. Full-frame cameras usually need lenses of 400m+.

Wild dog, Botswana. Canon 1DX, Canon 500mm, f/5.6, ISO 200, +2/3 EV, 1/160th sec, monopod. Image © Andrew Sproule

Although my go-to lens is a 500mm, I believe the versatility of zoom lenses make them ideal for African safaris. There’s such a wide variety of birds and mammals of a degree of varying sizes and distances that a good lens option would be something like the 100-400mm.

A short-zoom lens in the range of 24-70mm is also a great option as it provides the flexibility to pull away to present wildlife within its environment, adding real context to an image. Because I’m also a landscape photographer, I also favor super-wide lenses in the range of 16-35mm or 14-24mm.

Much of Africa’s wildlife is active in the early mornings and late evenings meaning you’ll be battling low levels of light. Lenses with larger apertures, such as f/2.8, allow more available light into the camera, so you’ll be able to use a reasonably high shutter speed for much longer. These lenses are a luxury item though, so an alternative solution is to increase the ISO. Doing so most certainly increases noise, but most photographers would rather have a sharp shot with an acceptable amount of noise than an out of focus shot with no noise. In many cases, you can eradicate most noise in post-production.

Filters for an Africa Photo Safari

I often use filters when composing landscape images, and on an Africa photo safari there are most certainly circumstances when the use of a filter is advantageous. For filters that reduce glare, saturate colors and darken skies, I recommend using a polariser filter.
If you need help to correctly expose bright skies, while preserving exposure detail in the foreground, then I recommend an ND filter.

Camera Support on an Africa Photo Safari

Burchell’s Zebra, Kenya. Canon 1DX, Canon 500mm, f/4, ISO 200, 1/50th sec, bean bag. Image © Andrew Sproule

Bean Bags

Bean bags are my go-to support, especially in East Africa. They are a simple, yet extremely effective support for your camera. Bean bags can be used to rest your lens on a vehicle’s doorsills, window frames, roof rails and the actual roof itself. Also, wildlife is often on the move, so you’re not limited to one position within the vehicle. Many reputable Africa photo safari tour operators provide beanbags. However, that said, it is always worthwhile double-checking beforehand. Bean bags can pack light and get filled with rice or beans on arrival. Some photographers prefer to fill their beanbags with lightweight polystyrene balls before they leave. It’s bulkier but a lightweight alternative. I’ve been using a couple of Kinesis SafariSacks 4.2™ for a while. As well as being a great support, the quick release straps secure the bags in place, so you never lose them in the bush.

A typical East Africa safari vehicle. Image courtesy of Governors Camp, Maasai Mara, Kenya

Unfortunately, bean bags are not a universal solution, contrary to what you may have read in certain books or magazine articles. Although they’re a fantastic solution in East Africa, they’re not as useful in Southern Africa (including South Africa, Botswana, Zambia, and Zimbabwe). The reason is that the vehicles there are radically different. Safaris in Southern Africa use open Land Rovers and Land Cruisers with no sides at all – often there isn’t even a windshield! So, there is nothing on which to rest the beanbag. In Namibia, both open Land Rovers and closed vehicles are in common use.

A typical Southern Africa safari vehicle. Image courtesy of Motswari Private Game Reserve, South Africa

Monopod

If a bean bag is not an option, a monopod offers a lightweight and more practical alternative to use within the confines of a safari vehicle. Especially in Southern Africa. You don’t need to extend it entirely, and it takes the strain from your arms and shoulders while seated. It’s surprising how effective it can be. I have tested many monopods over the years and have found that Gitzo Monopods™ best suit my needs. I also use a Really Right Stuff™ lever-style, quick release that makes the process of taking lenses on and off the monopod very fast.

Tripod

A tripod is useful or even an essential piece of kit for evening photography, longer exposures or for around the camp. Although, the wide-spread tripod legs make them impractical and ill-advised for most safari vehicles. However, if you’re in an open vehicle on your own, or perhaps with one other, a tripod can be rigged to provide an excellent platform for larger lenses. To avoid badly damaging your camera from vehicle shake, always remove your camera from the tripod while on the move.

Some airlines take a dim view of tripods, and you may find it difficult to persuade them to let you take it in the cabin as part of your hand luggage. If it’s going in the hold, it can take up more of your baggage weight allowance.

Clamp

I often use a ball head or gimbal head on a Manfrotto® Superclamp that can be bolted almost anywhere, including a vehicle’s roof bars. If I’m on my own, or part of a tiny group, I may even have several of these clamps placed in strategic points around the vehicle making it extremely easy to switch from side to side and back to front.

Manfrotto 035 Superclamp. Image courtesy of Manfrotto®

Storing Images while on an Africa Photo Safari

Laptop

You could easily take 300-500 images a day. Trigger-happy photographers may even have over 1,000, so a small laptop with external hard drives are useful for securely backing up your photographs. If weight restrictions allow, two hard drives that mirror each other is a great solution. Remember to pack essential items such as connecting cables, chargers and memory card readers.

Memory Cards

An alternative solution to external hard drives is to bring extra memory cards. You can file these away at the end of each day. That way, you are safe in the knowledge that your data remains untouched until you arrive home. If you don’t like the idea of swapping out memory cards too often, go for larger capacity ones such as 32GB. That said, I don’t like to put all my eggs in one basket, and therefore I opt for 2 or 3 smaller cards in favor of one larger one.

Accessories for an Africa Photo Safari

Batteries

Get to know what you can expect out of your camera with regards to battery life and take enough spares to get you through each day. Cold is a battery’s nemesis, so make sure they’re not getting too cold overnight. I have two spare batteries for each camera body, and that’s always been more than adequate for my purposes.

Lens Cleaning Cloth

Remember lens cleaning cloths. I would also recommend a camera and lens cover that helps protect your camera in the event of a rain shower and for protecting your gear against the dust mentioned above.

Others

Don’t forget your smartphone, binoculars, head torch, notepad and pen, personal medication, malaria medication, toiletries, money, your passport, and visa.

For detailed, up-to-date information on vaccinations and more, you are best to consult an official website.

Packing for an Africa Photo Safari

I recommend packing high-value items like cameras, lenses, and laptops in your hand luggage. Some airline safety requirements require you to pack batteries in your hand luggage, so ensure you charge your items, as airport security often requires you to demonstrate that laptops and cameras are all in full working order. A simple rule of thumb is to pack items essential to your photography, travel, and health in your hand luggage.

Pack your gear very carefully with disruption in mind. Some Africa photo tours can consist of two or three successive flights to get to various destinations in Africa. There may be two or even three layers of airport security on each of these flights. You may be required to unpack large cameras, lenses, and laptops. If you can, avoid placing smaller accessories on top of larger items that you may need to take out repeatedly and re-pack. Pack cables and batteries together in small pouches rather than loose in your bag.

Your camera bag should be large enough for your gear but small and light enough for all cabin limits. When packed you should be able to safely lift your bag in and out of the overhead lockers without assistance. Check the maximum sizes and weights for all the airlines and be aware that different flights often have different rules.

For small internal charter flights within Africa, total baggage allowance (hand luggage plus hold luggage) can be as little as 20kg and bags must be soft and pliable.

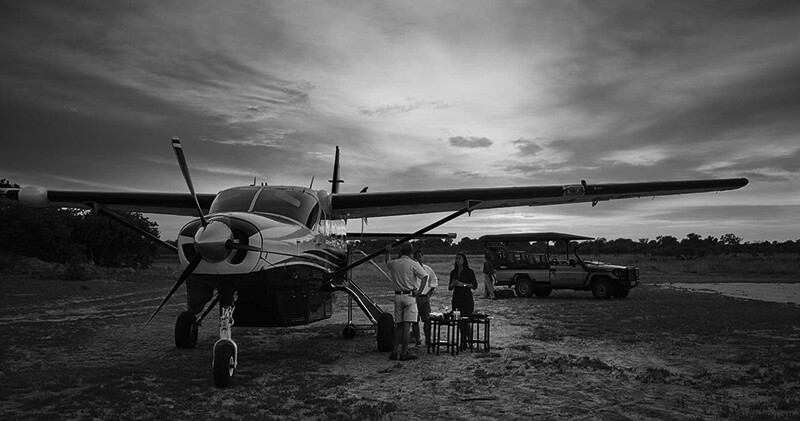
Typical Southern Africa internal charter flight. Image courtesy of Moremi Game Reserve, Botswana

Final Thoughts on an Africa Photo Safari

An Africa Photo Safari is an incredible experience. For many, it is a-once-in-a-lifetime opportunity both to experience incredible scenery and wildlife and to take amazing photographs.

There’s no doubt that it can be a daunting experience packing expensive and essential photography equipment for a safari. Even for seasoned photographers. Just remember to seek out advice. If you are booked on a photographer-specific tour, you can request support from your guides and or Africa safari tour facilitator. They have the experience and knowledge to help you make it the through this process with as little stress as possible.

The post Photography Equipment Tips for an Africa Photo Safari appeared first on Digital Photography School. It was authored by Andrew Sproule.


Digital Photography School

 
Comments Off on Photography Equipment Tips for an Africa Photo Safari

Posted in Photography


4 Tips for Building a Photography Portfolio and Business

06 Dec

The post 4 Tips for Building a Photography Portfolio and Business appeared first on Digital Photography School. It was authored by Lily Sawyer.

dps-Building a Photography Portfolio and Business

For some of us, a photography business springs from a hobby and grows into a paid endeavor, and so we feel it just landed in our laps. To others, it was more of a dream that was kept close and dear and planned to make a reality for a long time. For others, doors of opportunity open at the right time and place, and they’ve grabbed it.

Regardless of how your photography business has come about, for your business to take shape and grow, there are necessary steps to take. These steps require many initiatives and work and do not depend on luck or open doors of opportunity.

Let me share with you a few tips for building a photography portfolio and business. This article is of benefit if you are building your business from scratch or have been in operation but have relocated, requiring you to start afresh in a new location.

2-dps-Building a Photography Portfolio and Business

1. Build a Strong Portfolio

Now, don’t get me wrong – I don’t expect that you have a massive pile of photoshoots under your belt in the beginning (although that would be great.) All you need is a handful of carefully curated photos for your portfolio. If you have any images from practices or hobby shoots, choose your very best images. The best of the best, even if you only end up with a handful. If you are brave enough to do so, choose one genre and focus on that!

Usually the more niched, the stronger the portfolio.

3-dps-Building a Photography Portfolio and Business

2. Call for Models

If you don’t have any images to use or you feel your images are not good enough yet, plan a model call-out. Shoot new images that are more focused and consistent – your portfolio benefits from more consistent images. The goal down the line is that you are the one people think of when they need a photo shoot of a particular type.

You’re the expert in that field, and therefore you can also command decent prices. Having this in mind at the very start of your portfolio-building helps you streamline your model call plans in regards to age group, style, outfits location, and set-up. Branding is vital, especially at this stage. One could go as far as saying branding is everything.

3-dps-Building a Photography Portfolio and Business

You have two choices for model calls:

1. You can ask friends or friends of friends. You can do a public call on your social media platforms. If going the friends’ route, you may decide not to charge as you may feel they are doing you a favor. That is your call. However, money doesn’t grow on trees in business. Money comes from clients or investors who want a return on their investment.

Therefore, don’t be quick to offer your services for free, especially if you want to start charging decent fees or market rate. It’s hard for a potential paying client to start paying good money after initially being offered a freebie.

2. There are other options far better than offering freebies. You can do a barter of some sort. Think of something that either party finds beneficial with relatively equal values. You can also charge a fair rate for portfolio building that is lower than the market rate. You can offer the session at no charge in exchange for the model call but sell the prints. That way it’s not a total freebie.

Right off the bat, learn to accept money from clients without feeling guilty or feeling that you don’t deserve it. Also, don’t be embarrassed about it!

4-dps-Building a Photography Portfolio and Business

3. Have a Web Presence

Nowadays, if you are not on the web, you are not on the map. You don’t need a super-fancy website either if you feel that is out of reach at the moment. Although, it is easy enough to start a website using readily adaptable templates. More importantly, use social media platforms that are free and easy to set up such as Facebook and Instagram.

If possible, have both. However, if you are only doing one, a top tip is to think about your audience. What platform is your target market using? Parents with children are usually on Facebook. Younger age groups, like seniors, early 20s and 30s, are on Instagram. If you are after more real-time conversations and engagement with your followers, you could also link your accounts on Twitter.

5-dps-Building a Photography Portfolio and Business

A Web Presence is Your Virtual Office

Having a web presence is like having a virtual office. People can contact you and view your strongest images in your portfolio. This tool can be leveraged to reach more people, especially friends of friends. You can tag friends, share on their page, and ask them to share. All of these methods help to spread the word about you.

By tapping into your contacts’ friends, you are starting from a position of trust. You are no longer a stranger to a potential client but a referral. Use that to your advantage. By being reached easily on social media channels, you become more of a real person than just a webshop.

6-dps-Building a Photography Portfolio and Business

4. Print Some Business Cards and Stationery

While they may seem old-fashioned, business cards are useful because some people expect them, and they are great if you are networking in-person. If you want to be memorable, make your cards into a magnet, so you stay on people’s fridges! Think of something quirky, or at least different, so that you stand out more.

Having some printed promotional materials like mini-brochures and vouchers are invaluable. They come in handy if you want to collaborate with other small businesses in your area, such as your local health clinics for baby and maternity shoots, or boutique shops that sell outfits that fit with your branding.

6-dps-Building a Photography Portfolio and Business

I hope the tips in this article will help you in some way as you start your photography business. If you have any other tips, please share them in the comments below.

You may also find this article helpful.

The post 4 Tips for Building a Photography Portfolio and Business appeared first on Digital Photography School. It was authored by Lily Sawyer.


Digital Photography School

 
Comments Off on 4 Tips for Building a Photography Portfolio and Business

Posted in Photography


Improve Your Photography by Learning How To Use Exif Data

03 Dec

The post Improve Your Photography by Learning How To Use Exif Data appeared first on Digital Photography School. It was authored by Kevin Landwer-Johan.

Whenever a photo is taken with a digital camera, data relating to that photo gets stored with the image in what’s known as the Exchange image file format (Exif).

Knowing how to use that Exif data can help you gain insight into the camera settings of both your own and other people’s photos. Seeing what settings worked well together in a great photo (or didn’t work well in a bad one) can help you improve your photography skills.

Improve Your Photography by Learning How To Use EXIF Data Hmong Girl

© Kevin Landwer-Johan

Data About Data

The Exif data is what’s called metadata (data about data). Some data is more significant and useful than the rest. Within it you’ll find the information you probably know already – camera make and model, image dimensions, copyright information, etc. But you’ll also find information about the exposure, whether or not the flash fired, metering mode, distance to subject, and plenty more.

You can view the Exif data on your camera, on your computer, and on photo sharing sites such as Flickr and 500PX.

Here’s a screenshot of the Exif data being displayed in Adobe Photoshop after choosing ‘File Info...’ from the ‘File’ menu.

Improve your photography by learning how to use Exif data

To view this information in Windows right-click on the image file and select ‘Properties,’ then select the ‘Details’ tab.

If you’re using a Mac, open the image file in Preview, then select ‘Show Inspector’ from the ‘Tools’  menu and select the ‘Exif’ tab.

Note: Adobe programs create a file with the same name as the image but with the extension ‘xmp’. This stands for Extensible Metadata Platform and contains the Exif data for the image.

Improve Your Photography by Learning How To Use EXIF Data File Explorer Data View

As you can see, the EXIF data includes all the information about the exposure. My camera was set to manual mode. My shutter speed was 1/320 sec, the aperture was f/2.8, the ISO was 100, and I used my spot meter. It also shows that my flash fired.

In these examples, we’re looking at data from the RAW file. But the data is also stored in other file types such as JPEG and TIFF.

About the only thing it doesn’t tell you is whether a photo has been manipulated during post-processing.

How Is This Information Useful to Beginner Photographers?

When you first start out, and you’re still getting used to your first camera, the Exif data can help you learn. If you took a photo that didn’t turn out the way you thought it would, the data may show you why.

Improve Your Photography by Learning How To Use EXIF Data 105 one fourth

© Kevin Landwer-Johan

For example, seeing that the shutter speed was 1/4th sec will help you understand why your photo was blurred. To shoot at such a slow speed you need to use a tripod to avoid camera shake.

And seeing an aperture setting of f/16 will help you understand why so much of your image is in focus. You could then look at the Exif data of an image where more of the composition is out of focus to see what its aperture setting was.

Improve Your Photography by Learning How To Use EXIF Data Three at f16

© Kevin Landwer-Johan

Use Exif Data To Make Comparisons

The Exif data can also help you compare images you’ve made. Looking at the lens data can help you understand when it’s best to use that lens. Compare the same aperture setting on two different lenses. It will help you learn more about depth of field.

Comparing the same image shot with two different focal lengths is also a useful exercise. These three photos were taken using different lenses (as shown in the Exif data).

Improve Your Photography by Learning How To Use EXIF Data EXIF-f4

© Kevin Landwer-Johan

Analyze and Anticipate

Analyzing the Exif data of your photos can help you plan and improve future photo sessions of the same subject or situation. Studying the data on photos from an annual event will give you insights into what you did well and where you can improve.

The Hmong people in Thailand, Laos, Vietnam and other countries (including the US and France,) hold awesome New Year festivals. The celebrations include various sporting competitions such as kart racing, crossbow shooting and top spinning, which can all be challenging to photograph.

So before I go to the festival each year I look back at photos I’ve made previously. The Exif data from these images reminds me of the settings I’ve used in the past. When I arrive I know which lens will give me the best photos for each competition, and what shutter speed I’ll need to capture sharp action in the kart racing.

Improve Your Photography by Learning How To Use EXIF Data Kart

© Kevin Landwer-Johan

Analyzing data from photos of subjects you don’t photograph can also be helpful. On websites such as Flickr and 500px the Exif data is often displayed alongside the photos, and so you can use it as a reference. When you’re photographing new subjects, especially ones that require special camera settings, look at the Exif data of other people’s photos. It could save you a lot of time and stress.

Conclusion

Making the most of the tools you have will help you become a better photographer. Next time you wonder why a photo worked (or didn’t work) so well, take a look at the Exif data. You may be surprised what you can learn.

Do you use the Exif in other ways? I’d love to hear about it in the comments.

The post Improve Your Photography by Learning How To Use Exif Data appeared first on Digital Photography School. It was authored by Kevin Landwer-Johan.


Digital Photography School

 
Comments Off on Improve Your Photography by Learning How To Use Exif Data

Posted in Photography