RSS
 

Posts Tagged ‘Photography’

10 Rural Landscape Photography Tips (+ Examples)

19 Jul

The post 10 Rural Landscape Photography Tips (+ Examples) appeared first on Digital Photography School. It was authored by Jeremy Flint.

10 rural landscape photography tips

Have you ever wondered how you can capture stunning images of rural landscapes? Whether you live and shoot in rural areas or you’re simply taking a trip to a rural location, this rural landscape photography guide is for you.

Specifically, you’ll discover:

  • The best lighting for rural landscape photos
  • Key tips to take your compositions to the next level
  • Ways to use weather for dramatic results
  • Much more!

Let’s dive right in, starting with…

What is rural landscape photography?

Rural landscape photography refers to “photography in the countryside” and covers the rural environment.

While rural landscapes often contain architecture – much the same as urban landscapes – rural landscape photography is more about capturing the life and elements found in the countryside. This can include humans in the landscape as well as elements of human influence.

Rural landscape photography can also encompass rural scenes including buildings, animals, and stunning countryside scenery.

Now that you understand what rural landscape photography actually is, here are some tips to help you capture your own rural landscapes:

1. Experiment with different rural subjects

rural landscape with water and pastures

Rural landscape photography offers you the chance to capture a whole range of interesting subjects, including:

  • Old barns
  • Towers
  • Churches
  • Machinery
  • Buildings in disrepair

You might also include modern rural elements, such as houses, working farms, and more.

When doing rural photography, don’t confine yourself to a single subject. Instead, experiment with all these different options. If you find an old barn, take the time to photograph it – and if you find a shiny new farmhouse, photograph that, too!

2. Shoot when the light is soft

rocks in the fog

You can photograph rural landscapes at any time of the day…

…but golden hour, blue hour, and nighttime offer some of the best times to get out with your camera. The light tends to be soft and flattering, perfect for rural subjects.

Golden hour provides a magical glow that can elevate your images, while blue hour adds a cool tone that works well with subjects such as old houses and derelict buildings.

If you prefer to photograph at night, you may need to be more creative, as the building lights will likely be switched off. I recommend taking a flashlight and painting light on your subject to make it more visible in the final photo.

3. Think about the sky (and the weather)

Want to capture creative rural landscape photos? Make sure you spend plenty of time thinking about the sky, which has the power to elevate – or ruin – your images.

Ask yourself: What type of atmosphere do I want to capture? For moody photos, you can head out during rain, snow, or fog. And for upbeat, colorful images, shoot in strong sunlight.

By the way, you’ll want to consider whether the sky should be included in your photo. On overcast days (where you don’t have much cloud moodiness, but you also don’t have any nice sky color), you may want to leave out the sky completely. But on stormy days, or during dramatic sunrises and sunsets, the sky will add an extra dimension to your photos.

elevated rural landscape with city in the distance

4. Use architecture to anchor the viewer

I find that architecture makes for a great focal point in rural landscape photography; it often contrasts beautifully with nature.

Traditional structures can work great, especially barns with rugged, weathered facades. They’ll create a rustic look and feel, which can really capture the viewer’s imagination. For instance, take a look at this image of an old barn:

barn with mountains and trees

Other architecture that makes for interesting rural landscape images includes abandoned houses, old farms, and buildings that have been left behind by people moving to cities. You can capture their aging, rundown characteristics within the surrounding countryside.

5. Don’t be afraid to include people

People often make great subjects in the countryside! After all, they are an integral part of the rural landscape.

One great thing about rural settings is that there is always human activity. At farms, people can be seen tending to their land and farm animals. And people may be out riding horses, exercising, or operating machinery, all of which can make for beautiful images.

shepherd with sheep

6. Animals and the rural landscape

When you go out into the countryside, you will always come across animals. These might be wild animals, which are often well hidden and harder to photograph. Or they might be captive animals, such as horses, cows, and sheep.

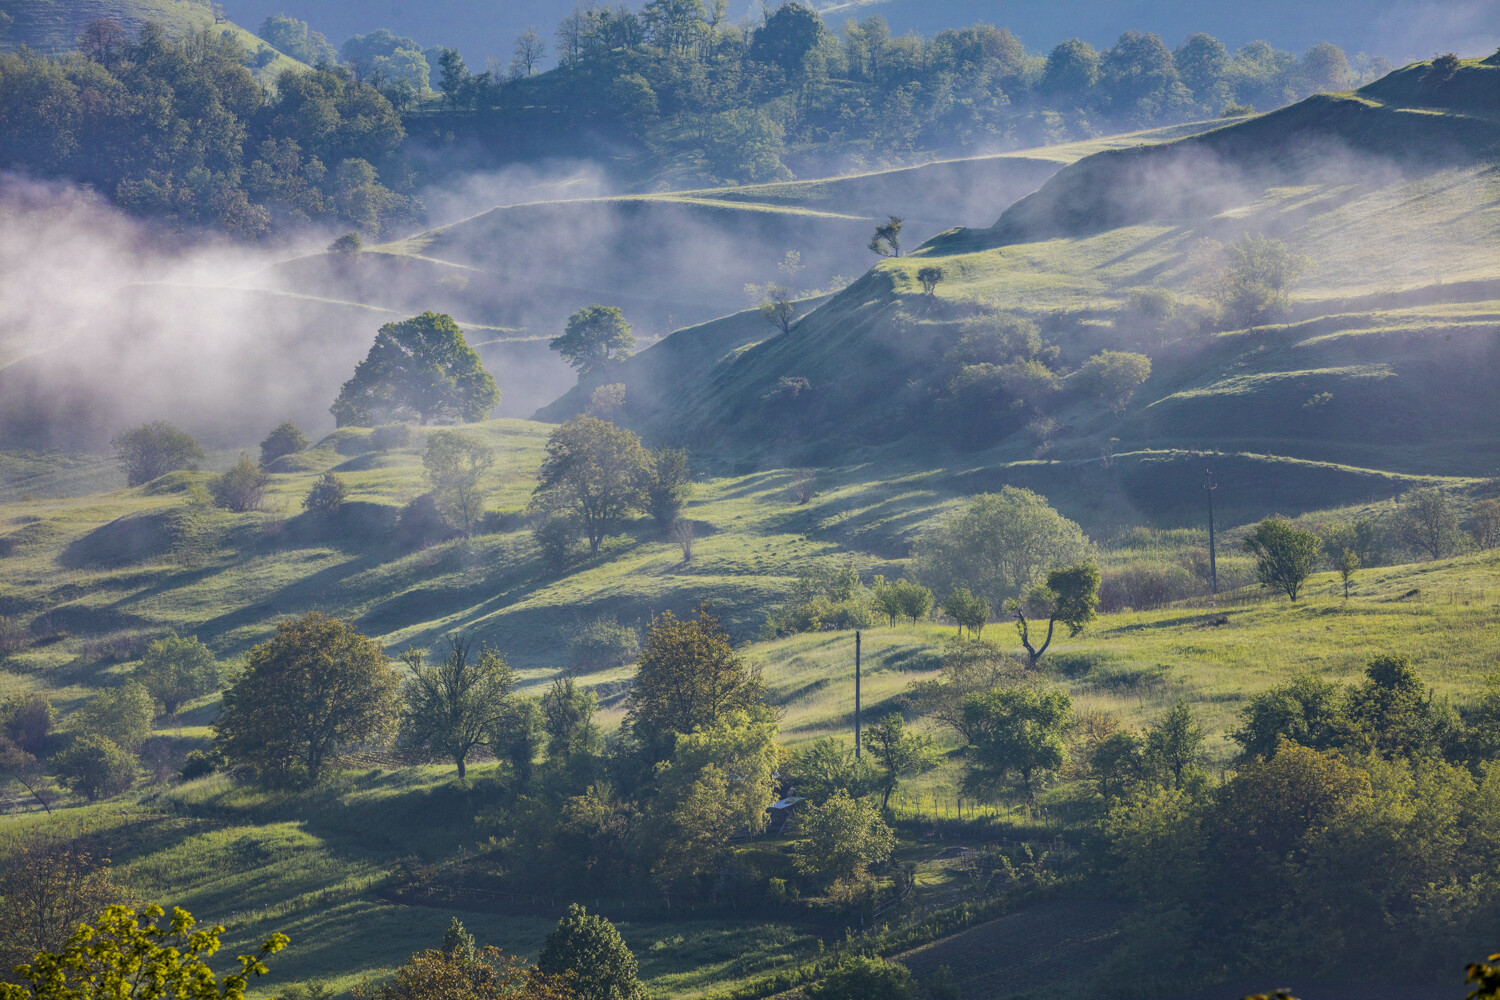
Take advantage of these photo opportunities. Experiment with different forms of lighting to create unique farm-animal images. And don’t be afraid to shoot when the weather gets foggy; it’ll offer plenty of stunning atmosphere to play with:

horses in a misty field

7. Carefully position your subject for better compositions

As with all landscape photography, composition is an essential part of the best rural photos – so it’s important you get it right.

Start by asking yourself: What is my main subject? What is it that interests me most about this scene? Then determine where you want to place that main subject in the frame.

You might put it right in the center of the shot, or you might put it off to one side. It often pays to remember the rule of thirds, which suggests you position your main subject about a third of the way into the frame (either vertically or horizontally).

Also consider whether you want to capture the entire countryside or if only part of it appeals to you. Wide-angle lenses are great for landscape shots, but don’t be afraid to go tight for a more intimate perspective, one that highlights details within the scene.

misty monastery

8. Use the right settings for sharp photos

For rural landscape photography, the best camera settings vary depending on the shots you’re after as well as the weather.

Generally speaking, a mid-range aperture of f/8 will give you an adequate depth of field to keep everything in focus, and this often works well. But if you want to throw parts of the frame out of focus, go with a wider aperture – f/4 is a good starting point, with f/2.8 decreasing the in-focus area even further.

You will want to keep the ISO fairly low, so go for an ISO of anything between 100 and 400. Any higher, and you’ll be risking unwanted noise – but if you’re shooting in low light, an ISO of 800 and beyond may still be necessary.

As for shutter speeds: If your scene includes moving subjects (such as a swaying horse), you’ll need at least 1/100s and probably more. For scenes without significant movement, I’d still recommend keeping your shutter speed above 1/60s or so (though you also have the option of using a tripod).

Of course, shutter speed often does involve experimentation. So don’t be afraid to test out different speeds and see what works best.

9. Head out when the weather is bad

misty rolling hills and trees

It’s true:

Bright, sunny days – especially around sunrise or sunset – offer great conditions for rural landscape photos.

But shooting in bad weather can bring another level of drama to the scene. For instance, fog can add tons of atmosphere, rain can look gloriously dreary, and snow can take your photos to new heights.

So don’t confine yourself to good weather. Instead, be prepared to shoot whenever the rural landscape looks dramatic (which is often on the most unpleasant days!).

10. Take a walk in the landscape

Here’s your final rural landscape photography tip:

Take a walk. Head out with your camera. Have fun.

After all, the countryside is a beautiful place, and you never know what you may find. You might come across wildlife, blooming flowers, hay bales, and more – all great subjects for photography!

bluebells in a forest

Rural landscape photography tips: conclusion

I hope you found these tips on rural landscape photography helpful. The countryside truly is a wonderful place to explore!

Now over to you:

Do you have any favorite rural landscape subjects? Do you have any tips for composition, lighting, or subject choice that we missed? Share your thoughts (and images!) in the comments below.

The post 10 Rural Landscape Photography Tips (+ Examples) appeared first on Digital Photography School. It was authored by Jeremy Flint.


Digital Photography School

 
Comments Off on 10 Rural Landscape Photography Tips (+ Examples)

Posted in Photography


The Weekly Photography Challenge – Patterns

18 Jul

The post The Weekly Photography Challenge – Patterns appeared first on Digital Photography School. It was authored by Sime.

We see patterns in many places, repetition in shapes and objects, buildings, fences, patterns are everywhere! This week we want you to find and photograph a pattern a pattern a pattern a pattern! (sorry, dadjoke)

You must take a new photograph for this weekly challenge, how else are you going to sharpen your skills! Make sure you post it on social media and share it with the tag #dPSPatterns or share it in the comments below this blog post.

Make sure you revisit any weekly challenges that you haven’t been able to complete, you can see them all over here

The Weekly Photography Challenge – Patterns
Photo by Victor Garcia on Unsplash

Patterns come in many shapes and sizes, above on a building, in architecture you’ll generally find patterns, and below, in the sand at the beach… Where will you go to find your pattern for this week’s challenge?

The Weekly Photography Challenge – Patterns
Photo by Maria Afanasyeva on Unsplash

Or this epic pile of tyres! Some great photos by the myriad of creators on Unsplash, I’ve had to resort to that website this week as none of mine were any good! I pledge to find and photograph a ‘pattern’ this week! — Simon

The Weekly Photography Challenge – Patterns
Photo by Imthaz Ahamed on Unsplash

As ever, some help with sharing your photo in the comments below (don’t click on this photo to upload your photo, scroll down to the Disqus section, log in, THEN click on the little camera icon in the comments)

Simply upload your shot into the comments field (look for the little camera icon in the Disqus comments section) and they’ll get embedded for us all to see. Or, if you’d prefer, upload them to your favorite photo-sharing site and leave the link to them.

Weekly Photography Challenge – Looking Up

Thanks for joining in! We can’t wait to see your photos!

–Simon

The post The Weekly Photography Challenge – Patterns appeared first on Digital Photography School. It was authored by Sime.


Digital Photography School

 
Comments Off on The Weekly Photography Challenge – Patterns

Posted in Photography


A Beginner’s Guide to Long Exposure Street Photography

15 Jul

The post A Beginner’s Guide to Long Exposure Street Photography appeared first on Digital Photography School. It was authored by Rick Ohnsman.

a guide to long exposure street photos

You may have done some long exposure photos and perhaps a bit of street photography. But have you combined these two genres for long exposure street photography?

Consider this: Photographs are frozen slices of time, and your camera is a time machine capable of freezing or stretching a moment. A short shutter speed can freeze things that happen far too fast to see. With a long shutter duration, motion is blurred, stretching time. When photographing in busy urban environments where people, vehicles, and other things are on the move, long exposures can create a sense of motion in a static photograph.

man walking near street long exposure
Late in the day when the light was fading, by dropping the ISO to 50 and stopping down to f/22, I was able to get a 1.3-second shutter speed, enough to blur this subject walking past the camera. Note the degree to which he is blurred compared to other people farther away in the shot.

I’d never before considered this quote from the movie Ferris Bueller’s Day Off to have photography implications, but considering what we’ll explore here, I like what it says:

“Life moves pretty fast. If you don’t stop and look around once in a while, you could miss it.”

Ferris Bueller

Taking photos is one way we “stop and look around.” It’s also a way we share what we see with others. But a limitation of still photographs is they are a 2D, static representation of a 3D, moving world. So how can we better communicate motion in a still photo? A long exposure that leaves the shutter open for an extended period will cause moving images to be rendered as blurs. That look communicates motion to the viewer.

So let’s talk about the mechanics of how to do long exposure street photography.

people walking along outdoor seating
Midday and in full sun; even at the minimal ISO of 50 and an aperture of f/22, I had to use a variable ND filter to cut the light for a 1-second shutter speed. Note the difference in blur between the moving subjects and those seated.

Where to go for the best long exposure street photography

If you’re going to depict motion, you want to go somewhere where things are moving. Busy locations where people, vehicles, and other things are on the move will work well. A busy city street or intersection might be a perfect spot. You could also try a sporting event where the participants are in motion.

For long exposure night photography (which we’ll discuss in greater depth), locations with moving lights and illuminated vehicles work well. Also, consider the interesting looks that can be created when your photograph combines static and dynamic elements. One person standing still in a crowd of moving people can make for an impactful image using the long exposure technique.

group of people walking by long exposure
When people walk, their feet are temporarily still – just for a moment – with each step. Even with a 2-second shutter speed, as in the photo above, while the bodies blur, the steps are visible. Low evening light, a low ISO, and a small aperture allowed for the 2-second shutter (no ND filter was needed).

A still camera in a moving world

You likely want the motion in your photos to be created by the movement of your subjects, not by the movement of your camera. Handholding your camera and keeping it still during a multi-second exposure will be very difficult, so a tripod is a good idea.

(Though consider if you will be able to use a tripod on a busy city sidewalk or other crowded environments. Creating a hazard where someone could trip over a tripod leg is not something you want to do.)

There is also the “attraction of attention factor.” I will confess: I have not done a lot of street photography because of my personal trepidation about having to engage with strangers who want to know why I’m taking their photo on a street corner. Should I decide street photography is something I want to pursue further, that’s something I’ll need to get past.

long exposure at the beach
A high vantage point off a pier assured no one was paying much attention to me as the photographer. A 6-stop ND filter, a low ISO of 50, and a small aperture of f/18 were all needed to deal with the bright sun and get this 8-second exposure.

That said, I guarantee that you will attract even more attention and possible questions if you set up a tripod and a professional-looking camera on a busy street corner and start taking photos of passersby. Perhaps you could find other ways to brace your camera aside from a tripod. Maybe even figure out how to do long exposures with your cell phone to reduce the attention factor.

(If this isn’t a concern for you, more power to you; you’ve already dealt with a major barrier to being a great street photographer.)

What is a long exposure?

Your objective here is to make “long exposures” so that your subjects move during the shot. So how do we define long exposure photography?

An object will render as blurred in a photograph if it changes position from the time the shutter opens until the time it closes. Two factors will determine the amount of blur:

  • The speed of the moving object relative to the duration the shutter is open
  • The relative distance the subject moves during the exposure.

Let’s use a moving car as an example. Say you have a shutter speed of 1/30s. You are taking a photo of a car moving at 40 mph. If the car is relatively close to the camera, it could move completely across the frame and thus be rendered as a complete blur. But if the same car, still traveling at 40 mph, was in the distance and relatively small in the frame, it would only move a relatively short distance across the frame in that same 1/30s – and thus wouldn’t show as much blur.

long exposure with blurry car and person
The car in this shot was moving quite slowly, so I needed to drop the shutter speed to 0.6 seconds for some noticeable blur.
long exposure of people waiting and dog
This car moved perpendicular to the camera, stayed fairly close, and moved completely across the frame during my 1-second exposure, thus rendering as nothing but a blur.

So to simplify, the distance an object moves across the frame during the exposure is what will determine its blurriness. Even relatively slow-moving objects can be blurred if the exposure time is long enough. Take a close-up of a snail with a 5-minute exposure, and you could quite possibly have it appear motion blurred, too!

It’s that exposure triangle thing again

I hope you know what I mean when I speak of the “exposure triangle” – the relationship between ISO, shutter speed, and aperture when making a properly exposed photograph. If you’re not completely familiar, I’d recommend you stop what you’re doing and read all about it here.

Now, if you’re going to make long exposures that are well exposed, you’ll need full control over your shutter speed. There are two basic modes you can use to achieve this: Shutter Priority mode (Tv on Canon cameras, S on Nikons and some other cameras), or full Manual (M) mode.

In either case, you will be able to pick a shutter speed and lock it in. (We’ll talk about choosing a shutter speed in a minute.)

police officer riding a motorbike
1/60s isn’t what we’d normally consider a “long exposure,” but panning the camera with a fast-moving subject blurs the background while keeping the subject sharp.

Let’s assume you decide to make a 2-second exposure. Let’s also assume you are in Shutter Priority mode.

When you meter the scene, your shutter speed will be 2 seconds. Your aperture and ISO (if you are using Auto ISO), will “float,” automatically switching to a setting for a proper exposure. Depending on the ambient light, you might get something like 2 seconds at f/11 and ISO 1000. Locking the shutter speed and letting the camera determine aperture and ISO will allow you to get a proper exposure at the shutter duration you choose.

Using Manual mode can give you even greater creative control. Say you set your shutter speed for the same 2 seconds but stop down to f/16 for some additional depth of field. Your ISO can be adjusted to maintain the right exposure, and you’ll get the same 2-second exposure but at f/16 and ISO 2000.

If you are in Manual mode, you get to do all the adjustments yourself. Assuming you want the same 2-second shutter speed, you dial that in. Then you can adjust either the aperture, ISO, or both to center the exposure bar indicator and get a proper exposure. Should you decide to capture multiple shots from the same spot and the light remains constant, you shouldn’t need to make any additional adjustments.

Two important factors

How you choose your long exposure street photography settings will depend on two important factors:

  1. Your desired shutter speed
  2. Ambient light in your scene

So ask yourself:

  • What shutter speed do I want? Like so much of photography, the answer here is probably “it depends.” How much are the subjects in your shot moving? How fast? How close are they to the camera? What is your desired look? On a crowded street with lots of pedestrians scurrying about, you might be able to make everyone completely disappear in your photo if you use a several-minute exposure. Is that the look you want? Experimentation is the best way to learn the perfect shutter speed for this kind of photography. Try different things, “chimp” your shots, adjust and try again. You will get a feel for what you like and what works best in different situations.
  • What are the ambient light conditions? You might decide you’d like a 30-second exposure but are out shooting in the middle of the day in bright sunshine. Even stopping down to f/22 and ISO 50, a 30-second exposure might not be possible without drastically overexposing the image. Long exposure night images, taken when you don’t have much ambient light to deal with, are much easier. At night, instead of lowering the ISO, you might need to raise it. The same 30-second night image might be something like 30 seconds at f/4 and ISO 1600.

The amount of light you have to work with will impact what you can do. Long exposures in low light are usually easier, as you can always open up your aperture to its widest setting and crank up the ISO (noise is still a consideration but less so thanks to improved sensor technology). But how do you make a long exposure when there’s too much light and the smallest aperture and lowest ISO won’t get you the shutter speed you want?

kids playing soccer with panning technique
A cloudy day, an ISO of 50, and an aperture of f/32 coupled with panning the camera along with the action enabled me to get this impressionistic image of kids playing soccer.

Reach for the “sunglasses”

On a bright, sunny day when the light becomes too intense for our eyes, we’ll often reach for a pair of sunglasses to reduce the brightness. We can do the same for our cameras with neutral density filters (ND filters), which offer different levels of darkness. We can use ND filters to reduce the light hitting the camera sensor, and thus get long shutter durations even in bright conditions.

Here’s an example: You meter the scene, and at your smallest aperture of f/22 and an ISO of 50, the slowest shutter speed you could use and still get a proper exposure is 0.8 seconds. So grab your 6-stop ND filter, add it to the front of your lens, and you’ll be able to use an 8-second exposure. (A 10-stop ND filter could take you all the way to a 2-minute exposure!)

long exposure street photo taken with an ND filter
Even with a minimal ISO of 50 and an f/10 aperture, a variable ND was needed to reduce the midday sun and get a 1/8s shutter speed, not a particularly “long” exposure.

Using ND filters and calculating exposures takes a little study and practice, but the advantage is being able to take long exposures in bright conditions where it would otherwise not be possible. (A nice app to have on your cellphone is an ND filter exposure calculator like this one from Lee, a filter manufacturer: for Android/for iOS).

Lights at night

We’re very accustomed to seeing nighttime long exposures, and light trails caused by moving vehicles are quite easy to photograph, so long as you have a tripod or way to stabilize your camera.

Decide how long you want your exposure to last. Then in Shutter Priority mode, pick an aperture. If you’re set to use Auto ISO, the camera should pick the ISO setting for you. Of course, if you’re in Manual mode, you get to pick all three settings.

Again, determine your desired shutter speed, pick an aperture, and then adjust the ISO to a setting where you get a proper exposure. It could take some trial and error, but once you get everything dialed in, you will be able to make repeated shots without too much need for further adjustment.

Boise at night with light trails
I made a lot of shots to get the look I was after with this image of rush-hour traffic in Boise, Idaho. During the “blue hour” with limited light, I was able to keep the ISO at 100, the aperture at f/13, and a 15-second shutter speed. Nighttime long exposure is often easier than daylight long exposure (as you now know, too much light requires the use of neutral density filters).
experimental long exposure in the back of a car
A different way to create some motion: Put the camera on a tripod in the back seat of your vehicle. Strap it down (or bring an assistant). ISO 100 helps keep down the noise and f/7.1 is a good sharp spot, at least for my Tamron lens. Take a downtown drive and trigger the camera with a 6-second exposure. Try different shutter speeds and take lots of shots. You might get one you like!
long exposure of freeway traffic
Freeway traffic with a 2.5-second shutter speed…
long exposure light trails
I then stopped down to f/22 and tried a 15-second shutter speed. You will find it beneficial when doing long exposure images to experiment with different shutter durations. You will get different looks depending on the speed of your subject, proximity to the camera, and various other factors.
Idaho state capitol building with long exposure light trails
A passing car adds some additional interest to this 10-second exposure of the Idaho Capitol building in Boise.

Beyond the mechanics

Working out the camera mechanics when making long exposures is a matter of determining how to get a long exposure in any given lighting conditions. The rest of making an interesting image is no different than with other kinds of photography. Determine if there’s a “story” you want to tell. Decide how to compose your shot. Use compositional guidelines, vary your perspective, and try different shutter speeds to create different looks.

For street photos of people, it can be interesting to go out with a model, someone who will work with you and pose as needed. Put them in a busy location, but instruct them to stay still while you make your shot. They will remain sharp in the shot while the moving passersby will blur. The contrast of static and dynamic between your frozen model and the people moving and blurring can create some dramatic looks.

people crossing the road
The woman on the corner was not my model, but this illustrates the concept. She remained relatively still during the 0.6 second exposure, while the other people walked across the crosswalk. It’s a good example of the static/dynamic image you can make, particularly if you take a model with you.

Add a flash

Here’s something else you can try:

Put a speedlight on your camera and set it up for second-curtain sync. (If you’re unfamiliar with the technique, make sure to read up on it!)

What you’re after is a long exposure that will motion-blur moving people or objects – but then, just before the shutter closes, the flash will fire. Moving elements will have a blur of motion behind them but be frozen by the burst of flash, like this:

second-curtain sync blurry bikers
Here, 1/8s was long enough to blur the action. A pop of flash using second-curtain sync was enough to freeze a part of the image. The final result is both dynamic and static at the same time.

Just be aware that, if you thought shooting with a tripod on a busy city street might attract attention, firing a flash will make it clear you’re taking photos. What’s nice about having a model with you is that people will assume you’re making photos of the model and not be as concerned about you making photos of them. You’ll even get lots of apologies from people who say, “Sorry, I got in your shot,” not knowing that was your intent all along.

people walking down a narrow road
In early evening without much light, I reduced the ISO to 50 and stopped down to f/16. With a 1.6-second shutter speed, you might get a look like this. The camera was mounted on a tripod, and I tripped the shutter nonchalantly as these people walked by.

Go hit the streets

Learning the mechanics of long exposure street photography is the easy part. Getting out on the streets and making photos, particularly with people in them, is the bigger challenge, especially if you haven’t done much street photography before.

If you pride yourself on being a people person, that will come in handy in this genre of photography. The rest, as they say, is practice. Best wishes!

Now over to you:

Do you have any favorite tips or techniques for long exposure street photography? And do you have any long exposure images you’re proud of? Share them in the comments below!

The post A Beginner’s Guide to Long Exposure Street Photography appeared first on Digital Photography School. It was authored by Rick Ohnsman.


Digital Photography School

 
Comments Off on A Beginner’s Guide to Long Exposure Street Photography

Posted in Photography


10 Summer Landscape Photography Tips (+ Examples)

11 Jul

The post 10 Summer Landscape Photography Tips (+ Examples) appeared first on Digital Photography School. It was authored by Jeremy Flint.

10 summer landscape photography tips

Summer is a welcome period for landscape photography, as it offers fully-leafed vegetation, the prospect of warm, sunny days, fields carpeted with flowers, and the opportunity to capture dramatic images of our natural environment.

But how can you create beautiful summer landscape photos? That’s what this article is all about; in it, you’ll find plenty of tips, tricks, and secrets for amazing results.

So whether you’re new to landscape photography and are looking to do some fun summer shooting, or you’re an enthusiast aiming to improve your images, here are some tips and ideas to help you on your way!

1. Start with an idea or a theme

field of poppies in the summer

To capture successful images of summer, start by thinking about the types of themes and subjects you want to photograph. Ask yourself: What subjects interest me most?

Of course, what you shoot largely depends on what is around you; for example, in the UK, summer is a brilliant time to see wildflowers in bloom. There is always an explosion of reds and pinks, as fields are often carpeted in poppies. There are also bursts of purple as lavender fields flourish, and this can also make great subjects for summer landscape photography.

Summer also provides a great opportunity to capture fully leafed vegetation such as trees and hedgerows, as well as gorgeous sunrises and sunsets, plenty of joy, and beautifully dramatic weather.

2. Think both wide and abstract

Water – such as lakes, rivers, and streams – as well as dramatic weather, make great subjects for wide-angle summer landscape photography.

But in addition to capturing the sweeping vistas of gorgeous landscape scenes, don’t forget to look for the finer details. You may find stunning gems, such as insects or animals hidden in the landscape, or intimate aspects of wider scene, such as individual flowers emerging from the soil.

beautiful reflection of mountains and trees

3. Don’t forget to location scout, if possible

A great way to identify good places to shoot? Do some location scouting!

Of course, you may already know places in your local area that are great for photography, but make sure to look at them with a photographer’s eye; consider where the sun will be at different times of the day, how the location will be affected by the weather, etc.

In addition to relying on locations you already know, do some research. You can simply walk around and explore – you never know when you’ll stumble across a great scene! – or you can do a bit of Googling. Look for places other photographers have shot, recommendations from locals, and lists of the best landscape photography spots near you.

Then, the next time you’re ready to head out with you’re camera, you know exactly where to go.

field of poppies with mountains in the background

4. Check the weather (in advance)

When undertaking summer landscape photography, be sure to always check the weather conditions before heading out. Although the weather can be more stable in summer, there are often periods of heavy rain and dramatic conditions that can severely impact the outcome of your images.

Aim to shoot on the days when the weather suits what you would like to achieve. For example, if bright landscapes are your preferred shooting subject, go out on sunny days. Alternatively, if dark, brooding skies or rain is your thing, then look for overcast, gloomy, stormy days to capture the shots you’re after.

stormy mountain landscape in summer

5. Consider the time of day

Days are longest and nights are shortest during the summer, with the day length decreasing after the summer solstice. There is therefore a longer period between first and last light compared with the spring or autumn.

Consequently, the sun will stay higher for longer during the summer, which means you will have more daylight time to do summer landscape photography. On the other hand, it makes night photography difficult, plus it pushes the golden hours (see the next tip!) into the early morning and late evening.

So make sure you always think about the changing light before heading out, and always check a sunrise and sunset calendar; that way, you can maximize your shooting time and get the type of shots you’re after.

6. Shoot when the light is best

Consider the light you like best for summer landscape photography. Do you prefer harsh light? Soft light? Dramatic light? Make sure you get out to shoot when the light fits your interests.

Generally speaking, the best light is at the start and end of the day – because as the sun rises and sets, the light offers golden hues and magical contrast. The vibrant colors at this time are amazing for summer landscape photography, so aim to set your alarm early and stay out late to maximize the best of the summer light.

seaside cliffs and rocks in summer landscape photography

In contrast, the light at midday is usually a lot harsher, especially when you have direct sunlight. So make sure to take this into consideration when photographing the landscape.

If you are out doing summer landscape photography in the middle of the day, be aware that the midday heat brings haze, which can make images look flat. This isn’t necessarily a bad thing, but it’s important to be aware of the effect so you can use it – or avoid it – in your photos.

7. Make the most out of the conditions

Often, you have limited time at your chosen location to do summer landscape photography, so make sure you get the most out of the conditions you are presented with. Whether you’re dealing with rain or bright sunlight, you’ll have ample opportunities to capture the landscape at its best.

For instance, you can use overcast skies and rain to your advantage. There are still subjects that you can photograph; woodlands are great areas to shoot under cloudy skies, as are waterfalls. The rain can increase waterfall fullness, and both waterfalls and woodlands tend to look more photogenic in overcast light.

waterfall with green moss and foliage

8. Use leading lines

One thing you can utilize in your landscape images during summer is leading lines. It’s a pretty popular technique because they’re a great way to lead the viewer’s eye into the frame.

In summer, there are specific things you can find in the landscape that you can use to lead the eye, such as roads, walkways, hedgerows, lines of flowers and vegetation, coastal paths, and trees.

leading lines headed toward tree

9. Keep your gear protected

If you like to capture dramatic weather, make sure you keep your camera protected at all times. Always bring a rain cover and look to capture your summer landscape images in the period just after a storm has passed. You may even get lucky and see a rainbow.

trees and rainbow

10. Select your settings carefully

I am often asked about the best camera settings for summer landscape photography, but in truth, it really depends on what you are trying to achieve and what you want to emphasize in your scene.

As a general rule, an aperture of around f/8 to f/16 will help create more depth in an image and keep your entire scene sharp. If you want to keep parts of the frame out of focus, an aperture of, say, f/4-f/5.6 is the way to go. And a low ISO will give a sharper image (such as ISO 100-400).

As for the shutter speed: If you’re shooting handheld, stick to 1/50s or above. Of course, a sturdy tripod will let you go much lower, and you can create all sorts of interesting artistic effects, such as motion blur in waterfalls.

vibrant green trees and hills summer landscape photography

Summer landscape photography tips: final words

Although the high sun can be harsh during the summer, wildflowers such as poppies and lavender can bring color and freshness, plus you have other subjects such as hedges, trees, lakes, rivers, waterfalls, and woodlands to add interest to your scenes.

It’s important to remember that landscape shooting should be enjoyed, so have fun with your summer landscape photography and appreciate being out in nature.

With these tips in mind, go and explore the landscape near you. See what you can capture!

Now over to you:

Do you have any tips for beautiful summer landscape photos? Do you have any summer images you’re proud of? Share your thoughts and photos in the comments below!

The post 10 Summer Landscape Photography Tips (+ Examples) appeared first on Digital Photography School. It was authored by Jeremy Flint.


Digital Photography School

 
Comments Off on 10 Summer Landscape Photography Tips (+ Examples)

Posted in Photography


College Photography Instructor Bans Kit Lenses, Cites “Subpar” Quality

10 Jul

The post College Photography Instructor Bans Kit Lenses, Cites “Subpar” Quality appeared first on Digital Photography School. It was authored by Jaymes Dempsey.

photo instructor bans kit lenses

How do you feel about kit lenses? Are they capable of good photos? Or are they an utter waste of time, the type of lens that should be discarded at the earliest opportunity?

According to one college photography instructor, who banned the use of kit lenses in her editorial photography course, kit lenses aren’t just poor quality; they simply shouldn’t be used – at least not by photography students. As the instructor explains in her syllabus, “You are talented enough by this point to not compromise your image quality by using these subpar lenses…You should do everything within your power to never use these lenses again.”

Here’s the full quote, as posted to Reddit by a frustrated student:

The 18-55mm kit lenses that come with entry-level, crop-sensor DSLRs are NOT good quality. You are required to have the insurance for this class, and since most assignments require a trip to the cage for lighting gear, I am also blocking the use of these lenses. You are talented enough by this point to not compromise your image quality by using these subpar lenses. Student work from this class has been licensed commercially as stock photography, but if you shoot with an 18-55mm lens, you are putting your work at a serious disadvantage, quality-wise. You are not required to BUY a different lens, but you are required to use something other than this lens. You should do everything within your power to never use these lenses again.

The student went on to explain that the class is designed for second-year photography undergraduates, and that the “cage” – where students can borrow lenses to complete assignments – “is only accessible two hours a day, two days a week.”

In other words, while students who don’t own acceptable equipment (i.e., non-kit lenses) can technically continue the course without purchasing additional lenses, they’ll need to show greater dedication than their peers, put in extra hours on campus, and compete with other students for access to school-owned equipment.

While this lack of course accessibility is bound to frustrate plenty of current and would-be students, it’s the instructor’s sweeping criticism of kit lenses that has photographers up in arms.

As the Reddit community was quick to point out, plenty of beautiful photos, including work published in top-notch newspapers and magazines, have been taken with kit lenses or similar. And furthermore, there are high-quality kit lenses available, many of which are perfectly adequate for pro-level photos. Sure, some kit lenses do offer soft image quality, but you can often correct the problem by stopping down to f/8 or so.

And as the original poster explained, even “older full-frame kit lenses are more than adequate for all but the most demanding of applications,” and the class assignments involve “shooting with big strobes – mostly [at] f/8+ and ISO 100.”

For me, kit lenses are one-hundred percent adequate for a whole host of situations. Their image quality is often decent, and with the right technique, you can come away with some very nice results. Plus, kit lens focal lengths tend to be very useful. At 18mm, you can capture scene-setting wide-angle images; at 25-35mm, you can do some impactful street and photojournalistic photography; and at 45-55mm, you can do intimate portraits, headshots, and more.

That’s not to say that kit lenses are superior to their much more expensive prime counterparts. Kit lenses aren’t as sharp, as fast focusing, or as effective in low light as, say, a high-quality 50mm f/1.4 lens. But the point isn’t that kit lenses are the best, it’s that they’re good enough – and that both students and professionals can use kit lenses to great effect.

Now over to you:

What do you think about kit lenses in photography? Do you like them? Dislike them? Do you think they should be banned from photography classes? Share your thoughts in the comments below!

(Via PetaPixel)

The post College Photography Instructor Bans Kit Lenses, Cites “Subpar” Quality appeared first on Digital Photography School. It was authored by Jaymes Dempsey.


Digital Photography School

 
Comments Off on College Photography Instructor Bans Kit Lenses, Cites “Subpar” Quality

Posted in Photography


The Weekly Photography Challenge – 2021 So Far

10 Jul

The post The Weekly Photography Challenge – 2021 So Far appeared first on Digital Photography School. It was authored by Sime.

We’ve passed the half-way mark for 2021 already, almost hard to believe really… This week your photo challenge is super easy – Share your favourite photograph (that you’ve taken) from the first half of 2021.

  1. Must be your own photograph. (Do I need to say this?!)
  2. Must tag your photo #dPS2021SoFar
  3. Has to be from this year. (Obviously haha)
  4. Share a note about why it’s your favourite.

Your photo can be amazing from a photographic perspective or a special moment for you personally. Mine, below, was a moment that the sun almost poked through when we went for a trip down to the 12 Apostles, what was supposed to be a quick, hand-held family memory turned into a capture of the (on that trip) seldom seen light on the stunning Apostles. The trip was a good one amidst lockdowns, so t’was a special moment.

The Weekly Photography Challenge – 2021 So Far

Upload your photograph into our comments field under this post (you’ll see the little camera icon in the Disqus comments area) and they’ll get embedded for us all to see. Or, if you’d prefer, upload them to your favourite photo-sharing site and leave the link to them.

dpS How To Add disqus photo

If you do get stuck, you can contact our friendly (mostly!… ok, well.. after coffee he’s ok!) support guy. He’s on the email support@digital-photography-school.com and he likes talking about himself in the third person…

The post The Weekly Photography Challenge – 2021 So Far appeared first on Digital Photography School. It was authored by Sime.


Digital Photography School

 
Comments Off on The Weekly Photography Challenge – 2021 So Far

Posted in Photography


Aperture in Photography: A Beginner’s Guide (+ Examples)

06 Jul

The post Aperture in Photography: A Beginner’s Guide (+ Examples) appeared first on Digital Photography School. It was authored by Darren Rowse.

aperture in photography: a beginner's guide

What is aperture in photography? How does it work? And how can you use it to capture photos like the pros?

Aperture is an essential camera setting; in my opinion, it’s where the magic happens in photography. So in this article, I’m going to take you through all the ins and outs of aperture, including:

  • What aperture actually is (in simple, easy-to-understand terms)
  • How you can use aperture to capture artistic images
  • How to choose the perfect aperture for landscape photography, portrait photography, and more
  • Plenty of other tips and tricks!

If you can master aperture, then you’ll gain a huge amount of creative control over your photography.

Ready to take your photos to the next level?

Let’s dive right in, starting with the most important question of all:

What is aperture?

Aperture is the opening in the camera lens. A larger hole allows more light to hit the sensor, lightening your photos. A smaller hole allows less light to hit the sensor, darkening your photos.

And by adjusting the aperture setting on your camera, you can adjust the size of the aperture (and, in turn, affect a photo’s brightness).

the lens aperture
The aperture is that (bladed) hole inside your lens!

Aperture and f-stops

Aperture is measured in terms of f-stops, also known as f-numbers. Like this: f/2.8, f/4, f/5.6, f/8, f/22, etc.

As shown in the diagram below, the smaller the f-number, the larger the aperture hole:

Aperture Diagram - f-stops
As the f-number increases, the aperture size decreases.

Now, each full stop corresponds to a halving of aperture size. So when you go from f/2.8 to f/4, you cut the aperture in half. And when you go from f/4 to f/5.6, you cut the aperture in half again.

(Of course, to double the aperture size, you just go in the reverse direction: from f/5.6 to f/4, and from f/4 to f/2.8.)

So f/2.8 is a much larger aperture than f/22. And f/11 is a much smaller aperture than f/4.

Does that make sense? It can be confusing at first, especially because large aperture sizes correspond to smaller f-stop numbers and vice versa. But stick with it, and it’ll become second nature.

How does aperture affect your photos?

At this point in the article, you should know what aperture is: a hole in the lens that increases and decreases depending on your camera settings (i.e., your f-stop value).

But what does aperture actually do? How does it affect your photos?

In the next two sections, I’ll discuss the primary effects of aperture:

  1. Exposure
  2. Depth of field

Aperture and exposure

As you may already know, exposure refers to the brightness of a photo.

In general, the goal is to end up with a photo that’s not too dark and not too bright; instead, you want a shot that’s just right, one with lots of detail.

So where does aperture come into play?

Aperture is one of the three key variables that affect your exposure. (The other two variables are shutter speed and ISO.)

Remember what I said above? By widening the aperture, you let in more light, which brightens your image. And by narrowing the aperture, you let in less light, which darkens your image.

So if you’re photographing a beautiful sunset and your photos keep turning out too bright, you can always narrow the aperture to darken down the image. (In fact, using a narrow aperture is often a good idea when shooting sunsets!)

sunset with narrow aperture
A sunset scene like this will often benefit from a narrow aperture.

And if you’re photographing a forest and your photos keep turning out dark and shadowy, you can always widen the aperture to brighten up the image. (As you might expect, this is a standard low-light photography practice.)

forest scene
If you’re photographing a subject in the shade, a wider aperture will brighten things up.

Of course, aperture isn’t the only variable that affects exposure. If you want to brighten a photo, you can also lower the shutter speed or boost the ISO. And if you want to darken a photo, you can raise the shutter speed or drop the ISO.

In terms of exposure, widening your aperture by a full stop has the exact same effect as lowering your shutter speed by a full stop or boosting your ISO by a full stop. A key consequence of this: different exposure variables can cancel each other out. Increase your ISO by a stop while decreasing your aperture by a stop, and you’ll end up with an identical exposure.

The point here is that, while aperture does determine exposure, you can’t think about it in isolation. Aperture, shutter speed, and ISO work together to give you a well-exposed (or poorly exposed) image.

Aperture and depth of field

Aperture also affects the depth of field in your photos.

What exactly does that mean? Well, depth of field (DOF) is the amount of your shot that is in focus. So a photo with a large depth of field will have most of the image in focus, like this:

deep depth of field sand dunes

Do you see how sharpness stretches from the foreground to the background? That’s thanks to the large depth of field.

A photo with a small depth of field, on the other hand, will have only a sliver in focus, like this:

shallow depth of field dahlia

As you can see, the effect is pretty artistic; you get a sharp subject but a blurry background. Neat, right? Because a blurry background helps the subject to stand out, this is an effect you’ll often see in portrait photography.

As for aperture, the wider the aperture (and the smaller the f-number!), the shallower the depth of field.

So an image with an f/2.8 aperture will have very little in focus:

wide aperture portrait

And an image with an f/16 aperture will have all of the scene in focus:

narrow aperture grand canyon

Got it? If you’re still struggling to understand – and if you are, don’t be embarrassed! – let me illustrate using two pictures I took in my garden:

Side by side aperture depth of field example

The first picture was taken with an aperture of f/22, while the second picture was shot at f/2.8. The difference is obvious, right? The f/22 picture has both the flower and the bud in focus and you’re able to make out the fence and leaves in the background. Whereas the f/2.8 shot has the left flower in focus, but the right flower is less in focus and the background is completely blurry.

That’s all thanks to aperture, which controls the depth of field.

4 simple aperture examples

Here are a handful of additional aperture examples to help you wrap your head around its effects – in particular, how aperture affects the depth of field.

First, take a look at this landscape shot. It was captured with a narrow aperture, which resulted in a deep depth of field and sharpness throughout:

arches national park deep depth of field

Now take a look at this street photo, which was taken with a wide aperture; it has a shallow depth of field:

shallow depth of field (wide aperture) street photo

And here’s a third example, which has a midrange depth of field. The entire photo isn’t sharp, but the main subject plus some of the surrounding area look crisp:

midrange depth of field person walking down the street

Finally, here’s one more example with an ultra-wide aperture for an ultra-shallow depth of field:

wide aperture close-up flower

What’s important to know is that the aperture offers you creative control as a photographer. Want to create a blurry background? Pick a wide aperture. Want to keep your shot sharp throughout? Pick a narrow aperture.

Of course, you also have to remember the effect of aperture on exposure, which is what makes things a bit more complex (but a lot more fun!).

Adjusting the aperture on your camera

Now that you’ve made it this far, you might be wondering:

How can you actually change the aperture on your camera? What do you have to do?

Fortunately, adjusting the aperture is easy. You just set your camera’s shooting mode to Manual or Aperture Priority. Then rotate the relevant camera dial to change the f-number. (The specific dial will depend on your camera model; if you’re struggling, consult your manual.)

Which aperture is best?

When photographers first learn about aperture, this is a question that crops up constantly.

But as you’ve hopefully gleaned from the sections above, there is no single best aperture that you can use all the time. Sometimes you’ll want a deep depth of field or you’ll want to darken down a too-bright shot, in which case you’ll need to use a narrow aperture. Other times you’ll want a shallow depth of field or you’ll want to brighten up a too-dark shot, in which case you’ll need to use a wide aperture.

That said…

There are apertures that get used consistently in certain genres. I’ll cover them briefly below, starting with:

The best landscape photography aperture

Landscape photographers gravitate toward small aperture settings, such as f/8, f/11, and even f/16.

Why?

When you’re shooting a sweeping photo of the land, sea, or sky, you often want to keep the whole shot sharp. That way, the viewer can appreciate every little detail of your majestic scene.

mountain landscape
Landscape photos like this one generally require a narrow aperture.

Plus, a deep depth of field makes the shot feel more real, like the viewer could physically step into the scene.

The best portrait photography aperture

In portrait photography, it can be handy to have your subject perfectly in focus but the background nice and blurry. That way, your main subject stands out and the background doesn’t become a distraction.

wide aperture portrait
Wide apertures work great for portraits!

In other words, use a large aperture to ensure a shallow depth of field.

It’s a trick used by family portrait photographers, headshot photographers, fashion photographers, and more.

The best macro photography aperture

Macro (i.e., close-up) photographers tend to disagree over aperture.

Some macro photographers use a very narrow aperture because depth of field gets shallower at high magnifications. And by using a narrow aperture, a macro photographer can ensure that their entire subject is in focus, even if the background is blurred.

bee with a narrow aperture
This macro photo was shot at f/13; at such high magnifications, keeping an entire insect in focus is tough.

Whereas other macro photographers embrace a shallow depth of field. They use a very wide aperture for a soft-focus effect.

dandelion seed head with a wide aperture
A soft-focus effect looks great in macro photography.

Which is the way to go? That depends on your preferences! Both approaches work well, and there are plenty of professionals using each technique, so don’t stress about it too much.

Aperture in photography: final words

Hopefully, you now have a good understanding of aperture in photography and how you can use it to gain creative control over your photos.

But if you’re still a little confused, that’s okay. Grab your camera and do some experimenting. Find a subject – an apple works great! – and shoot it with different apertures. Watch as the depth of field changes.

Pretty soon, it’ll click. And your photos will (genuinely!) never be the same again.

The post Aperture in Photography: A Beginner’s Guide (+ Examples) appeared first on Digital Photography School. It was authored by Darren Rowse.


Digital Photography School

 
Comments Off on Aperture in Photography: A Beginner’s Guide (+ Examples)

Posted in Photography


10 Best Lenses for Landscape Photography (in 2021)

06 Jul

The post 10 Best Lenses for Landscape Photography (in 2021) appeared first on Digital Photography School. It was authored by Jeremy Flint.

the 10 best lenses for landscape photography

If you want to take beautiful landscape photos, you need to choose your lens carefully. After all, a lens determines the quality of your image; pick a good lens, and you have the potential for amazing results. But get the lens wrong, and your images will be consistently unsatisfying.

That’s why, in this article, I’ll take you through all the best lenses for landscape photography you can buy today – including options for Canon, Nikon, Sony, and Fujifilm, as well as choices at every price point.

So without further ado, here are our recommendations of top-notch landscape lenses, starting with the number one pick:

1. Canon EF 16-35mm f/4L IS USM

Canon 16-35mm f/4L lens

If you use Canon full-frame DSLRs, then the 16-35mm f/4L IS USM is an excellent choice; it carries the prestigious L-series label and features a very nice focal range and sharp image quality.

There is an f/2.8 version of this lens, but the f/4 version gives equally stunning results and comes with a cheaper price tag. It’s a fast and dynamic lens with an ultrasonic focus system and a minimum focusing distance of 11 inches (0.28 meters), perfect for photographing close foreground subjects. Plus, the 4-stops of image stabilization and great in-built weather sealing allow you to capture sharp landscape photos in all lighting and weather.

If you want to create stunning images of expansive scenes, then this is one of the best landscape lenses on the market in 2021.

2. Canon RF 15-35mm f/2.8L IS USM

Canon RF 15-35mm f/2.8L lens

The Canon RF 15-35mm f/2.8L is the ultimate lens for landscape photographers looking to give their images a professional edge. It’s a great match for Canon mirrorless users, although there is a huge hike in price compared to the Canon EF 16-35mm f/4 (featured above).

The 15-35mm is a joy to use, and photographers will love its edge-to-edge sharpness, amazing image quality, and superbly silent and fast autofocus. The lens promises image stabilization of up to five stops, which is a big deal if you plan to shoot landscapes handheld in low light.

Overall, the RF 15-35mm f/2.8L is a landscape photographer’s dream, thanks to its ideal focal length and great all-around performance.

3. Nikon AF-S 16-35mm f/4G ED VR

Nikon 16-35mm f/4 lens

The Nikon 16-35mm f/4G is one of the best landscape lenses for full-frame Nikon DSLR users, and a perfect match for photographers in search of that beautiful wide-angle perspective.

The lens is both portable and durable, plus it packs great Vibration Reduction for low-light handheld photography. The 16-35mm focal length range is ideal for landscape photography and allows you to shoot stunning near-far compositions for pro-level results. It is also (relatively) inexpensive, compact, and much lighter than most f/2.8 zooms (at 24 oz/680 g).

The lens accommodates filters with a 77mm thread – a standard filter size that will please a lot of photographers. And the lens optics are beautifully designed to enhance sharpness and contrast.

4. Nikon Z 14-30mm f/4 S

Nikon Z 14-30mm f/4 lens

The Nikon Z 14-30mm f/4 lens was Nikon’s first ultra-wide-angle zoom for Z-mount cameras, and it remains one of the best landscape lenses for Nikon full-frame mirrorless cameras in 2021.

The 14-30mm f/4 is lightweight, and it’s also extremely portable. It supports direct filter attachment to the front of the lens, which expands the creative possibilities for ultra-wide landscape photography. It’s well designed with resistance to dust and water and features fabulous optics for clear and sharp shots.

Ultimately, the compact design and incredible corner-to-corner sharpness make the Nikon 14-30mm f/4 a lens worth considering.

5. Fujifilm XF 10-24mm f/4 R OIS

Fujifilm 10-24mm lens

The Fujifilm 10-24mm f/4 lens is one of the best lenses for Fujifilm X-mount cameras, and an excellent landscape photography lens for many reasons.

Key features include enhanced optical image stabilization, an elegant design, improved weather sealing, an ultra-wide-angle view and focal range, and silent shooting. This wide-angle zoom feels and looks fabulous and offers great image sharpness across the focal range. The construction is good quality, and you get a minimum focusing distance of 9 inches (0.24 meters).

Thanks to the ultra-wide angle of view, the 10-24mm f/4 provides gorgeous landscape possibilities for APS-C users.

6. Sony E 10-18mm f/4 OSS

Sony 10-18mm f/4

Coupled with Sony’s E-mount cameras, the 10-18mm f/4 is a super wide-angle zoom lens, though bear in mind that it’s designed to work with APS-C cameras only (its focal length equivalent is 15-27mm).

The superior glass provides optimal optical performance, with excellent contrast and sharp image quality, even at the 10mm focal length. It is one of the best-quality landscape lenses for APS-C Sony mirrorless users out there, plus it’s small and lightweight (it only weighs 7.9 oz/225 grams).

The Optical SteadyShot feature keeps handheld shots blur-free, and the constant f/4 maximum aperture is decent enough for noise-free shooting in low light. Its minimum focus distance of 10 inches (0.25 meters) and attractive zoom range let you capture expansive landscapes with precision.

7. Fujifilm XF 16-55mm f/2.8 R LM WR

Fujifilm 16-55mm f/2.8 landscape photography lens

One of the biggest reasons to grab the Fujifilm 16-55mm f/2.8 for landscape photography is its versatility – it features a fantastic focal length range, from wide-angle to short telephoto, along with an excellent maximum aperture for astrophotography.

It also offers the opportunity to capture the landscape with real accuracy; as you can imagine, optical performance is top-notch, and thanks to the f/2.8 aperture, sharp results are practically guaranteed, even in low light.

The Fujifilm 16-55mm f/2.8 is suitable for landscape photographers in search of an all-around performer, especially someone who requires quality, precision, and sharpness across a wide focal range.

8. Canon EF 24-70mm f/2.8L II USM

Canon 24-70mm f/2.8 landscape lens

Yes, it’s on the pricey side, but the greatest benefit of the 24-70mm f/2.8 lens for landscape shooters is the versatile focal range offered for shoots. At 24mm, you can capture beautiful wide-angle images; at 70mm, you can shoot intimate landscapes, close-up scenes, and more.

Astrophotographers will love the f/2.8 maximum aperture, which allows for a low ISO when photographing the night sky.

Bottom line: The 24-70mm f/2.8 is an incredibly sharp lens, and if you can afford it, buy it. For those who want to spend less cash, Canon offers a cheaper f/4 version.

9. Canon EF 24-105mm f/4L IS II

Canon 24-105mm landscape lens

With a versatile zoom range that extends beyond the 24-70mm lens featured above, the Canon EF 24-105mm f/4L packs a punch in terms of focal length range, image quality, and edge-to-edge sharpness.

Thanks to the extra reach on the telephoto end, you can zoom in to highlight specific landscape features and create more intimate, even abstract images. But you can always capture standard landscapes in the 24-35mm range, and the image stabilization ensures you can shoot in lower light without a tripod.

10. Sony FE 70-200mm f/4 G OSS

If you’re a Sony mirrorless shooter, the 70-200mm f/4 G is a great choice; it’s a telephoto zoom lens with a constant f/4 maximum aperture, and it delivers great image quality with wonderful background bokeh.

While the focal length range sits squarely in the “telephoto” arena, you can use the 70-200mm to hone in on various elements of the landscape (and potentially even wildlife, too!).

It is a fast lens and performs well out in the field, especially when coupled with its image stabilization and f/4 maximum aperture, both of which allow for improved performance in low light.

The best lens for landscape photography: final words

There are quite a few excellent lenses for landscape photography, far too many to list – but I hope this article has been helpful, and that you can now confidently choose the best landscape lens for you.

Ultimately, the ideal lens comes down to your own individual needs and budget, so don’t feel pressure to choose the most expensive or most popular option. Instead, think about your camera model (and its corresponding lens compatibility), as well as features such as image quality, build quality, image stabilization, focal length, and more.

Briefly, the Canon EF 16-35mm f/4L and the Nikon Z 14-30mm f/4 S lenses are excellent choices for those looking for a mix of price and quality. The Canon EF 24-105mm f/4 L IS II and the Sony FE 70-200mm f/4 G are great if you love to capture a range of landscape shots from wide-angle to telephoto. Finally, for anyone looking for a budget-friendly landscape lens, the Sony E 10-18mm f/4 OSS is a reasonable buy.

Now over to you:

Do you have a favorite landscape photography lens? Which lens on this list was your favorite? Share your thoughts in the comments below!

The post 10 Best Lenses for Landscape Photography (in 2021) appeared first on Digital Photography School. It was authored by Jeremy Flint.


Digital Photography School

 
Comments Off on 10 Best Lenses for Landscape Photography (in 2021)

Posted in Photography


The Weekly Photography Challenge – Cold

03 Jul

The post The Weekly Photography Challenge – Cold appeared first on Digital Photography School. It was authored by Sime.

This week our challenge may or may not be a direct result of me being in a house this week with no heating, school holidays for the kids here in Melbourne and the weather has been pretty chilly, so ‘cold’ it is!

The theme is #dPSCold use that hashtag wherever you share your photo. Make sure you take a new photo for this challenge, you don’t learn much by grabbing a photo out of your archive and uploading it ?

A cold photography scene

Tips for shooting in the cold or perhaps you could try the frozen bubbles thing

Keeping in mind that ‘cold’ could be many things as it’s applied to photography. A cold colour temperature, a cold scene and that could be many things too… Someone that’s cold, physically, mentally, it’d your story to tell!

Upload your photo into the comments field below this post (look for the little camera icon in the Disqus comments section below this post) and they’ll get embedded for us all to see. Or, if you’d prefer, upload them to your favourite photo-sharing site and leave the link to them.

Weekly Photography Challenge – Looking Up

If you do get stuck, you can contact our friendly (mostly!… ok, well.. after coffee he’s ok!) support guy. He’s on the email support@digital-photography-school.com

The post The Weekly Photography Challenge – Cold appeared first on Digital Photography School. It was authored by Sime.


Digital Photography School

 
Comments Off on The Weekly Photography Challenge – Cold

Posted in Photography


Creative Phone Photography: 8 Tips for Artistic Mobile Photos

02 Jul

The post Creative Phone Photography: 8 Tips for Artistic Mobile Photos appeared first on Digital Photography School. It was authored by Megan Kennedy.

creative phone photography: 8 tips for artistic images

A phone with a camera is great for photography. But it can be tough to break away from a “snapshot” mindset and start taking images that are truly creative.

In this article, we’ll take a look at some tips to help you capture creative phone photography. Specifically, I’ll share:

  • Key settings to make the most of your phone’s camera
  • Several tips to get you creating unique, artistic compositions
  • A simple secret for surreal-looking phone photos
  • Much more!

So if you’re ready to shoot some creative images, then let’s get started.

1. Shoot in RAW

Familiarizing yourself with the ins and outs of your phone camera is an important way to expand your creative options. Modern camera phones have a surprising range of capabilities that you can use for better photos.

For example, it’s a good idea to shoot in a RAW file format (an option now offered by many native camera apps). While JPEGs are the default format on many phones, they experience a loss in image quality thanks to compression – whereas RAW files are uncompressed and therefore tend to look better.

RAW files also offer greater post-processing versatility. You can adjust colors and tones and recover lost details in a natural, realistic way.

So if you’re after high-quality photos – which allow for extensive enhancement during post-production – then try switching to RAW. (Even if your mobile phone doesn’t offer RAW in its native camera app, you should still be able to find a third-party app that produces high-quality RAW files.)

setting up RAW format on a phone
RAW activated in Pro mode on an Android device.

2. Make the most of Manual mode

As with a conventional camera, Manual mode allows you to take control of your phone’s camera’s settings when capturing a photo. In Manual mode, you can adjust shutter speed, ISO, and white balance – and this additional control allows for greater creative input.

Creative phone photography bokeh

To activate Manual mode (also known as Pro mode) on some devices, open your Camera app and look at the camera mode tray. You should see settings like Timelapse and Panorama, and if you’re lucky, you’ll also have a Pro option.

Simply tap the Pro mode icon, and you’ll be good to go; you’ll gain access to numerous options for adjusting your phone camera’s functionality.

If your phone doesn’t offer a Pro mode, don’t worry. Simply download a third-party app such as ProCamera, Camera+ 2, or Obscura 2. All of these apps feature a Manual mode of sorts, and you can use it to harness your phone camera’s creative potential.

3. Don’t forget about composition!

Over time, plenty of guidelines have been developed to help photographers compose effective images. While none of these guides are inflexible laws, if you’re familiar with some basic compositional concepts, your photos will come a long way.

Of course, compositional knowledge translates to creative phone photography, too! For example, by activating your phone camera’s grid function, you’ll get a useful visual overlay, perfect for positioning key points of interest.

rocks on a beach

Learn about the rule of thirds, leading lines, the rule of space, triangular composition, and more; each of these will be helpful tools that’ll aid in your creative phone photography.

4. Make use of editing apps

I’ve already mentioned how third-party camera apps can give you increased control over your phone camera. But did you know that editing apps offer a whole other world of creativity?

For instance, Snapseed (Android and iOS) is a (free!) Google-owned application with plenty of tools for tweaking images and applying filters. VSCO (Android and iOS) offers some editing functions for free, including artistic, film-like filters. Adobe Lightroom (Android and iOS) supplies image editing tools similar to its desktop counterpart for free, and it can also be upgraded to a paid premium version for additional functionality.

(Unlike VSCO and Snapseed, only the paid version of Lightroom will edit RAW files.)

editing apps for creative phone photography

There are plenty of fun, creative apps available for both iOS and Android devices. Need a retro aesthetic? Afterlight (above, left) provides users with an advanced toolkit to add light leak effects to an image. Want to combine two images into a single photograph? Snapseed (above, right) allows you to quickly and easily merge image layers to create a double-exposure effect.

There are a multitude of apps that suit a huge variety of purposes and capabilities. The fun part is trying them all out!

5. Try different perspectives

One of the great things about creative phone photography is the mobility of a small photographic device. A camera phone isn’t just an accessory; it’s a pocket-sized machine capable of capturing stunning photos.

So take advantage of the size and portability of a phone camera by physically experimenting to create intriguing perspectives. Place your phone close to the ground, try a high angle, or shoot from off to the side. Just make sure to get a non-conventional perspective, and you’re bound to end up with interesting results.

cake from above

6. Go abstract

Also known as experimental, non-objective, or conceptual photography, abstract photography avoids depicting immediately identifiable subject matter.

In fact, creative phone photography and abstraction are a good mix. The accessibility of the phone camera allows you to snap abstract images anywhere, anytime. For instance, when you’re out in a city, you might capture abstract images of puddles on the ground, posters torn off a wall, or reflections in a glass building.

And thanks to readily available editing apps, unique abstract perspectives can be rapidly captured, edited, and shared – or even saved as inspiration for a later shoot with a dedicated camera.

abstract creative phone photo

7. Photograph details

If you have your phone in your pocket all the time – and let’s face it, most of us do! – you’ll be ready to capture even the smallest occurrences at a moment’s notice.

Even when it’s tough to find inspiration, focusing on the details that shape an everyday environment can make for beautiful photos. Try activating your phone’s close-up or macro function, then get close to a subject. You can even purchase little lenses that attach to your phone for close-up photography. A small tripod or a sturdy surface can help keep the camera phone steady.

black and white creative images

8. Experiment!

It may sound obvious, but doing great phone photography can take a little experimentation. Many people assume (due to the advanced and accessible nature of phone camera technology) that every shot will be successful.

But in reality, practice and experimentation are the keys to effective creative phone camera photography. Familiarize yourself with your phone camera’s capabilities and make time to shoot. The more you experiment, the better your images will turn out.

experimental phone photo of a blurry road

Creative phone photography tips: conclusion

Phone photography is a great way to create stunning photos, especially if you want to be artistic without investing in a heavy camera.

Plus, with such a huge variety of apps available, doing creative phone photography has become a much more streamlined process.

There is an old saying: “The best camera is the one you have with you.” And while this might not always be the case, if you take advantage of your phone camera, you can create some truly outstanding images!

Now over to you:

Have you done a lot of phone photography? How do you like it? Which of these tips do you plan to use first? Share your thoughts in the comments below!

The post Creative Phone Photography: 8 Tips for Artistic Mobile Photos appeared first on Digital Photography School. It was authored by Megan Kennedy.


Digital Photography School

 
Comments Off on Creative Phone Photography: 8 Tips for Artistic Mobile Photos

Posted in Photography