RSS
 

Posts Tagged ‘Photography’

Photography projects that make you feel alive

15 Jan

Malawi orphanage 2

We live in a new digital world of social media and computer games which makes it all too easy to keep the real world at arms-length.

Do you ever find yourself thinking you want to do more, feel more and live more, but comfortable familiarity and lack of confidence holds you back?

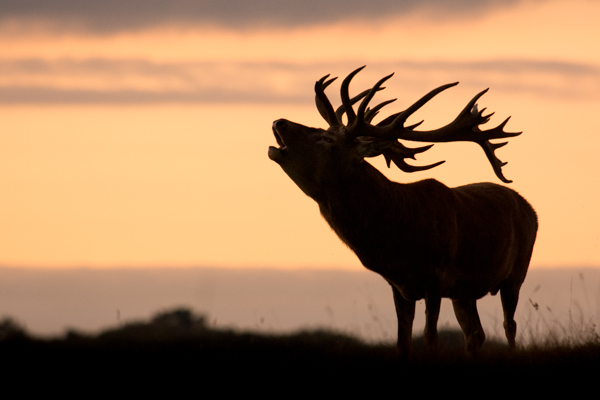
Think about why you love photography. For many of us it’s that we’re fascinated by the world we live in and want to share our vision of it. To create great photos you need to feel, but to feel more you may need to push yourself to do things that take you out of your comfort zone.

How to push your boundaries

On a Monday morning you probably daydream about doing something more exciting, yet when Friday comes around it ‘s easy to slip into your old routine. How do you break the monotony and start doing something that really excites you, without feeling overwhelmed?

Photography projects that make you feel alive

  1. Malaysia.jpgStart dreaming. There’s nothing wrong with daydreaming. What kind of photography project would have you leaping out of bed each morning? What ideas haven’t been done before? What do you love? What do you aspire to?
  2. Plan it. Think about what’s stopping you and find solutions. Do you need to negotiate some free time away from your family? What are the steps you need to carry out to take you from where you are now to where you want to get to? Write it all down. Each time you think of a reason not to do it, think of how you might feel if you never gave it a try.
  3. Repetition breeds confidence. The first time is always the scariest, whether you’re photographing a wedding, or learning to scuba dive. Things that scare you can quickly become a breeze, if you’ll just try.
  4. Announce it to the world. If you tell your friends and family that you’re going to do something, it forces you to go through with it. It’s no longer a dream, it’s real.
  5. Start small. You can have the grandest idea in the world, but don’t think about the enormity of the project, just focus on what you need to do first. Once momentum gathers you’ll find that your early successes drive you onwards.

Malaysian child

Be a photojournalist

Do you have a boiling passion that longs to tell an untold story? Maybe it’s a great injustice that needs unearthing, an unsung hero who needs championing, or a wondrous event that deserves attention.

Do something that’s never been done before

The human race has an inherent desire for a sense of self respect, achievement, fulfilment and recognition. Any first year psychology student can tell you that. It’s called “Maslow’s Hierarchy of Needs”.

By endeavouring to accomplish something that has never been tried before you’re satisfying the natural desires the modern world does such a good job of suppressing. To come to the twilight years of your life and be able to proudly state “I did that!” is one of the hallmarks of a life well lived.

“Get busy living, or get busy dying” Andy Dufresne, Shawshank Redemption

A great train of thought to start with when dreaming up this kind of project is “I’d like to photograph every (fill in the blank) in the world, or country”. Alternatively you could be the first person to ever photograph a “blank”.

Massage charity Labuan Bajo

An exhaustive study of a single subject

Most things in this world have been photographed at least once, but there are still many subjects that haven’t been studied photographically for an extended period. If you photographed a year in the life of a dementia care home or a homeless person it would be far more interesting than one passing photo.

A helpful project

If you have the nagging feeling that you want to do more with your life and your photography, then a project that helps others can help you find your mojo. There are many studies that show lasting happiness and fulfilment can be found through helping others. If you can combine helping people with your passion for photography then so much the better. This is the approach I took.

For two years I had an idea that wouldn’t leave me alone. I kept putting it to the back of my mind as the idea seemed too big to handle. The idea was to do something nice for someone from every country on earth.

Finally I took the plunge. I followed my own advice by planning the idea, laying out the rules, and announcing it to the world through my website and social media. I could no longer back out.

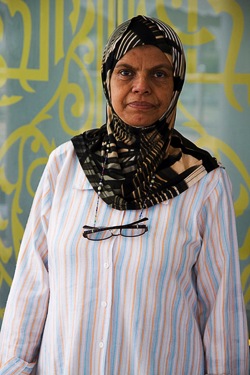
A project like this encourages you to keep picking up your camera and exploring the world around you. You end up experiencing things and talking with people you would normally have overlooked. Without this project I never would have reached out to a local care home to create poignant family portraits for the residents. Now I have happy memories and this fabulous testimonial of how my photography touched people’s hearts:

Care home

“I treasure the lovely photos that you took of my mother, husband and me at Avery House back in February of this year. My mother became very ill shortly after those photos were taken with advanced Alzheimer’s disease. She also broke her leg and had a partial hip replacement in August of this year, no mean feat at the age of 87. She had to be placed into nursing care at Wentworth Croft, as Avery House couldn’t meet her needs any more. Sadly she passed away on 19th November after seven weeks in nursing care. So you see those photos are priceless to me, everyone says how natural and professional they are and I always tell them who took them. So a BIG THANK YOU to you for a lasting memory of my mum.” Janice Osborne, Peterborough

Visiting and helping an orphanage in Kenya was one of the most humbling experiences of my life. Far more fulfilling than wallowing by the pool like a drunken hippo.

Kenyan Orphanage 1

Kenyan orphanage

Throwing yourself into situations you’d never normally experience opens up a whole new world of photographic opportunities. Great photos often tell a story and projects like this naturally create the necessary environment and atmosphere to help you produce your best work.

What projects are you working on or dreaming of? When will you take the plunge and get started?

For more ideas on projects see:

  • 8 Photo Projects in Your Own Backyard
  • 11 Hot Photography Tutorials, Projects, Stories and Tips to Improve Your Photography
  • Start a Personal Photography Project
  • The Importance of Personal Projects

The post Photography projects that make you feel alive by Dan Waters appeared first on Digital Photography School.


Digital Photography School

 
Comments Off on Photography projects that make you feel alive

Posted in Photography


Techniques for Working Textures Into Your Photography

12 Jan

Textured-purple-flower-600Where do you begin when you are considering using textures in your photography? I suggest you begin with the absolute best photo possible. Adding a texture to a bad photo does not make it a good photo. You want to make sure you have it exposed correctly, composed well, have a clear subject and not too much in the competing in the background competing. Textures work best with photos that are not too busy to start. Once I have chosen the photo I am going to work with, I do all of my edits before I add the texture, including adjusting the colors and sharpening.

In this article I’ll share some of my techniques for working textures into your photography.

Sharpening your image

You want to sharpen your photo before you add the texture. This is so that your subject is sharp and the texture isn’t over sharpened compared to the subject. You want the texture to enhance your photo, not compete with it. When I sharpen the photo I use the high pass filter as opposed to the unsharp mask. I like this method best because it defines and clears up all the edges of your subject without over-sharpening all the fill areas. Below is how I do this and the settings:

  1. Duplicate your background layer and while that duplicate copy is still highlighted, go up to the Filter menu and select: Other > Highpass filter
  2. Set the filter radius between 6 and 10 pixels (or higher) depending upon how sharp you need to have your photo, but be careful not to over sharpen.
    Sharpening highpass pop up
  3. Next change the blending mode of this layer to “Softlight” or “Overlay”. Overlay is stronger than Softlight, so test out each option to see what works best for your image.
Textured-yellow-flower-600

Finished image with texture and vintage paper applied

Once I am finished adding my textures to the photo I might do a final sharpen at the end if needed.

How to erase texture and still retain tone, plus a few extras

Once you are finished with your edits and sharpening, you are ready to add the texture. One concern people have in adding texture is how to erase the texture from the subject without it being obvious. You wouldn’t want to have the face of a baby be texturized, for instance, but you would want the face to match the rest of the photo in color and tone.

5 Steps:

  1. Place the selected texture on your photo. Do this by going to: “File > Place” in the top menu. Then select the texture image you want to use. It opens up as a new layer on top of your photo, ready to resize. Do that, then I right click the texture layer and choose “rasterize”, so it will no longer be a Smart Object. Change the blend mode and opacity of the texture layer to suit your image, such as “Softlight” or “Overlay”. At this point you are just manipulating the texture and not worrying about erasing it yet.
  2. While the texture layer is still highlighted, there are a few techniques you can do to the layer before you move on. Adjust the levels, curves, and the saturation of the texture layer to make the texture more vivid or pronounced, but not more opaque. I work in Softlight mode a lot as it brings out some of the texture without changing the mode.Levels curves saturation
  3. Once you are happy with the way the texture is working with the image, duplicate the texture layer and apply a Gaussian blur set to about 60 pixels to the bottom texture layer so it gives you the exact tones of the texture. Get to the Gaussian blur box by going to “Filter > Blur > Gaussian blur”. Next, turn off the bottom layer that you just added the blur to.
    Gaussian blur
  4. Add a mask to the top layer. With a soft black brush, set to about 30% opacity, ybegin to brush off the texture in any areas where you don’t want it. By using a low opacity you can slowly build up the amount you are removing. If you remove too much simply change the brush to white ,and wipe some of the texture back on. Make sure while you are doing this that you have the mask box selected (it will have square brackets around it) not the image itself.Sharpening mask
  5. Once you are happy that the texture is removed from all the important areas – select the mask box, hold down “Shift + Alt” and drag the mask box from the top texture layer to the bottom texture layer. Now you have applied the mask to the blur layer, and you have inverted it at the same time. Turn that layer back on and you will notice the tone where you erased the texture has the same coloring as the rest of your photo.Sharpening finished

Using vintage papers in your photography

Working with vintage papers is another fun aspect of textures that you can use in your photography. I get vintage papers from several great sources including my own family documents from the mid 1800’s, flea markets, online searches, Etsy, etc. I have curated several collections on my website for sale if you don’t want to go through the trouble of searching for them yourself. I especially love vintage French papers because of their wonderful scripts, markings, and fancy headers.

Part One

Working with the vintage papers is the same as working with textures. Place the paper on your photo in the approximate location that you want to use it. You will notice in the sample that I have placed it on the top of the many textures I have used in this photo, but you can place it on any layer that you want, to get the look you are trying to achieve.

Textures vintage paper

Part Two

Next, adjust the layer using the darkening blending modes: darken, darker color, color burn, linear burn, and multiply. Experiment with them all to see which one works best on the photo. The goal is to make the paper part of the document disappear, and have just the writing remain. Then just adjust the opacity to suit your taste. You can add a mask to this layer if you want to strategically erase some of the text which I do quite often.

Vintage paper texture

Finished image

Finished image

I hope you will give some of these techniques a try whether you are new to textures or have been doing them for years. If you do, please share in the comments below!

Further reading on using textures in your photography:

  • How To Create Your Own Unique Textures and Apply Them To Your Photography
  • Textures Made Simple
  • How To Apply Textures To Your Photographs

The post Techniques for Working Textures Into Your Photography by Denise Love appeared first on Digital Photography School.


Digital Photography School

 
Comments Off on Techniques for Working Textures Into Your Photography

Posted in Photography


Weekly Photography Challenge – Bicycles

11 Jan

Earlier today I admitted my dirty little secret. I am addicted to photographing bicycles. Yes, it is true!

By Kat…

I also shared some amazing bike images – check them out!

So you can probably guess what this week’s photography challenge will be, right? You guessed it – bicycles!

Get out there and photograph bikes of all kinds:

  • big ones
  • small ones
  • pedal bikes
  • motorbikes
  • scooters
  • with people
  • without people
  • moving
  • standing still
  • old rusty ones
  • shiny new ones

You get the idea. Bikes are great subjects because you can usually find them anywhere, at any time of the year. Even where I live, in two feet of snow, someone is crazy enough to ride their bike, or you can find one buried under the snow.

So no excuses accepted!

Here are a few ideas on how to approach this bicycle challenge:

  • look for shadows, so harsh sunlight contrasty lighting
  • look for shapes and use them in your composition
  • try your panning technique on some moving bikes
  • create abstract images
  • try some macro photography
  • create a silhouette, look for light behind the bike
  • if it has rained or is wet on the pavement, look for reflections

By Bernat Casero

By matt

By Pörrö

Share your bicycle images!

Once you’ve taken your ‘bicycle’ shots we’d love to see them in comments below. Simply upload your shot into the comment field (look for the little camera icon in the Disqus comments section as pictured below) and they’ll get embedded for us all to see or if you’d prefer upload them to your favourite photo sharing site and leave the link to them.

The post Weekly Photography Challenge – Bicycles by Darlene Hildebrandt appeared first on Digital Photography School.


Digital Photography School

 
Comments Off on Weekly Photography Challenge – Bicycles

Posted in Photography


5 Photography Rules Moms Can Ignore

09 Jan

If you’re anything like me, you made the investment in a DSLR camera to take beautiful professional quality photos of your kids. You want to document their childhood so the moments they may not remember on their own, they’ll have at their fingertips down the road.

Photography rules mom can break 02

Your camera has opened up a world of possibility in how to go about documenting your days as a family. But, if you’re new to photography, you may have quickly realized that your camera has a lot of buttons, settings, and dials that you have no clue how to use. On top of it all, the advice you’ve been given or articles you read have had conflicting information as well.

When I began my learning journey with the wonderful world of technical photography I was bombarded with information overload. There was no shortage of advice, opinions, and tutorials for what I needed to do to take beautiful pictures. I was told I needed to learn flash, and that I needed special filers, or software, or more lenses, or even a different camera.

During my years of ‘going pro‘ I’ve learned it’s that photography is all about intention and purpose. The rules a nature photographer follows, are going to be much different than the rules that apply to a mom trying to take better photos of her kids.

Photography rules mom can break 05

These days, I’m breaking some of the most common photography rules that were shared with me on my own photography learning journey. Why not become a ‘rule breaker‘ with me? If there’s one thing I’ve learned from my kid, it’s that rules are always meant to be broken. Life (and your photography) will be so much more fun that way.

5 rules moms can ignore

Rule #1: You need to invest a lot of money in gear and accessories

Once you get your camera other DSLR owners will be lining up to tell you all the other gadgets and gizmos you should have to go along with it. If you’re a mom who is just starting out, you don’t need to run out and invest in big bulky external flashes, studio light set ups, lots of lenses and filters, etc. The few affordable accessories I DO think a mom can benefit from are: a 1.8 prime lens (a 35mm works well on an APS-C or cropped sensor) for low light indoor photos, a 70-300mm zoom lens for sports photos, a sturdy tripod, and a wireless remote so you can trigger the shutter away from the camera and actually be in photos with your kids every now and then.

Photography rules mom can break 07

Rule #2: Manual mode is the only way to take good photos

The next piece of advice that I constantly read over and over again was that I needed to learn how to put my camera in ‘M’ (Manual mode) to take good photos. Although there is definitely a better level of control and confidence that comes from mastering Manual mode and knowing how Shutter Speed, ISO, and Aperture all work together to expose photos, it’s not the be-all, end-all, to shooting amazing images. I’d argue that finding decent light is definitely a better starting place for moms. There are still times when I’m running after my preschooler taking snapshots in tricky, constantly changing light, and I won’t shoot in full Manual mode. In these moments I typically opt to use A/Av mode instead and get a bit of help from my camera in choosing shutter speed for me.

Photography rules mom can break 01

Rule #3: The bigger the camera the better

I will admit, as I learned more and more about my photography, I got a bit of camera envy. I knew that the pros shot with some really fancy top of the line cameras, and I thought that I needed the same gear, in order to achieve the same results. The truth is, entry level SLRs are improving by leaps and bounds and are rivalling the bigger cameras in their low light, high ISO capabilities. If your camera is over four or five years old you might want to consider a slight upgrade. Because as it is with technology, newer models will have additional power to them (especially in the area of ISO limits), but you don’t need to immediately jump to a top of line model that costs thousands of dollars in order to take beautiful shots.

Rule #4: The best times of day to photograph are sunrise and sunset

This was another rule that was stated to me over and over and over again, especially as I made the transition to professional photography. Even though the light tends to be awesome during these times (sunset isn’t called the ‘golden hour‘ for no reason), a shoot during these times can go south rather quickly when your child hasn’t had a nap and it’s nearing their dinner time. I want to challenge you to take photos of your kids when they are in the best mood. Good photography is all about finding the right light. The middle of a bright sunny day might be more tricky to seek out even lighting, but if that’s when your kids are the most awake, and alert and willing to play for the lens, then that’s when you should shoot. At the end of the day, it’s all about their beautiful smile and not the beautiful sunset behind them.

Photography rules mom can break 03

Photography rules mom can break 06

Rule #5 You need to invest in Photoshop or Lightroom to edit professionally

One misconception I had when I bought my first DSLR camera was that my photos would come straight out of the camera looking professionally retouched. I learned very quickly that wasn’t always the case, and that editing software would allow me to transform my drab photos into fabulous works of art. Photoshop and Lightroom are two of the most frequently talked about and discussed programs out there for professional photographers, but they are complicated and in some cases expensive, pieces of software that can take a great deal of time and effort to learn. For a mom who is on the go and wants something a bit more user friendly and lower cost, I absolutely love the website PicMonkey. From basic editing features, to filters, collages, and more this website makes it super easy for the mom on the go to still make her DSLR photos look incredible.

Photography rules mom can break 04

Are there any other photography ‘rules’ you’ve heard before that you have a difficult time following? I’d love to hear about them in the comments. Happy snapping!

If you want some inspiration, or more reading and tips for photographing kids, check out these articles:

  • The 3 Biggest Kid Photography Mistakes
  • KIDS: Weekly Photography Challenge
  • How to go Beyond the Regular Composition Advice for Getting the Best Shots of your Kids
  • 7 Tips for Photographing Kids
  • Click! a dPS ebook to help you take better photos of your kids

The post 5 Photography Rules Moms Can Ignore by Beryl Young appeared first on Digital Photography School.


Digital Photography School

 
Comments Off on 5 Photography Rules Moms Can Ignore

Posted in Photography


Jumpstart Your Photography: Start a 365 Project

09 Jan

With the beginning of a new year, many people around the world take time to reflect on the past year and set goals or resolutions for the upcoming year.

McEnaney candle

It’s a good time to ask yourself; “What do I want out of my photography this year?” For most of us, the response might be to improve our skills, to be inspired, and to find more time and energy to pursue our passions. No matter what you want out of your photography, your path to accomplishing your goals will require dedicated time and effort.

If you are looking for a way to dramatically improve your photography this year, now is an excellent time to consider starting a 365 project.

What is a 365 Project?

There are many different 365 projects, but they all share one goal in common: taking at least one photograph every single day, for a full year. Many photographers take that idea one step further to including taking, and posting, at least one photograph a day for an entire year. Some people start 365 projects on January 1st, but you can begin one at any time.

McEnaney 365 2012

A 365 project is an important commitment that will make an immediate and lasting impact in your photography. While the idea of daily photography sounds deceptively simple, such a project will push and stretch you, and your photography.

There are many different online communities that support 365 projects including 365 Project, Capture Your 365, and many, many 365-themed groups on Flickr and Google+. Joining a community will help you in your 365 journey by providing encouragement and accountability. You will also find many ideas, challenges, themes, and examples for inspiration and motivation.

Why Do a 365 Project?

The most important part of a 365 project is the commitment to daily photography. If you truly want to improve your photography and push yourself, then you need to be using your camera, often! Accepting the challenge of using your camera everyday will help make photography a commitment and even a habit for you.

Using your camera every day will also open your eyes to the photographic possibilities that abound in your everyday life. I find myself noticing so much more now that I would have just passed by without comment before: the way the shadows on the wall change with the hours, or the tiny details of fallen pollen on the inside of a flower. Daily photography has made me keenly aware of the passing of the seasons and the small differences in each day.

McEnaney oak seasons

Daily photography will push you out of your comfort zone and force you to engage with other types and styles of photography. You may love shooting macro (close-up) shots of insects, but will now have to deal with rainy days and changing seasons. You may love shooting portraits of people but will need to find new ways and places for finding willing subjects. Whatever photography you ‘do’ now, you will find yourself in situations or late nights when you simply must find something to photograph. You may find that these more desperate times led to your most productive photographic ideas and images.

McEnaney abstract

Daily photography will also help you better plan your day or your time. I have found that waking up fifteen minutes earlier allows me to leave the house earlier in the morning, to spend those fifteen minutes taking a photography break along my commute. Watching the sun rise over one of the many lakes in town is an amazing joy and privilege, but it is a commitment I would never had made on my own, without 365.

Tackling a 365 Project

I highly encourage you to try a 365 project, as there is no better way to keep yourself taking pictures and making progress in your photography. While a 365 project is a huge commitment, there are some steps you can take to keep yourself (and your friends and family) sane and motivated along the way.

  • Plan for photography. Make a commitment to scheduling time for daily photography. Think about the subjects and situations you are attracted to, and plan for how to include those in your day. Maybe it is waking up 15 minutes earlier, or picking up your camera as soon as you get home in the evening, or taking a walk during your lunch break. Or it could be something more elaborate, like planning a photography outing to bucket list locations near or far.McEnaney heron
  • Plan for posting, viewing, and commenting. If you want to get the most out of your 365 project, then you will want to get involved in a photography community. Viewing photographs and leaving comments will keep you inspired, while receiving comments and feedback from others will help you improve and motivate you to keep going. I found early on that it was much easier for me if I was taking a photograph every day, but was posting and sharing yesterday’s photograph each day. That gave me a day in-between to look back and select the previous day’s picture as well as a chance to do any editing or post-processing.
  • Pick a theme or try a challenge. At some point (or, more likely, many points) during your project, you will find yourself in a slump. Pushing through the low points will teach you a great deal about commitment and motivation. Think about picking a theme for a week or a month or perhaps trying a challenge offered by other 365ers. Last year in February, I was part of a “Flash of Red February” challenge that involved taking black and white photographs for the entire month, except for a red photograph on the 14th for Valentine’s Day. This was a creative twist, and black and white was a great choice for a potentially dull winter month.McEnaney flashofred
  • Seek out balance. A 365 project is a large commitment and one that can occasionally be draining on your friends and family. Remember that taking a photograph a day does not mean you have to be taking a photograph every moment of the day. Your children, pets, spouses, and friends will thank you.

Interested in starting your own 365 project?

All you have to do is pick up your camera and get started. Think about joining a 365 photography community too, as the motivation and support along the way will be priceless. You can find my project at Archaeofrog.

The post Jumpstart Your Photography: Start a 365 Project by Katie McEnaney appeared first on Digital Photography School.


Digital Photography School

 
Comments Off on Jumpstart Your Photography: Start a 365 Project

Posted in Photography


March Fashion Photography Workshop in LA

09 Jan

There’s one thing that I have noticed from doing my workshops that is quite endearing: I watch the workshop students forge friendships from the weekend long seminar that carry on for months afterwards. I see them add each other on Facebook and continue to encourage each other along their individual paths towards becoming fashion photographers. It’s been really sweet for me to watch this! I see them commenting on each other’s pictures and keeping in touch with one another through skype and email, because they comment about it! Very cool! We all need to have people on our team when we’re starting out. People who we trust to critique our work as we develop as photographers and people who root us on and tell us to keep going, even when we feel like sacking it in and giving up! It’s been a wonderful PLUS to see this happening in my workshops.


Photo by: Jerome Lim – Workshop Student 2012

This March, in Los Angeles, I will hold another Fashion Photography Workshop. Held at BoxEight Studios in (the now very hip) downtown LA, BoxEight becomes our home for two days of intensive learning. Saturday we’re going to cover how to light beauty using different modifiers strictly for lighting the face and we’ll learn how to position the light for optimum benefits. After lunch on Saturday we learn lighting for fashion. We try 4 or 5 different lighting set ups, going from basic catalog or look book lighting, to showing you some much edgier, editorial lighting. The great thing about Los Angeles in March is that the weather is fantastic! The great thing about BoxEight is there is an outdoor studio which makes it perfect to take the shoot outdoors at the end of Saturday and conquer some outdoor lighting set ups!

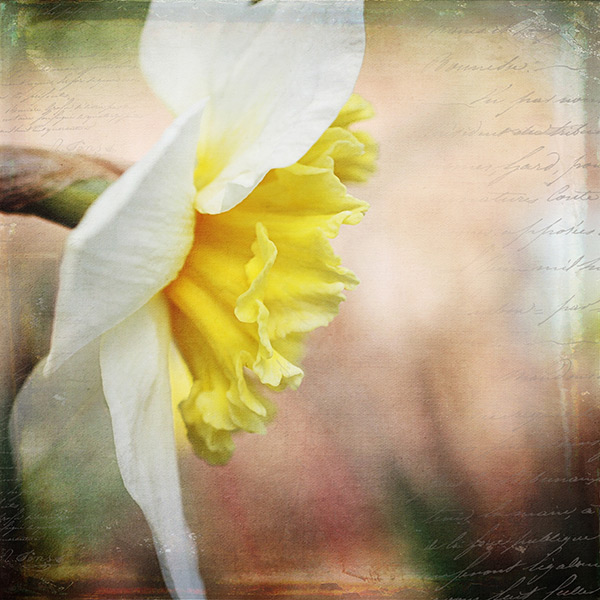
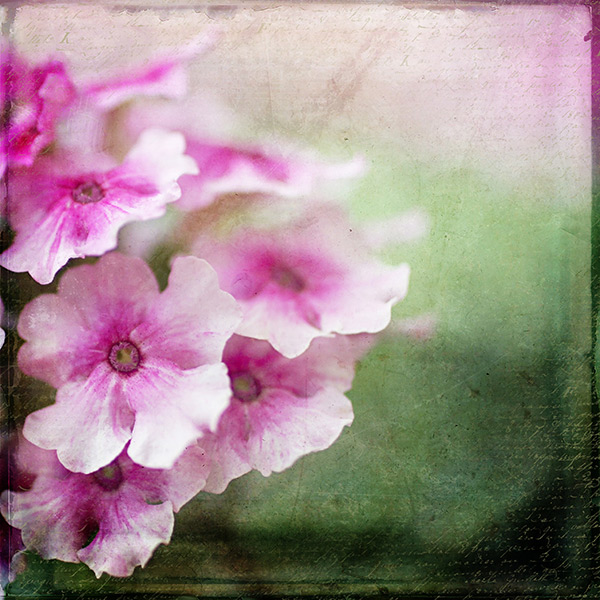
Photo by: Jerome Lim– Workshop Student 2012

Sunday is all about honing your retouching skills. We teach you about dodging and burning instead of using filters and plug ins. We take your work to a whole other level! A much more professional one! In the afternoon, I teach about the business of fashion photography and what it takes to get your foot in the door. It’s a whole afternoon of lecture and Q & A. This is the time when you can ask me anything you have ever wanted to know about fashion photography but were afraid to ask!

Photo by: Mario Gandia – Workshop Student 2012

You can read about the entire workshop by clicking on the link here. Tickets are selling fast as we posted loosely about it on our launch post. So don’t delay! Come join us in one of the most exciting cities in the world, Los Angeles! And let’s take your work to The Next Level!

See you there!


Fashion Photography Blog

 
Comments Off on March Fashion Photography Workshop in LA

Posted in Uncategorized


Manipulating Natural Light in Wildlife Photography

08 Jan


back-light-wildlife-photography-1-edit

An Icelandic pony, shot against a setting sun

When photographing wildlife, the sun is one of the most useful tools that enables you to create something different or add impact to your images.  By taking control of your position relative to your subject, and to the sun, you can manipulate the available light to your advantage.

Favourable times of day for wildlife photography are at the beginning and end of the day when the sun is low in the sky.  This often coincides with periods of heightened activity of many animals, but also with a warmer directional light from the sun being lower in the sky.  When the sun is low in this way, it lends itself to a number of key natural lighting techniques.

side lighting wildlife photography

A side lit brown hare (Lepus europaeus)

Side lighting

You can naturally side light your subject by keeping the sun at approximately 90 degrees to the direction that you are facing.  The sunlight will then be lighting your subject from the side which can result in a greater sense of shape, form, and texture from the contrast between the soft light and shadows across the subject.

side lighting wildlife photography

Side lit grey seals (Halichoerus grypus) courting at sunrise

It can add a sense of three dimensionality that full-on front lighting cannot do, and because of the soft nature of the light, the highlights and shadows are not too intense and can be easily captured.

side lighting wildlife photography

A bellowing red deer stag (Cervus elaphus) with light from the side

Back lighting

One of the first tips you often hear when starting in photography is not to shoot into the sun. However, by doing just that you can create striking images.  By positioning yourself so that your subject is directly between you and the sun, you can capture a strong backlit outline of your subject that is almost like a halo of light.  This works best when there are fur or feathers to capture the light, and it is preferable that the outline of your subject is easily recognizable.

back lighting wildlife photography

The hair of this pony create a golden outline when backlit by the low sun

Exposing for backlit subjects can be difficult, as you will be dealing with areas of extreme brightness and shadow. It is best to ensure you retain detail in the highlights (as that will be forming the main detail of the image) by manually underexposing.

Silhouettes

Silhouettes are another way of capturing the strong outline of your subject, but in this instance it is achieved by shooting your subject against a bright background, often the sky.  Just after the sun has gone down is a great time for this technique.  There can often be far more colour in the sky once the sun is below the horizon, and the sky will still be bright enough to easily cast your subject into silhouette.

One tip for shooting wildlife silhouettes is that sometimes it can be good to ensure you retain some detail in the shadows, for example an eye. This can help retain some interest in the large area of black, and to keep a connection between the subject and the viewer.  If you want to do this, you will need to ensure that you do not underexpose the subject too far, such that the shadow detail is lost, to give you flexibility during post-processing.

silhouette wildlife photography

A silhouette of a red deer stag (Cervus elaphus) is an instantly identifiable form against a sunset sky

To conclude

It can be difficult to motivate yourself to get up for sunrise or to be out photographing at sunset, but those times of day give you much more flexibility to use the natural light as a powerful tool in your wildlife photography.  By understanding how the position of the sun relative to you or your subject will influence the final image, you can create images that aren’t possible at other times of day.

So get out there and see how you can use natural light to make you images stand out!

Further reading on wildlife photography:

  • How Low Can you Go? An Illustration of Camera Angle for Wildlife Photography
  • Making Sharper Wildlife Photographs – [Part 1 of 2]
  • Making Sharper Wildlife Photographs – [Part 2 of 2]
  • 5  Big Tips to add Impact and Variety to your Wildlife Images

The post Manipulating Natural Light in Wildlife Photography by Elliot Hook appeared first on Digital Photography School.


Digital Photography School

 
Comments Off on Manipulating Natural Light in Wildlife Photography

Posted in Photography


Winter Photography Tips and Ideas to Make You Master the Season

08 Jan

Winter is an amazing time of the year, especially if you live in a region that produces tons of snow. Don’t hibernate even if there is no snow outside since winter is the best season for outdoor photography. Cold weather is not an excuse for sitting at home. Warm, comfortable clothes and special, cropped gloves could help you easily overcome Continue Reading

The post Winter Photography Tips and Ideas to Make You Master the Season appeared first on Photodoto.


Photodoto

 
Comments Off on Winter Photography Tips and Ideas to Make You Master the Season

Posted in Photography


Some Photography Education Deals Are Too Good Not To Mention

08 Jan

Olmstead Point Star Trails, Yosemite National Park

Over $ 1200 of Photography Education Resources for $ 89

This week there is a 5 day sale (4 days remain) of an amazing treasure trove of photography education material including over 12+ eBooks, 12 collections of Presets & Actions, 12 Videos/Courses and nearly a dozen discounts to a variety of photography services. If that weren’t enough 10% of every sale is going to a variety of charities.

Start your week and year right by checking this out.

Be sure to act soon as the The Complete Photography Bundle discount ends 1/10/14 at noon EST.

Copyright Jim M. Goldstein, All Rights Reserved

Some Photography Education Deals Are Too Good Not To Mention

The post Some Photography Education Deals Are Too Good Not To Mention appeared first on JMG-Galleries – Landscape, Nature & Travel Photography.


Related Stories

  • Some Photography Education Deals Are Too Good Not To Mention – Enclosure
  • Best Photos of 2013 by Jim M. Goldstein
  • Best Photos of 2013 by Jim M. Goldstein – Enclosure


JMG-Galleries

 
Comments Off on Some Photography Education Deals Are Too Good Not To Mention

Posted in Equipment


Top 10 Ways to Sabotage your Professional Photography Aspirations

07 Jan

Through the various classes and workshops I teach, I inevitably run into a number of students with professional photography aspirations.  More than a few of them however, seem doggedly determined to do everything they can to make their dream of professional photography impossible.

I’m nothing, if not a helper.  So if you really want to sabotage your pro photography aspirations, here, presented in traditional count-down order, are 10 ways to make sure you’ll never turn your dream into a profession.

© Paul Burwell Photography | www.bsop.ca

Red Fox Kits playing outside their den

In no particular order how to sabotage your professional photography aspirations

1. Don’t show your work to anyone other than family or friends

  • Family and friends are great for moral support, and can really help pick you up when you’re down, but do they really know what makes a great picture and what sort of stuff is going to sell?
  • You need to get professional opinions about your work if you want to know if it is good, or what you might need to work on improving.

2. Design your web site so that it’s impossible for a photo buyer to do business with you

  • Through fear of protecting their images from being “stolen” from their web site, many photographers make it so you can’t right-click to save a picture or use flash web sites that make it almost impossible to easily save images to a local hard drive.
  • While none of these methods truly protect the images from “theft” they are a really great deterrent to the editor or photo buyer looking for images.  They can’t easily save them to run past other people, and they’ll usually just move onto the next web site.
  • While we’re at it, don’t put those huge ugly copyright notices over the center of the photo.  If you need to add a copyright watermark, add it to somewhere where it intrudes on the photograph’s story as little as possible.
© Paul Burwell Photography | www.bsop.ca

Juvenile Merlin perched on an old fence

3. Only post your “second-tier” images on your web site

  • Many folks operate under the mistaken belief that they should save their “good” stuff for when they get that National Geographic offer.  Sorry, but that isn’t going to happen until people can see the sort of great photos you can produce.

4. Bring only your best images to an image critique

  • During my photography workshops I always set aside time for people to bring some images for myself and the rest of the group to comment on.  Many folks only bring their best stuff.  I guess it’s fun to hear for the umpteenth time what a great image that is, but wouldn’t it be more useful to bring some images that you’re not sure are great?  An image you haven’t already been told 10 or 100 times that it’s a great image?  Take a risk and learn a bit.

5. Just do photography

  • I hear from some of the long-time professional nature photographers how they used to be able to make a living out of just selling images.  I wish my life were so simple.
  • The most likely way someone starting out is going to sell an image, is along with some writing.  So, you’ll want to learn how to put some words together that can support the images you’ve got.  While you’re at it, you might want to take some business management and marketing courses along the way.
© Paul Burwell Photography | www.bsop.ca

Hexagonal Plate Snowflake

6. Stop learning

  • Unfortunately, some folks figure that they’ve learned it all, they’ve got it all figured out.
  • Sorry, but in today’s digital world that just isn’t possible.  New techniques, software and equipment are constantly being developed.  You need to devote a significant portion of your time into educating yourself and keeping current.

7. Don’t look at other people’s images

  • I’ve run into a few people who can’t seem to appreciate any photos other than those they’ve created.  Holy narcissism batman!
  • If you don’t look at what your contemporaries are doing, you’re really short-changing yourself and sabotaging your aspirations.  Look around at what sells (because if you’re a pro, you NEED to care about what sells) and hang some of that on your wall.  Learn why it sells and try to use that within your own photography.

8. Don’t treat your photography like a business

  • If you want to remain an amateur, that’s great.  But if you want to be professional photographer, you have to start thinking like a professional.  Covering a subject as a pro is totally different than just going out and shooting a few snap shots.  You need to prepare in advance and have your gear and attitude ready to go.  When you start shooting, you work it until you get what you need.
  • If you’re under the mistaken impression that you need to be a great, or “one of the best” photographers in your area of interest to be a professional, get over it.  At least as important as the photography skills are your business and self-marketing skills.  Make sure you work on those non-photography skills at least as much as you do on your photography skills.

9.  Just take photos, don’t tell stories

  • For me, a great photo is one that tells a story.  If someone were to ask you about a photo and you couldn’t immediately come up with the story being told, I would argue that it isn’t a great photo.
  • Use image compositional techniques to make your photos tell great stories.

10. Treat ethics as an inconvenience to be avoided

  • While ethics are a personal matter and we all have to determine what is, and isn’t ethical for ourselves, the surest path to disaster is to have others view you as unethical.
  • Treat people the way you expect to be treated.  Be above board in all your business dealings.  Your clients should never experience negative surprises.  Follow through on your promises.

So, if you’re an aspiring pro, and bound and determined to stymie your chances of making it, I think I’ve outlined a pretty clear road map for you.

Do you have some comments or additional items to add to the list?  We’d all love to hear from you.

The post Top 10 Ways to Sabotage your Professional Photography Aspirations by Paul Burwell appeared first on Digital Photography School.


Digital Photography School

 
Comments Off on Top 10 Ways to Sabotage your Professional Photography Aspirations

Posted in Photography