RSS
 

Posts Tagged ‘Photography’

5 Tips for Planning a Winter Photography Excursion

04 Dec

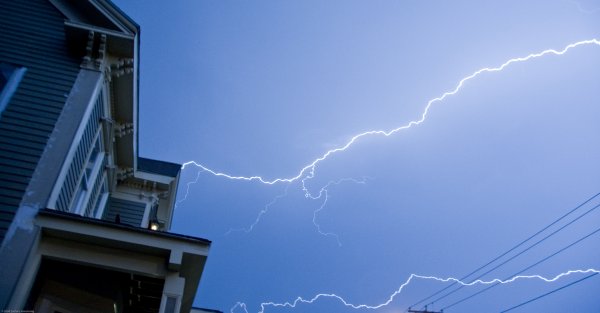
If you have seen the recent photos of the record snowfall in Buffalo, NY, you know that for much of the world winter is here and it’s coming fast, whether you like it or not.

While your feet might be cold for the next four months, a reason to get excited is the photographic opportunities that will come from it. I am writing this to convince you to prepare now for photographing that next snowstorm because it will creep up on you, and you want to take full advantage of it.

Tips for planning a winter photography excursion

Poets' Walk, Central Park

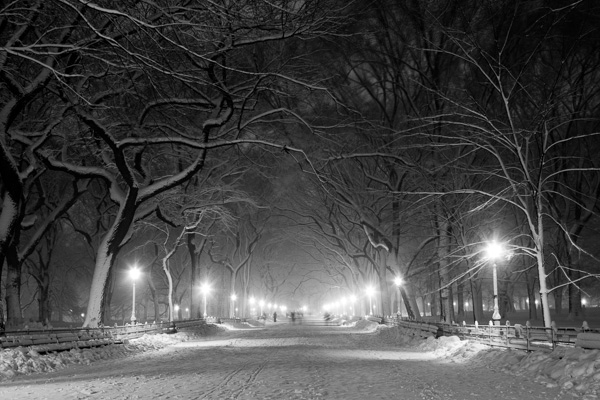
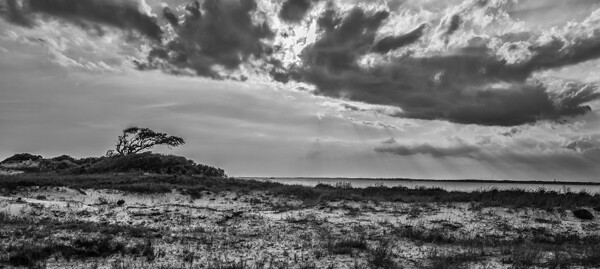
Poets’ Walk, Central Park, NYC.

1. Plan to go out in the middle of the storm

A lot of photographers choose go out the next morning after the storm has hit, when the weather is clear and the snow is bright and crisp. You should do this as there are some fantastic photographic opportunities, however, in my opinion the best opportunities occur in the middle of the storm, when the weather is fierce and the skies are gray.

If you are going to shoot in the middle of the storm, be careful. Make sure to be safe and that the storm will not have a chance to be severe enough to get you in trouble. Make sure you have a working and fully powered cellphone, the correct clothing, and any supplies that you might need should you get stuck for awhile. It will only be more fun with friends along but always make sure that someone who is not along on your excursion knows exactly where you are going.

Couple in Snowstorm, Central Park

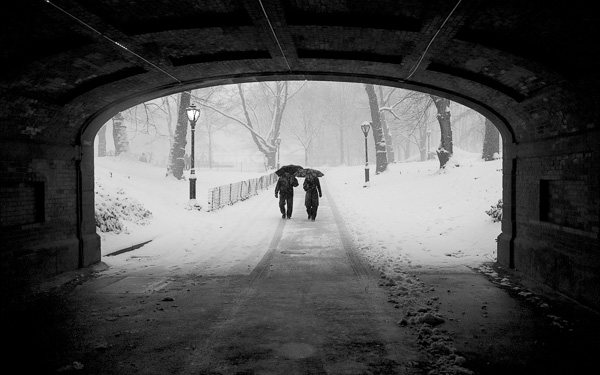
Couple in Snowstorm, Central Park, NYC.

2. Scout your route

Create your route ahead of time. You can always explore and veer off, but it will help to have a plan of action. The key to photographing snowstorms is that you are not going out to just photograph the snow, you are going out to photograph interesting places in the snow.

Create a route with scenes that you think will look good in the snow. This could be a house, a barn, a lamppost, a main street, a park, or a scenic landscape. In addition, creating this route ahead of time will allow you to share it with someone beforehand should you get stranded.

3. Protect your camera

The best camera weather protector, a small plastic bag and some tape.

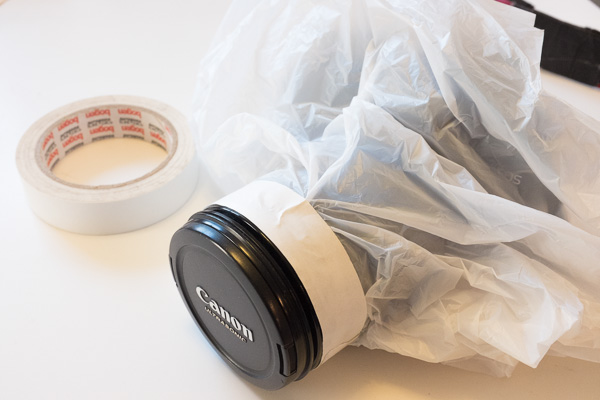
The best camera weather protection – a small plastic bag and some tape.

Digital cameras are tough, but you still want to treat them carefully. In extremely cold and severe weather conditions you might want to take further precautions, but for most winter situations there are only a few things that you will need to do.

Pick a lens for the day and keep it on your camera. Some people might disagree with this, but in this situation, I personally do not want to risk getting moisture inside the camera, so I will not change the lens. If anything, I will take a second camera with another lens on it, but mostly I will take either my 24-105mm or 70-200mm lens and only use one of them.

I have tried so many rain protection devices for my Canon SLR and I have given up on every single one of them. They have all been too bulky and cumbersome to use with the camera freely in harsh weather. I have yet to find one that works better than a simple plastic bag with a hole in it, and tape to attach it to the lens or lens hood. I use the typical pharmacy plastic bags. Bring multiple bags and the roll of tape because they will have to be replaced a couple times during the day. I use this setup for shooting in the rain as well.

Tenement Rooftops, Lower East Side.

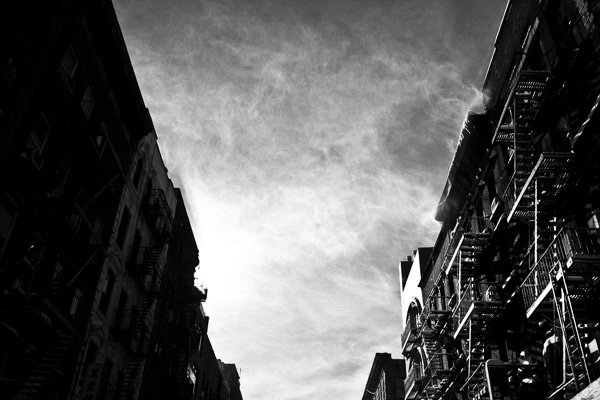
Tenement Rooftops, Lower East Side, NYC. You do not want that getting into your camera while you change lenses.

Bring multiple hand towels and microfiber cloths to dry off the camera, and to keep the front of the lens clear from fog. A lens hood can add further protection. If the snow is light, then I will keep the camera uncovered and will often use a small umbrella, while drying off the camera frequently. When the snow gets stronger then I will use the plastic bag and sometimes I will use it in combination with the umbrella. In between shots I keep the camera covered and I always keep the front of the lens pointed down until I actually take the shot, to keep it clear of snow.

You will also want to bring along extra batteries, since they do not work as well when they are cold.

Finally, be careful about suddenly changing the temperatures on your camera. This is what can really hurt your camera. You do not want to go from shooting in the middle of a snowstorm to putting it by a warm fire right away. Let the camera warm up slowly in your car, garage, or in a cooler area of your house.

Photography gloves.

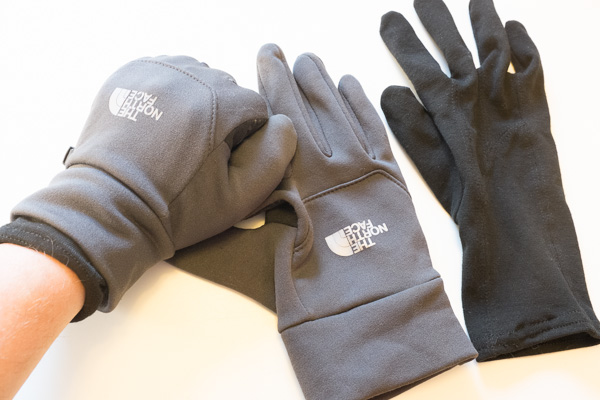
North Face touch screen gloves with inner linings. Still not as warm as heavy duty gloves, so not ideal for Arctic exploration, but they are much easier to work with when handling a camera.

4. Prepare your clothing and equipment ahead of time

Sense a theme here? Set up everything ahead of time so that when the storm hits all you have to do is get dressed and walk out the door. It is so easy to procrastinate and ultimately decide to stay in with some hot coffee. Planning and packing everything right before the shoot just adds another layer to stop you from doing it. I know this from experience. If everything is set, then the only thing that is standing between you and the outdoors is you.

You might try to tell yourself that there will be another storm but that is never guaranteed. If the weather is perfect, then you need to take advantage of the opportunity while it is there. It could be a once in a lifetime experience.

Use two layers of thinner gloves. Gloves are a huge problem with photography as the warmest ones are too bulky to adjust the fine controls on the camera, and the thin ones are not warm enough. I use a thin inner layer glove combined with a medium strength pair of North Face gloves. This is still not as warm as a heavy duty pair, but the mobility is a big advantage.

Brooklyn Bridge in Snowstorm, at Sunset

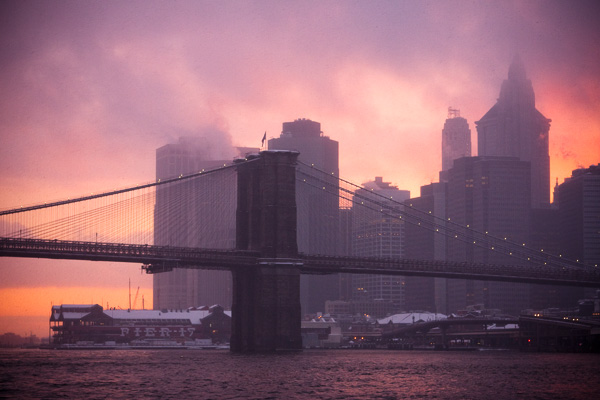
Brooklyn Bridge in Snowstorm, at Sunset, NYC.

5. Plan a sunset into dusk route

The most uncomfortable times to shoot often yield the best results. You may have heard to shoot during the golden hour, or at night, or during a snowstorm, but the real magic happens when all of these come together in one. Plan out exactly where you want to be during the golden hour and after the sun sets. If it is in the middle of a hard storm then the sunset might not shine through the fog, but everything will still get magical as it transitions to night.

Make sure to bring a tripod for dusk. Also a strong flashlight can help for focusing, because it can be tough for the camera to lock onto dark scenes. You can also use manual focusing to select the focus distance that you want.

Cold Spring, New York.

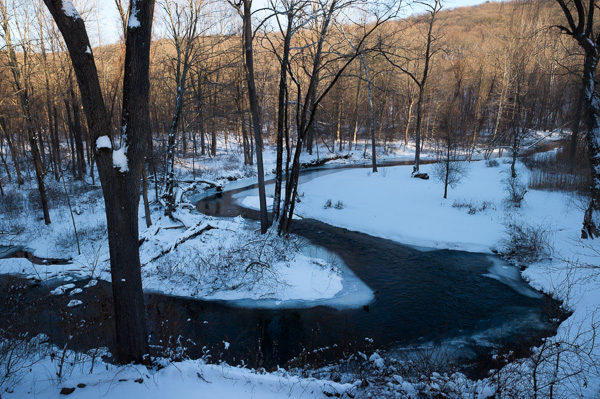
Cold Spring, New York. The warm sunset light contrasted with the blue shade adds an interesting aspect of contrasting color.

Bonus: Technical tips

If you are not shooting in full manual, all that white snow is going to trick the camera’s light meter to make the images darker than they need to be. It is common for people to come back from a day shooting in the snow to wonder why the photos all look so gray. Raise your exposure compensation (+/-) to combat this and make the snow whiter, but make sure to not blow out the details completely.

The opposite side of this tip is that a gray snowy scene can be fantastic, so you might not want the snow be very white. You have creative control here and can use the +/- on your camera or manual mode to achieve the exact look that you want. It is better to do this in the camera rather than in post-production.

Also, pay attention to make sure that your focus point is correct and if you are shooting digitally then take a few shots of the same scene. Snowy and harsh conditions can make focusing tough and can make the problem of back-focus even easier to occur. Make sure the focus point is locked onto the area that you want to be the sharpest and not the area behind it.

Broken Taxi, 5th Avenue.

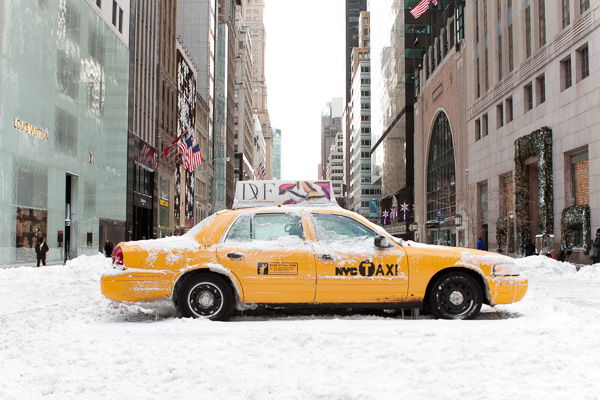
Stuck Taxi, 5th Avenue, NYC.

Be adventurous. This is not just about getting that ideal photo, it is about enjoying the process as well. The camera is a wonderful tool to force you out the door to explore gorgeous locations when you might otherwise decide to stay inside in the warmth. A camera is a gift in many ways.

googletag.cmd.push(function() {
mobile_slots.push( googletag.defineSlot( “/1005424/_dPSv4_mob-all-article-bottom_(300×250)”, [300, 250], “pb-ad-78158” ).addService( googletag.pubads() ) );
} );

The post 5 Tips for Planning a Winter Photography Excursion by James Maher appeared first on Digital Photography School.


Digital Photography School

 
Comments Off on 5 Tips for Planning a Winter Photography Excursion

Posted in Photography


creativeLIVE presents ‘The Art of Wildlife Photography’ with Tom Mangelsen

03 Dec

creativeLIVE is hosting a two day live workshop with nature photographer Tom Mangelsen. The class will be broadcast live from 9am today, December 2nd (Pacific time) and will cover everything from gear and location scouting advice to wildlife etiquette. It also includes a critique and portfolio review of viewers’ images. The class is free to watch live and costs $ 99 for the rebroadcast. Click through for a link

Articles: Digital Photography Review (dpreview.com)

 
Comments Off on creativeLIVE presents ‘The Art of Wildlife Photography’ with Tom Mangelsen

Posted in Uncategorized


7 Tips for Better Beach Photography

01 Dec

The beach can be a great place for photography. You are in a scenic environment. You typically have friends or family members with you. You are usually there on nice days. All these can contribute to great photographs.

But the degree of photography problems you will face on the beach might surprise you. Exposure can be tricky given the bright environment. Often, there is nothing but sand, so the composition can be dull. And of course there are elements like sand and salt-water that do not mix well with electronics. So I want to give you some tips for beach photography, dealing with these potential problems and make it a great place for photography.

SantaRosa

1.  Control Your Exposure

If you are shooting in automatic mode, you might find that your pictures are darker and flatter than you anticipated. That is because your camera will try to reduce all things to a middle grey. Try shooting in Manual or Aperture Priority mode, which will give you additional control over your exposure. Use that control to slightly overexpose your picture. Set the exposure so that the meter in your camera is a little to the right of zero. If your camera uses numbers instead of a scale to show your exposure, start by setting it at +1. This will make your picture accurately capture the bright scene that you see in front of you.

GreyWhaleCove

2.  Watch the Dynamic Range

At the beach, you will almost always be looking at a bright sky. Even though the foreground may be well lit, the sky will usually be much, much brighter. That can cause a dynamic range problem and, if you are not careful, your sky will be blown out or pure white.

To deal with this problem, break out a graduated neutral density filter. This is a square filter that fits on a holder in front of your lens. The top of the filter is be dark, while the bottom of the filter is clear glass. When you attach the filter to the front of your lens, it will darken the top portion of your picture while keeping the bottom portion at the same brightness level. This keeps everything within the dynamic range of your camera. The upshot for you is that it will darken your sky a bit to bring it in line with the foreground and keep the sky from blowing out. The beach is an ideal place to use these filters because the horizon is typically a straight line with nothing sticking up over it (such as trees or buildings).

If you do not have such a filter, try bracketing your exposures. You can then merge them later using Photoshop or an HDR software.

3.  Use Fill Flash

It might seem counter-intuitive to you, but the beach on a bright sunny day is a great place to break out your flash unit. You can expose your picture with an eye on the brightness level of the sky, and brighten up the person or thing in the foreground using the flash. Because the overall scene is so bright, the flash should not overpower it. I personally find that the beach on a sunny day is one of the best times to use a flash unit. Adding fill flash can dramatically improve your beach photos.

Pier

4.  Seek Out Subject Matter

I once complained to a friend that I was having difficulty taking good pictures at the beach. He responded, “Of course you are, there’s nothing but a bunch of sand.” Sometimes, that sentiment is right. So you will have to work on finding a good subject to add to your composition. If you do so, you can turn your beach photos something great.  Some ideas to look for are:

  • Piers
  • Rocks
  • Driftwood
  • Beach chairs
  • Beach umbrellas
  • Fences
  • Sea oats
  • Abandoned boats
  • And, of course, people

GreyWhale

5.  Work the Foreground

At the beach, you already have a ready-made background for your photos; that being the ocean and the sky. What will separate a great photo from a snapshot will frequently be the foreground. Focus nearly all your energy on making the foreground look as good and as interesting as you possibly can.

Using the subject matter set forth above can help you with your foreground. Having any of those elements in the frame will usually go a long way in making the foreground an interesting part of the photo. If none of those items are available, a lot of times interesting formations in the sand can also create a good foreground. Look for a pattern. They can be difficult to see though, sometimes you will need to have your eye to the viewfinder or be looking at the LCD to find them. Take a test shot if time permits.

Once you find your subject matter, consider your angle of view. Very often, we tend to shoot directly out towards the ocean. However, there are usually much more interesting views looking down the coast. Sometimes it is actually best to put your back to the ocean and get the sand and land formations in your frame. Just be sure you’ve considered all the angles.

PensacolaPanorama

6.  Get the Best Light

As with most other forms of outdoor photography, the best light is usually predawn, or just after sunset. Try to get up early or stay late. These are virtually always the best times for photography, and many serious shooters will not shoot at any other time of day.

Of course, getting up before dawn or staying after sunset is not always possible. Rather than just put the camera away, you might want to try some midday shots. If you do, there are a few ways you can make your photos look as good as possible. I already talked about using a fill flash, and that can be a great way of cutting down on the harsh shadows you might encounter. In addition, to make your sky look as good as possible, consider using a polarizing filter. This will make your sky appear a deeper, richer, blue. Polarizers actually work best near midday, so you will get the maximum benefit from it if you are shooting at that time.

One final tip if you are shooting at midday and dealing with harsh contrasts is to consider converting your photos to black and white; it loves contrast. The overly contrasty light of midday photography can go from a liability in a color photo to an asset in a black and white photo. Once you’re back in front of your computer, try converting a few photos to black and white and see how you like them.

DestinChairs

7.  Beware of the Elements

Sand and salt water do not mix well with expensive electronics. It is difficult to keep them away from your camera sometimes. Sand seems to get in everything.

Further, a crashing wave can send spray into the air and get into your camera. You will want to take a few precautions to avoid any such problems. You could actually buy a waterproof case for your camera, but these are amazingly expensive. The cases can cost more than the camera itself. They are often more than is necessary, particularly if you are making efforts to keep away from the water and sand. In normal situations, you can get a rain sleeve to cover your camera for just a few dollars. You might use one of these if there’s any chance that sand or spray get near your camera.

Another idea is to purchase a waterproof point-and-shoot camera. I normally recommend that you steer clear of point-and-shoots because of the inherent problems with them, largely stemming from the small sensor size. However, because you are typically shooting in bright light at the beach, a lot of the limitations of point-and-shoots are somewhat muted. Further, you can use the camera with confidence, even taking it into the water. They can be a lot of fun, and they are pretty cheap (relatively speaking).

Conclusion

These tips should make photographing the beach the fun occasion that you expect. If you know how to deal with the bright light, your pictures will look better. Finding good subject matter and using an interesting angle will make them interesting. And finally remember to keep your equipment safe from the elements to keep your day from being ruined.

The post 7 Tips for Better Beach Photography by Jim Hamel appeared first on Digital Photography School.


Digital Photography School

 
Comments Off on 7 Tips for Better Beach Photography

Posted in Photography


Photography Challenge – Chill Out with Cool Tones

29 Nov

Today I rounded up 37 great examples of images in cool tones. The tone or color of your image can create or shift the mood and meaning if your image and is a very powerful compositional tool when used well.

This week your goal is to practice creating cool tones in your photography.

Photography challenge – cool tones

Here are a few examples of images with cool tones.

Kelsi  Barr

By Kelsi Barr

Chris Smith

By Chris Smith

Brandon Watts

By Brandon Watts

You can create a color tint in your image a few different ways:

  • By shooting at blue hour
  • Adjusting your white balance
  • Changing the color in post-processing
  • Using a colored filter on your lens

It’s your turn to get shooting, show me your blue or cool images.

Share your cool tone images here:

Simply upload your shot into the comment field (look for the little camera icon in the Disqus comments section) and they’ll get embedded for us all to see or if you’d prefer upload them to your favourite photo sharing site and leave the link to them. Show me your best images in this week’s challenge.

Here are some more  examples:

Barbara Willi

By Barbara Willi

Matthew Paulson

By Matthew Paulson

Edward Townend

By Edward Townend

Zacharmstrong

By zacharmstrong

Aphotoshooter

By aphotoshooter

Leland Francisco

By Leland Francisco

Giorgos~

By Giorgos~

Ateens Chen

By Ateens Chen

Dave Campbell

By Dave Campbell

The post Photography Challenge – Chill Out with Cool Tones by Darlene Hildebrandt appeared first on Digital Photography School.


Digital Photography School

 
Comments Off on Photography Challenge – Chill Out with Cool Tones

Posted in Photography


20 Thanksgiving Photography Examples to Get You in the Festive Mood

28 Nov

Thanksgiving is the time for warm get-togethers and celebration of the autumn harvest. It marks the start of the holiday season which is naturally a busy time for photographers. Festive mood, holiday decorations, and family gatherings – this is the perfect time to create memorable emotional shots that will be enjoyed long after. This Thanksgiving don’t miss an opportunity to Continue Reading

The post 20 Thanksgiving Photography Examples to Get You in the Festive Mood appeared first on Photodoto.


Photodoto

 
Comments Off on 20 Thanksgiving Photography Examples to Get You in the Festive Mood

Posted in Photography


Weekly Photography Challenge Bird’s Eye View

22 Nov

Earlier I shared a collection of photos shot from above using a bird’s eye view. In the photography challenge last week you were assigned to photograph from a worm’s eye view or low down. This week you will be looking down, using the bird’s eye view to create your images.

Bird’s eye view

Bird’s are usually flying overhead or sitting up high on a wire looking down on us. So try something to get that kind of perspective in your image this week. Get up high and look down. That could mean:

  • Climb to a roof or the top of a hill and look down
  • Stand on a chair to photograph something on the floor
  • Just simply being aware of what is below your eye level and shoot that
  • If you really want to go for it take a hot air balloon, fly a quadcopter or GoPro, or even take a gondola ride

You get the idea right? Get up – and look down!

Share your bird’s eye view images here:

Simply upload your shot into the comment field (look for the little camera icon in the Disqus comments section) and they’ll get embedded for us all to see or if you’d prefer upload them to your favourite photo sharing site and leave the link to them. Show me your best images in this week’s challenge.

Here are some more  images to give you ideas:

Farrukh

By Farrukh

Cnemil

By cnemil

William Cho

By William Cho 

Svenwerk

By svenwerk

Peggy2012CREATIVELENZ

By Peggy2012CREATIVELENZ

Mgstanton

By mgstanton

Adam Baker

By Adam Baker

Thomas Hawk

By Thomas Hawk

Faisal Akram

By Faisal Akram

Jason Mrachina

By Jason Mrachina

John Chandler

By John Chandler

Ed Suominen

By Ed Suominen

The post Weekly Photography Challenge Bird’s Eye View by Darlene Hildebrandt appeared first on Digital Photography School.


Digital Photography School

 
Comments Off on Weekly Photography Challenge Bird’s Eye View

Posted in Photography


Roman Robroek: Winnner of Defrozo Portrait Photography Contest 2014

21 Nov

Last month our friends at Defrozo held a photography contest on their Facebook page. The contest was a success with some amazing works submitted by entrants. There could only be two winners, though. The first one would be selected by Facebook users who voted for their favorite photos, the other winner is Defrozo’s Staff Pick. In this post we’re interviewing Continue Reading

The post Roman Robroek: Winnner of Defrozo Portrait Photography Contest 2014 appeared first on Photodoto.


Photodoto

 
Comments Off on Roman Robroek: Winnner of Defrozo Portrait Photography Contest 2014

Posted in Photography


How to Make the Most of Your Hard-Earned Vacation Time Photography Wise

20 Nov

Image 1

You are looking forward to that vacation you have wanted so much? You are not the only one. Amidst our work, family and everything else, we all need a little getaway at times. I travel extensively throughout the United States and based on my experience, I am going give you some tips to make the most of your hard-earned vacation time. Please be advised that I speak from a photographer’s perspective but most of what I say applies to any kind of vacation, not just a photo trip.

Plan, Plan and Plan

I cannot overstate this. Whether you are traveling across the ocean or a place only a few hours from home, the better you plan, the more time you will have on your hands when you arrive. Plan for the time of the year and time of the day.

Allow for more time during peak tourist seasons and in the middle of the day. Most people sightsee between 9 a.m. and 5 p.m. Photographically, that time generally doesn’t yield good light (do not give up, read on) so if you are wondering why the fall colors do not look awesome in your pictures, that is why.

Image 3 1

You could use midday for visiting indoor attractions like museums, cathedrals, barns, checking out the downtown or perhaps do some street photography. I should clarify – I do not mean to say that street photography does not benefit from great light – however, you can often pull off a shot in diffused light or just based on the emotion of the people involved.

If you are into Infra-Red (IR) photography, you have a great advantage over those who are not. IR can be shot in strong daylight, often requiring long exposures even in the sun.

We live in an age where you can find more information about a place with a few clicks, than was possible by visiting that place twenty years ago. Put Google maps to work for you. Check out sites like Trip Advisor for first hand information from other travellers. Ask questions in forums. If the place you are traveling to offers tourist guides and maps, order those ahead of time and use them in your planning. If you are planning to shoot a famous landmark, check out sun and moon positions for best light. One app I use for that is The Photographer’s Ephemeris (TPE). Look at other photographers’ images made at these locations. I am not suggesting that you plagiarize, but there is nothing wrong in drawing inspiration from well-acclaimed work.

Keep an Eye, or Two, on the Weather

Image 4

Weather plays a crucial role in any outdoor photography, especially landscape. Human beings have yet to invent a softbox that could light a mountain or a diffuser that could soften the harsh light on a forest.

Weather also dictates the choice of subjects. On overcast days, you are better off shooting intimate forest scenes and waterfalls than, say, rocky shorelines. The greenery in the forest can literally glow on overcast days. Break open a polarizer and you have a winner.

Image 5 1

Moving water can be shot with slow shutter speed (long exposure) to get that milky effect. Depending on the available light, you may have to use a neutral density filter to achieve a slower shutter speed.

Bad weather can make for some very compelling images where the ominous clouds, play of light and shadows create a mood and drama that are not found under clear sky.

Even if it is raining, you do not need to give up. Unless it is pouring cats and dogs, you could add some macro shots to your portfolio. Colorful storefronts also make great rainy day subjects where you could literally shoot from inside the car letting those raindrops on the windows add drama to the scene.

Be Prepared to Adjust the Plan

Perhaps this is a continuation of what I said earlier about planning, but it is so important that it deserves separate mention. It’s all good if you have a great plan but you cannot control Mother Nature. She may decide to throw a curved ball at you and if you are not ready, it could cause big disappointments. Roads may close unexpectedly, rain could kick in suddenly, and sites could be closed due to increased wildlife activity. Things could happen that are beyond your control. Be open to shuffling your itinerary, adding things that you thought you would not be able to do or see, and giving away on some others. The point is, being flexible is key when you are traveling.

Know Yourself

Image 6 1

This may sound a little odd, allow me to explain. To be able to fully enjoy your time off, you should be very clear about the things that you like to do and those that you do not. If the word “vacation” means to you sleeping in, relaxing by the fire with a drink or taking a boat ride, you may not be happy to pack seven mile hike, rock climbing, or canoeing into your schedule. On the other hand, if you are an outdoor buff, staying indoors could seem like a terrible waste of time. When traveling with family, it is important to know everyone’s preferences, then if they are different, strike a balance amongst them all.

When traveling with a companion, it is a great advantage to have similar likings. That does not only mean way of living. Meal habits are very important too. Perhaps you are one who does not like to spend a lot of time looking for an Italian restaurant in an unknown place. Your companion, on the other hand, could be a strict vegetarian and very picky about where they eat. Unless you are conscious about those differences, you could be spending time resolving conflicts instead of doing what you are there for.

Have Extra Cash Available

Image 7

When you are traveling, being a Scrooge is often not the best way to go. I am not suggesting that you splurge but most vacation spots make their money from seasonal tourism. Thus, everything will be more expensive than usually justified, and that means everything from food, to room rent, to souvenirs. If you are constantly counting pennies, it will occupy your mind, rather than important things. Keep some budget for unforeseen expenses and when those happen, do not sweat it. Enjoying your time matters more than money.

Do not Take it too Hard

Image 8

Sometimes unfortunate things happen even after the best of planning. You cannot do anything about that. I hope not, but should you run into any such situation, just take it in strides. During my trip to the Acadia National Park, I took a fall, twice. I got several deep cuts, hurt a finger so bad that I was afraid that I might have broken it (luckily not), worst of all my camera gear was damaged. I did not lose heart or cancel my vacation. I just dealt with it; got the injuries checked out at an urgent care, did first aid, took painkillers and did what I was there to do – photography. The point is, bad things happen; it’s not the end of life but rather, part of it. Have fun!

The post How to Make the Most of Your Hard-Earned Vacation Time Photography Wise by Abhijit Sarkar appeared first on Digital Photography School.


Digital Photography School

 
Comments Off on How to Make the Most of Your Hard-Earned Vacation Time Photography Wise

Posted in Photography


Welcome to the Future of Photography Websites with MotoCMS 3.0

17 Nov

Modern web is focused on photographers. It is stated in devices more and more improving screen resolution. And especially with an introduction of Retina Display that brings the image quality to the forefront. Despite a wide range of photography-focused social networks available like Flickr, Tumblr, Pinterest, and even Instagram, a personal website still matters for photographers. It’s a private sphere Continue Reading

The post Welcome to the Future of Photography Websites with MotoCMS 3.0 appeared first on Photodoto.


Photodoto

 
Comments Off on Welcome to the Future of Photography Websites with MotoCMS 3.0

Posted in Photography


Some Wedding Photography Tips with Two Different Perspectives

16 Nov

Today I wanted to share these two videos with you that offer pretty my completely opposite ways to do wedding photography; candid storytelling and posed shots.

In this first video 19 year wedding veteran  photographer, Joe Buissink, talks about his philosophy on shooting weddings in a storytelling style. He says he started in 1995, I actually have him beat on that one – 1990 for me. Unlike Joe however, I started off doing the more traditional posed style which was popular at the time. Eventually I became a bit bored with it and moved towards using 35mm cameras with high speed b/w film and I got the same reaction Joe talks about in the video. Other photographers would gasp and tell me how wrong that was, that the images would be grainy and it wasn’t quote, “professional”. Like Joe, I did it anyway and my clients loved it because I was able to capture more of the storytelling he talks so passionately about.

While you’re telling their story, your story is also in there (your images) as well. – Joe Buissink

See what else Joe has to say and be inspired by his moving images:

In this second video, Moshe Zusman talks about creating poses rather than capturing moments. This is a different approach to wedding photography. Often many photographers use a mix of both candid storytelling images and posed. See if you can grab some tips from Moshe on posing in this video:

I don’t think either style and philosophy is right or wrong, just different. So which style do you relate to more? If you were getting married which would you want your photographer to shoot?

Want more wedding photography tips? Try these dPS articles:

  • Are you Ready to be a Wedding Photographer?>
  • Wedding Photography – 5 tips for the Speeches
  • How Connecting with Vendors Can Help Skyrocket Your Wedding Photography Business
  • Wedding Photography 101 (Part 1)

The post Some Wedding Photography Tips with Two Different Perspectives by Darlene Hildebrandt appeared first on Digital Photography School.


Digital Photography School

 
Comments Off on Some Wedding Photography Tips with Two Different Perspectives

Posted in Photography